


Weight Distribution and
 10-26-2018 | 11:55 AM
#26
Thread Starter
Junior Member
Joined: Oct 2018
Posts: 24
Likes: 0
Received 0 Likes
on
0 Posts
I did one side already, then I have to reassemble the sprockets and tracks, plug everything and check before I put it all back together.
Last edited by RCEnduro; 10-26-2018 at 12:01 PM.
 10-27-2018 | 10:07 AM
#27
 10-27-2018 | 11:11 AM
#28
Thread Starter
Junior Member
Joined: Oct 2018
Posts: 24
Likes: 0
Received 0 Likes
on
0 Posts
All back together, mostly. Plugged everything in and it works. Had to put longer wires on the motors and speaker.
at first it looked like the larger motors used the same gauge wire, whatever that is 20-22. but when I went to solder on the motor and actually look the longer wires were aluminum looking not copper. While the shorter wires that came on larger motors were copper.
So .. I just.. pretend I didn't see that and keep going. the wire nut is for one of the speaker wires. don't @me. Also this was during testing and I put some cable tie and tuck wires in along right side hull now so it won't interfere with turret or fitment.
Last edited by RCEnduro; 10-27-2018 at 11:45 AM.
10-27-2018 | 12:13 PM
#29
Thread Starter
Junior Member
Joined: Oct 2018
Posts: 24
Likes: 0
Received 0 Likes
on
0 Posts
Surprise the larger output from the taigen gearbox has a larger bolt which doesn't fit through the metal HL sprocket. Where's my drill?.
Last edited by RCEnduro; 10-27-2018 at 12:17 PM.
10-27-2018 | 02:25 PM
#30

My Feedback: (1)
Looks like you did a fine job. You'll find yourself acquiring stuff as you go, and one good thing to have is a jst kit (the white pugs that are everywhere in one of these puppies) and a decent crimping tool. An assortment of shrink tube never hurts, either. If you have a decent electronics shop nearby you're in luck. Ever since Radio Shack went belly up I have to order most stuff online. It can be really handy having a place close by for the basics, like wire and resistors and LEDs and what-not. You'll hear a lot of opinions on holding stuff down and a lot of guys like a hot glue gun but I prefer this stuff called Zap Goo. A simple Google search will find it, and I think it's great stuff for everything from holding wiring in place to securing stowage. It sticks like crazy, until you want it to stop sticking and then it comes apart fairly easily. But if you know something better I'm always up for new ideas. 
Looking forward to more on this tank, and can't wait to see video!
Looking forward to more on this tank, and can't wait to see video!
10-27-2018 | 06:46 PM
#31
Thread Starter
Junior Member
Joined: Oct 2018
Posts: 24
Likes: 0
Received 0 Likes
on
0 Posts
Looks like you did a fine job. You'll find yourself acquiring stuff as you go, and one good thing to have is a jst kit (the white pugs that are everywhere in one of these puppies) and a decent crimping tool. An assortment of shrink tube never hurts, either. If you have a decent electronics shop nearby you're in luck. Ever since Radio Shack went belly up I have to order most stuff online. It can be really handy having a place close by for the basics, like wire and resistors and LEDs and what-not. You'll hear a lot of opinions on holding stuff down and a lot of guys like a hot glue gun but I prefer this stuff called Zap Goo. A simple Google search will find it, and I think it's great stuff for everything from holding wiring in place to securing stowage. It sticks like crazy, until you want it to stop sticking and then it comes apart fairly easily. But if you know something better I'm always up for new ideas.
Looking forward to more on this tank, and can't wait to see video!
Looking forward to more on this tank, and can't wait to see video!
Last edited by RCEnduro; 10-27-2018 at 06:53 PM.
11-01-2018 | 12:32 PM
#33
Here is a running video, I know its lame in my living room but its cold and wet outside heh.
I can't seem to get embedding to work. but hopefully it will be a link
https://www.youtube.com/watch?v=dQMYEpTswUE
I can't seem to get embedding to work. but hopefully it will be a link
https://www.youtube.com/watch?v=dQMYEpTswUE
 11-01-2018 | 04:08 PM
#34
Thread Starter
Junior Member
Joined: Oct 2018
Posts: 24
Likes: 0
Received 0 Likes
on
0 Posts
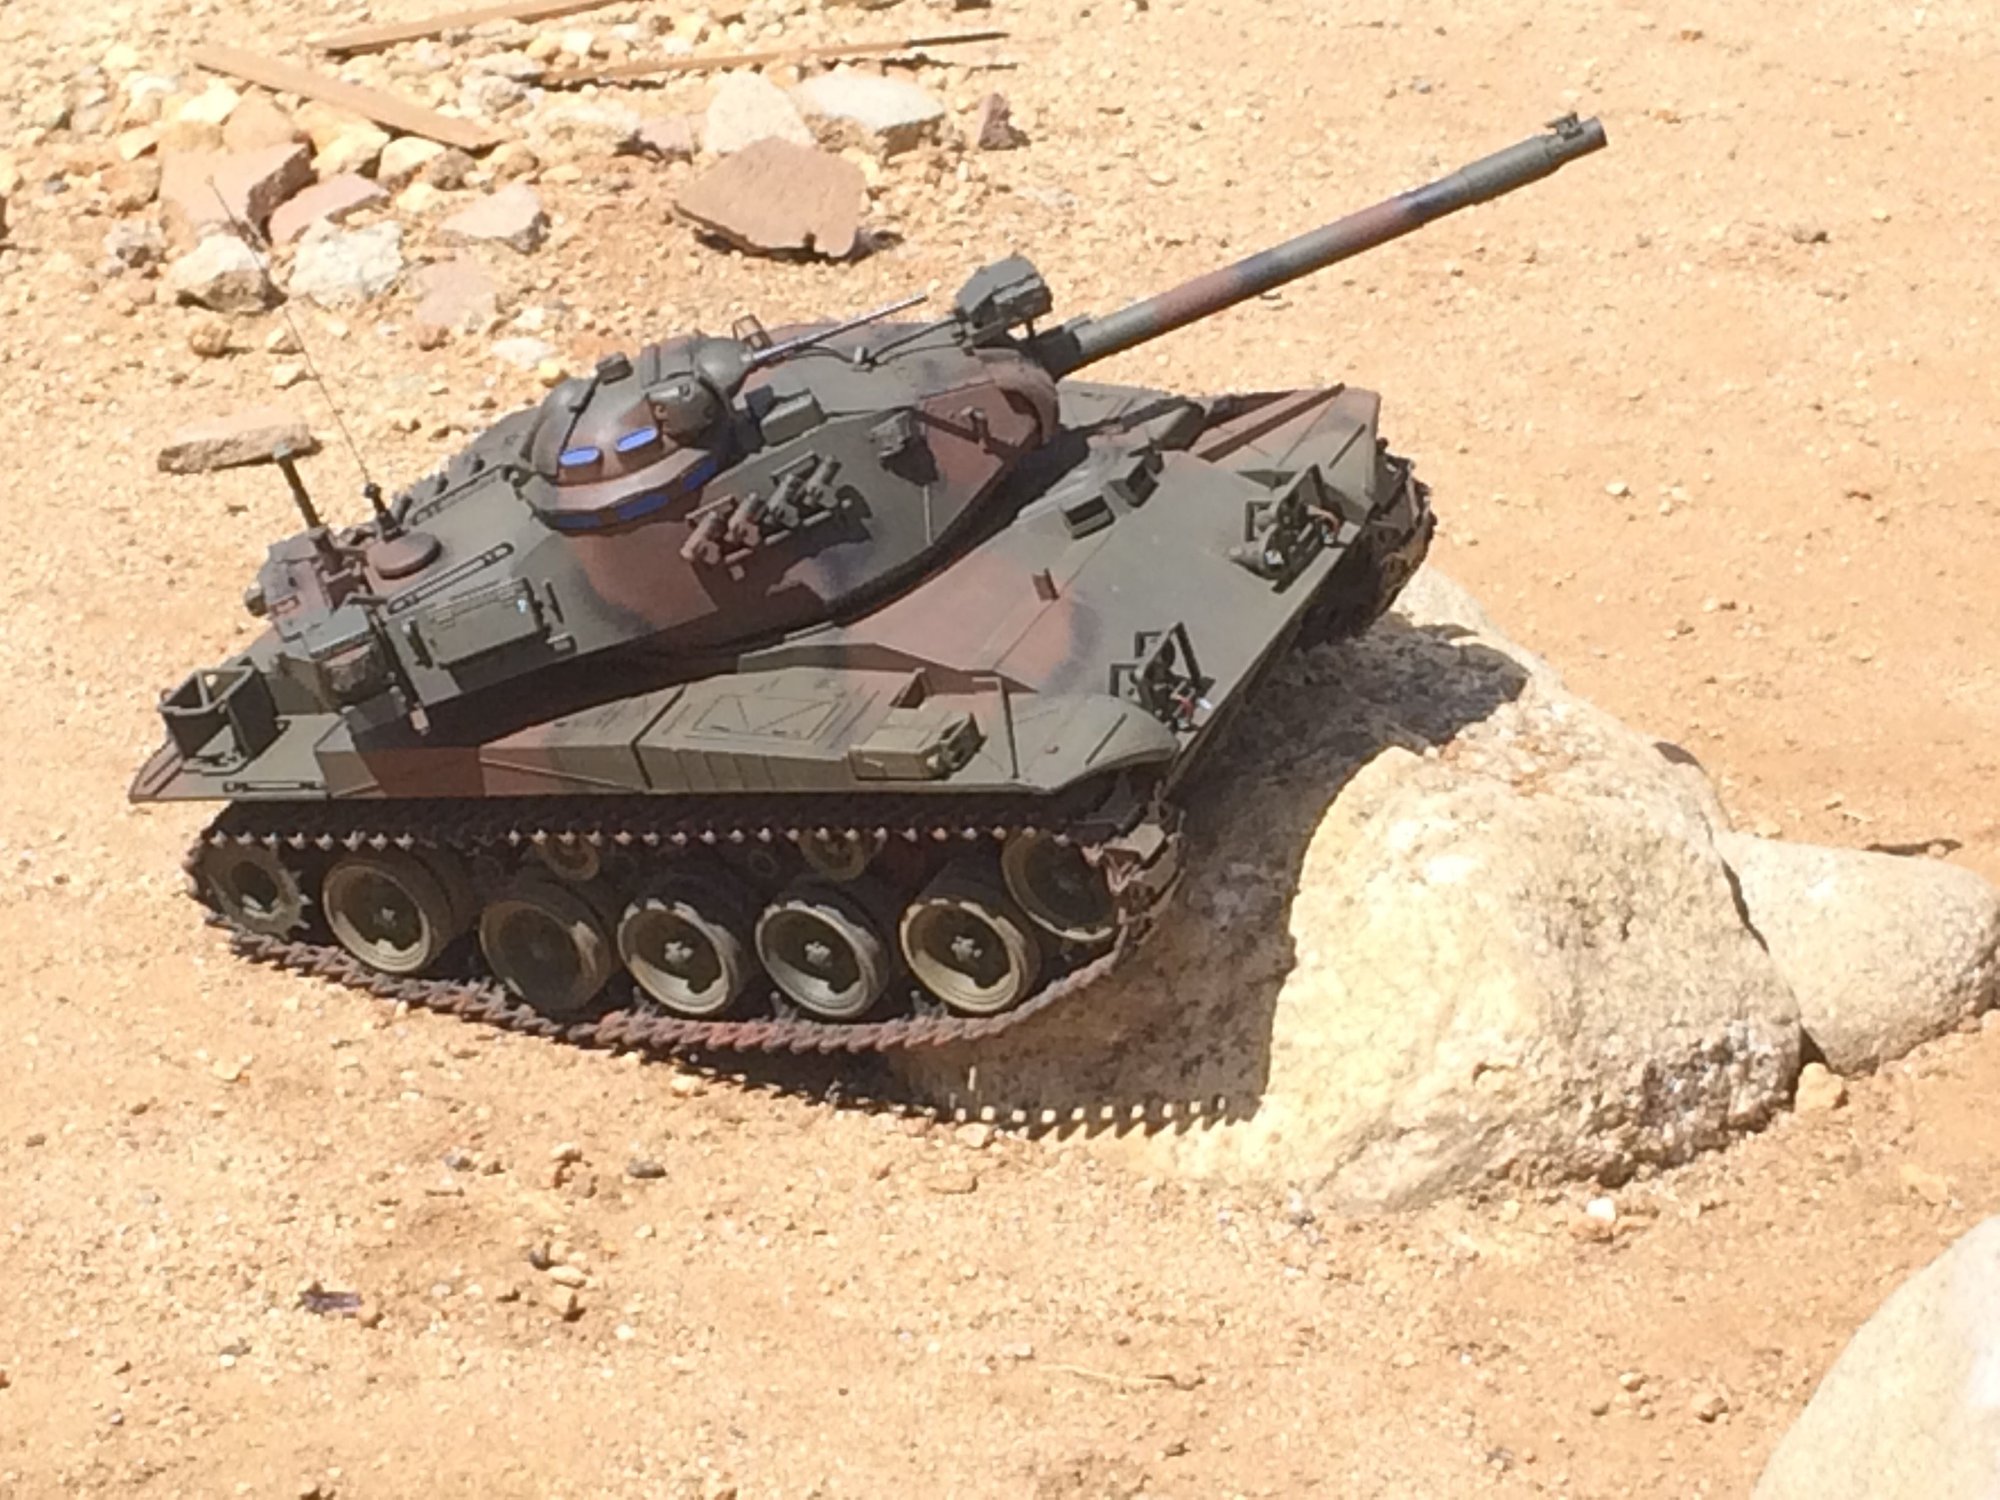
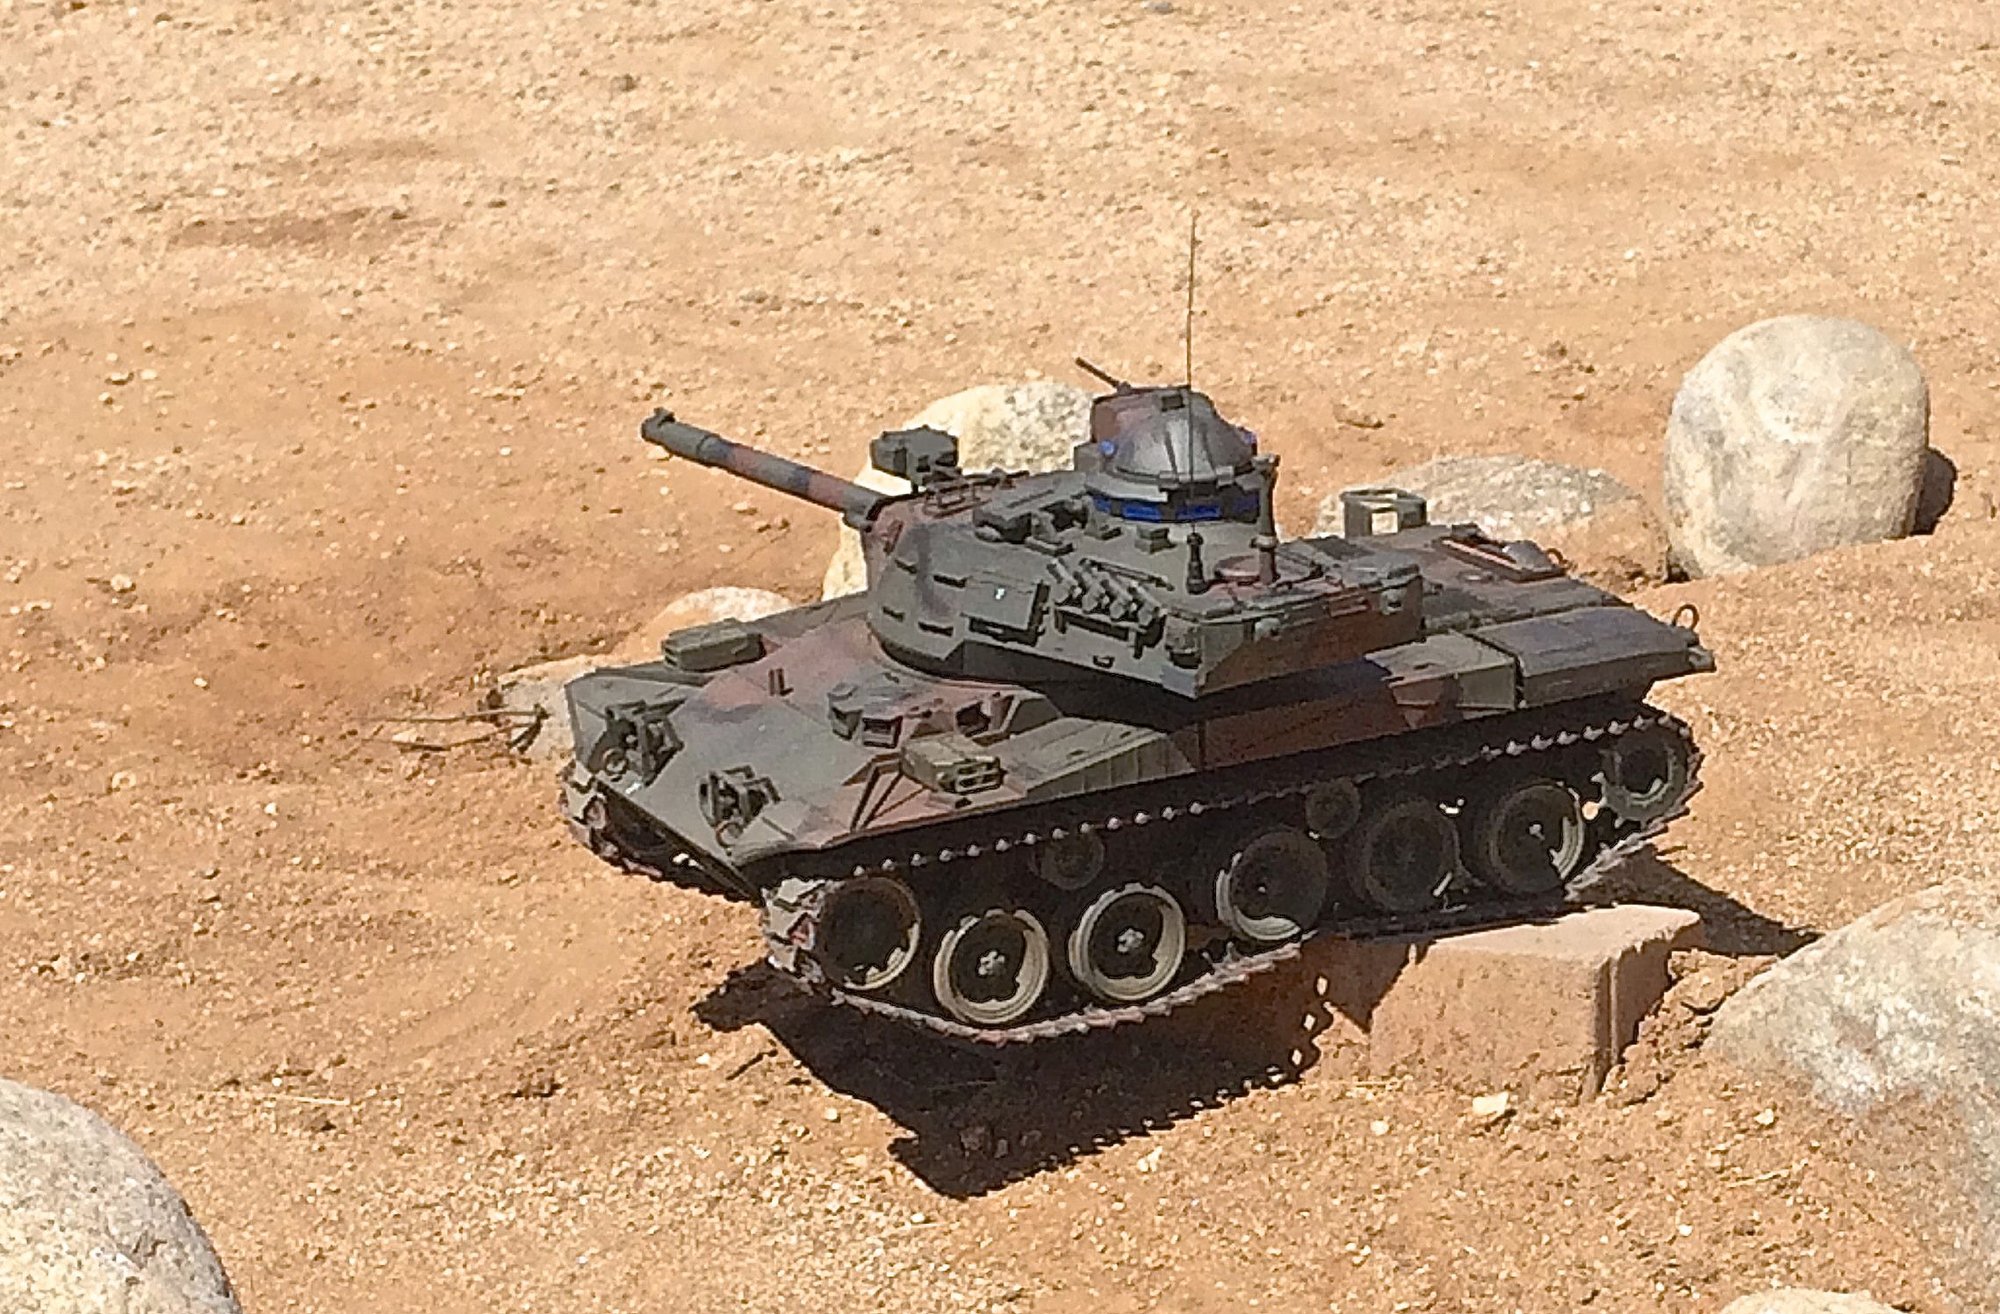
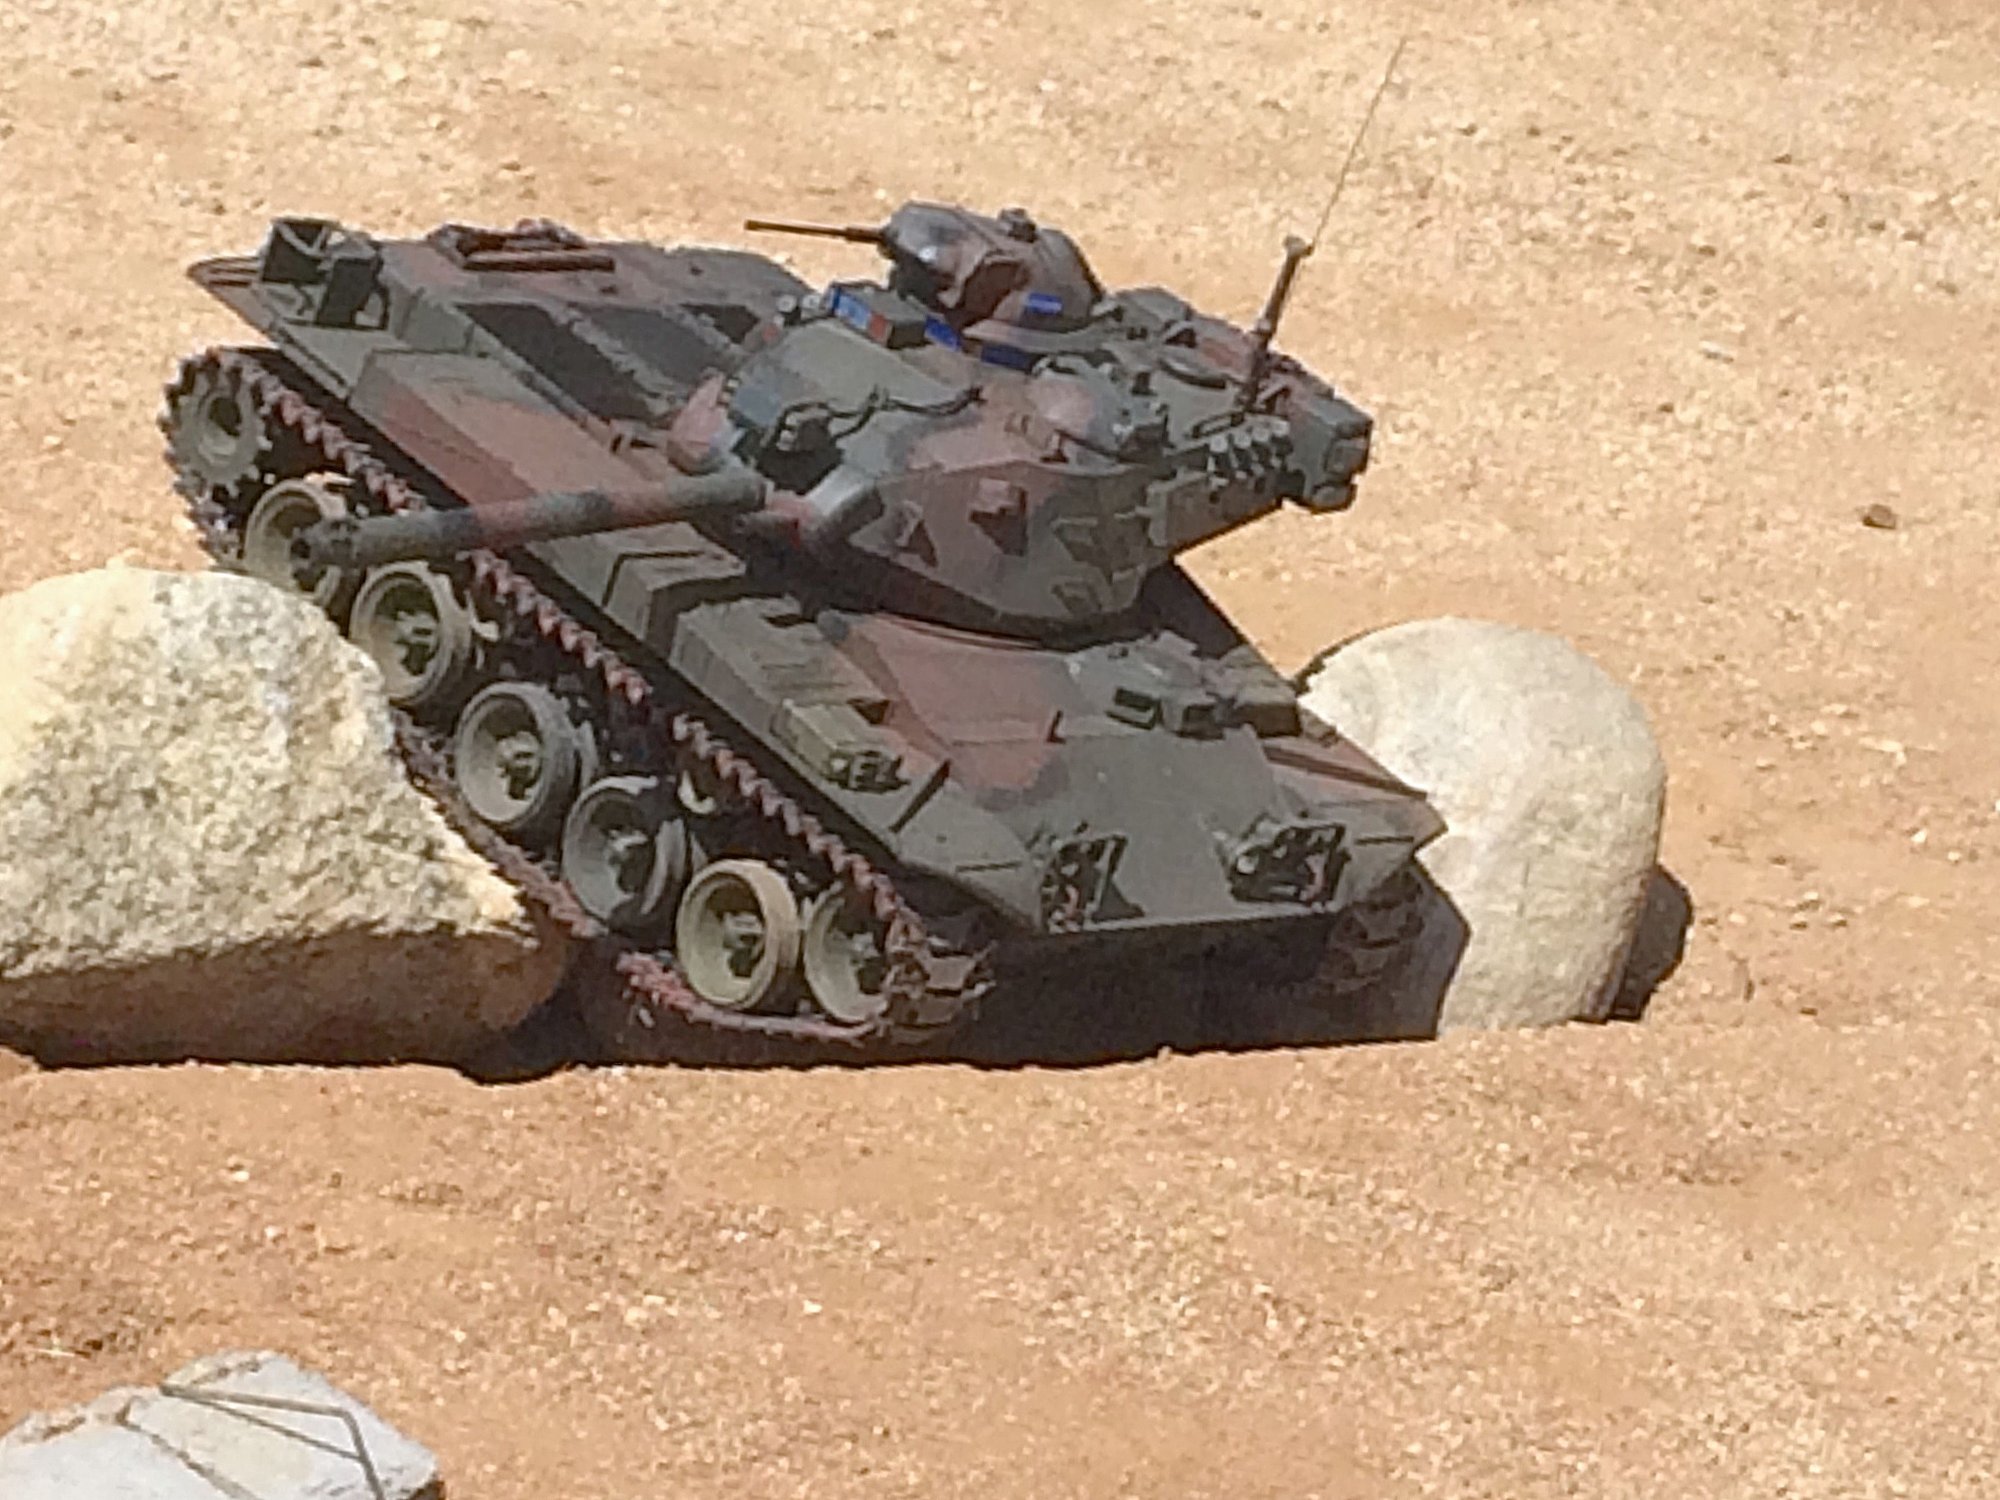
[QUOTE[color=#333333]=Fsttanks;12475273]Might want to consider taking out one link of track which will increase track tension. Yours are very loose and once you start running the tank in rough off camber terrain, rock crawling, soft dirt/mud you are going to "de-track" fairly easily. The photos below show one of my M41s with stock metal tracks properly tensioned for hard off road use. [/QUOTE]
Although I havn't had any real issue yet, I agree they seem on the looser side.
I have hard time using that Heng Long controller but I can't upgrade everything all at once.. I am pretty excited now though the tank performs well I think its going to be great to try outside for the first time. I worry about those stubby little road wheel axles and the little idler guys have been reinstalled a few times already heh. I know whats not going to break though.. that taigen axle.
Btw, your tanks looks awesome those later variant m41s are interesting some had 90mm cannon?
11-01-2018 | 04:50 PM
#35
The majority of the issues with control while using the HL electronics come from the poor track to ground "grip" provided by the stock M41 tracks. Even with the slightest addition of power they break traction easily and this causes the track to spin faster than desired. Since tanks roll on their tracks this makes for handling difficulty. Adding weight to the tank will help to some degree, but it will still be touchy unless you swap over to "rubber padded" tracks with FAR FAR greater grip or replace the electronics at some point.
The metal control/axle arms for the road wheels are pretty strong and you will have to really work at breaking them. To date I have not broken a metal one and I drive my tanks harder and faster then most. I do not know what you mean by "little idler guys" are you referring to the three upper track return rollers on each side of the tank or the front hull mounted wheels (idlers). Either way there are easy ways to ensure the stay secure.
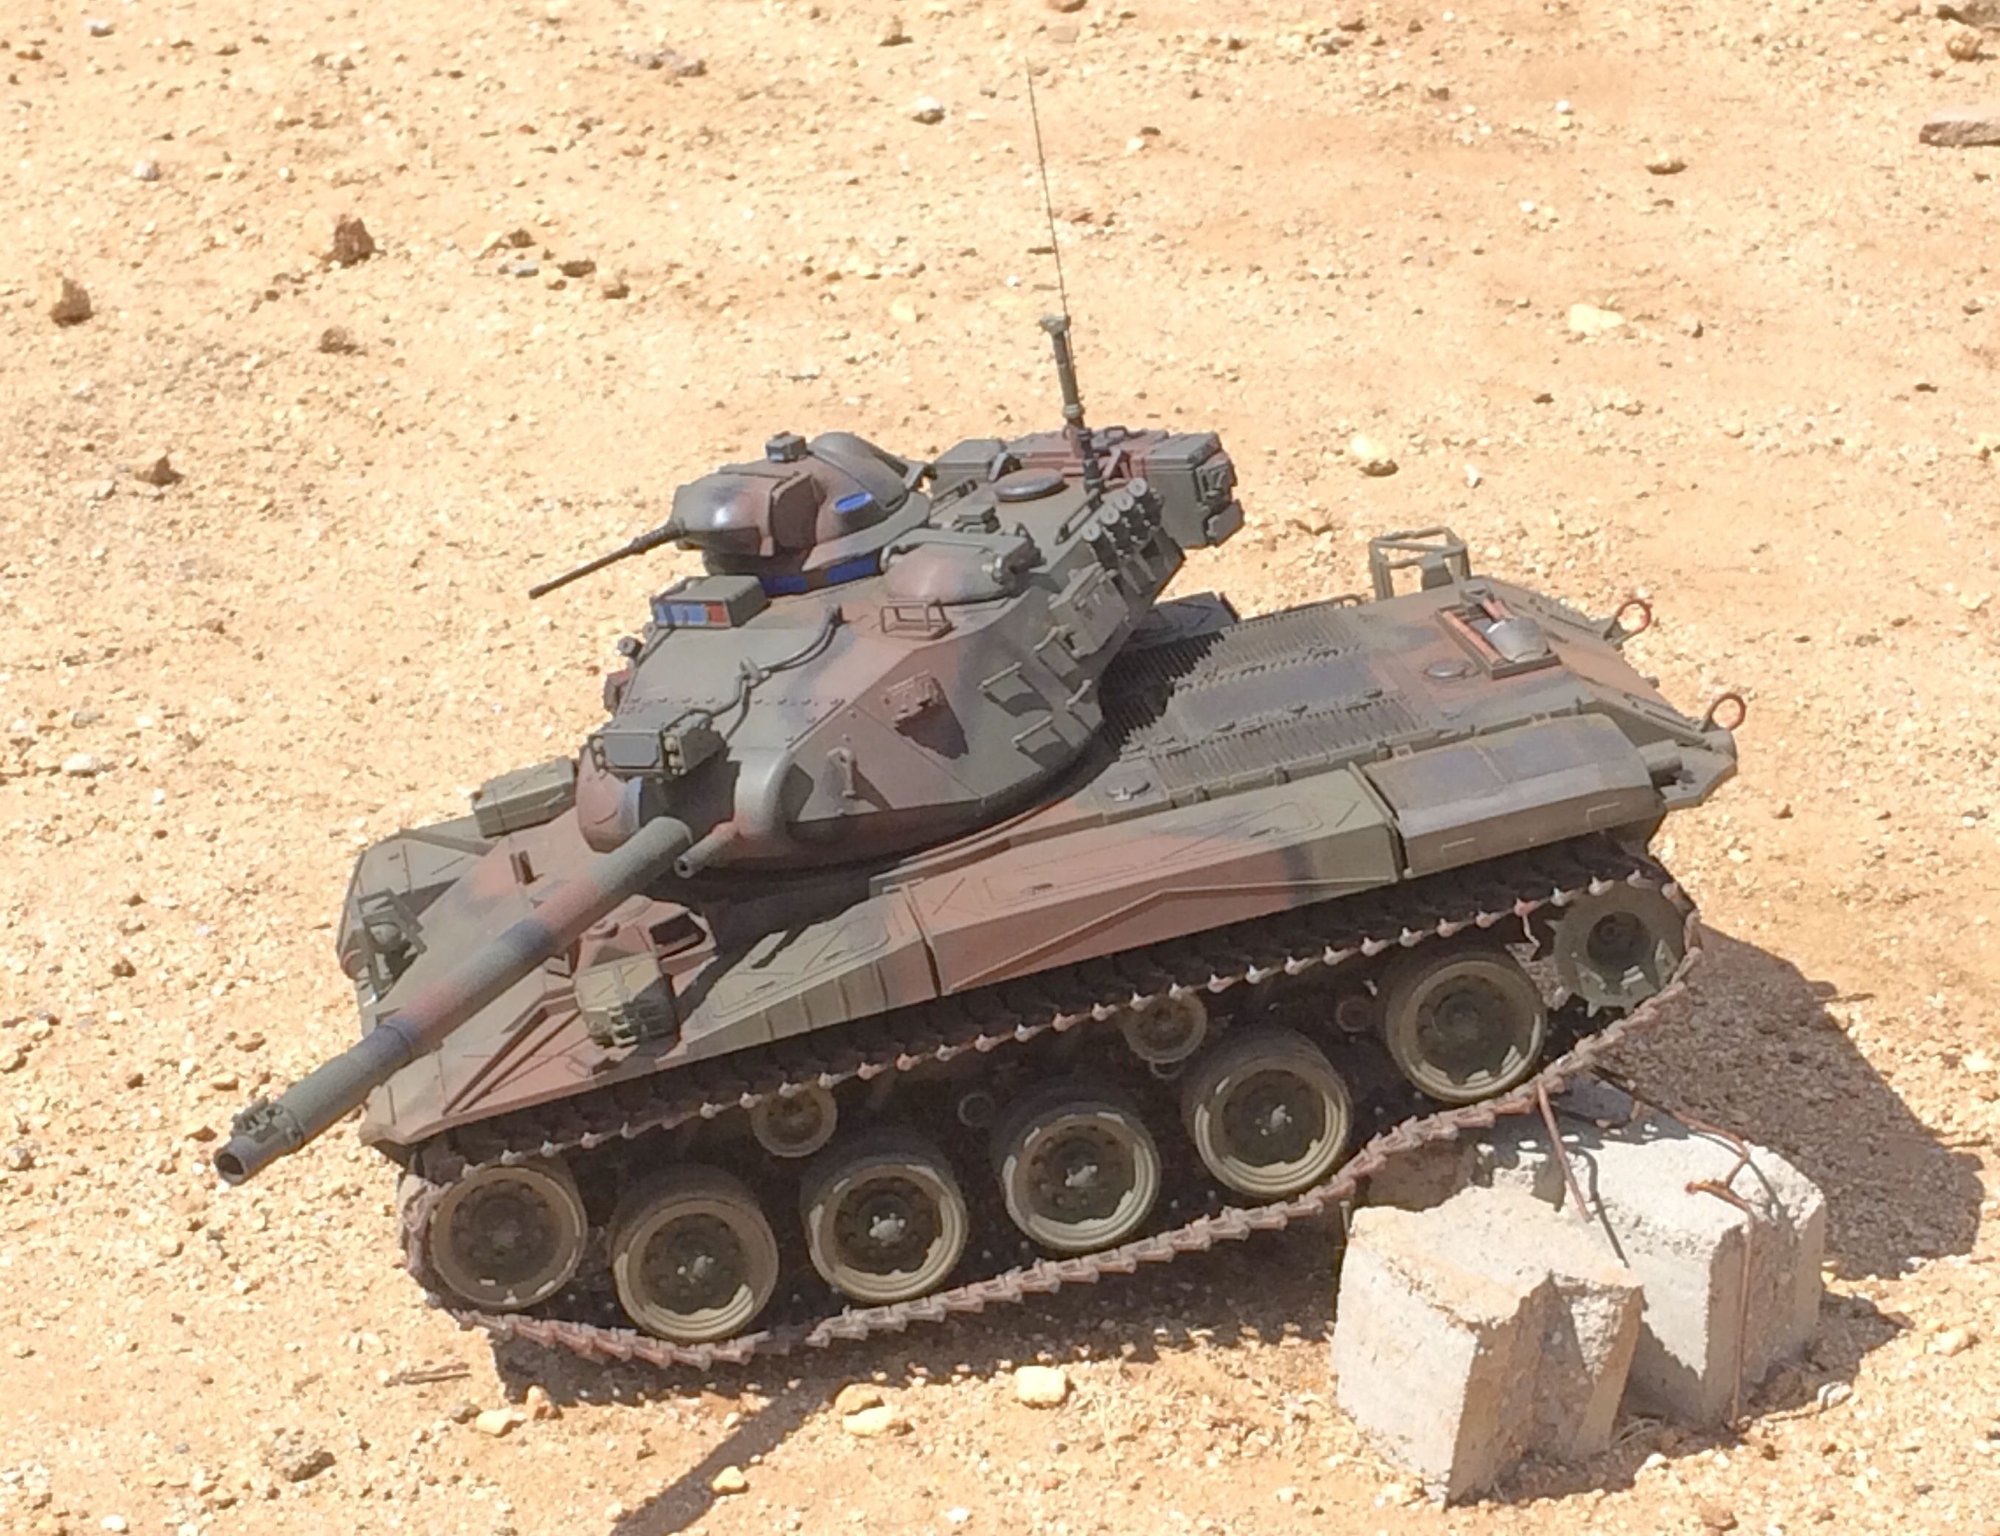
The M41 pictured in my last post has a modified turret to give it a slightly modernized look. The main gun has also been changed to represent a modern 90mm cannon.
The metal control/axle arms for the road wheels are pretty strong and you will have to really work at breaking them. To date I have not broken a metal one and I drive my tanks harder and faster then most. I do not know what you mean by "little idler guys" are you referring to the three upper track return rollers on each side of the tank or the front hull mounted wheels (idlers). Either way there are easy ways to ensure the stay secure.
The M41 pictured in my last post has a modified turret to give it a slightly modernized look. The main gun has also been changed to represent a modern 90mm cannon.
Last edited by Fsttanks; 11-01-2018 at 05:08 PM.
11-02-2018 | 04:59 AM
#36
Thread Starter
Junior Member
Joined: Oct 2018
Posts: 24
Likes: 0
Received 0 Likes
on
0 Posts
The majority of the issues with control while using the HL electronics come from the poor track to ground "grip" provided by the stock M41 tracks. Even with the slightest addition of power they break traction easily and this causes the track to spin faster than desired. Since tanks roll on their tracks this makes for handling difficulty. Adding weight to the tank will help to some degree, but it will still be touchy unless you swap over to "rubber padded" tracks with FAR FAR greater grip or replace the electronics at some point.
The metal control/axle arms for the road wheels are pretty strong and you will have to really work at breaking them. To date I have not broken a metal one and I drive my tanks harder and faster then most. I do not know what you mean by "little idler guys" are you referring to the three upper track return rollers on each side of the tank or the front hull mounted wheels (idlers). Either way there are easy ways to ensure the stay secure.
The M41 pictured in my last post has a modified turret to give it a slightly modernized look. The main gun has also been changed to represent a modern 90mm cannon.
Plus now I have two more extra links and pins! Sorry about my bad terminology I was referring to the smaller wheels on top.
I lubed them up alittle bit and they will probably stretch after I run it a few times and be just right. Hopefully the extra load on the drivetrain doesn't get things too hot but it will probably be fine. plus if anything breaks its good excuse to upgrade lol
Last edited by RCEnduro; 11-02-2018 at 05:05 AM.
11-02-2018 | 09:53 AM
#37
OK so I took one link out of both tracks, I lost some downward suspension travel on the far ends but without a tensioner and the tracks being so loose before I still think better this way for outdoor use like you said.
Plus now I have two more extra links and pins! Sorry about my bad terminology I was referring to the smaller wheels on top.
I lubed them up alittle bit and they will probably stretch after I run it a few times and be just right. Hopefully the extra load on the drivetrain doesn't get things too hot but it will probably be fine. plus if anything breaks its good excuse to upgrade lol
Unless you are running higher than 8.4 volts, heat will not be an issue. I run 9.6 volts in all my tanks and things can get hot, but this is easily managed with the addition of small ** "cooling fans" inside the tanks. The 390 motors can handle a lot of heat (mine have hit as high as 200 deg), it is the MFU (receiver) and power switch that have issues and need cooling assistance at higher volts or amp draws.
* If the return rollers wheels separate again simply add a "small" amount of automotive silicon ( I prefer black) to to the "male" half and press them pack together and let dry overnight. You can also use CA or epoxy but the use on wheels tends to fail sooner as they do not hold up well under hard use and the vibrations caused by it. Silicon tends to handle the vibration of hard use better. I am sure others have their technics as well.
** Small cooling fan can be added by simply using the "smoke" power slot on your MFU (since you have removed the smoke unit). You may have to splice the adaptor plug for the MFU onto the fan wires, this is super easy anyone into RC hobbies can do it (some fans come with the correct plugs and splicing will not be needed). The cooling fan can then be controlled on/off with the "smoke button" on the transmitter as desired. Another option is to use the IR port on your MFU to power a fan. There are a few "ready made" MFU covers that can be found on eBay with built in fans relatively cheap, around $20. These work well if you have limited space.
11-02-2018 | 10:35 AM
#38
Thread Starter
Junior Member
Joined: Oct 2018
Posts: 24
Likes: 0
Received 0 Likes
on
0 Posts
I ran a full battery through and made a small hill to crawl on, along with the tensioned tracks, and the results were the high side of OK @ 160F on the motors and 135F on the RX18.
there is really no where for the air to go in there. but a fan might help yea I'll have to try it. Interestingly the tank became a lot more controllable at the end of the battery life or maybe I'm just getting used to it.
I started at 8.4 and ended at 7.3 the tank still wanted to run though, and still had a lot of speed.
Unfortunatly the airsoft fun doesn't fire anymore, no sound or recoil from it. I doubt its the board since it shows no signs of trouble. but maybe I pulled wires loose from turret side.. I don't really NEED it to shoot but something to fix. it still traverses fine.
Last edited by RCEnduro; 11-02-2018 at 10:54 AM.
11-02-2018 | 11:21 AM
#39
I ran a full battery through and flipped my big mat over to where it has a lot of grip and friction and made a small hill to crawl on, along with the tensioned tracks, and the results were the high side of OK @ 160F on the motors and 135F on the RX18 there is really no where for the air to go in there. but a fan might help yea I'll have to try it. Interestingly the tank became a lot more controllable at the end of the battery life. I started at 8.4 and ended at 7.3 the tank still wanted to run though, and still had a lot of speed.
The 390 motors coupled to the Taigen 3:1 gearbox on a light tank such as your M41 do handle well and smooth out when the volts are around 7.6 to 7.9 volts. As you increase the tanks weight this smoother handling comes in earlier in the battery charge/volt output. It is almost immediate if you swap to rubber padded tracks on a weight balanced tank, at which point you will be happy you have the extra volt(s) available.
Couldn't tell you what is wrong with the airsoft unit. I think I have one that is still installed and functioning. I "remove" them from my tanks for various reasons. But it is not surprising that yours is not working, they tend to have short lived lives.
Everything is a balancing act, electronics + battery + motors + gearing + weight + traction = handling desire for a given terrain or driving style. Finding yours can be simple or as complex as you want to make it. I have done simple and complex and have enjoyed experimenting with both.
Last edited by Fsttanks; 11-02-2018 at 11:34 AM.
11-03-2018 | 07:13 AM
#40
Thread Starter
Junior Member
Joined: Oct 2018
Posts: 24
Likes: 0
Received 0 Likes
on
0 Posts
I had a 2s lipo with a deans plug on it. my other batteries are 3s with traxxas, and I just use a traxxas to deans adaptor when I charge them using a traxxas charger. I ended up using the deans end off one of my adaptors and splicing and soldering it onto what used to be the Tamiya plug on the tank. So now I have over twice the running time and quicker charging. I ran it for 30minutes starting at 8.4 volts and it only dropped to 8.2v. That means even though I don't have a low voltage alarm at the moment, i'll have plenty of time to check it using my meter and it won't be so easy to run into low voltage because I estimate it will be over an hour!. Yes its a tight fit but there it is.


