


ESM FW D-9
 07-09-2014, 08:30 PM
#2726
thanks a lot Downer, your paint scheme is very cool too!!! you are absolutely right about the muffler hanging out...thats the only annoying thing about that plane....many times i thought to replace my four stroke glow engine with another stronger gas engine but every time i start the engine....i regret it!!! its has a real nice-sweet sound....its my only glow engine model and i want to have something to remember.....i could hide the muffler though but that will be.....next time when it will be its turn again to spend some time with it!
 07-09-2014, 08:47 PM
#2727
Looks good dgiatr!
You all know what I'm going to ask....wait for it.......wait for it..............
Dgiatr, what kind of paint did you use?
No I haven't tried the Latex yet, BUT, as the weather was the pits over the holiday weekend, I got quite a bit done on the Dora. The motor is mounted, tail feathers and tail wheel done, fuse servos in, and tail rigged. Finishing up the "homemade" main gear prior to fitting the wing to fuse. As the summer months are upon us, and time is short, just going to focus on putting it together and putting some flights on it as is. So many cool paint schemes to choose from, I what to enjoy painting it, and not feel rushed
Keep posting those pix, keeps the rest of us ( at least me) motivated to get this one done!
RLM 76 wings underneath and low fuselage part
RLM 74,75 wings and fuselage upper surface
mottling : thined RLM 74,02
"wash" using artists oils : lamp black, burnt umber for wing and fuselage underneath
flake white hue, brown oxide for wing upper surface and fuselage.
Last edited by dgiatr; 07-09-2014 at 08:49 PM.
07-15-2014, 03:24 PM
#2729

My Feedback: (24)
Made a little more progress on the mains. After looking at pictures of full size struts, decided to silver sold some brass tubes to the sides of the main struts for the door mounts. They are a little big, but it's what I had laying around. Tapped them for 4-40 button head screws on the outter doors. Finished fitting retracts to the wing, glass beaded them, and primed. Once I'm sure everything is working correctly, and has clearance, will add some color. I shortened the struts compared to pictures/measurements Ram posted way back of the ESM/Sierra units, but they still look a little long compared the full size in these pictures...optical illusion?? While they are not scale, I'm hoping they work well, and are robust.
Had the plane sitting on all three gear last night, and have to say, it is a nice looking model, and seems very light for it's size. Looking forward to flying it!


https://www.youtube.com/watch?v=r88FehRLWCw&feature=youtu.be
Had the plane sitting on all three gear last night, and have to say, it is a nice looking model, and seems very light for it's size. Looking forward to flying it!
https://www.youtube.com/watch?v=r88FehRLWCw&feature=youtu.be
Last edited by 70 ragtop; 07-15-2014 at 03:39 PM.
 07-15-2014, 06:14 PM
#2731

My Feedback: (1)

Join Date: Oct 2008
Location: Camas, WA
Posts: 312
Likes: 0
Received 0 Likes
on
0 Posts
Ragtop,
nice job. Your gear are looking good. Scale size for this plane should be close to 12.5 inches from axel to pivot Not sure what yours are but they look about right. Remember that the FW is a leggy bird
nice job. Your gear are looking good. Scale size for this plane should be close to 12.5 inches from axel to pivot Not sure what yours are but they look about right. Remember that the FW is a leggy bird
07-16-2014, 10:52 AM
#2732
My Feedback: (6)
Join Date: Aug 2004
Location: san antonio, TX
Posts: 94
Likes: 0
Received 0 Likes
on
0 Posts
Perhaps no one has mentioned this so I will...One of the reasons your gear looks too long is because on the full scale, the strut is partially compressed. This is why all the RC P-51 gear looks wrong. In addition, the gear is usually angled backward to aid in handling making it wrong on two counts. When our planes are sitting on the ground the springs in the strut are more than enough to fully extend the gear. Not so on the full scale. So I think you have it right the way it is.
Someone at Monaville Tx had a large P-38, looked different, squatting too low on the gear. I commented. He said he'd changed the springs in the strut and that's why it had a "scale stance." After looking again and thinking on it, I decided he was exactly right.
Someone at Monaville Tx had a large P-38, looked different, squatting too low on the gear. I commented. He said he'd changed the springs in the strut and that's why it had a "scale stance." After looking again and thinking on it, I decided he was exactly right.
07-16-2014, 01:54 PM
#2733
My Feedback: (1)
Join Date: Oct 2008
Location: Camas, WA
Posts: 312
Likes: 0
Received 0 Likes
on
0 Posts
Corsair183,
You are correct about compression of the Oleo. I wasn't going to get into that but it is true that most RC planes will have a fully extended oleo which will make the gear longer. However, if you change the springs to compress more than usual then you won't have enough compression left to provide adequate suspension on those rougher landings.
I usually subtract about a half inch from the overall length to compensate for the oleo compression on my gear so the overall length is about correct. But that is just my 2 cents.
07-16-2014, 08:05 PM
#2734
My Feedback: (24)
Thanks Guys
Robart gear are not greatest when it comes to strut travel and spring compression, that's why I shortened them up a little.
Yes the Ziroli P-38s with Robart mains sit way too high, and has very little travel. By contrast, the Yellow P-38 has lots of travel, and controls height using dual springs. There is a long light weight spring for the majority of travel, and a heavy weight spring that regulates strut height when sitting on the ramp, and provides the cushion for hard landings. The two springs are isolated from one another by a floating aluminum plug between them, which keeps the springs from binding. Very simple, slick setup
On the Dora, the Robart design is fine for me since I don't plan to do a two piece door, and don't want the door getting ripped off in the grass. They will ride fully extended, and only cushion heavier bumps/landings. The plane looks right sitting on them, at least it looks good to me. To do a strut with scale travel, you would need a two piece door to fly off grass...IMO. Picture of the Yellow nose strut fully extended, and sitting at ride height. Could not get away with a one piece door on a strut like that, door would be in the grass
Not sure what you mean angled backwards? Seems like the FW-190 has a huge amount of fwd rake, pushing the axle out past the LE when sitting. Really easy to adjust camber and toe once everything is finished up
Finished up gear, and painted the gear bays, and one retract. The Rustoleum� Camo Army green looked really close to RLM 02, so gave it a shot. I would say it is passable. I ended up spraying testers RLM 02 with an airbrush to see the difference, and the colors are soooo close, RLM just has a little more gray in it
Last edited by 70 ragtop; 07-16-2014 at 08:12 PM.
07-16-2014, 11:39 PM
#2735

Ragtop, I think your gear looks great!
Many Focke Wulfs don't have the forward rake they should have, and therefore looks a bit corny.
Hopefully you got it right.
Many Focke Wulfs don't have the forward rake they should have, and therefore looks a bit corny.
Hopefully you got it right.
Last edited by kwik; 07-18-2014 at 04:04 AM.
07-19-2014, 06:56 PM
#2739
My Feedback: (6)
Join Date: Aug 2004
Location: san antonio, TX
Posts: 94
Likes: 0
Received 0 Likes
on
0 Posts
A local guy told me that when the datum line is parallel to the ground, the axle should be about even with or, slightly in front of the leading edge.
I modified a Hangar nine .60 Mustang to comply with this idea and the ground handling became almost intolerable.
I modified a Hangar nine .60 Mustang to comply with this idea and the ground handling became almost intolerable.
07-19-2014, 08:37 PM
#2740
My Feedback: (24)
n8822t
Thanks
Haven't tried Rustoleum on fuse, but I do have a can. Will try a sample tomorrow and get a picture.
Corsair183
Yup, that's about where the axle is. Not sure why increasing rack on your H9 Mustang would adversely affect ground handling?? Typically just helps with nose overs. Wheels straight, everything tight..nothing worn, loose or binding?
07-20-2014, 02:22 PM
#2741
My Feedback: (24)
Glued the wing halves together, fit it to the fuselage, and installed the mains, hopefully for the last time today. Was going to install the servos, hinge the surfaces before gluing the wing together, but as this plane has been kicking around the shop for a little while, I somehow lost the servo covers....oh well
Going to go with gear doors as is for now, but they look too small with the Sierra wheels. Might end up doing two piece doors whenever I get around to painting it. Couple pictures from the side. It looks to me like the fwd rake is a little less than the prototype, but not by much. I didn't change the angle and looks pretty close to other models. Easy enough to add shims under aft side of retract if desired, but going to leave as is for now
Picture of the RLM 02 vs Rustoleum Camo Army Green. It looks more green in the picture than it does in person, but here it is. Also tried Fuse sample, does not match the stock ESM color
Last edited by 70 ragtop; 07-20-2014 at 02:30 PM.
The following users liked this post:
P47Pilot (07-07-2021)
07-21-2014, 12:56 PM
#2743
Senior Member
Join Date: Dec 2004
Location: Thessaloniki, GREECE
Posts: 128
Likes: 0
Received 0 Likes
on
0 Posts
Ragtop can you please tell me how you did the arm that is connected at the strut and on the retract? I recently began building my fw190 d9 and the struts are handmade put on an electric eurokit retract.
07-21-2014, 02:26 PM
#2744
My Feedback: (1)
Join Date: Oct 2008
Location: Camas, WA
Posts: 312
Likes: 0
Received 0 Likes
on
0 Posts
Ragtop,
That rattle can green looks more like green chromate than RLM 02 in the pic. I think the gear rake looks pretty good. I did the two part gear doors using the stock doors and William Bros wheels. I modified both to suit. A bit of work but they work great and allow the bottom part to be fixed to the strut so it is more sturdy and it can slide up and down with the oleo.
That rattle can green looks more like green chromate than RLM 02 in the pic. I think the gear rake looks pretty good. I did the two part gear doors using the stock doors and William Bros wheels. I modified both to suit. A bit of work but they work great and allow the bottom part to be fixed to the strut so it is more sturdy and it can slide up and down with the oleo.
07-21-2014, 02:49 PM
#2745
My Feedback: (24)
Ragtop,
That rattle can green looks more like green chromate than RLM 02 in the pic. I think the gear rake looks pretty good. I did the two part gear doors using the stock doors and William Bros wheels. I modified both to suit. A bit of work but they work great and allow the bottom part to be fixed to the strut so it is more sturdy and it can slide up and down with the oleo.
That rattle can green looks more like green chromate than RLM 02 in the pic. I think the gear rake looks pretty good. I did the two part gear doors using the stock doors and William Bros wheels. I modified both to suit. A bit of work but they work great and allow the bottom part to be fixed to the strut so it is more sturdy and it can slide up and down with the oleo.
07-21-2014, 03:04 PM
#2746
My Feedback: (24)
It is a really tight fit as the air cylinder pin on the downlock bellcrank needs to be a little futher out from the pivot point to give a harder pull on the downlock, but no room in the wing to make the unit any taller. I went back after these pictures and made the links go a little further over center, so hopefully that will be enough when it starts bouncing down the feild
Last edited by 70 ragtop; 07-21-2014 at 07:00 PM.
07-21-2014, 11:01 PM
#2747
Senior Member
Join Date: Dec 2004
Location: Thessaloniki, GREECE
Posts: 128
Likes: 0
Received 0 Likes
on
0 Posts
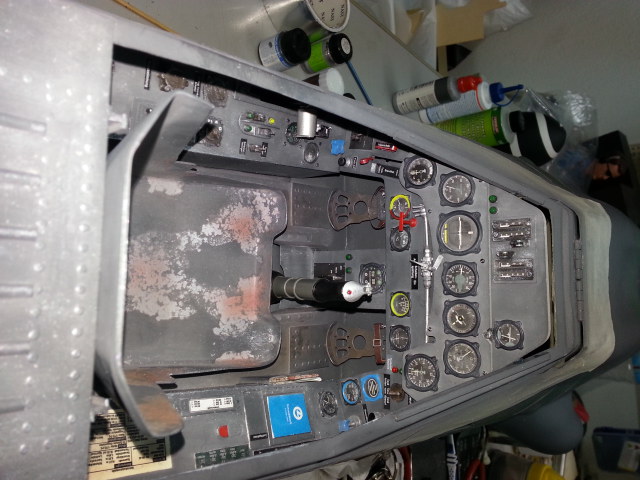
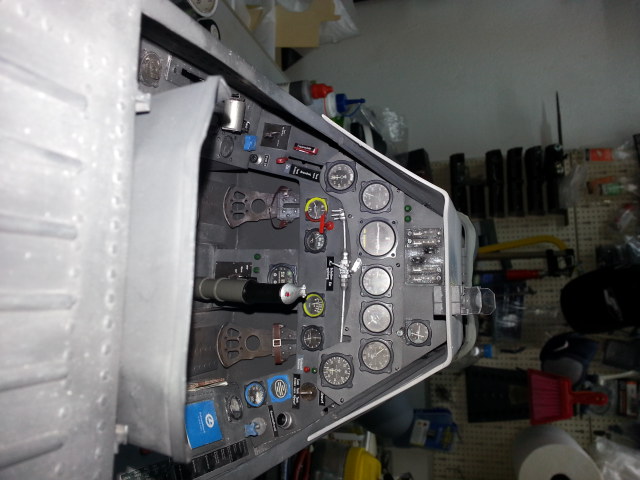
Thank you very much for the photos and for the description. I hope I will manage to make something similar... I am now building my cockpit from iflytalles and with a little weathering looks like this...
07-22-2014, 10:33 AM
#2749
Join Date: Dec 2007
Location: Davison, MI
Posts: 548
Likes: 0
Received 0 Likes
on
0 Posts
Hi panioul,
Can you tell us about fitting the cockpit in the ESM D9? Looks like it fits good.
I ordered my D9 last Sunday night late and Tomas from VQWarbirds let me know he was out..... 4-6weeks... I was hoping to get it on the bench at the end of September to begin my winter build. Oh man....
Are there any other canopies I should look at besides Ty's ? I want a good version of the blown canopy.
It's time to start buying bits and pieces.
Joe
EDIT: Anyone out there that made a mold of the gun hood feel like making an extra hood ? I will need one and it would save me a bunch of time to get one pulled from one of your molds.
Last edited by Joespeeder; 07-22-2014 at 10:36 AM.
07-22-2014, 12:56 PM
#2750
Senior Member
Join Date: Dec 2004
Location: Thessaloniki, GREECE
Posts: 128
Likes: 0
Received 0 Likes
on
0 Posts
Hi panioul,
Can you tell us about fitting the cockpit in the ESM D9? Looks like it fits good.
I ordered my D9 last Sunday night late and Tomas from VQWarbirds let me know he was out..... 4-6weeks... I was hoping to get it on the bench at the end of September to begin my winter build. Oh man....
Are there any other canopies I should look at besides Ty's ? I want a good version of the blown canopy.
It's time to start buying bits and pieces.
Joe
EDIT: Anyone out there that made a mold of the gun hood feel like making an extra hood ? I will need one and it would save me a bunch of time to get one pulled from one of your molds.
Can you tell us about fitting the cockpit in the ESM D9? Looks like it fits good.
I ordered my D9 last Sunday night late and Tomas from VQWarbirds let me know he was out..... 4-6weeks... I was hoping to get it on the bench at the end of September to begin my winter build. Oh man....
Are there any other canopies I should look at besides Ty's ? I want a good version of the blown canopy.
It's time to start buying bits and pieces.
Joe
EDIT: Anyone out there that made a mold of the gun hood feel like making an extra hood ? I will need one and it would save me a bunch of time to get one pulled from one of your molds.
http://www.aeromodelling.gr/ForumS/i...opic=39304.165