


VQ A6M5 Zero Build Thread
 07-12-2009 | 09:59 PM
#51
Junior Member
Joined: Jul 2006
Posts: 13
Likes: 0
Received 0 Likes
on
0 Posts
From: Cincinnati,
OH
Guys, I finished the Zero and maidened her last Monday and spent today flying her as well. I did away with the mechanicals and installed Spring Air retracts with Robart scale wheels. It's powered by an old .46 OS Max FX that runs like a champ. I installed a Slimline Pitts style muffler because I wanted the cowl to keep some sort of scale appearance. The canopy was masked inside with tape and then I shot the frame with Testors Gray paint. It took a bit of time to do but the results speak for themselves. I wasn't too keen on using the colored stickers to "frame" it up as I was worried about them peeling off over time. I'm running the 2.4 Futaba 7 Channel Rx with an 1800 mAh NiCd pack. It's a bit crowded inside with the air tank, battery, servos and gear valve/servo but it works. I named it "Krazy-San" as a throwback to how the Japanese engineers at Honda referred to me when I worked there. Note the pilot is a little "Crazy" himself. Finally, after one day in the sun the instrument panel sticker started peeling up so I removed it, stuck it to a thin piece of wood as a backing and then sealed the edges with Testor Clear Window Maker cement. It help up today in the 90 degree heat.
Love this plane!!! Flies like a dream on 1/4 throttle.
Love this plane!!! Flies like a dream on 1/4 throttle.
 07-13-2009 | 10:00 AM
#53


My Feedback: (77)
Joined: Apr 2002
Posts: 3,157
Likes: 0
Received 0 Likes
on
0 Posts
From: Bryan, TX
BOXMAN27,
CONGRATS,,,, LOOKS REAL GOOD,,,,I agree... best to paint the canopy vs using stickers...
Now you need a wingman to watch your 6'
Pippin,
IF you want a Grey ZERO,,, Just email me direct at [email protected]
WE ship to EUROPE regularly....
www.vqwarbirds.com
=CHEERS!
TOMAS
VQ WARBIRDS
CONGRATS,,,, LOOKS REAL GOOD,,,,I agree... best to paint the canopy vs using stickers...
Now you need a wingman to watch your 6'
Pippin,
IF you want a Grey ZERO,,, Just email me direct at [email protected]
WE ship to EUROPE regularly....
www.vqwarbirds.com
=CHEERS!
TOMAS
VQ WARBIRDS
07-25-2009 | 10:12 PM
#55
Junior Member
Joined: Jul 2006
Posts: 13
Likes: 0
Received 0 Likes
on
0 Posts
From: Cincinnati,
OH
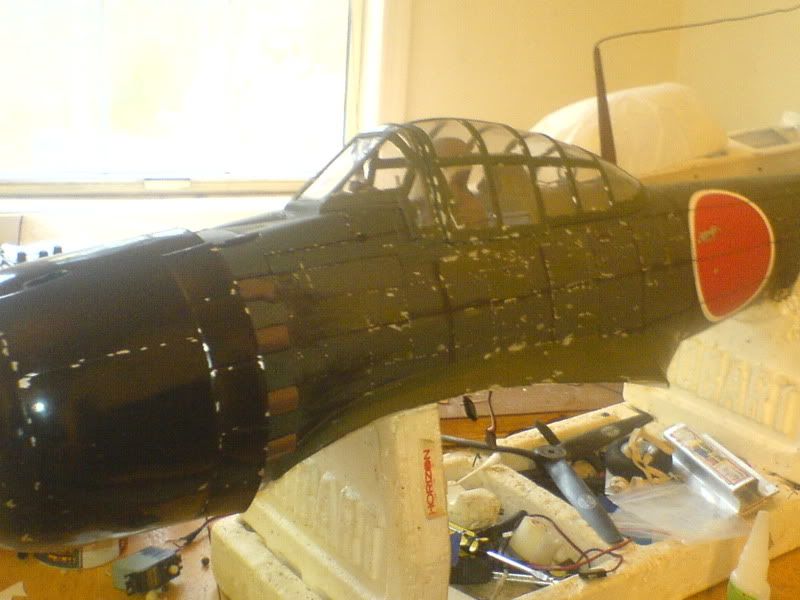
Ok folks, I realize that most people think adding scale detail to an ARF is silly..but, I honed my plastic modeling chops on this one. Some details I added for a bit more realism are rivets and panel lines as well as simulated wear areas. I scribed a few panel lines on the "hood" between the cowl and windscreen. It looked to bare. I also added rivets to the canopy. I used Testors Window Maker cement to simulate them by just adding a tiny drop for each rivet. The wear marks are simply Aluminum paint. I took a permanent black marker and traced the scribe lines and wiped the excess off with a paper towel. This accentuated the lines and gave them a dirty look. Not shown but forthcoming are the 20mm cannons added to the wing roots.
07-25-2009 | 10:28 PM
#56
My Feedback: (2)
Joined: Feb 2008
Posts: 1,455
Likes: 0
Received 0 Likes
on
0 Posts
From: Elmwood Park ,
IL
20mm guns you say ! Hm I await with great anticiptation ! LOL make sure you post lots of pic I'd love to see the whole plane when your finished I am currently doing the 120 size CMP version of the A6M5 could use some new ideas on weathering etc , keep up the great work , I'll be watching
08-03-2009 | 07:53 PM
#57
Junior Member
Joined: Jul 2006
Posts: 13
Likes: 0
Received 0 Likes
on
0 Posts
From: Cincinnati,
OH
Here are some shots of the bird with the wing attached after adding the "cannons". Unfortunately, I crashed her into the bean field at the flying site after a high speed pass and chandelle done a little too aggressively..high speed stall and flipped into the beans! Unbelievable, the only damage was the cowling and a broken prop. The pilot came unglued and smashed his head into the instrument panel cracking the plastic. Everything else was solid! No structural damage at all. Our flying club is putting on the yearly air show this weekend and my Zero is one of ten that we are flying to recreate the attack on Pearl Harbor as part of the show. She WILL fly!
12-15-2009 | 10:16 AM
#59
Senior Member
Joined: Jul 2008
Posts: 138
Likes: 0
Received 0 Likes
on
0 Posts
From: Woodford,
VA
Excellent aircraft ya'll.
I have been wanting this bird for over a year and finally got one on sale......
This Zero will have a nearly full depth cockpit, removable pilot, servo operated sliding canopy, flaps, retracts, and a Saito .82 .
I am slowly aquiring my components as I go so the build will probally take me 1-2 months[ ]
]
I have just started the build and would like to share some pics.
First, this is what I want the craft to look like, especially in regards to the weathering(Spring 44');

This is what I have done so far, cockpit is about 85% complete, same with pilot.


I'll be asking alot of questions from everyone, so I warn in advance.
Are the VQ retracts and struts worth their price? Do they work well enough to buy?
What fuel-proof clear coat can I use with this covering?
Are the LGear legs too short? Is their a problem with prop clearance?
Any other advice or tips??
I have been wanting this bird for over a year and finally got one on sale......
This Zero will have a nearly full depth cockpit, removable pilot, servo operated sliding canopy, flaps, retracts, and a Saito .82 .
I am slowly aquiring my components as I go so the build will probally take me 1-2 months[
]I have just started the build and would like to share some pics.
First, this is what I want the craft to look like, especially in regards to the weathering(Spring 44');
This is what I have done so far, cockpit is about 85% complete, same with pilot.
I'll be asking alot of questions from everyone, so I warn in advance.
Are the VQ retracts and struts worth their price? Do they work well enough to buy?
What fuel-proof clear coat can I use with this covering?
Are the LGear legs too short? Is their a problem with prop clearance?
Any other advice or tips??
12-15-2009 | 04:24 PM
#61
Senior Member
Joined: Jul 2008
Posts: 138
Likes: 0
Received 0 Likes
on
0 Posts
From: Woodford,
VA
Yes, cockpit is from scratch,lol.
Cockpit is made from scrap balsa,cardboard, bits of wire( did have a 1/2 used up set of intrument bezels laying around), ect,ect. If anyone can spot the cigarette-butt used in the cockpit construction, they get a cookie,LOL.
I had to convert the stock pilot bust into a 7/8 full figure, I gotta a couple of pics.
Workin on the sliding canopy right now, hard to find room for the mechanics but, I've got it figured out. I have the flaps figured out already too but, I'm wondering if I should mod the retract bay to allow longer gear legs....Do I need longer gear, more prop clearence??
I uploading a couple of pics of the 80% done pilot.....
I also must say again how impressed I am with the quality of this model( can't call an ARF a kit).
12-16-2009 | 09:38 PM
#64
Senior Member
Joined: Jul 2008
Posts: 138
Likes: 0
Received 0 Likes
on
0 Posts
From: Woodford,
VA
Being stuck with using the stock pilot supplied with the kit, I had to build arms and legs onto him to fit my cockpit.
Here is some pics of what I was able to do with the pilot.
I couldn't stand the way that the pilot looked, his eyeballs were not even in the right location.
First, I sawed off his goggles and his fake,plastic fur collars.
Then I stuffed his empty head and filled in his now empty eye-sockets.
I then painted on his new eyes then gave him a new pair of goggles with clear plastic lenses.
Some real "fur" for his collar and some real cloth for his jumpsuit, then some parachute straps and buckles, ect, ect.....


He is almost done, I want to give him a good bandanna/headband to flap in the wind while canopy is open.
I also need to figure out how to post thumbnail pics......
Here is some pics of what I was able to do with the pilot.
I couldn't stand the way that the pilot looked, his eyeballs were not even in the right location.
First, I sawed off his goggles and his fake,plastic fur collars.
Then I stuffed his empty head and filled in his now empty eye-sockets.
I then painted on his new eyes then gave him a new pair of goggles with clear plastic lenses.
Some real "fur" for his collar and some real cloth for his jumpsuit, then some parachute straps and buckles, ect, ect.....
He is almost done, I want to give him a good bandanna/headband to flap in the wind while canopy is open.
I also need to figure out how to post thumbnail pics......
12-20-2009 | 10:44 PM
#65
Senior Member
Joined: Jul 2008
Posts: 138
Likes: 0
Received 0 Likes
on
0 Posts
From: Woodford,
VA
Here are some pics of the operational servo driven canopy.

The first is a shot of a final test with cowl in place to test for clearance of my linkage. As you can see, I kust hooked the Zero up to another plane on the "flap" channel to test my canopy.
After studying for a few days, researching on the net and stuff, I read that the hardest part is getting enough control-throw to slide a canopy 3-5". I read about "sailing" winch servos and alot of air-operated pistons to drive linkage that far.
I just went with simple big arm on the old servo trick......the trick was finding room for said servo..


Servo and linkage for canopy installation is shown. Also of note is the wing in the background showing my flaps already cut and linkage routed for airelons.
The first is a shot of a final test with cowl in place to test for clearance of my linkage. As you can see, I kust hooked the Zero up to another plane on the "flap" channel to test my canopy.
After studying for a few days, researching on the net and stuff, I read that the hardest part is getting enough control-throw to slide a canopy 3-5". I read about "sailing" winch servos and alot of air-operated pistons to drive linkage that far.
I just went with simple big arm on the old servo trick......the trick was finding room for said servo..
Servo and linkage for canopy installation is shown. Also of note is the wing in the background showing my flaps already cut and linkage routed for airelons.
12-21-2009 | 02:25 AM
#66
My Feedback: (2)
Joined: Feb 2008
Posts: 1,455
Likes: 0
Received 0 Likes
on
0 Posts
From: Elmwood Park ,
IL
Very Cool ! Less and less often it is rare that someone puts in this kind of detail in a smaller size bird, pilot looks great ! cockpit superb ! weathering very nice ! very nice indeed, may I ask for you to describe the method you used for the weathering ?
12-21-2009 | 07:49 AM
#67
Senior Member
Joined: Jul 2008
Posts: 138
Likes: 0
Received 0 Likes
on
0 Posts
From: Woodford,
VA
The weathering is only maybe a third of the way done,( I still need to post pics of weathering models* on your thread and I try today).
What weathering you do see is from everytime that I used silver in the cockpit, I'd do a little to the plane.
I'm no expert, just copying techniques from scale plastic models.*
Today I'll take a few pics to show detail of the canopy rails and more of how I got it to work.
Then I'm pulling my canopy for painting and finishing my cockpit interior.
12-21-2009 | 05:33 PM
#68
Senior Member
Joined: Jul 2008
Posts: 138
Likes: 0
Received 0 Likes
on
0 Posts
From: Woodford,
VA
I wish "boxman" could chime in and explain what he used to scribe his panel lines onto his gun-hood and cowl.
I would think that an Exacto would be too narrow.
I would think that an Exacto would be too narrow.
12-24-2009 | 07:50 PM
#69
My Feedback: (2)
Joined: Feb 2008
Posts: 1,455
Likes: 0
Received 0 Likes
on
0 Posts
From: Elmwood Park ,
IL
I would very much like if you could post some pic of the completed plane, I'm a nut when it comes to Zero's as you can probably already tell LOL
01-21-2010 | 04:58 PM
#71
Senior Member
Joined: Jul 2008
Posts: 138
Likes: 0
Received 0 Likes
on
0 Posts
From: Woodford,
VA
I have a few new pics to share of my zero.....
Exacto worked well, I wish that I took a pic before work was done to gunhood. Also made mg's from nyrod tubing with holes drilled and smaller tubing stuck inside for barrel.

An overall view of my work(still not 100% done) on the weathering and exhaust stains for the fuse.

I was a bit disappointed with the plastic tailcone that was supplied but, a coat of paint, then scribed panel line and some rivets helped.
I also did some work on the tailwheel area, I just couldn't live with the musicwire tailwheel strut/axle so I gave it a little going over.

I wish "boxman" could chime in and explain what he used to scribe his panel lines onto his gun-hood and cowl.
I would think that an Exacto would be too narrow.
I would think that an Exacto would be too narrow.
An overall view of my work(still not 100% done) on the weathering and exhaust stains for the fuse.
I was a bit disappointed with the plastic tailcone that was supplied but, a coat of paint, then scribed panel line and some rivets helped.
I also did some work on the tailwheel area, I just couldn't live with the musicwire tailwheel strut/axle so I gave it a little going over.
01-21-2010 | 09:42 PM
#73
Senior Member
Joined: Jul 2008
Posts: 138
Likes: 0
Received 0 Likes
on
0 Posts
From: Woodford,
VA
another one of your scratch built ideas ?
Just used some epoxy/putty( green stuff sold on tv) and just stuck it onto the the tailwheel strut, then shaped, then sanded after dry.
Then another piece of tubing for the fake shock/strut. Some ply to form the triangle part, ect.
The hard part was to fabricate the black dust cover. I found some thin latex/rubber painted it black then I used a block of balsa shaped to give me the contours that matched a side-view drawing.
01-23-2010 | 09:23 AM
#75
Senior Member
Joined: Jul 2008
Posts: 138
Likes: 0
Received 0 Likes
on
0 Posts
From: Woodford,
VA
may have to contract you to fabricate me
I actually thought about you yesterday and offering to make you a tailwheel assembly for free!!
How is your tail strut setup on your CMP? Is it too late to mod it?
The tailwheel strut on the VQ is directly connected into the rudder so is now non-removable but, I did the work after it's installation.
Maybe a can take some more pics of mine to show you more of what I did.....
Just ask and we'll do your tailwheel...
 ( I should have taking more pics as I was workin on it)....

