Go Back  RCU Forums > RC Airplanes > RC Warbirds and Warplanes
Reload this Page >

Meister 1/5 scale P-47

Community
Search
Notices
RC Warbirds and Warplanes Discuss rc warbirds and warplanes in this forum.

Meister 1/5 scale P-47

Thread Tools
 
Search this Thread
 
Old 03-11-2015, 04:30 PM
  #1976  
ram3500-RCU
Thread Starter
My Feedback: (221)
 
ram3500-RCU's Avatar
 
Join Date: Aug 2002
Location: n. canton, OH
Posts: 9,737
Received 12 Likes on 6 Posts
Default

Rails glued in place and Icing added.

Attached Thumbnails Click image for larger version

Name:	DSCN2274.JPG
Views:	542
Size:	844.8 KB
ID:	2080759  
Old 03-11-2015, 04:32 PM
  #1977  
ram3500-RCU
Thread Starter
My Feedback: (221)
 
ram3500-RCU's Avatar
 
Join Date: Aug 2002
Location: n. canton, OH
Posts: 9,737
Received 12 Likes on 6 Posts
Default

Now the cowl can be fit to the cradles. When this is done, I'll install the former to the slider.

Attached Thumbnails Click image for larger version

Name:	DSCN2275.JPG
Views:	471
Size:	855.8 KB
ID:	2080760  
Old 03-11-2015, 04:35 PM
  #1978  
ram3500-RCU
Thread Starter
My Feedback: (221)
 
ram3500-RCU's Avatar
 
Join Date: Aug 2002
Location: n. canton, OH
Posts: 9,737
Received 12 Likes on 6 Posts
Default

Painted the rivets I had added. These were not flush.

Usually takes two evenings for a canopy. On track even though I had a setback last night when I cracked the original canopy that I had all fit up. Glued something I shouldn't have and broke the dang canopy getting it loose. Fortunately, I had a spare on hand and didn't have to 911 Dino. But, this one had the protective covering removed. Be very very careful.

Attached Thumbnails Click image for larger version

Name:	DSCN2272.JPG
Views:	466
Size:	853.4 KB
ID:	2080761   Click image for larger version

Name:	DSCN2273.JPG
Views:	479
Size:	872.5 KB
ID:	2080762  

Last edited by ram3500-RCU; 03-11-2015 at 07:20 PM.
Old 03-12-2015, 12:46 PM
  #1979  
ram3500-RCU
Thread Starter
My Feedback: (221)
 
ram3500-RCU's Avatar
 
Join Date: Aug 2002
Location: n. canton, OH
Posts: 9,737
Received 12 Likes on 6 Posts
Default

I'm using magnets on this canopy. Here is the front section with them installed.

Attached Thumbnails Click image for larger version

Name:	DSCN2279.JPG
Views:	459
Size:	876.4 KB
ID:	2080942  
Old 03-12-2015, 01:02 PM
  #1980  
TonyBuilder
My Feedback: (11)
 
TonyBuilder's Avatar
 
Join Date: Mar 2010
Location: Austin , TX
Posts: 4,166
Likes: 0
Received 1 Like on 1 Post
Default

Is this for the manual canopy close?

TB
Old 03-12-2015, 01:25 PM
  #1981  
ram3500-RCU
Thread Starter
My Feedback: (221)
 
ram3500-RCU's Avatar
 
Join Date: Aug 2002
Location: n. canton, OH
Posts: 9,737
Received 12 Likes on 6 Posts
Default

With the canopy closed, I make alignment marks on both sections, then install the magnets. Again, I unscrew the front section from the fuselage to make this easy.

Like batteries, care must be taken not to install them backwards, like I did. I got the center one backwards and had to drill a tiny hole from the inside so I could push it out with a small drill bit. PIA.

Here is the whole canopy with all the magnets installed and holding it together.

Attached Thumbnails Click image for larger version

Name:	DSCN2280.JPG
Views:	453
Size:	884.6 KB
ID:	2080944  
Old 03-12-2015, 01:27 PM
  #1982  
ram3500-RCU
Thread Starter
My Feedback: (221)
 
ram3500-RCU's Avatar
 
Join Date: Aug 2002
Location: n. canton, OH
Posts: 9,737
Received 12 Likes on 6 Posts
Default

Originally Posted by TonyBuilder
Is this for the manual canopy close?

TB
Yes. I have an idea how it could be driven with electric, but no time right now to experiment with it, plus, the devise I would like to use is just now being developed by a friend.
Old 03-12-2015, 01:29 PM
  #1983  
ram3500-RCU
Thread Starter
My Feedback: (221)
 
ram3500-RCU's Avatar
 
Join Date: Aug 2002
Location: n. canton, OH
Posts: 9,737
Received 12 Likes on 6 Posts
Default

Fits nice.

Attached Thumbnails Click image for larger version

Name:	DSCN2278.JPG
Views:	436
Size:	879.8 KB
ID:	2080945  
Old 03-12-2015, 01:33 PM
  #1984  
ram3500-RCU
Thread Starter
My Feedback: (221)
 
ram3500-RCU's Avatar
 
Join Date: Aug 2002
Location: n. canton, OH
Posts: 9,737
Received 12 Likes on 6 Posts
Default

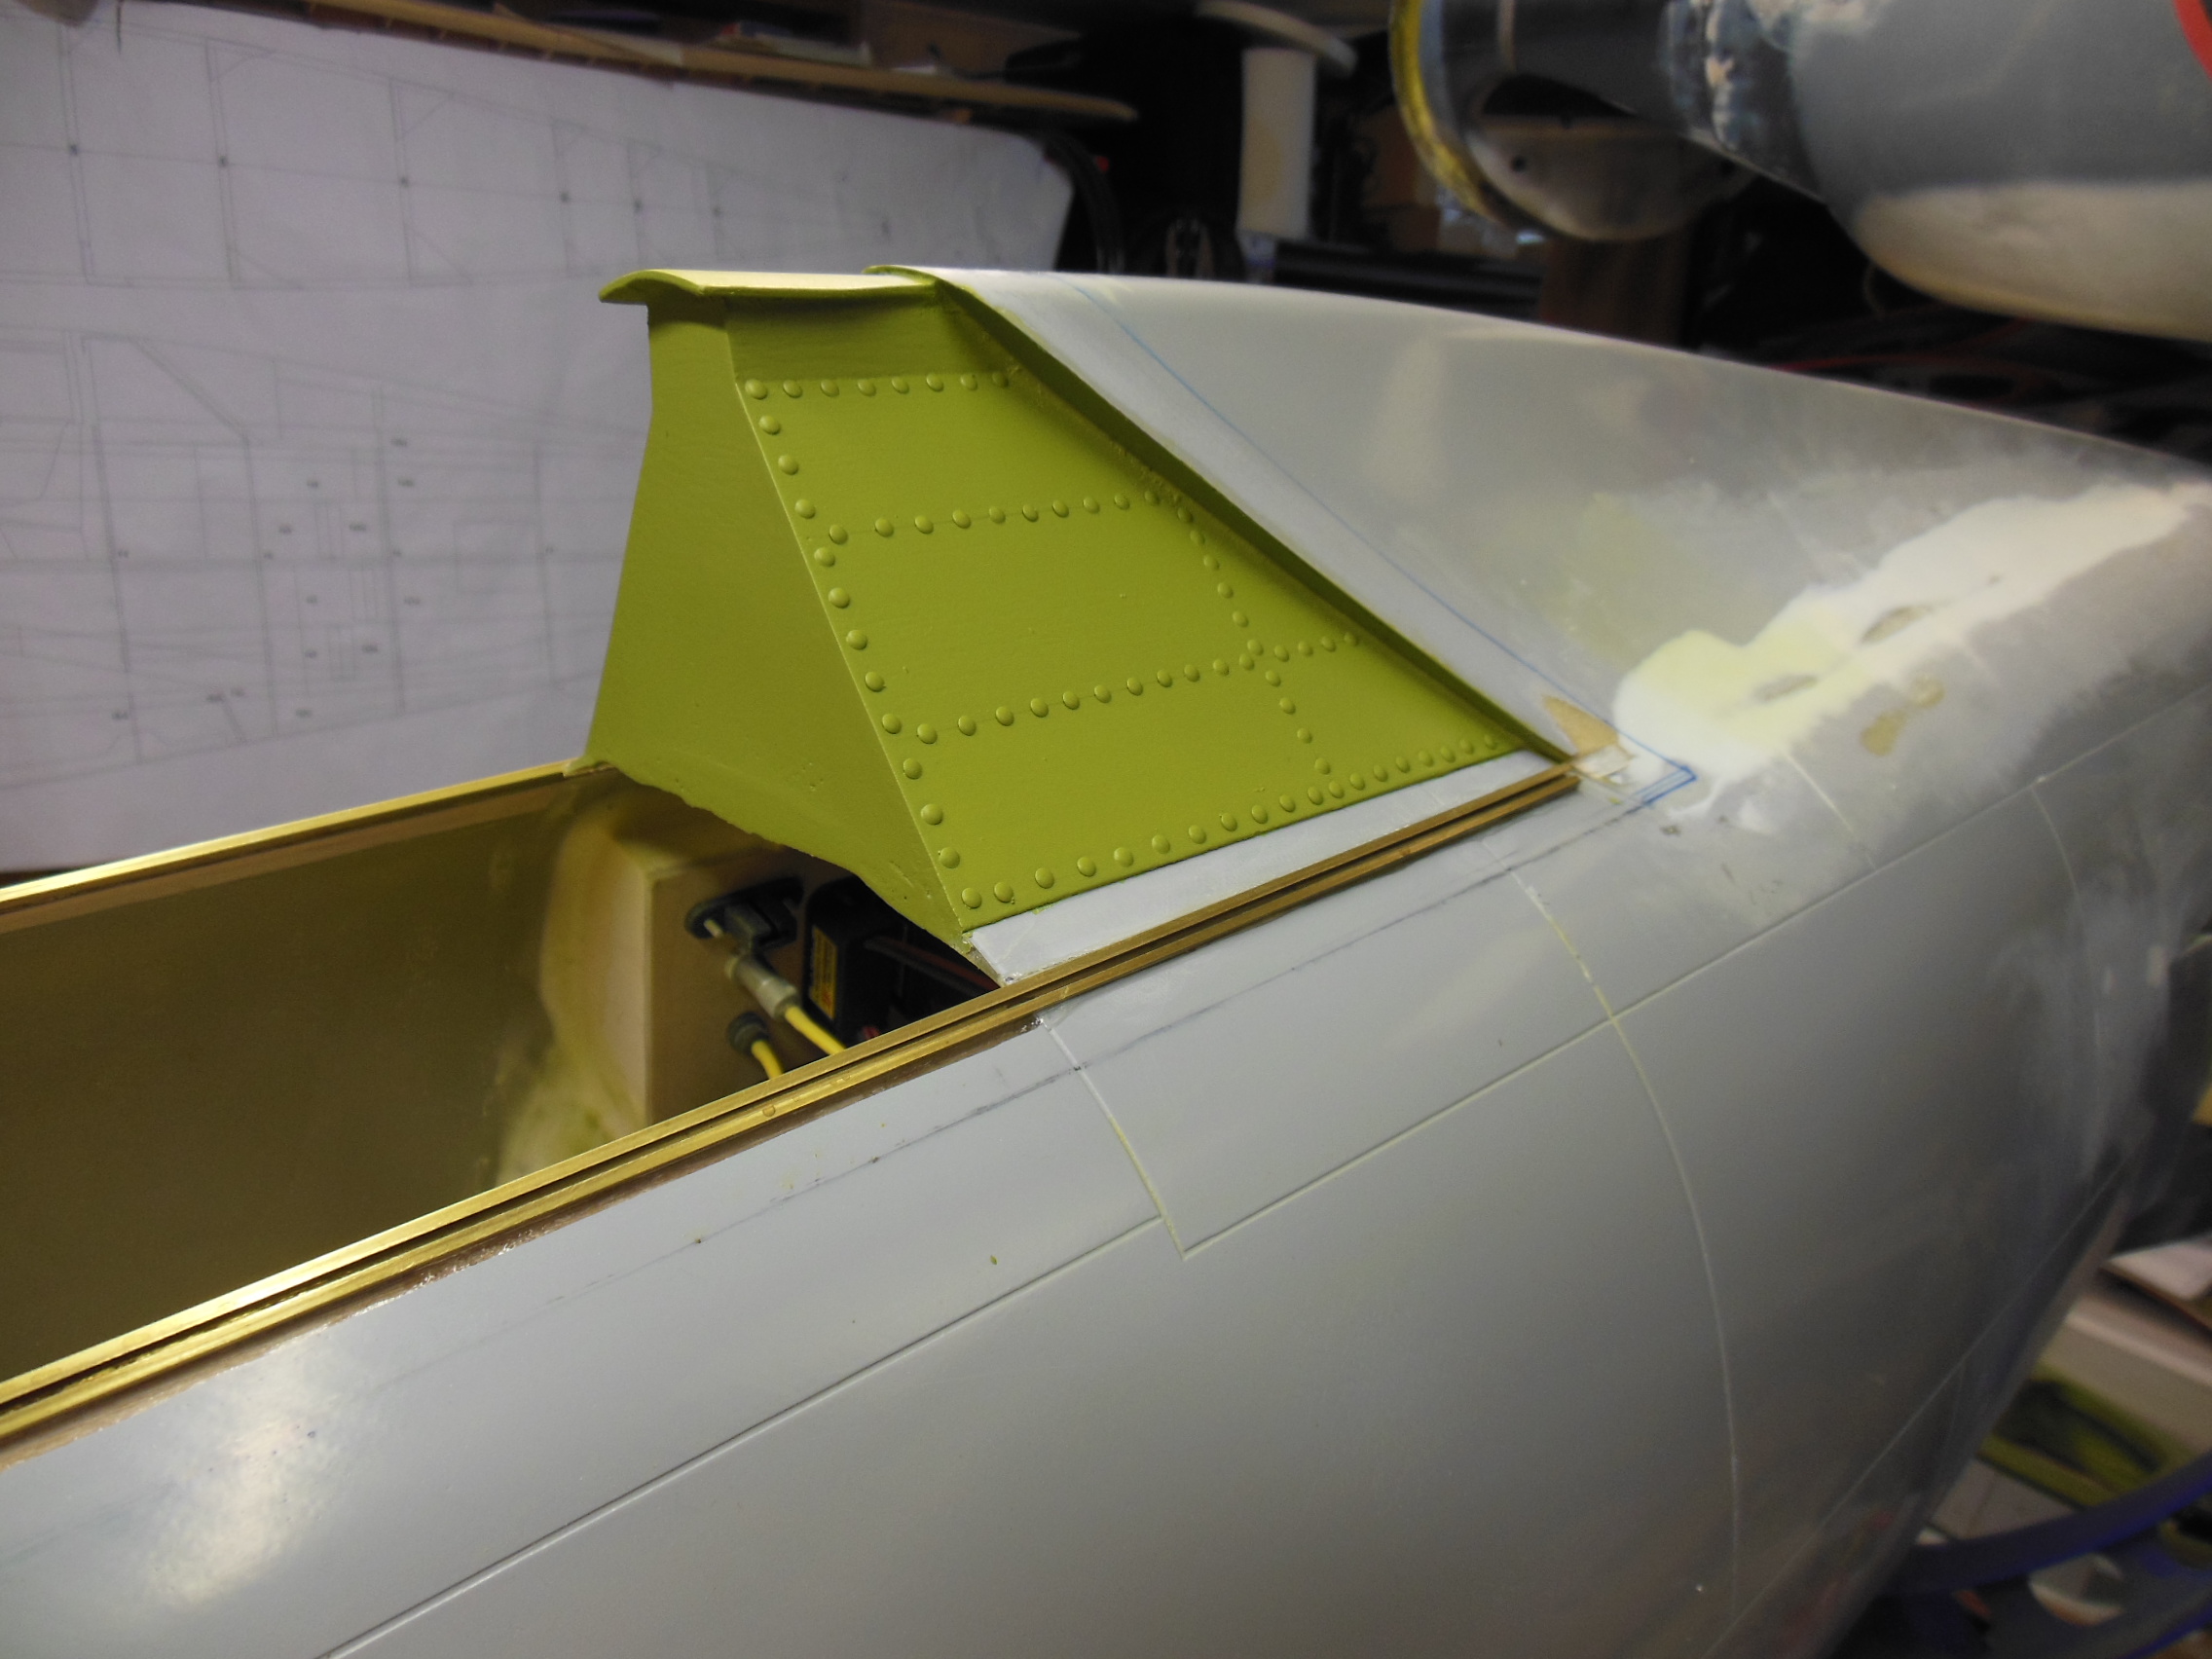
A close up of my canopy "cradle". When everything is painted, your cockpit is done, and the front section is permanently installed, it is an easy thing to glue the slider to these cradles with RC 56, adjusting it for a perfect fit. You have a lot of play to get it right, and the glue is nowhere near the rails.

Attached Thumbnails Click image for larger version

Name:	DSCN2275.JPG
Views:	447
Size:	855.8 KB
ID:	2080954   Click image for larger version

Name:	DSCN2277.JPG
Views:	434
Size:	868.7 KB
ID:	2080955   Click image for larger version

Name:	DSCN2276.JPG
Views:	436
Size:	850.7 KB
ID:	2080957  

Last edited by ram3500-RCU; 03-12-2015 at 01:37 PM.
Old 03-12-2015, 02:06 PM
  #1985  
TonyBuilder
My Feedback: (11)
 
TonyBuilder's Avatar
 
Join Date: Mar 2010
Location: Austin , TX
Posts: 4,166
Likes: 0
Received 1 Like on 1 Post
Default

What are you using for the canopy side rail?

TB
Old 03-12-2015, 02:27 PM
  #1986  
ram3500-RCU
Thread Starter
My Feedback: (221)
 
ram3500-RCU's Avatar
 
Join Date: Aug 2002
Location: n. canton, OH
Posts: 9,737
Received 12 Likes on 6 Posts
Default

I buy 6" flashing by the roll for the Corsair wing intakes we make. I use scrap pieces for things like this.
Old 03-12-2015, 02:43 PM
  #1987  
Greg Wright
My Feedback: (6)
 
Greg Wright's Avatar
 
Join Date: Sep 2008
Location: Illinois
Posts: 2,243
Likes: 0
Received 8 Likes on 6 Posts
Default

What are you using to guide the metal flashing down the length of the brass channel.
Old 03-12-2015, 03:06 PM
  #1988  
ram3500-RCU
Thread Starter
My Feedback: (221)
 
ram3500-RCU's Avatar
 
Join Date: Aug 2002
Location: n. canton, OH
Posts: 9,737
Received 12 Likes on 6 Posts
Default

Originally Posted by Greg Wright
What are you using to guide the metal flashing down the length of the brass channel.
Plastic I beam.
Old 03-12-2015, 05:10 PM
  #1989  
ram3500-RCU
Thread Starter
My Feedback: (221)
 
ram3500-RCU's Avatar
 
Join Date: Aug 2002
Location: n. canton, OH
Posts: 9,737
Received 12 Likes on 6 Posts
Default

Here is a picture of the other side of the cradle, or some might say carriage, and the I beam. This, along with the slotted brass rail, is what you get when you order the slider kit from Meister. You can also find this plastic I beam material at hobby stores and craft stores in the styrene shapes selection. It is used by model train enthusiasts to build bridges and such, for example.

Attached Thumbnails Click image for larger version

Name:	DSCN2271.JPG
Views:	463
Size:	881.1 KB
ID:	2081014   Click image for larger version

Name:	DSCN2258.JPG
Views:	457
Size:	894.0 KB
ID:	2081015   Click image for larger version

Name:	DSCN2268.JPG
Views:	484
Size:	881.8 KB
ID:	2081016  
Old 03-12-2015, 05:16 PM
  #1990  
ram3500-RCU
Thread Starter
My Feedback: (221)
 
ram3500-RCU's Avatar
 
Join Date: Aug 2002
Location: n. canton, OH
Posts: 9,737
Received 12 Likes on 6 Posts
Default

I mount the rail, slide this I Beam into place, add a small bead of medium CA to the to the styrene beam, then install the aluminum cradle holding it on the outline of the canopy made on the fuselage. Very simple. Then I slide it back off (because of the notch made in the turtledeck earlier) and back up the joint with a bead of Loctite Professional Liquid (found at Lowe's and other places, and one of the strongest CA type glues I know of) on either side of the beam. You'll destroy everything before your canopy comes loose. I don't use the Loctite product for the initial install of the beam to the aluminum because it sets up too fast.

Now, when you slide your canopy open, it is supported by the beam and the aluminum it is glued to, instead of just the molded canopy hanging out there.

Also, when it is time to glue the canopy in place, using RC 56 and this broad strip of aluminum gives you the time and space to work with so you can get it perfectly aligned with the wind screen.

Attached Thumbnails Click image for larger version

Name:	DSCN2259.JPG
Views:	414
Size:	854.4 KB
ID:	2081017  

Last edited by ram3500-RCU; 03-12-2015 at 06:45 PM.
Old 03-12-2015, 06:44 PM
  #1991  
TonyBuilder
My Feedback: (11)
 
TonyBuilder's Avatar
 
Join Date: Mar 2010
Location: Austin , TX
Posts: 4,166
Likes: 0
Received 1 Like on 1 Post
Default

Sweet, sure is easyer as the sides are strait unlike the curved bubble canopy.

TB
Old 03-12-2015, 07:08 PM
  #1992  
ram3500-RCU
Thread Starter
My Feedback: (221)
 
ram3500-RCU's Avatar
 
Join Date: Aug 2002
Location: n. canton, OH
Posts: 9,737
Received 12 Likes on 6 Posts
Default

Originally Posted by TonyBuilder
Sweet, sure is easier as the sides are strait unlike the curved bubble canopy.

TB
Yes, for sure. I'd like to see your install on the bubble when you get to it.
Old 03-12-2015, 07:30 PM
  #1993  
TonyBuilder
My Feedback: (11)
 
TonyBuilder's Avatar
 
Join Date: Mar 2010
Location: Austin , TX
Posts: 4,166
Likes: 0
Received 1 Like on 1 Post
Default

Originally Posted by ram3500-RCU
Yes, for sure. I'd like to see your install on the bubble when you get to it.
this is how I will be doing it, same as my TFGS P-47

this system has really worked well and will even be better with the larger Meister.


TB
Attached Thumbnails Click image for larger version

Name:	image.jpg
Views:	461
Size:	253.1 KB
ID:	2081062   Click image for larger version

Name:	image.jpg
Views:	441
Size:	214.1 KB
ID:	2081063   Click image for larger version

Name:	image.jpg
Views:	460
Size:	242.9 KB
ID:	2081064   Click image for larger version

Name:	image.jpg
Views:	462
Size:	221.9 KB
ID:	2081065   Click image for larger version

Name:	image.jpg
Views:	451
Size:	411.1 KB
ID:	2081068   Click image for larger version

Name:	image.jpg
Views:	423
Size:	193.7 KB
ID:	2081069   Click image for larger version

Name:	image.jpg
Views:	424
Size:	241.2 KB
ID:	2081070   Click image for larger version

Name:	image.jpg
Views:	428
Size:	240.5 KB
ID:	2081071  

Click image for larger version

Name:	image.jpg
Views:	451
Size:	213.5 KB
ID:	2081073  
Old 03-12-2015, 08:00 PM
  #1994  
ram3500-RCU
Thread Starter
My Feedback: (221)
 
ram3500-RCU's Avatar
 
Join Date: Aug 2002
Location: n. canton, OH
Posts: 9,737
Received 12 Likes on 6 Posts
Default

Any pictures of the side rails without the canopy, and the inside of the canopy? Of the side components before installation? Looks very nice. This subject may help a lot of guys. Hope so.

Last edited by ram3500-RCU; 03-12-2015 at 08:05 PM.
Old 03-13-2015, 02:49 AM
  #1995  
TonyBuilder
My Feedback: (11)
 
TonyBuilder's Avatar
 
Join Date: Mar 2010
Location: Austin , TX
Posts: 4,166
Likes: 0
Received 1 Like on 1 Post
Default

Rails are brass squar tube, squar solid slide inside, canopy frame is carbon fiber overlay. Rail fram is carbon fiber sub skin. Rear slides is brass tubes side by side soldered together.


This will act as the prototype to the canopy I will do for the Meister with a few modifications and improvements. But the method and system will be the same, a little more detail and maybe a new side rail system. The liner servo worked/ works really well and instalation is easy.

TB
Attached Thumbnails Click image for larger version

Name:	image.jpg
Views:	408
Size:	210.9 KB
ID:	2081096   Click image for larger version

Name:	image.jpg
Views:	404
Size:	246.9 KB
ID:	2081097   Click image for larger version

Name:	image.jpg
Views:	403
Size:	323.9 KB
ID:	2081098   Click image for larger version

Name:	image.jpg
Views:	418
Size:	379.1 KB
ID:	2081099   Click image for larger version

Name:	image.jpg
Views:	426
Size:	304.0 KB
ID:	2081100   Click image for larger version

Name:	image.jpg
Views:	416
Size:	296.6 KB
ID:	2081101   Click image for larger version

Name:	image.jpg
Views:	399
Size:	299.0 KB
ID:	2081102   Click image for larger version

Name:	image.jpg
Views:	409
Size:	247.7 KB
ID:	2081103  

Click image for larger version

Name:	image.jpg
Views:	400
Size:	258.6 KB
ID:	2081104   Click image for larger version

Name:	image.jpg
Views:	395
Size:	306.4 KB
ID:	2081105   Click image for larger version

Name:	image.jpg
Views:	390
Size:	241.4 KB
ID:	2081106   Click image for larger version

Name:	image.jpg
Views:	385
Size:	267.2 KB
ID:	2081107   Click image for larger version

Name:	image.jpg
Views:	389
Size:	208.3 KB
ID:	2081108   Click image for larger version

Name:	image.jpg
Views:	442
Size:	560.8 KB
ID:	2081109   Click image for larger version

Name:	image.jpg
Views:	391
Size:	398.5 KB
ID:	2081110  

Last edited by TonyBuilder; 03-13-2015 at 02:55 AM.
Old 03-13-2015, 07:58 AM
  #1996  
ram3500-RCU
Thread Starter
My Feedback: (221)
 
ram3500-RCU's Avatar
 
Join Date: Aug 2002
Location: n. canton, OH
Posts: 9,737
Received 12 Likes on 6 Posts
Default

Good stuff Tony. Thank you for taking taking time to post. I personally am repulsed by the bubble JUG, but you do a masterful mechanical and esthetic job of it.

Last edited by ram3500-RCU; 03-13-2015 at 08:00 AM.
Old 03-13-2015, 08:07 AM
  #1997  
ram3500-RCU
Thread Starter
My Feedback: (221)
 
ram3500-RCU's Avatar
 
Join Date: Aug 2002
Location: n. canton, OH
Posts: 9,737
Received 12 Likes on 6 Posts
Default

With the canopy done, I have moved back inside. Finishing up all the connections and organizing the main harness and sub harnesses to the wings. I leave the tank out till all this is done. Then I'll bolt the cowl flap unit on,rehang the engine, make those connections, and then install the tank.

Punch list is getting smaller.

Attached Thumbnails Click image for larger version

Name:	DSCN2281.JPG
Views:	444
Size:	885.3 KB
ID:	2081138  

Last edited by ram3500-RCU; 03-13-2015 at 08:12 AM.
Old 03-13-2015, 02:05 PM
  #1998  
TonyBuilder
My Feedback: (11)
 
TonyBuilder's Avatar
 
Join Date: Mar 2010
Location: Austin , TX
Posts: 4,166
Likes: 0
Received 1 Like on 1 Post
Default

Looks like covering is next! What do you use to branish the aluminum tape with? I will be trying it for the first time and have no qlue.

TB
Old 03-13-2015, 02:05 PM
  #1999  
TonyBuilder
My Feedback: (11)
 
TonyBuilder's Avatar
 
Join Date: Mar 2010
Location: Austin , TX
Posts: 4,166
Likes: 0
Received 1 Like on 1 Post
Default

Rcu dp

Last edited by TonyBuilder; 03-13-2015 at 04:27 PM.
Old 03-13-2015, 05:22 PM
  #2000  
ram3500-RCU
Thread Starter
My Feedback: (221)
 
ram3500-RCU's Avatar
 
Join Date: Aug 2002
Location: n. canton, OH
Posts: 9,737
Received 12 Likes on 6 Posts
Default

Originally Posted by TonyBuilder
Looks like covering is next! What do you use to branish the aluminum tape with? I will be trying it for the first time and have no qlue.

TB
This one is being finished by the owner. He will do his cockpit, paint and other surface details. We are working on a couple CARF Corsairs that we are doing aluminum on and painting. In fact, I am posting some pictures this evening of some of the aluminum work on the wings, in that thread tonight.

To answer your question though, the primary tool is a # 8 blending stick found at art supply stores, basically a paper stick. On larger panels, spray Windex on them before applying the foil. It goes much esiesr

Last edited by ram3500-RCU; 03-13-2015 at 05:26 PM.


Contact Us - Archive - Advertising - Cookie Policy - Privacy Statement - Terms of Service -

Copyright © 2024 MH Sub I, LLC dba Internet Brands. All rights reserved. Use of this site indicates your consent to the Terms of Use.