


1/10th scale Hydro Build


 11-04-2020 | 10:53 AM
#28

Joined: May 2018
Posts: 2
Likes: 0
Received 0 Likes
on
0 Posts
From: wilmington NC
Hi enjoyed reading your questions and answer, since Mr hydro junkie, seem to know alot about these types of boats... i have a question. I'm building a dumas Miss unlimited. must be one of there last ones, cause it is on there clearance section. Ok so i have build a dumas 1930 three section runabout. took a long time.. retired now so things happen a lot quicker.. I'm going to use it just in the local ponds,, there not to big. sna i know brush motors. and have nicad batteries so i';m sticking with them... wondering what size motor to put in it. do not want to race it.. just to go fast enough, up on plane. and a little speed...
would a 700 or 800 size motor work..????? and they come in a slow RPM (6000) and a faster RPM.. (12000) at 10-20 volts
I'm going to rum them at the 7.4 volts
does that sound right a fast 800 size motor..?? or is that to much;????
and should i fiberglass the front of the boat... the sponson look not to strong... I'm not to good with fiberglass..
thank you and keep up the writing, it helps novices on how to do things.i have learn a lot by reading these blogs... or what every you call them..
sc
11-04-2020 | 01:03 PM
#29
This is from the E-R/C Unlimiteds rule book:
▪The only power source shall be up to 12 sub‐c battery cells of NiCd or NiMH chemistry, or up to 4S configured Lithium Polymer (LiPo) battery(s). The total capacity of batteries in the allowed chemistries and configurations shall not exceed a total capacity rating of 6,000 mAH and a total fully charged voltage of 16.8 voltsDC. • Only LiPo batteries with a manufacturer’s maximum discharge rate of 20C or greater shall be allowed for manufacturer’s rated capacities less than 4,000 mAH and a manufacturer’s maximum discharge rate of 15C or greater shall be allowed for manufacturer’s rated capacities of 4,000 mAH andup. ▪Power shall be provided by a single motor limited to one of the following currently approved motors.
NAMBA‐approved motors
Bearings may be replaced at any time.
I'm not an electric drive expert but the above should work since they are used for racing 1/10 scale boats which are slighty smaller. Since you've said you're not going to be racing, that shouldn't be a problem. One thing that would be a problem is using a 6000RPM motor. Hydroplanes need a high speed motor as the prop is what lifts the rear of the boat. Lift is provided by a combination of the prop blades entering the water and the drag from the blade shape. The "roostertail" you see behind the boat is from the prop blades leaving the water since, when the boat is on plane, only the bottom half of the prop is in the water.
Just out of curiosity, Colman11040, did you see the picture of my boat back in Post 5? That thing is a giant compared to the Miss Unlimited and requires over twice the power to get it to run properly. Add to that the fact I've been building and racing these things since 1982 AND have worked on some of the full sized boats, I'd say I know a thing or two about them
▪The only power source shall be up to 12 sub‐c battery cells of NiCd or NiMH chemistry, or up to 4S configured Lithium Polymer (LiPo) battery(s). The total capacity of batteries in the allowed chemistries and configurations shall not exceed a total capacity rating of 6,000 mAH and a total fully charged voltage of 16.8 voltsDC. • Only LiPo batteries with a manufacturer’s maximum discharge rate of 20C or greater shall be allowed for manufacturer’s rated capacities less than 4,000 mAH and a manufacturer’s maximum discharge rate of 15C or greater shall be allowed for manufacturer’s rated capacities of 4,000 mAH andup. ▪Power shall be provided by a single motor limited to one of the following currently approved motors.
NAMBA‐approved motors
- AquaCraft AQUG7000 L36/56 7.2‐18V – 6 pole brushless
- Himax HB3630 1500 brushless – 6 pole brushless
- ProBoat PRB3310 A3630‐1500 – 6 pole brushless
- DYNM3835 A3630‐1500kv, 6‐pole, Water Cooled, Marine Motor
Bearings may be replaced at any time.
I'm not an electric drive expert but the above should work since they are used for racing 1/10 scale boats which are slighty smaller. Since you've said you're not going to be racing, that shouldn't be a problem. One thing that would be a problem is using a 6000RPM motor. Hydroplanes need a high speed motor as the prop is what lifts the rear of the boat. Lift is provided by a combination of the prop blades entering the water and the drag from the blade shape. The "roostertail" you see behind the boat is from the prop blades leaving the water since, when the boat is on plane, only the bottom half of the prop is in the water.
Just out of curiosity, Colman11040, did you see the picture of my boat back in Post 5? That thing is a giant compared to the Miss Unlimited and requires over twice the power to get it to run properly. Add to that the fact I've been building and racing these things since 1982 AND have worked on some of the full sized boats, I'd say I know a thing or two about them
Last edited by Hydro Junkie; 11-04-2020 at 01:14 PM.
11-05-2020 | 12:31 AM
#30
Work has been out of control so I haven't had much to update.
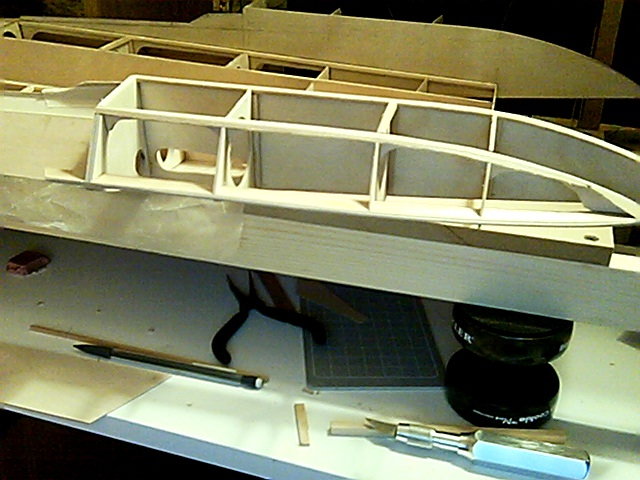
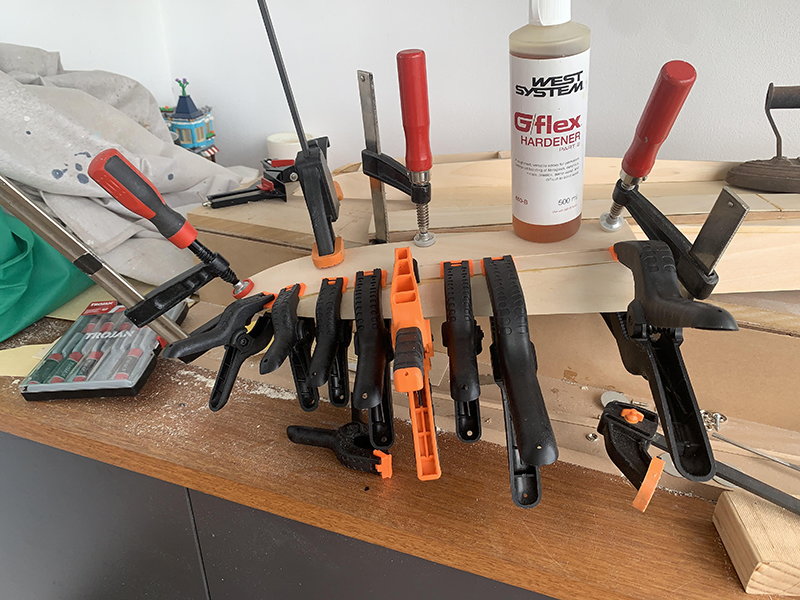
I've been setting up a jig so that I can use the router to create some tri hardwood (see image) for the supports. Turning out OK, but the router doesn't like hardwood.
I've also bought some carbon tube so I can use it to square up the front (and it's true to life). This should help me get it all square so I can figure out how the front end works with the deck etc.
11-05-2020 | 02:34 AM
#31
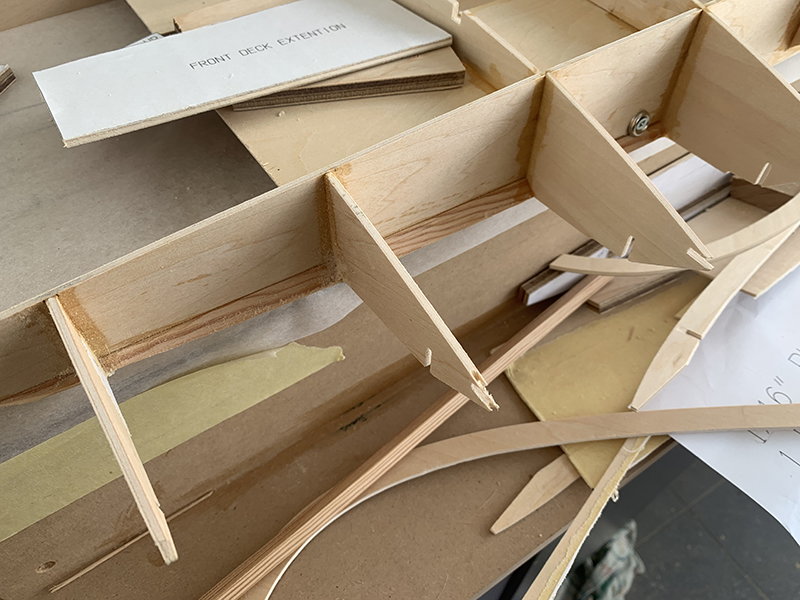
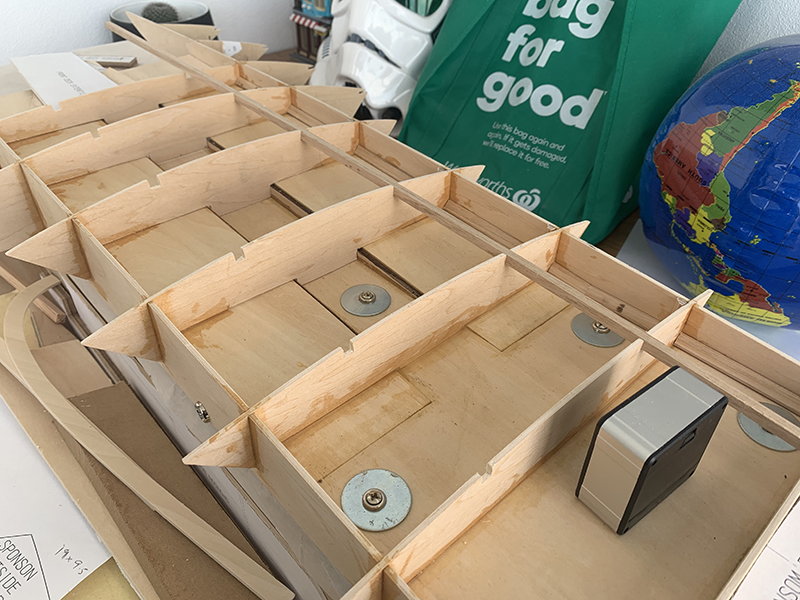
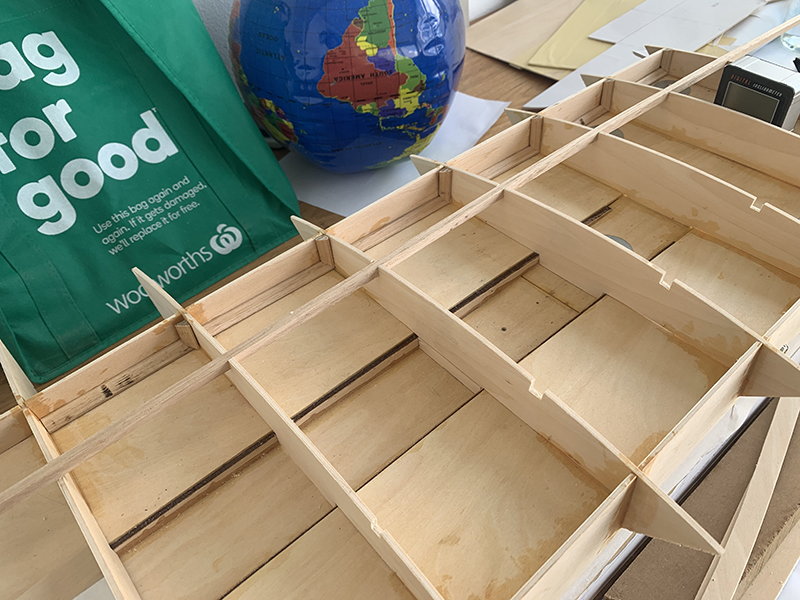
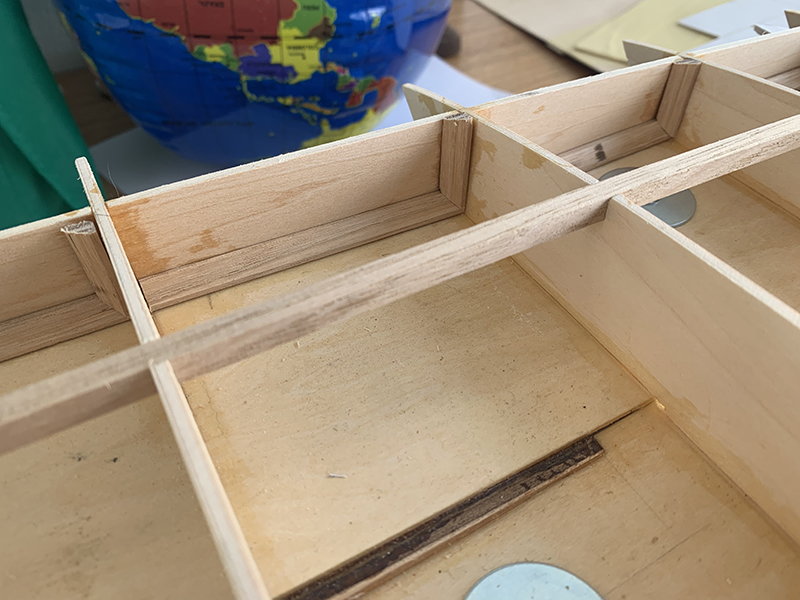
These pictures might help a bit:
Click image for larger version
Name: Zx69890.jpg
Views: 205
Size: 89.7 KB
ID: 1647896Click image for larger version
Name: Tk76707.jpg
Views: 154
Size: 95.5 KB
ID: 1647810Click image for larger version
Name: Oz31434.jpg
Views: 155
Size: 92.4 KB
ID: 1647809Click image for larger version
Name: Pn35261.jpg
Views: 199
Size: 107.3 KB
ID: 1647750
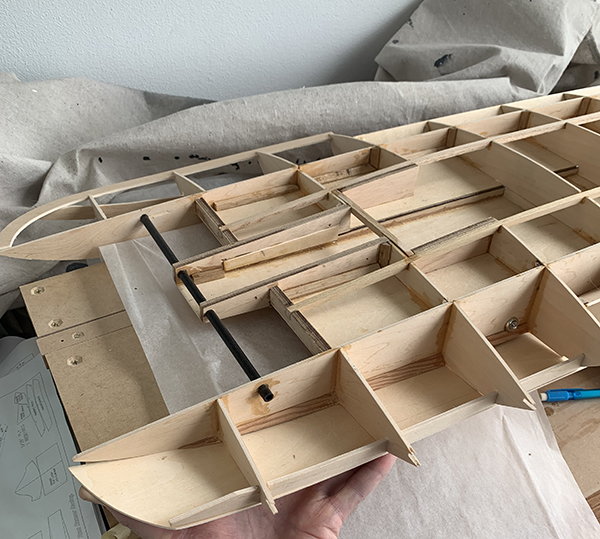
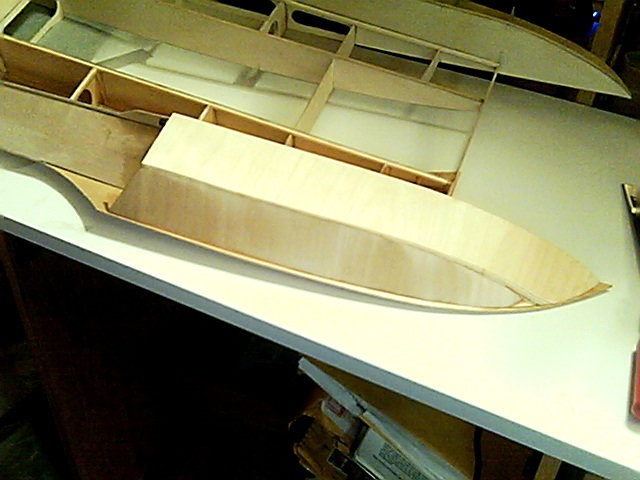
You can see the cross framing in between the sponsons at the front of the boat that the deck and bottom are glued to. You can also see, in many of the pictures, how I used 3mm glue blocks to re-enforce gluing locations. I don't know what your plans show but another option would be to rough shape a bulnose(nose block) and glue it to the hull in the appropriate location, gluing the bottom, decking and side panels to it
Click image for larger version
Name: Zx69890.jpg
Views: 205
Size: 89.7 KB
ID: 1647896Click image for larger version
Name: Tk76707.jpg
Views: 154
Size: 95.5 KB
ID: 1647810Click image for larger version
Name: Oz31434.jpg
Views: 155
Size: 92.4 KB
ID: 1647809Click image for larger version
Name: Pn35261.jpg
Views: 199
Size: 107.3 KB
ID: 1647750
You can see the cross framing in between the sponsons at the front of the boat that the deck and bottom are glued to. You can also see, in many of the pictures, how I used 3mm glue blocks to re-enforce gluing locations. I don't know what your plans show but another option would be to rough shape a bulnose(nose block) and glue it to the hull in the appropriate location, gluing the bottom, decking and side panels to it
11-05-2020 | 02:48 AM
#32
Just found the plans on line. The plans have you shaping the bow blocks(bulnoses) and gluing them to the framing and then to the bottom and decking. I would make them out of spruce or fir as they are a softer wood that will allow them to be shaped easier. One thing I would do is cut a lip into the blocks that will give you a place to glue the deck and bottom to that will leave the deck and bottom flush with the blocks
11-05-2020 | 04:00 AM
#33
Nice, thanks HJ. Thanks for the pics.
The carbon tube idea comes from the actual boat which has silver supports. I think I'd like to do those, I like that look, and it would also provide support/square it all up.

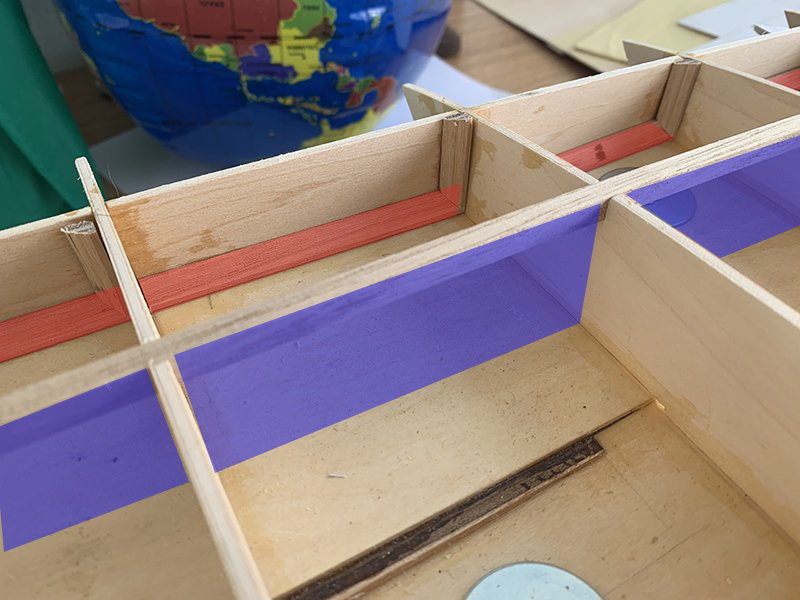
I was thinking of using the 6mm triangular timber where I've shown in red and then just a 3mm square in the blue sections. Thoughts?

The carbon tube idea comes from the actual boat which has silver supports. I think I'd like to do those, I like that look, and it would also provide support/square it all up.
I was thinking of using the 6mm triangular timber where I've shown in red and then just a 3mm square in the blue sections. Thoughts?
11-05-2020 | 04:45 AM
#34
How thick are the cross frames? In my boat, many of the cross frames were only .80mm thick so I used the 3mm blocks to give more gluing surface. The lengthwise frames and some cross frames were 1.5mm so I added the 3mm blocks in high stress areas so not all got the blocks. Anything over 1.5mm only got blocks where there was a butt splice, regardless as to whether it was a skin panel or a frame butting up to another frame at a 90 degree angle. On your boat, I'd use the 6mm blocks
- at the joint between the sponson insides and boat bottom
- at the joint on the outside of the sponson insides and the sponson transoms
- in the joints where the lengthwise frames are glued to the transom at the rear of the boat. These would be in the under deck area.
- at the vertical joints between the lengthwise and cross frames not already called out, ESPECIALLY THE FRONT TWO IN THE SPONSONS
- at all glue joints between the sponson skins and the cross frames
- at the top of the nontrips, between the sponson transoms and rear transom. This is to give the deck more surface area to be glued down to as the other choice would be to glue the deck edge to nothing more than the top of the non trips which, if they are mounted at a true 45 degree angle, is less than 2.4mm.
11-05-2020 | 04:20 PM
#38
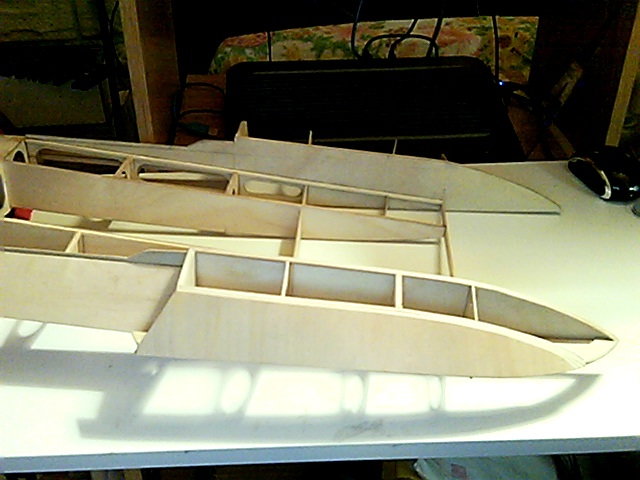
This is what I've come up with. It's just sitting there so it look poorly fi, but it'll be neat once it's glued up.
I don't have anything on the back side but figured that would be overkill. Do you think I need some vertcal supports inside the sponsons or just on the sponson bottom once that's glued in?
I don't have anything on the back side but figured that would be overkill. Do you think I need some vertcal supports inside the sponsons or just on the sponson bottom once that's glued in?
11-05-2020 | 07:46 PM
#39
Okay, on the last picture, where you put the vertical blocks is where I would have used 3mm but, with that said, since you're using 3mm framing, I would only have used glue blocks on the front two sponson cross frames since they are butt joints and not interlocking.
11-05-2020 | 07:49 PM
#40
OK, I see what you mean. Do you think that horizontal band is worth it since the floor is essentially just butted up against the transom, or does all the panelling going on too strengthen it sufficiently?
11-06-2020 | 12:50 AM
#41
Actually, per the plan instructions, the transom is on top of the bottom so, if you're butting the bottom up against the front of the transom, you 're going to have the transom fail.
11-06-2020 | 04:00 AM
#43
Not a problem. I know how confusing the various terms can be, been there myself. It also doesn't help when the guys in the sport use two different names for the same parts. One example of this is using the terms bulnose and ramwing. They are talking about the same part of the boat, the leading edge of the center area's wing shaped hull on the "picklefork style hulls. The sad part is they will interchange the words without thinking about it but, for rookies, it's totally confusing
11-06-2020 | 02:46 PM
#44
Do you think I should keep the angle that I've highlighted in red here? The thing I notice about this design VS others, is that there's no second stringer on the inside (where I've marked blue), so I'm not sure how strong it will all be, especially around the front.
11-06-2020 | 04:23 PM
#45
The boat is designed for electric power so it's not built as strong as a nitro boat would be.
The area you have in blue would be an internal bulkhead that would divide the engine bay from the rest of the hull, not a stringer. The boat does have a stringer that runs across the top that's only there so the deck has something to be glued to.
As for the red glue blocks, I would leave them since they are all that is supporting the edge of the bottom. If you remove them, the seam would have no support and would probably break after a few runs. As for the vertical ones, I would have gone with 3mm blocks instead of 6mm since the interlocking of the parts probably is strong enough to hold already.
12-19-2020 | 03:09 PM
#46
Sorry for the lack of posts, I've barely had time to work on it lately with real work getting in the way, let alone post about it too.
I've hit a bit of a hard spot. I have to skin the bottom and sides of the sponsons. Trying to figure out how the seams will work, which section overlaps which etc.
Should I be leaving them long and sand back once they're installed, or should I be fitting it all and making sure it all fits before I glue? That's a bit hard with the deck part.
12-19-2020 | 08:38 PM
#47
Cut the skins a bit oversized as it's almost impossible to get a fitted part to line up with the frames. Also, install the sponson sides first. This will give you more surface area to glue the bottom surface to. You have to remember that the bottom surfaces are going to take a pounding when running at speed. They do, therefore, need to be well secured and supported. You will probably notice that I added a glue block along the outside of the sponson frame where the side and bottom come together. This was then sanded to get the correct angle, followed by removing some of the extra material of the bottom frame to cut down on the weight.
Last edited by Hydro Junkie; 12-19-2020 at 09:06 PM.
12-20-2020 | 04:02 AM
#49
Just one thing to be aware of. If you look at the top picture closely, you can see I used a piece of larger stick stock at the front of the frame where the side and bottom come together. This is to make sure the side panel is securely attached. That would otherwise be the weakest point of the sponson. Instead, it's actually one of the strongest
01-04-2021 | 06:24 PM
#50
Skinning the side pods is definitely a learning experience but I'm getting there (and enjoying it).
I'm starting to consider how I paint it (even though that's a long way off, as I'd like to get some practice). I was originally intentioning to use 2 pack (I have a compressor and a gun) but after doing a lot of reading I'm concerned about the safety of the product. I've only got a small space and I'd be worried about it getting to the neighbours etc.
So I think I'll have to use enamel. Does anyone have experience with it, and boats?

