


Vanessa c.g. Rig: How to.
 06-12-2013 | 04:08 PM
#176

My Feedback: (10)
What I did was small bubble level on the stab, level it and remove the level and see how much it changed, sometimes I had to crank another mini turn to compensate. I also used the TLAR method with my mark 1 mod 0 eyeball and "leveled" it that way.<div>
</div><div>Whit</div>
</div><div>Whit</div>
 06-12-2013 | 07:20 PM
#177

My Feedback: (15)
Joined: Sep 2008
Posts: 32
Likes: 0
Received 0 Likes
on
0 Posts
From: kimberley,
BC, CANADA
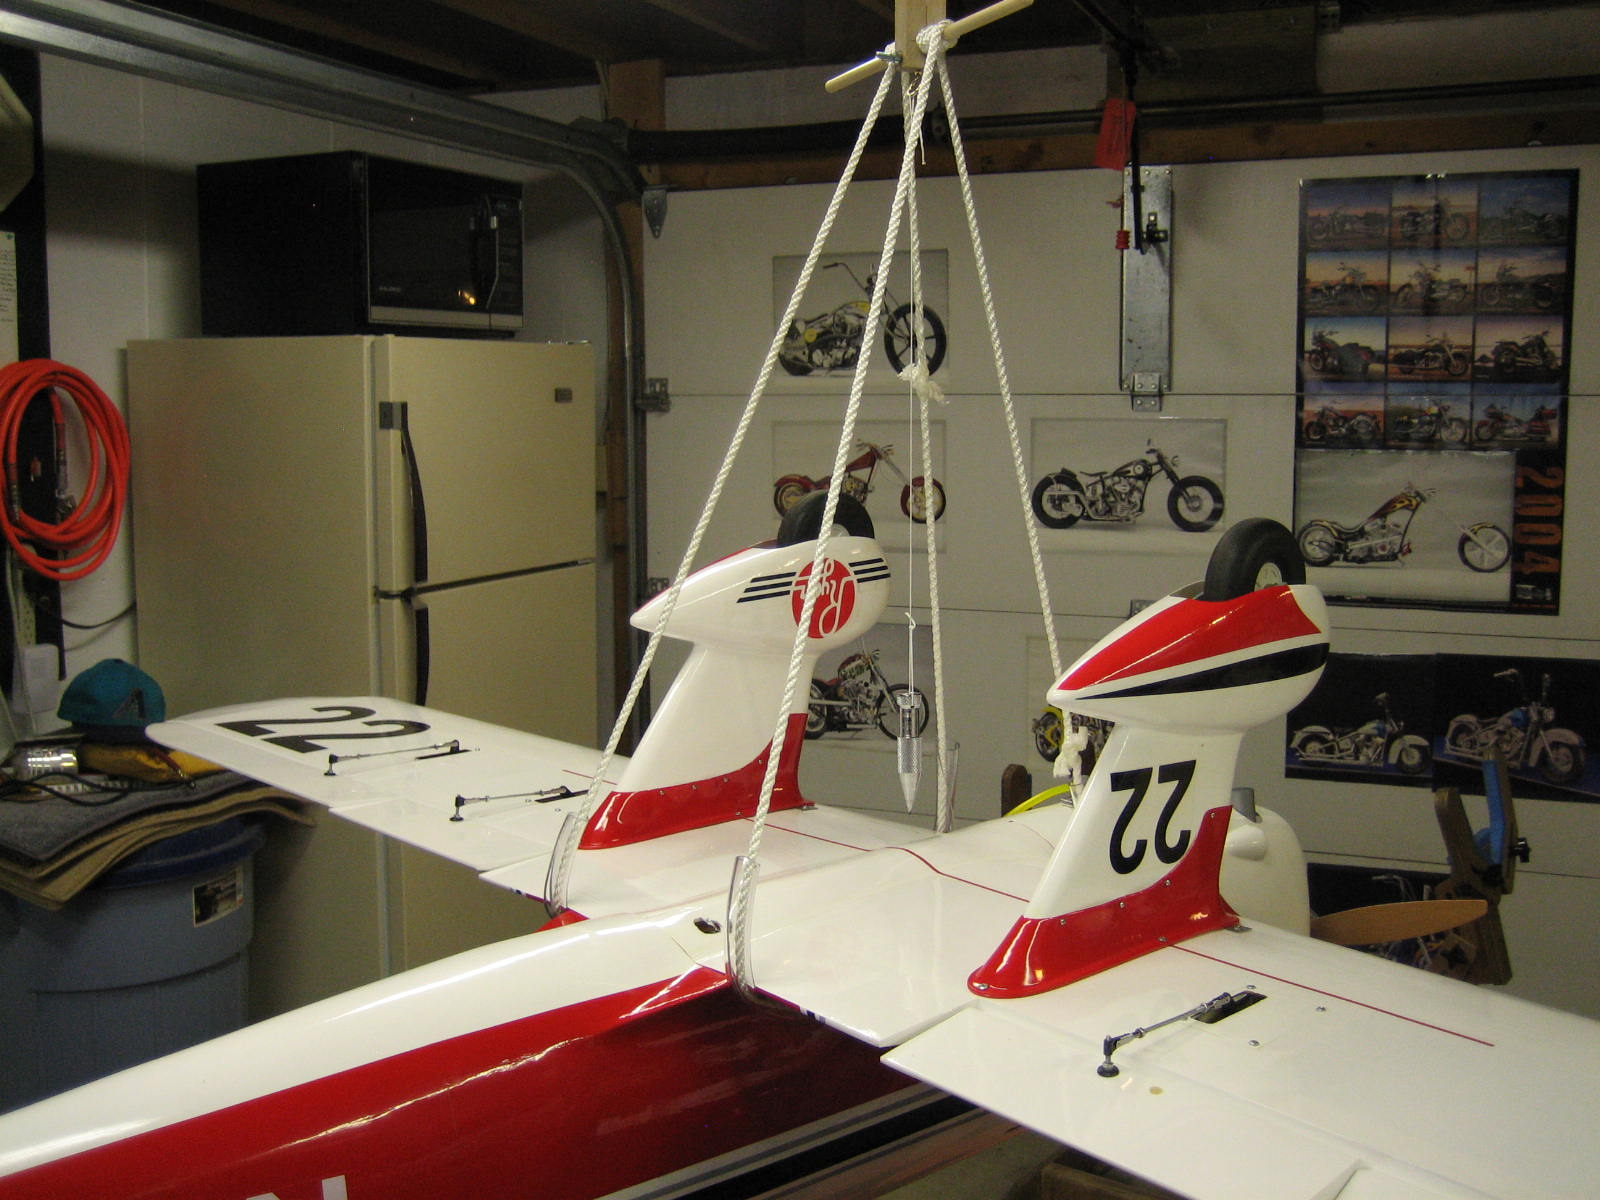
I took the Vanessa Rig one step further and have it hanging from a digital fish scale for my new builds....one stop weight and balance!</p>
just zero it with the rig hanging off of it and you're off to the races.</p>

 Smart thinking
06-13-2013 | 07:41 AM
Smart thinking
06-13-2013 | 07:41 AM
#179
It came from my old CG machine weighs 1-2 grams not going to effect anything that drasticlly but if it were any heavier then it might be an issue. Like I said you are looking to get it in the ball park +/- 1/4" will still allow you to flywithout crashing. Check your local HWstore for a plastic line level and remove the tube with the bubble and then CA it to a thin piece of plastic or ply.
ORIGINAL: LesUyeda
" placing a small bubble level on the horizontal stab"
Watch out for the extra weight on the horizontal stab; that is a long ways from cg; i.e. a long lever arm.
Les
" placing a small bubble level on the horizontal stab"
Watch out for the extra weight on the horizontal stab; that is a long ways from cg; i.e. a long lever arm.
Les
06-14-2013 | 11:30 AM
#180

"placing a small bubble level on the horizontal stab"
Watch out for the extra weight on the horizontal stab; that is a long ways from cg; i.e. a long lever arm. "
That was the method I was going to use but than I placed the level on the top horiz stab and realized it had a curve to it which now is almost impossible to use. Looking at the bottom of the horiz stab it is flat so it appears I might try the upside down method as this might work better.
I know it seems like I am over thinking this but really just toying around with a new tool as I think its the funnest part of the hobby.
I am thinking of trying a laser level which than I can setup like I have it however than I can shoot a level to the very edge of the horiz stab which I think would work really well. Only issue would be keeping the plane from moving around.
Regards,
Dennis
07-07-2013 | 08:42 AM
#181
Joined: Jul 2013
Posts: 8
Likes: 0
Received 0 Likes
on
0 Posts
From: , IL
I am making a Vanessa rig using instructions I found in various places. The question I can't seem to find an answer for either in posts or images, is where do you hang the plumb bob from. Assuming I go with the standard 1x2 with a dowel rod and a thumb screw to adjust tension on the rod, should I center the line holding the plumb bob on the bottom of the 1X2. I saw one picture which, though it wasn't clear seemed to have the plumb bob hanging with its line wrapped around the dowel. Wouldn't that be itself off finding CG by half the diameter of the dowel rod, or is the difference too small to matter.Thanks.Jack
07-07-2013 | 09:17 AM
#182
My Feedback: (15)
Joined: Sep 2008
Posts: 32
Likes: 0
Received 0 Likes
on
0 Posts
From: kimberley,
BC, CANADA
hang it off the dowel...its not enough to worry about. I have it come off of the front side of the dowel, so it will err to the nose heavy side of things...</p>
It works really well!</p>
</p>
07-08-2013 | 03:02 AM
#184
My Feedback: (13)
Joined: Dec 2001
Posts: 1,380
Likes: 0
Received 0 Likes
on
0 Posts
From: Prior Lake,
MN
The plumb bob hangs from a sliding loop. The loop goes over the dowel so the plumb bob hangs directly under the center of the dowel.
The loop with slipknot allows for adjustment closer or further from the wing.
I just used a plumb bob from the hardware store.
Greg
The loop with slipknot allows for adjustment closer or further from the wing.
I just used a plumb bob from the hardware store.
Greg
08-09-2013 | 03:38 PM
#185
My Feedback: (5)
Joined: Sep 2003
Posts: 197
Likes: 0
Received 0 Likes
on
0 Posts
From: Walton,
KY
Waters10, If you put the plumb bob in the center of the vanessa rig, instead of on the
dowel legs does the dowel have to remain parallel to the wing spar, or can it be in any position
for the plumb bob to register a reliable reading? My rig twists all over the place. Is there a
solution to keeping it parallel to the wing spar? If so please give the secret. Thanks, Aframe2
dowel legs does the dowel have to remain parallel to the wing spar, or can it be in any position
for the plumb bob to register a reliable reading? My rig twists all over the place. Is there a
solution to keeping it parallel to the wing spar? If so please give the secret. Thanks, Aframe2
08-09-2013 | 04:50 PM
#186
My Feedback: (10)
If you have the room, you can afix a eye hook under the center of the Vanessa as close to underneath the center line of the dowel as you can that no matter how the rig shifts the CG line still hangs straight down. Due to the design it will have to be slightly fore or aft of the dowel centerline but you can adjust for this by measurement and it will be a constant fore or aft amount. It will also be a very slight amount if you do it right and this isn't meant to be a 1/32" tolerance device.
I just try to adjust the loops as much as I can to get a straight hang, or twist the rig as needed until it hangs "straight" sometimes it works, other times, not so much.
whit
I just try to adjust the loops as much as I can to get a straight hang, or twist the rig as needed until it hangs "straight" sometimes it works, other times, not so much.
whit
08-09-2013 | 11:22 PM
#187
My Feedback: (5)
Joined: Sep 2003
Posts: 197
Likes: 0
Received 0 Likes
on
0 Posts
From: Walton,
KY
If you have the room, you can afix a eye hook under the center of the Vanessa as close to underneath the center line of the dowel as you can that no matter how the rig shifts the CG line still hangs straight down. Due to the design it will have to be slightly fore or aft of the dowel centerline but you can adjust for this by measurement and it will be a constant fore or aft amount. It will also be a very slight amount if you do it right and this isn't meant to be a 1/32" tolerance device.
I just try to adjust the loops as much as I can to get a straight hang, or twist the rig as needed until it hangs "straight" sometimes it works, other times, not so much.
whit
I just try to adjust the loops as much as I can to get a straight hang, or twist the rig as needed until it hangs "straight" sometimes it works, other times, not so much.
whit
08-11-2013 | 02:28 AM
#188
My Feedback: (5)
Joined: Sep 2003
Posts: 197
Likes: 0
Received 0 Likes
on
0 Posts
From: Walton,
KY
I used the vanessa, and seemed to balance the plane in no time. I'm just not sure if it is balanced
properly. The plumb bob pointed directly to the cg line that I had previously marked on the wing, but the
dowel legs were not parallel to the wing spar, they were a little twisted. Since I had the plumb bob in the
center of the machine and not on the dowel legs themselves can I trust this reading? Aframe2
08-11-2013 | 04:46 PM
#189

..........The plumb bob pointed directly to the cg line that I had previously marked on the wing, but the
dowel legs were not parallel to the wing spar, they were a little twisted. Since I had the plumb bob in the
center of the machine and not on the dowel legs themselves can I trust this reading? Aframe2
dowel legs were not parallel to the wing spar, they were a little twisted. Since I had the plumb bob in the
center of the machine and not on the dowel legs themselves can I trust this reading? Aframe2
See this previous post:
http://www.rcuniverse.com/forum/tips...ml#post9175443
The line you drew, the CG of your plane and the CG of the plumb are on the same vertical line.
For that very reason, the plumb is also indicating the lateral balance.
Man, ........................that is a really beautiful airplane !!!
Last edited by Lnewqban; 08-11-2013 at 04:51 PM.
08-11-2013 | 07:04 PM
#191
My Feedback: (151)
I would think it is good too. For fun you could throw some weight on there and see if it changes where the plumb bob sits based off of where you put the weight. You can also do the finger test as a double check. I still do that to be sure. Almost all the time they match. Very rarely they do not. One thing I would do as a personal preference is drill a hole in the plumb bob you are using and loop that cord though the hole. This way the plumb bob is would hang straight down from the loop instead of being slightly tilted to one side since it is looped from the side.
04-19-2014 | 02:28 AM
#192
Junior Member
Joined: Apr 2014
Posts: 2
Likes: 0
Received 0 Likes
on
0 Posts
Here is another version, made mostly from recycled materials. Two pieces of aluminium (correct Australian spelling) tubing, a piece of coat-hanger wire, a piece of EPP packing foam and a piece of venetian blind cord to make the basic rig. I found a plumb bob in my nuts & bolts bucket in the garage (but you could use a pyramid shaped lead fishing sinker or anything similar).
Method:
1. Cut tube to desired length (length is not important).
2. Drill small holes in one end to tie string through, drill correct size holes for dowel to freely turn at other end.
3. Bend coat-hanger wire around dowel to form the hook to hang plumb bob from
4. Push a piece of EPP foam into the fat tube at the end where the dowel goes. The EPP foam works as a friction brake on the dowel, no need for a cinch bolt.
5. Push a pencil or similar through the foam to where the dowel goes through.
6. Cut a small slit in the foam to slide the hook into and slide hook in from bottom.
7. Push dowel through the dowel hole with foam and hook in place.
8. Tie small loop at top to hang rig from.
Last edited by Radical Ryther; 04-19-2014 at 04:50 AM.

 04-19-2014 | 07:07 PM
#194
Junior Member
Joined: Apr 2014
Posts: 2
Likes: 0
Received 0 Likes
on
0 Posts
window sash cord would probably be another one to try.
04-23-2014 | 10:29 AM
#195
I was looking at your pictures and this might be out in left field but I'll bet it has something to do with the rope you are using and its twist. If you can get some ski rope or abseiling rope or any braided rope I'd try experimenting with it.
window sash cord would probably be another one to try.
window sash cord would probably be another one to try.
09-26-2015 | 04:46 AM
#196
Thread Starter
Member
Joined: Mar 2003
Posts: 42
Likes: 0
Received 0 Likes
on
0 Posts
From: Sarnia, ON, CANADA
Wow. I've not been back here for more than a few years. I still lurk but have not been to active in building or flying (other then a couple c/l demo's at my sons school. Very cool to see how a post somewhat takes on a life of it's own. Time does certainly "fly".
Tony
Tony
10-13-2015 | 03:31 PM
#197
Senior Member
Joined: Oct 2014
Posts: 110
Likes: 0
Received 0 Likes
on
0 Posts
The advantages with this is you won't drop the model and possibly do damage and you have your hands free to make adjustments, even the G.P. artificial fingers type can be hard to keep a out of balance model on. One thing missing from the discussions is you can use the artificial fingers type on the top side of the wings if wing supports get in the way of balancing from below.but you still have the problems I talked about on either side .
05-13-2016 | 05:07 PM
#198
Joined: Oct 2011
Posts: 24
Likes: 0
Received 0 Likes
on
0 Posts
From: Mackay, AUSTRALIA
Hi to all, what a site this is! - I had seen this some time past but thought "nah too hard" = idiot. my new build(stearman) turned out to be impossible to mount on my balance jig that I have been using for some time. after reading this thread - went and made a "Vanessa jig" , mine I used soft rachet strap webbing for under fuse, I anchored the plumb bob from the adjuster bolt under the dowel - my only hiccup was getting the length of string too suit all my flyers. have checked them all and will have to move the battery in my Nemisis forward, the Jungmester still is waiting for its undercarriage and a fibreglass cowl then in the rig. many thanks to all for advise and sharing. my photos show the stearman as built (approx. 40mm too far back) then with 1,011grams on the shaft - will have to soak some of that with a bigger battery and see). the classic checked out near goodas, my scanner the same.


 05-13-2016 | 06:41 PM
#200
Thread Starter
Member
Joined: Mar 2003
Posts: 42
Likes: 0
Received 0 Likes
on
0 Posts
From: Sarnia, ON, CANADA
The rig will pin point where your CG currently is. You can compare this location to the location on the plans or as suggested in your building instructions and such. While it hangs in the rig, you can then adjust the hardware (radio gear, battery, lead weights, etc) to effect the correct CG target location. You should have an idea where the CG should be for the model you are going to fly. If you google the term "Mean Aerodynamic Chord" you will find the formula for figuring out a good starting point for a first flight CG location. Here is but one such link:
http://www.airfieldmodels.com/inform...amic_chord.htm
There are lots of on-line sources to tap which can lead you down the path of finding/figuring out a good CG based on the MAC.
FWIW,
Tony
http://www.airfieldmodels.com/inform...amic_chord.htm
There are lots of on-line sources to tap which can lead you down the path of finding/figuring out a good CG based on the MAC.
FWIW,
Tony
Last edited by TigreST; 05-13-2016 at 07:22 PM.

