


Homelite 26cc gas engine conversion help

 07-28-2015, 09:20 AM
#52

Thread Starter

Join Date: Mar 2015
Location: Charlotte, NC
Posts: 90
Likes: 0
Received 0 Likes
on
0 Posts
Found this
http://www.valleyviewrc.com/estore/dle-30-propeller-drive-hub-assembly.html but i think the crankshaft on the homelite is to wide for the adapter. But then again I dont know the diameter of the 30cc DLE crankshaft.
-sam
EDIT:
I found this and this also. I am thinking that I can drill out the great planes adapter to 9.5mm.
Last edited by sierra_bravo; 07-28-2015 at 10:30 AM.
07-28-2015, 09:30 AM
#53
Thread Starter
Join Date: Mar 2015
Location: Charlotte, NC
Posts: 90
Likes: 0
Received 0 Likes
on
0 Posts
So i found out the diameter of the dle 30cc crank shaft. Its 5/16" which is 1/16" to small. But i could drill it out to 3/8" then use a tap to thread it so i can screw it onto the homelite crankshaft. What do you think. Also I found out about ch ignition which sells some conversion parts. I called and they said that they would email me later to tell me if they have a homelite prop hub.
-sam
-sam
Last edited by sierra_bravo; 07-30-2015 at 11:59 AM.
07-30-2015, 06:14 PM
#54
Thread Starter
Join Date: Mar 2015
Location: Charlotte, NC
Posts: 90
Likes: 0
Received 0 Likes
on
0 Posts
hey av8tor you said that you could make me a prop hub. But do you think that you could send me a detailed drawing of the prop hub. I ask because I called my local machine shop to see if they might be able to make the hub and they said they could but they would need a product drawing with the sizes and dimensions of the hub. I would make the drawing my self but I don't really know any of the dimensions for the hub.
Thanks
-Sam
Thanks
-Sam
08-03-2015, 11:43 AM
#55
Thread Starter
Join Date: Mar 2015
Location: Charlotte, NC
Posts: 90
Likes: 0
Received 0 Likes
on
0 Posts
So FINALLY after so much searching on the internet I found a shop that could make the part and I now have the finished prop hub. I went to the machine shop this morning and the guy who works there said that he could easily make one. So I showed him the 3D model I maid and he sketched a quick drawing and then went to work. He actually let me watch him make it and talked me through what he was doing since it's the first time I went to a machine shop. So I was standing there for about 1 1/2 hours and I got to see him using the manual lathe and I have to say it's pretty cool getting to see the guy get a solid piece of 2025 aluminum that he got from a scrap metal bin and turn it into the hub. So I can now get some more work done on the motor like taking the muffler to a welding shop so someone could weld in the outlet tubes.
I took a photo of the finished hub.
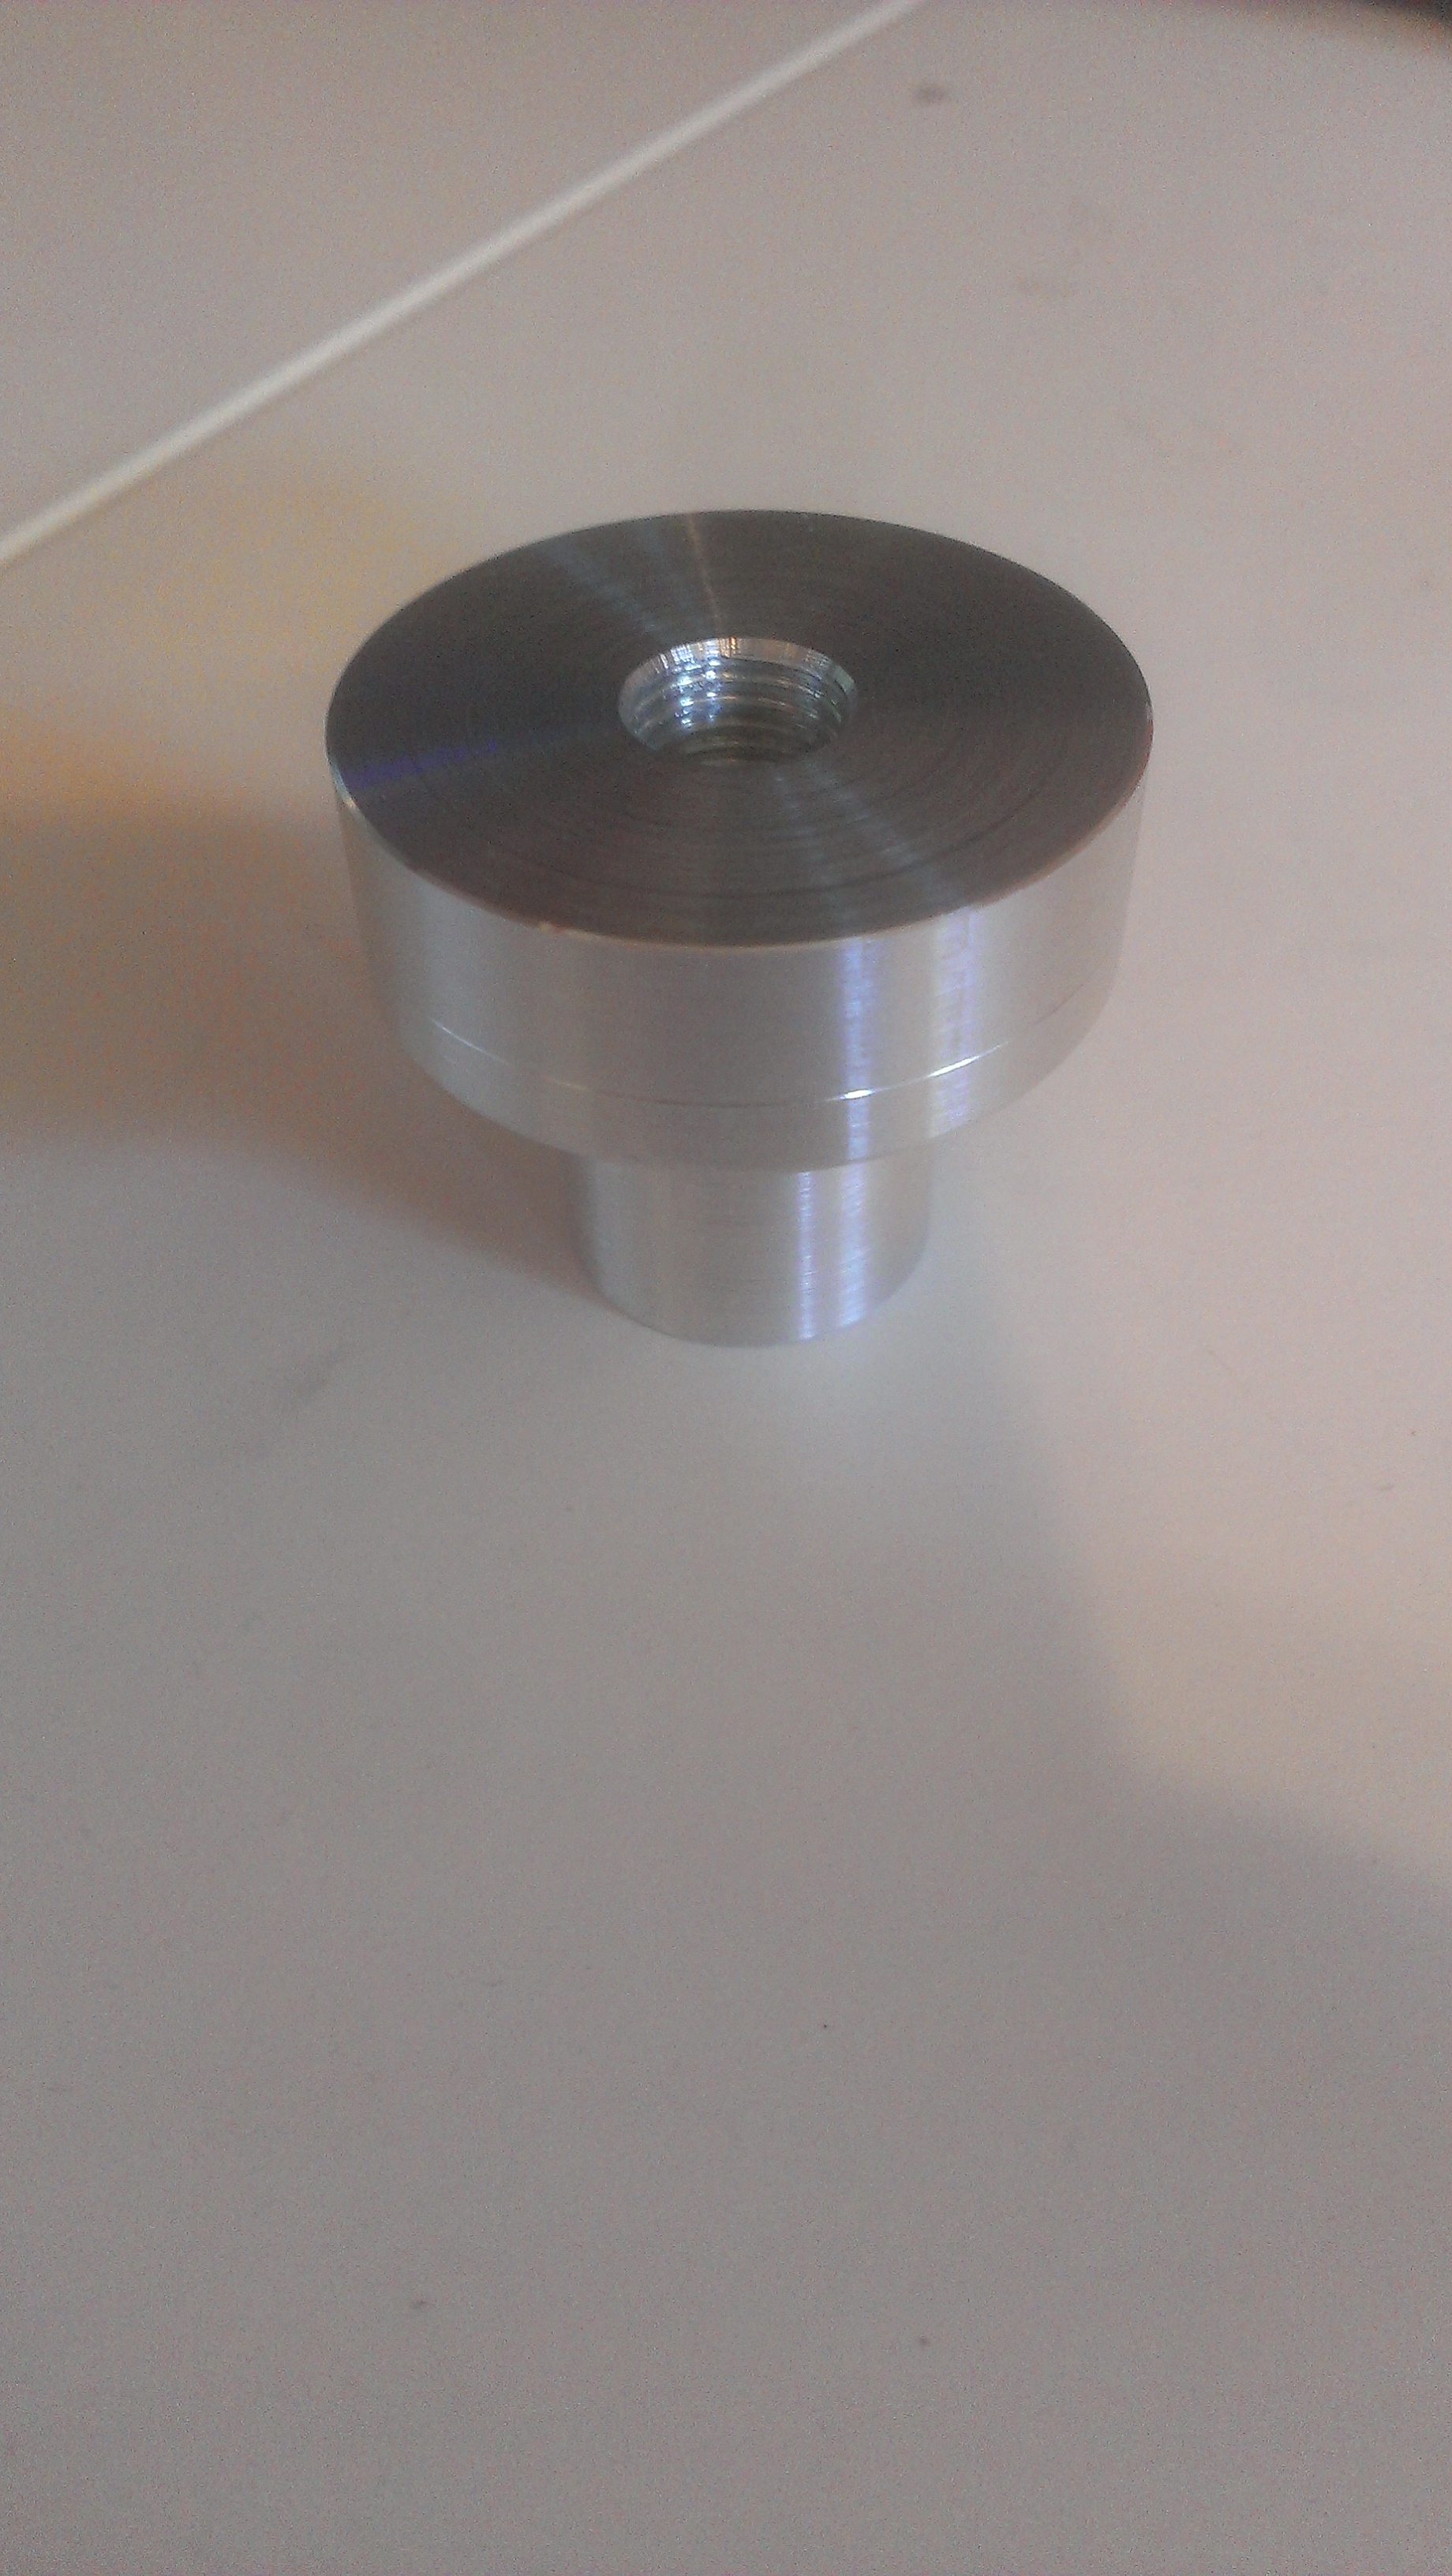

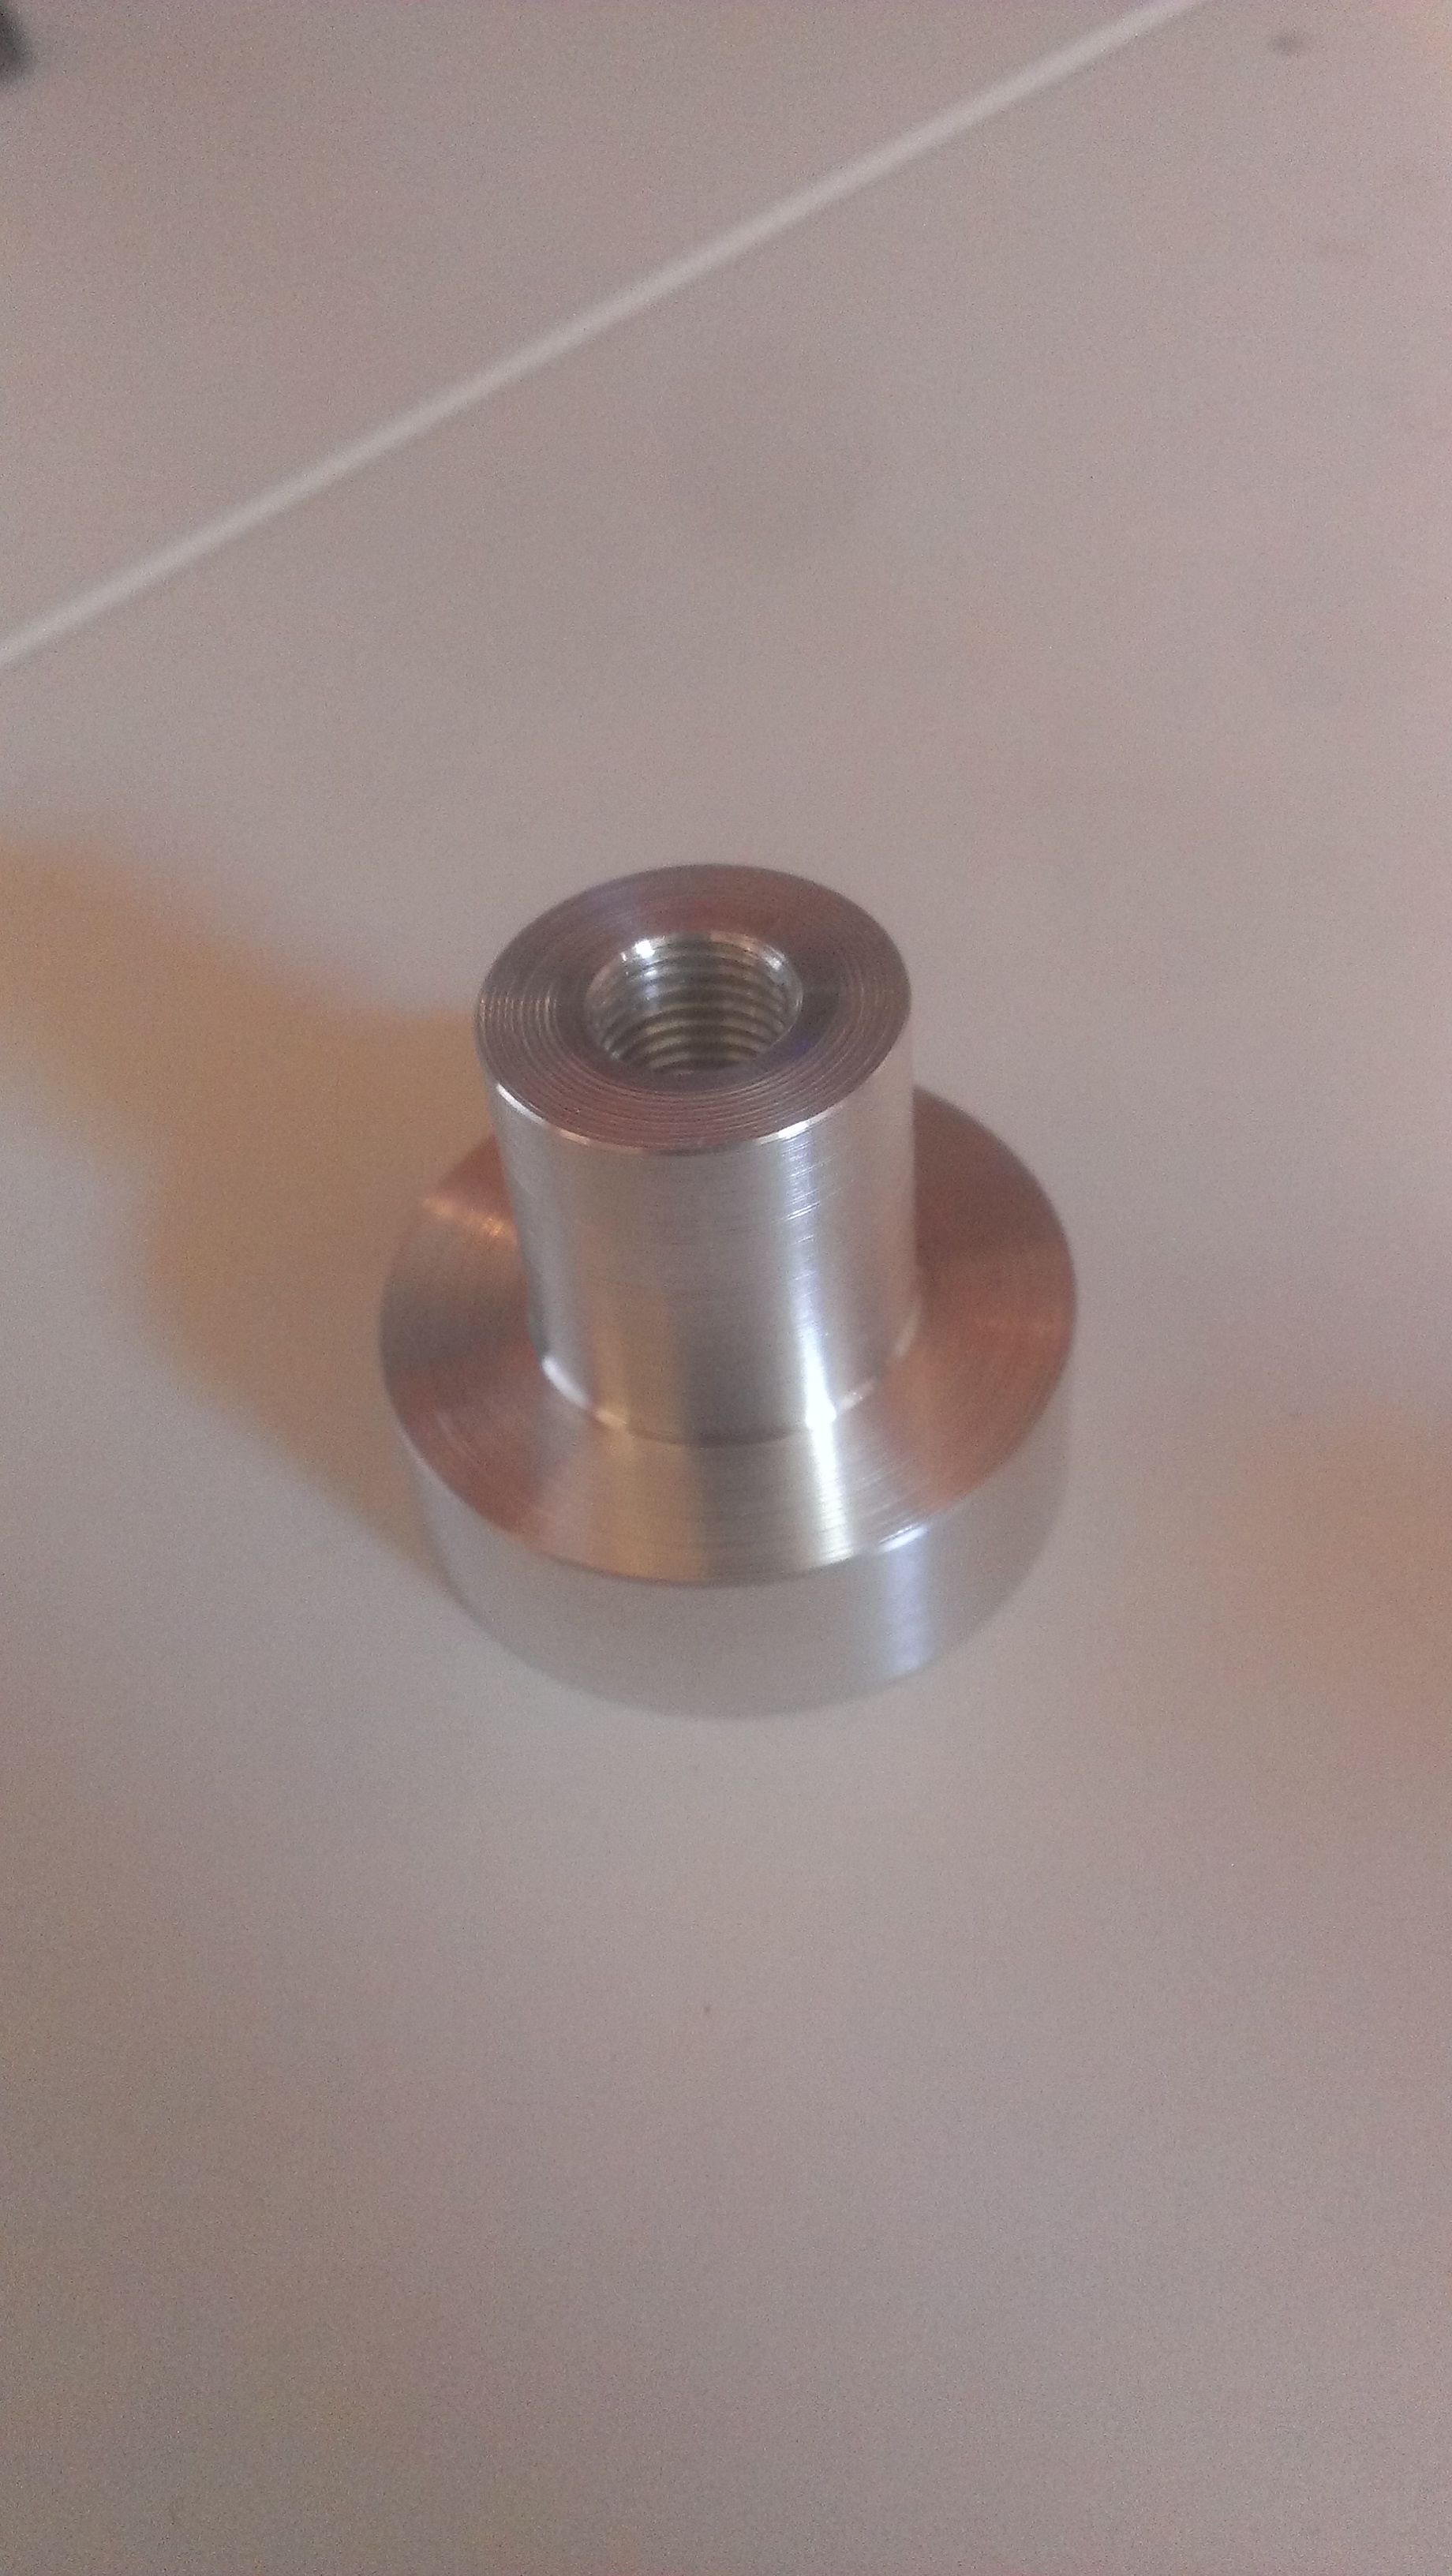
-Sam
I took a photo of the finished hub.
-Sam
08-03-2015, 02:58 PM
#56
So FINALLY after so much searching on the internet I found a shop that could make the part and I now have the finished prop hub. I went to the machine shop this morning and the guy who works there said that he could easily make one. So I showed him the 3D model I maid and he sketched a quick drawing and then went to work. He actually let me watch him make it and talked me through what he was doing since it's the first time I went to a machine shop. So I was standing there for about 1 1/2 hours and I got to see him using the manual lathe and I have to say it's pretty cool getting to see the guy get a solid piece of 2025 aluminum that he got from a scrap metal bin and turn it into the hub. So I can now get some more work done on the motor like taking the muffler to a welding shop so someone could weld in the outlet tubes.
I took a photo of the finished hub.
-Sam
I took a photo of the finished hub.
-Sam
Also some knurling added to the prop surface face will help keep the prop from slipping. Just practical hints offered in great sincerity.
Sincerely,
Richard
Last edited by spaceworm; 08-03-2015 at 03:01 PM. Reason: add knurling note
08-03-2015, 08:25 PM
#57

What I often do is make a hole clear through the large diameter part of the prop hub, and then use a Phillips screwdriver through the hole to tighten the prop hub. And yes, knurling the face of the prop mounting surface is almost a must. At this point, you could just glue some # 220 sandpaper to that face to help keep the prop from slipping. That will work too.
I strongly recommend using Loctite both on the threads where you thread the prop hub on the engine, and on the stud you will use to hold the prop on. Loctite is not needed on the prop nut itself, and not desired.
AV8TOR
I strongly recommend using Loctite both on the threads where you thread the prop hub on the engine, and on the stud you will use to hold the prop on. Loctite is not needed on the prop nut itself, and not desired.
AV8TOR
Last edited by av8tor1977; 08-03-2015 at 08:28 PM.
08-04-2015, 04:28 AM
#59
What I often do is make a hole clear through the large diameter part of the prop hub, and then use a Phillips screwdriver through the hole to tighten the prop hub. And yes, knurling the face of the prop mounting surface is almost a must. At this point, you could just glue some # 220 sandpaper to that face to help keep the prop from slipping. That will work too.
I strongly recommend using Loctite both on the threads where you thread the prop hub on the engine, and on the stud you will use to hold the prop on. Loctite is not needed on the prop nut itself, and not desired.
AV8TOR
I strongly recommend using Loctite both on the threads where you thread the prop hub on the engine, and on the stud you will use to hold the prop on. Loctite is not needed on the prop nut itself, and not desired.
AV8TOR
Sincerely, Richard
08-04-2015, 04:38 AM
#60
Thread Starter
Join Date: Mar 2015
Location: Charlotte, NC
Posts: 90
Likes: 0
Received 0 Likes
on
0 Posts
spaceworm
The flats are a good idea but I kinda wanted the smooth hub look since the engine is going to be exposed. I asked the guy if he could knurl the top but he said he needed a special machine but he didn't have one. I cant really complain to much since he made me the part for free.
av8tor1977
thanks for the sand paper tip. I have to go to home depot later today and i'll pick up some yard stick and some drywall sanding mesh. I also have to go back to my local machine shop to get the crank shaft threaded.
It looks like the servos get here Thursday but I still have to buy 2mm coroplast.
-Sam
Last edited by sierra_bravo; 08-04-2015 at 08:10 AM.
08-04-2015, 05:44 PM
#62
Thread Starter
Join Date: Mar 2015
Location: Charlotte, NC
Posts: 90
Likes: 0
Received 0 Likes
on
0 Posts
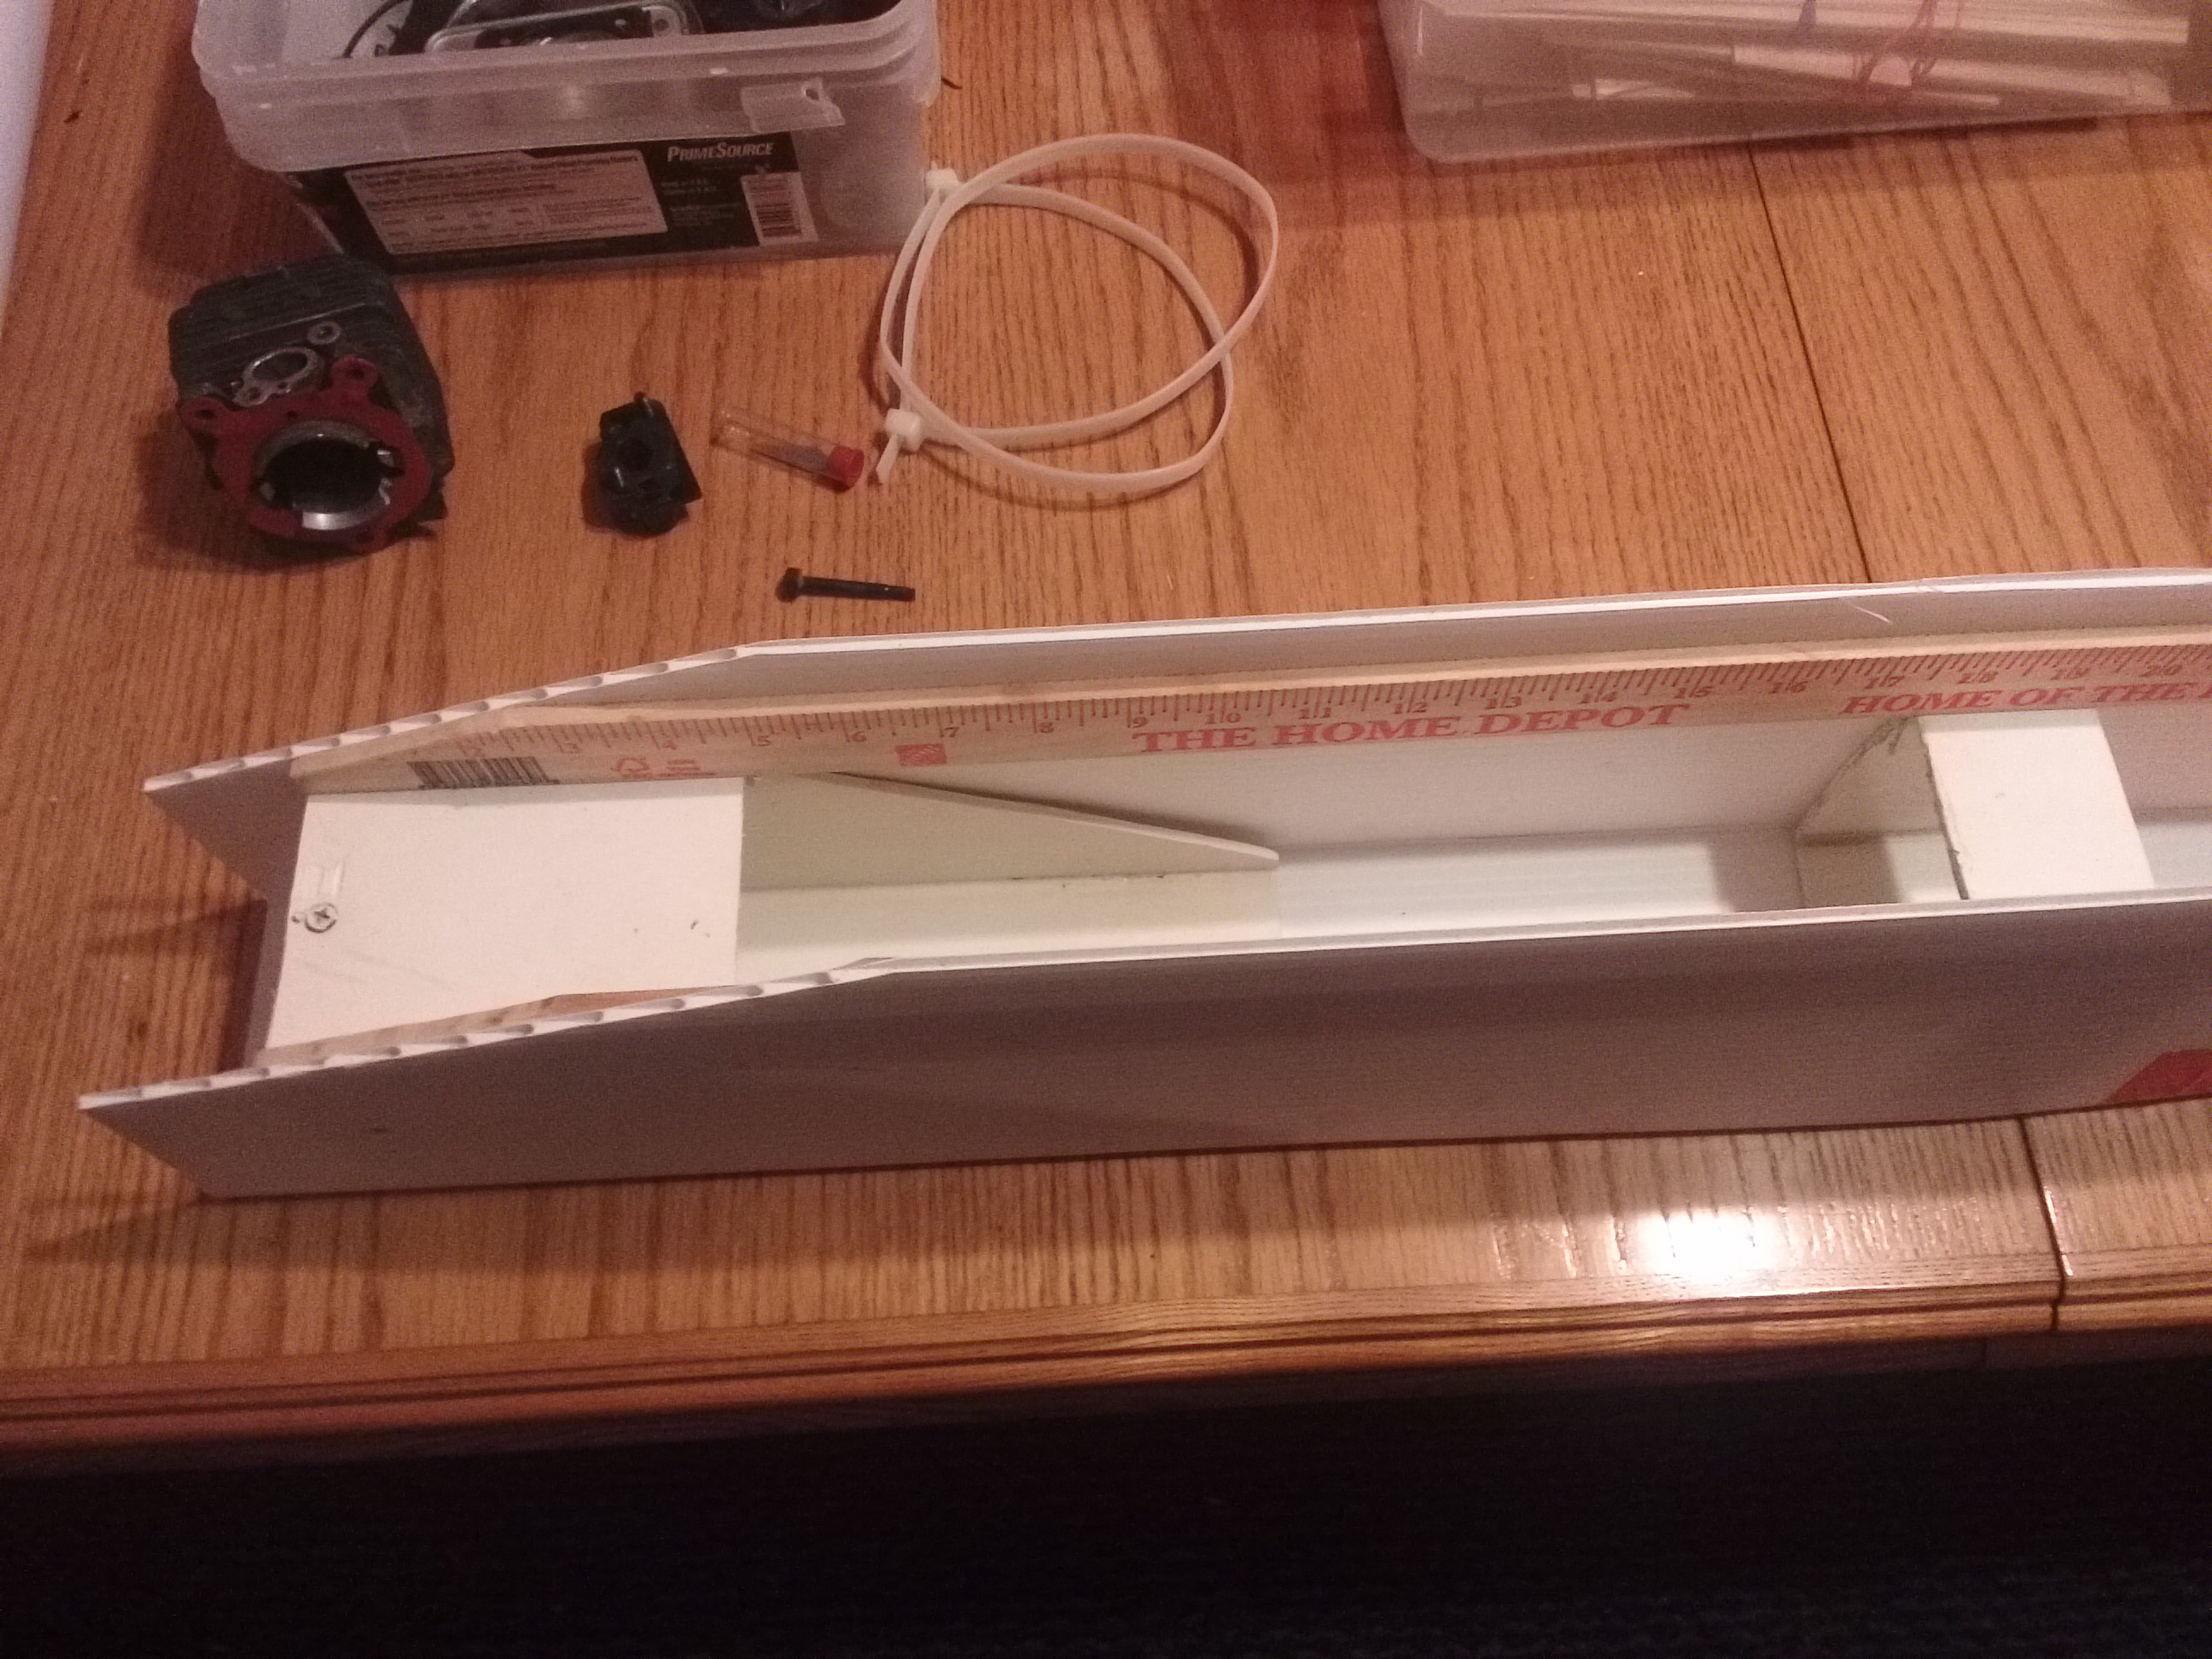
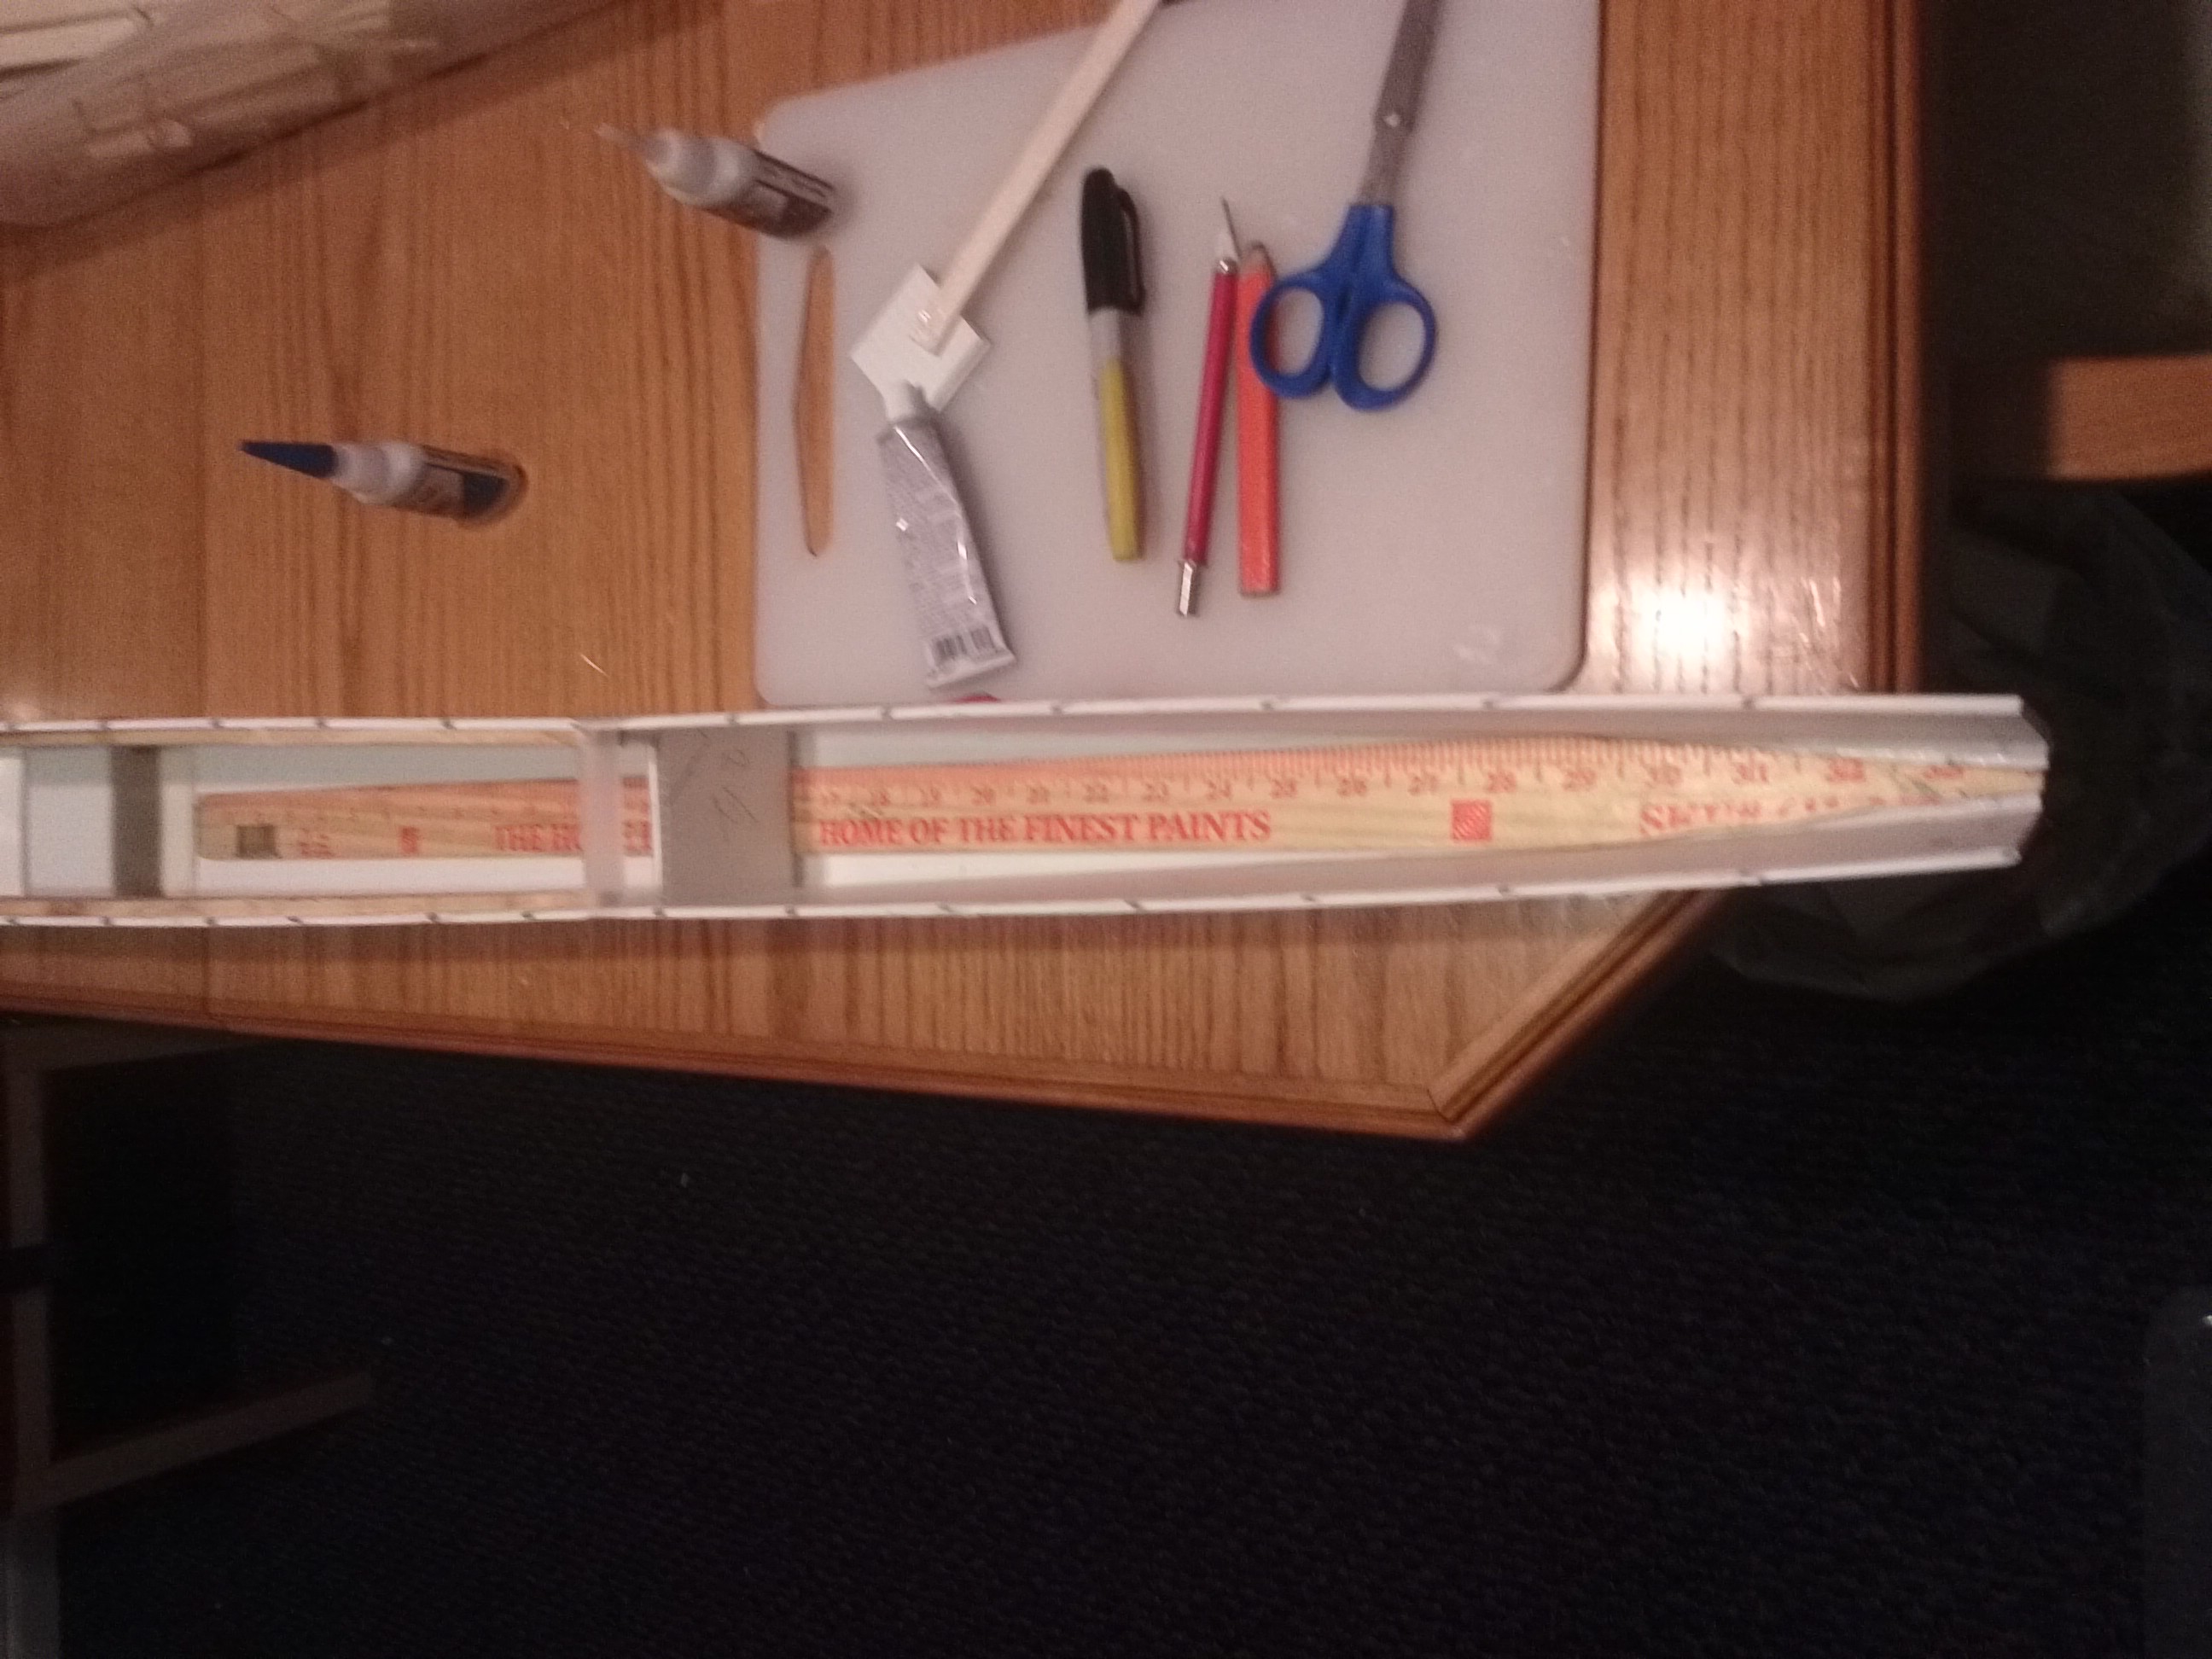
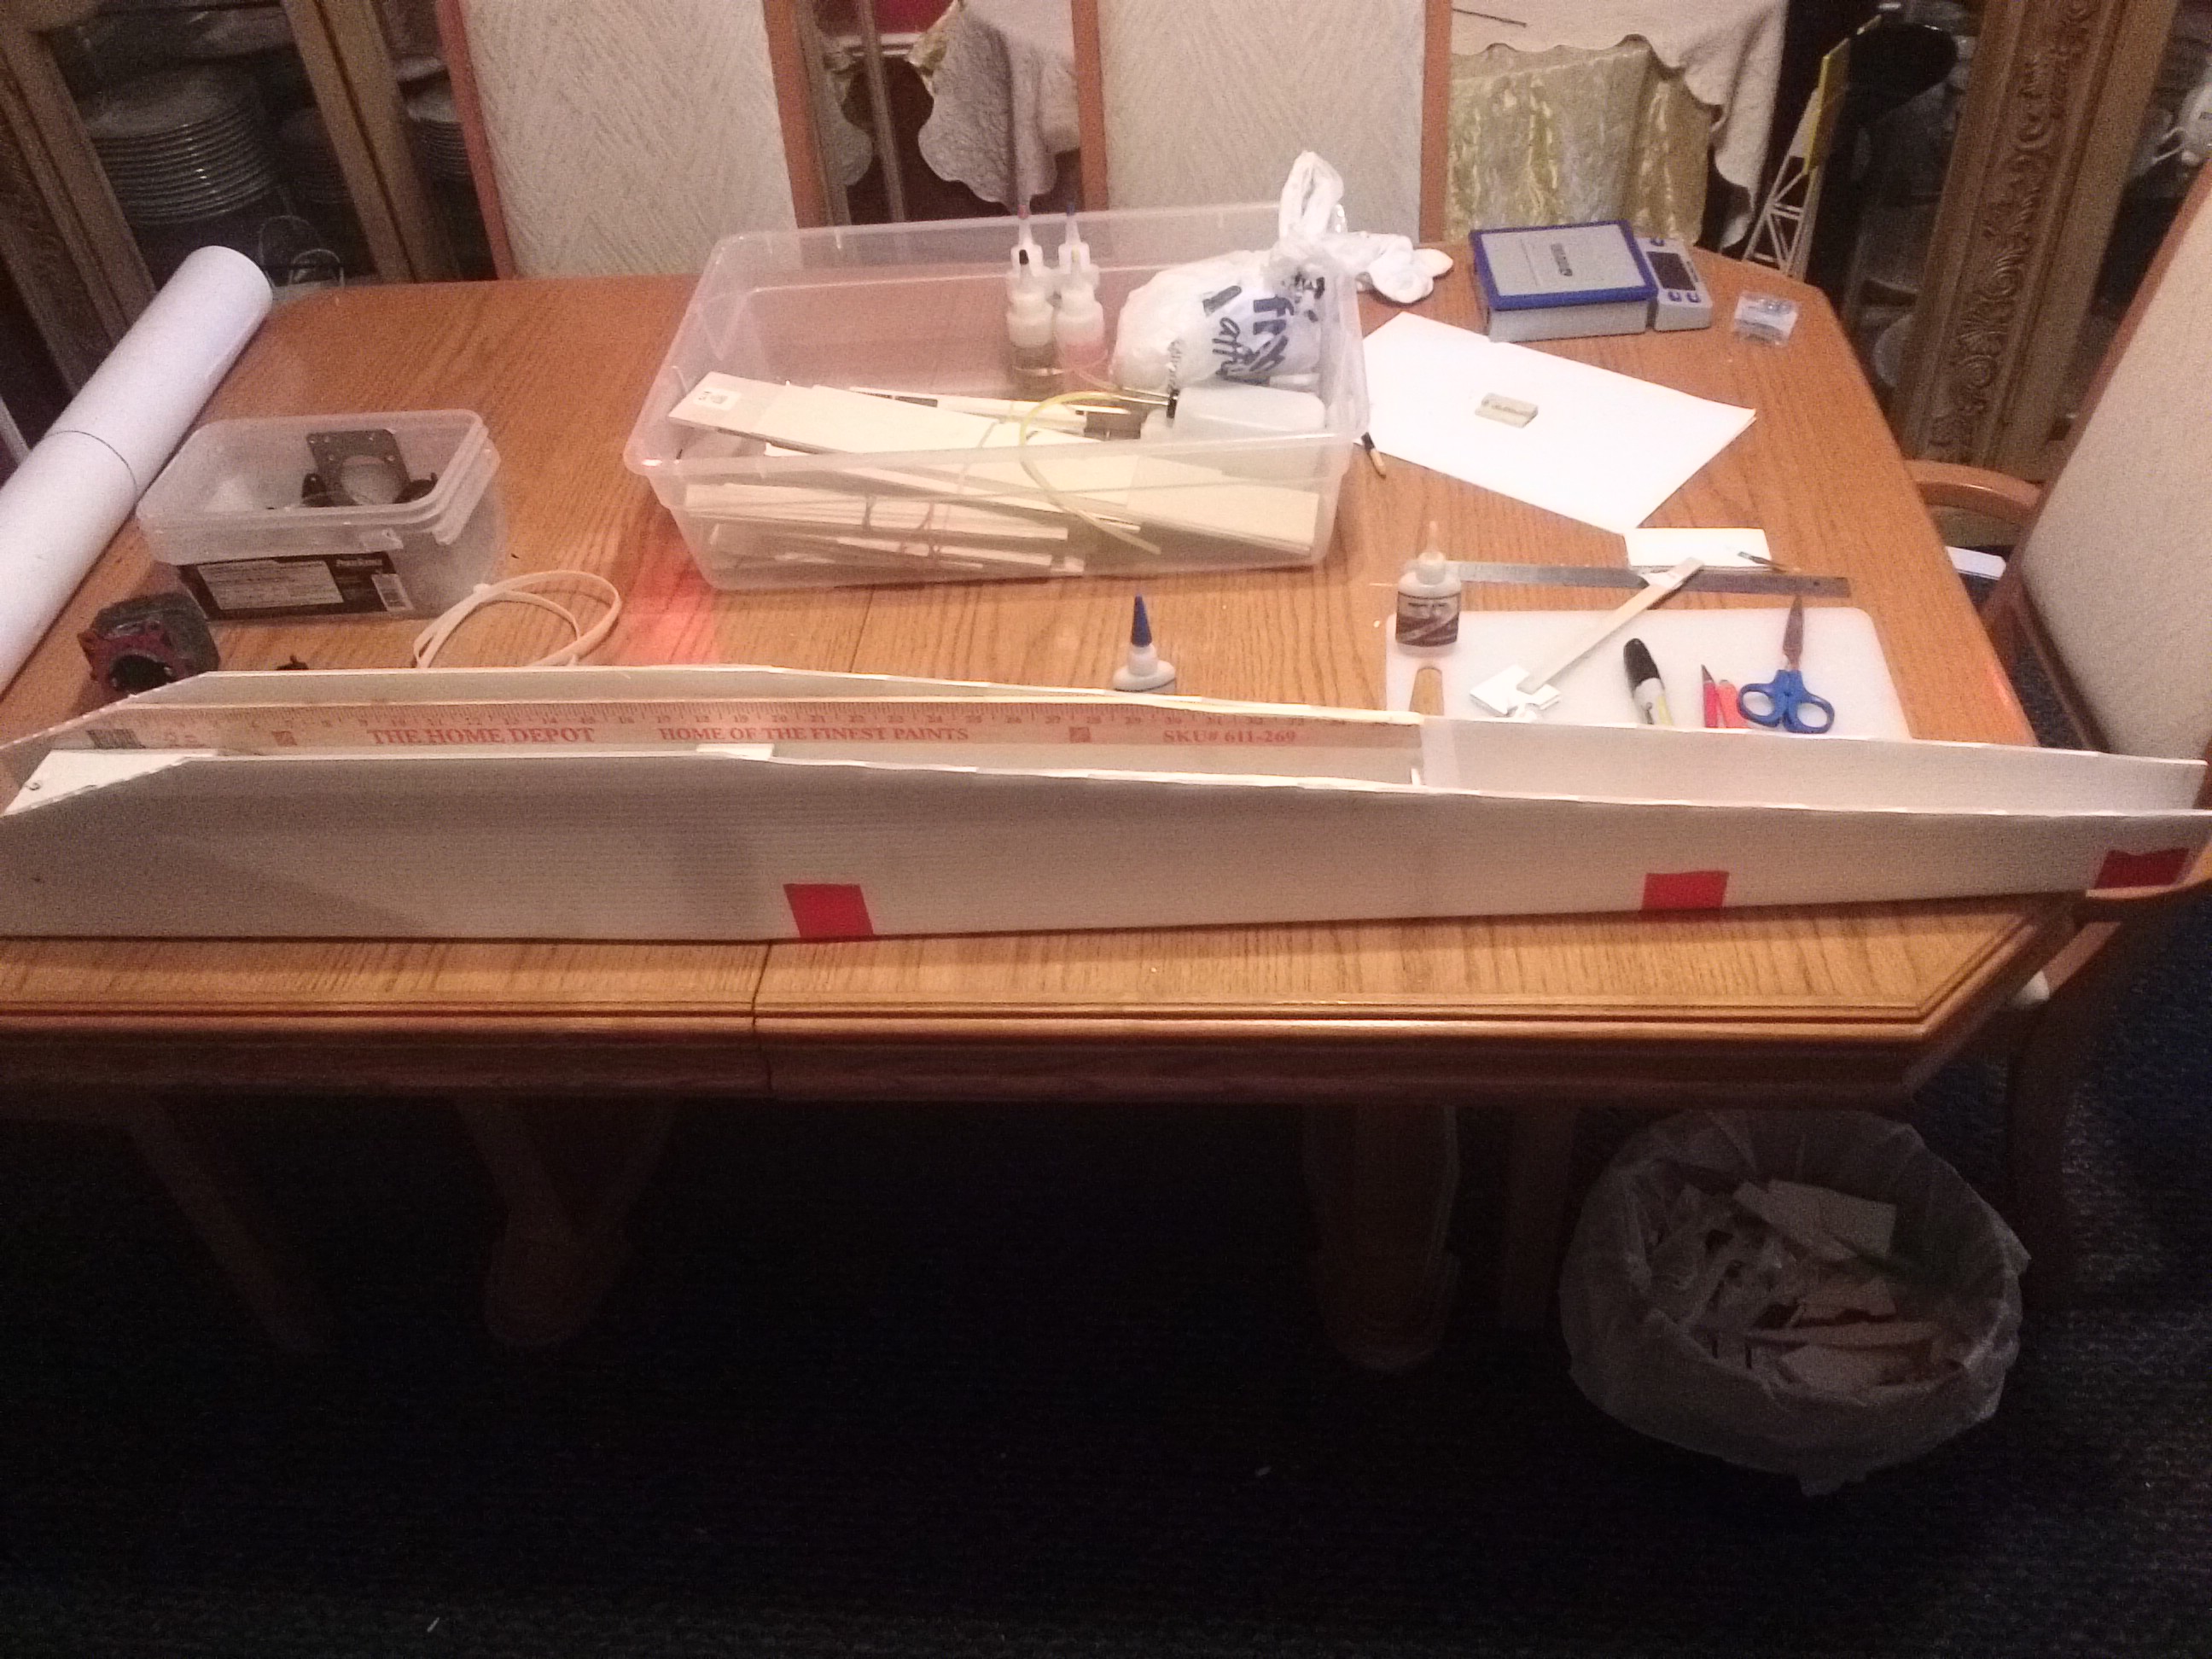
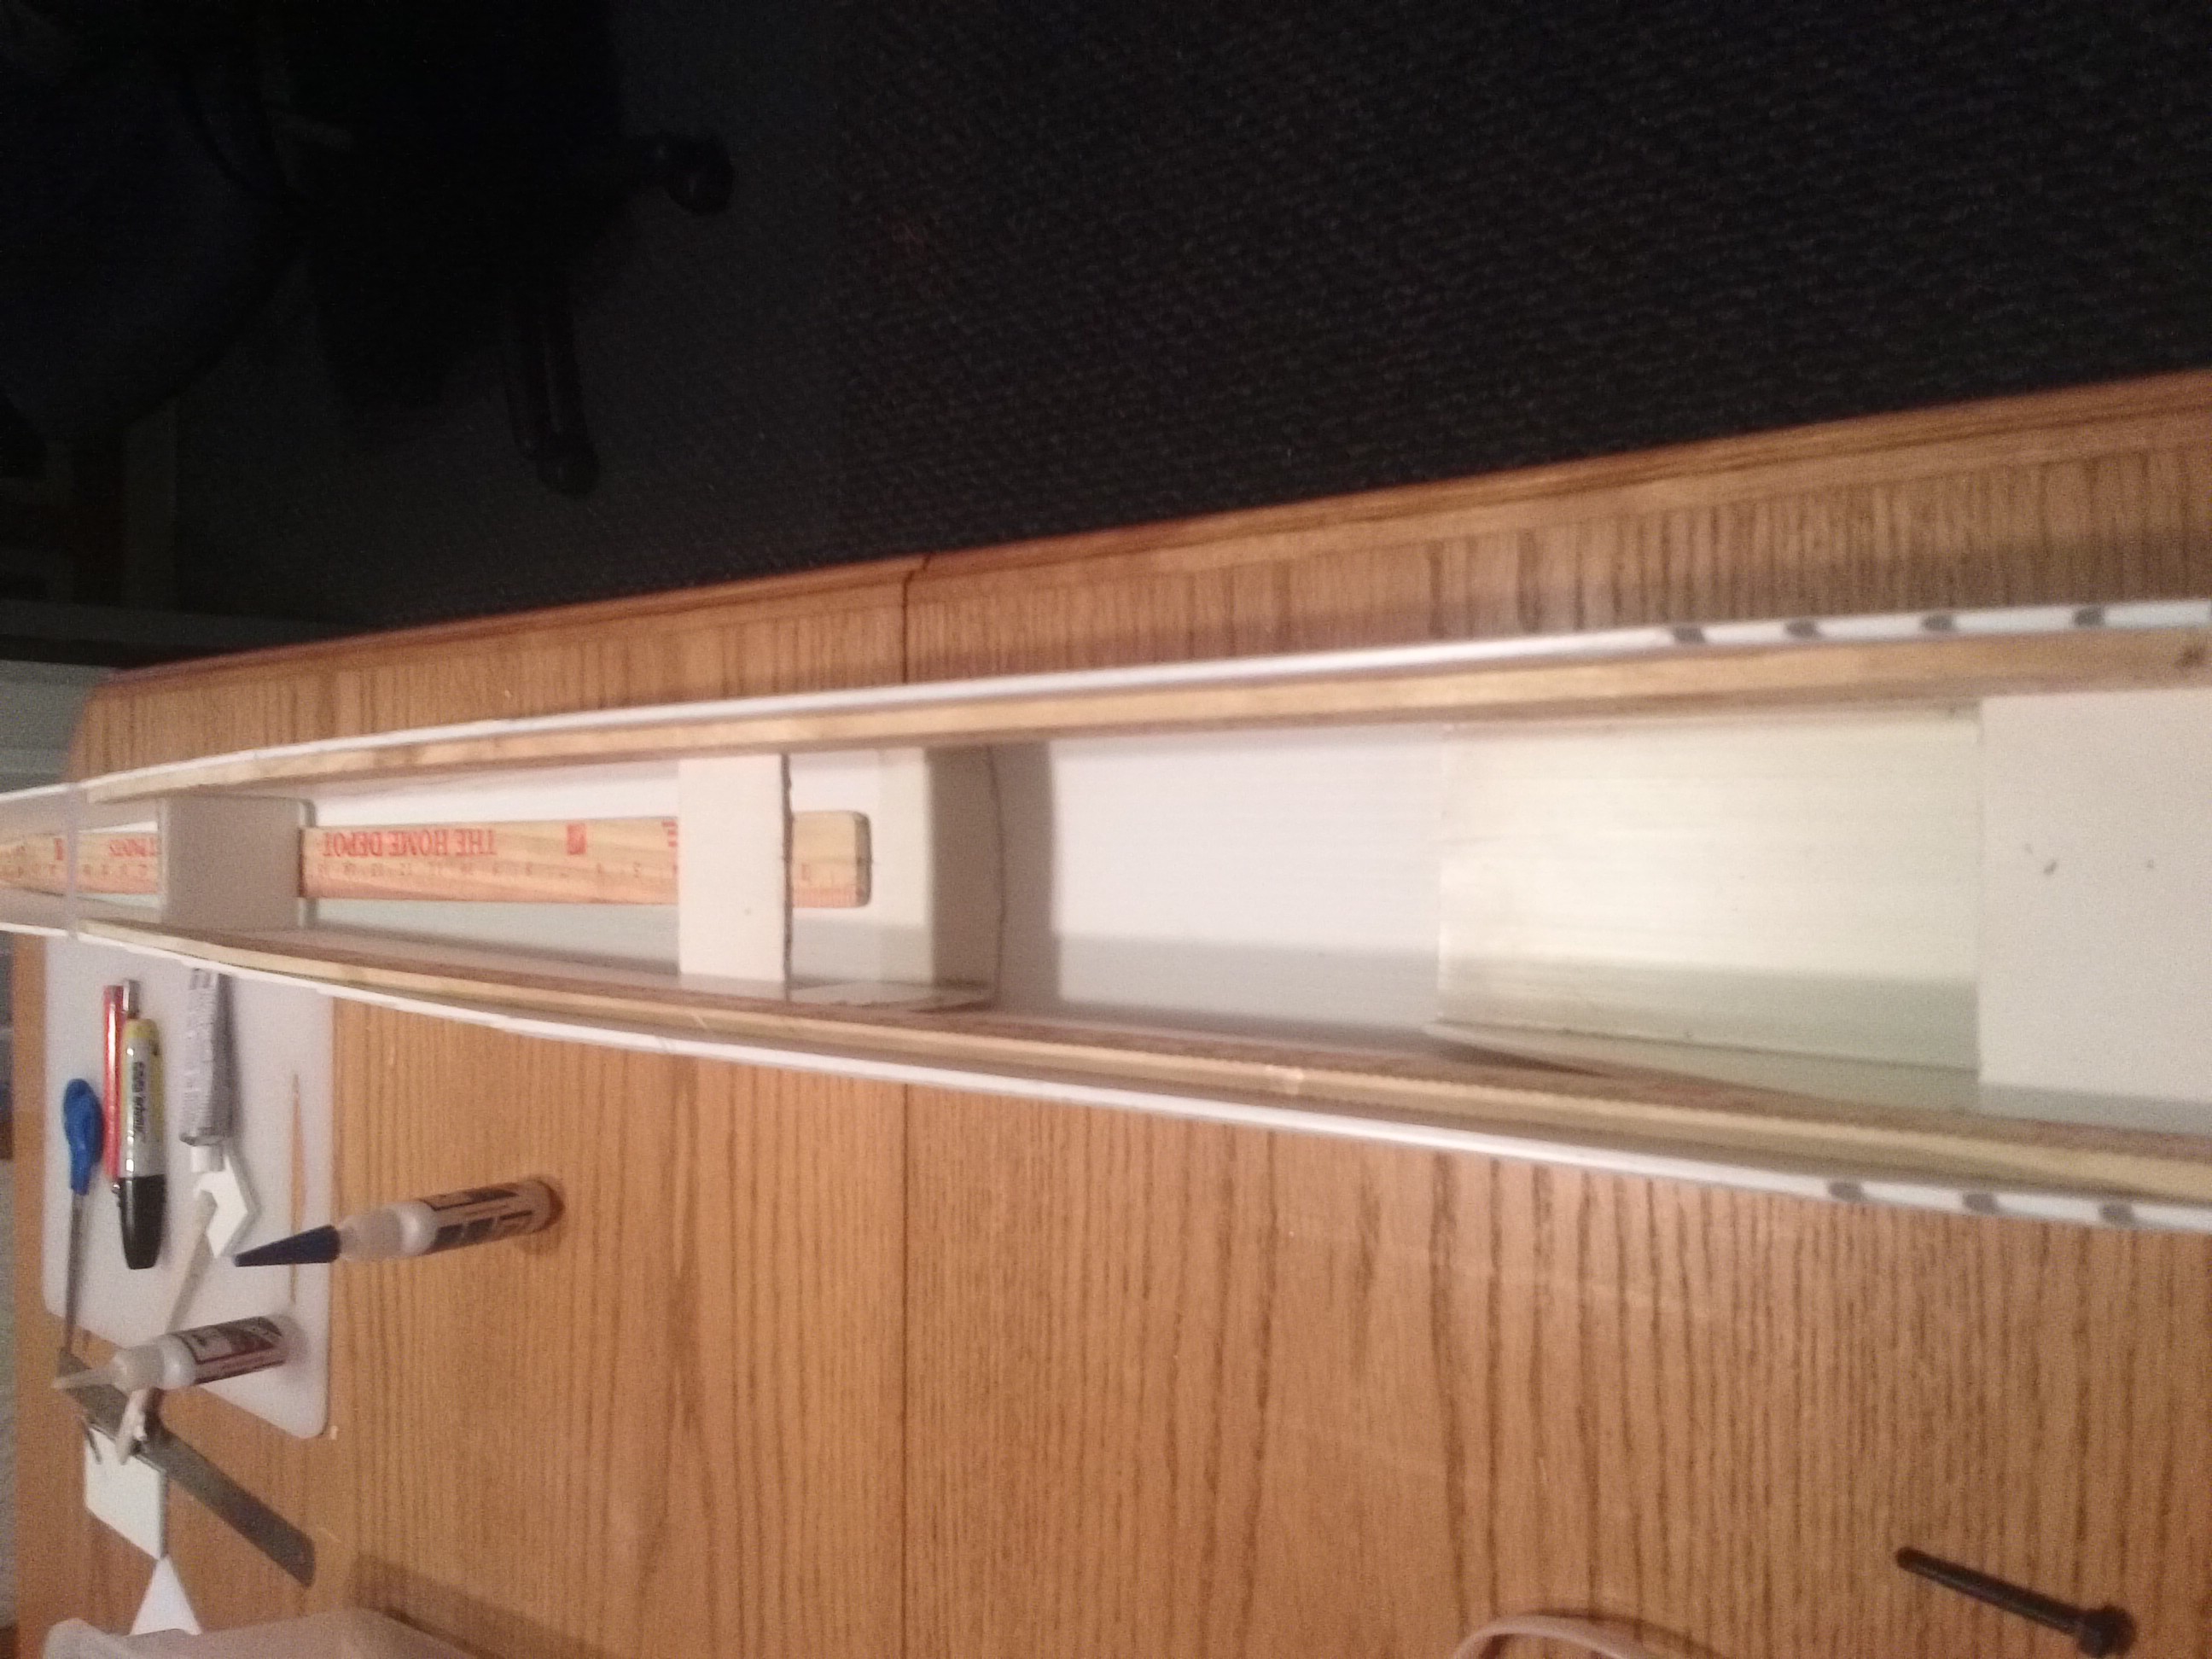
I got a bit more done on the fuselage. I glued in the gutter pipe fuselage frame and glued in the yard stick on both sides and the tail. I had to go to a dollar general to pick up some goop to glue the rudder to the fuselage but I ran out of time to actually glue it in so I'll do that tomorrow. I also have to get the homelite crank shaft removed so does anyone have any tips on how to do that.
thanks
-Sam
thanks
-Sam
08-04-2015, 08:35 PM
#63
He should be able to cut and thread it by only taking off the magneto flywheel and not disassembling the entire engine, which is what I highly recommend. Be sure it gets cut far enough beyond the magneto to have plenty of threads (but not too many) to engage your new prop hub securely.
(A good way to keep the engine from turning over while you are threading the crankshaft is to put the piston near the bottom of its stroke, and then insert soft cotton rope in through the spark plug hole. Then when the piston goes up, it hits and compresses the rope and the crank stops turning, allowing you to thread the shaft.)
AV8TOR
Last edited by av8tor1977; 08-04-2015 at 08:40 PM.
08-05-2015, 06:03 AM
#64
Thread Starter
Join Date: Mar 2015
Location: Charlotte, NC
Posts: 90
Likes: 0
Received 0 Likes
on
0 Posts
Thanks for the tip. I'll go to the machine shop and talk to the guy who made me the hub. I sent an email to someone else who works at the shop but doess'nt use any of the machines and he was the one who said i needed to remove the shaft.
-sam
-sam
08-05-2015, 09:46 AM
#65
Be sure to securely tape shut any and all openings into the engine while he is working on cutting and threading the shaft so no trash gets into the engine.
If they absolutely insist on the engine being taken apart, (which they shouldn't), let me know and I'll send you some tips on disassembly and re-assembly of the engine. There are pitfalls and possible problem areas for a "newbie" when doing this....
As a hint for you in general, a lot of times people prefer a phone call to an e-mail, and it's certainly faster. Keeping up with ones e-mail can be a chore, and a lot of people are getting away from e-mail, and/or neglecting keeping up with it.
AV8TOR
08-05-2015, 11:25 AM
#66
Thread Starter
Join Date: Mar 2015
Location: Charlotte, NC
Posts: 90
Likes: 0
Received 0 Likes
on
0 Posts
good point on taping any openings like the carb and muffler holes. I had to email the guy a photo since he was using the shops land line phone. Hopefully I'll be able to go tomorrow morning and get the shaft cut and re threaded. To bad I don't have a die or else I could have done it my self.
-Sam
-Sam
08-05-2015, 11:48 AM
#67
That shaft is rather hard and threading it can be difficult for a "first timer". Best that the machinist does it. Take your new prop hub with you when you go. Also, when you talk to him again, explain that the crankshaft is a "cantilevered" type and there is no way to chuck it in the lathe for threading. It has to be done with a threading die. That might convince him that the engine does not need to be disassembled.
Additional note: I have found studs for use in the prop hub to mount the propeller at Lowes, Home Depot, and Ace Hardware stores. Take your propeller and prop hub with you to make sure you get a stud with the correct size and threads, and long enough for a prop, large flat washer, and nut.
AV8TOR
Additional note: I have found studs for use in the prop hub to mount the propeller at Lowes, Home Depot, and Ace Hardware stores. Take your propeller and prop hub with you to make sure you get a stud with the correct size and threads, and long enough for a prop, large flat washer, and nut.
AV8TOR
Last edited by av8tor1977; 08-05-2015 at 12:34 PM.
08-05-2015, 12:42 PM
#68
You also need to prepare yourself for starting the engine. Homelites with a magneto instead of electronic ignition are quite difficult to hand start. And a standard glow engine starter doesn't have enough power to turn them over. The cheapest/easiest route is to buy a starter cone and insert, and install a long 5/16" bolt in it with a nut. You can then chuck that bolt into a good battery powered electric hand drill and easily start the engine.
http://www3.towerhobbies.com/cgi-bin...?&I=LXL400&P=7
http://www3.towerhobbies.com/cgi-bin...?&I=LXL404&P=7
AV8TOR
http://www3.towerhobbies.com/cgi-bin...?&I=LXL400&P=7
http://www3.towerhobbies.com/cgi-bin...?&I=LXL404&P=7
AV8TOR
Last edited by av8tor1977; 08-05-2015 at 12:44 PM.
08-05-2015, 01:31 PM
#70

Join Date: Oct 2004
Location: Coshocton, OH
Posts: 290
Likes: 0
Received 0 Likes
on
0 Posts
08-05-2015, 02:59 PM
#71
Thread Starter
Join Date: Mar 2015
Location: Charlotte, NC
Posts: 90
Likes: 0
Received 0 Likes
on
0 Posts
Next time I go to a hobby shop i'll pick up the starter cone and insert and use a makita drill. Also what do you mean by "prepare yourself for starting the engine". Getting comfortable flipping the prop quickly and being able to quickly move my hand( or the chicken stick) away from the prop. I called the machine shop but no one picked up so I'll just call them in the morning to see if I could go. I think in the afternoon they leave the shop because both times I called after 6pm no one answers but when I call before 10am someone always picks up. I got the rudder glued in but the glue is still wet but it should be dry by tomorrow morning and it looks like the servos arrive tomorrow. Lots of progress being made.
-Sam
-Sam
Last edited by sierra_bravo; 08-05-2015 at 03:02 PM.
08-05-2015, 03:29 PM
#72
Sincerely, Richard
08-05-2015, 04:22 PM
#73
Join Date: Oct 2004
Location: Coshocton, OH
Posts: 290
Likes: 0
Received 0 Likes
on
0 Posts
Having an engine I could not start with my Sullivan 12 volt starter, I made an adapter for my 18 volt portable drill this way. I bought an insert from my LHS. I took a hole saw the size that the insert would fit in snugly. I used the mandrel that came with the set of hole saws that has a key to keep the saw from turning. I removed the pilot drill by loosening the set screw. At first I used the hole saw with the teeth still on to prove the concept. After it worked so well, I ground the teeth off. Works great!!! I have also used it in a 3/8 inch corded drill, since we have 110vac in our pits. It has started 35cc and up gassers. I got the hole saw set from Harbor Freight on sale really cheap.
Sincerely, Richard
Sincerely, Richard
08-06-2015, 05:56 AM
#74
Interesting idea, but the real starter cone only costs 7 bucks. If you attach a bolt to it with a nut and two star washers and tighten it good, it won't slip. Actually, I've done it without the star washers and it didn't slip.
By "prepare yourself for starting the engine", I only meant round up the stuff to do so. But once again the warning though, it will cut your fingers right off if you're not careful. Always have someone else helping when you start the engine to hold the plane and assist.
AV8TOR
By "prepare yourself for starting the engine", I only meant round up the stuff to do so. But once again the warning though, it will cut your fingers right off if you're not careful. Always have someone else helping when you start the engine to hold the plane and assist.
AV8TOR
08-06-2015, 11:01 AM
#75
Thread Starter
Join Date: Mar 2015
Location: Charlotte, NC
Posts: 90
Likes: 0
Received 0 Likes
on
0 Posts
Oh ok. I still need to get a gas pump since mine is only for glow(it's the cheap hobbico fuel pump). I dropped off my motor at my local machine shop since the guy who works there wasn't there but it should be ready by tomorrow morning. I also have to get the 2mm coro for the wings.
-Sam
-Sam