


Painted wing, stabs and advanced graphics
 01-12-2016, 09:35 AM
#176

Thread Starter
Doug,
I just thought about that this morning that I forgot to go over which one I use. I use the "Ultra Fine" as I want it to look as close to a true silver as possible without the flake showing. I haven't tried Super Silver.
I buy all of my HOK unmixed. I don't know if TCP carries them, but I buy from Coast their empty plastic bottles with the flip top and mix my own as I need it. I buy white by the quart and reducer by the gallon. I haven't figured it out, but logic says I am saving a bit by mixing it myself.
HOK has revamped their web site and you can find all kinds of cool formulas to get zillions of different colors. It's like a kid in a candy store, except their candy is real expensive.
http://www.houseofkolor.com/homepage/
 01-12-2016, 05:54 PM
#177

I remembered I had at one time purchased some acrylic paint from Hobby Lobby (craft store). I sprayed it as a solid color without any blending, pin striping etc. I cleared it with automotive urethane from a local parts house. It was the "house brand". So far it has held up without issue. Because it was a solid color I did no masking so can't comment on how the tape did or did not pull paint off. I was relatively happy with the coverage (yellow and red) but was not trying to save every gram. The paint is cheap so experimenting is easy to do without ruining the budget.
I used rattle can high build auto primer, sanded, touched up the primer, sprayed the color and then cleared after three or four days to assure the acrylic paint was dry.
I just though I'd toss this out there for those the want to experiment a bit.
Ken
PS All the fancy stuff was done by Calli Graphics and sealed under the clear coat.
Last edited by kenh3497; 01-12-2016 at 06:04 PM.
01-12-2016, 06:49 PM
#178
Thread Starter
Ken,
Very nice graphics, but you cheated! If you didn't spend 80 hours painting all of those,,,,it doesn't count!
Very nice graphics, but you cheated! If you didn't spend 80 hours painting all of those,,,,it doesn't count!
Last edited by Portlandflyer; 01-12-2016 at 08:52 PM.
01-12-2016, 10:31 PM
#179
Thread Starter
Here's an overview of how to take an image off the internet and convert it to a vector file to send to the plotter. Keep in mind a JPEG image must be converted before we can send it to the plotter.
The first thing I did was Google "Futaba" and just right click and hit "Copy" on the image I wanted. I then open Corel Draw and "Paste" the image.
The next step is to hit "bitmap", then "Outline Trace, then "Detail Logo".
This will now create a vector file from your JPEG image.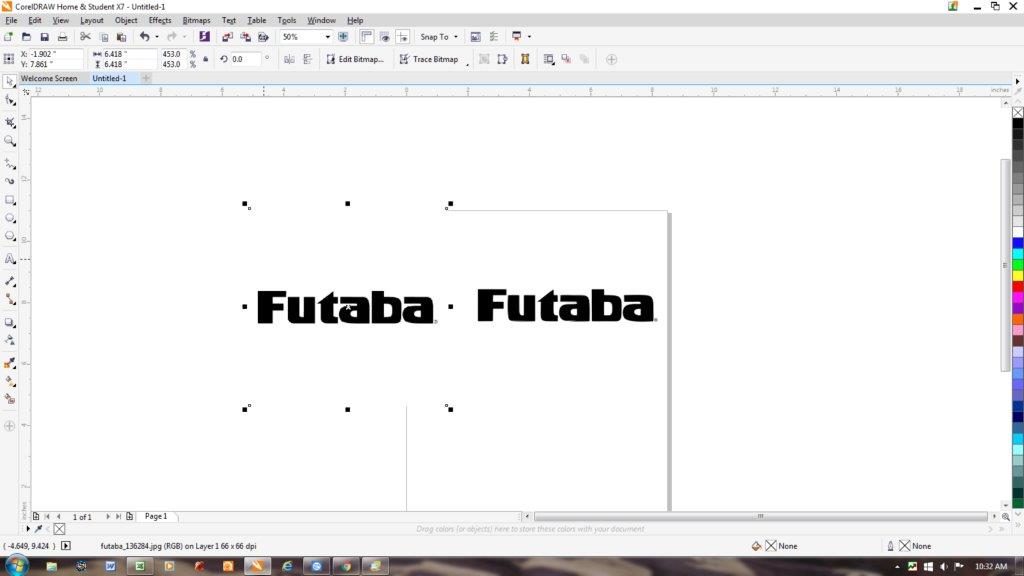 The original image and the vector file are displayed side by side. I just drag the original JPEG off to the side to work on the vector image. After the image is converted they will need to be cleaned up. This is a very simple image and won't require a lot, but some take some time to clean up.
When we zoom in on the image, we can see some raged edges and extra lines that need to be removed.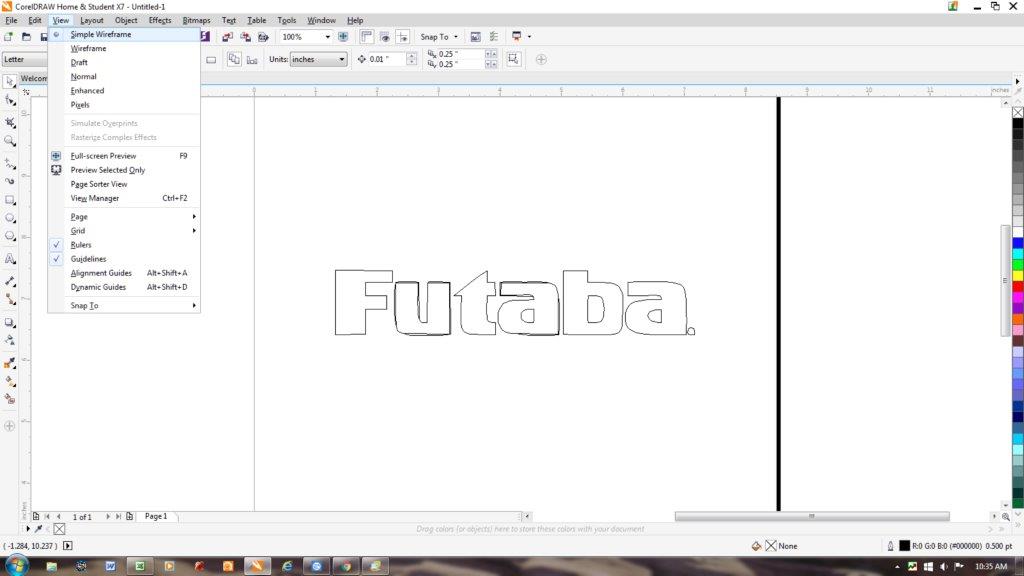
You can see the rough edges and lines that need to be removed even clearer when we zoom in closer.
I use the "Virtual Segment Delete" tool to remove the unwanted lines with just a few clicks. I now use the "Shape" tool to highlight the nodes. When we convert a file, it will have extra nodes that need to be removed. All that is needed to remove them it to double click them and they are gone.
You can see the lines of the image are not all straight. We just click on the node and little arrows will come up. All we have to do is maneuver the arrows to smooth out the lines.
The image is now ready to send to the plotter.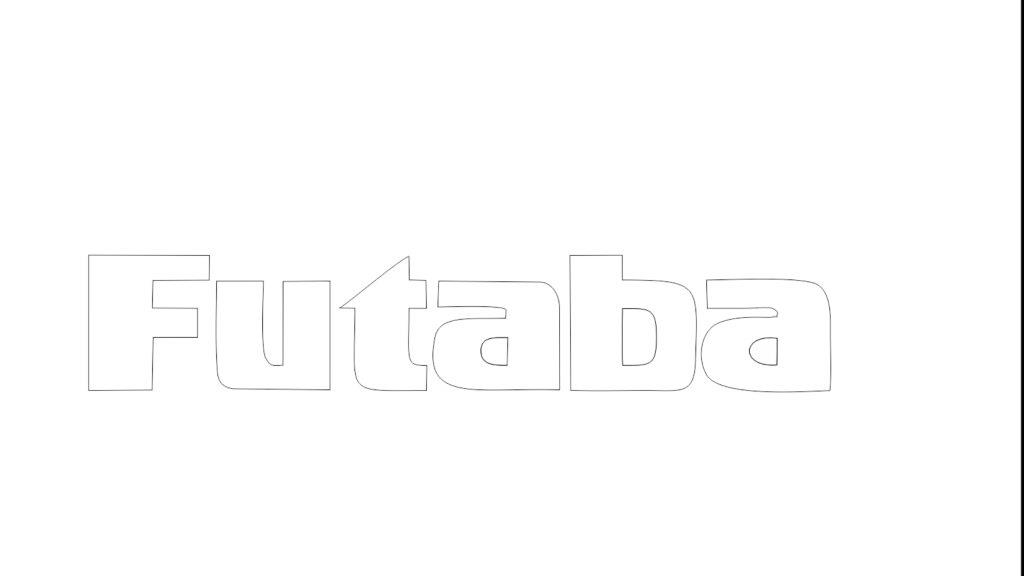
This whole process took about five minutes, but it was a very simple conversion.
The first thing I did was Google "Futaba" and just right click and hit "Copy" on the image I wanted. I then open Corel Draw and "Paste" the image.
The next step is to hit "bitmap", then "Outline Trace, then "Detail Logo".
This will now create a vector file from your JPEG image.
When we zoom in on the image, we can see some raged edges and extra lines that need to be removed.
You can see the rough edges and lines that need to be removed even clearer when we zoom in closer.
I use the "Virtual Segment Delete" tool to remove the unwanted lines with just a few clicks. I now use the "Shape" tool to highlight the nodes. When we convert a file, it will have extra nodes that need to be removed. All that is needed to remove them it to double click them and they are gone.
You can see the lines of the image are not all straight. We just click on the node and little arrows will come up. All we have to do is maneuver the arrows to smooth out the lines.
The image is now ready to send to the plotter.
This whole process took about five minutes, but it was a very simple conversion.
01-13-2016, 12:00 AM
#180

Here's an overview of how to take an image off the internet and convert it to a vector file to send to the plotter. Keep in mind a JPEG image must be converted before we can send it to the plotter.
The first thing I did was Google "Futaba" and just right click and hit "Copy" on the image I wanted. I then open Corel Draw and "Paste" the image.
The next step is to hit "bitmap", then "Outline Trace, then "Detail Logo".
This will now create a vector file from your JPEG image. The original image and the vector file are displayed side by side. I just drag the original JPEG off to the side to work on the vector image. After the image is converted they will need to be cleaned up. This is a very simple image and won't require a lot, but some take some time to clean up.
When we zoom in on the image, we can see some raged edges and extra lines that need to be removed.
You can see the rough edges and lines that need to be removed even clearer when we zoom in closer.
I use the "Virtual Segment Delete" tool to remove the unwanted lines with just a few clicks. I now use the "Shape" tool to highlight the nodes. When we convert a file, it will have extra nodes that need to be removed. All that is needed to remove them it to double click them and they are gone.
You can see the lines of the image are not all straight. We just click on the node and little arrows will come up. All we have to do is maneuver the arrows to smooth out the lines.
The image is now ready to send to the plotter.
This whole process took about five minutes, but it was a very simple conversion.
The first thing I did was Google "Futaba" and just right click and hit "Copy" on the image I wanted. I then open Corel Draw and "Paste" the image.
The next step is to hit "bitmap", then "Outline Trace, then "Detail Logo".
This will now create a vector file from your JPEG image.
When we zoom in on the image, we can see some raged edges and extra lines that need to be removed.
You can see the rough edges and lines that need to be removed even clearer when we zoom in closer.
I use the "Virtual Segment Delete" tool to remove the unwanted lines with just a few clicks. I now use the "Shape" tool to highlight the nodes. When we convert a file, it will have extra nodes that need to be removed. All that is needed to remove them it to double click them and they are gone.
You can see the lines of the image are not all straight. We just click on the node and little arrows will come up. All we have to do is maneuver the arrows to smooth out the lines.
The image is now ready to send to the plotter.
This whole process took about five minutes, but it was a very simple conversion.
01-13-2016, 08:58 AM
#181
Thread Starter
Scott,
Home & Student X7. It is $130 U.S. I think that's less than I payed.
http://www.coreldraw.com/us/product/...ent/?topNav=us
Home & Student X7. It is $130 U.S. I think that's less than I payed.
http://www.coreldraw.com/us/product/...ent/?topNav=us

 01-13-2016, 01:49 PM
#185
Scott,
Home & Student X7. It is $130 U.S. I think that's less than I payed.
http://www.coreldraw.com/us/product/...ent/?topNav=us
Home & Student X7. It is $130 U.S. I think that's less than I payed.
http://www.coreldraw.com/us/product/...ent/?topNav=us
I downloaded the free trial X7 Graphics Suite, but haven't been able to figure out how to do the, "bitmap", then "Outline Trace, then "Detail Logo" thing yet..
01-13-2016, 02:55 PM
#186
Senior Member
Outstanding work. Best I've seen yet and that includes Hebert and Potters work.
Ive been getting my stuff ready. I have some of the paints on hand but of course weather turned frigid and I've been recovering from a cold. While being laid up, decided to buy the airbrush Pat suggested early on and also have metalume and black coming. I'll play with these to start developing some skill and we'll see where I end up in the early trials.
Ive been getting my stuff ready. I have some of the paints on hand but of course weather turned frigid and I've been recovering from a cold. While being laid up, decided to buy the airbrush Pat suggested early on and also have metalume and black coming. I'll play with these to start developing some skill and we'll see where I end up in the early trials.
01-13-2016, 05:37 PM
#187
Thread Starter
OK you owe me! I spent about an hour downloading the trial program that you did to see if it is different from mine and it looks the same.
The important thing is you need to copy a JPEG. You might just do what I did and Google Futaba and then click the "Images
tab in Google. Just find one of the basic Futaba logos and right click and hit Copy. Now pull up a new "desktop" in Corel (File/New). When you have the desktop up on Corel, just right click and hit Paste.
Now that you have a JPEG on the desktop, go to Bitmaps at the top menu. Go down to Outline Trace and then hit click on High Quality Image.
If you don't have a JPEG on your Corel desktop, Outline Trace will not be available.
01-13-2016, 05:58 PM
#188
Thread Starter
Outstanding work. Best I've seen yet and that includes Hebert and Potters work.
Ive been getting my stuff ready. I have some of the paints on hand but of course weather turned frigid and I've been recovering from a cold. While being laid up, decided to buy the airbrush Pat suggested early on and also have metalume and black coming. I'll play with these to start developing some skill and we'll see where I end up in the early trials.
Ive been getting my stuff ready. I have some of the paints on hand but of course weather turned frigid and I've been recovering from a cold. While being laid up, decided to buy the airbrush Pat suggested early on and also have metalume and black coming. I'll play with these to start developing some skill and we'll see where I end up in the early trials.
You know as well as I that a lot of this stuff is just attention to all the little details.
OK when you get your airbrush you will want to run it around 25 to 30 pounds. All of the House of Kolor paints are reduced 50%. I run the same 50% reduction for my HVLP guns and my airbrushes. You may find you need to reduce it a hair more for an airbrush. Now keep this in mind, white is the worst color there is to shoot in an airbrush. Almost all paint brands are the same. The reason is the pigments in white paint are larger. With white, you will get what is called Tip Dry. What is does is literally dry on the tip and needle of the airbrush and all of a sudden it spits out a nice blob of white paint. The best thing to do is to just clean the tip of the brush every now and then, You can usually hear it and it will kind of hiss when it's getting ready to spit. Most other colors are fine. The best color to practice with is black.
OK, one major difference from shooting an airbrush versus an air gun is to always leave the air on with an airbrush. This is for a double action like you will have. Just hold down the trigger all the time. You will then just pull back on the trigger to release the paint. The more you pull back, the more paint comes out. Everyone that starts out wants to stab at it and push the air down and then pull back. If you do that you will have no control over the brush.
Practice on card stock or cardboard. The first thing to do is learn to make uniform dots. Be fairly close and just pull back just a hair until the paint comes out. When you have to dot you want, just move the trigger forward, but leave the air on. The further you are from the surface, the bigger the dot will be and the more paint you will need.
Then start working drawing straight consistent lines, again leaving the air on all the time and just move the brush as you pull back on the trigger. The faster you move the more paint you need. The further you are away, the more paint you need. The closer the less paint.
There is a learning curve, but it comes fast,
01-13-2016, 09:08 PM
#189
Thread Starter
Here is a great tip on how to get clean outside corners when masking. A lot of guys really struggle getting a clean cut. This is what you want the final cuts to look like. 
Here is how to do it. The first cut is on the tape on the bottom of the overlap. Just cut against the top tape. The second cut is over the top of the underlying tape. Here it is: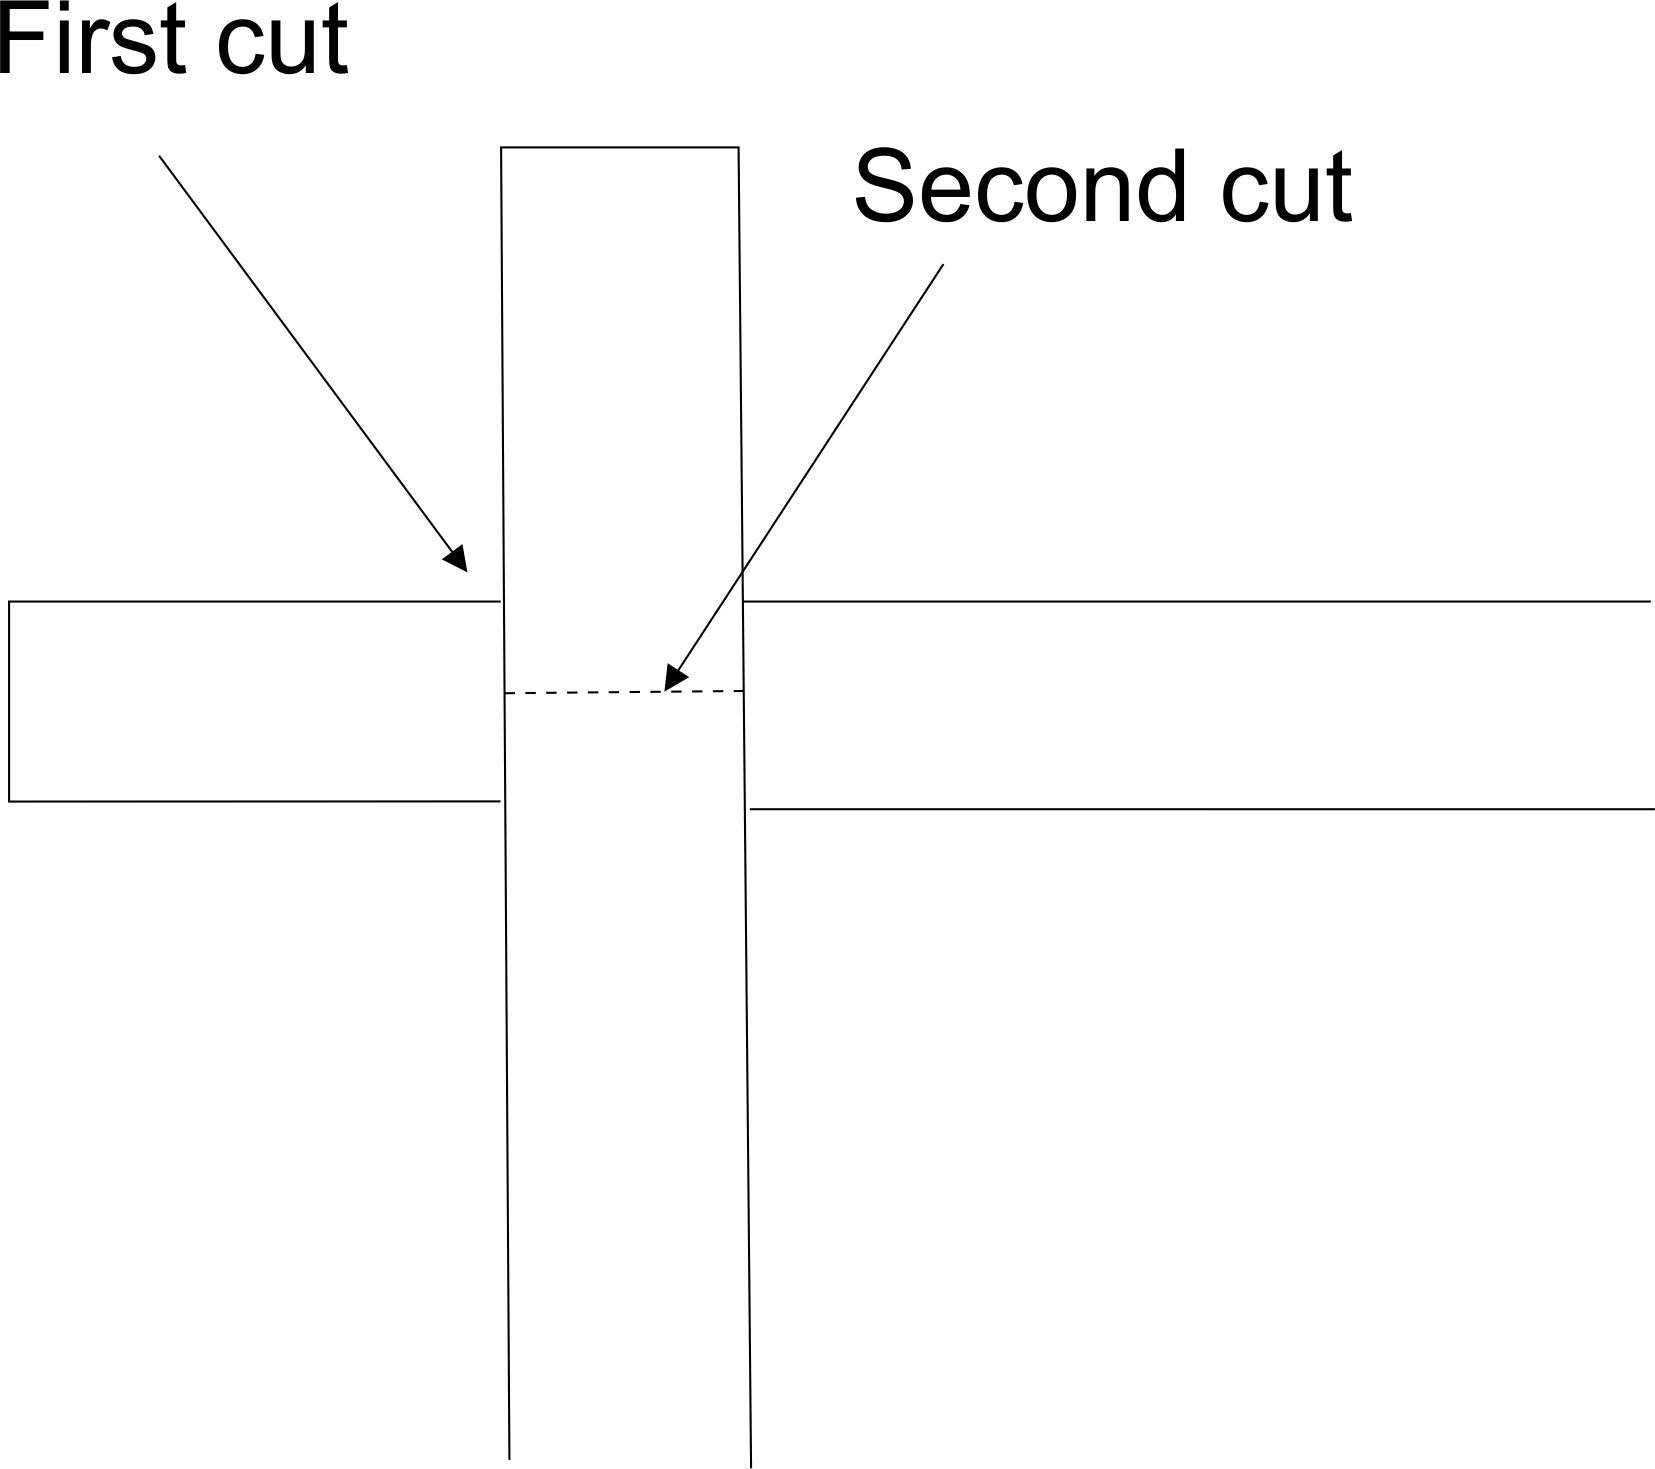
Here is another one.
Here is how to do it. The first cut is on the tape on the bottom of the overlap. Just cut against the top tape. The second cut is over the top of the underlying tape. Here it is:
Here is another one.
01-14-2016, 07:07 AM
#190
Senior Member

Join Date: Nov 2003
Location: Olathe,
KS
Posts: 165
Likes: 0
Received 0 Likes
on
0 Posts
Thanks again Pat.
OK, time for more questions.
On the painting with the HOK colors. How bad are they for you and do you, use a respirator, paint outside, have a paint booth, or anything else that I should know about these. And if I wanted to use other paints like the Auto Air Colors, since they are water-based and less dangerous to health, would they mix ok with the HOK. Thinking of doing the HOK black pearl and metalume for the 3D highlights but the other paints for the base colors, etc. I looked at the auto air aluminum fine and it looks like it would work, except for the fact that it is very delicate to touch; masking over it doesn't sound like an option. So that means that I would most likely have to clear-coat over every layer of the aluminum paint, or just skip it all together.
on the cutting of the masking on the corners, on the post right above, how do you make the first cut against the surface of what you are painting, so as not to damage, slice, leave a mark, etc.
Otherwise, seems easy to follow, probably hard to duplicate. Also, if I am going to learn to use an airbrush correctly anyways, think I will go with the dual action and sell my single action kit. no sense learning to do something twice.
Cheers,
Doug
01-14-2016, 09:39 AM
#191
Thread Starter
Thanks again Pat.
OK, time for more questions.
On the painting with the HOK colors. How bad are they for you and do you, use a respirator, paint outside, have a paint booth, or anything else that I should know about these. And if I wanted to use other paints like the Auto Air Colors, since they are water-based and less dangerous to health, would they mix ok with the HOK. Thinking of doing the HOK black pearl and metalume for the 3D highlights but the other paints for the base colors, etc. I looked at the auto air aluminum fine and it looks like it would work, except for the fact that it is very delicate to touch; masking over it doesn't sound like an option. So that means that I would most likely have to clear-coat over every layer of the aluminum paint, or just skip it all together.
on the cutting of the masking on the corners, on the post right above, how do you make the first cut against the surface of what you are painting, so as not to damage, slice, leave a mark, etc.
Otherwise, seems easy to follow, probably hard to duplicate. Also, if I am going to learn to use an airbrush correctly anyways, think I will go with the dual action and sell my single action kit. no sense learning to do something twice.
Cheers,
Doug
OK, time for more questions.
On the painting with the HOK colors. How bad are they for you and do you, use a respirator, paint outside, have a paint booth, or anything else that I should know about these. And if I wanted to use other paints like the Auto Air Colors, since they are water-based and less dangerous to health, would they mix ok with the HOK. Thinking of doing the HOK black pearl and metalume for the 3D highlights but the other paints for the base colors, etc. I looked at the auto air aluminum fine and it looks like it would work, except for the fact that it is very delicate to touch; masking over it doesn't sound like an option. So that means that I would most likely have to clear-coat over every layer of the aluminum paint, or just skip it all together.
on the cutting of the masking on the corners, on the post right above, how do you make the first cut against the surface of what you are painting, so as not to damage, slice, leave a mark, etc.
Otherwise, seems easy to follow, probably hard to duplicate. Also, if I am going to learn to use an airbrush correctly anyways, think I will go with the dual action and sell my single action kit. no sense learning to do something twice.
Cheers,
Doug
OK let's take them in order. Yes the HOK stuff is pretty stinky stuff. I just paint in my garage with no both. Now do as I say and not as I do. You should really wear a respirator with any of this stuff, even water base. I always wear one when I shoot with a HVLP gun, but don't always with an airbrush. The really bad stuff is clear coats. The catalyst will pickle your brain so never shoot it without a respirator.
You should be fine with using Auto Air. There are tons of custom painters using it and they don't have a problem with it lifting. I have shot some of it and the trick with any water base is to put down a bunch of thin coats and let it dry. You can force it with a hair dryer or a heat gun, but if you try to dry a thick coat it will skim over on the surface and not dry and then it will lift. I have shot their pearl and it is really nice. I haven't used their silver. You should be able to intermix them fine, but I don't think you need to. The key to water base is just take a little more time with it. I would just buy a few of their little bottles and experiment. TCP carries it in small bottles. There should be no need to clear between coats as long as you let it dry.
OK on cutting the tape. Good question. I am testing you guys to see if you are reading this stuff!
 What I do is use a new number 11 or a razor blade and just score the surface of the tape very lightly two or three times. Then you just hold the blade in place and pull up the tape into the blade if that makes sense? In other words don't slice all the way trough the tape. Do the same on the other cut.
 That being said, we are working on very fragile surface and we are going to get flaws and dings. The car and motor cycle guys don't have the same issues. I may be working over a bipe wing for fifteen to twenty hours total and stuff happens. I am kind of at the point now, that if it's a big ding or it bugs me too much I fix it, but the little micro stuff, no way. The reality is, you are going to be the only one that sees it. I have said it before, you better do this stuff for you, because, no one else cares (or very few do). I probably spend about thee to four hours fixing little stuff on a bipe wing and I could probably spend twice that and still have flaws.
I agree, get a good double action and it will serve you well.
01-14-2016, 10:07 AM
#192
Senior Member
Join Date: Nov 2003
Location: Olathe,
KS
Posts: 165
Likes: 0
Received 0 Likes
on
0 Posts
Well, you can bet that I am reading it. and learning a bunch as well.
As far as the painting for me, well, that is pretty much it. Have a top flite sea fury, that technically someone else painted for me,but the way i wanted it. It is in RAF colors. but no rivets, panel lines, etc, just the way I wanted it. there is at least one scale stickler in my club that his first words will be, "the panel lines are missing". Second is my first painting attempt that went on an R140 Q500 plane. I used the auto air colors on it, plus a single stage clear. Learned an important lesson, don't wet-sand water based paints. So I am going to call this my Shabby Chic plane. plus all of the things I learned not to do, and how to do them better in the future.
I have an auto paint store within 30 miles that has the auto air paints, and supposedly I can get the wicked colors from hobby lobby or michael's so will be able to practice some with them as well. I have shot the pearl white auto air, and i love the way in shimmers in the light.
Here is the wording from auto air on their aluminum, which is why I think masking over it will be a problem.
Aluminum Bases are sensitive to touch. Do not wipe clean or scuff after painting as any direct contact will create visible streak marks in the final finish due to the aluminum flakes being bent & crushed when wiped. The aluminum flakes are brilliant but are much different to work with compared to Auto Air 4300 Series silvers. Applying a clear top-coat or candy mid-coat is recommended soon after Aluminum Bases have cured. Apply 4004 Transparent Base or 4030 Auto Air Inter-Coat if extended time is planned before top-coating as inter-coat will protect from direct contact when cleaning prior to clear.
01-14-2016, 10:25 AM
#193
Thread Starter
Well, you can bet that I am reading it. and learning a bunch as well.
As far as the painting for me, well, that is pretty much it. Have a top flite sea fury, that technically someone else painted for me,but the way i wanted it. It is in RAF colors. but no rivets, panel lines, etc, just the way I wanted it. there is at least one scale stickler in my club that his first words will be, "the panel lines are missing". Second is my first painting attempt that went on an R140 Q500 plane. I used the auto air colors on it, plus a single stage clear. Learned an important lesson, don't wet-sand water based paints. So I am going to call this my Shabby Chic plane. plus all of the things I learned not to do, and how to do them better in the future.
I have an auto paint store within 30 miles that has the auto air paints, and supposedly I can get the wicked colors from hobby lobby or michael's so will be able to practice some with them as well. I have shot the pearl white auto air, and i love the way in shimmers in the light.
Here is the wording from auto air on their aluminum, which is why I think masking over it will be a problem.
Aluminum Bases are sensitive to touch. Do not wipe clean or scuff after painting as any direct contact will create visible streak marks in the final finish due to the aluminum flakes being bent & crushed when wiped. The aluminum flakes are brilliant but are much different to work with compared to Auto Air 4300 Series silvers. Applying a clear top-coat or candy mid-coat is recommended soon after Aluminum Bases have cured. Apply 4004 Transparent Base or 4030 Auto Air Inter-Coat if extended time is planned before top-coating as inter-coat will protect from direct contact when cleaning prior to clear.
As far as the painting for me, well, that is pretty much it. Have a top flite sea fury, that technically someone else painted for me,but the way i wanted it. It is in RAF colors. but no rivets, panel lines, etc, just the way I wanted it. there is at least one scale stickler in my club that his first words will be, "the panel lines are missing". Second is my first painting attempt that went on an R140 Q500 plane. I used the auto air colors on it, plus a single stage clear. Learned an important lesson, don't wet-sand water based paints. So I am going to call this my Shabby Chic plane. plus all of the things I learned not to do, and how to do them better in the future.
I have an auto paint store within 30 miles that has the auto air paints, and supposedly I can get the wicked colors from hobby lobby or michael's so will be able to practice some with them as well. I have shot the pearl white auto air, and i love the way in shimmers in the light.
Here is the wording from auto air on their aluminum, which is why I think masking over it will be a problem.
Aluminum Bases are sensitive to touch. Do not wipe clean or scuff after painting as any direct contact will create visible streak marks in the final finish due to the aluminum flakes being bent & crushed when wiped. The aluminum flakes are brilliant but are much different to work with compared to Auto Air 4300 Series silvers. Applying a clear top-coat or candy mid-coat is recommended soon after Aluminum Bases have cured. Apply 4004 Transparent Base or 4030 Auto Air Inter-Coat if extended time is planned before top-coating as inter-coat will protect from direct contact when cleaning prior to clear.
Actually what they are saying applies to any sliver. It's not a sticking issue, rather like they say, more an issue of damaging the silver surface. I deal with it too with HOK. What I do is on the areas I paint black, you don't have a problem, but the areas that are left silver can have blemishes. What I do in my final touch up is just re mask those areas and shoot a light mist of silver (Metalume) over it to clean it up. One other thing you can do that will stop that is to shoot their 4030 Inter Coat clear over the silver. Inter Coat clear is just carrier with no pigment in it. HOK Inter Coat is SG100. I buy it by the Quart.
Even with HOK Metalume I have to let it set about 30 to 40 minutes before I mask over it, or it will leave masking marks.
I still think you will be fine with the Auto Air silver. Just give it lots of dry time.
I really like Wicked too. Very nice paint. I would change over to a water base, but I have a lot of working knowledge with HOK and I own a bunch of it, so I stick with it.
01-14-2016, 01:33 PM
#194
Scott,
OK you owe me! I spent about an hour downloading the trial program that you did to see if it is different from mine and it looks the same.
The important thing is you need to copy a JPEG. You might just do what I did and Google Futaba and then click the "Images
tab in Google. Just find one of the basic Futaba logos and right click and hit Copy. Now pull up a new "desktop" in Corel (File/New). When you have the desktop up on Corel, just right click and hit Paste.
Now that you have a JPEG on the desktop, go to Bitmaps at the top menu. Go down to Outline Trace and then hit click on High Quality Image.
If you don't have a JPEG on your Corel desktop, Outline Trace will not be available.
") .
.I actually used a JR image. Just checked and it's a PNG image. Need to do some more searching.
01-14-2016, 01:41 PM
#195
Thread Starter
Scott,
I expect two drinks and I'm not a cheap date.
It shouldn't be an issue. If you go to this page in Google and find an image, then just right click and save it, you can just paste in into Corel and it will be in a format it can work with.
https://www.google.com/search?q=jr+r...8mCuMQ_AUICCgD
I expect two drinks and I'm not a cheap date.
It shouldn't be an issue. If you go to this page in Google and find an image, then just right click and save it, you can just paste in into Corel and it will be in a format it can work with.
https://www.google.com/search?q=jr+r...8mCuMQ_AUICCgD
01-14-2016, 01:46 PM
#196
Thread Starter
Scott,
I copy and pasted this JR logo and converted it in about 10 seconds.
The bottom one is the converted vector file and you can see it needs to be cleaned up a bit.
I copy and pasted this JR logo and converted it in about 10 seconds.
The bottom one is the converted vector file and you can see it needs to be cleaned up a bit.
01-14-2016, 02:55 PM
#198
Thread Starter
Good stuff on airbrushes.
Terry Hill..one of the best in the business; https://www.youtube.com/watch?v=rxC_...ature=youtu.be
Additional good stuff: https://www.youtube.com/watch?v=REkKctz-zLY
Here are the basic: https://www.youtube.com/watch?v=YrP6o3QmJ30
Terry Hill..one of the best in the business; https://www.youtube.com/watch?v=rxC_...ature=youtu.be
Additional good stuff: https://www.youtube.com/watch?v=REkKctz-zLY
Here are the basic: https://www.youtube.com/watch?v=YrP6o3QmJ30
01-14-2016, 08:51 PM
#200
Thread Starter
It's in the third menu on the side bar on the left. Just hold it down and it will bring up another menu and it's the third one down.
Oh, one other thing I forgot about. Before you can work on the file you have to "Ungroup" it.
1) Be sure and click on the object you are working on (it will now have handles on the image).
2) Go to the top menu and click "Object"
3) Go down to "Group"
4) Click "Ungroup all objects"
You can now edit the file with the Shape tool to rework the nodes and the Virtual Delete tool. After you are done working on the file, be sure and go back and Regroup it or each part will be separate