


Dave Patrick super cub
 08-25-2004 | 12:30 PM
#176
Junior Member
Joined: Feb 2003
Posts: 13
Likes: 0
Received 0 Likes
on
0 Posts
From: Marathon,
ON, CANADA
Just Excellent! Still admiring after getting the plane well over a month ago. Heck I waited 7 months for this. A Saito 150 will power it. Can anyone provide a picture or two showing the installation of engine of choice.
Wayne
Wayne
 08-26-2004 | 02:51 AM
#177

My Feedback: (6)
Joined: Mar 2004
Posts: 28
Likes: 0
Received 0 Likes
on
0 Posts
From: El Paso,
TX
To all
I just got the saito 182 twin. Has any one else used the engine? And if so whatdid you use to extend the engine out about 1 1/2 inch? hard wood? , and glue the hech out of it? I would very much apprictate the help and in put.
and Thank you
The saito does fit in the cowl well with plenty of room for the driver.
08-28-2004 | 10:29 PM
#179
Senior Member
My Feedback: (9)
Joined: Oct 2002
Posts: 546
Likes: 0
Received 0 Likes
on
0 Posts
From: On a Grass Strip,
NC
Hi Guys, Your right about the saito 150 not fitting. Thats the only reason that I did'nt mount one.
I went out and bought a new saito 120 and it just barely fits, although the very front corners of the
rocker covers are just touching the inside of the cowl. I for sure did'nt want to hack up my cowling.
I have the white one and I have painted it in a scale 1976 green and white paint scheme. If you guys have not tried the new klass coat epoxy system, you dont know what your missing. Flows out beautiful, and adheres to the ultacoat with no problems at all.
Regards,
Scott
08-29-2004 | 07:39 AM
#180
Thread Starter
Senior Member
My Feedback: (1)
Joined: Sep 2002
Posts: 897
Likes: 0
Received 0 Likes
on
0 Posts
From: Mt Airy, MD
Sounds good Scott but where are the pictures? How about some info on this paint you mentioned. Do they have a web site?
08-29-2004 | 01:21 PM
#181

Senior Member
My Feedback: (1)
Joined: Jun 2002
Posts: 274
Likes: 0
Received 0 Likes
on
0 Posts
From: Allentown,
PA
Hey guys! I don't know what you're doing but my Saito 150 fit in the cowl without cutting it with no problems. Here's some pictures!
08-29-2004 | 01:32 PM
#182
Senior Member
My Feedback: (1)
Joined: Jun 2002
Posts: 274
Likes: 0
Received 0 Likes
on
0 Posts
From: Allentown,
PA
Here's some more!
The only problem that I had, and was wondering if anyone had the same problem was that the cown pre-drilled mounting holes were too far back and when I first measured to mount the engine, the distance that I had from the firewall to the front of the thrust washer was 6 5/8 in. instead of the 6 1/8 as per the instructions. If I would have used the original holes I would have had to use the mounting blocks and I didn't want to do that. So I drilled some new holes and then got my proper clearance. This is something that I have to tell Dave 'cause the cowl was definetly drilled wrong! Other than that so far, it's been without a hitch!
The only problem that I had, and was wondering if anyone had the same problem was that the cown pre-drilled mounting holes were too far back and when I first measured to mount the engine, the distance that I had from the firewall to the front of the thrust washer was 6 5/8 in. instead of the 6 1/8 as per the instructions. If I would have used the original holes I would have had to use the mounting blocks and I didn't want to do that. So I drilled some new holes and then got my proper clearance. This is something that I have to tell Dave 'cause the cowl was definetly drilled wrong! Other than that so far, it's been without a hitch!

 08-30-2004 | 10:41 AM
#184

According to the instruction manual , you mount the cowl before installing the engine. Then you measure the distance from the firewall to the cowl and add 1/8" They say that "their plane" measured 6 1/8" but that yours will probably vary.
(On my kit, it measured 6 1/2").
The holes to mount the cowl are NOT drilled incorrectly. You just didn't measure it first.
(On my kit, it measured 6 1/2").
The holes to mount the cowl are NOT drilled incorrectly. You just didn't measure it first.
08-30-2004 | 06:53 PM
#186
Junior Member
Joined: Sep 2003
Posts: 8
Likes: 0
Received 0 Likes
on
0 Posts
From: Miami,
FL
I have been using the Saito 182T for 6 months in a Hanger 9 Taylor Craft. Started with an on board glow but after it stopped working I removed It. I set up the two carbs as per the instructions and I have not had to adjust the mixtures since I took the engine off the test stand.
I only use Cool Power 30% Heli. fuel ( as recommended by the Saito Web site) and I have never had a problem - no dead sticks, GREAT power,
and I get 18 to 20 min. flights on a 24oz tank.
Hope to get my new Cub tomorrow - I will buy a second Saito 182T.[img][/img]
I only use Cool Power 30% Heli. fuel ( as recommended by the Saito Web site) and I have never had a problem - no dead sticks, GREAT power,
and I get 18 to 20 min. flights on a 24oz tank.
Hope to get my new Cub tomorrow - I will buy a second Saito 182T.[img][/img]
08-31-2004 | 01:07 AM
#187
Senior Member
My Feedback: (1)
Joined: Jun 2002
Posts: 274
Likes: 0
Received 0 Likes
on
0 Posts
From: Allentown,
PA
The cowl is off center by 1/8 in. and I can live with that since I got clearance around the valve covers and they're not touching the cowl.
My holes were definetely drilled too far back, as I stated, in my airplane the distance from the firewall to the front of the thrust washer was 6 5/8 in. At this distance (never mind adding another 1/8 in.) using the stock mount and with the engine all the way forward I still wouldn't have cleared the front of the cowl unless I used the wood blocks.
My holes were definetely drilled too far back, as I stated, in my airplane the distance from the firewall to the front of the thrust washer was 6 5/8 in. At this distance (never mind adding another 1/8 in.) using the stock mount and with the engine all the way forward I still wouldn't have cleared the front of the cowl unless I used the wood blocks.
08-31-2004 | 08:07 AM
#188
Thread Starter
Senior Member
My Feedback: (1)
Joined: Sep 2002
Posts: 897
Likes: 0
Received 0 Likes
on
0 Posts
From: Mt Airy, MD
Orvel, am I not reading this right or do you mean the holes were too far forward? If you needed the blocks then that tells me the cowl is forward and you moved it back. Mine measures 6 1/2" so if I were to stick with 6 1/8" I'd have to move the cowl back. I'm going to use the standoffs on my OS160 if I ever find the time to put it all together. How's yours coming? Flown it yet? I'm still waiting to see a bunch of pictures of the different paint schemes.
Bud
Bud
08-31-2004 | 11:07 AM
#189
Senior Member
My Feedback: (1)
Joined: Jun 2002
Posts: 274
Likes: 0
Received 0 Likes
on
0 Posts
From: Allentown,
PA
Bud, I guess "forward" is relative depending on how you're looking at the cowl. What I meant is that they (the holes) were too close to the rear edge of the cowl, or too far "back" looking at it from the front. So looking at it from this perspective, my cowl was then too far forward (didn't even look right making the nose too long) necessitating the use of the blocks had I used the original holes. Mine is coming slow, haven't had the time to work too much on it ( I travel a lot on business). But I do have a few days off this week and I'm planning to make some progress--hopefully!
08-31-2004 | 01:49 PM
#190
Thread Starter
Senior Member
My Feedback: (1)
Joined: Sep 2002
Posts: 897
Likes: 0
Received 0 Likes
on
0 Posts
From: Mt Airy, MD
O.K.....now i've got it, depends on how your looking at it. I'm a little slow sometime. As forrest gump said..."I'm not a smart man"  Hear ya on the travel, been there...done that! Now my son's doing it. I have no real excuse for not getting mine done, I could lay the other promised projects aside and do it but think i'll enjoy it more this winter. Still toying with the idea of floats on it instead of my other cub...or both? Will take some mods. to floats (cross bracing) and new forward fuselage brackets to fit new cub, using Swenson brackets and DPM's
are too narrow to fit my already made upper float attachments. Hope somebody else does theirs on floats, gotta be a pretty sight!
Bud
Hear ya on the travel, been there...done that! Now my son's doing it. I have no real excuse for not getting mine done, I could lay the other promised projects aside and do it but think i'll enjoy it more this winter. Still toying with the idea of floats on it instead of my other cub...or both? Will take some mods. to floats (cross bracing) and new forward fuselage brackets to fit new cub, using Swenson brackets and DPM'sare too narrow to fit my already made upper float attachments. Hope somebody else does theirs on floats, gotta be a pretty sight!
Bud
08-31-2004 | 03:02 PM
#191
Senior Member
My Feedback: (1)
Joined: Jun 2002
Posts: 274
Likes: 0
Received 0 Likes
on
0 Posts
From: Allentown,
PA
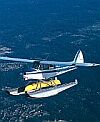
Bud, I understand in the near future Dave Patrick will be offering a set of scale floats for the Super Cub, in fact I heard he went to China to inspect the prototypes. If they're anything like the kit they should be dandy. I use to fly a Great Planes Cub on floats and it's a lot of fun, so if I can get this Cub on floats I definetely will!
08-31-2004 | 09:45 PM
#193
Senior Member
My Feedback: (6)
Joined: Jul 2003
Posts: 213
Likes: 0
Received 0 Likes
on
0 Posts
From: West Chester , OH
Well my dad made mention that there was no pics of his so here they are! (builder jim's Cub)
These are from when he first received it, to it's near completion!
These are from when he first received it, to it's near completion!
09-01-2004 | 08:09 PM
#195
Senior Member
My Feedback: (6)
Joined: Jul 2003
Posts: 213
Likes: 0
Received 0 Likes
on
0 Posts
From: West Chester , OH
The first flight for this aircraft will be Sept 16th! Our Four Stroke rally is during that weekend, and my father and I are quite excited! Thanks for the good words and I'm sure our flight will be recorded on this thread.
Thanks Jonathan
Thanks Jonathan
09-02-2004 | 08:43 AM
#196
Senior Member
Joined: Apr 2002
Posts: 130
Likes: 0
Received 0 Likes
on
0 Posts
From: New York, NY
Anyone have a balance problem with this model. I have a saito 1.50 in mine with a slimline Pitts muffler and it seems way tail heavy. The rest of the plane is set up per instructions. Comments?
09-03-2004 | 07:45 AM
#198
Thread Starter
Senior Member
My Feedback: (1)
Joined: Sep 2002
Posts: 897
Likes: 0
Received 0 Likes
on
0 Posts
From: Mt Airy, MD
Jon, in your picture looking down on your installation...what's that unit next to your battery? Is it part of the on board glow and if so was that part of the extra $45.00 package or did it come with the $35.00 price for the unit?
Bud
Bud
09-03-2004 | 07:32 PM
#199
Thread Starter
Senior Member
My Feedback: (1)
Joined: Sep 2002
Posts: 897
Likes: 0
Received 0 Likes
on
0 Posts
From: Mt Airy, MD
Well....you have to start somewhere so I decided to get my float attach points and cross bracing set before I do anything else. Now I can fly wheels or floats. If the wing had been a full clark Y I would have set 0-0 on the float/wing relation but since Dave did some minor mods to the wing I set the floats at negative 1 degree, with that big wing I probably could have left it at 0-0.
09-04-2004 | 04:14 AM
#200
Senior Member
Joined: Jan 2003
Posts: 271
Likes: 0
Received 0 Likes
on
0 Posts
From: westerville,
OH
Bud, next to the battery pack is jr`s 700 reciever, in front of the battery pack is the edr control box which has been mounted to the right side and forward just partly under the dash, the edr battery pack is now to the left side just under the dash, not shown in photo`s. no camera to retake, did this arrangment for balance! Wow, the bud perfect floats, really make your cub look good! nice job!

