


Need advise and help on new project
 02-10-2014 | 03:49 PM
#1
Thread Starter

My Feedback: (14)
Joined: Mar 2013
Posts: 131
Likes: 0
Received 0 Likes
on
0 Posts
From: Clayton,
GA
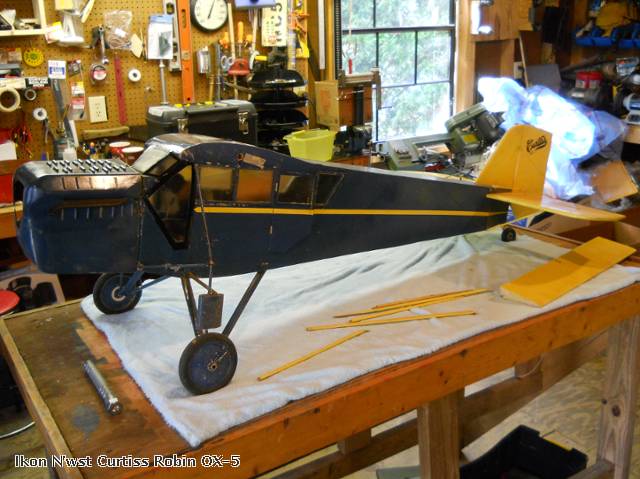
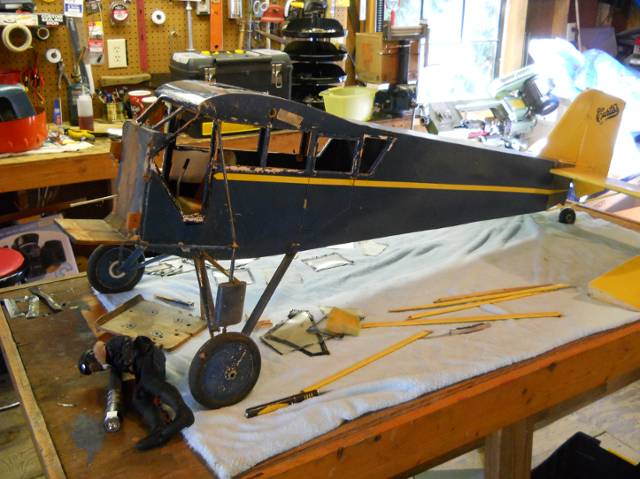
Hi Guy's, I've got a new project in my shop and I've hit a wall. I recently got an older built Curtiss Robin OX-5 that was built many years ago using a kit from the now defunct company which was called Ikon N'wst.
The plane is very sound and intact with no fuel soaked wood or rot. I've got just about all the covering off and striped down to the frame. Here's my question! How would a person go about getting the tail apart so as to recover it? It's glued with what appears to be your standard white wood glue.
I've read where people soaked the glue over several day's using white vinegar and even 90% rubbing alcohol and the list goes on. Some say they use a heat gun?
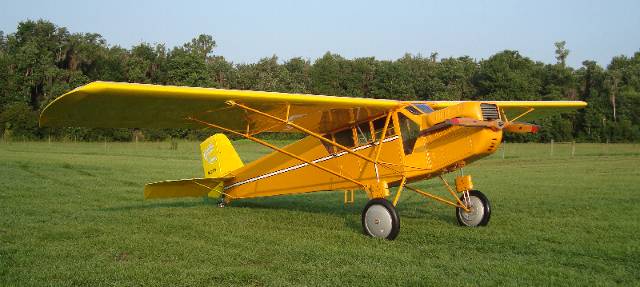
What'ya think? I'll post pic's of the beast later. Here's a pic of a real Curtiss Robin.
The plane is very sound and intact with no fuel soaked wood or rot. I've got just about all the covering off and striped down to the frame. Here's my question! How would a person go about getting the tail apart so as to recover it? It's glued with what appears to be your standard white wood glue.
I've read where people soaked the glue over several day's using white vinegar and even 90% rubbing alcohol and the list goes on. Some say they use a heat gun?
What'ya think? I'll post pic's of the beast later. Here's a pic of a real Curtiss Robin.
 02-10-2014 | 04:39 PM
#2

I just recovered an Ultra Stick Lite and while the horizontal stab had come off, I covered the rest while on the plane. If there no structural problems, I would try to leave it intact. That said, I am very interested in what others say, should I have to do it again.
02-10-2014 | 06:19 PM
#3
You usually can't get them off, and there's rarely a reason you need to. Just cover 1/4 inch or so past the corner where the stab and fuselage meets when you do the stab, then stop right at the corner when you do the fuselage. Nobody will ever know there's a seam there.
02-11-2014 | 02:12 AM
#4

I'm in agreement with the others. Strip the covering, but leave the control surfaces installed.
I am envious of your acquisition. The IKON Curtis Robin is the one kit that I buy, right now.
I've built or owned several IKON models. They look great and fly very well.
I am envious of your acquisition.
The IKON Curtis Robin is the one kit that I buy, right now.I've built or owned several IKON models. They look great and fly very well.
Last edited by TomCrump; 02-11-2014 at 02:14 AM.
02-11-2014 | 06:37 AM
#5
Thread Starter
My Feedback: (14)
Joined: Mar 2013
Posts: 131
Likes: 0
Received 0 Likes
on
0 Posts
From: Clayton,
GA
I don't think there were very many Curtiss Robin kit's ever sold compared to Ikon's other kit's. The Ikon Monocoupe seem's to be one of the most popular. This plane appears to have sat for many year's but it's held up to the test of time very well. I plan on replacing all the hardware and building new struts as well.
02-11-2014 | 11:26 AM
#6
Thread Starter
My Feedback: (14)
Joined: Mar 2013
Posts: 131
Likes: 0
Received 0 Likes
on
0 Posts
From: Clayton,
GA
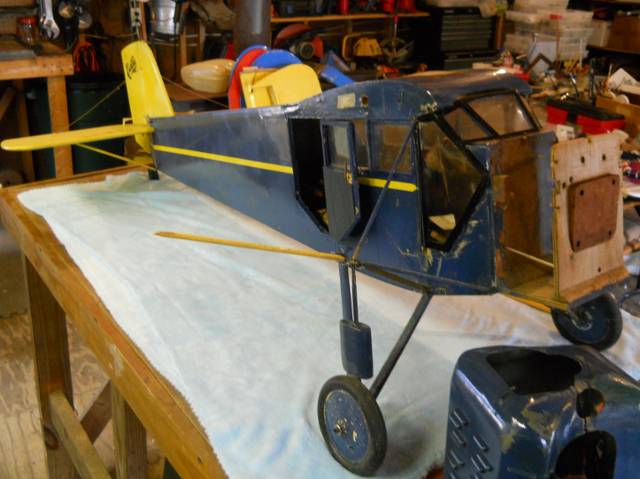
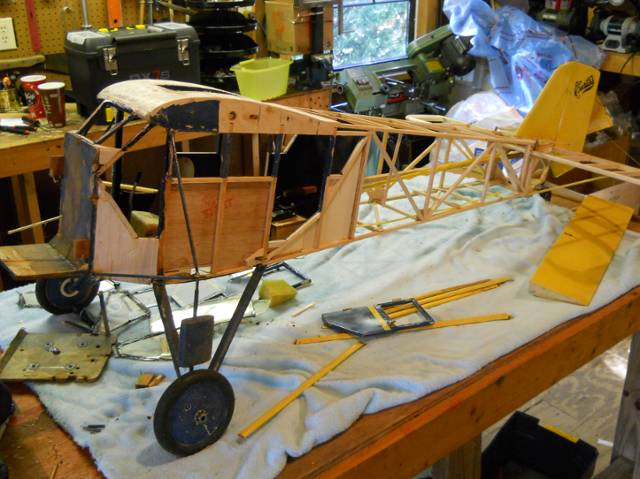
Here's a few pics of the old bird.
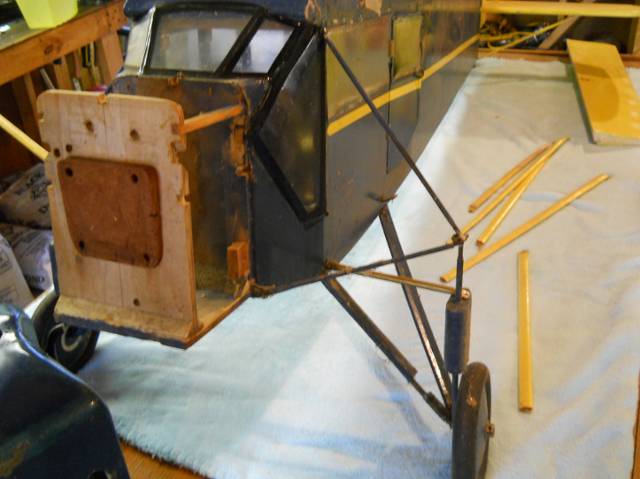

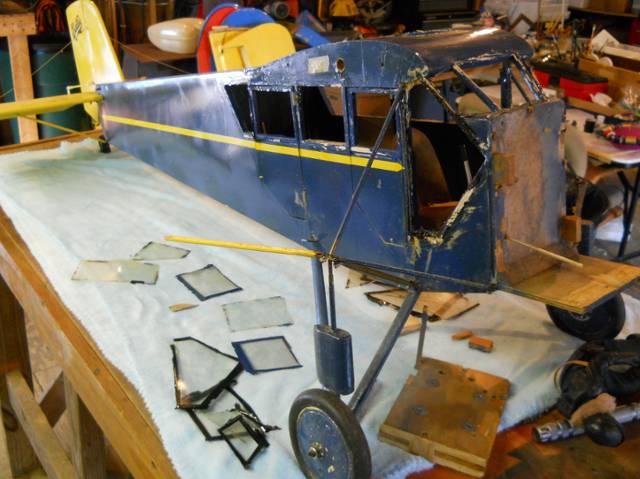
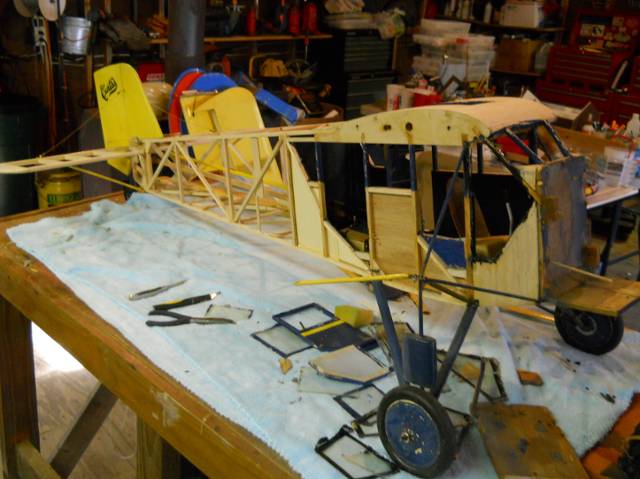
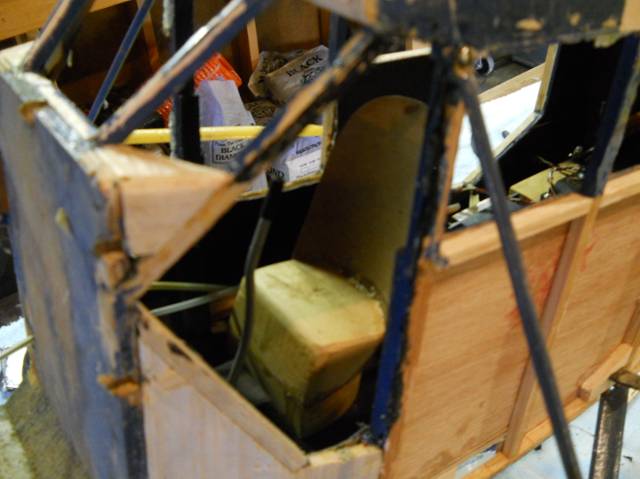
I'm relieved to hear that I can leave the tail assembled during the covering process. I'm going to put some hatches in the rear fuse before I cover it so as to have access to the rear linkage's.
I'm relieved to hear that I can leave the tail assembled during the covering process. I'm going to put some hatches in the rear fuse before I cover it so as to have access to the rear linkage's.
02-13-2014 | 03:07 AM
#9
May I suggest Natural Solartex and paint ? It'd be a perfect combination for this unusual model.
If you took pictures of the Curtis logo, etc, new graphics cam easily be reproduced.
I build mostly scale models. The last 7 or 8 have all been covered in Solartex and then painted. The covering is so easy to apply, that it spoils you. LOL
If you took pictures of the Curtis logo, etc, new graphics cam easily be reproduced.
I build mostly scale models. The last 7 or 8 have all been covered in Solartex and then painted. The covering is so easy to apply, that it spoils you. LOL
02-13-2014 | 07:58 AM
#10
Thread Starter
My Feedback: (14)
Joined: Mar 2013
Posts: 131
Likes: 0
Received 0 Likes
on
0 Posts
From: Clayton,
GA
May I suggest Natural Solartex and paint ? It'd be a perfect combination for this unusual model.
If you took pictures of the Curtis logo, etc, new graphics cam easily be reproduced.
I build mostly scale models. The last 7 or 8 have all been covered in Solartex and then painted. The covering is so easy to apply, that it spoils you. LOL
If you took pictures of the Curtis logo, etc, new graphics cam easily be reproduced.
I build mostly scale models. The last 7 or 8 have all been covered in Solartex and then painted. The covering is so easy to apply, that it spoils you. LOL
 02-13-2014 | 08:01 AM
#11
Thread Starter
My Feedback: (14)
Joined: Mar 2013
Posts: 131
Likes: 0
Received 0 Likes
on
0 Posts
From: Clayton,
GA
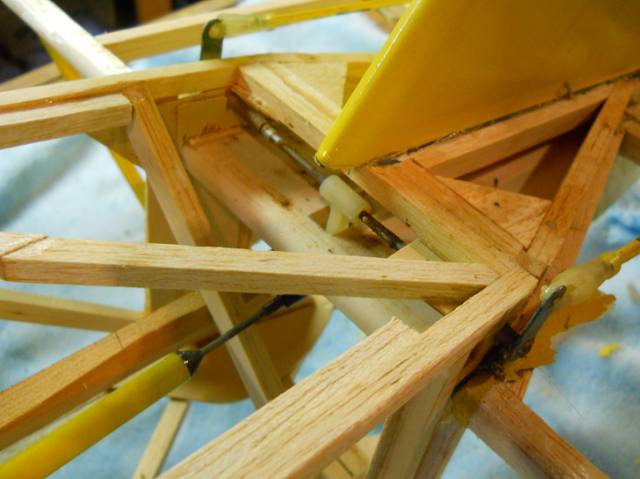
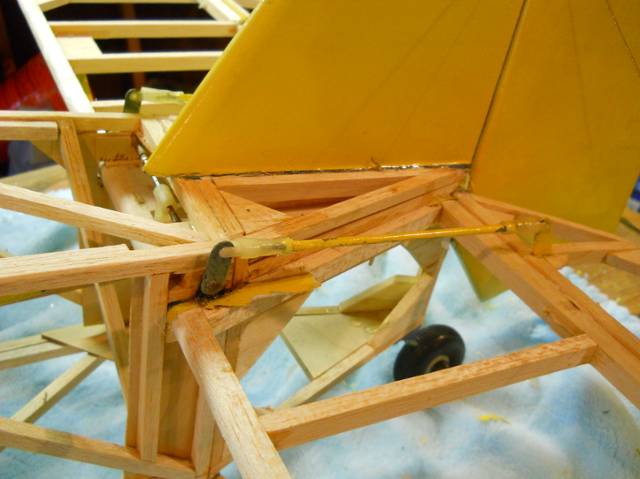
What are the blocks for just above the tire's? The landing gear has built in spring loaded shocks just above those block's and those shock's seem to work quite well.
02-13-2014 | 12:48 PM
#12


My Feedback: (1)
Those are the simulated full scale streamlined housings for the bungee rings which provide the springing action on those telescoping struts. My guess is on the full scale there are perhaps six rings on each strut with three in front and three in the back working in tension.
Alternately instead of multiple short rings of bungee its it may be one in front and one in back with a single continuous wrap,
John
02-13-2014 | 02:56 PM
#13
Tom, I've never used Solartex before but if you guy's are willing to stick with me on this one I would like to try it on this plane. Callie graphic's will be making all my decal's. Where's the best place to order the Solartex? Would a 15 M roll be enough? If I paint it do I need to get the natural color Solartex? Can Solartex be painted using PPG automotive Global 2000 paint? My best friend restore's high dollar antique car's and I could get a paint job for free
If your Robin has a 100" wingspan, or less, I think a 10 meter roll should suffice.
I fel that Natural Solartex is the way to go. It accepts paint better than the colored product.
Just about any paint works over Solartex, but I haven't tried auto paint. I suggest that you make up a small test panel, and ask your friend to spray it with the paint that you plan to use. It's bettter to screw up a test panel, if something goes wrong.
There are reasons to not use primer whjich we don't need to go into. Just spray the paint directly to the Solartex.
I have a pic of what goes under your "blocks". My current build has them, too.
02-13-2014 | 04:03 PM
#14
Thread Starter
My Feedback: (14)
Joined: Mar 2013
Posts: 131
Likes: 0
Received 0 Likes
on
0 Posts
From: Clayton,
GA
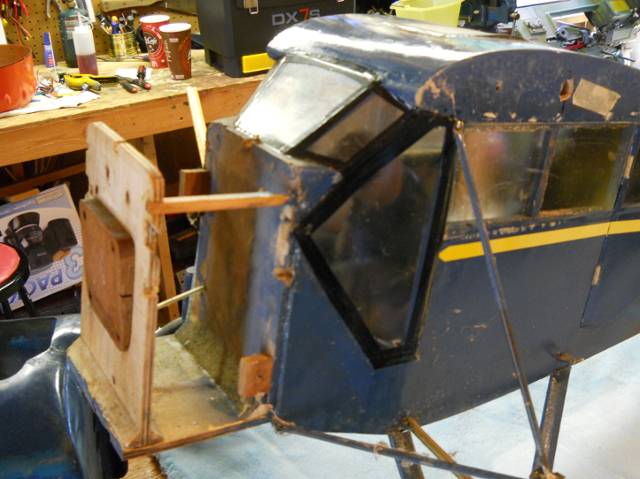
Tom, My Curtiss has a 98" wing. I'll get me some of the natural solartex on the way. I've also got to order some streamline tubing to replace some that is damaged on the landing strut. I'm going to clean the frame up and make a list of part's I need to order so I can move on this baby. I'm going to replace all the horn's, rod's, servo's and hinges. The original wing struts were made from wood. I would like to make the from some thin wall 1/2" streamline tubing if possible?
On another note: I'm building an animated pilot for this plane. I've already got the stick and servo's built and tested it with my radio and it work's great. Now if I can just figure out how to stuff it in the plane.
Here's a video of a similar animated pilot like the one I'm doing now.
http://www.youtube.com/watch?v=gGVteelff4o
") 02-13-2014 | 04:43 PM
02-13-2014 | 04:43 PM
#17
Senior Member
Joined: Aug 2009
Posts: 420
Likes: 0
Received 0 Likes
on
0 Posts
From: Gunton, MB, CANADA
What'ya think? I'll post pic's of the beast later. Here's a pic of a real Curtiss Robin.
[/QUOTE]
Never heard of this plane before. Thanks for posting. I love it.
Good luck with your's.
Never heard of this plane before. Thanks for posting. I love it.
Good luck with your's.
02-13-2014 | 05:47 PM
#18
Thread Starter
My Feedback: (14)
Joined: Mar 2013
Posts: 131
Likes: 0
Received 0 Likes
on
0 Posts
From: Clayton,
GA
Good luck with your's.[/QUOTE]
These planes were made around 1928 and I don't think there were very many produced. Like the real plane I don't think many RC models ever made it to the field either. This model I have is an Ikon N'wst kit plane. From what I hear of these kit's I would say half or less were ever completed due to poor plans and instruction, Poor wood choice and quality and the list is endless. Who ever the old timer was that originally built my plane was an old school master builder to say the least.
I personally could never build this plane if I had a new kit sitting in front of me. I'm very fortunate that another RCU member here allowed me the opportunity to own this plane so I could restore it. I got another hard to come by plane from him as well that was built by the same builder. I'll post pics of it this weekend.
02-14-2014 | 03:13 AM
#19
Tom, My Curtiss has a 98" wing. I'll get me some of the natural solartex on the way. I've also got to order some streamline tubing to replace some that is damaged on the landing strut. I'm going to clean the frame up and make a list of part's I need to order so I can move on this baby. I'm going to replace all the horn's, rod's, servo's and hinges. The original wing struts were made from wood. I would like to make the from some thin wall 1/2" streamline tubing if possible?
I've built several IKON kits, and do not share the view of their products that you have related.
IKON kits were for advanced builders. Their design assumed that the builder had advanced his skills to the point where these kits would be challenging, but completion was not beyond their reach. IKON was a cottage industry. They didn't have die cutting presses. The kits were cut by hand. Some alternate materials were implemented, which may explain the "poor wood" comment.
The plans were fine. The instructions, because this model was for advanced builders, were minimal. They covered only any areas where the designer felt the builder may have problems. Emil (the designer) had an unusual way of wording things, which sometimes left his instructions open for interpretation. Back in the day, a quick call to him would clear things up.
There are several of us who collect, and build these kits. We enjoy the challenge, and yes, the quality of these kits.
Here are pics of some of the IKON designs that I have owned and built over the years. My latest one (the green/yellow Cessna Airmaster) was built 2 years ago. The kit was still in great shape ! Although some are 20 years old, I still have all of these, except the orange/blue Fairchild which met an early demise.
 02-15-2014 | 12:31 PM
#20
Thread Starter
My Feedback: (14)
Joined: Mar 2013
Posts: 131
Likes: 0
Received 0 Likes
on
0 Posts
From: Clayton,
GA
The wing struts on IKON desiogns are functional. Be careful, if you plan to use streamlined tubing. The K&S product is thin wall, and is not sufficient,.I hear, but have not tried that this tubing will work. http://www.flygtm.com/products.php?type=struts I assume the price is on a per foot basis. I would ask the vendor if they are of sufficient strength for a wing with functional struts.
I've built several IKON kits, and do not share the view of their products that you have related.
IKON kits were for advanced builders. Their design assumed that the builder had advanced his skills to the point where these kits would be challenging, but completion was not beyond their reach. IKON was a cottage industry. They didn't have die cutting presses. The kits were cut by hand. Some alternate materials were implemented, which may explain the "poor wood" comment.
The plans were fine. The instructions, because this model was for advanced builders, were minimal. They covered only any areas where the designer felt the builder may have problems. Emil (the designer) had an unusual way of wording things, which sometimes left his instructions open for interpretation. Back in the day, a quick call to him would clear things up.
There are several of us who collect, and build these kits. We enjoy the challenge, and yes, the quality of these kits.
Here are pics of some of the IKON designs that I have owned and built over the years. My latest one (the green/yellow Cessna Airmaster) was built 2 years ago. The kit was still in great shape ! Although some are 20 years old, I still have all of these, except the orange/blue Fairchild which met an early demise.
I found a master builder here on RCU that's printing the original Ikon Curtiss plan's for me. He added that he had traced in missing part's and it would come with a revised instruction sheet to make the build process go easier. If I were to take a notion to build one of these from scratch I'd use the revised plan's and find someone to select my wood and cut my part's for me then I might be able to build one.
The original kit's make some of the nicest planes on the field but it takes an above average builder to complete one.
02-15-2014 | 01:50 PM
#21
I don't know much about theses kit's other than what I have researched and read here and on other forum's. I would safely say that 70% of people who have written review's on these kit's sounded like horror stories with the poor quality of wood and part fitment and most of all the lack of clear build instruction's on the plan's. Now the worst part is if you have a problem you can't call Ikon to help like you could back in the day.
I found a master builder here on RCU that's printing the original Ikon Curtiss plan's for me. He added that he had traced in missing part's and it would come with a revised instruction sheet to make the build process go easier. If I were to take a notion to build one of these from scratch I'd use the revised plan's and find someone to select my wood and cut my part's for me then I might be able to build one.
The original kit's make some of the nicest planes on the field but it takes an above average builder to complete one.
Many builders are used to step by step instructions with illustrations, to show them what to do. IKON never had this feature. Emil expected you to know what you were doing when you bought one of his kits.
20 years agom th Stinson SR-8, and maybe a couple other IKON kits, ran close to $400.00. Thas big money to spend, if you don't know what you are doing.
You're right. They are among the nicest models at the field.
02-15-2014 | 05:23 PM
#22
Thread Starter
My Feedback: (14)
Joined: Mar 2013
Posts: 131
Likes: 0
Received 0 Likes
on
0 Posts
From: Clayton,
GA
The Ikon kit's if untouched still garner top dollar price's above most all other kit's out there and the Ikon plane's alway's draw a crowd at Joe Nall every year. The other plane I told you I had isn't a 195 like I thought but rather a C 37 like you suggested before. I wasn't familiar with this plane like I was the Curtiss and the guy I bought it from told me it was a 195 when I bought it. I looked up a 195 and it looked like one to me at the time.
The Cessna looks way better than the Curtiss as far as condition and will take little to fix it. Mostly just fix a wing tip and recover the plane.
The Cessna looks way better than the Curtiss as far as condition and will take little to fix it. Mostly just fix a wing tip and recover the plane.
02-23-2014 | 03:49 PM
#24
Thread Starter
My Feedback: (14)
Joined: Mar 2013
Posts: 131
Likes: 0
Received 0 Likes
on
0 Posts
From: Clayton,
GA
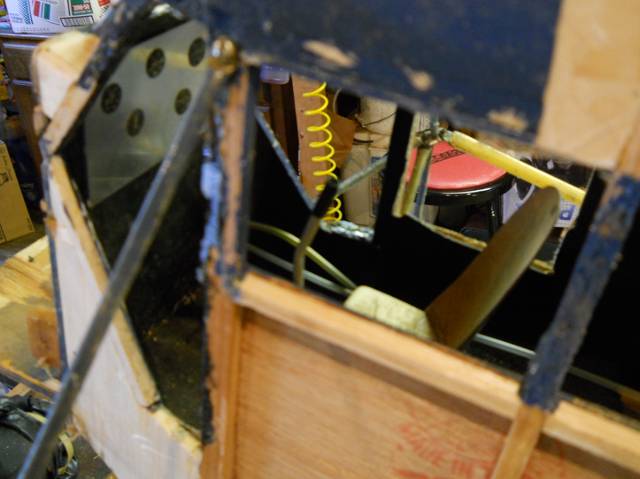
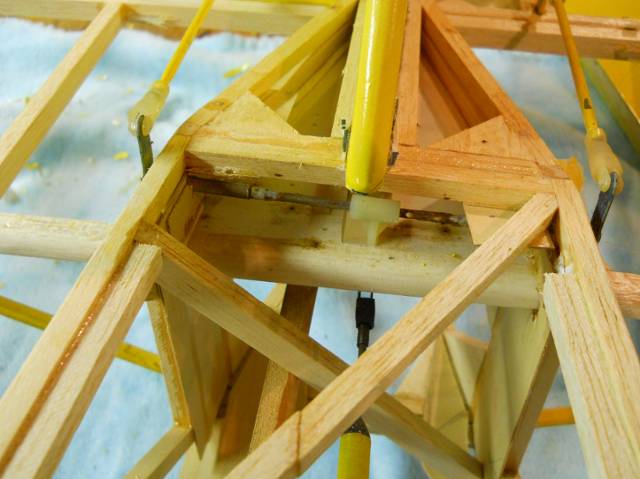
Does anybody know the proper name for this elevator linkage? I've looked online for this elevator linkage and can't come up with anything like it. The original linkage is worn and slips and I'm intent on replacing all the hardware on this plane.
02-24-2014 | 07:54 AM
#25
That is a bell crank. I doubt you'll be able to find one like that though as they went out of style a long time ago. They introduce extra slop into the system and are an added failure point. If you will run two golden rods or steel rod in a tube pushrods back to the elevator that connect at the servo you'll get the same result with a much stronger and tighter connection. There are a number of different ways to join the pushrods at the servo end depending on which ones you choose. A 2-56 coupler can be made by drilling the right size holes in a piece of HDPE or even tapping a piece of aluminum. Or if you know how to solder (that doesn't mean just watching a youtube video about it) you can use plumbing solder or Stay Brite silver bearing solder to join them. Wrapping them with thin copper wire before soldering will give you an indestructible joint. And, of course, there is always option 3, which is to run two elevator servos.

