


BJCraft BISIDE
 08-30-2013 | 08:01 PM
#201
Thread Starter

My Feedback: (5)
I re-checked my CG location as I left it from the first test flights. I ended up right at the 130mm CG mark. I should also note that I had very little trim changes on any surfaces.
My next outing will be to focus on CG and thrust settings. I think those are pretty close right now.
My next outing will be to focus on CG and thrust settings. I think those are pretty close right now.


 )
09-01-2013 | 04:22 AM
)
09-01-2013 | 04:22 AM
#210
Joined: Jul 2002
Posts: 105
Likes: 0
Received 0 Likes
on
0 Posts
From: Eppelborn, GERMANY
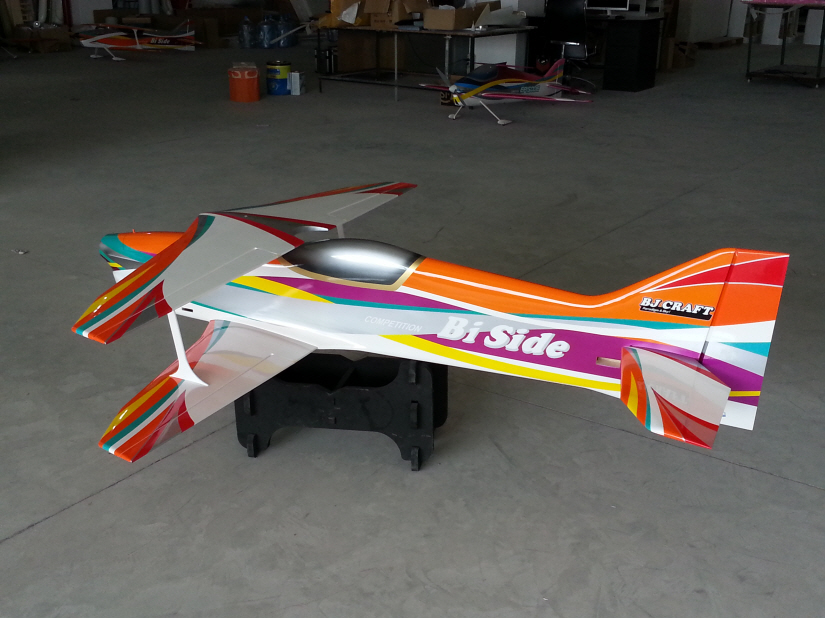
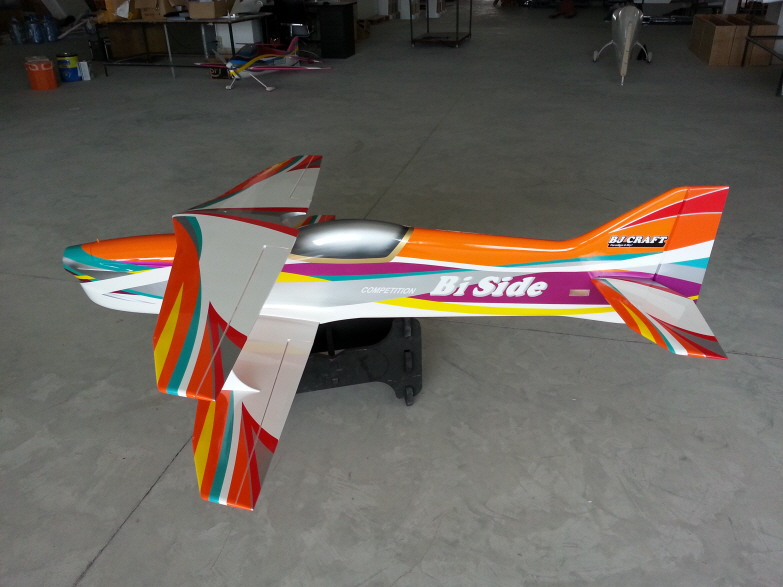
Another nice color scheme at the Biside.
From the original scheme, only the silver is changed with orange and a little more silver at the wings and tail.
Found at Lorenz Modelltechnik Germany, shipping worldwide at attractive prices.
regards
Bruno

From the original scheme, only the silver is changed with orange and a little more silver at the wings and tail.
Found at Lorenz Modelltechnik Germany, shipping worldwide at attractive prices.
regards
Bruno
09-01-2013 | 09:24 AM
#211
Thread Starter
My Feedback: (5)
The color schemes posted above all look great. I like the stock scheme so far, I find it to be very visible and easy to see.
As for flying and setup updates, I got a chance to put in some more flights yesterday. I rechecked my CG after my first outing and found that the location I preferred was right at 130mm, as recommended by B.J. The airplane felt very stable and locked in at this location. So, all of my flying yesterday was done with the CG at this location. It tracked nicely on uplines, felt good on the inverted 45 uplines, very close to needing no mix on KE, and it had a solid overall feeling.
I think the most unique thing about this airplane is the flying stab. It has a very different feeling to it than a conventional elevator. I remember discussing this with B.J. and he told me that when flying a loop you do not need to modulate the elevator input as you would in a conventional elevator. Normally, when flying a loop you begin by feeding in elevator then you relax it a bit and then feed more in etc. as you fly through the loop. With the flying stab you do not fly the maneuver the same. Basically, you modulate the elevator much less than you would with a conventional setup. I found that I would set my elevator input and then vary throttle to fly the round loop segments. I still modulated elevator, but much less than I was used to with conventional elevator control. I found that I was initially flying loop and loop segments like I would with a standard elevator and it just didn't feel or look right. Then I remembered our discussion and began to use the elevator as I described. It has a very nice and solid feeling. This is a whole new element for me. I really began to like the feeling, but it does require some getting used to.
It is very important, I believe, to follow his setup recommendations to the letter. I set mine as he described with a servo that meets the basic requirements. I used the JR DS8411 (with plastic gear set), put the pushrod at 17mm location on the control arm, placed the elevator control horn in the stab such that the clevis hole was 45mm above the stab, set the throw to 80%, and used NO EXPO.
Here's a pic of my elevator setup:
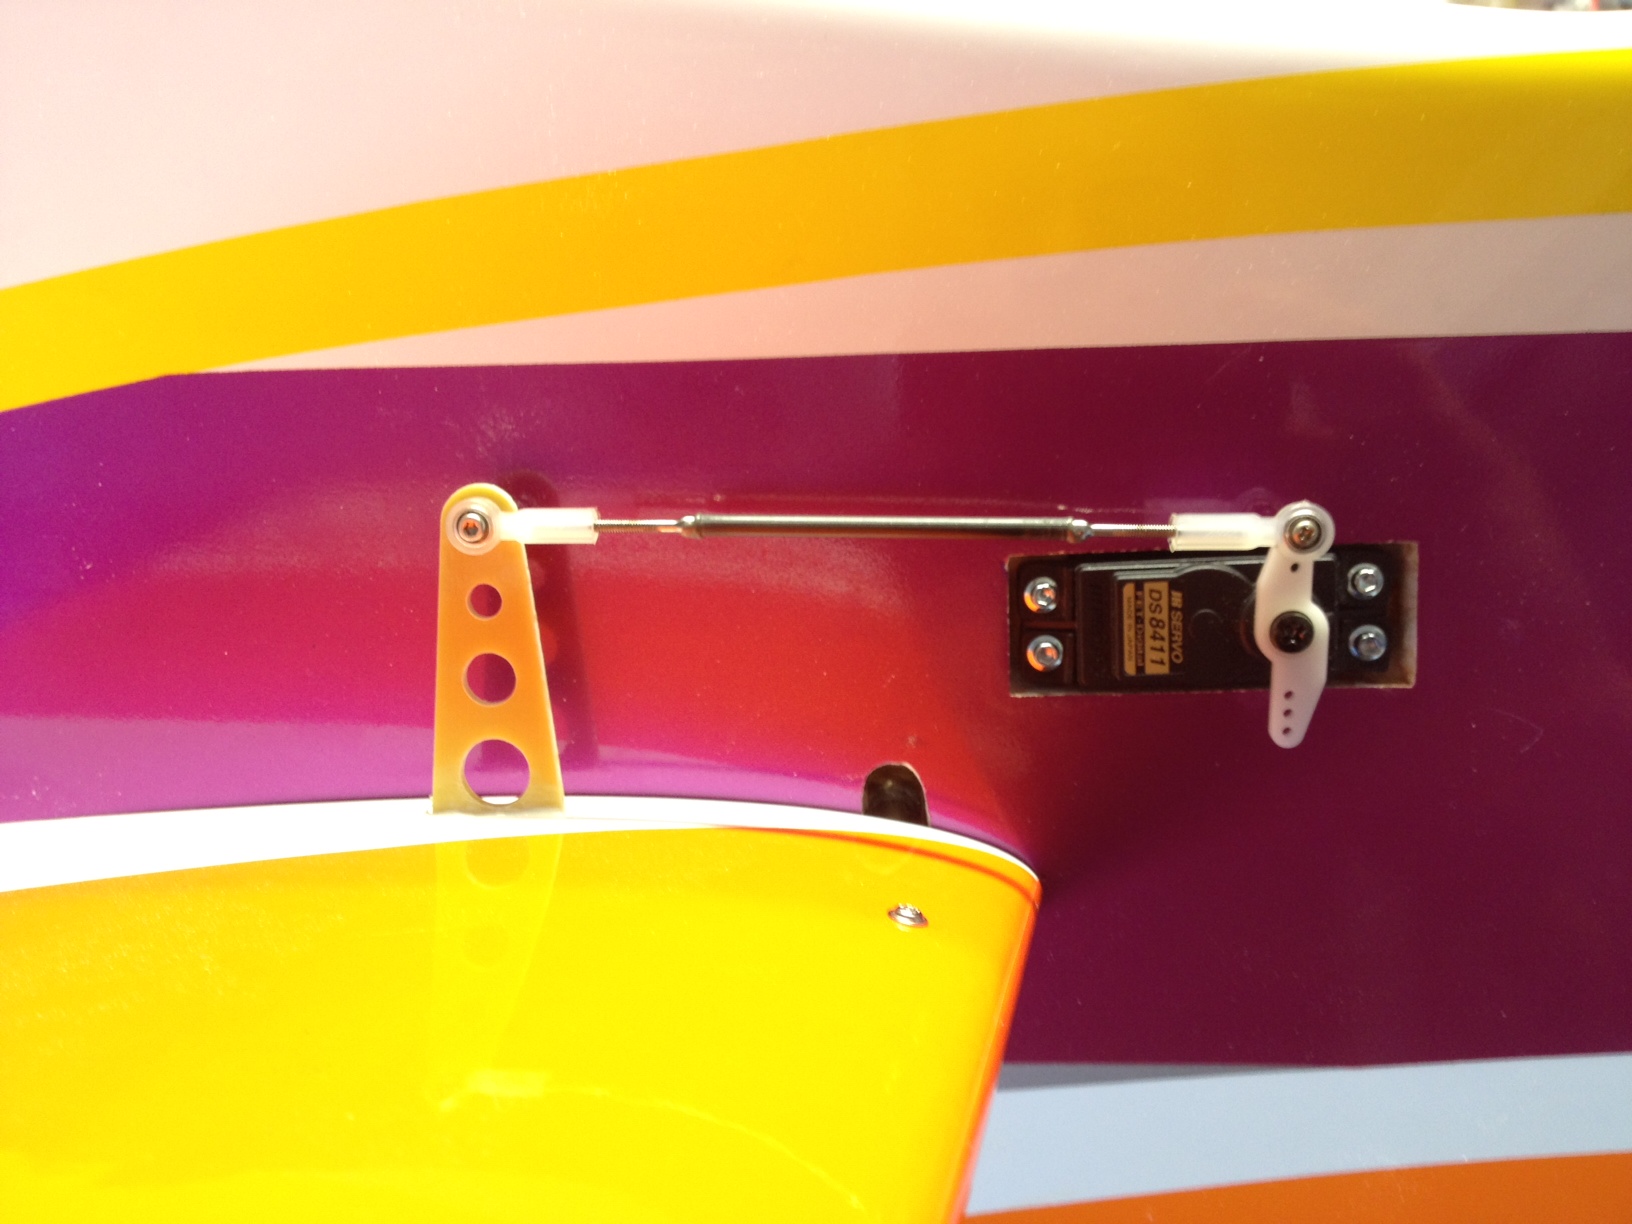
I felt that the elevator control was extremely solid. I never had any feeling of overshoot or lag. It is not overly sensitive around neutral but has a lot of authority.
This adds to the overall flying experience with the Bi Side. The best way I can describe the feeling of the Bi Side is that it is very crisp. The Episode feels a bit sluggish in comparison. Don't get me wrong, the Episode is great but it is not as spirited and quick as the Bi Side. The Bi Side is very fast and responsive, even when flying slow (if that makes any sense to anyone). That brings up a whole separate topic of how to tame the power profile for this airplane. More on that later.
I'll post more as I make progress. I have a decision to make this weekend, whether to put the motor back in the Episode (had to send my new Advance back to Plettenberg in Germany) and get busy practicing for the next contest or to stick with the Bi Side. I may have to go back to the Episode because I just have so much to learn and adapt to with the Bi Side in order to be ready to compete with it. I have no doubt that it will be awesome. In fact, I was almost ready to make the switch to the bipe yesterday.
As for flying and setup updates, I got a chance to put in some more flights yesterday. I rechecked my CG after my first outing and found that the location I preferred was right at 130mm, as recommended by B.J. The airplane felt very stable and locked in at this location. So, all of my flying yesterday was done with the CG at this location. It tracked nicely on uplines, felt good on the inverted 45 uplines, very close to needing no mix on KE, and it had a solid overall feeling.
I think the most unique thing about this airplane is the flying stab. It has a very different feeling to it than a conventional elevator. I remember discussing this with B.J. and he told me that when flying a loop you do not need to modulate the elevator input as you would in a conventional elevator. Normally, when flying a loop you begin by feeding in elevator then you relax it a bit and then feed more in etc. as you fly through the loop. With the flying stab you do not fly the maneuver the same. Basically, you modulate the elevator much less than you would with a conventional setup. I found that I would set my elevator input and then vary throttle to fly the round loop segments. I still modulated elevator, but much less than I was used to with conventional elevator control. I found that I was initially flying loop and loop segments like I would with a standard elevator and it just didn't feel or look right. Then I remembered our discussion and began to use the elevator as I described. It has a very nice and solid feeling. This is a whole new element for me. I really began to like the feeling, but it does require some getting used to.
It is very important, I believe, to follow his setup recommendations to the letter. I set mine as he described with a servo that meets the basic requirements. I used the JR DS8411 (with plastic gear set), put the pushrod at 17mm location on the control arm, placed the elevator control horn in the stab such that the clevis hole was 45mm above the stab, set the throw to 80%, and used NO EXPO.
Here's a pic of my elevator setup:
I felt that the elevator control was extremely solid. I never had any feeling of overshoot or lag. It is not overly sensitive around neutral but has a lot of authority.
This adds to the overall flying experience with the Bi Side. The best way I can describe the feeling of the Bi Side is that it is very crisp. The Episode feels a bit sluggish in comparison. Don't get me wrong, the Episode is great but it is not as spirited and quick as the Bi Side. The Bi Side is very fast and responsive, even when flying slow (if that makes any sense to anyone). That brings up a whole separate topic of how to tame the power profile for this airplane. More on that later.
I'll post more as I make progress. I have a decision to make this weekend, whether to put the motor back in the Episode (had to send my new Advance back to Plettenberg in Germany) and get busy practicing for the next contest or to stick with the Bi Side. I may have to go back to the Episode because I just have so much to learn and adapt to with the Bi Side in order to be ready to compete with it. I have no doubt that it will be awesome. In fact, I was almost ready to make the switch to the bipe yesterday.
Last edited by shannah; 09-01-2013 at 09:40 AM.
09-01-2013 | 02:21 PM
#212

My Feedback: (34)
I guess I'm curious why it wouldn't be better to set it up for maximum mechanical advantage and servo resolution by using a closer hole in the servo arm, and running the endpoints higher, especially when any slop is going to be exacerbated by a flying stab setup.
09-02-2013 | 06:21 PM
#216
Thread Starter
My Feedback: (5)
Here's my last update for the next week or so:
I flew another 6 flights today and I am really happy with the progress so far. The Bi Side seems to be converging much faster than the Episode and I am pretty surprised overall by how quickly it is trimming. There have been only very subtle things done so far. I have kept the CG at 130mm and have worked the control throws and slight mixing. I am impressed by the fact that it really didn't take any significant trim changes. Zero aileron trim, a couple clicks of rudder (more on that to come), and maybe 1 click of elevator.
It flies very true. I spent today making sure I had differential set correctly and trying to fine tune the small amount of rudder/elevator mixing required. This is similar to the Episode in that it takes a really small amount of rudder to elevator mix just off neutral. You have to tune that in with a Spline mix. You can't use a linear mix because it would take too much at the throw extremes in order to get the correct amount required off neutral. I think I have about 0.5% just off neutral and I carry that out and end up at about 1% at the extremes. I was lucky today that Randy was at the field an helped me keep track of my mix adjustments. There were very subtle adjustments required, but it ended up great.
I think I still need to add a small amount of right thrust. So, probably a 0.5mm (or less) shim to the motor mount will be added. It tracks fine but does veer slightly left at the end of a very long vertical.
I struggled a little in dialing in the axial rolls. I ended up increasing my elevator throw a bit since it is more dull around neutral than I was used to. That helped me out a lot. I also dialed my throttle back to top out at 80%. It was too explosive.
By doing this and slowing down the flight envelope overall I had a couple really, really nice flights at the end of the day. I was very happy with the F13 performance (awesome snaps. The reverse KE snaps are better than the Episode and it did the prettiest KE loop with roll across the top) and the last P13 that I flew was really solid.
I see no major issues on the setup. Incidence seems right on. CG is right where I like it. It flies extremely deliberately and has very good lateral stability. I think B.J. did a great job in testing and fine tuning this design.
I am going to shorten my aileron servo control horns because I have too much throw, and I will move the elevator servo control horn in one position. And, I'll add the right thrust shim. That's about it. The rest is just pilot acclimation. I was feeling pretty good with it at the end of the day.
Later.
Last edited by shannah; 09-02-2013 at 06:48 PM.
09-02-2013 | 06:27 PM
#217
Thread Starter
My Feedback: (5)
Oh, I forgot to add a tip:
It's kind of a pain to assemble at the field. Two wings are much more than double the work! Here's what I do:
1. Mount the bottom wing (duh...)
2. Secure the Cabane struts to the bottom wing
3. Set the top wing on the center pylon and get the mounting bolt started in the pylon blind nut. Don't tighten it.
4. Pop the Cabane struts into place on the top wing and screw in the bolt to the Cabanes but don't tighten them.
5. Go back to the center bolt and snug it down, but not all the way
6. tighten the cabane bolts
7. finish tightening the center bolt.
Once you do this a couple times its fairly easy. The hardest part is locating the center bolt into the pylon. I marked the side of the shim to show where the center bolt hole is located so I can find the hole easily.
09-13-2013 | 01:07 PM
#221
My Feedback: (34)
So this morning before work I finally cracked open the shipping crate, and pulled everything out. I'm blown away. BJ and his people do amazing work. I'll get weights on the parts tonight (my scale's battery was dead). I can't wait to get this beauty flying. Probably won't be for a few weeks though thanks to that horrible thing called work.
Fuse - 946g
Top Wing - 371g
Bottom Wing - 383g
Left Stab - 82g
Right Stab - 81g
Fuse - 946g
Top Wing - 371g
Bottom Wing - 383g
Left Stab - 82g
Right Stab - 81g
Last edited by Doug Cronkhite; 09-14-2013 at 12:48 AM.
09-15-2013 | 07:39 PM
#222
Thread Starter
My Feedback: (5)
Hey everyone
I made it back from my trip to China. Unfortunately I didn't have a chance to visit BJ Craft this trip. I shook off the jet lag and put in a few flights this afternoon.
After my last session, before my trip, I was thinking of making a thrust adjustment. But B.J. told me to wait on that and try high speed trimming first. He suggested trimming the airplane for full throttle (or at least 80%) horizontal flight. I did that and no longer felt the need to add thrust. I also adjusted my CG a bit more forward as well. After adjusting it I removed all my rudder mix and have no added thrust adjustment. Now it's like starting over with the flight setup. I really didn't do much other than make a lot of long passes today but it does track nicely. So, I'm pretty much at factory setting across the board right now but my CG is probably 5mm forward.
09-16-2013 | 06:01 PM
#224
Thread Starter
My Feedback: (5)
Hi Doug,
No, I intend on flying it at my normal pace, which is mid throttle or lower. But, I am taking B.J.'s suggestion to trim it at a high speed and following his lead. I decided to try this instead of shimming thrust and doing other slight adjustments. This is a little different approach and will result in a few things that I will need to try out to see how I like it. Namely, it means that I will be trimming this for more of a "zero G" type setup. That means that for my normal, slower flight I may hold a bit of up elevator on horizontal flight. It sounds strange but I will try it since B.J. recommended this approach. Now, I have a pretty good traditional setup saved that I can switch back to if necessary but I am really curious to see how this method will work out. I didn't have a chance to really try much yesterday but I noticed that with the trim changes and shifting the CG a bit forward that I really liked the way it tracked. I found I was able to roll very nicely with this setup. I have a lot of work to do on this, so the jury's out for a while. I may go back to my old method of trimming at the speed I fly at, but I did find on my Episode that (thanks to Tony F.) it really helped when I flew faster when trimming. I just didn't do much at full throttle like I am doing now.
No, I intend on flying it at my normal pace, which is mid throttle or lower. But, I am taking B.J.'s suggestion to trim it at a high speed and following his lead. I decided to try this instead of shimming thrust and doing other slight adjustments. This is a little different approach and will result in a few things that I will need to try out to see how I like it. Namely, it means that I will be trimming this for more of a "zero G" type setup. That means that for my normal, slower flight I may hold a bit of up elevator on horizontal flight. It sounds strange but I will try it since B.J. recommended this approach. Now, I have a pretty good traditional setup saved that I can switch back to if necessary but I am really curious to see how this method will work out. I didn't have a chance to really try much yesterday but I noticed that with the trim changes and shifting the CG a bit forward that I really liked the way it tracked. I found I was able to roll very nicely with this setup. I have a lot of work to do on this, so the jury's out for a while. I may go back to my old method of trimming at the speed I fly at, but I did find on my Episode that (thanks to Tony F.) it really helped when I flew faster when trimming. I just didn't do much at full throttle like I am doing now.
09-17-2013 | 03:50 AM
#225
Hey Doug,
I flew the F3AU company plane this past weekend and WOW! Instant best friend,good mid-throttle pace, rolls very nice and has great rudder authority. The plane didn't have much mixing in it, but I could instantly tell it's much, much better than what I am currently flying. The struts whistle, a bit.....,annoying at first, lol. I think you will really like it! I have already committed to something else. I am considering purchasing one very soon, gonn'a wait till I get some updates/info about the one being flown here. Very impressed with how it initially flew.
Just wanted to pass that on.
Bill H.

