


Caelus New F3A design by Top RC Model


The following users liked this post:
big_G (04-27-2021)
 06-24-2021, 07:44 PM
#478

I talked to mike at F3A Unlimited a couple of days ago and he recommended starting at .75, Probably splitting hairs here due to angle machine acuracy but that's what I'll shoot for.
Anywhoo, I finally got to start building after not being able to for a while. First thing I did was the hinging. Unfortunately whoever worked on mine at the factory didn't give a rats az about precision. ALL of the holes were drilled crooked or off center, horns too. After I had opened them up enough to allow good geometry they were very loose. So I decided to try something different. I used Hysol as hinge and horn glue because it doesn't run. Worked great BTW. I used a fine sharpie to mark he centers of the hinges, I replaced the perfectly good stock hinge points with Robart ones just because I had some. I hinged both sides of the hinges at the same time, worked them back and forth to line up the hinges, made sure they were centered by adjusting the sharpie marks with an eXacto, taped them in place with little squares of cardboard to help align them top to bottom, and prayed. Worked out great! The hinge gaps required varied quite a bit as my surfaces had some warps and off angles but its done and everything is aligned and free, also I'll tape the gaps. Should be good.
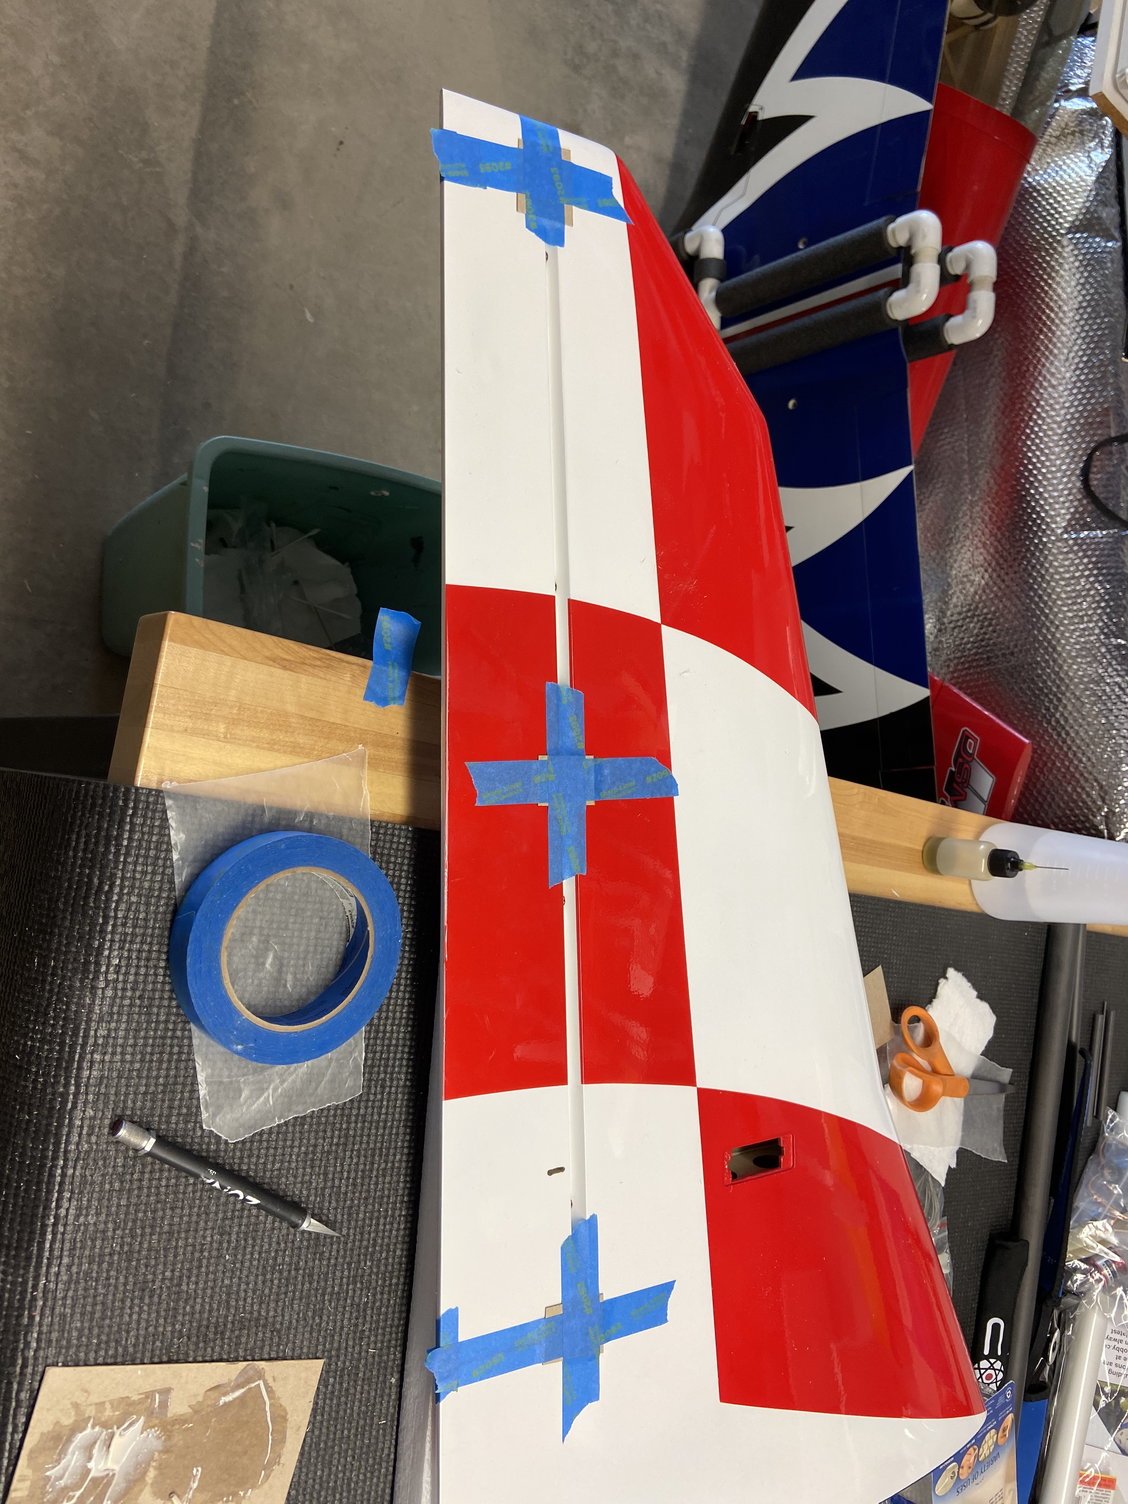
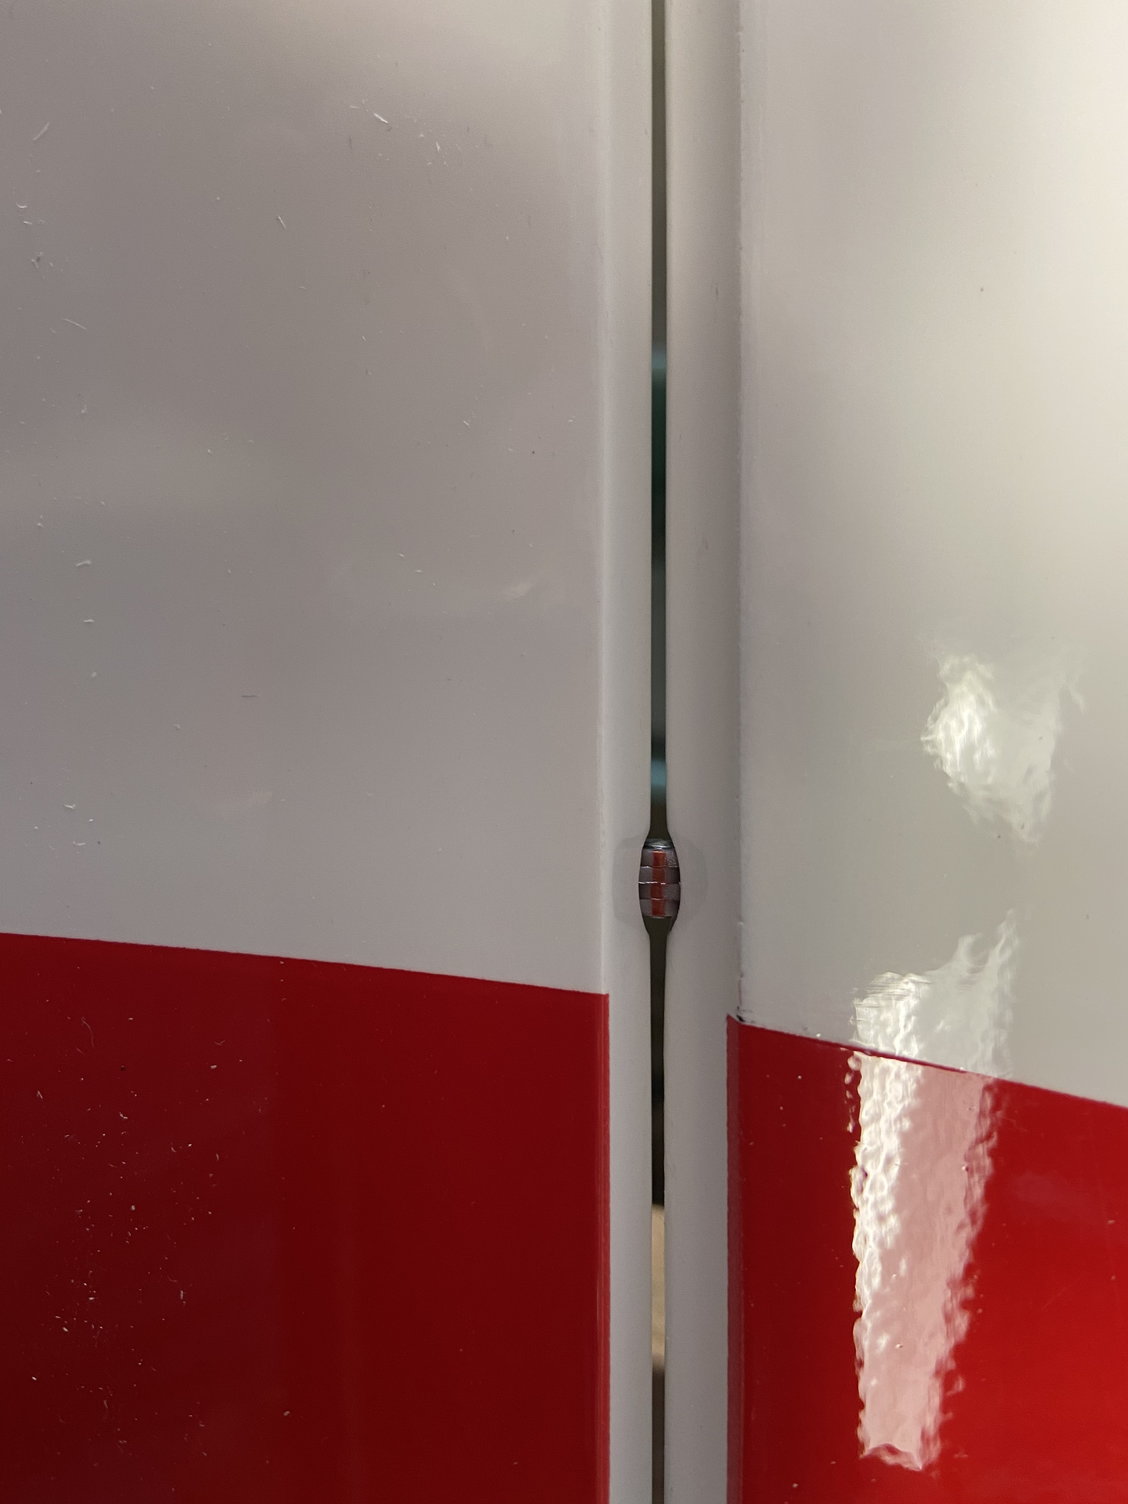
Anywhoo, I finally got to start building after not being able to for a while. First thing I did was the hinging. Unfortunately whoever worked on mine at the factory didn't give a rats az about precision. ALL of the holes were drilled crooked or off center, horns too. After I had opened them up enough to allow good geometry they were very loose. So I decided to try something different. I used Hysol as hinge and horn glue because it doesn't run. Worked great BTW. I used a fine sharpie to mark he centers of the hinges, I replaced the perfectly good stock hinge points with Robart ones just because I had some. I hinged both sides of the hinges at the same time, worked them back and forth to line up the hinges, made sure they were centered by adjusting the sharpie marks with an eXacto, taped them in place with little squares of cardboard to help align them top to bottom, and prayed. Worked out great! The hinge gaps required varied quite a bit as my surfaces had some warps and off angles but its done and everything is aligned and free, also I'll tape the gaps. Should be good.
Last edited by husafreak; 06-24-2021 at 07:48 PM.
07-06-2021, 03:42 PM
#479
I'll go back and skim through the thread, but...
Did anyone replace the pushrods? I'd like to use the ball ends but my kit is missing an elevator pushrod and I'd like to kn ow what size to get. The stock ones are 2mm rod and 2.2mm threads. Plus the turnbuckle type would be nice.
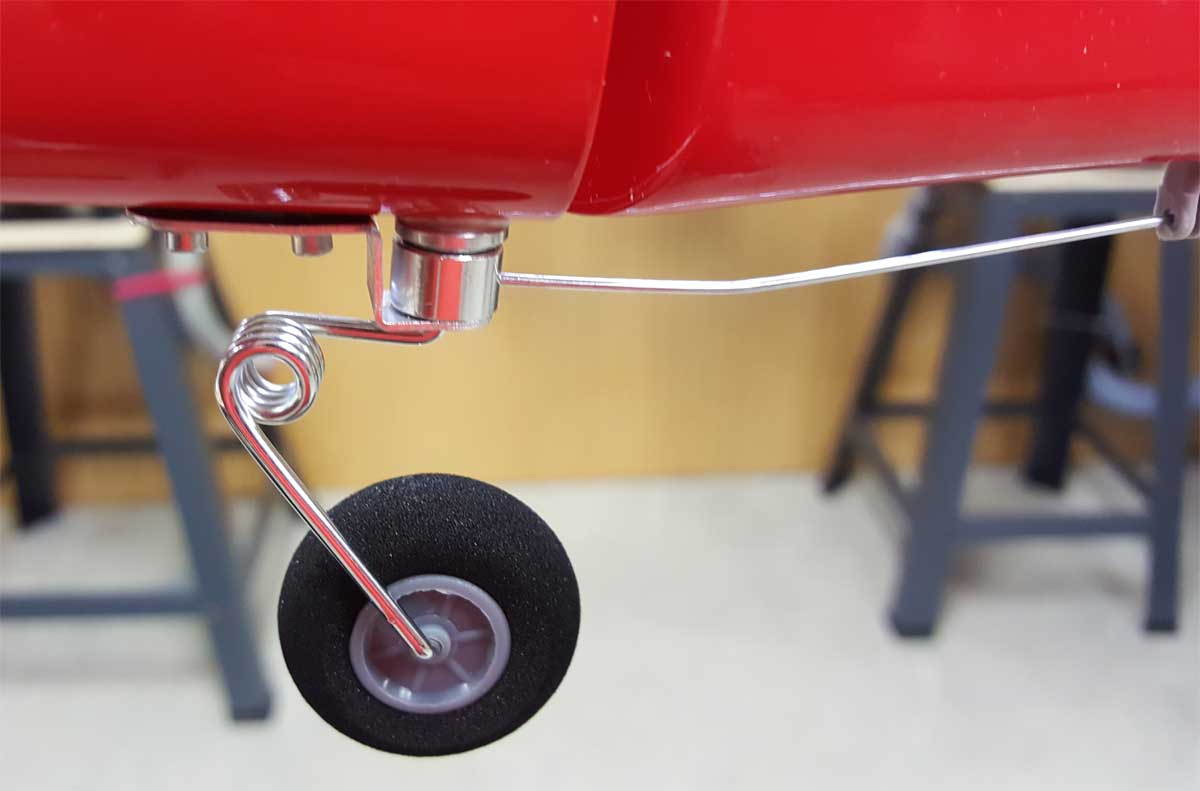
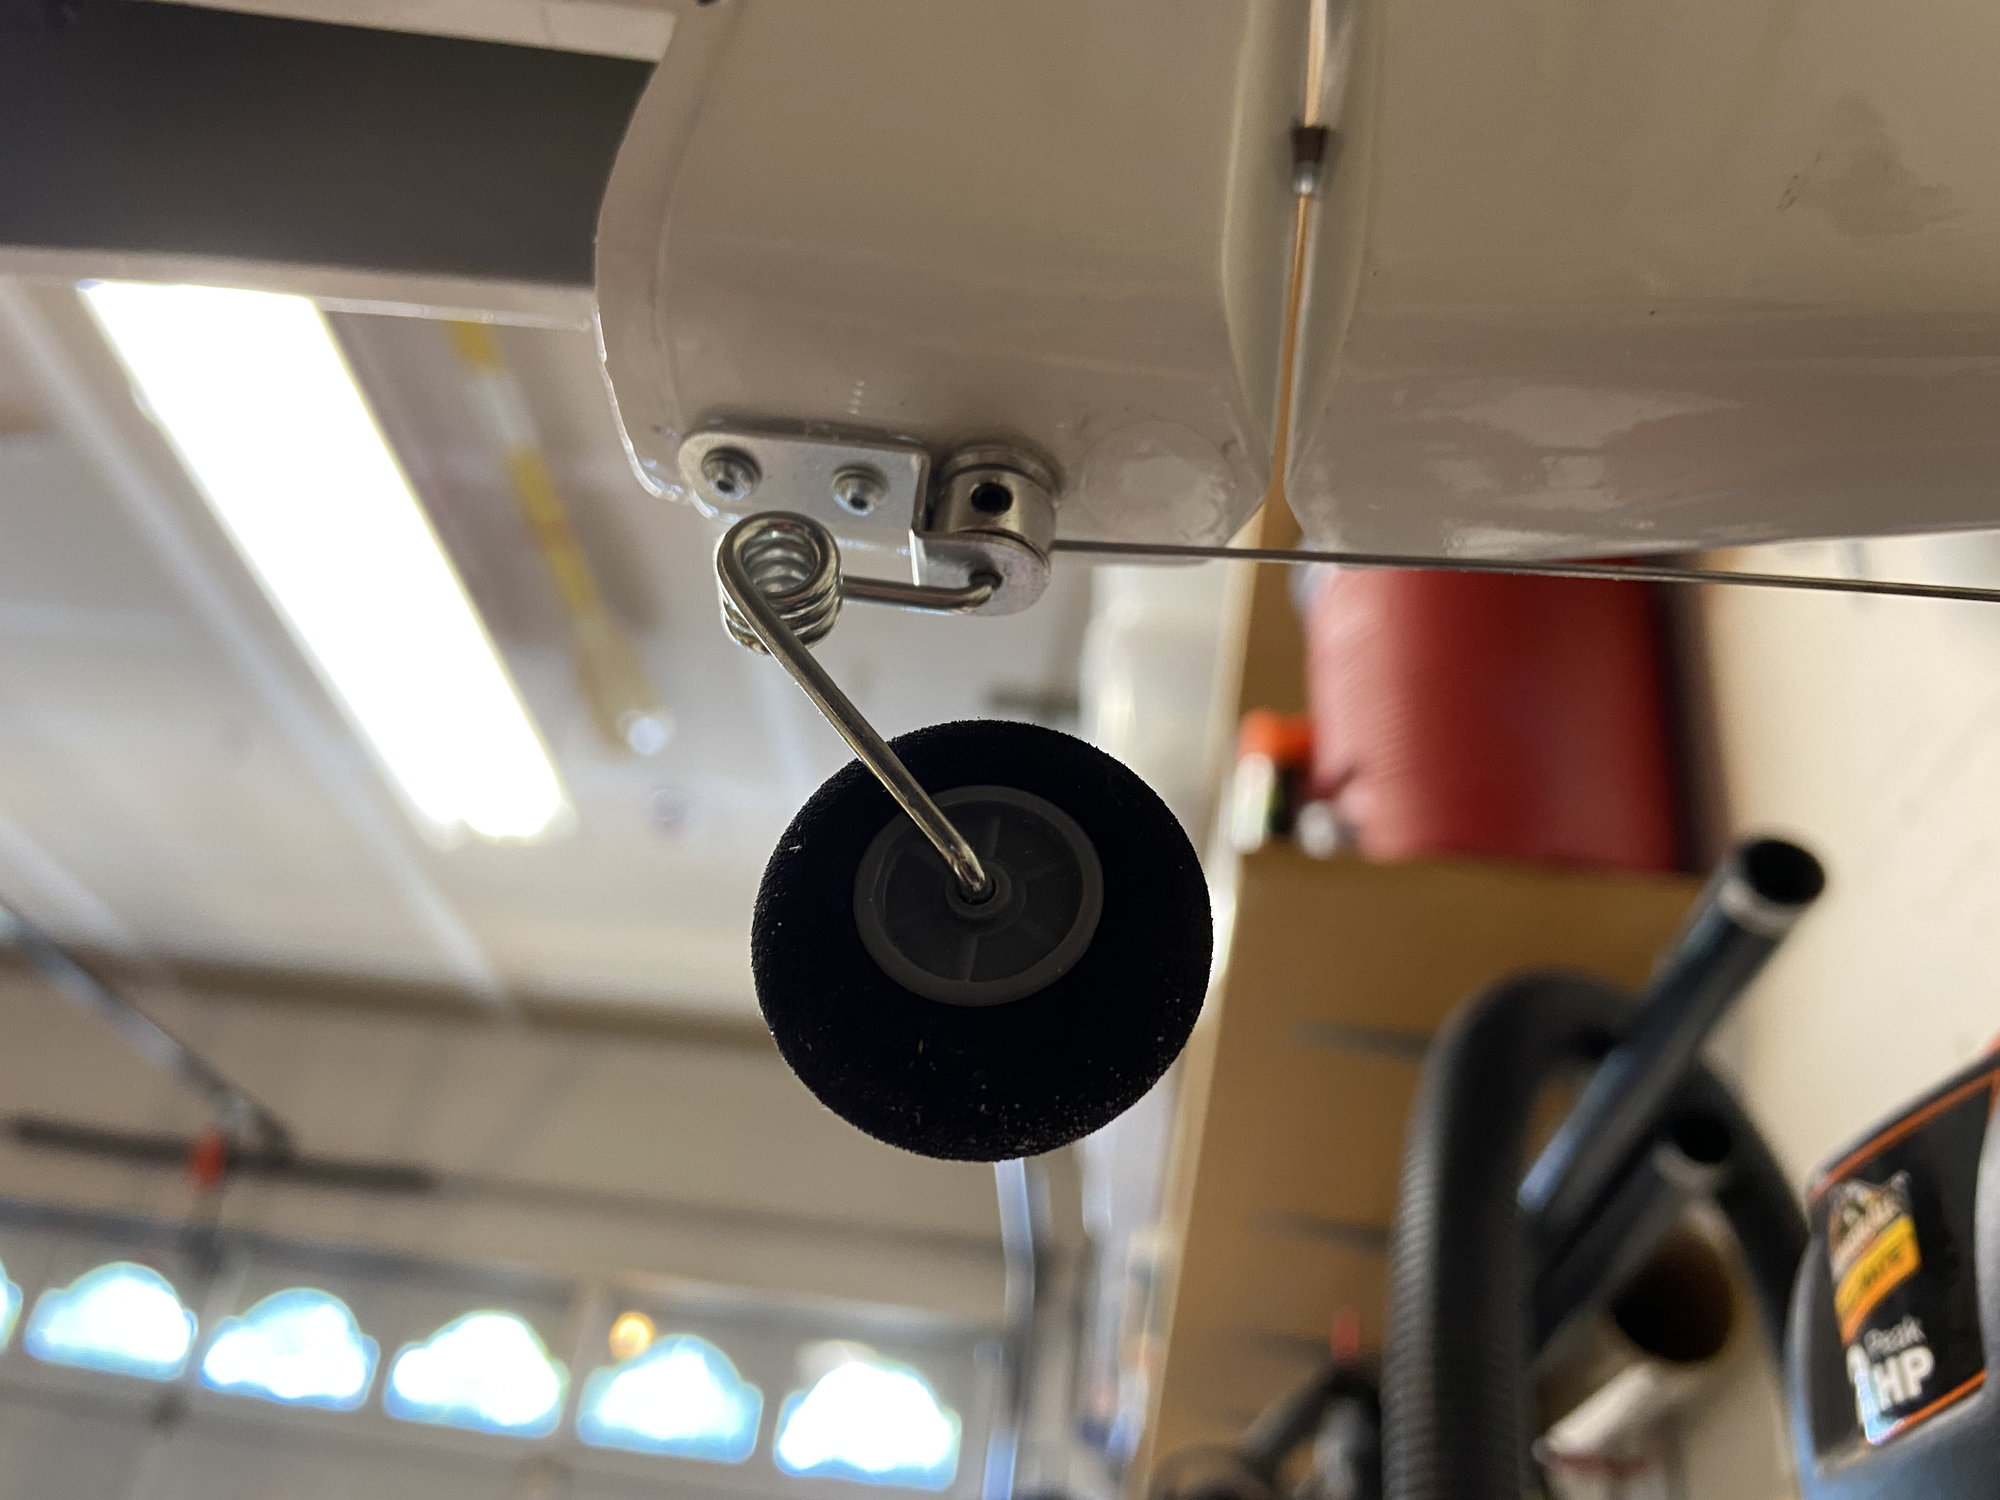
The stock tail gear looks barely good enough to use and it is very light, but the main gear not so much. I'll have to bore out the wheels to get them on the axles and there is not much material there. So I think better wheels might be nice.
Did anyone replace the pushrods? I'd like to use the ball ends but my kit is missing an elevator pushrod and I'd like to kn ow what size to get. The stock ones are 2mm rod and 2.2mm threads. Plus the turnbuckle type would be nice.
The stock tail gear looks barely good enough to use and it is very light, but the main gear not so much. I'll have to bore out the wheels to get them on the axles and there is not much material there. So I think better wheels might be nice.
07-06-2021, 04:09 PM
#480

My Feedback: (8)
2mm turnbuckles are what I used with Secraft 2mm ball links.
Maxx wheels & 16 mm Secraft axles. I lightly filed down the bushing on the wheels to fit the axles. They fit perfectly.
Turnbuckles: https://www.f3aunlimited.com/hardwar...buckle-pushrod
2mm Secraft ball links: https://www.f3aunlimited.com/hardwar...ink-2mm-qty-10
Secraft axle (16mm): https://www.f3aunlimited.com/secraft-wheel-axle-16mm
Max wheels (specify the diameter you need): https://www.f3aunlimited.com/wheels-...ssories/wheels
Tailwheel I use and it might be the one included in the kit (look at the installation photos): https://www.f3aunlimited.com/tailwheel-assembly-f3a
07-06-2021, 05:33 PM
#481
Wow! Thank you. That is indeed the tailwheel supplied. I'll get the wheels and axles. The Seacraft ball links are described as being suitable for 2/56 or (if bored and tapped) for 3mm. But the turnbuckles are available in 4/40 or 3mm thread in various lengths. Which thread did you use and if you used the 4/40 ones was it necessary to drill and tap the links? I see also aluminum, S.S. and Ti rods but imagine aluminum is the way to go for lightness. This is not a 150cc 3D ship!
07-06-2021, 06:31 PM
#482
My Feedback: (8)
Buy 2mm ball links and use 4-40 turnbuckles, they are 2.74 mm and leaves a little meat on the bone. I use stainless steel ones, the difference in weight is nothing.
I drill the ball link and thread the rod in place, remember... one end is left hand thread, ask me how I know.
I drill the ball link and thread the rod in place, remember... one end is left hand thread, ask me how I know.
The following users liked this post:
husafreak (07-06-2021)
The following users liked this post:
husafreak (07-06-2021)
08-18-2021, 06:38 AM
#485
Hi all
my Caelus is almost assembled. I feel the fuselage structure is very flexible specially at the tail end.
I can easily twist the fuselage through its longitudinal axis by hand.
is it ok? Or some reinforcements are needed?
what is your suggestion to make the fuselage mor stiff?
Regards
Ehsan
my Caelus is almost assembled. I feel the fuselage structure is very flexible specially at the tail end.
I can easily twist the fuselage through its longitudinal axis by hand.
is it ok? Or some reinforcements are needed?
what is your suggestion to make the fuselage mor stiff?
Regards
Ehsan
 08-18-2021, 05:31 PM
#487
My Caelus has a white foam ladder already installed in the fuselage back to the tail. It doesn't appear to have any glue on it though! I may add a few grams of Hysol to make sure it is doing something back there.
I was trying to decide how to reinforce the landing gear but I'm not sure whether to add some light ply structure in front of and behind the bulkheads or just add an inch wide strip of coarse fiberglass on either side of the bulkheads against the fuselage side hoping to distribute the loads to the shell that way. Hard to decide not knowing how they fail.
I was trying to decide how to reinforce the landing gear but I'm not sure whether to add some light ply structure in front of and behind the bulkheads or just add an inch wide strip of coarse fiberglass on either side of the bulkheads against the fuselage side hoping to distribute the loads to the shell that way. Hard to decide not knowing how they fail.
08-19-2021, 06:21 AM
#488

My Feedback: (1)
I would use foam friendly thin CA to glue the ladder to the fuselage. I've had to do this more than once and both planes are still flying. How to do it? Raise the nose of the plane as high as you comfortably can and tilt the fuse to the right and left as you wick the thin CA down the length of the foam ladder. Hysol will just ad unnecessary weight and no real bonding qualities as it relates to this common issue. As far as the landing gear bulkhead, I would use 2 inch wide strips of coarse fiberglas gluing directly to the landing gear bulkhead (front and back) and the sides of the fuse. Saturate the glass strips laminating epoxy that takes at least 24 hours to cure. Take your time and you will enjoy the results. Unfortunately in the pattern world, quality control usually takes a back seat to speed of production. It's all about making a "quick buck"! Sad but true. Wish you success,
08-19-2021, 04:58 PM
#489
That sounds reasonable, thanks. It�s amazing really how all loads are transferred to the fuselage shell which is very thin and light. So an extra ounce to spread the landing loads over a larger area is a small price to pay. Just in case I have a poor landing! I have another idea now that if I spread some micro balloons in the crack between the foam ladder and the fuselage sides that will also help bond and spread the load and keep the thin CYA from just running free. Nice not to add unnecessary weight. Here I�m just making sure there is a bond.
I�ve had planes come apart in the air (well, once) because of no glue internally and that sucks. But here we can see what needs to be done so no excuses.
I�ve had planes come apart in the air (well, once) because of no glue internally and that sucks. But here we can see what needs to be done so no excuses.
08-20-2021, 05:58 AM
#490
My Feedback: (1)
You are exactly correct, one can never be too careful when repairing a crack most anywhere in a 2 meter composite fuselage. My fear is what I can't see! About 6 years ago I had the nose of one of my current generation 2 meter planes completely shear off coming out of the 1st maneuver of Masters and to this day still have PTSD! I will tell anyone number 1, be careful which 2 meter pattern plane you buy and number 2, do NOT assume your overpriced "master piece" is indestructible! I've been in the game for more than 30 years and am keenly aware of all the activity that goes on behind the scene that the average pattern flyer is not aware of. IMHO, the future of "pattern" i(as we know it) is hanging in the balance. To bring this into focus, my Sportsman Class at the 1990 AMA Nats had more flyers than this years Nats combined total of flyers! Everyone fears the future FAA rules and regulations but are seemingly oblivious to the REAL monster in the room....Ourselves! I wish you well and hope I can be of service again in the future.
Last edited by wattsup; 08-20-2021 at 07:45 AM.
08-26-2021, 08:45 PM
#491
Doing research on my intended Jeti Mezon Lite 90 I found threads stating that its use is not recommended for F3A. Apparently Jeti does not want us to use it for F3A! So I am going to use a Castle Creations ICE2 HV120 I have. Oh well, another ounce... I have decided to use a pair of 600 mAh Lipo's for Rx power via a Powerbox Sensor V3 regulator switch so I didn't want to use the Mezon BEC anyway. Now researching the CC ESC settings for my Himax HC6330-210 motor and I am finding lots of different threads. I've updated the CC ESC to the latest V4.22. Prop is Falcon 20x13. I've gotten settings from a few threads and in particular one from Dave Lockhart but they are all pretty old and most using the 80 amp ESC. Does anyone here have a recommendation for my ESC settings or can someone point me to an up to date thread on this combination? I hate to bother Mike again, LOL.
Won't be long now, install and program electronics and I'm done.
Which makes me realize I have no idea what kind of control throws to use either, hmmm. Haven't flown a "real" pattern plane in a long time.
Won't be long now, install and program electronics and I'm done.
Which makes me realize I have no idea what kind of control throws to use either, hmmm. Haven't flown a "real" pattern plane in a long time.
The following users liked this post:
husafreak (08-27-2021)
08-27-2021, 07:43 AM
#493
Thanks! The only setting that surprised me was the Low Timing (0) but I'll program the ESC using that table now. Crazy that you can get away with a CC 80A ESC yet Jeti warns us not to use their 90 Lite for F3A set ups. I believe that motor pulls in the low 70's. I had successfully used the Jeti for a couple of years in my Acuity 2m but I really won't be sad to see it go. As related previously That ESC and Jeti mag switch/back up battery system failed in flight (?) and the plane was lost, out of control. But then everything worked fine again on the bench and Powerbox gave the Rx a clean bill of health. Data log just showed Rx power off. I'll never know for sure.
08-27-2021, 07:51 AM
#494
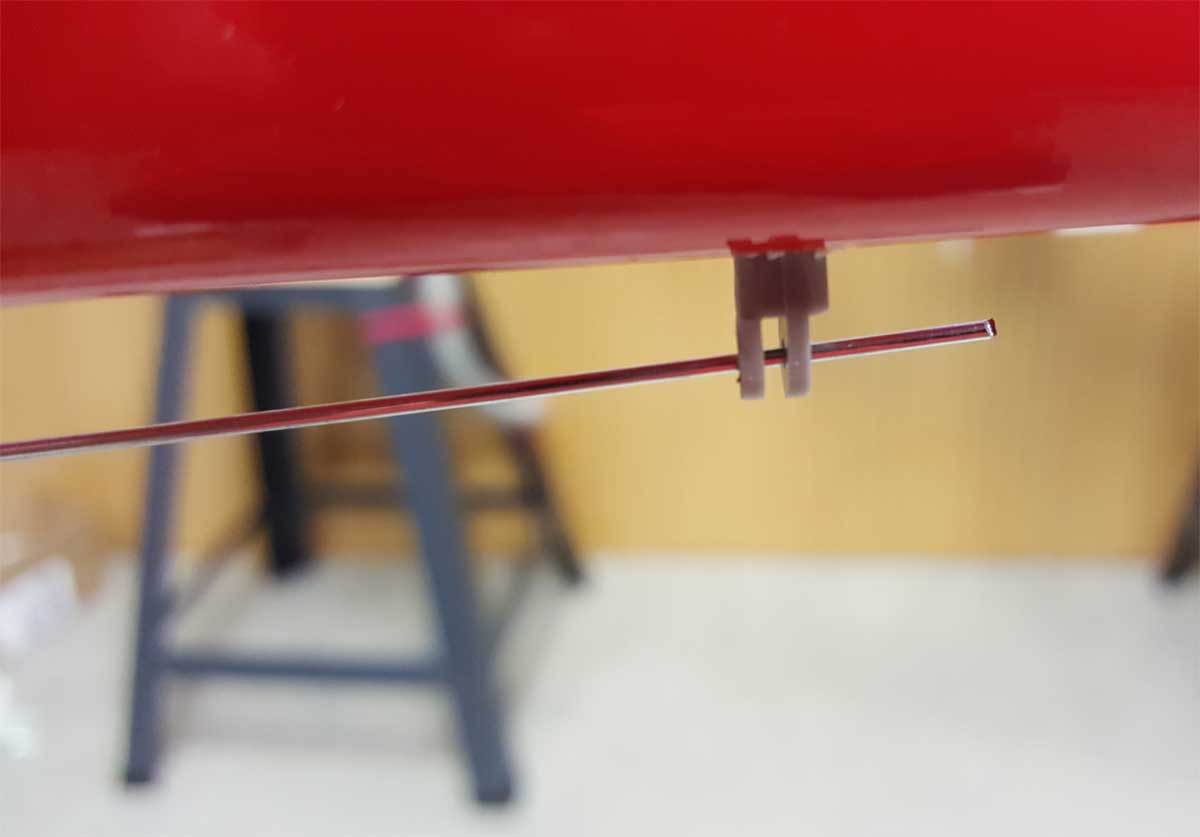
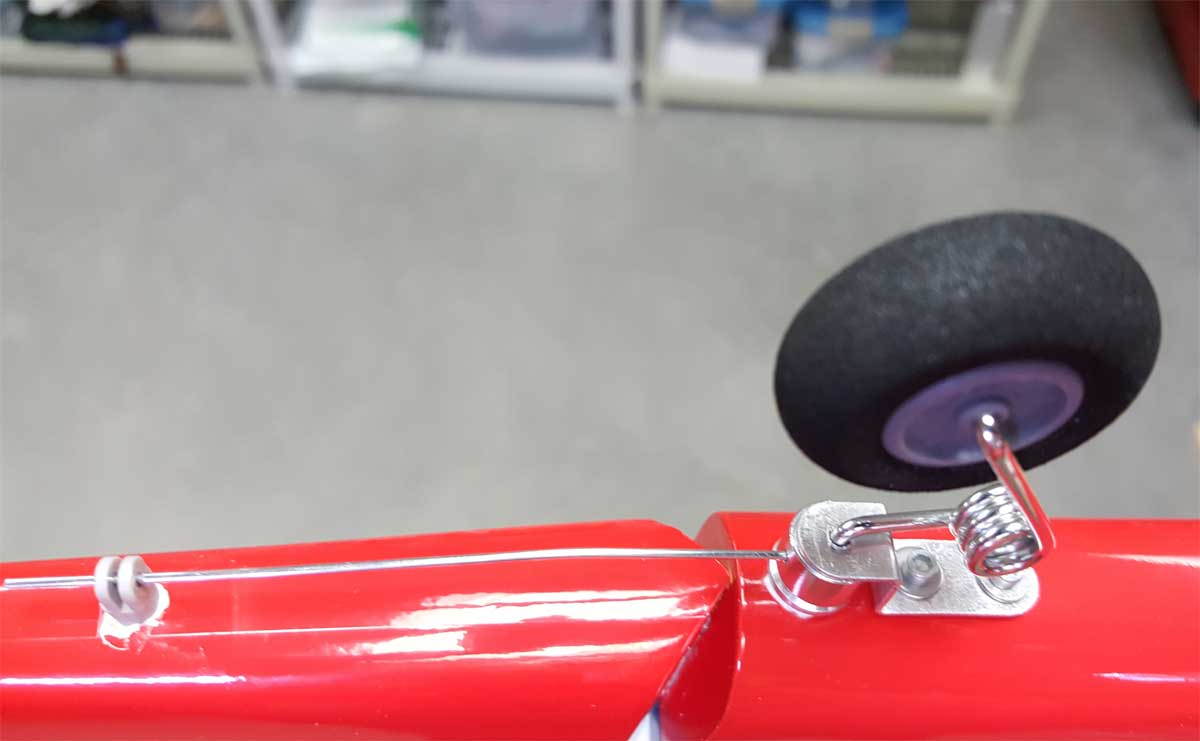
I guess I should comment on this installation. On my (newer paint scheme) aircraft I drilled where you have here for the Tailwheel axle receiver and found there was no structure inside the fuselage there. And no good way to get any in. The factory had placed the balsa block for the tailwheel structure too far forward and it did not extend to the hinge line. I had to relocate everything as far forward as possible, to just behind the hatch, to have the post imbedded in balsa.
08-27-2021, 08:11 AM
#495
Also one of the landing gear blind nuts installed in the fuselage did not line up with the hole in the CF gear. No biggie, I just elongated the hole in the gear leg. But I think whoever built mine was in a big hurry!
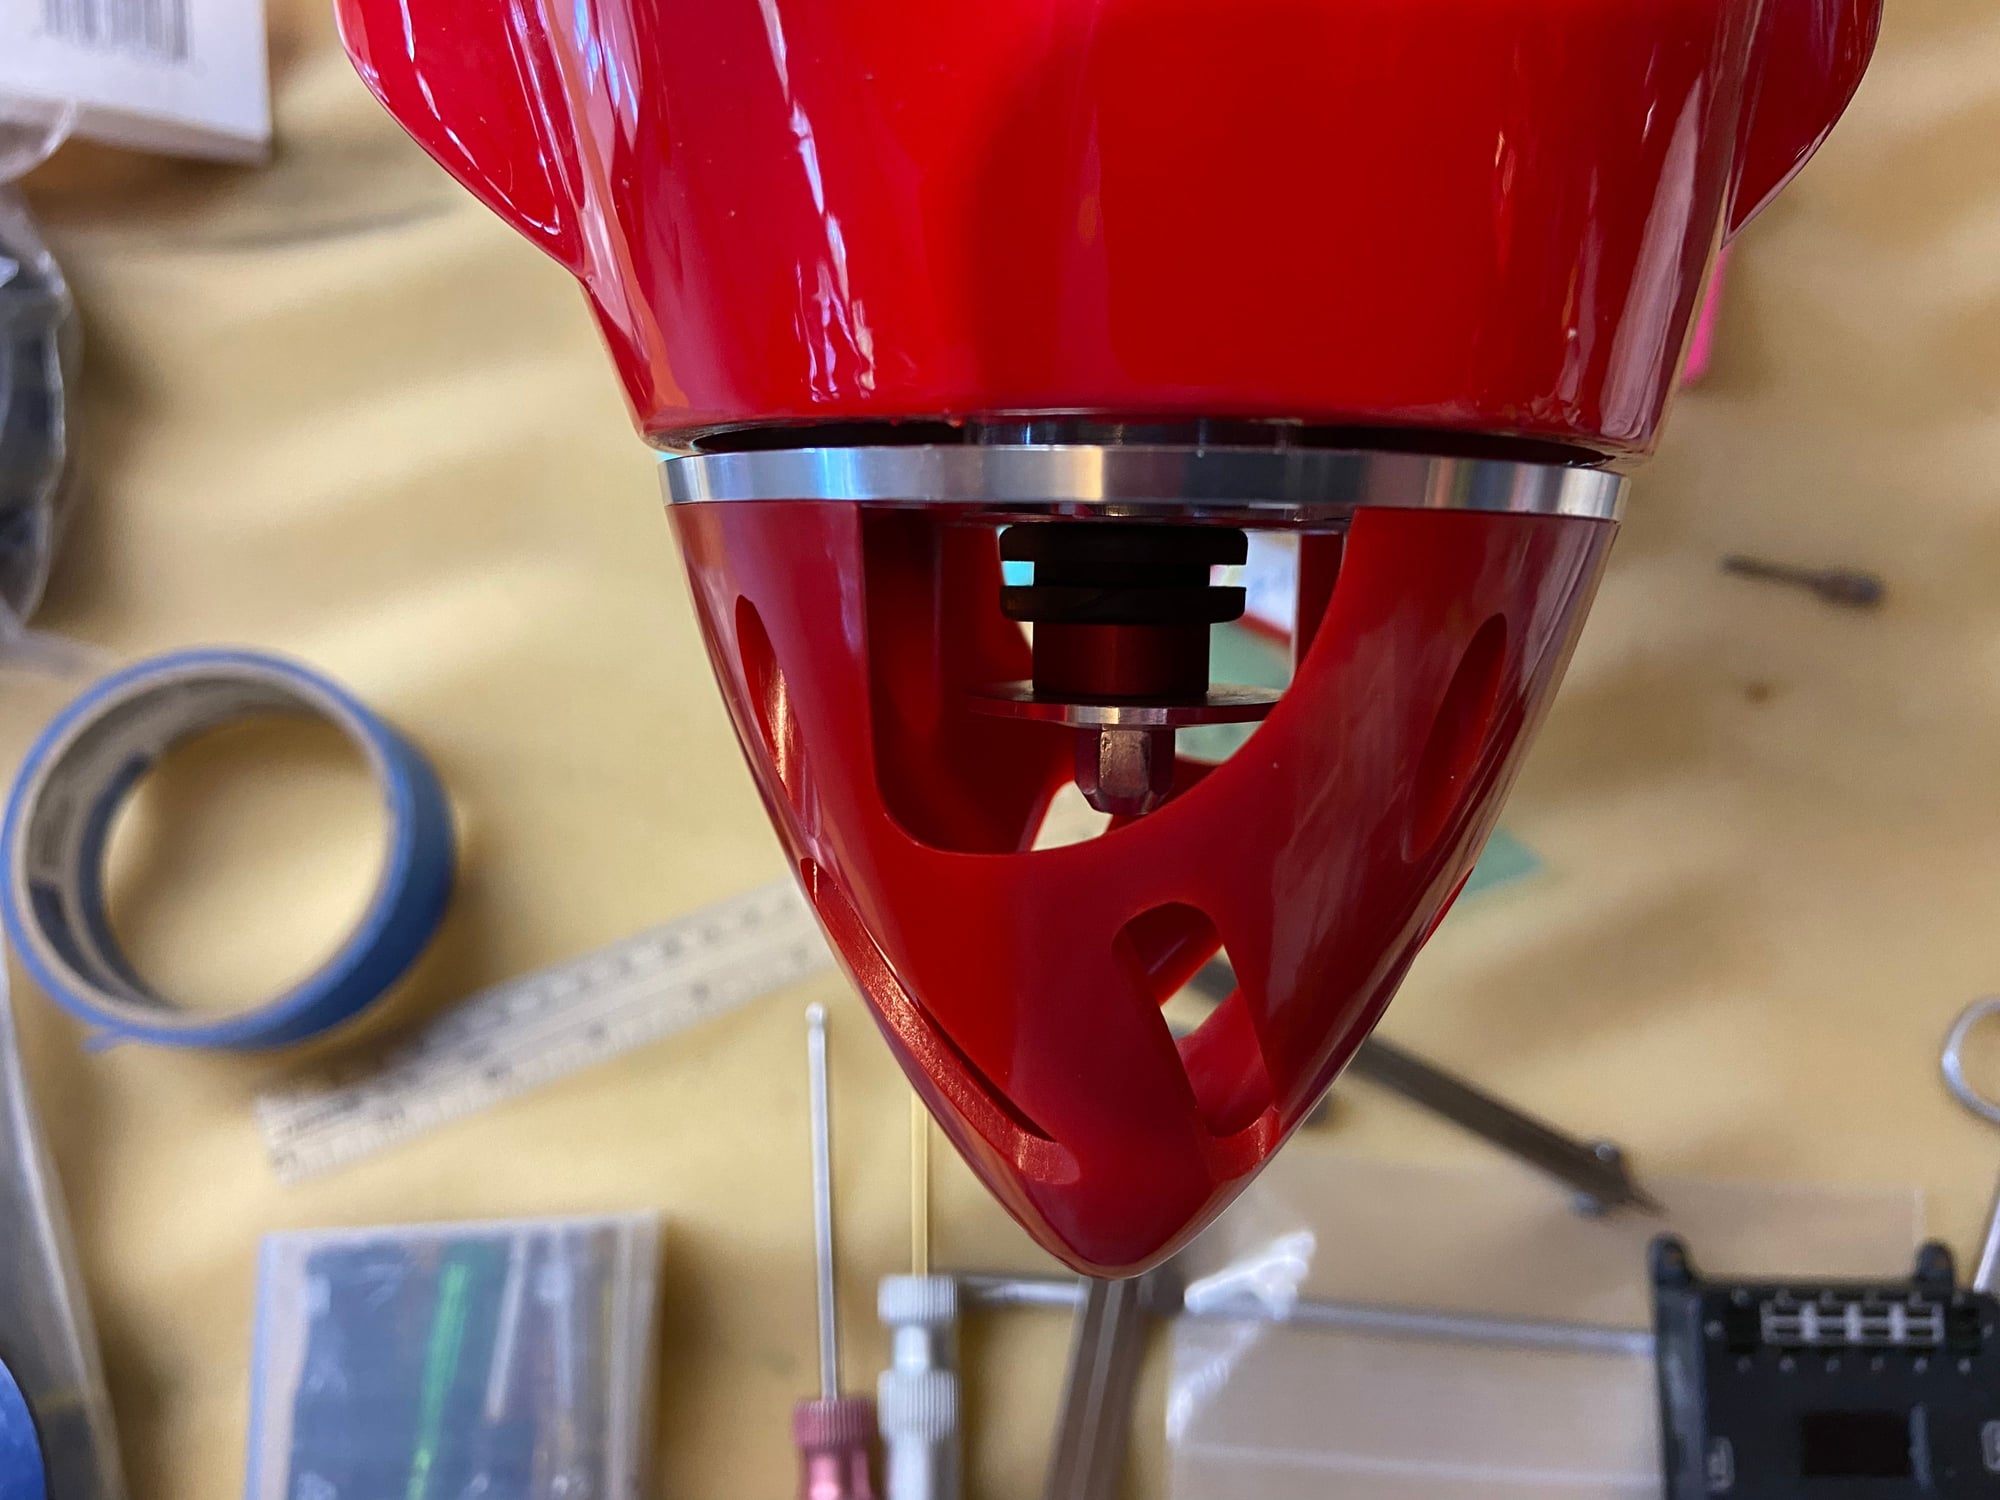
The rear motor mount former from F3A Unlimited went in nicely. Some sanding in small steps had a nice fit. The Gator flow through spinner doesn't not appear to be a perfect fit though. It specs at 3.25" (82mm) and looks small, but not too noticeable. The Falcon specs at 3.35" (85mm) and I believe that would be perfect?
Pics to follow.
 08-27-2021, 11:18 AM
#497
Looking for batteries now. My old Gator packs are 5200 30C and weigh a whopping 620g each. The Gator 4400 are out of stock but set a benchmark for light weight at 500g. The only other batteries I see in that weight range for a reasonable price are the thunder Power 4400 25C Pro Lite at 109.99. So I would not spend more than that. On the cheap side again HK Zippy 4500 are 580g 57.14, the HK Nano Tech about $10 more. Same weight, heavy. At least F3A is not too hard on batteries so light weight packs may hold up pretty well. Any suggestions?
08-29-2021, 02:12 PM
#499
Just checked balance on my new version Caelus and wish I hadn't put the rudder servo in the tail. I read through the thread and figured it would work out great but it is really tail heavy. So I am moving the rudder to the stock location and putting the pull/pull system in. Even with that my lightweight packs will probably be forward in the stock tray location.
09-01-2021, 07:34 AM
#500
I'm fishing for comments here. But I am puzzled why my Caelus is so tail heavy? I have my rudder servo moved to the spar location (pull/pull), my Rx, Powerbox Sensor switch, dual 600 mAh Rx packs, CC 120 ESC and wiring harness as far forward in the fuselage as physically possible. Even then my heavy (620g) packs need to be centered on the stock tray to balance between the aft edge of the spar tube to 1/2" behind it. With the light weight 520g packs I am getting it may be necessary to extend the stock tray forward and put the packs against the firewall of the rear mounted Himax 6330-210. I may need nose weight! Spinner is the heavier Gator one too. Has anyone else with the new paint scheme Caelus experienced this?
Oh well, I may have some lightweight batteries to sell soon!
Oh well, I may have some lightweight batteries to sell soon!