


WACO YMF
 11-04-2012, 04:37 AM

Thread Starter

It's not the Waco, but here are a couple of pics of the plan that I did, and the first wing panel for the Ryan. I'll get back on the Waco soon.
Bill, Waco Brother #1
Bill, Waco Brother #1
 11-04-2012, 05:31 AM

Dave,
Glad tosee you made it home safe. It was good seeing you again this year. One good thing about the wind was being able to BS with the guys more then I normally get to because I'm always on the flight line taking photos. Hope to see you again next year.
Glad tosee you made it home safe. It was good seeing you again this year. One good thing about the wind was being able to BS with the guys more then I normally get to because I'm always on the flight line taking photos. Hope to see you again next year.
ORIGINAL: mogman
Made it home today from Monster Planes. Too bad about the weather, but still a good time. Already looking forward to next year.
Cheers,
Dave
W/B #180
Made it home today from Monster Planes. Too bad about the weather, but still a good time. Already looking forward to next year.
Cheers,
Dave
W/B #180
11-04-2012, 05:38 AM
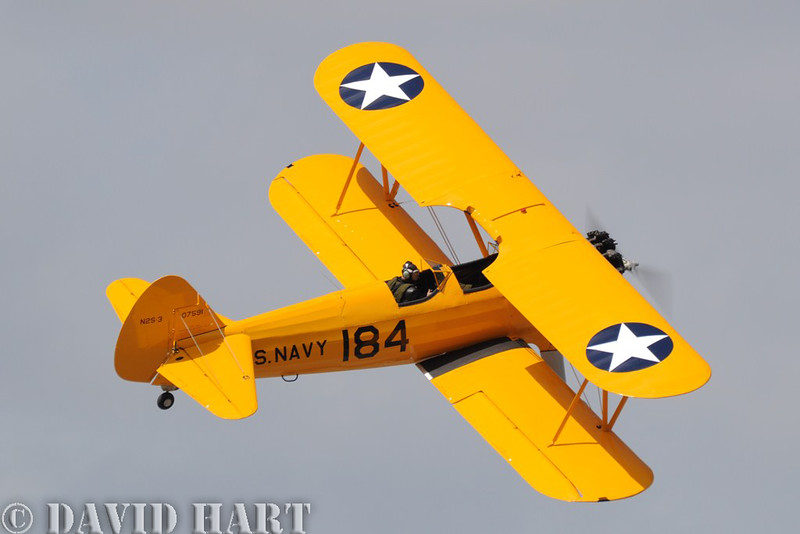
I believe this is the Stearman in your video. It is owned by Robert Varney. This is a shot I took of it at TICO this year. He has offered me a ride in it, I just need to hook up with him and find out when would be a good weekend. 
DSC_3933 copy by dwhart24, on Flickr
DSC_3933 copy by dwhart24, on Flickr
ORIGINAL: mrdhud
Dave,
Glade you made it home OK long drive. Sure enjoyed you and the Waco to bad it wasn’t this weekend it was a beautiful day today.
I was working in the shop about 2:30 today and had a Stearman (I think) flying right over the house it was pretty neat got the camera out and took a video. If I get a chance I’ll post the video.
11-04-2012, 06:38 AM

Join Date: Nov 2005
Location: Omaha, NE
Posts: 595
Likes: 0
Received 0 Likes
on
0 Posts
Interesting Bill, so you decided to frame up the wings rather than use the Byron foam panels. I have a Byron Staggerwing that needs wing panels due to a crash, that looks like a great alternative.
11-04-2012, 07:39 AM
Join Date: Jan 2009
Location: cape canaveral, FL
Posts: 276
Likes: 0
Received 0 Likes
on
0 Posts
Dave, glade to see you made it home, do hope your trip wasn't too unpleasent with Sandy blowing around. As with everyone else sorry the weather didn't cooperate with the game plan, but it was good to talk with you and see your GREEN MACHINE in the air again. As you said looking forward to next year, its starting to become a regular gettogether. Take care i'll be in touch soon.
regards,
Chris Melhus, ceije 196
regards,
Chris Melhus, ceije 196
11-04-2012, 08:23 AM
Join Date: Jan 2009
Location: cape canaveral, FL
Posts: 276
Likes: 0
Received 0 Likes
on
0 Posts
Bill, or anyone, I need a little help on servos and their use as far as sufficient torque for its application. I had plained to Hitec 5645 servos throughout my 1/4 scale Barth, now I'm rethinking my elevator set up and want to go to a single servo instead of two. The 5645 has 143 oz. of torque at 6.0V. Due to the type of setup I'm thinling of and the space I'll be working in my question is will the Hitec 7245 mini servo with 72 oz. of torque at 6.0V be sufficient for this scale and elevator load or is there a stronger mini servo i can go to the is compatible. When it comes to servo application of this nature and electronics I'm in the dog house.
regards,
Chris Melhus, ceije 196
regards,
Chris Melhus, ceije 196
11-04-2012, 09:23 AM
Thread Starter
Chris,
For the primary controls (rudder and elevator) I would always err on the side of caution and strength and go with the more powerful digital servos. No, the load is not normally that high on something like a Waco, but when you have to make a change in attitude and do it right the heck now..............
Bill, Waco Brother #1
11-04-2012, 11:15 AM
Senior Member
Join Date: Oct 2006
Location: Johannesburg , SOUTH AFRICA
Posts: 100
Likes: 0
Received 0 Likes
on
0 Posts
Hi Chris
Why would you want to change the servo set up at all, and then go for a mini servo? Expain your motive and reasoning, and then we would be more in a position to comment.
I am using two Futaba BLS451 servos on my elevator, brushless motors , digital with metal gears each rated at 147oz at 6v.
My belief is to stick with the servo arrangement of the designer. He designed the plane so he should know.
Regards
ERROL #204
11-04-2012, 11:47 AM
Join Date: Jan 2009
Location: cape canaveral, FL
Posts: 276
Likes: 0
Received 0 Likes
on
0 Posts
Bill, Errol, Thanks for the reply, I guess my game plan will be to err on the side if caution.
regards,
Chris, ceije 196
"sometimes you have to build it a little wrong in order for it to look right"-DAVE PLATT-
regards,
Chris, ceije 196
"sometimes you have to build it a little wrong in order for it to look right"-DAVE PLATT-
 11-04-2012, 10:34 PM
Senior Member
Join Date: Oct 2006
Location: Johannesburg , SOUTH AFRICA
Posts: 100
Likes: 0
Received 0 Likes
on
0 Posts
Chris
In my humble opinion there are two items on a plane where you do NOT compromise. Servos and batteries. A failure of either can cause your day and your plane to come to an abrupt and expensive ending. I use only high quality top end branded products for both. I also do not believe in making changes to the design of a model that will affect it's structural or mechanical integrity. If the designer says two servos on an elevator, then put two servos on the elevator.
Best regards
ERROL #204
11-05-2012, 06:47 AM
Join Date: Jan 2009
Location: cape canaveral, FL
Posts: 276
Likes: 0
Received 0 Likes
on
0 Posts
ORIGINAL: Errol Levin
Chris
In my humble opinion there are two items on a plane where you do NOT compromise. Servos and batteries. A failure of either can cause your day and your plane to come to an abrupt and expensive ending. I use only high quality top end branded products for both. I also do not believe in making changes to the design of a model that will affect it's structural or mechanical integrity. If the designer says two servos on an elevator, then put two servos on the elevator.
Best regards
ERROL #204
regards
Chris, ceije 196
"sometimes you have to buils it a little worng in order for it to look right"-DAVE PLATT-
11-06-2012, 09:46 AM
Join Date: Jan 2009
Location: cape canaveral, FL
Posts: 276
Likes: 0
Received 0 Likes
on
0 Posts
Errol, Bill, I managed to find a little extra room below the stablizer and am going back to the larger servo a Hitec 7954 ultra high torque of about 300 oz. this servo should cover all my sins.[ ] Now all i have to do is find the shoehorn to squeeze it in.[:-] Sorry Errol I'm still staying with a single servo setup just not a mini servo.
regards
Chris Melhus ceije196
] Now all i have to do is find the shoehorn to squeeze it in.[:-] Sorry Errol I'm still staying with a single servo setup just not a mini servo. regards
Chris Melhus ceije196
11-06-2012, 01:18 PM
Junior Member
Join Date: Sep 2006
Location: steamboat springs,
CO
Posts: 6
Likes: 0
Received 0 Likes
on
0 Posts
I am just getting started on my first WACO, a Taperwing CTO (Model builder mag. Larry Scott des.). I reduced plans to 1/6 scale, 62 in. W S , so that it will just fit into my suburban without disassembling it. Would it be a good idea to make the stab solid rather than adjustable incidence for strength? What should wing incidences be? I have built 2 Sig Skybolts and 1 Bob Dively 1/4 scale Skybolt- time to branch out. Will it be considerably more difficult to fly than a Skybolt? Any hints would be appreciated. I don't consider myself a good enough builder to build a good scale plane but I can build pretty straight and true. Thanks Jim
11-06-2012, 06:39 PM

Join Date: Mar 2002
Location: Smithfield,, VA
Posts: 1,013
Likes: 0
Received 0 Likes
on
0 Posts
A few weeks ago, i brought up the subject of how to make therib stitching. Several suggestions were made, from glue drops, to commercially available strips, as well as making them ourselves. I had an idea, which someone else also mentioned. This involved making up a jig using small nails on either side of a board spaced two scale inches apart. Imade up a jig and after three different attempts, finally have a useable material to use.
My idea was to use a piece of plastic film as a release base, then the carrier material onto which the stitching string would be attached, and then the string. Ifelt that dope would attached the string well enough to make this work. My first base material was a piece of light tissue from a rubber powered kit. When Idoped over this, the tissue wrinkled so badly there was a lot of small sections of the string not touching the base. When cut into 1/8 inch wide strips, a lot of the now short pieces of the string, or "stitches", just came off.
My second attempt involved the use of light silkspan. The big problem here , as it was also in the first attempt, was that the light plastic film wrinkled up under the silkspan, causing the same problem with wrinkles. On this attempt, I used a thinned out coat of Coverite to adhear the string to the silkspan. This worked somewhat better, but Istill had the wrinkle problem with the silkspan. It appeared that the flat surface allowed the string to lift above the paper with the slightest irregularities in the plastic film.
To help keep the string in contact with the base material, I placed a light cardboard over the jig in a slight arch. By making the card 1/8 inch wider that the spacing of the nails, it created an arch of about 3/8 inch high in the center. This time I used the same Koverall fabric whcih the wing is covered with. Imade sure the plastic film was pulled smooth, and stretched the fabric to remove wrinklies and pinned it down to keep it tight. This time, I used a much heavier mixture of Coverite to attach the string to the fabric, and followed it with two coats of Dope. The arch worked to keep the string tight to the fabric. This time when I cut the material into 1/8 inch strips, the strings did not come loose.
The photos below show my attempts starting with the silkspan. The two long wrinkles in that attempt and the "stitches" coming off when the film was cut, rendered this attempt no good. The last three photos show the arch in my jig, the finished sheet of stitching material, and my stab with some stitches applied to the bottom surface. I used dope to apply them to the stab, as it softened the coverite enough for a pretty good bond.
Next step is to apply the pinked tape over the stitches. More to come..........
Now for a question for those familiar with full scale practices on rib tape. Obviously, the rib stitching is covered with pinked tape. I'm also pretty sure all seams are covered with the Pinked tape. How about the edges of surfaces, such as leading and trailing edges, ends of aileron bays, etc. All help is appreciated.
Joe
11-06-2012, 10:07 PM

Join Date: Sep 2004
Location: Festus,
MO
Posts: 2,031
Likes: 0
Received 0 Likes
on
0 Posts
Joe,
In a nut shell, all points of contact with the internal structure gets a reinforcement of pinked tape - stringers, edges, penetrations and any where there may be rubbing (such as the edges of fairing but not always) but only the ribs on the wing, stab and rudder are stitched in general (sometimes some stringers are stitched as well but that is rare). These pictures may help although they are of a WACO YKS cabin.
P1 – Overall shot of the fuselage
P2 – Leading edge and tip. Leading edge is usually 4” or 6” tape, the tip is covered with tape cut on the bias (45° to the grain of the fabric)
P3 – Inside corner of the Aileron Bay.
11-06-2012, 11:05 PM
Senior Member
Join Date: Oct 2006
Location: Johannesburg , SOUTH AFRICA
Posts: 100
Likes: 0
Received 0 Likes
on
0 Posts
Hi Chris
Seems you want to make your life difficult. LOL Go to page 586, post number 14638. I posted a pic of my elevator setup (bottom left). I mounted them in the luggage compartment and it worked out great. The servo tray is removable to allow me to work on them should the need arise.
Best regards to all.
ERROL #204
11-07-2012, 04:21 AM
Join Date: Jan 2009
Location: cape canaveral, FL
Posts: 276
Likes: 0
Received 0 Likes
on
0 Posts
aminiet, For general the servo you mentioned was replaced by HS 7955 GT, had me giongfor a moment, this information came from Shawn Spiker of Hitec.
regards
Chris Melhus, ceije 196
regards
Chris Melhus, ceije 196
11-07-2012, 05:03 AM
Join Date: Mar 2002
Location: Smithfield,, VA
Posts: 1,013
Likes: 0
Received 0 Likes
on
0 Posts
John,
Your comments and the photos gave me the answer I needed, but not neccessarly wanted to hear. That's a lot of pinked tape! I may have to order some more!
Thanks for your reply.
Joe
Your comments and the photos gave me the answer I needed, but not neccessarly wanted to hear. That's a lot of pinked tape! I may have to order some more!
Thanks for your reply.
Joe