


Sig 1/3 scale Spacewalker
 06-06-2011, 11:29 AM
#176

Join Date: Apr 2010
Location: Clinton,
IL
Posts: 198
Likes: 0
Received 0 Likes
on
0 Posts
Here is another choice. These have a setscrew to tighten to the flat on the throttle shaft.
Joe
http://www.valleyviewrc.com/estore/throttle-arms.html
Joe
http://www.valleyviewrc.com/estore/throttle-arms.html
 06-06-2011, 11:55 AM
#177
Senior Member
Thread Starter

Join Date: Jan 2007
Location: Lancaster,
NY
Posts: 1,550
Likes: 0
Received 0 Likes
on
0 Posts
Joe
These look good, I emailed Jody to get the ID of the arm to check fit. Thanks.
I see some threads on the make up of the spark plug cap assembly and it looks like this can be taken apart and re-asssembled. I may try this tomorrow.
These look good, I emailed Jody to get the ID of the arm to check fit. Thanks.
I see some threads on the make up of the spark plug cap assembly and it looks like this can be taken apart and re-asssembled. I may try this tomorrow.
06-06-2011, 01:06 PM
#178

My Feedback: (149)
Hi Huck, Been enjoying this forum & so many of the pictures. Believe in either the DLE20 or DLE30 forums I've read some post from Jodi @ VVRC concerning "reattaching" the plug cap. You might PM or call him to get the particulars. Have a great evening & looking forward to continued progress & MAIDEN flite of your Spacewalker.
T-man49
Club Saito 723
T-man49
Club Saito 723
06-06-2011, 01:18 PM
#179
Senior Member
Thread Starter
Join Date: Jan 2007
Location: Lancaster,
NY
Posts: 1,550
Likes: 0
Received 0 Likes
on
0 Posts
T-man49
Thanks for the suggestion. You imply that it is not as easy as I imagined. One question I have is - if the plug wire has a resister in it, why do people recommend using a resister plug to reduce RF noise? I remember the old point ignitions in cars used a capacitor to reduce RF noise in the car radio. I remember TV interference when a car without a cap went by. I guess this shows my age. Ha Ha.
Thanks for the suggestion. You imply that it is not as easy as I imagined. One question I have is - if the plug wire has a resister in it, why do people recommend using a resister plug to reduce RF noise? I remember the old point ignitions in cars used a capacitor to reduce RF noise in the car radio. I remember TV interference when a car without a cap went by. I guess this shows my age. Ha Ha.
06-06-2011, 02:29 PM
#180
My Feedback: (149)
http://www.rcuniverse.com/forum/m_10...m.htm#10039315 Hope this is a link to thread on spark plug cap replacement. Couple of post in there from W8YE & Jodi. Hope this helps......Have a great day from this DAMN YANKEE (Troy, New York birthplace-been south since 1963)!!!
T-man49
club Saito 723
T-man49
club Saito 723
06-08-2011, 10:17 AM
#181
Senior Member
Thread Starter
Join Date: Jan 2007
Location: Lancaster,
NY
Posts: 1,550
Likes: 0
Received 0 Likes
on
0 Posts
T-man49
Yes this is helpfull. I see that post also answers my question about resister plugs and plug wire with a resister embeded. It feels like Alabama here in western NY today; 90 degress and humid.
Thanks for your input.
Yes this is helpfull. I see that post also answers my question about resister plugs and plug wire with a resister embeded. It feels like Alabama here in western NY today; 90 degress and humid.
Thanks for your input.
06-10-2011, 12:38 PM
#182
Senior Member
Thread Starter
Join Date: Jan 2007
Location: Lancaster,
NY
Posts: 1,550
Likes: 0
Received 0 Likes
on
0 Posts
Made some more progress.
1. Decided to make the balsa block in front of the wing removeable. So I reinforced the wing hold down straps and put a tongue on the balsa block.
2. Installed all the stringers that give the fuselage it's rounder shape. I mitered the joint of the side stringers where the fuse angles to a narrower shape and don't like the protrusion, so I will sand them down to smooth out the transition from front to aft of the fuselage.
3. I also installed a solid block in the space under where the horizontal stab attached to the fuselage. This will make it a lot stronger.
4. Added the rear wingmount blocks. Still have to drill and tap the blocks.
5. I covered the horizontal stab with fabric.
06-11-2011, 06:35 PM
#185
Senior Member
Thread Starter
Join Date: Jan 2007
Location: Lancaster,
NY
Posts: 1,550
Likes: 0
Received 0 Likes
on
0 Posts
Tom
I was looking at the fuse sides and wondered if the covering is best sealed down on the saddle side fill strips or the saddle itself (bottom). I am thinking (I know that is a problem in itself) that if not sealed to the side filler strip the covering will be more vulnerable to puncture from handling, etc. What did you do?
This plane with all the open spans of covering is like a 20lb egg as far as care in handling. Slab sided planes are much more forgiving in the hangar.
06-12-2011, 03:46 AM
#186

My SW was sealed in both places, huck. I tacked it to the sides of the saddle fill strips first, and then folded the covering into the saddle, where I sealed it again.
06-12-2011, 11:48 AM
#187
Senior Member
Thread Starter
Join Date: Jan 2007
Location: Lancaster,
NY
Posts: 1,550
Likes: 0
Received 0 Likes
on
0 Posts
Tom, thanks for the pics. I figured that was the way to go but was not sure how it looked, etc. I was going to sand down the point where the joint is on the side stringers so it is not so prominent. Your pic looks like you did the same. I was also thinking that I would add some vertical balsa filler at the the fuse joint for fabric attachment. This looks like a good place to seam the covering. Then I can cover the nose back to the end of the cockpit with one piece and cover the aft sections separately. How did you do your seaming?
06-13-2011, 03:11 AM
#188
These pics will give you an idea of how I covered the fuselage on my SW, huck. I did the mounted tail first, then the top and bottom. The sides were last.
The sides were done in one piece, nose to tailpost. Note that extra balsa was added, in front of, and below the stab, to give purchase area for the covering.
The sides were done in one piece, nose to tailpost. Note that extra balsa was added, in front of, and below the stab, to give purchase area for the covering.
06-14-2011, 10:18 AM
#190
Senior Member
Thread Starter
Join Date: Jan 2007
Location: Lancaster,
NY
Posts: 1,550
Likes: 0
Received 0 Likes
on
0 Posts
Here are some pics of the removable hatch on the bottom of the nose. This will make it easy to service the throttle servo, ignition module and gas tank. The hatch has a tongue on the front and magnets at the rear corners.
07-08-2011, 05:58 PM
#191
Senior Member
My Feedback: (4)

Join Date: Oct 2003
Location: Hamilton,
OH
Posts: 1,141
Likes: 0
Received 0 Likes
on
0 Posts
Howdy Spacewalker fans,
I've been watching this thread with interest as I built one back in the late 80's and flew it for 17 yrs. before selling it.
In the mid 80's the Hawks club in Hamilton, Ohio started their 4 Cycle Rally. If memery serves me (I'm old now) Hazel and Maxie
attended 3 or 4 of the events (after the first one). Their first time there Maxie won our raffle of an OS 4cyl Pegisus. The next year
they brought the prototype of the Spacewalker with that engine in it. It flew awesome.
It was an honor meeting and having them there, such a nice couple.
So, here are some pictures of Spacewalker model #1.
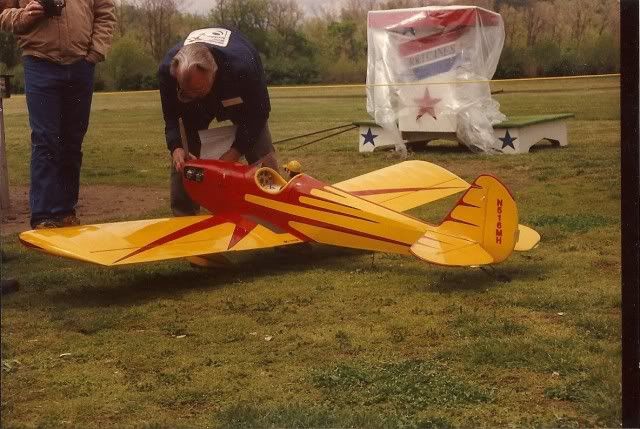
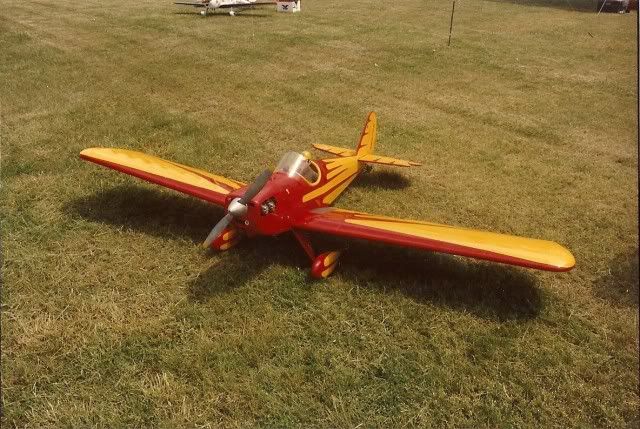
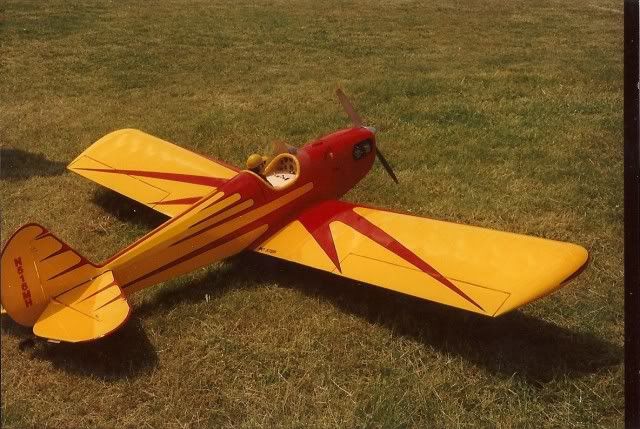
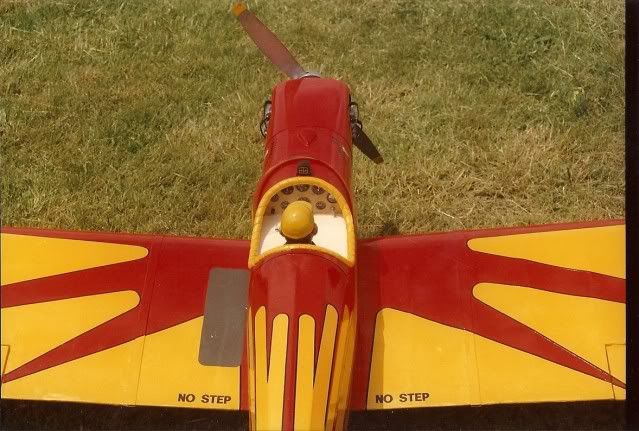
Enjoy
Del Johnson
I've been watching this thread with interest as I built one back in the late 80's and flew it for 17 yrs. before selling it.
In the mid 80's the Hawks club in Hamilton, Ohio started their 4 Cycle Rally. If memery serves me (I'm old now) Hazel and Maxie
attended 3 or 4 of the events (after the first one). Their first time there Maxie won our raffle of an OS 4cyl Pegisus. The next year
they brought the prototype of the Spacewalker with that engine in it. It flew awesome.
It was an honor meeting and having them there, such a nice couple.
So, here are some pictures of Spacewalker model #1.
Enjoy
Del Johnson
07-11-2011, 12:03 PM
#195
Senior Member
Thread Starter
Join Date: Jan 2007
Location: Lancaster,
NY
Posts: 1,550
Likes: 0
Received 0 Likes
on
0 Posts
Del
Nice looking plane. I hope my paint scheme looks as nice.
ZeroDave
Yes, the kit is still available from Sig.
Tom C
Made a little progress. I have been busy installing new windows in my house. Replaced 14 and have the big front picture window left to do. Then I have to put up the new siding - 22 sq.This is getting expensive. But here are some more pics.
1. Put in the cross member to hold the rudder pull-pull wires,
2. Mounted the horizontal stab and triangle stock on the underside.
3. Mounted the fuel tank and a removeable cross brace. I am using 5/32" tygon for the fuel feed and 1/8" for the vent and fill plumbing.
4. Trial mounted the engine, Turnigy 52cc, to determine throttle servo location. Flipped the carb over to make the throttle arm easier to hook up. I replaced the original arm with one from Jody as suggested - it is very nice.
5. Put on side blocks where the fuse sections are joined so that I can seam the coveriningaft of the cockpit. I will use one piece of matterial for the sides and top. Then use four pieces for the aft fuse - 1 top. 2 sides, and 1 bottom.
07-13-2011, 06:10 AM
#200
Banned
Interesting. I would have covered the bottom of the fuselage, then the sides, then the top, so that all the overlap seams would be downward facing, and (theoretically) less noticable.
Les
Les