


Top Flite 1/7 P-51 Build
 01-06-2006, 02:33 PM
#326
Senior Member
Join Date: Dec 2004
Location: newburgh,
NY
Posts: 179
Likes: 0
Received 0 Likes
on
0 Posts
jamieduff1981,
Thanks for the advice. I think I will be going with the 7/16 robart struts and 550rs retract mains. On the other hand, my kit hasn't even arrived yet[&o], so I'm keeping all options open. I'm also attempting to gain as much knowledge about this kit before I even open it.
p.s. how the heck does one post pictures in the forum !!!????
 01-08-2006, 08:59 PM
#329
Junior Member
Join Date: May 2004
Location: Richmond,
VA
Posts: 16
Likes: 0
Received 0 Likes
on
0 Posts
Well - I think it would fair to say that my head is spinning!! My Top Flite P-51 kit is on the way....should be here this Wednesday. I have been reading this thread little by little over the last week........man, lot's of info to take in.
I built my first plane....a Kadet LT 25 Trainer......I built my second plane.....a 4 Star 40.....I figured it was time for a big challenge so I went with the Top Flite P-51. From the reading here I can tell that I certainly found a challenge.
I am planning a very slow build.....probably a year and a half to tell the truth.....I just know that there is no way I will get it done any sooner.......particularly since this build will cost much more than the others.....not to mention the sanding I keep reading about.
Anyway.....I look forward to getting started and look forward to continuing to read this thread for help.
Thanks!
01-09-2006, 12:56 PM
#330
Senior Member
Join Date: Aug 2005
Location: AberdeenScotland, UNITED KINGDOM
Posts: 219
Likes: 0
Received 0 Likes
on
0 Posts
Hi sdortch, sure you'll like the kit. It turns into something that looks like a Mustang pretty quickly. After that, it's all up to you and how far you want to go with the details etc.
My Century Jets retracts arrived today............time to get chopping the wing up
My Century Jets retracts arrived today............time to get chopping the wing up
01-10-2006, 08:11 AM
#331
Senior Member
Join Date: Aug 2005
Location: AberdeenScotland, UNITED KINGDOM
Posts: 219
Likes: 0
Received 0 Likes
on
0 Posts
Well chopping up the wing I did. And a lot of chopping too.
Here's the progress so far. It's taken quite a bit of work to get the retracts to fit properly
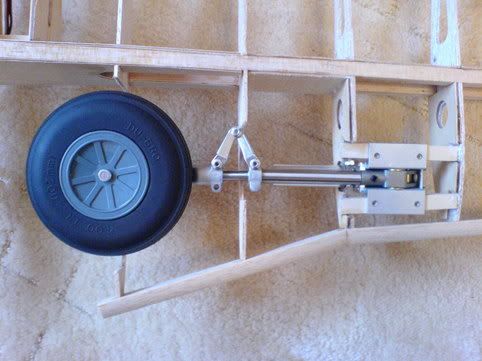
The retract rails are not spaced parallel. If they were, the unit couldn't be removed due to one of the nipples on the cylinder
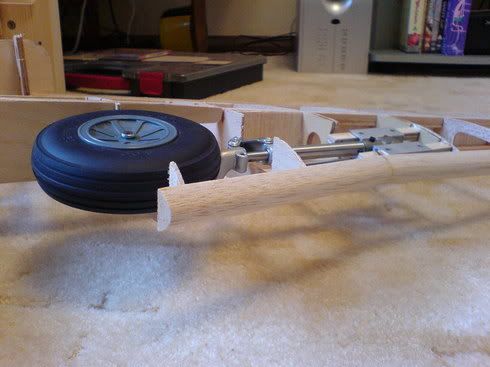
After much cursing and fiddling about, the wheel retracts fully into the well, whilst the retract unit fits inside the wing skins (just!!!)
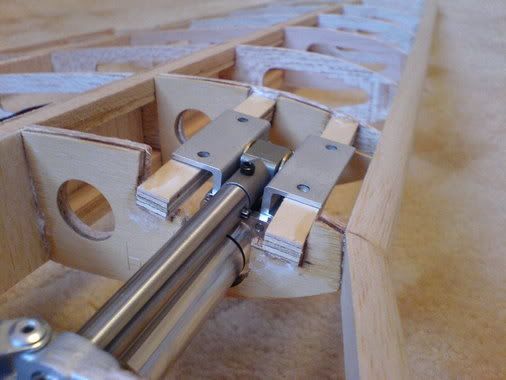
Note the amount of material that must be removed from Rib W-4. Z-5 took some faffing about too, but to a lesser extent.
I shall need to glass inside the wheel well for sure now.......... Also I need to paint those wheel hubs to see if I can improve them any. Failing that I'll have to buy aluminium hubs, which I neither want to pay for, nor carry around in the air (lbs.........................)
Here's the progress so far. It's taken quite a bit of work to get the retracts to fit properly
The retract rails are not spaced parallel. If they were, the unit couldn't be removed due to one of the nipples on the cylinder
After much cursing and fiddling about, the wheel retracts fully into the well, whilst the retract unit fits inside the wing skins (just!!!)
Note the amount of material that must be removed from Rib W-4. Z-5 took some faffing about too, but to a lesser extent.
I shall need to glass inside the wheel well for sure now.......... Also I need to paint those wheel hubs to see if I can improve them any. Failing that I'll have to buy aluminium hubs, which I neither want to pay for, nor carry around in the air (lbs.........................)
01-10-2006, 01:15 PM
#333
Senior Member
Join Date: Aug 2005
Location: AberdeenScotland, UNITED KINGDOM
Posts: 219
Likes: 0
Received 0 Likes
on
0 Posts
Hi Mustang, those you see are the 3/8" version. Didn't fancy the extra weight of the 1/2" counterparts.
Also the 3/8" seem stiff enough as it is. If anything's going to break it will be the mounts I should think. Obviously I could be wrong, but that's the impression I get at the moment.
Also the 3/8" seem stiff enough as it is. If anything's going to break it will be the mounts I should think. Obviously I could be wrong, but that's the impression I get at the moment.
01-10-2006, 01:48 PM
#336
Senior Member
Join Date: Aug 2005
Location: AberdeenScotland, UNITED KINGDOM
Posts: 219
Likes: 0
Received 0 Likes
on
0 Posts
The wheels are just 4" Dubro efforts I picked up in a hobby shop while I was in the US on holiday 4 years ago. They do use a lot of room though! It's worth noting that while they are scale size, they are a bit of a pain. In particular, W1A and the Wing Bolt Plate need to be modified as the wheels infringe on the space they normally reside in.
I used 3.1/4" wheels on the T-Bolt and it noses over quite easily flying from grass, so I wanted the 4" wheels on the 'Stang for that reason if not for accuracy.
It's a lot of trial and error cutting and messing about, but hopefully the end result will be worth the effort........
I used 3.1/4" wheels on the T-Bolt and it noses over quite easily flying from grass, so I wanted the 4" wheels on the 'Stang for that reason if not for accuracy.
It's a lot of trial and error cutting and messing about, but hopefully the end result will be worth the effort........
01-10-2006, 02:16 PM
#337
Senior Member
Join Date: Dec 2004
Location: newburgh,
NY
Posts: 179
Likes: 0
Received 0 Likes
on
0 Posts
jamie,
That looks great so far. I havent been able to start mine yet, but I am looking forward to it. Do you know the dimensions of the retracts you used ( height/width ) ?
That looks great so far. I havent been able to start mine yet, but I am looking forward to it. Do you know the dimensions of the retracts you used ( height/width ) ?
01-10-2006, 02:27 PM
#338
Senior Member
Join Date: Aug 2005
Location: AberdeenScotland, UNITED KINGDOM
Posts: 219
Likes: 0
Received 0 Likes
on
0 Posts
Bull, if you would care to copy my photo and mark it up in MS Paint or whatever showing the dimensions you want I'll happily measure it all up for you.
Not sure I could provide anything useful without knowing what exactly you were after
Not sure I could provide anything useful without knowing what exactly you were after
01-10-2006, 05:14 PM
#339
Senior Member
Join Date: Dec 2004
Location: newburgh,
NY
Posts: 179
Likes: 0
Received 0 Likes
on
0 Posts
jamie,
Basically, I am looking for the height of the main. That is, from the point that the main mounts to the rails, to the top of the casing. But nevermid, I got it from Tower's web site. Again, its looking good.
bull
Basically, I am looking for the height of the main. That is, from the point that the main mounts to the rails, to the top of the casing. But nevermid, I got it from Tower's web site. Again, its looking good.
bull
01-10-2006, 05:37 PM
#340
Senior Member
Join Date: Aug 2005
Location: AberdeenScotland, UNITED KINGDOM
Posts: 219
Likes: 0
Received 0 Likes
on
0 Posts
Thanks for the compliments Bull, glad you found the info you need. If there's anything I can help with though don't hessitate to ask!
01-10-2006, 08:55 PM
#341
Member
Join Date: Nov 2002
Location: Rockville,
MD
Posts: 56
Likes: 0
Received 0 Likes
on
0 Posts
Jamie,
Nice job so far. I remember fitting in mine long ago. I spent a lot of time on this step and had to remove an alarming amount of material like you!
I would recommend running some carbon reinforcement along the rails to stiffen them for hard landings. You will need it. Ask me how I know. I would also highly recommend glassing, plywood laminating, or using CF to stiffen the ribs that hold the rails. They also take a beating on hard landings. The CJM gear are nice, but they are also often too stiff to absorb a meaningful amount of shock.
01-11-2006, 02:09 AM
#342
Member
My Feedback: (5)
Join Date: May 2005
Location: Fort Dodge,
IA
Posts: 97
Likes: 0
Received 0 Likes
on
0 Posts
Go see my P-51 not a top-gun scale winner but will be fun at the field. http://www.rcuniverse.com/forum/m_35...tm.htm#3503284
01-11-2006, 02:16 AM
#343
Member
My Feedback: (5)
Join Date: May 2005
Location: Fort Dodge,
IA
Posts: 97
Likes: 0
Received 0 Likes
on
0 Posts
Got mine done take a look!http://www.rcuniverse.com/forum/m_35...tm.htm#3503284
01-12-2006, 01:19 AM
#346
Member
My Feedback: (5)
Join Date: May 2005
Location: Fort Dodge,
IA
Posts: 97
Likes: 0
Received 0 Likes
on
0 Posts
You are doing a fine job on your P-51 however I going to tell you something I’m sure you already know about. That single servo set up on the ailerons just spells disaster! Do your self a favor and change it out. It’s simply not a matter of if it will fail it’s a matter of when it will fail. I personally never use 2-56 ball links or solder on brass threads on flying surfaces there is way to much load for them. Put the servo out in the wing under a hatch like the flap servo they will fit just fine the wing is thick enough. As far as brass solder on threads go well they work fine on cables for pull pull stuff but not for dual ailerons. Also brass gets weak when heated too much and they can break. Not a good idea when most beginners don’t know how much heat to apply to them before they are unknowingly useless. So my best advice for this application and all other flying control links is as follows. Screw a plastic cleaves (not metal) onto a 2-56 (4-40 if larger that .60 size) threaded (on one end) rod for the control horn and then put a simple Z bend on the servo end. There are many types of Z bend pliers on the market any work just fine for this. Remember keep all your links as short as possible, strong with the least amount of parts.
01-12-2006, 05:41 AM
#348
Member
My Feedback: (5)
Join Date: May 2005
Location: Fort Dodge,
IA
Posts: 97
Likes: 0
Received 0 Likes
on
0 Posts
More cool stuff ok now give that Mustang some bling bling. After I installed the gun molding that came with the kit I went with a smooth finished look for them. I cut off the tips of the guns and drilled a 3/16 hole through the L.E. of the wing in there place. I also cut an access hatch into the bottom just under the guns for later use. Now you need to fit in some 3/16 K&S aluminum tubing into the holes you drilled. Make sure the tubing goes through the L.E. and into the rib bay about ½” and extends from the gun mount about 3/16” to ¼” like the tips we cut off did. Now you need to go to Wal-Mart and buy two of those bright red led bike safety flashers. Take it apart keep the lights and board see how it works this is not hard to do. Unsolder the LEDs from the board pay attention to there polarity. Simply make the wires longer from the LED to the board about 3” or so. Now use some heat shrink tubing to attach the LEDs to the end of the new gun tubes in the rib bay. Find the place on the board that activates the different lighting affect you can make them blink slow fast or chase it’s just so cool. In the air you would swear they where firing real guns! To power this unit you can run wires out of the wing into the plane with the rest of the servo wires. A 1.5 volt battery. is all you need. If you don’t like red and would rather use another color like white or yellow you can do that to just order the LED color you need from this link below. By all means put lots of LEDs on the plane landing lights, navigation, cockpit lights these never burn out and are very very bright even in sunlight.
http://extremeled.com/SearchResult.aspx?CategoryID=5
http://extremeled.com/SearchResult.aspx?CategoryID=5