


F104g 1:4 scale
 06-07-2017, 12:08 AM
#151

WOW, model look FANTASTIC!!!!!
Great work with landing gear. Front gear is also from Airworld?
I'll prepare Detail set in next few days, just to find good drawings (in big resolution) of top, bottom, left & right F 104 side. I work on that already...
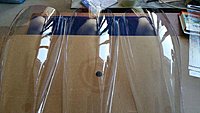
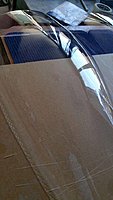
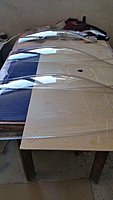
Finally good news about F 104 canopies, after few up & down I got pictures of first transparent parts.
One more time, awesome work Luke...
Mirce
Great work with landing gear. Front gear is also from Airworld?
I'll prepare Detail set in next few days, just to find good drawings (in big resolution) of top, bottom, left & right F 104 side. I work on that already...
Finally good news about F 104 canopies, after few up & down I got pictures of first transparent parts.
One more time, awesome work Luke...
Mirce
 06-09-2017, 07:02 AM
#152

Thanks Mirce! Yes main and nose are Airworld.
I've been working on various jobs at different corners of this plane, it is a lot of area to cover! I settled on a compromise for the stab, I wanted it to look good on the ground, how it actually functions as compared to the full scale is not important. The model has a different pivot point, that would make the split further back and it would not look right, my compromise looks great for neutral and most minor control surface deflections, of course when you go to full extreme down elevator then you see it's flaws.
It looks great though and is easy to remove, so it fits my criteria perfectly. I just added a balsa block to the top most ply vertical rib, centered the elevator and finished the back part of the cap with 1/8" balsa. After that all you have to do is cut it off, simple isn't it? lol!
06-11-2017, 12:10 AM
#153


Join Date: Jan 2005
Location: CaloundraQueensland , AUSTRALIA
Posts: 493
Likes: 0
Received 2 Likes
on
2 Posts
Nice work Luke haven't done much work on mine due to working 6 days a week so it's been a bit slow I just need a week of wet weather to catch up little bit lol ... Very nice Mirce I will send you a email to order a canopy and the detail set as well...
Damo
Damo
06-11-2017, 09:10 AM
#154
Looks good Damo, interesting vertical leading edge, I was able to strip plank mine without any issues.
I'm at the point where I really would like to know the control surface throws, the full scale only had 5 degrees of down elevator and 17 degrees of up. I am mainly concerned about the elevator, but having aileron control throws would be nice. I may have to set up duel rates with what I think it should be on low rate and a higher setting, but you are definitely limited on down elevator because of the rudder. I set my elevator center at the same incidence as the wings, maybe I'll add a few clicks of up for the first take off just in case, I hate the nose down out of trim on maidens!
I've been racking my brain about a lot of stuff on this plane, like fuel tank placement and many other things. I have a 1 gallon main tank and 60 oz saddle tanks, with a Kingtech 210 that would be 9 minutes at full throttle. Also not knowing the CG, I don't know how far ahead the main tank is in front of the CG. I have it between the intakes where they go together inside the fuselage. Airworld said on their F-104 it did not matter where they put the fuel tank, it was a non issue, I hope that is the case!
I would also like servo torque recommendations, if anyone has ideas please post them. I'm using two 500 oz/in Savox servos on the elevator and I've got a 277.7 oz/in on the rudder. I will probably just use the 500 oz/in Savox servos on ailerons so I don't have to worry about them. I had 2 JR 8711's laying around that I am using on flaps.
On the rudder construction, the bottom of the rudder is 90 degrees to the hinge line, I just used a soft balsa block below the rudder and sanded it to shape so it blends with the fuselage. Again I'm using 1/32" gap seals.
06-12-2017, 01:38 AM
#155
Join Date: Jan 2005
Location: CaloundraQueensland , AUSTRALIA
Posts: 493
Likes: 0
Received 2 Likes
on
2 Posts
Nice work mate it's coming up very well... With the LE of the fin I did for the extra strength and it work very well witch I'm happy with the elevator I'm going to be running two Futaba BLS177SV 514 oz-in (37 kg-cm) @ 7.4V it might be a overkill and the rest Futaba S9075SB 425 oz-in (31 kg-cm) at 6.0V
Damo
Damo
06-12-2017, 08:23 AM
#156
I try to find information for control surface move and CG position. Hope Damiano will put here that information.
Also, I sent message to Peter Goldsmith, he have same model, maybe he can help us...
Regards
Mirce
Also, I sent message to Peter Goldsmith, he have same model, maybe he can help us...
Regards
Mirce
06-12-2017, 10:12 AM
#157
Join Date: Jan 2005
Location: CaloundraQueensland , AUSTRALIA
Posts: 493
Likes: 0
Received 2 Likes
on
2 Posts
Hi Mirce that would awesome if you could do that I've been watching Damiano videos of his F104 flying over and over trying to work out how he set his control surface but can't really tell
Damo
Damo
06-12-2017, 06:24 PM
#158
Thanks Mirce, I could really use the info now.
I think we, or at least I have been over thinking the control set ups. Seems like the prototype used plastic control horns on its control surfaces to include the elevator! Even more incredible is that it weighed about 63lbs and is powered with a 160 size turbine!
I think we, or at least I have been over thinking the control set ups. Seems like the prototype used plastic control horns on its control surfaces to include the elevator! Even more incredible is that it weighed about 63lbs and is powered with a 160 size turbine!
06-13-2017, 06:41 AM
#160
Damo, I am curious now about your elevator set up. My internal structure kind of limits me to an external linkage though, plus I want the stab to be easy to remove. I make all of my control horns out of G10, so the forward half of the stab rib will be two pieces of G10 with the ball link attached on the lower edge of the stab, sort of internal so that all you see is the rod going into the stab. All I have to do then is unscrew the servo arm to remove it.
I got the last biggest job of the construction done before glassing, the gear door fiberglass piece is glued to the fuselage! Finishing is going to be a real treat on this thing, I'm kind of tired of building now! lol!
One major thing about the gear doors is the hinging, the hinge line must be perfectly straight, I did this after the fact by removing the ends of the formers near the gear doors and gluing in a square spruce stick, this straightened the balsa. Now I can use the micro piano hinges, I am not anticipating any problems with the doors at this point, I've already tested the Airworld linkage for aft gear doors and it works great. I just hope I bought the right air cylinders for the main gear doors.
I made a plug for an exhaust nozzle, it is lacking some detail, but I wanted to be able to vacuum form it and not have it get stuck. I may just lay fiberglass inside it and leave it or I may use it as a mold and make a fiberglass one. Either way it is so far away from the turbine pipe I think you could leave it plastic to save weight. The plastic I use is specially treated high quality plastic made for outdoor sign use, so it is very durable. With some extra work and Mirce rivets, I could add some decent detail very easily.
Last edited by dionysusbacchus; 01-05-2018 at 07:24 PM.
06-13-2017, 12:52 PM
#161
Nice work Luke, as always...
I got control surface movement:
- elevator +- 35 mm
- flaps 70/30 degreese
- ailerons +- 35 mm
Detail set for F 104 is ready, with combination with Mirce Finish set, and Extra rivets set you can now made scale Starfighter surface...
Mirce
I got control surface movement:
- elevator +- 35 mm
- flaps 70/30 degreese
- ailerons +- 35 mm
Detail set for F 104 is ready, with combination with Mirce Finish set, and Extra rivets set you can now made scale Starfighter surface...
Mirce
Last edited by mirce; 06-13-2017 at 12:54 PM.
06-13-2017, 04:32 PM
#162
Thanks Mirce, and great news about the control surface throws and the finish set! I can't believe only 35mm for elevator, I was ready for much more, but that makes it very easy.
I cut the doors out and they work great, I will hinge the door side permanently and temporarily attach them to the fuselage for testing, that way I can remove them for glassing. I would probably get resin in those hinges if I kept them attached. I will add some inner door detail to the rear doors, as they are visible on the ground, but the main doors are always closed, so no need for detailing them.
I cut the doors out and they work great, I will hinge the door side permanently and temporarily attach them to the fuselage for testing, that way I can remove them for glassing. I would probably get resin in those hinges if I kept them attached. I will add some inner door detail to the rear doors, as they are visible on the ground, but the main doors are always closed, so no need for detailing them.
06-14-2017, 08:32 AM
#164
That is where I figured the CG would be, I'm not anticipating any problems balancing this plane with the length of the nose and all the room!
I got the rear gear doors installed, they went pretty easy because of the control rod already installed by Airworld, I just had to figure out on the door where they attach. Everything on the gear is adjustable, so you have to Loctite everything, because it all moves when you operate the gear. I will do that when I install everything permanently. My air cylinders will work for the main doors, I'm just a little burnt out right now so I think I'll move on to the canopy and finish that, little change of pace.
Always remember to check your gear with the plane right side up! Everything works a little different upside down!
06-15-2017, 07:39 AM
#165
OK, I lied, I was on the verge of heat stroke working outside, it's a little cooler this morning so I got the doors done, yay! I was a little worried about the large main doors, but the air cylinders don't have a problem with them at all, they stay firmly open and shut. Nice thing about these air clylinders is the restricted nipples built into them, they do not slam shut or open. Here are the ones I used for the main doors: Dreamworks Model Products LLC
I hope to start glassing very soon, just have to tidy up a few things and install the nose gear doors.
Some pictures for your viewing pleasure!
I hope to start glassing very soon, just have to tidy up a few things and install the nose gear doors.
Some pictures for your viewing pleasure!
06-15-2017, 08:07 AM
#166

That is looking very nice, congratulations.
I'm just starting the F86 and will be well pleased if it finishes up anywhere near the standard of your 104!
Gary.
I'm just starting the F86 and will be well pleased if it finishes up anywhere near the standard of your 104!
Gary.
06-15-2017, 10:06 AM
#167
Join Date: Jan 2005
Location: CaloundraQueensland , AUSTRALIA
Posts: 493
Likes: 0
Received 2 Likes
on
2 Posts
Having the last couple of days off due to the rain got a little bit more done on the F-104 finished off the LE of the fin very happy how it's come up it has made it a lot stronger. Also started to make up the exhaust nozzle plug it's slightly in the close position happy with it...
Luke I'll take some photos of how I'm going to the elevator linkage over the weekend for you...
I also have one of the F-86 kits as well I'll be starting after I get the F-104 done
Damo
Luke I'll take some photos of how I'm going to the elevator linkage over the weekend for you...
That is looking very nice, congratulations.
I'm just starting the F86 and will be well pleased if it finishes up anywhere near the standard of your 104!
Gary.
I'm just starting the F86 and will be well pleased if it finishes up anywhere near the standard of your 104!
Gary.
Damo
Last edited by Damo260; 06-15-2017 at 10:17 AM.
06-15-2017, 10:55 AM
#168
Thanks Gary! Damiano is a great designer, now partnered with Mirce, these kits are hard to beat as far as ease of assembly and top quality manufacturing! I'm sure your plane will turn out awesome!
Damo, you are a busy guy, another giant balsa plane? I need some recovery time in between full balsa builds, go for it man! lol!
I'm getting ready to tackle the elevator, but the throw is only 35mm! I was testing where I want the attachment point on the stab, so I can make my PC board ribs, I will set it up for about 45mm just so I have it if I need it.
Good job on the exhaust nozzle, keep up the good work and I'm looking forward to your elevator solution.
Luke
06-16-2017, 04:30 PM
#170
All of us balsa bashers have to stick together, we are a very small segment of this ARF hobby now! Damo is a balsa warrior!
I've been doing the grunt work now, prime time is over with the gear and doors figured out!
I'll show my aileron servo mounting, pictures are pretty self explanatory.
I've been doing the grunt work now, prime time is over with the gear and doors figured out!
I'll show my aileron servo mounting, pictures are pretty self explanatory.
06-21-2017, 09:54 AM
#172
Join Date: Jan 2005
Location: CaloundraQueensland , AUSTRALIA
Posts: 493
Likes: 0
Received 2 Likes
on
2 Posts
I've been waiting for my 2.4mm G10 to show up Australia post starting to give me the ****s.... So I can cut up 4 ribs if I don't get it today I'll cut them out of ply as a mock-up and I'll take some photos...
Damo
06-22-2017, 08:58 AM
#173
My Feedback: (30)
Looks good Damo, interesting vertical leading edge, I was able to strip plank mine without any issues.
I'm at the point where I really would like to know the control surface throws, the full scale only had 5 degrees of down elevator and 17 degrees of up. I am mainly concerned about the elevator, but having aileron control throws would be nice. I may have to set up duel rates with what I think it should be on low rate and a higher setting, but you are definitely limited on down elevator because of the rudder. I set my elevator center at the same incidence as the wings, maybe I'll add a few clicks of up for the first take off just in case, I hate the nose down out of trim on maidens!
I've been racking my brain about a lot of stuff on this plane, like fuel tank placement and many other things. I have a 1 gallon main tank and 60 oz saddle tanks, with a Kingtech 210 that would be 9 minutes at full throttle. Also not knowing the CG, I don't know how far ahead the main tank is in front of the CG. I have it between the intakes where they go together inside the fuselage. Airworld said on their F-104 it did not matter where they put the fuel tank, it was a non issue, I hope that is the case!
I would also like servo torque recommendations, if anyone has ideas please post them. I'm using two 500 oz/in Savox servos on the elevator and I've got a 277.7 oz/in on the rudder. I will probably just use the 500 oz/in Savox servos on ailerons so I don't have to worry about them. I had 2 JR 8711's laying around that I am using on flaps.
On the rudder construction, the bottom of the rudder is 90 degrees to the hinge line, I just used a soft balsa block below the rudder and sanded it to shape so it blends with the fuselage. Again I'm using 1/32" gap seals.
I'm at the point where I really would like to know the control surface throws, the full scale only had 5 degrees of down elevator and 17 degrees of up. I am mainly concerned about the elevator, but having aileron control throws would be nice. I may have to set up duel rates with what I think it should be on low rate and a higher setting, but you are definitely limited on down elevator because of the rudder. I set my elevator center at the same incidence as the wings, maybe I'll add a few clicks of up for the first take off just in case, I hate the nose down out of trim on maidens!
I've been racking my brain about a lot of stuff on this plane, like fuel tank placement and many other things. I have a 1 gallon main tank and 60 oz saddle tanks, with a Kingtech 210 that would be 9 minutes at full throttle. Also not knowing the CG, I don't know how far ahead the main tank is in front of the CG. I have it between the intakes where they go together inside the fuselage. Airworld said on their F-104 it did not matter where they put the fuel tank, it was a non issue, I hope that is the case!
I would also like servo torque recommendations, if anyone has ideas please post them. I'm using two 500 oz/in Savox servos on the elevator and I've got a 277.7 oz/in on the rudder. I will probably just use the 500 oz/in Savox servos on ailerons so I don't have to worry about them. I had 2 JR 8711's laying around that I am using on flaps.
On the rudder construction, the bottom of the rudder is 90 degrees to the hinge line, I just used a soft balsa block below the rudder and sanded it to shape so it blends with the fuselage. Again I'm using 1/32" gap seals.
Are you Soloman or Dionisys from RCG?
If so this is Elmer from EDF Hobbies.
I saw a video of you I think and it says you have a number of patents, I would like to patent something and would like your advice
My phone number is 913-219-2529
Regards
06-27-2017, 04:29 PM
#175
Thanks Damo, yea, I've already made my decision early in construction, I would have to build a new tail to change the linkage. I went with external because I need to take the plane apart easily. I've found that painting the linkage with the rest of the plane helps a lot to blend the linkage in. I'm just going to keep it as clean as possible, I'm sure it will blend in 15' away.
I retracted the gear with the radio retract switch today. I've found the factory restrictors built into the air rams for the main gear are not the best with my application. I'm using the UP2 and UP3 valves and these valves have a restrictor built into them by adjusting the needle valves on the units. The main gear take so much air that restricting them really slows the retract cycle down, but I can't speed them up because the doors are so slow. Even with the needle valves for the doors fully open the door speed stays the same, speed the gear up at all and they hit the doors!
I may just take the hit and buy more air rams, I don't think I will be totally happy until I change them.
I used the small BVM air rams for the nose gear. I took the measurements for the nose gear doors from my 1/32 plastic model, just as I did with the main gear doors. They seem long, but it worked out because it gives me plenty of room to add the air rams.