


1/6 F-105 Build Thread
 02-13-2019, 05:24 PM
#351

Thread Starter
My Feedback: (20)
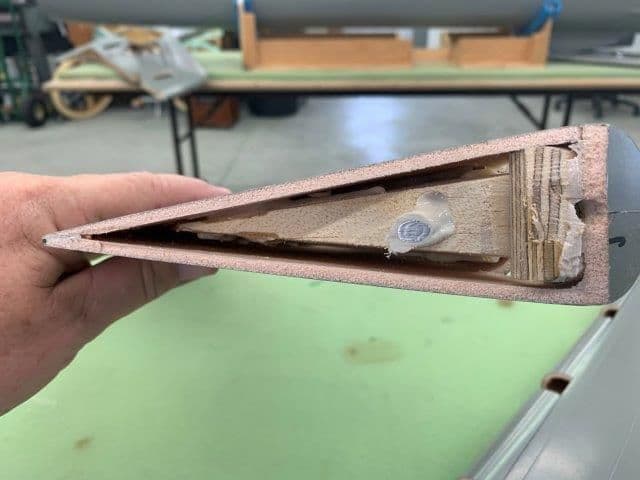
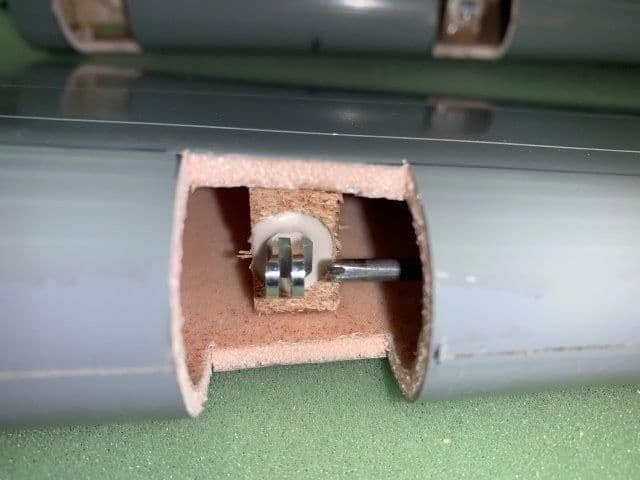
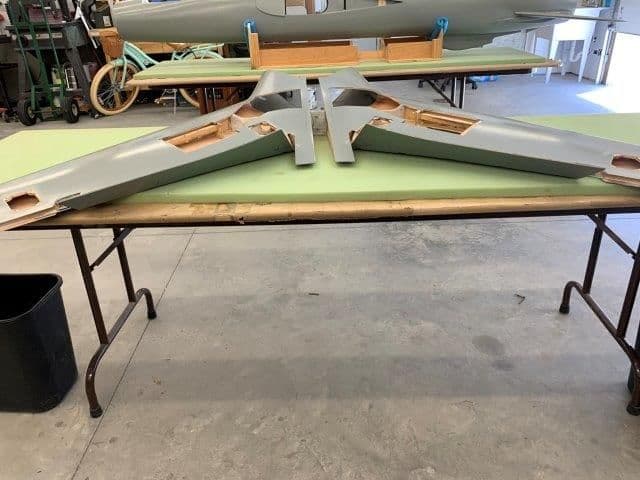
Hinge pins glued into flaps
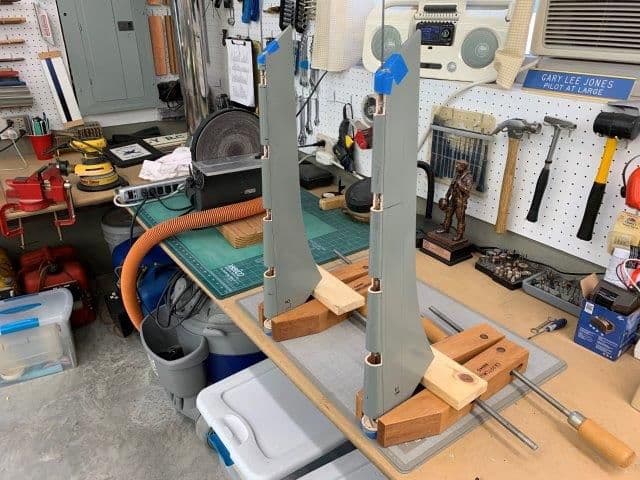
Hysol applied to holes and hinge pins and then placed into flaps. The wire was then run through the flaps to hold hinge pins in place during cure. Flaps stood on end to keep wire from sagging in middle.
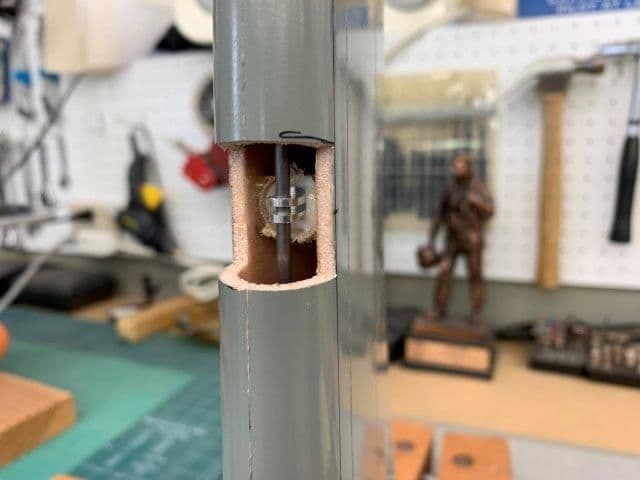
Typical glue joints...
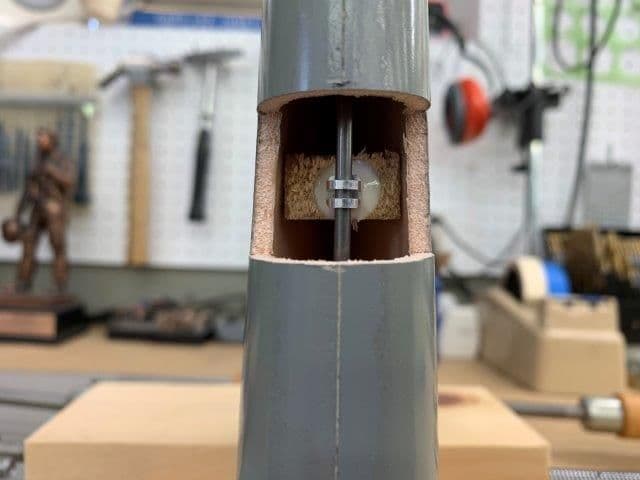
Of interest here is that the wood hard point in the flap root does not touch the inside of the flap skins. Not sure why so many wood hard points are done this way.
Hysol applied to holes and hinge pins and then placed into flaps. The wire was then run through the flaps to hold hinge pins in place during cure. Flaps stood on end to keep wire from sagging in middle.
Typical glue joints...
Of interest here is that the wood hard point in the flap root does not touch the inside of the flap skins. Not sure why so many wood hard points are done this way.
 02-13-2019, 05:45 PM
#352
Thread Starter
My Feedback: (20)
Prepping trailing edge and wing hinge pins
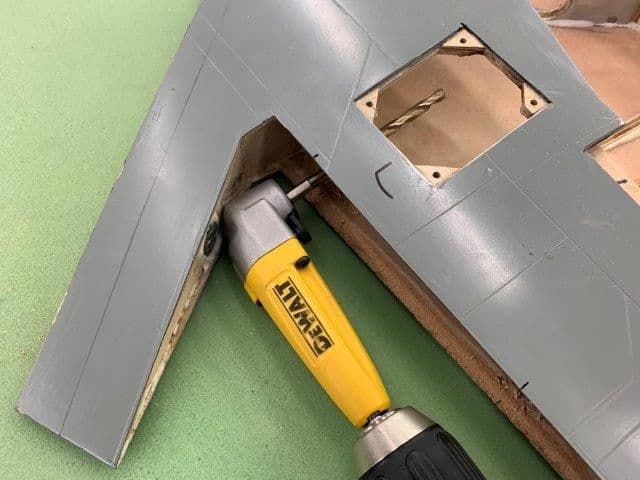
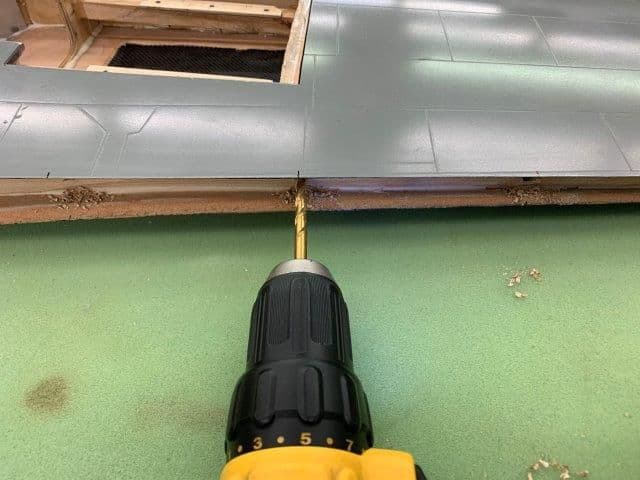
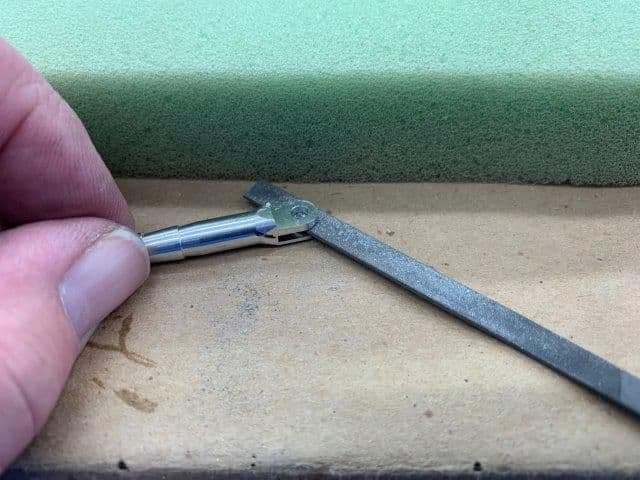
Hinge pin holes drilled in wing trailing edges. 90� angle drill used to clear the trailing edge root tab
Trailing edge wood is about 1/4" thick hardwood or plywood
Root edges of flaps cut off to allow clearance to make flap removable
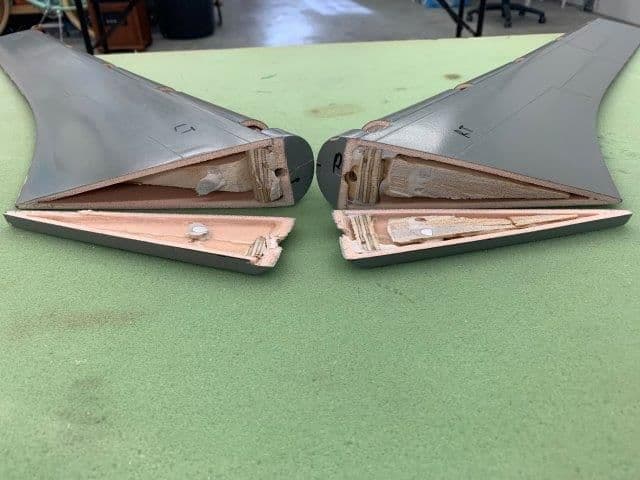
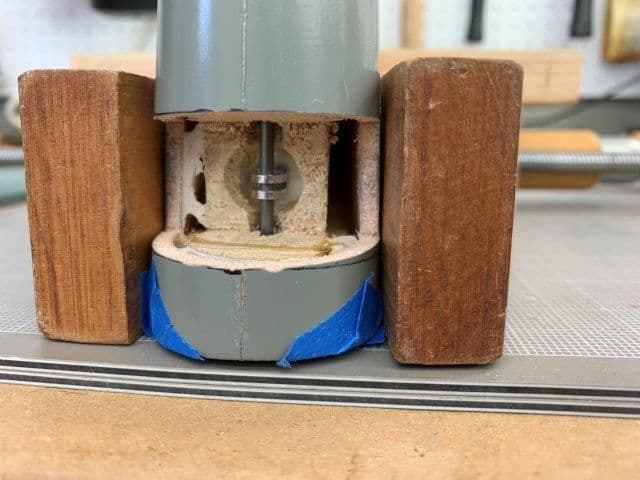
Balsa hard points are different shapes on either flap.
Balsa hard point does not touch inside skin of the flaps. Saw cut through the aluminum hinge pin.
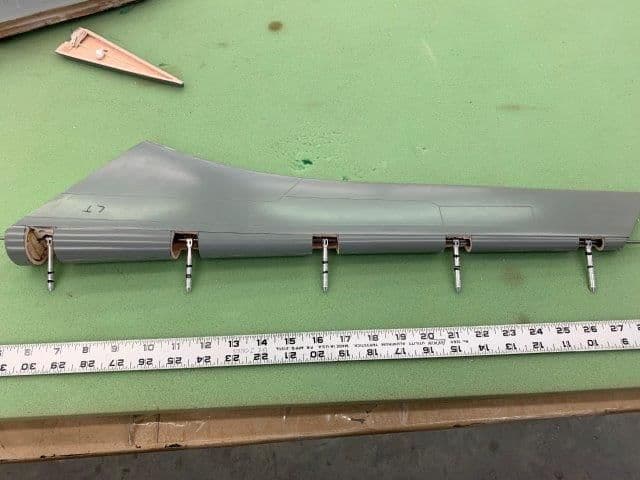
Pins marked for cut off to allow fit into the wing
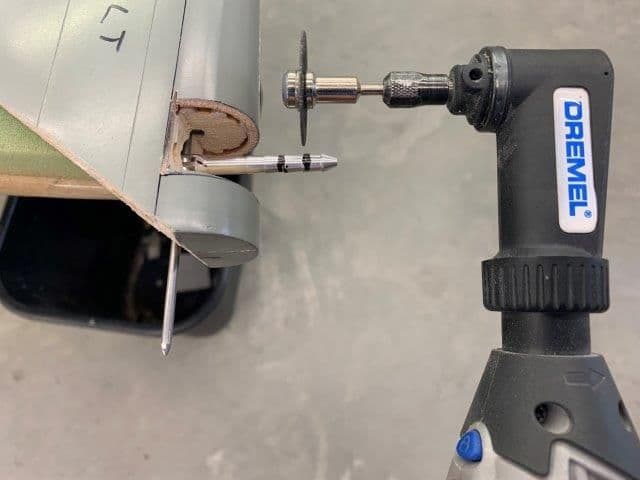
Dremel cut off wheel used to cut hinge pins. The wood is only about 1/4" wide and cutting off the hinge pins allows easier install.
Hinge pin holes drilled in wing trailing edges. 90� angle drill used to clear the trailing edge root tab
Trailing edge wood is about 1/4" thick hardwood or plywood
Root edges of flaps cut off to allow clearance to make flap removable
Balsa hard points are different shapes on either flap.
Balsa hard point does not touch inside skin of the flaps. Saw cut through the aluminum hinge pin.
Pins marked for cut off to allow fit into the wing
Dremel cut off wheel used to cut hinge pins. The wood is only about 1/4" wide and cutting off the hinge pins allows easier install.
02-13-2019, 05:59 PM
#353
Thread Starter
My Feedback: (20)
Reaming out hinge pin holes
 A
A
After a couple of hours of cut and fit I got the hinges ready to install to the wing but the wire was just too tight. The 6mm aluminum hinges are machined to very close tolerance and any slight misalignment was causing the wire to bind. It was very hard to get in or out. I needed to ream out the holes slightly but I did not have a 25" long #30 bit. So I made one.
I pounded the end of the wire on a vise anvil a few times to slightly flatten it from round. Then I cut a small notch on the end and made a homemade reamer. The notch provided a chip clearance channel and the slightly out of round wire opened up the hole just enough to allow the wire to slide in and out easily.
After reaming out the holes I used a couple of strokes with a fine jewelers file to deburr the flat sides and they all fit much better afterwards.
AAfter a couple of hours of cut and fit I got the hinges ready to install to the wing but the wire was just too tight. The 6mm aluminum hinges are machined to very close tolerance and any slight misalignment was causing the wire to bind. It was very hard to get in or out. I needed to ream out the holes slightly but I did not have a 25" long #30 bit. So I made one.
I pounded the end of the wire on a vise anvil a few times to slightly flatten it from round. Then I cut a small notch on the end and made a homemade reamer. The notch provided a chip clearance channel and the slightly out of round wire opened up the hole just enough to allow the wire to slide in and out easily.
After reaming out the holes I used a couple of strokes with a fine jewelers file to deburr the flat sides and they all fit much better afterwards.
02-13-2019, 06:09 PM
#354
Thread Starter
My Feedback: (20)
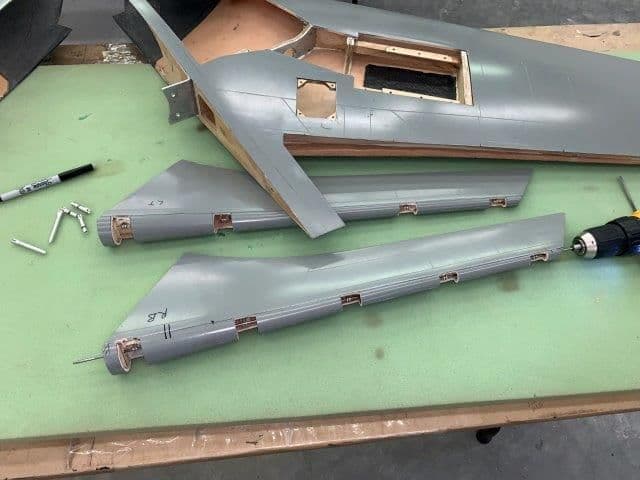
The moment of truth, gluing in the flap hinges
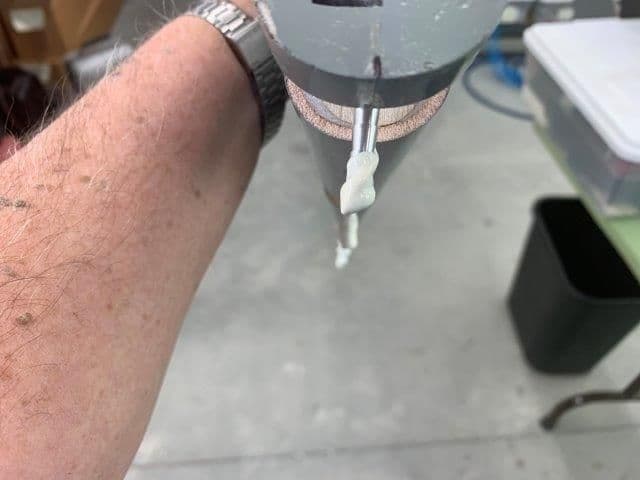
Hysol applied to the hinge pin holes

Hysol applied to the hinge pins
Gluing set up ready and motions rehearsed to install the flap without making a mess.
All the pins lined up ready to insert
Success...both flaps installed with a balsa spacer at the root to provide clearance. The shape of the wing trailing edge does not match the shape of the flap leading edge exactly and there is a possibility of some rubbing. I used a balsa spacer at the tip of the flap to set if off the trailing edge slightly to avoid the rubbing. We will see after the cure if they move correctly.
Hysol applied to the hinge pin holes
Hysol applied to the hinge pins
Gluing set up ready and motions rehearsed to install the flap without making a mess.
All the pins lined up ready to insert
Success...both flaps installed with a balsa spacer at the root to provide clearance. The shape of the wing trailing edge does not match the shape of the flap leading edge exactly and there is a possibility of some rubbing. I used a balsa spacer at the tip of the flap to set if off the trailing edge slightly to avoid the rubbing. We will see after the cure if they move correctly.
Last edited by Viper1GJ; 02-13-2019 at 06:15 PM.


 02-14-2019, 05:25 PM
#360
Thread Starter
My Feedback: (20)
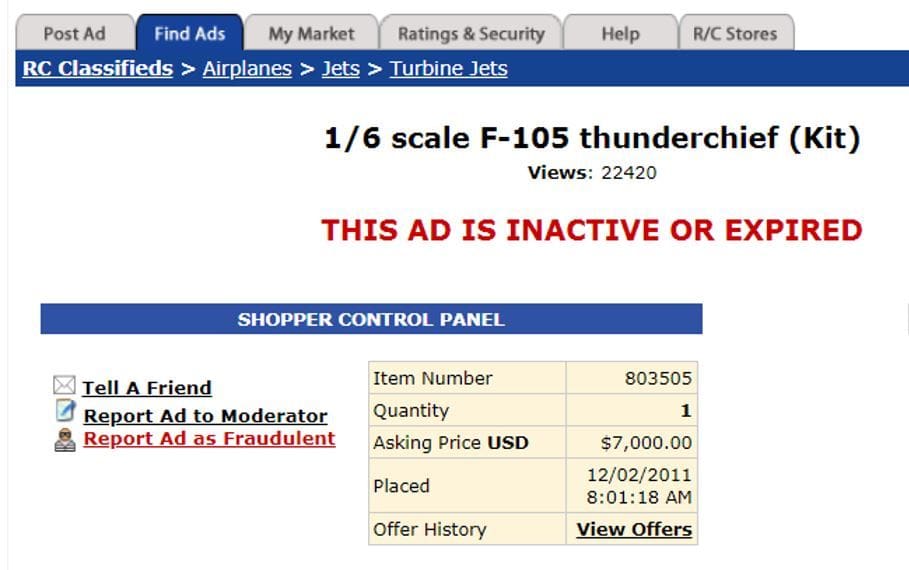
Your right, here's a copy of one of the original adds I was able to find. This was with the first gear. Mine has the second generation Matrix gear. Whether it works is TBD. Larry sent me a mod he made for the nose gear that makes it much more reliable. The real question is whether the mains will work in flight against the air flow. Bob Rullie had to convert his to electric to make them work. We will see...
A real adventure so far. I'll post next the goat rope I went thru today to get the flaps working.
A real adventure so far. I'll post next the goat rope I went thru today to get the flaps working.
02-14-2019, 06:08 PM
#361
Thread Starter
My Feedback: (20)
I went out to the shop today excited to see how the flaps worked. It was not good. The flaps would barely move with lots of friction and rubbing and the wire was very hard to pull out. So I started out working on the wire.

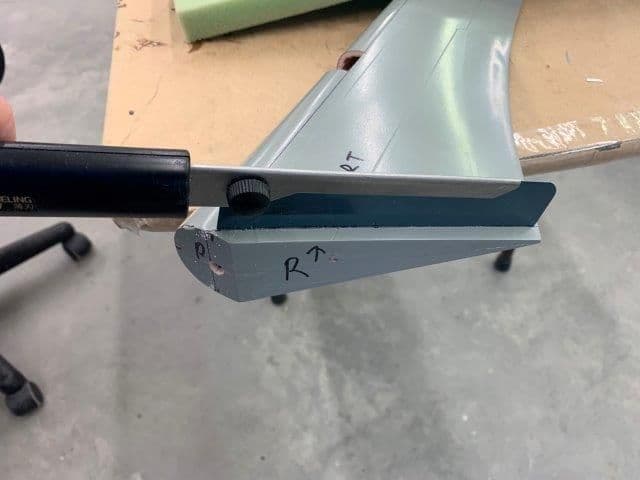
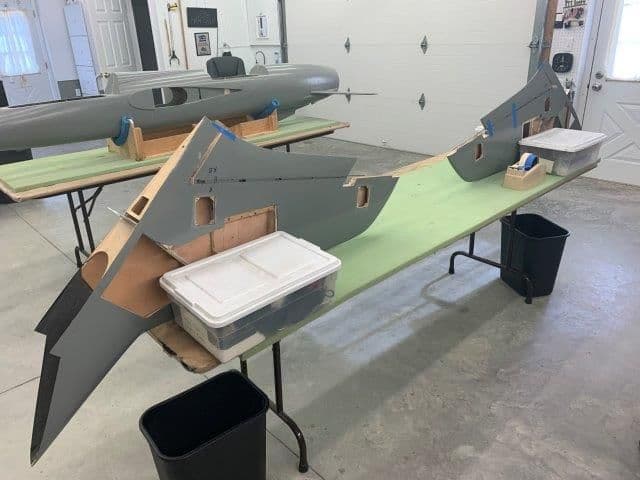
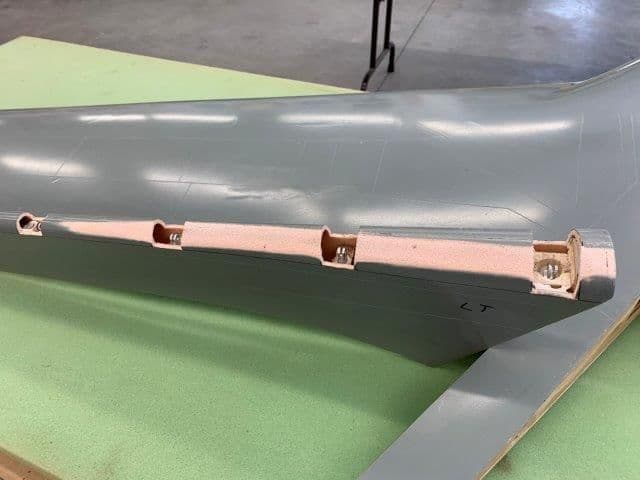
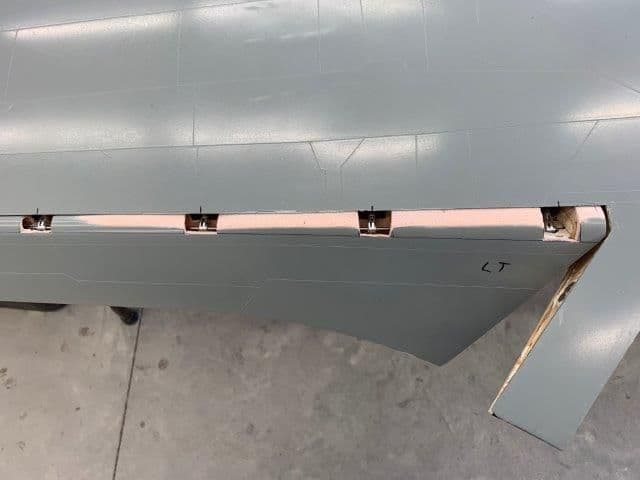
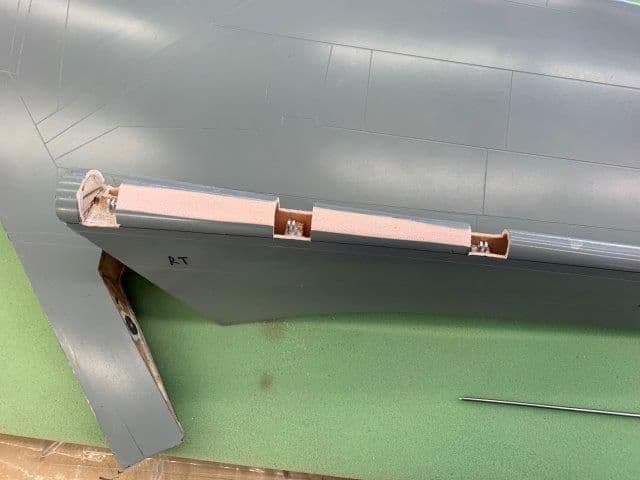
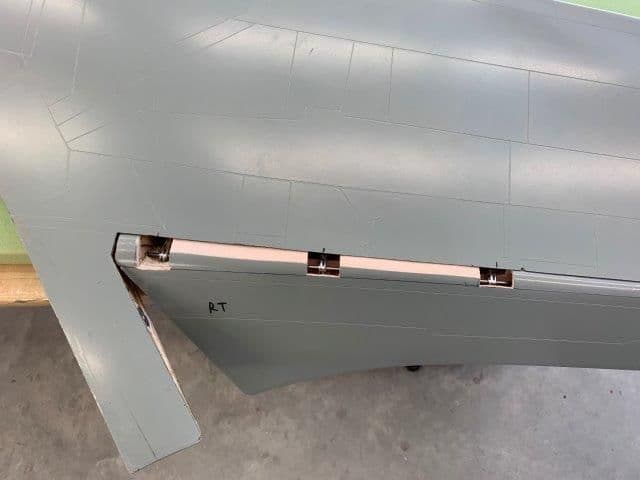
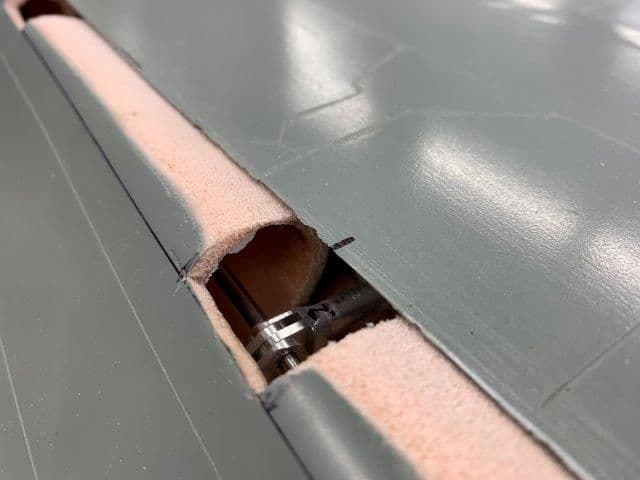
Hinges mounted in wing trailing edge. Hysol glue joints worked out OK.
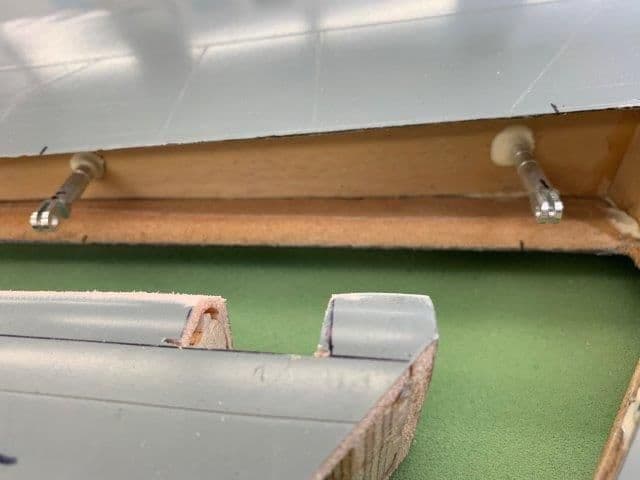
Aluminum hinges stand out about 1" at root of flap
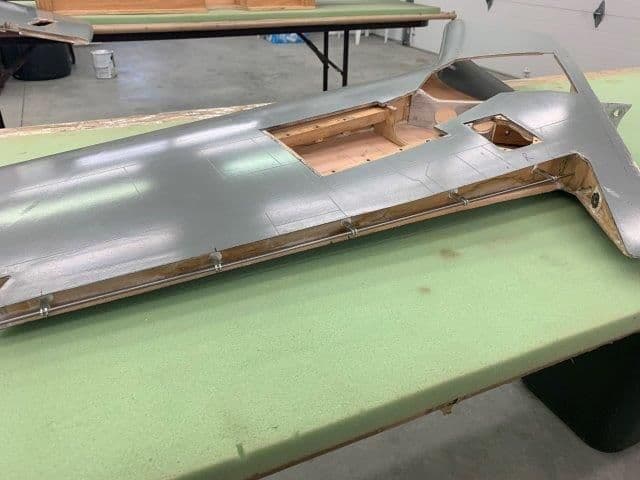
Hinge wire inserted after reaming out holes again to get a looser fit.
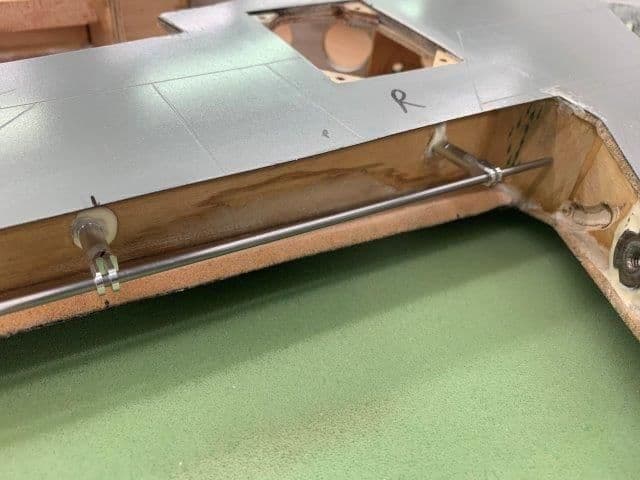
Now it slides in and out ok.
Hinges mounted in wing trailing edge. Hysol glue joints worked out OK.
Aluminum hinges stand out about 1" at root of flap
Hinge wire inserted after reaming out holes again to get a looser fit.
Now it slides in and out ok.
Last edited by Viper1GJ; 02-14-2019 at 06:49 PM.
02-14-2019, 06:21 PM
#362
Thread Starter
My Feedback: (20)
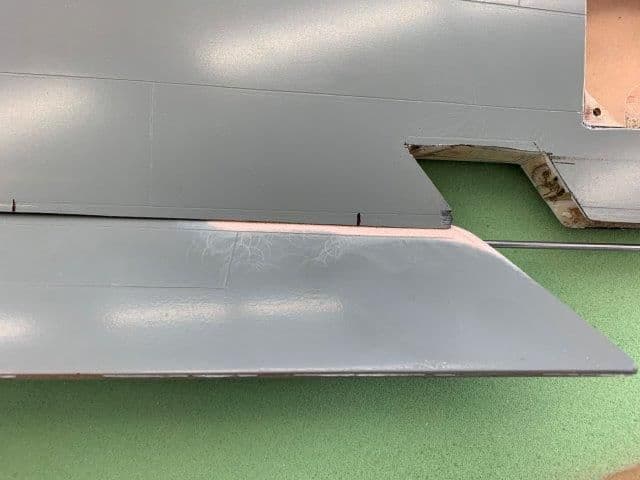
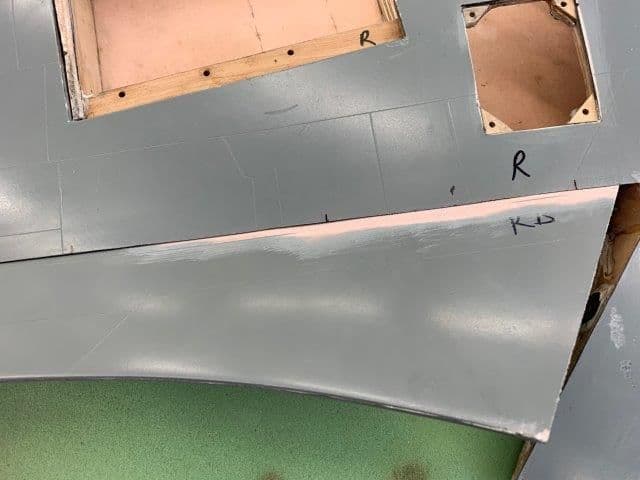
Next I started looking at the flaps. After a few minutes, I found severe rubbing on the top of each flap when either flap was lowered more than 20�. This was caused by the shape of the trailing edge taper not matching the flap leading edge taper. In fact the left wing, the thin one. the flap actually popped back up like a spring because of rubbing the upper wing skin. So I spent the rest of the day polishing the tur... I mean sanding the flaps to fit.
Right wing rubs between hinge #1 and #3.
Left wing had severe rubbing between hinge #2 and #3. This is the thin wing. The force would actually push the flap back up. The servo would probably over amp just putting the flap down much less with air loads.
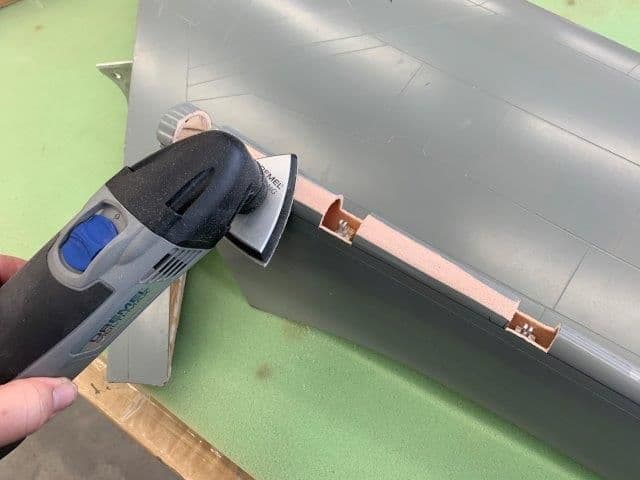
So out comes the sander and here we go... polishing the you know what again!
Right wing rubs between hinge #1 and #3.
Left wing had severe rubbing between hinge #2 and #3. This is the thin wing. The force would actually push the flap back up. The servo would probably over amp just putting the flap down much less with air loads.
So out comes the sander and here we go... polishing the you know what again!
Last edited by Viper1GJ; 02-14-2019 at 06:51 PM.
02-14-2019, 06:35 PM
#363
Thread Starter
My Feedback: (20)
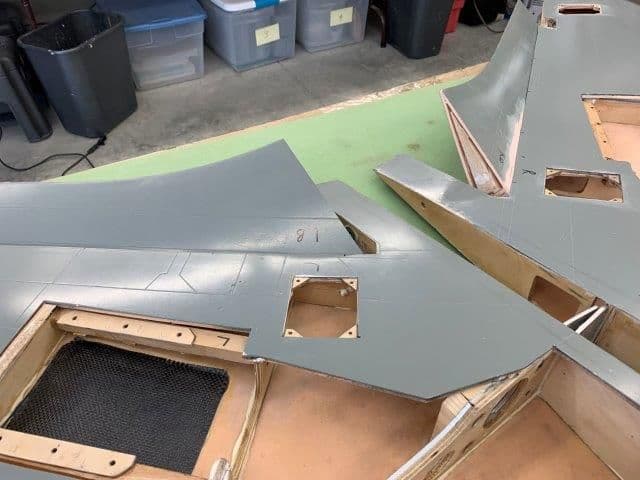
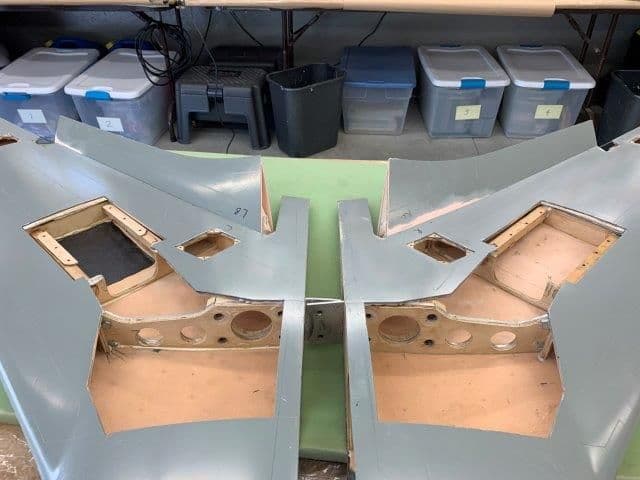
The rest of the day spent sanding, fitting, sanding fitting ...
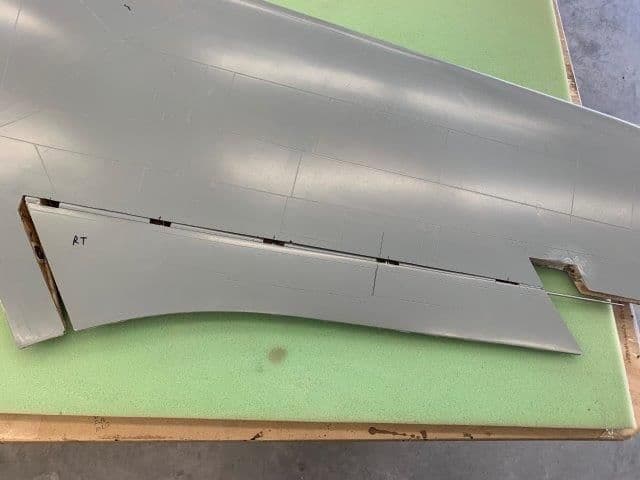
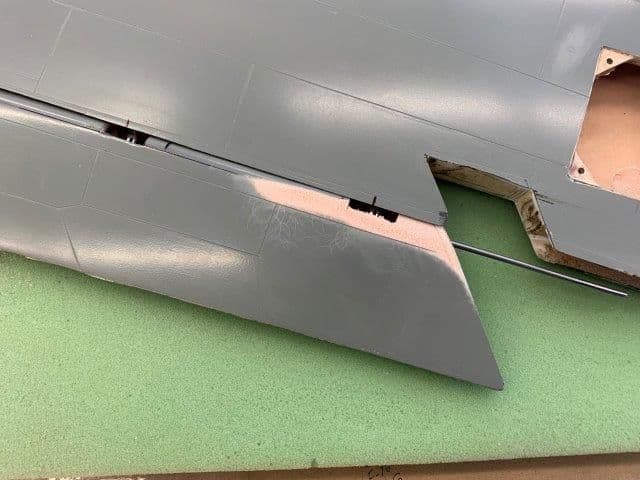
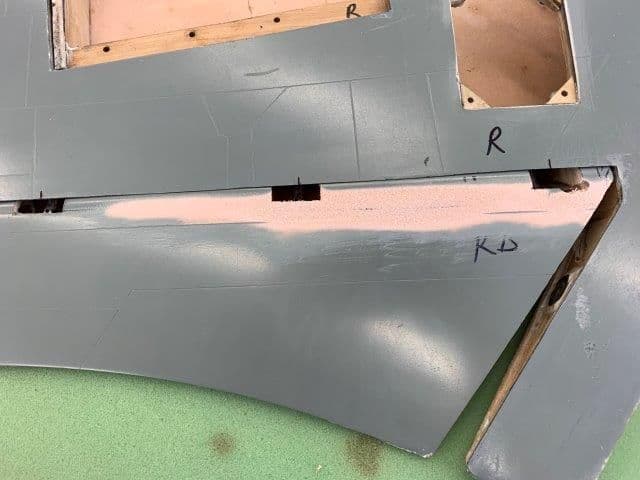
Left flap was worst. Here is the top surface sanded to not rub the wing in the curved section
Left flap attached and full down
Bottom of left flap at tip rubbed and sanded clear
Left flap down at tip
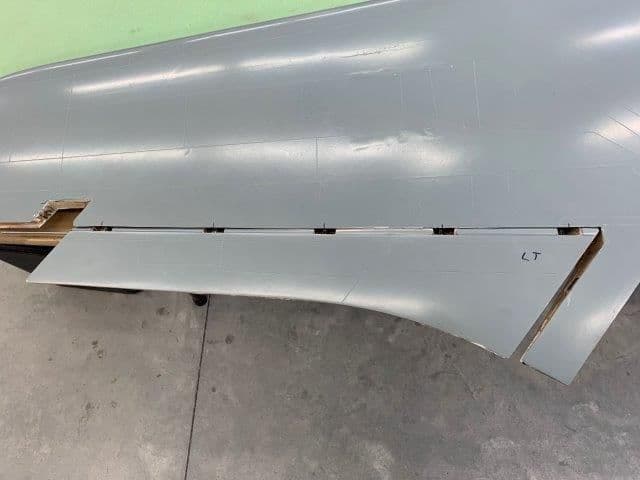
Right flap bottom
Right flap top rubs wing trailing edge
Right flap down clears trailing edge now
Right flap bottom
Here is how thin I had to sand the left flap top to clear the wing when extended. The foam airex material is about 3/16" deep and is sanded almost completely through because of the poor fit of the flap to the wing shape. I think the flaps were molded correctly, its the left wing that is messed up by being significantly thinner in this area than the right wing. Not sure why but all the parts I'm aware of had this defect.
Left flap was worst. Here is the top surface sanded to not rub the wing in the curved section
Left flap attached and full down
Bottom of left flap at tip rubbed and sanded clear
Left flap down at tip
Right flap bottom
Right flap top rubs wing trailing edge
Right flap down clears trailing edge now
Right flap bottom
Here is how thin I had to sand the left flap top to clear the wing when extended. The foam airex material is about 3/16" deep and is sanded almost completely through because of the poor fit of the flap to the wing shape. I think the flaps were molded correctly, its the left wing that is messed up by being significantly thinner in this area than the right wing. Not sure why but all the parts I'm aware of had this defect.
Last edited by Viper1GJ; 02-14-2019 at 06:49 PM.
02-14-2019, 07:06 PM
#364
Thread Starter
My Feedback: (20)
Finally got the flaps working OK. I may could have avoided this process if I had set the flaps out more from the wing trailing edge, however if you set them much further out there started to be a large gap between the flap and the wing skin and looked ugly. So I tucked them in but some spots rubbed.
After working several hours I got both flaps moving down smoothly with little friction. Servos will survive now.
I will apply 2 oz. glass the areas sanded to get a smooth surface again.
==
Now both flaps give in excess of 45� deflection. That will be plenty and probably will create a lot of drag that could be a real problem if you got behind the thrust curve. Next I will have to slot and replace the hinge cut outs, flap root end caps, then make a wire pull out recessed in the flap tip.
Out of shop time till next week. Promised the wife and granddaughter a trip to Myrtle Beach for the long weekend. Till then...polish polish polish...
Last edited by Viper1GJ; 02-14-2019 at 07:08 PM.
 02-16-2019, 08:14 AM
#366
02-16-2019, 09:19 AM
#368
You have my respect for pushing on with this project my friend. For all the video's where bob said "Smooth as a babies bum" when he was sanding and laying up the mold I couldn't believe it when I could see in pictures the sanding scratches and imperfections in the gelcoat surface of the parts...... his baby must have had a bad case of diaper rash..... I wish you all the greatest success on this airplane when it's ready to fly, my fingers are crossed that there are no structural issues that can't be seen anywhere. $7000 put this airplane in the same high end category price wise as the JMP firebird or some of the BVM kits, Airworld etc. Those prices are ok, but not when this much re-engineering has to be done just to build the damn thing. It reminds me of the old Fiberclassics/Comp ARF Mig 29. Huge money for the kit and it was incomplete, components didn't work, nothing fit, and nothing aligned the way it needed to.
In the end you'll be rewarded with a very unique airplane. I hope it performs well and is worth all the "fixes" you are having to do. I have enjoyed watching the thread but my eye sockets are getting tired from all the eye rolling and neck is sore from all the head shaking seeing all the problems you have had to deal with on a very expensive airplane. My fingers are crossed for you that the next steps go smoothly!
Jeremy
02-16-2019, 05:41 PM
#369
Thread Starter
My Feedback: (20)
Thanks, Jeremy. Its been a slog for sure. I really didn't expect all the re-engineering that I had to do. At least I can see the way through most of the remaining tasks. There's some body work needed still on some parts, engine hatch, drag chute doors, gear doors, etc but nothing beyond model airplane "grunt work". Setting the wing anhedral, main gear mounting and realignment, main spar fabrication, stab actuating system, stab pivot point, and hinging flight controls were the big issues I did not expect. To be sure I made more work with the removable nose and nozzle, and removable flight controls but I wanted those features. I wanted the nose and nozzle off for service access and I never did like painting with flight controls attached. It never came out well. To be sure the glass work is rough and will take some filling and sanding but I not too concerned with the surface scratches and such. I never flew a combat aircraft that was not dull, scratched, and dirty, and that is what I am going to model. But that's the area I have very little experience or skill. I may ask your advice.
Thanks,
Gary
Thanks,
Gary
02-25-2019, 07:17 AM
#371

You have my respect for pushing on with this project my friend. For all the video's where bob said "Smooth as a babies bum" when he was sanding and laying up the mold I couldn't believe it when I could see in pictures the sanding scratches and imperfections in the gelcoat surface of the parts...... his baby must have had a bad case of diaper rash..... I wish you all the greatest success on this airplane when it's ready to fly, my fingers are crossed that there are no structural issues that can't be seen anywhere. $7000 put this airplane in the same high end category price wise as the JMP firebird or some of the BVM kits, Airworld etc. Those prices are ok, but not when this much re-engineering has to be done just to build the damn thing. It reminds me of the old Fiberclassics/Comp ARF Mig 29. Huge money for the kit and it was incomplete, components didn't work, nothing fit, and nothing aligned the way it needed to.
In the end you'll be rewarded with a very unique airplane. I hope it performs well and is worth all the "fixes" you are having to do. I have enjoyed watching the thread but my eye sockets are getting tired from all the eye rolling and neck is sore from all the head shaking seeing all the problems you have had to deal with on a very expensive airplane. My fingers are crossed for you that the next steps go smoothly!
Jeremy
In the end you'll be rewarded with a very unique airplane. I hope it performs well and is worth all the "fixes" you are having to do. I have enjoyed watching the thread but my eye sockets are getting tired from all the eye rolling and neck is sore from all the head shaking seeing all the problems you have had to deal with on a very expensive airplane. My fingers are crossed for you that the next steps go smoothly!
Jeremy
02-25-2019, 07:43 AM
#373

 02-25-2019, 07:59 AM
#374

A co-worker mentioned an F-105 movie on Amazon Prime, Thud Pilots. I have not watched it yet, but here's the link.
Should be good for some inspiration.
https://www.amazon.com/Thud-Pilots-L.../dp/B07M6V7842
Paul
Should be good for some inspiration.
https://www.amazon.com/Thud-Pilots-L.../dp/B07M6V7842
Paul
02-25-2019, 09:33 AM
#375
I just feel for everyone who has been affected .........