


Painted wing, stabs and advanced graphics
 12-30-2015 | 01:12 PM
#126

Thanks for this thread! I have been painting r/c airplanes since the 60's and have been through a number of different systems. There are always new products and techniques to learn and I am getting an enormous amount of helpful information which I can use in my current projects. Keep up the good work for those interested in craftsmanship we truly appreciate the good advice.
This stuff isn't brain surgery. We can all do it if we really want to.
 12-30-2015 | 01:27 PM
#127
Paints are due in today, so i should be rocking and rolling soon.
Just for fun, let's go over the cool psychedelic butterfly I posted a while back. A few moths ago I was Googling for companies that sell Vector Graphics and ran across a firm (forgot who they are) that was giving away five graphics free to entice you to buy more from them. I was really surprised that two of the five were images that would fit perfect on a paint job I was doing at the time. One of them was the butterfly. It literally took seconds to size it and cut two mask for the tail on a Proteus. You can see in the picture I just airbrushed yellow around the perimeter, orange was next and purple in the middle and the antennas.
Trust me it took longer to clean my airbrush and put in a new color than it took to paint it. I would say, I had five minutes at most on both sides of the rudder.
12-30-2015 | 01:38 PM
#128

Joined: Nov 2007
Posts: 14
Likes: 0
Received 0 Likes
on
0 Posts
From: Boise,
ID
What a wonderfully written and informative thread! Thank you for taking the time to include the many different supplies and suppliers.
Also as a side note; As it is when flying pattern, or finishing the design of a plane... I am happy to make a straight line!
Kerry
Also as a side note; As it is when flying pattern, or finishing the design of a plane... I am happy to make a straight line!
Kerry
12-30-2015 | 01:45 PM
#129
Good to hear from you...how are the boys in the Great White North doing? Shoveling snow to fly? I think you fly just fine. I remember you doing very well at the Boise contest.
Pat
12-30-2015 | 01:49 PM
#130
Kerry...BTW, If Karl makes some crack about "that I am indeed old"...tell him I'm taking him out of my will!
At a contest this year he told me "I fly really well...for an old guy".
At a contest this year he told me "I fly really well...for an old guy".
12-30-2015 | 02:38 PM
#131
Joined: Nov 2007
Posts: 14
Likes: 0
Received 0 Likes
on
0 Posts
From: Boise,
ID
Pat,
The snow is frozen to the ground... still, and will be for awhile. But in a way that is good because I am in the process of putting together my new full size pattern plane. What you have provided in this thread will help in finishing it. I am very excited to begin flying my full size pattern plane and improving my skills.
Thank again for all your help last year. This pattern stuff is very addicting.
Kerry
12-30-2015 | 03:02 PM
#132
Pat,
The snow is frozen to the ground... still, and will be for awhile. But in a way that is good because I am in the process of putting together my new full size pattern plane. What you have provided in this thread will help in finishing it. I am very excited to begin flying my full size pattern plane and improving my skills.
Thank again for all your help last year. This pattern stuff is very addicting.
Kerry
The snow is frozen to the ground... still, and will be for awhile. But in a way that is good because I am in the process of putting together my new full size pattern plane. What you have provided in this thread will help in finishing it. I am very excited to begin flying my full size pattern plane and improving my skills.
Thank again for all your help last year. This pattern stuff is very addicting.
Kerry
12-31-2015 | 07:52 AM
#133
Senior Member
12-31-2015 | 08:08 AM
#134
Senior Member
Paints are due in today, so i should be rocking and rolling soon.
Just for fun, let's go over the cool psychedelic butterfly I posted a while back. A few moths ago I was Googling for companies that sell Vector Graphics and ran across a firm (forgot who they are) that was giving away five graphics free to entice you to buy more from them. I was really surprised that two of the five were images that would fit perfect on a paint job I was doing at the time. One of them was the butterfly. It literally took seconds to size it and cut two mask for the tail on a Proteus. You can see in the picture I just airbrushed yellow around the perimeter, orange was next and purple in the middle and the antennas.
Trust me it took longer to clean my airbrush and put in a new color than it took to paint it. I would say, I had five minutes at most on both sides of the rudder.
Just for fun, let's go over the cool psychedelic butterfly I posted a while back. A few moths ago I was Googling for companies that sell Vector Graphics and ran across a firm (forgot who they are) that was giving away five graphics free to entice you to buy more from them. I was really surprised that two of the five were images that would fit perfect on a paint job I was doing at the time. One of them was the butterfly. It literally took seconds to size it and cut two mask for the tail on a Proteus. You can see in the picture I just airbrushed yellow around the perimeter, orange was next and purple in the middle and the antennas.
Trust me it took longer to clean my airbrush and put in a new color than it took to paint it. I would say, I had five minutes at most on both sides of the rudder.
12-31-2015 | 08:44 AM
#135
Actually very easy and very fast to do. I'll show how it's done. That 3D look is what you are going for. A lot of custom painting is just an allusion and some of the easiest stuff to do is the most impressive.
12-31-2015 | 08:45 AM
#136
The spectral butterfly is what I waslooking for when I was naming my previous design which I eventually named Aesthesis. I wanted to name it Papillon but without the butterfly it would have been dumb. The spectral butterfly was to be masked at the root of the wing panels and overlap the fuse center. So many ideas....... Just not enough knowledge to execute them.
12-31-2015 | 05:14 PM
#137

I made an "executive decision" and posted a link to this thread over at the Groups site. This information is just to good not to spread around as much as possible. Who knows, there may be a master painter waiting for some inspiration
Ken
PS This is one of the best threads I've seen in a VERY long time. Thank you!!!
and posted a link to this thread over at the Groups site. This information is just to good not to spread around as much as possible. Who knows, there may be a master painter waiting for some inspirationKen
PS This is one of the best threads I've seen in a VERY long time. Thank you!!!
12-31-2015 | 06:44 PM
#138
I made an "executive decision" and posted a link to this thread over at the Groups site. This information is just to good not to spread around as much as possible. Who knows, there may be a master painter waiting for some inspiration
Ken
PS This is one of the best threads I've seen in a VERY long time. Thank you!!!
and posted a link to this thread over at the Groups site. This information is just to good not to spread around as much as possible. Who knows, there may be a master painter waiting for some inspirationKen
PS This is one of the best threads I've seen in a VERY long time. Thank you!!!
12-31-2015 | 07:31 PM
#139
OK, I am finally painting.
The first thing I do is reattach the ailerons so I can mask and paint everything as one unit.
This is the lower wing so I make a paper template of the wing saddle, so I can get my reveals just right.
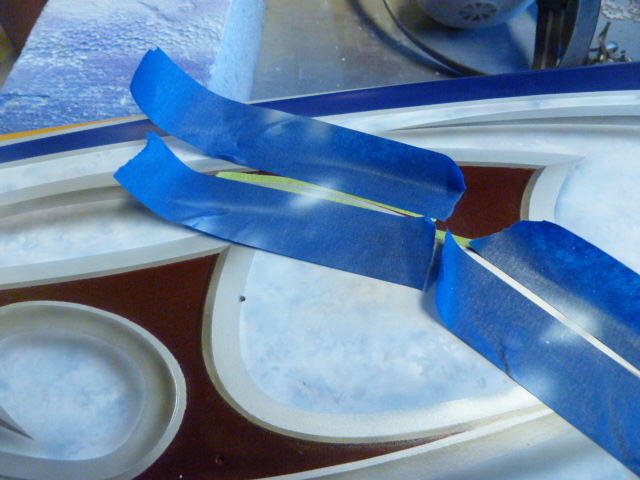
I have taken the cutting blade out of my plotter and and inserted a pen to print the graphic that will be the center piece of the wings. I cut it out and use it as a reference to lay out all the other tape lines.

Here I am laying out the bands that will surround the graphic. One important thing about laying out tape is the hand holding the tape roll is the one doing all the layout (the work). The other hand, just presses the tape into position.
Here you can see how using the template allows me to get the first tape line down to form around the graphic.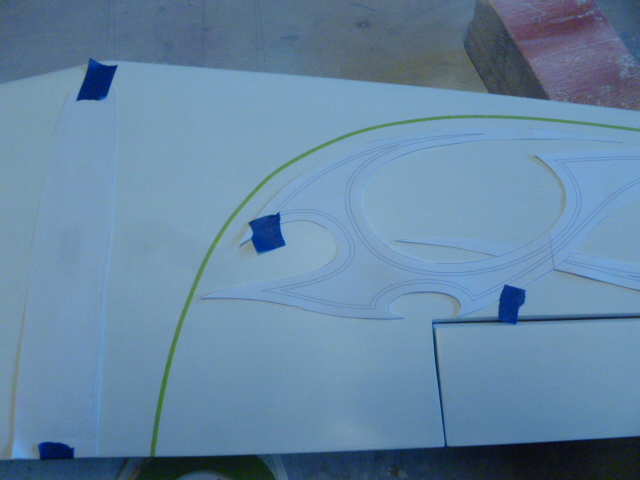
The first thing I do is reattach the ailerons so I can mask and paint everything as one unit.
This is the lower wing so I make a paper template of the wing saddle, so I can get my reveals just right.
I have taken the cutting blade out of my plotter and and inserted a pen to print the graphic that will be the center piece of the wings. I cut it out and use it as a reference to lay out all the other tape lines.
Here I am laying out the bands that will surround the graphic. One important thing about laying out tape is the hand holding the tape roll is the one doing all the layout (the work). The other hand, just presses the tape into position.
Here you can see how using the template allows me to get the first tape line down to form around the graphic.
12-31-2015 | 07:55 PM
#141
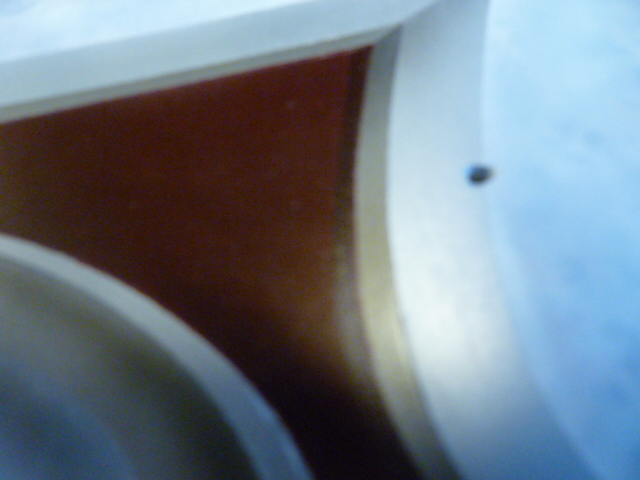
OK now thing get interesting. I am laying everything out so I will be able to paint a 1/8 inch line with HOK Metalume (looks like aluminum) around all the bands without having to mask specifically for the 1/8 inch line. In this picture you can see how I airbrushed the Metalume all the way around the outside tape line, but you will see it doesn't go up against another tape line. It just fades off. You will also see where the single piece of tape was, there is now a Metalume band where the tape was. What I did was just use the tape as a marker and just shot the paint as I lifted the tape. Sounds confusing, but it should make sense. 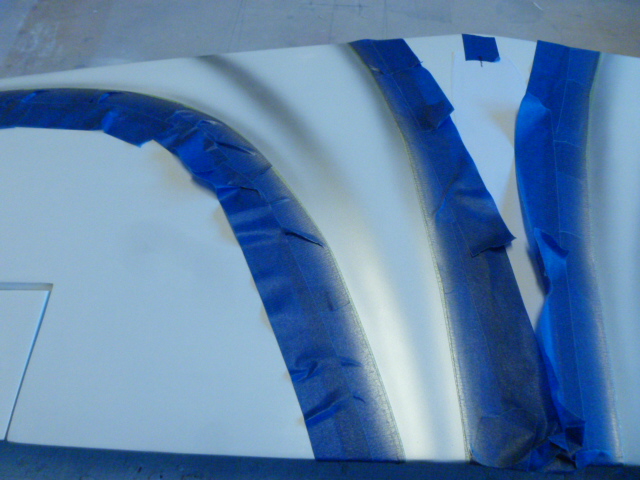
Now you can see the tape in the center has been pulled.
The center section will be blue. I now mask back over the pinstripe line just a hair so when I pull the center section of tape you will see just a little bit of the pinstripe showing that the blue in the center will cover. I then butt another piece of 1/8 inch tape up against the tape line for the center section. That 1/8 inch tape creates the pinstripe between the blue center section and the yellow band next to it.
So when I pull the tape, the 1/8 inch pinstripe will be revealed.
Last edited by Portlandflyer; 12-31-2015 at 09:29 PM.
12-31-2015 | 08:07 PM
#142
For that section that I just hand airbrushed the Metalume, I just lay a 1/8 inch piece of tape over the center of it and that creates the pinstripe on the other side of the yellow band. 
Here you can see I am doing the same thing all around the outside of the bands. I just lay down a 1/8 inch piece of tape butted up against the tape allready down. You see how it covers up the Metalume that again will create a pinstripe all around the bands.


Here you can see I am doing the same thing all around the outside of the bands. I just lay down a 1/8 inch piece of tape butted up against the tape allready down. You see how it covers up the Metalume that again will create a pinstripe all around the bands.
12-31-2015 | 08:14 PM
#143
Before I paint up against a tape edge, I clean it. 
I use a wax and grease remover. I just shoot a little on a cloth and run it around all the tape edges. It really helps clean up edges to give a clean line.
I use a wax and grease remover. I just shoot a little on a cloth and run it around all the tape edges. It really helps clean up edges to give a clean line.
12-31-2015 | 08:21 PM
#144
Here you can see how we create what I call ghost graphics, These will be very subtle and you have to look very close to see them when painted. I like to think of them as a little bonus for the one or two guys that actually look close enough to find them.
I cut the name of the plane "AUSTRAL" on my plotter and applied the positives (the letters) to the band that will be painted yellow. I also added one on each wing tip. These are applied over a white base and we then shoot the yellow right over the top of them.
I cut the name of the plane "AUSTRAL" on my plotter and applied the positives (the letters) to the band that will be painted yellow. I also added one on each wing tip. These are applied over a white base and we then shoot the yellow right over the top of them.
12-31-2015 | 08:39 PM
#145
After the yellow is shot up to 100% density, I use a plastic razer blade to gently lift the masking film pieces. You can use an Exacto to lift them, but you get a lot of little pick marks with a blade. The plastic razer blade won't do that. I bought a life time supply off Ebay for a few bucks. A sign shop may have them as well. They make a huge difference lifting masking film.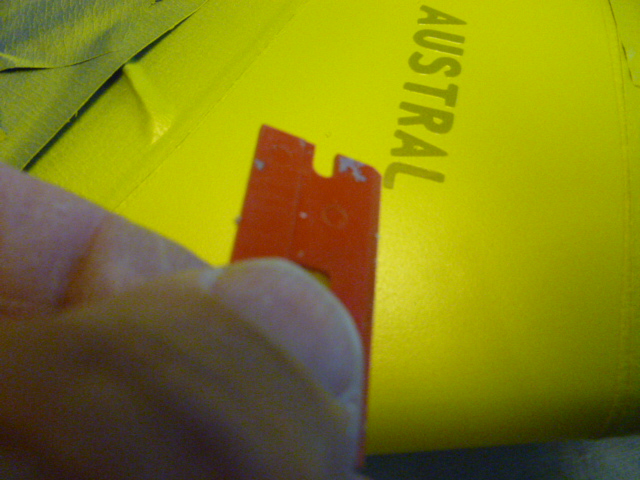
After I lift all the little letters, this is what we have.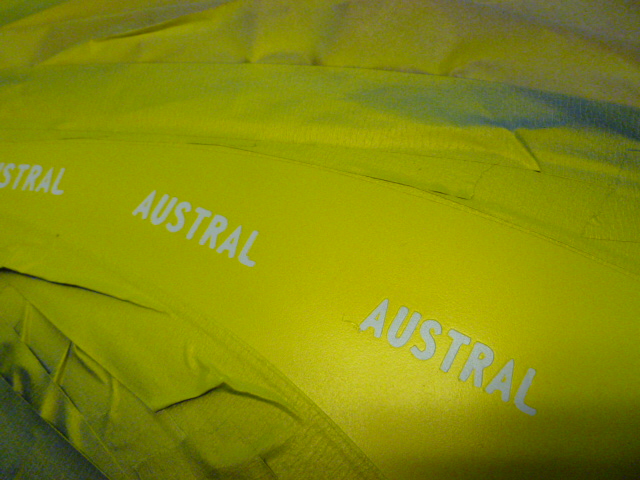
I hit the letters lightly with 600 wet paper to knock down the ridges.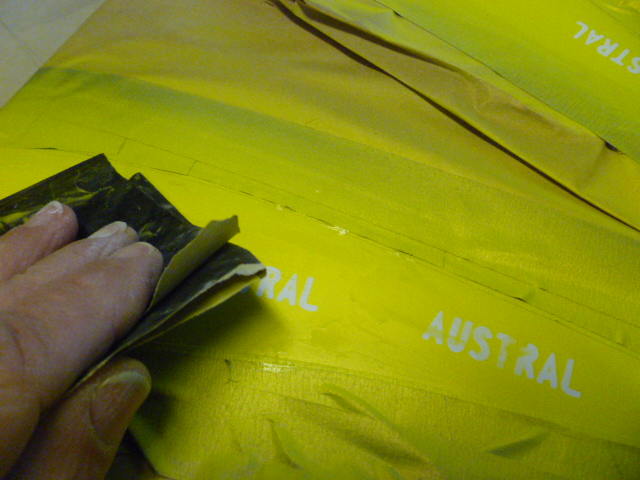
What I then do is now come back and dust on yellow over the letters to knock the white back. The more you lay on, the less you will see them when done.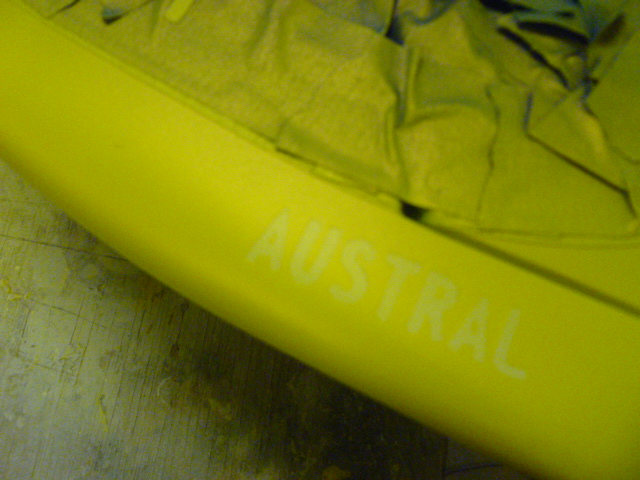
Next I lay on a ultra thin coat of orange starting heavy on the leading edge and fade it back to pure yellow. I shoot this right over the letters.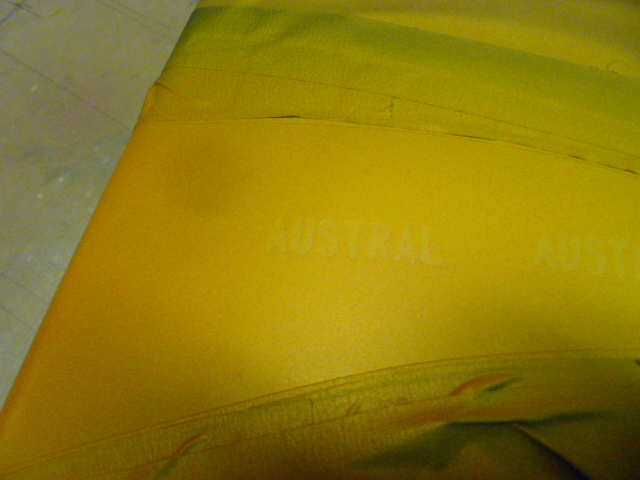


You can see how subtle they are. They will stand out more when the clear goes on.
The reason you want to bring up your base coat around the ghost graphics to 100% is to avoid halos or rings. If you didn't have your base up to 100% density (saturation), when you paint just the ghost graphics it could make that area darker.
After I lift all the little letters, this is what we have.
I hit the letters lightly with 600 wet paper to knock down the ridges.
What I then do is now come back and dust on yellow over the letters to knock the white back. The more you lay on, the less you will see them when done.
Next I lay on a ultra thin coat of orange starting heavy on the leading edge and fade it back to pure yellow. I shoot this right over the letters.
You can see how subtle they are. They will stand out more when the clear goes on.
The reason you want to bring up your base coat around the ghost graphics to 100% is to avoid halos or rings. If you didn't have your base up to 100% density (saturation), when you paint just the ghost graphics it could make that area darker.
12-31-2015 | 08:49 PM
#147
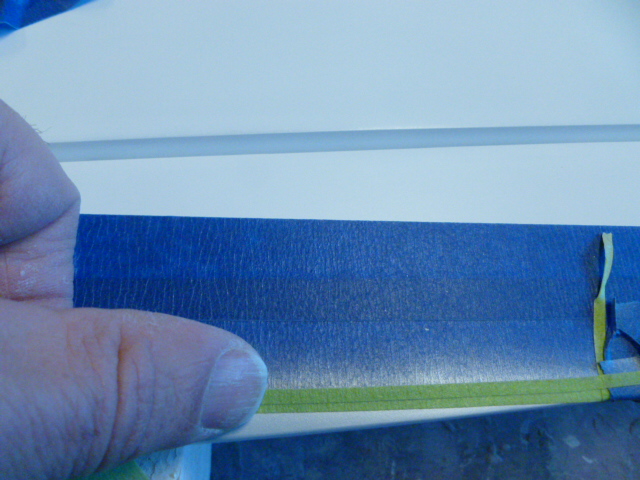
This is the tape I use. 3M green fine line. 
BTW, keep the cardboard backing that comes with the tape. You really want to keep your tape clean. I try (I'm a bad boy sometimes) to always lay it back on the cardboard after I am done. If you lay your tape on your workbench, it can pick up little pieces of gunk on the side of the tape that can stay stuck to the tape and will make a raged edge.
BTW, keep the cardboard backing that comes with the tape. You really want to keep your tape clean. I try (I'm a bad boy sometimes) to always lay it back on the cardboard after I am done. If you lay your tape on your workbench, it can pick up little pieces of gunk on the side of the tape that can stay stuck to the tape and will make a raged edge.
12-31-2015 | 09:07 PM
#148
OK, on to the beveled graphic tomorrow. Here is the layout. 
You will see a line about 1/4 inch wide on the outside of the graphic and a line about 1/8 inch wide on the inside. These will create the allusion of a double beveled edge. Here is what it would look like as a cross section of the graphic
You will see we are assuming the light source is coming from the left side. If we leave the left side unpainted it looks like it is highlighted in the light and if we paint the backside (right side) black it will appear as a shadow, tricking the brain to believe the edge is actually beveled. You can see the bevel on the left also cast a shadow on the center part of the graphic which I will paint as well.
It's confusing now, but will make sense as we go along.
01-02-2016 | 04:36 PM
#149
Here we go on the main graphic.
The first thing I did was lay down a little bit of texture with the Gerald Mendez FX Artool texture stencil. I would guess that just about every custom painting shop in the world owns these stencils....they are that good.
I just start out laying a bit of texture in with the same blue I used before with some black mixed in.

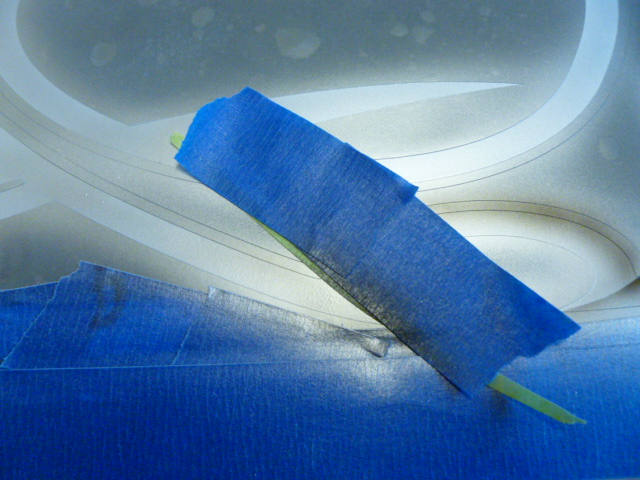
I then lay out the masking film and put a piece of tape across the center. You can see that the larger 1/4 inch section has been removed. This will become the outside bevel.
I pull back half of the graphic and peal off the paper back and lay it down on the surface.
I then pull back the other half, peal off the paper back and lay it down. This method holds the masking film in position being applied.
Here I'm pulling the transfer paper.
And this is what we have.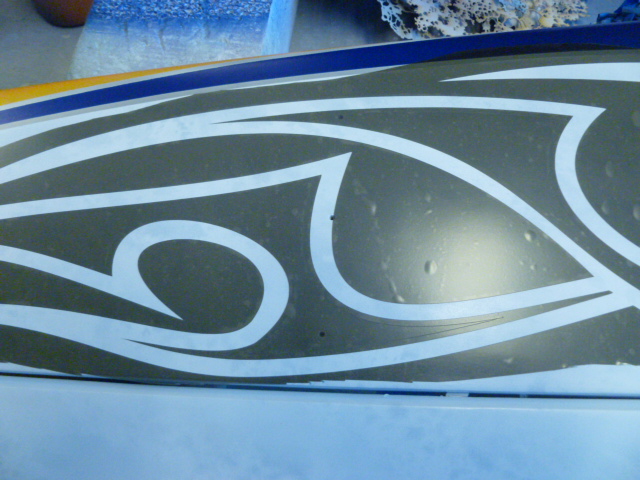
The exposed area is shot with Metalume. Notice an arrow in the upper right. This indicates the direction of light.
Keep in mind if this was an actual beveled edge the side facing the light will be bright (highlight). The side facing away from the light will be in a shadow. At this point, I paint the shadow side only and will add highlights on the lighted side later. What I do is split the pointed parts with a piece of tape and spray thin black on the shadow side.

Here you will see all the shadows painted on the 1/4 inch (outside) bevel.
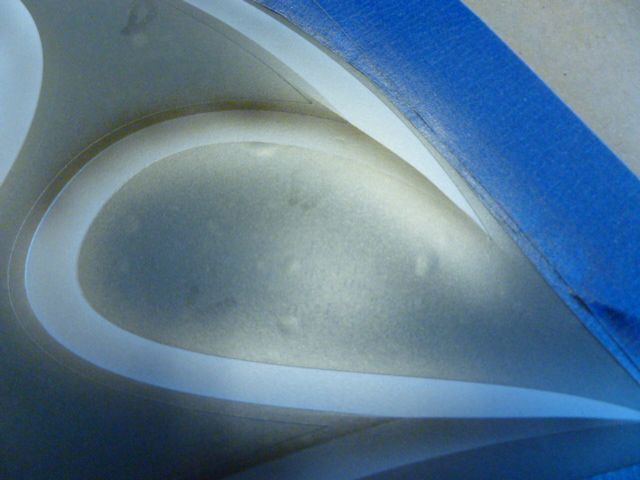
Now the 1/4 inch area is masked and I pull the 1/8 inch piece which will be the inside bevel.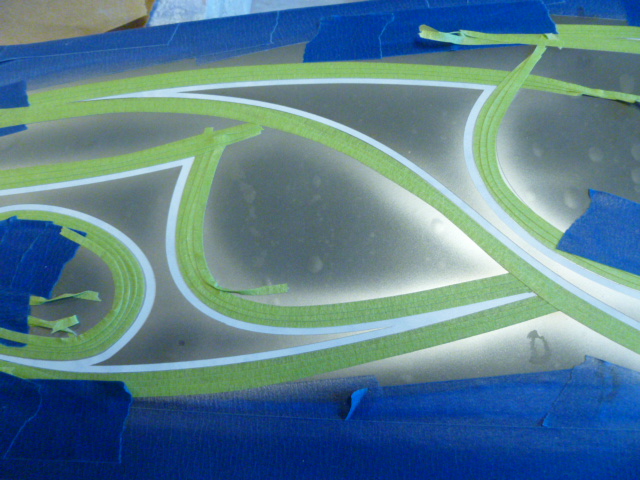
Now I paint the shadow side on the inside bevel, which will be the opposite of the 1/4 inch (outside) bevel.

I then pull the film from the center part of the graphic and mask off the inside (1/8 inch) line.
Now I paint the inside of the graphic.
OK, now the tape and film is pulled to reveal the magic! You can see I have hand airbrushed a drop shadow under the graphic to make it stand out from the background.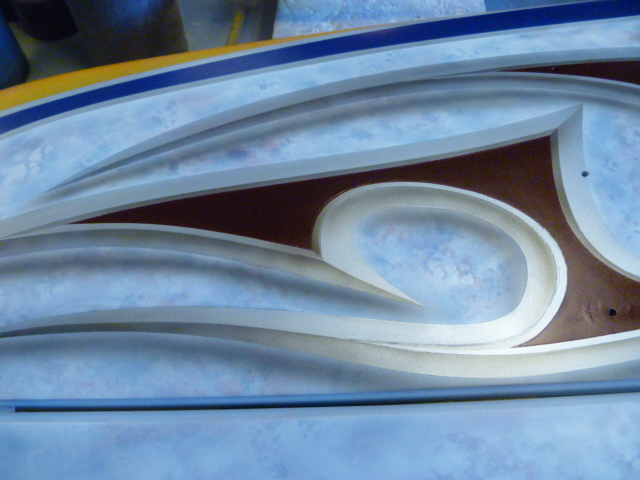
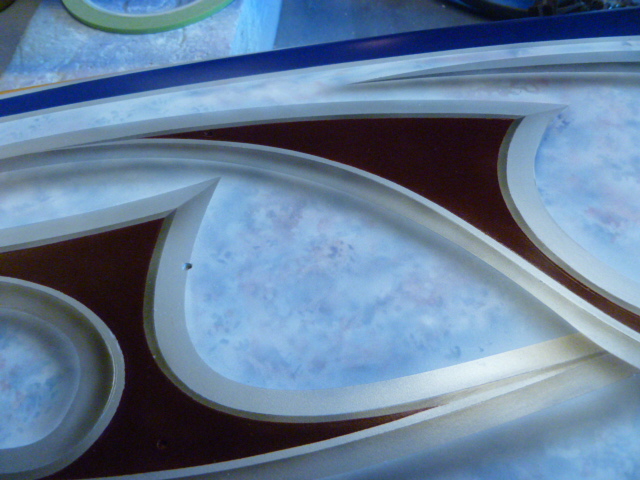
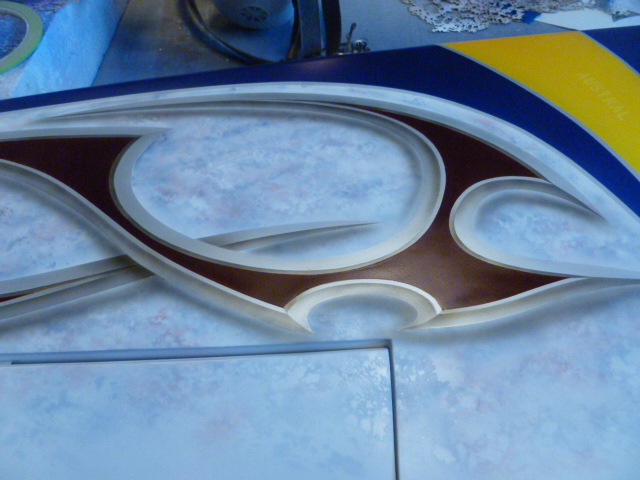
Keep in mind if this was a true raised bevel, the 1/4 inch portion would cast a shadow on the center part of the graphic (red) here is mask and paint that shadow.
I now add the highlight on the front face of the bevels. I shoot white and then a bit of white pear over it and then a bit of Metalume.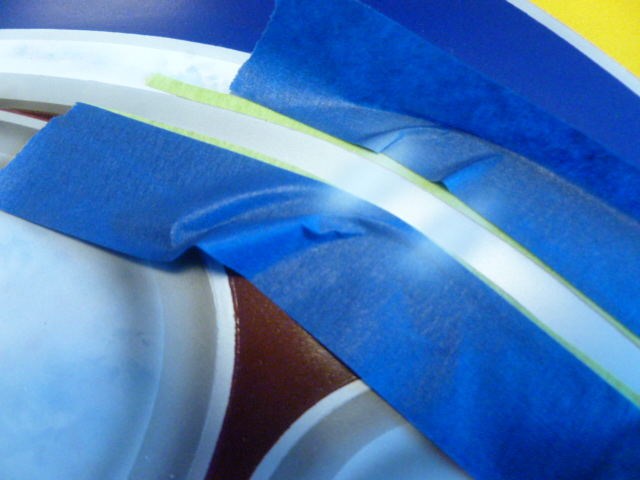

The first thing I did was lay down a little bit of texture with the Gerald Mendez FX Artool texture stencil. I would guess that just about every custom painting shop in the world owns these stencils....they are that good.
I just start out laying a bit of texture in with the same blue I used before with some black mixed in.
I then lay out the masking film and put a piece of tape across the center. You can see that the larger 1/4 inch section has been removed. This will become the outside bevel.
I pull back half of the graphic and peal off the paper back and lay it down on the surface.
I then pull back the other half, peal off the paper back and lay it down. This method holds the masking film in position being applied.
Here I'm pulling the transfer paper.
And this is what we have.
The exposed area is shot with Metalume. Notice an arrow in the upper right. This indicates the direction of light.
Keep in mind if this was an actual beveled edge the side facing the light will be bright (highlight). The side facing away from the light will be in a shadow. At this point, I paint the shadow side only and will add highlights on the lighted side later. What I do is split the pointed parts with a piece of tape and spray thin black on the shadow side.
Here you will see all the shadows painted on the 1/4 inch (outside) bevel.
Now the 1/4 inch area is masked and I pull the 1/8 inch piece which will be the inside bevel.
Now I paint the shadow side on the inside bevel, which will be the opposite of the 1/4 inch (outside) bevel.
I then pull the film from the center part of the graphic and mask off the inside (1/8 inch) line.
Now I paint the inside of the graphic.
OK, now the tape and film is pulled to reveal the magic! You can see I have hand airbrushed a drop shadow under the graphic to make it stand out from the background.
Keep in mind if this was a true raised bevel, the 1/4 inch portion would cast a shadow on the center part of the graphic (red) here is mask and paint that shadow.
I now add the highlight on the front face of the bevels. I shoot white and then a bit of white pear over it and then a bit of Metalume.
01-02-2016 | 04:50 PM
#150
Now lets go over the "AUSTRAL" logo on the ailerons.
I have applied the mask with the letters removed (negative of the film) and shoot the whole area with Metalume
Notice an arrow in the upper right hand corner. This is the light direction.
I am going to paint the graphic to make it look like it's carved into the surface or "concave", This is ultra easy to do. All we do is paint black on the sides of the letters that would be in the shade if it actually was carved into the surface. In this case the right side of the letters.

What I then do is paint the other side of the letters in white.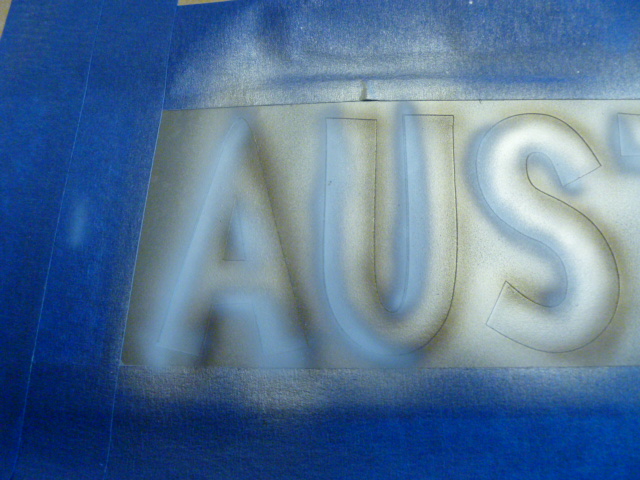
After I pull the film, this is what we have.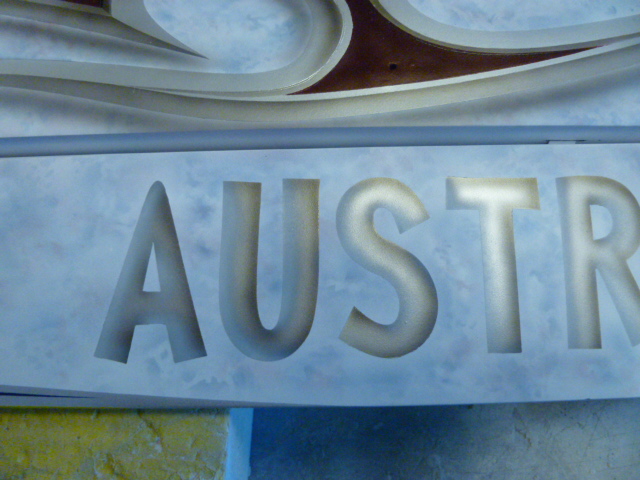
I have applied the mask with the letters removed (negative of the film) and shoot the whole area with Metalume
Notice an arrow in the upper right hand corner. This is the light direction.
I am going to paint the graphic to make it look like it's carved into the surface or "concave", This is ultra easy to do. All we do is paint black on the sides of the letters that would be in the shade if it actually was carved into the surface. In this case the right side of the letters.
What I then do is paint the other side of the letters in white.
After I pull the film, this is what we have.
Last edited by Portlandflyer; 01-25-2016 at 02:41 PM.

