


SR Eindecker

 10-05-2005 | 03:37 PM
#2
Senior Member
Joined: May 2003
Posts: 358
Likes: 0
Received 0 Likes
on
0 Posts
From: pelham, NH
I have been flying it since last December. I modified it by using the full flying stabilizer. It flies great but there are some problems. The biggest problem I have found is the rigging. Any hard landing will affect the rigging because the flying wires are attached to the landing gear and there is no provision for tightening the wires. I installed turnbuckels on the flying wires and adjustable clevises on the landing wires to adjust everything. Loose flying wires will come into contact with the wheels and the aircraft will trip over itself on landing. The first time it happened the wheel ran over the flying wire and it ripped the attactment block right out of the wing. Another solution to this problem is to keep your suspension tight. Another solution would be to refrain from making hard landings. The kit goes together like a dream and the wings are real easy with the technique they use. There is an article in this mionth's AMA mag.
10-06-2005 | 08:37 AM
#4
Senior Member
Joined: May 2003
Posts: 358
Likes: 0
Received 0 Likes
on
0 Posts
From: pelham, NH
I'm using a G26 with an 18/6 but next time out I'm going to go back to an 18/8. Seems like you get a better responce from the 18/8. I think it's the large cowl. You need more pitch. How far along are you? I have some suggestions for your build based on crash tests I've done lol ! I'll have to continue this tonight after work.
10-06-2005 | 09:57 AM
#5
Thread Starter
Senior Member
My Feedback: (1)
Joined: Sep 2002
Posts: 897
Likes: 0
Received 0 Likes
on
0 Posts
From: Mt Airy, MD
Haven't even started.....still have to order the balance of items needed to complete. I only ordered the kit and deluxe package. I use Futaba and am wondering if I want Futaba servos or hitec, S9001 Futaba is same size as hitec from SR but with a little more torque. I have a new G26 sitting on the shelf so I just have to order the pull/pull, covering etc. Did you use their covering and if so is it anything like super coverite? I've always leaned toward the super coverite. Probably won't start mine till after Christmas as I'm trying to get my house renovations finished by then. I'll take all the building suggestions I can get. Am thinking about turnbuckles for the flying wires. I have the article in this months mag but haven't had a chance to read it yet. What size tank did you use?
10-06-2005 | 03:47 PM
#6
Senior Member
Joined: May 2003
Posts: 358
Likes: 0
Received 0 Likes
on
0 Posts
From: pelham, NH
House renovations! Where are your priorities? Seriously, when I first taxied the plane it went over a bump and the flying wire got grabbed by the wheel and it ripped the attachment block out of the rib. If your shock cord is not stiff enough your wheels will come into contact with the forward flying wires at some point in time. As it is designed now, this will damage the rib, fabric, and possibly stretch your wires to the point of having to replace them. My solution was to tie the rigging blocks to the spars. I used wire through each one and around the spar and then I used thin 1" strips of coverite and wrapped them around both blocks and then strips around the block and ribs ( in other words I wrapped the blocks both ways) I also doubled up my ply ribs. You could do this by using 1/4 ply or by simply beefing up the area where the blacks attach to the ribs. I also put webbing between the false ribs at the front spar and I used a 1/8' cap on top of the webbing. I use turnbuckels on my flying wires and I used adjustable clevises for my landing wires. that way you can keep your wires tight and away from the wheels and you can ajust any warps you may develop.
10-06-2005 | 08:28 PM
#8
Senior Member
Joined: May 2003
Posts: 358
Likes: 0
Received 0 Likes
on
0 Posts
From: pelham, NH
turnbukles are dubro 1/4 scale and the clevisis come with pull -pull setups. I had to modify the set up on the upper pylon to accept the clevises and there are two clevisis per wing on the landing wires. to answer your other questions. I have a futaba tsxa with standard servos. Two for elevator and one for rudder. The elevator started out as a one piece full flying unit which I attached to the rear of the fuselage with my own brackets. Now the elevators are seperate with a servo for each side. I don't know what their covering is like but I have used super coverite before and I liked how it goes on. My tank is 16 oz with a 3 line set up 1 to fill 1 to vent and 1 to carb. I had one of those fill valves that you plug into. but it started sucking air and thats how I learned how not to turn when you flame out on take off and also what happens to the wing when it cartwheels on the ground. Sal at SR wants to bend my ear about crashing the plane because he says I'm the first that he has heard of. Hey its a tough job but ........
10-06-2005 | 09:34 PM
#9
Thread Starter
Senior Member
My Feedback: (1)
Joined: Sep 2002
Posts: 897
Likes: 0
Received 0 Likes
on
0 Posts
From: Mt Airy, MD
Sounds good feep, I have a three line setup on my super cub with two clunks, one on the fill and one on the carb line and have always just stuck a screw in my fill line before flying, no fancy pluggy thingy. On the covering I've always used super coverite and prefer it. So...Sal wants to bend your ear huh?  I'm sure you're not the first to ding one but probably the first to admit it! Think i'll sit down tomorrow and figure what else I need to order so i'll have all my goodies together. I love new toys!!! Now if I can just get this dang renovation out of the way.
I'm sure you're not the first to ding one but probably the first to admit it! Think i'll sit down tomorrow and figure what else I need to order so i'll have all my goodies together. I love new toys!!! Now if I can just get this dang renovation out of the way.
10-07-2005 | 10:46 AM
#10
Thread Starter
Senior Member
My Feedback: (1)
Joined: Sep 2002
Posts: 897
Likes: 0
Received 0 Likes
on
0 Posts
From: Mt Airy, MD
Feep, getting ready to order the dubro turnbuckles....how many do I need? Looks like there's a two pack, one large and one small.

 Thanks Bob.
10-07-2005 | 12:42 PM
Thanks Bob.
10-07-2005 | 12:42 PM
#13
Senior Member
Joined: May 2003
Posts: 358
Likes: 0
Received 0 Likes
on
0 Posts
From: pelham, NH
Bob is right. get four plus a couple extras. You will have to drill or ream one side out to fit over the treaded rod. After inststalling them make sure you wire them and PROTECT them during transportation. I went to the field after I had set them up and when I began assembly I noticed that 3 of the six I had put on initially had come off. I found two in the back of the truck but one end of one turnbuckle put the skids on a whole day of flying. Now I use 4 turnbuckle on the bottom flying wires and I leave the safety wires on and I use four adjustable clevisis on the top I attach the top clevis to a special fittting that I made and after I attach the bottom wires I grab the landing wires by that top fitting an sort of stretch it over the pylon and secure it with wire. It's a real easy system and it saves a lot of set up time I just realized as I was trying to expalin this thqt I going to have to figure out how to download pictures and do stuff like that. ugh!!
10-07-2005 | 02:51 PM
#14
Thread Starter
Senior Member
My Feedback: (1)
Joined: Sep 2002
Posts: 897
Likes: 0
Received 0 Likes
on
0 Posts
From: Mt Airy, MD
Oh Boy! The magic word......pictures!! Not hard to add if you have them in your pc, just click on where it says click here to upload and browse through your pictures to add.
10-07-2005 | 05:59 PM
#15
Senior Member
Joined: May 2003
Posts: 358
Likes: 0
Received 0 Likes
on
0 Posts
From: pelham, NH
I'll start workin on getting some pictures. Did you order the aluminum covering material? Thats one of the things that gets the most remarks in my E111. I applied it and then skuffed it with a 400 wetndry. The I took that little round brush from the dremel tool( you know, the one you never use) and I wrapped some steel wool around it with an elastic and just went to town. Yea, I know show me a picture.
10-07-2005 | 06:29 PM
#16
Thread Starter
Senior Member
My Feedback: (1)
Joined: Sep 2002
Posts: 897
Likes: 0
Received 0 Likes
on
0 Posts
From: Mt Airy, MD
Yea, I know...show me a picture.
Yes I did order the alum covering. I ordered the deluxe package with that and the wheels and the book. I saw the video on SR's site as to how to do that burnishing. Nice touch.
Yes I did order the alum covering. I ordered the deluxe package with that and the wheels and the book. I saw the video on SR's site as to how to do that burnishing. Nice touch.
10-07-2005 | 07:49 PM
#17

A couple words on scale detail. First the metal cowling on the eindecker did NOT have those uniform rows of machine turned swirls that you see on most models (and that so awe people at the field). If fact, Sopwith seems to have been the only manufacturer who did this. The German scrolling is much more random and looks more like squiggles (or Arabic) than circles. It'd be a shame to expend all that effort to so that patterns machine swirls only to end up with something that is non-scale. To do the scrolling I borrowed an electric eraser -- and practices on some Dollar Store aluminum pots until I got the look I was after.
On the turnbuckles, I found some much cheaper ones from a wooden boat hobby shop in Canada somewhere (about $3.50 a pair). I think I ended up using at least 8 of them. Since I found myself pressed for time at the end of my build though I gave up on scale attachment points on the wings and just went for black metal clevises and thsoe DuBro 2-56 threaded couplers attached to small eye-screws.
On the turnbuckles, I found some much cheaper ones from a wooden boat hobby shop in Canada somewhere (about $3.50 a pair). I think I ended up using at least 8 of them. Since I found myself pressed for time at the end of my build though I gave up on scale attachment points on the wings and just went for black metal clevises and thsoe DuBro 2-56 threaded couplers attached to small eye-screws.
10-09-2005 | 02:49 PM
#18
Senior Member
Joined: May 2003
Posts: 358
Likes: 0
Received 0 Likes
on
0 Posts
From: pelham, NH
wow Don, I was about to reply to your comments about burnishing when I began going through your threads and ran across a thread on ackerman. I have had problem with my elevator all season and finally I think I have solved it. I chose to do a full flying elevator on my SR E111. I took the carbon fiber leading edge and made it the pivot point on my structure. I used a dowel for the LE and used SR's controll horns, which are 1 piece and wrap around the carbon fiber spar which is the hinge point for the entire structure. Every once in a while the E111 would start" porpoising",and I recognized that it had something to do with the fact that the elevator was "loose". No matter how much I tightened up the pull-pull lines I still had the problem and in fact, since I had a single spar for a pivot point it would begin to bind. The ackerman article just prompted me to measure my control horn and I found that the connection point for my horns are 5/32' in front of the forward edge of the spar and 11/32" in front of the center line.The last 2 paragraphs of the ackerman article make since until you consider that the E111 full flying elevator is 3 1/4" in front of the hinge line and 6 1/2" behind it!
I will be grounding my E111 until I redo the elevator. But I can't wait till I get to the field with it and show everyone how "smart" I have become!
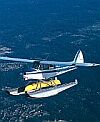
BTW I love the" Flying" pic of yor E111. You should make it your signature instaed of the BE2.
I will be grounding my E111 until I redo the elevator. But I can't wait till I get to the field with it and show everyone how "smart" I have become!
BTW I love the" Flying" pic of yor E111. You should make it your signature instaed of the BE2.
10-09-2005 | 03:22 PM
#19
Thread Starter
Senior Member
My Feedback: (1)
Joined: Sep 2002
Posts: 897
Likes: 0
Received 0 Likes
on
0 Posts
From: Mt Airy, MD
Don,
Here's the EIII at the san diego museum and as you said the cowl has the squigles.
BTW: Where can I find the ackerman article?
Bud
Here's the EIII at the san diego museum and as you said the cowl has the squigles.
BTW: Where can I find the ackerman article?
Bud
10-09-2005 | 03:37 PM
#22
Senior Member
Joined: May 2003
Posts: 358
Likes: 0
Received 0 Likes
on
0 Posts
From: pelham, NH
Here's the Ackerman site Bud...
http://members.cox.net/bdfelice/Ackerman/ackerman.htm
Are you going to do the standard construction on your kit?
http://members.cox.net/bdfelice/Ackerman/ackerman.htm
Are you going to do the standard construction on your kit?
10-09-2005 | 04:03 PM
#23
Thread Starter
Senior Member
My Feedback: (1)
Joined: Sep 2002
Posts: 897
Likes: 0
Received 0 Likes
on
0 Posts
From: Mt Airy, MD
Thanks for the link feep. Haven't even started and already deviating from the kit mentally. I'll add as much scale into it as possible starting with cutting back the root ribs at the L.E. on an angle where they actually clear the cowl. There's a book available "Fokker E.III in detail" but it costs a good bit to ship from overseas. I think it's the same one that's in the San Diego museum. Would sure like to see some up close photos of the real one. I ordered the balance of what i'll need yesterday from SR....graphics, pilot etc.
10-09-2005 | 08:42 PM
#24
Senior Member
Joined: May 2003
Posts: 358
Likes: 0
Received 0 Likes
on
0 Posts
From: pelham, NH
I know I have some close ups of "509" as I hung in museeum in London. I'll see if I can dig them up and scan them. I already owe my son for showing me how to download pics. "509" was captured intact and the pics show it without any fabric. so the details are invaluable. This particular aircraft was tested by the British at Upavon and even though at the time the Fokkers were becoming obsolete, the tests showed the RFC that the fokker scourge was no longer a threat. The decals from SR are vynal aren't they? I have hand done most of my makings and at this point I have done the wings over sooo many times that I can probably paint them quicker than applying decals. I would like to redo my E111 over the winter as "509" and make some spoked wheels for it.
10-09-2005 | 10:20 PM
#25
ORIGINAL: Bud Faulkner
There's a book available "Fokker E.III in detail" but it costs a good bit to ship from overseas. I think it's the same one that's in the San Diego museum.
There's a book available "Fokker E.III in detail" but it costs a good bit to ship from overseas. I think it's the same one that's in the San Diego museum.
Also I believe that the FTS CD are now being sold through an American site to avoid the overseas shipping charges. I can't seem to find when at the moment but you might send Achim an email. He is a great guy!
http://www.collectors-edition.de/QAU...-6_english.htm
BTW, I was in London for a day back in June and I mistakenly thought the EIII was in the Imperial War Museum (honest mistake!) so missed it entirely. But then I did get some nice photos of a BE2.

