


CLARKE TK20 Installation and Configuration
 12-13-2012 | 08:59 AM
#1

Thread Starter
Senior Member
Joined: Dec 2008
Posts: 315
Likes: 0
Received 0 Likes
on
0 Posts
From: Scottsale,
AZ
The post on the Clarke TK controller is very lengthy. I would propose another post that is designed to help in the installation, configuration and actual running of the TK series of controllers from Clarke. If this should go in different area, holler.
If not, I'll start posting tonight some questions and pictures of how I am installing and configuring (or not...) the controller.
Clarke's website has a lot of information, but it's a little intimidating to open up the package (6 day speedy delivery to Scottsdale!) and there's no directions, documents or help. I beleive this post could help a lot of people and provide helpful insight to Clarke on what issues buyers are having and how to better address and correct those issues in the future.
Oh - I need to buy a Sony remote tonight at Walmart..... I would swear that we had a handful at the house, but the kids told me the dog ate them...
TJS
 12-13-2012 | 09:13 AM
#2
Good idea to post this, as this board may be an option for my Sherman. Question though, when your dog farts does it change the channel?
Cheers
Wade
Cheers
Wade
12-13-2012 | 09:21 AM
#3


Joined: Apr 2012
Posts: 775
Likes: 0
Received 0 Likes
on
0 Posts
From: Sellersville, PA
To start off with, these are the initial installation directions which are listed on Clarks TK20 Series website page:
<p style="mso-pagination:widow-orphan" class="MsoNormal"><span class="smalltxt1"> <span lang="EN-US" style="font-family:Tahoma"> <font size="2"> </font></span><span lang="en-us"><font size="2" color="#FF0000"> <span style="font-family: Tahoma">Inspect metal portion on FETs and make sure they are not touched to each other after shipment</span></font></span></span></p><p style="text-align: left;"><span class="smalltxt1"><span lang="EN-US" style="font-family:Tahoma"> <font size="2">
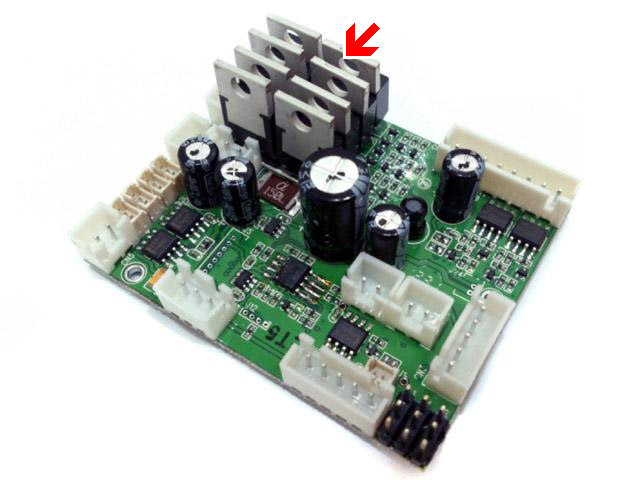
 </font></span></span></p><p style="mso-pagination:widow-orphan" class="MsoNormal"><span class="smalltxt1"> <span lang="EN-US" style="font-family:Tahoma"> <font size="2"> Set </font></span> <span lang="en-us"><font size="2"><span style="font-family: Tahoma"> Main Gun Function Mode to match your tank hardware configuration (HL AirSoft, HL Recoil or TAMIYA Recoil)</span></font></span><span lang="en-us" style="font-family: Tahoma"><font size="2">,</font></span></span></p><p style="mso-pagination:widow-orphan" class="MsoNormal"><span class="smalltxt1"> <span lang="EN-US" style="font-family:Tahoma"> <font size="2"> Disconnect RX-18 and plug cables to the same connector on TK board,</font></span></span></p><p style="mso-pagination:widow-orphan" class="MsoNormal"><span class="smalltxt1"> <span lang="EN-US" style="font-family:Tahoma"> <font size="2"> Set </font></span><span style="font-family: Tahoma"><font size="2"> Sound Volume<span lang="en-us"> to middle</span></font></span></span></p><p style="mso-pagination:widow-orphan" class="MsoNormal"><span class="smalltxt1"> <span lang="EN-US" style="font-family:Tahoma"> <font size="2"> Connect a switch cable (for example, </font></span></span> <span lang="en-us"><font size="2" face="Tahoma">HL Smoke Unit Switch Cable</font></span><span class="smalltxt1"><span lang="en-us" style="font-family: Tahoma"><font size="2">)</font></span><span lang="EN-US" style="font-family:Tahoma"><font size="2"> to </font></span><span lang="en-us" style="font-family: Tahoma"> <font size="2">Switch Cable Port as power switch. Because HL tank already have power switch on battery cable, you can just to short </font></span> <font size="2"><span lang="en-us" style="font-family: Tahoma"> Switch Cable Port's two pins or connect to a switch cable and keep it switched on.</span></font></span></p><p style="mso-pagination:widow-orphan" class="MsoNormal"><span class="smalltxt1"> <span lang="EN-US" style="font-family:Tahoma"> <font size="2"> Connect a </font></span><span lang="en-us"><font size="2"> <span style="font-family: Tahoma">recoil servo to J2(Optional),</span></font></span></span></p><p style="mso-pagination:widow-orphan" class="MsoNormal"><span class="smalltxt1"> <font size="2"> <span lang="EN-US" style="font-family:Tahoma"> Rewire </span> <span style="font-family:Tahoma"> Air-soft unit <span lang="en-us">if you want to </span>elevate and depress gun directly<span lang="en-us">, see "</span></span><span lang="en-us" style="font-family: Tahoma">HL Gun Elevation and AirSoft Correction"</span><span lang="en-us" style="font-family: Tahoma"> section</span></font></span></p><p style="mso-pagination:widow-orphan" class="MsoNormal"><span class="smalltxt1"> <span lang="EN-US" style="font-family:Tahoma"> <font size="2"> Connect </font></span><span lang="en-us"><font size="2"> <span style="font-family: Tahoma">channel cables to receiver according to RC mode( See picture "TK series connector and pin assignments" ) . if you are not sure what mode you RC system is, just swap CH2 and CH3 and try again. TK20 board has BEC( Battery </span></font></span></span> <font face="Tahoma"><font size="2">eliminat</font></font><span lang="en-us"><font size="2" face="Tahoma">ion circuit)</font><span class="smalltxt1"><font size="2"><span style="font-family: Tahoma">, can power receiver through channel cables, no additional battery is needed for receiver </span></font></span></span></p><p style="mso-pagination:widow-orphan" class="MsoNormal"><span class="smalltxt1"> <font size="2"> <span lang="EN-US" style="font-family:Tahoma"> Set CH1, 2 and 3 trimmer on transmitter to center position, Set CH4 trimmer on transmitter to most left or right position, </span> </font></span></p><p style="mso-pagination:widow-orphan" class="MsoNormal"><span class="smalltxt1"> <font size="2"> <span lang="EN-US" style="font-family:Tahoma"> </span> </font><span lang="en-us"><font size="2"><span style="font-family: Tahoma"> Connect battery( make sure that battery is fully charged),</span></font></span></span></p><p style="mso-pagination:widow-orphan" class="MsoNormal"><span class="smalltxt1"> <font size="2"> <span lang="EN-US" style="font-family:Tahoma"> Switch on TK board and transmitter, you should hear </span> </font></span><font size="2" face="Tahoma"><span class="smalltxt1"> <font face="Tahoma">turret traverse</font></span><span lang="en-us"><span class="smalltxt1"><font face="Tahoma"> sound. if not, please contact us.</font></span></span></font></p><p style="mso-pagination:widow-orphan" class="MsoNormal"><span class="smalltxt1"> <font size="2"> <span lang="EN-US" style="font-family:Tahoma"> gently move CH4</span></font><span lang="en-us" style="font-family: Tahoma"><font size="2">(Multi function</font></span><font size="2"><span lang="EN-US" style="font-family:Tahoma;mso-font-kerning:0pt"> control </span> </font> <span style="font-family:Tahoma;mso-font-kerning:0pt"><font size="2">signal 2<span lang="en-us">)</span></font></span><font size="2"><span lang="EN-US" style="font-family:Tahoma"> trimmer to center till </span> </font><font size="2" face="Tahoma">turret traverse<span lang="en-us"> is gone.</span></font></span></p><p style="mso-pagination:widow-orphan" class="MsoNormal"><span class="smalltxt1"> <font size="2"> <span lang="EN-US" style="font-family:Tahoma"> gently move CH2(</span></font><span lang="EN-US" style="font-family:Tahoma;mso-font-kerning:0pt"><font size="2">Throttle )</font></span><font size="2"><span lang="EN-US" style="font-family:Tahoma"> trimmer up and down if you hear motor hum sound.</span></font></span></p><p style="mso-pagination:widow-orphan" class="MsoNormal"><span class="smalltxt1"> <font size="2"> <span lang="EN-US" style="font-family:Tahoma"> Cannon firing sound should be generated and </span> <span lang="en-us" style="font-family: Tahoma"> recoil servo should moves when move </span><span lang="EN-US" style="font-family:Tahoma"> CH3 stick to most top position, if not, gently move CH3(</span></font><span lang="en-us" style="font-family: Tahoma"><font size="2">Multi function</font></span><font size="2"><span lang="EN-US" style="font-family:Tahoma;mso-font-kerning:0pt"> control </span> <span style="font-family:Tahoma;mso-font-kerning:0pt">signal 2</span></font><span lang="EN-US" style="font-family:Tahoma;mso-font-kerning:0pt"><font size="2"> )</font></span><font size="2"><span lang="EN-US" style="font-family:Tahoma"> trimmer up and down </span> </font><span lang="en-us"><font size="2"><span style="font-family: Tahoma">till it work correctly.</span></font></span></span></p><p style="mso-pagination:widow-orphan" class="MsoNormal"><span class="smalltxt1"> <font size="2"> <span lang="EN-US" style="font-family:Tahoma"> You are all set
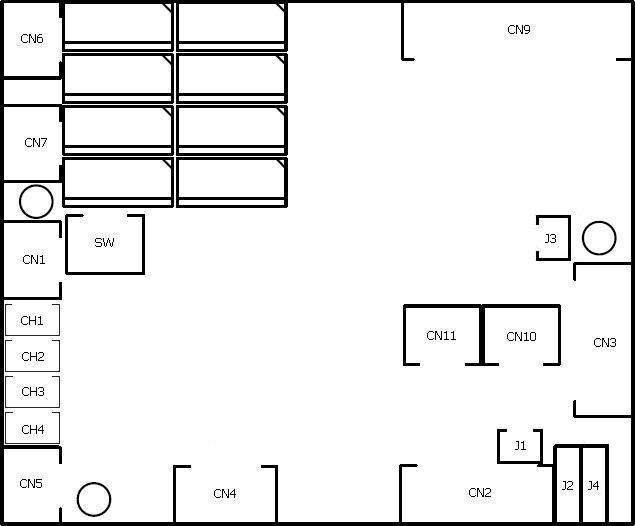
In the diagram in the second picture when connecting up to Heng Long tanks, remember to place a jumper shunt on the plug marked as "SW" to short thos<font size="2">e two pins</font>, otherwise the board will not power up!
~ Craig ~
</span></font></span></p>
<p style="mso-pagination:widow-orphan" class="MsoNormal"><span class="smalltxt1"> <span lang="EN-US" style="font-family:Tahoma"> <font size="2">
</font></span><span lang="en-us"><font size="2" color="#FF0000"> <span style="font-family: Tahoma">Inspect metal portion on FETs and make sure they are not touched to each other after shipment</span></font></span></span></p><p style="text-align: left;"><span class="smalltxt1"><span lang="EN-US" style="font-family:Tahoma"> <font size="2"> </font></span></span></p><p style="mso-pagination:widow-orphan" class="MsoNormal"><span class="smalltxt1"> <span lang="EN-US" style="font-family:Tahoma"> <font size="2"> Set </font></span> <span lang="en-us"><font size="2"><span style="font-family: Tahoma"> Main Gun Function Mode to match your tank hardware configuration (HL AirSoft, HL Recoil or TAMIYA Recoil)</span></font></span><span lang="en-us" style="font-family: Tahoma"><font size="2">,</font></span></span></p><p style="mso-pagination:widow-orphan" class="MsoNormal"><span class="smalltxt1"> <span lang="EN-US" style="font-family:Tahoma"> <font size="2"> Disconnect RX-18 and plug cables to the same connector on TK board,</font></span></span></p><p style="mso-pagination:widow-orphan" class="MsoNormal"><span class="smalltxt1"> <span lang="EN-US" style="font-family:Tahoma"> <font size="2"> Set </font></span><span style="font-family: Tahoma"><font size="2"> Sound Volume<span lang="en-us"> to middle</span></font></span></span></p><p style="mso-pagination:widow-orphan" class="MsoNormal"><span class="smalltxt1"> <span lang="EN-US" style="font-family:Tahoma"> <font size="2"> Connect a switch cable (for example, </font></span></span> <span lang="en-us"><font size="2" face="Tahoma">HL Smoke Unit Switch Cable</font></span><span class="smalltxt1"><span lang="en-us" style="font-family: Tahoma"><font size="2">)</font></span><span lang="EN-US" style="font-family:Tahoma"><font size="2"> to </font></span><span lang="en-us" style="font-family: Tahoma"> <font size="2">Switch Cable Port as power switch. Because HL tank already have power switch on battery cable, you can just to short </font></span> <font size="2"><span lang="en-us" style="font-family: Tahoma"> Switch Cable Port's two pins or connect to a switch cable and keep it switched on.</span></font></span></p><p style="mso-pagination:widow-orphan" class="MsoNormal"><span class="smalltxt1"> <span lang="EN-US" style="font-family:Tahoma"> <font size="2"> Connect a </font></span><span lang="en-us"><font size="2"> <span style="font-family: Tahoma">recoil servo to J2(Optional),</span></font></span></span></p><p style="mso-pagination:widow-orphan" class="MsoNormal"><span class="smalltxt1"> <font size="2"> <span lang="EN-US" style="font-family:Tahoma"> Rewire </span> <span style="font-family:Tahoma"> Air-soft unit <span lang="en-us">if you want to </span>elevate and depress gun directly<span lang="en-us">, see "</span></span><span lang="en-us" style="font-family: Tahoma">HL Gun Elevation and AirSoft Correction"</span><span lang="en-us" style="font-family: Tahoma"> section</span></font></span></p><p style="mso-pagination:widow-orphan" class="MsoNormal"><span class="smalltxt1"> <span lang="EN-US" style="font-family:Tahoma"> <font size="2"> Connect </font></span><span lang="en-us"><font size="2"> <span style="font-family: Tahoma">channel cables to receiver according to RC mode( See picture "TK series connector and pin assignments" ) . if you are not sure what mode you RC system is, just swap CH2 and CH3 and try again. TK20 board has BEC( Battery </span></font></span></span> <font face="Tahoma"><font size="2">eliminat</font></font><span lang="en-us"><font size="2" face="Tahoma">ion circuit)</font><span class="smalltxt1"><font size="2"><span style="font-family: Tahoma">, can power receiver through channel cables, no additional battery is needed for receiver </span></font></span></span></p><p style="mso-pagination:widow-orphan" class="MsoNormal"><span class="smalltxt1"> <font size="2"> <span lang="EN-US" style="font-family:Tahoma"> Set CH1, 2 and 3 trimmer on transmitter to center position, Set CH4 trimmer on transmitter to most left or right position, </span> </font></span></p><p style="mso-pagination:widow-orphan" class="MsoNormal"><span class="smalltxt1"> <font size="2"> <span lang="EN-US" style="font-family:Tahoma"> </span> </font><span lang="en-us"><font size="2"><span style="font-family: Tahoma"> Connect battery( make sure that battery is fully charged),</span></font></span></span></p><p style="mso-pagination:widow-orphan" class="MsoNormal"><span class="smalltxt1"> <font size="2"> <span lang="EN-US" style="font-family:Tahoma"> Switch on TK board and transmitter, you should hear </span> </font></span><font size="2" face="Tahoma"><span class="smalltxt1"> <font face="Tahoma">turret traverse</font></span><span lang="en-us"><span class="smalltxt1"><font face="Tahoma"> sound. if not, please contact us.</font></span></span></font></p><p style="mso-pagination:widow-orphan" class="MsoNormal"><span class="smalltxt1"> <font size="2"> <span lang="EN-US" style="font-family:Tahoma"> gently move CH4</span></font><span lang="en-us" style="font-family: Tahoma"><font size="2">(Multi function</font></span><font size="2"><span lang="EN-US" style="font-family:Tahoma;mso-font-kerning:0pt"> control </span> </font> <span style="font-family:Tahoma;mso-font-kerning:0pt"><font size="2">signal 2<span lang="en-us">)</span></font></span><font size="2"><span lang="EN-US" style="font-family:Tahoma"> trimmer to center till </span> </font><font size="2" face="Tahoma">turret traverse<span lang="en-us"> is gone.</span></font></span></p><p style="mso-pagination:widow-orphan" class="MsoNormal"><span class="smalltxt1"> <font size="2"> <span lang="EN-US" style="font-family:Tahoma"> gently move CH2(</span></font><span lang="EN-US" style="font-family:Tahoma;mso-font-kerning:0pt"><font size="2">Throttle )</font></span><font size="2"><span lang="EN-US" style="font-family:Tahoma"> trimmer up and down if you hear motor hum sound.</span></font></span></p><p style="mso-pagination:widow-orphan" class="MsoNormal"><span class="smalltxt1"> <font size="2"> <span lang="EN-US" style="font-family:Tahoma"> Cannon firing sound should be generated and </span> <span lang="en-us" style="font-family: Tahoma"> recoil servo should moves when move </span><span lang="EN-US" style="font-family:Tahoma"> CH3 stick to most top position, if not, gently move CH3(</span></font><span lang="en-us" style="font-family: Tahoma"><font size="2">Multi function</font></span><font size="2"><span lang="EN-US" style="font-family:Tahoma;mso-font-kerning:0pt"> control </span> <span style="font-family:Tahoma;mso-font-kerning:0pt">signal 2</span></font><span lang="EN-US" style="font-family:Tahoma;mso-font-kerning:0pt"><font size="2"> )</font></span><font size="2"><span lang="EN-US" style="font-family:Tahoma"> trimmer up and down </span> </font><span lang="en-us"><font size="2"><span style="font-family: Tahoma">till it work correctly.</span></font></span></span></p><p style="mso-pagination:widow-orphan" class="MsoNormal"><span class="smalltxt1"> <font size="2"> <span lang="EN-US" style="font-family:Tahoma"> You are all setIn the diagram in the second picture when connecting up to Heng Long tanks, remember to place a jumper shunt on the plug marked as "SW" to short thos<font size="2">e two pins</font>, otherwise the board will not power up!
~ Craig ~
</span></font></span></p>
12-13-2012 | 09:29 AM
#4
Thread Starter
Senior Member
Joined: Dec 2008
Posts: 315
Likes: 0
Received 0 Likes
on
0 Posts
From: Scottsale,
AZ
I almost lost my coffee on that one! Nope, but I'm bringing the dog to the next DAK battle. If I position him just right, I think I can use him like a smart bomb to foul the programming on any other Clarke board in the battle.
tjs
tjs
12-13-2012 | 09:34 AM
#5
Thread Starter
Senior Member
Joined: Dec 2008
Posts: 315
Likes: 0
Received 0 Likes
on
0 Posts
From: Scottsale,
AZ
Here's an installation using a fan cooled enclosure and mounting the RX on the outside. Due to the heat and sensitivity of the electronics, I opted to run the box with two fans. I'll continue posting pictures, issues and solutions as I go through this installation for the first time. I promise to leave the dog out of it.
tjs
tjs
12-13-2012 | 12:29 PM
#7
Thread Starter
Senior Member
Joined: Dec 2008
Posts: 315
Likes: 0
Received 0 Likes
on
0 Posts
From: Scottsale,
AZ
I think it is much more plug and play than my photos would indicate! I have a tendency to complicate things. A really good manual would be great with the TK20 series. I am mainly concerned with the configuration of the TX as I followed the instructions which should put my throttle controls on my left stick and turn control on my right stick right and left. However, my throttle in on my right along with turn control (which is what I'm use to). But, I have no engine sound which may be due to the incorrect stick position and not being able to identify which stick for turning on the engine sound. I'll figure it out, but it's not as simple as I hoped (and I like simple these days).
I am very excited about learning about it. One small controller is great even if you can't configure custom sounds (I do have a TBS....).
Here's the stick layout:
tjs
I am very excited about learning about it. One small controller is great even if you can't configure custom sounds (I do have a TBS....).
Here's the stick layout:
tjs
12-13-2012 | 12:42 PM
#8
Joined: Apr 2012
Posts: 775
Likes: 0
Received 0 Likes
on
0 Posts
From: Sellersville, PA
ORIGINAL: Baron Fel
Wow, this thing is FAR from plug and play.<div></div><div>Barom</div>
Wow, this thing is FAR from plug and play.<div></div><div>Barom</div>
~ Craig ~
12-13-2012 | 01:27 PM
#10
Let's not get too excited, there's no massive rewireing of tanks to use this. Afew people replace the recoil with a servo as the real recoil function is so good but that's about it.
12-13-2012 | 01:45 PM
#11
Joined: Apr 2012
Posts: 775
Likes: 0
Received 0 Likes
on
0 Posts
From: Sellersville, PA
ORIGINAL: Baron Fel
Rewire most of the tank and then program the unit. "Wow" and "FAR" is aunderstatement.<div></div><div>Baron</div>
Rewire most of the tank and then program the unit. "Wow" and "FAR" is aunderstatement.<div></div><div>Baron</div>
You don't have to rewire <u>most</u> the tank or program the board if the factory defaults of the board work for your setup. But at least the board itself has <u>many</u> options to choose from & program if you want to customize it's functionality, & thank goodness it's not just the same old boring & basic battle system Heng Long & the other branded HL versions still provide.
Programming the Tx to your liking & possibly having to switch the Rx cables to get things just right, isn't only something you might have to deal with when installing a Clark board either, that can happen with any new electronics board where you're adding in a 3rd party 2.4GHz Tx/Rx system.
So let's look at how "Wow" & "FAR" is an understatement (according to you), when it comes to describing all the hard work someone must do because the board is so FAR from being 100% plug & play.
Using the original cables from my HL IR tanks ...
- Both motors plug right in. ( CN6 & CN7 )
- The Volume Level plugs right in. ( CN4 )
- The Speaker plugs right in. ( CN5 )
- The On/Off switch plugs right in. ( CN1 )
- The Smoker plugs right in. ( CN10 )
- The Smoker switch plugs right in. ( CN11 )
- The Turret Traverse, Gun Elevation, Main Gun Fire, Machine Gun Fire, Headlight all work with just plugging in the HL cable in. ( CN9 )
- The HL IR receiver (apple) port will work if just plugged in. ( CN2 )
- Take the IR LED wires from the HL turret connection & run them down to connect them to the J1 IR port on the board to fire the IR signal.
- Take the Flash LED wires from the turret connection & run them down to the J3 Flash port on the board to fire the barrel flash.
- Cut the common positive wire shared between the Gun Elevation & Gun Barrel Recoil motor
- And if you want to have gun barrel recoil, you have to rewire the stock recoil unit back up, or add a servo (100% better & worth it anyway on any HL tank) & use the Real recoil servo port.
So please, tell me how Wow & FAR is an understatement, & list those "most" things that need to be rewired again, this way I can go back over my 6 boards & make sure I got everything right!

~ Craig ~
12-13-2012 | 02:17 PM
#12
Thread Starter
Senior Member
Joined: Dec 2008
Posts: 315
Likes: 0
Received 0 Likes
on
0 Posts
From: Scottsale,
AZ
Now we are getting some information:
Craig, when you plugged in your RX to the TK20 leads, did you follow the directions on Clarke's website and if so, did the controls work according to the Diagram that was provided with respect to the stock positions. If not, could you please explain what you changed and if you are running the controls on the TX in the manner that the Clarke diagram indicates?
If you are running your sticks in a different manner, perhaps you could explain it.
Thanks
tjs
12-13-2012 | 02:23 PM
#13
Joined: Aug 2011
Posts: 1,063
Likes: 0
Received 0 Likes
on
0 Posts
From: Cambridge ON, CANADA
I'd like to jump in here and make some notes on Tsull's TK20 here
First thing awesome work, I love it when people dig in with new ideas, Those fans over the fets are great especially in Az where it gets 150 million deg in the shade lol Most won't need them but running in that hot it just helps things out.
Tsull can I have your ok to copy the design and maybe twist it a bit for my purposes?
I love all the connectors too. I always add connectors on all my wires. Looks like quality workmanship as well. Keep pushing those boundaries
Moddifying Tanks is a major part of this hobby as nobodies tanks or electronics suit every application 100%, some may suit more than others but there is not one thing that suits everything and everybody. I was a huge plug and play fan and YES we NEED plug and play.
But with that being said I jumped over a major hurdle today with some electronics that were haunting me and all of my builds will be much better for it, thanks to modifcations, programming and getting zapped once or twice lol
12-13-2012 | 02:39 PM
#14
Thread Starter
Senior Member
Joined: Dec 2008
Posts: 315
Likes: 0
Received 0 Likes
on
0 Posts
From: Scottsale,
AZ
Absolutely use the idea! That's why I wanted to start this post.
I bought one of those mini handheld printers that print out the plastic tape (at HomeDepot). It's one of the best tools I have. I label EVERYTHING! I also bought a variety of servo connectors, wire and crimpers at HanenHobbies.com. It makes wiring a tank almost (almost) fun.
Here's a picture of some of the connectors I bought. I think their prices were really good and the service was fantastic.
tjs
12-13-2012 | 02:51 PM
#15

Senior Member
I have the Clark Board, and it is plug and play if you want it to be. Only thing you need to get your soldering iron out for is if you want to make use of the boards ability to give you up and down on the Barrel elevation.
Clark has done a lot of work tweaking this to the needs of tankers, and it is plug and play with Darn good sound, and Tamiya compatible battle system for less then $70. You can plug in a Tamiya apple as well
Todd You just need to experiment with the servo connections. I have mine set up to run like a Heng Long. Throttle on the Right, turret and cannon on the left. Because the Clark is fully functional wihtout starting the motor, it allows you to add your Benedini if you want to add custom engine sounds. You still have to use the Clark sound for Cannon and everything else though.
12-13-2012 | 08:18 PM
#16

Joined: Sep 2009
Posts: 239
Likes: 0
Received 0 Likes
on
0 Posts
From: Concord, NC
<p class="MsoNormal">I would hardly say I have an "uniformedopinion". I have read nearlyeverything they've published about this product. Also, I'm involved in the RC tank industry ona professional level.</p><p class="MsoNormal">By definition, "Plug and Play" means plug it inand run it. No special modifications or "tweaks". The discussion here (and your own admission, BADASSForce) confirm that this is not the case with the Clark board. You have a lot of controltweaking to do even for a basic installation without the bells and whistles that require rewiring.</p><p class="MsoNormal">The basic control diagram looks like a fatality sequence onMortal Combat.</p><p class="MsoNormal"><o >That being said, I am impressed with this product. If not exactly "plug and play", itIS reasonably simple to install. The fact that it CAN be custom wired to fit the user's specific needs is a bigplus. Mr Clark's active participation onthe forums shows a dedication to his product and customers not always seen in this industry.</o></p><p class="MsoNormal"><o>"Wow" was just an exclamation expressing my shockat how much has to be done. I will concede that maybe "far" is an inappropriate adverb.</o></p><p class="MsoNormal">Last time I checked though, civil discourse is much more productive than sarcastic pot shots.</p><p class="MsoNormal">My apologies if I sidetracked this. Let's move along and be productive.</p><p class="MsoNormal"><o></o></p><p class="MsoNormal">BTW tsull - Your installation is beautifully executed. I am envious.</p>
>That being said, I am impressed with this product. If not exactly "plug and play", itIS reasonably simple to install. The fact that it CAN be custom wired to fit the user's specific needs is a bigplus. Mr Clark's active participation onthe forums shows a dedication to his product and customers not always seen in this industry.</o></p><p class="MsoNormal"><o>"Wow" was just an exclamation expressing my shockat how much has to be done. I will concede that maybe "far" is an inappropriate adverb.</o></p><p class="MsoNormal">Last time I checked though, civil discourse is much more productive than sarcastic pot shots.</p><p class="MsoNormal">My apologies if I sidetracked this. Let's move along and be productive.</p><p class="MsoNormal"><o></o></p><p class="MsoNormal">BTW tsull - Your installation is beautifully executed. I am envious.</p>
12-13-2012 | 09:35 PM
#17
Senior Member
I have seen this board evolve over the past couple of months, and the only thing that might cause you grief is the recoil. However the real recoil feature that the Clark board offers is superior to any other on the market using a standard servo, so I completely forgot there was any issue with it.
12-13-2012 | 10:28 PM
#18
Joined: Apr 2012
Posts: 775
Likes: 0
Received 0 Likes
on
0 Posts
From: Sellersville, PA
ORIGINAL: Baron Fel
<p class="MsoNormal">I would hardly say I have an "uniformedopinion". I have read nearlyeverything they've published about this product. Also, I'm involved in the RC tank industry ona professional level.</p><p class="MsoNormal">By definition, "Plug and Play" means plug it inand run it. No special modifications or "tweaks". The discussion here (and your own admission, BADASSForce) confirm that this is not the case with the Clark board. You have a lot of controltweaking to do even for a basic installation without the bells and whistles that require rewiring.</p><p class="MsoNormal">The basic control diagram looks like a fatality sequence onMortal Combat.</p><p class="MsoNormal"><o>That being said, I am impressed with this product. If not exactly "plug and play", itIS reasonably simple to install. The fact that it CAN be custom wired to fit the user's specific needs is a bigplus. Mr Clark's active participation onthe forums shows a dedication to his product and customers not always seen in this industry.</o></p><p class="MsoNormal"><o>"Wow" was just an exclamation expressing my shockat how much has to be done. I will concede that maybe "far" is an inappropriate adverb.</o></p><p class="MsoNormal">Last time I checked though, civil discourse is much more productive than sarcastic pot shots.</p><p class="MsoNormal">My apologies if I sidetracked this. Let's move along and be productive.<o>
</o></p><p class="MsoNormal">BTW tsull - Your installation is beautifully executed. I am envious.
<p class="MsoNormal">I would hardly say I have an "uniformedopinion". I have read nearlyeverything they've published about this product. Also, I'm involved in the RC tank industry ona professional level.</p><p class="MsoNormal">By definition, "Plug and Play" means plug it inand run it. No special modifications or "tweaks". The discussion here (and your own admission, BADASSForce) confirm that this is not the case with the Clark board. You have a lot of controltweaking to do even for a basic installation without the bells and whistles that require rewiring.</p><p class="MsoNormal">The basic control diagram looks like a fatality sequence onMortal Combat.</p><p class="MsoNormal"><o
>That being said, I am impressed with this product. If not exactly "plug and play", itIS reasonably simple to install. The fact that it CAN be custom wired to fit the user's specific needs is a bigplus. Mr Clark's active participation onthe forums shows a dedication to his product and customers not always seen in this industry.</o></p><p class="MsoNormal"><o>"Wow" was just an exclamation expressing my shockat how much has to be done. I will concede that maybe "far" is an inappropriate adverb.</o></p><p class="MsoNormal">Last time I checked though, civil discourse is much more productive than sarcastic pot shots.</p><p class="MsoNormal">My apologies if I sidetracked this. Let's move along and be productive.<o></o
></p><p class="MsoNormal">BTW tsull - Your installation is beautifully executed. I am envious.
Besides in my very first response to your "Wow" & "FAR" comment (with your use of CAPITALS on FAR to accentuate just how distant actual plug & play was for the board), I wasn't taking pot shots or being very sarcastic at all, I actually agreed it wasn't plug & play, stated it wasn't too far from it, & simply suggested you not be too overly melodramatic (Characteristic of melodrama, esp. in being exaggerated, sensationalized, or overemotional.) using "Wow" & "FAR" with respect to the board's plug & play capability; which by the way even you now concede actually was inappropriate. Overly melodramatic was an accurate description of your first Wow & FAR comment, since it was exactly that, so there was no irony, ridicule, or cutting remark in that description intended as sarcasm. But in your response post you then sensationalized your claim of the boards not being plug & play even farther by stating most of the tank needs to be rewired (wrong), then program the unit (not necessarily correct), & go further by insinuating "Wow" & "FAR" was now some how an understatement; which it was that response where the real sarcasm started! So if you want civil discourse without sarcasm, I have always been one to oblige, but then don't start with your own.
So regardless of your professional involvement with the RC tank industry, you have zero personal experience with installing the Clark board in any tank, where I have installed several now. I'll reaffirm, the Clark board isn't really that FAR from plug & play by admission from not just myself, someone who has just a few months of beginner RC modding experience, but by a lot of other people owning & installing the boards. So it's good we can agree to stop side-tracking the discussion now on all this & move on to more productive conversation, like I had with my very first post in this thread.
~ Craig ~
12-13-2012 | 11:11 PM
#19
Can you 2 take this to PM?<div></div><div>tsull keep the info comming, as I'm looking into a clark board this helps a lot, thank you.</div>
12-14-2012 | 05:40 AM
#20
Thread Starter
Senior Member
Joined: Dec 2008
Posts: 315
Likes: 0
Received 0 Likes
on
0 Posts
From: Scottsale,
AZ
I will!
I have a new IPAD with a keyboard. It works great to take pictures and upload with information during a build. I'll document how I wire it, what mistake I've made and how I figured out the right process.
Bear in mind that my build has a NO Heng Long wiring left in it. It's all been redone with custom wiring. An unmolested Heng Long (would that be a virgin?) doesn't last long in my garage (I have 3 more sitting on racks waiting for their "treatements").
tjs
12-14-2012 | 01:01 PM
#21
Joined: Apr 2012
Posts: 775
Likes: 0
Received 0 Likes
on
0 Posts
From: Sellersville, PA
ORIGINAL: tsull
Now we are getting some information:
Craig, when you plugged in your RX to the TK20 leads, did you follow the directions on Clarke's website and if so, did the controls work according to the Diagram that was provided with respect to the stock positions. If not, could you please explain what you changed and if you are running the controls on the TX in the manner that the Clarke diagram indicates?
If you are running your sticks in a different manner, perhaps you could explain it.
Thanks
tjs
I do believe I at least hooked all the Rx cables up to the board with all channels matching what the board plugs show on the board, from channel 1 through 4.
Maybe everyone else understands the control diagram clearly & got it. What I can say is that diagram of the controls confused the heck out of me, in looking at it, I thought for each single action, both sticks needed to be in the position showing in each side of the double picture. For instance, when I looked at the diagram, I thought to turn the engine On/Off, I would have to pull the right stick all the way down, hold it there, then move the left stick from center position, all the way to the right before the engine would start.
But that wasn't the case for me. To turn on the engine, just one stick had to be moved, but in both those directions indicated in both pictures. So to turn on the engine, I just had to pull the left stick down, then push the left stick all the way to the left, which was the opposite direction of what the diagram showed for engine On/Off going to the right, but again, I think my Tx mode was different.
I think I can safely say though, that if you can get the machine gun to work, then moving the same stick in the opposite direction should start the engine, no matter which mode the Tx is set to at the time.
I think I'm a little odd to most with how I like my controller setup, because I want all tank movement on the left stick alone, while the right stick does everything else. So my controls are as follows right now:
<div style="margin-left: 40px;">Left stick pushed Up = Forward
Left stick pushed Down = Backward
Left stick pushed Left = Left
Left stick pushed Right = Right
Right stick pushed Up Fully = Main Cannon Fire
Right stick pushed Up Half & then Pushed Right = Gun Barrel Elevation Up
Right stick pushed Up Half & then Pushed Left = Gun Barrel Elevation Down
Right stick pushed Left = Turret Traverse Left
Right stick pushed Right = Turret Traverse Right
Right stick pushed Down Fully & then Pushed Right = Machine Gun
Right stick pushed Down Fully & then Pushed Left = Engine Start Up / Shut Down
Right stick pushed Down Half & then Pushed Right = Light On / Off</div>
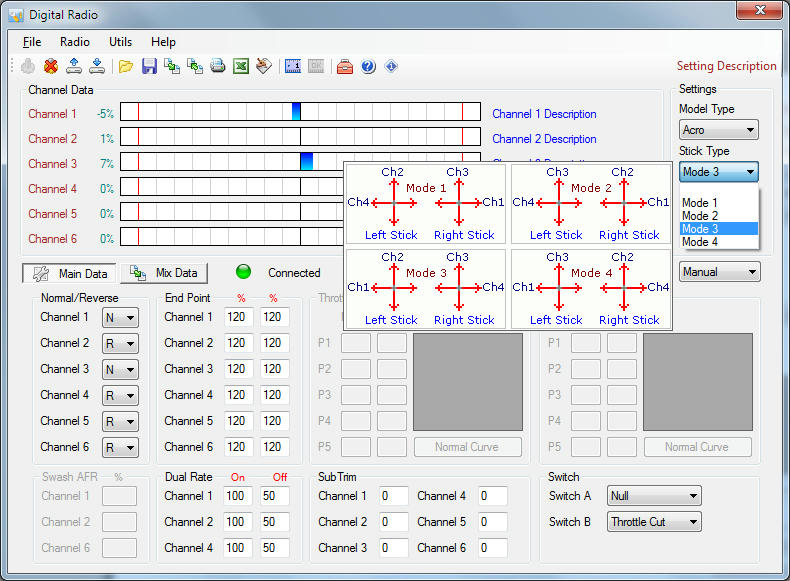
For this to work on my CT6B that way I have channels 2 & 4 reversed in the Tx programming with channels 1 & 3 normal, & my Tx is set to Mode 3 according to Digital Radio, where channels 1 & 2 are on the left stick, channels 3 & 4 on the right stick.
Here was a shot of DigitalRadio for the setup:
~ Craig ~
12-14-2012 | 01:18 PM
#22
Thread Starter
Senior Member
Joined: Dec 2008
Posts: 315
Likes: 0
Received 0 Likes
on
0 Posts
From: Scottsale,
AZ
HI Craig,
I really appreciate your help! That's where I'll be tomorrow morning - trying the different combinations to get the TK20 functioning to my TX. But - tonight - my wife and friends are taking me out to see a band, drink much beer, take a cab home and have some fun.
I have a Turnigy radio that just shipped from Hobby King. Unbelievable price! I have not tried a TX that is configured by your PC. This should be interesting.
I ordered the metal wheels and arms from Welsh Dragon last Saturday. Spent my christmas money. They arrived yesterday and are incredible quality and speed of shipping. With the metal interior frame, metal treads, wheels, dual batteries, etc., I'm afraid this KT will be one fat cat.
All the better to run over those Super Pershings that are suddenly showing up in Arizona....
Thanks again,
tjs
12-14-2012 | 01:59 PM
#23
Can you elaborate on what you got?
For my KT i only found 'torro metal hull' that comes with the metal suspension arms.
For my KT i only found 'torro metal hull' that comes with the metal suspension arms.
ORIGINAL: tsull
HI Craig,
I really appreciate your help! That's where I'll be tomorrow morning - trying the different combinations to get the TK20 functioning to my TX. But - tonight - my wife and friends are taking me out to see a band, drink much beer, take a cab home and have some fun.
I have a Turnigy radio that just shipped from Hobby King. Unbelievable price! I have not tried a TX that is configured by your PC. This should be interesting.
I ordered the metal wheels and arms from Welsh Dragon last Saturday. Spent my christmas money. They arrived yesterday and are incredible quality and speed of shipping. With the metal interior frame, metal treads, wheels, dual batteries, etc., I'm afraid this KT will be one fat cat.
All the better to run over those Super Pershings that are suddenly showing up in Arizona....
Thanks again,
tjs
12-15-2012 | 08:51 AM
#24
Junior Member
Joined: Sep 2011
Posts: 4
Likes: 0
Received 0 Likes
on
0 Posts
From: Scottsdale,
AZ
I wiIll move this over to my KT build thread which I need to update with pictures. But look at Welshdragon for the wheels, arms and they have bearings. Very nice.
12-16-2012 | 09:19 AM
#25
Thread Starter
Senior Member
Joined: Dec 2008
Posts: 315
Likes: 0
Received 0 Likes
on
0 Posts
From: Scottsale,
AZ
WIRING PART 1 (Custom Application)
First, we need the proper tools. A Saturday afternoon, the family and wife busy with their own projects, christmas shipping done for the weekend, a hot cup of coffee with a splash of Bailey's (delievered from the wife so you know all is good).
First, we need the proper tools. A Saturday afternoon, the family and wife busy with their own projects, christmas shipping done for the weekend, a hot cup of coffee with a splash of Bailey's (delievered from the wife so you know all is good).

