


ESM 50cc Spitfire rework
 12-19-2011, 10:34 AM
#26
Senior Member
Thread Starter

Join Date: Feb 2004
Location: Barrowhill, Staffordshire, UNITED KINGDOM
Posts: 586
Likes: 0
Received 0 Likes
on
0 Posts
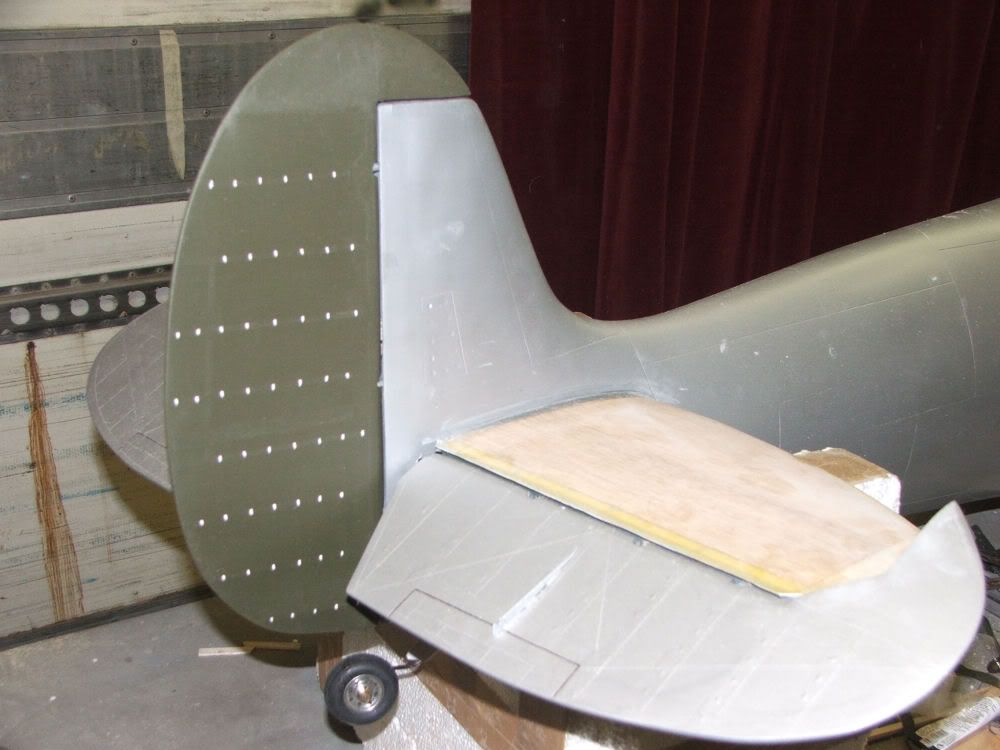
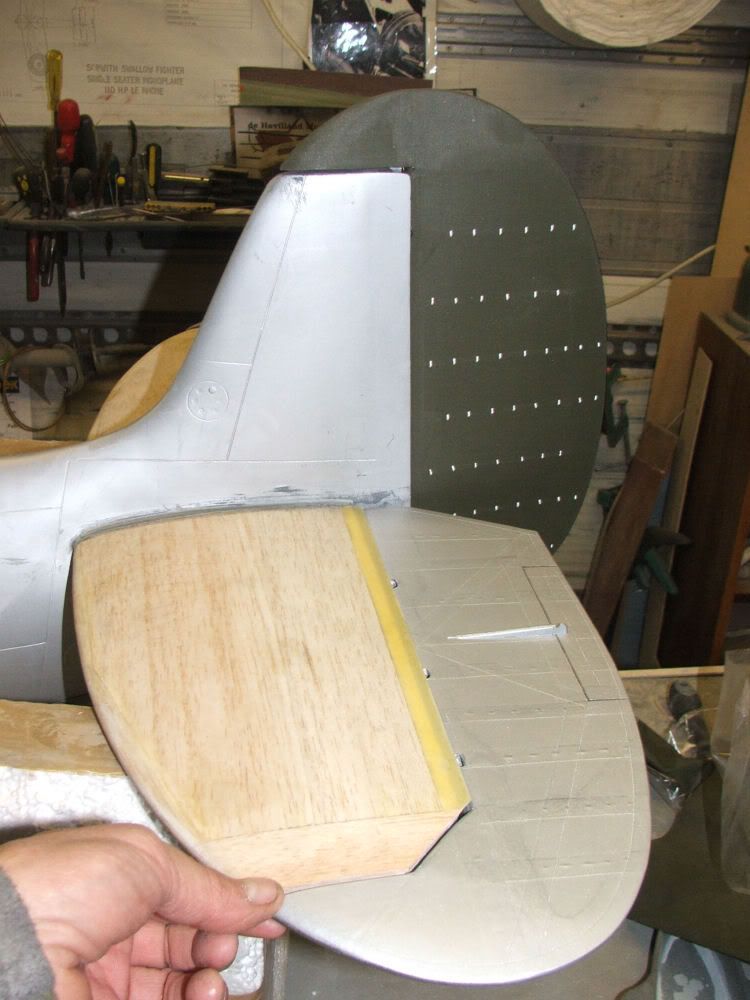
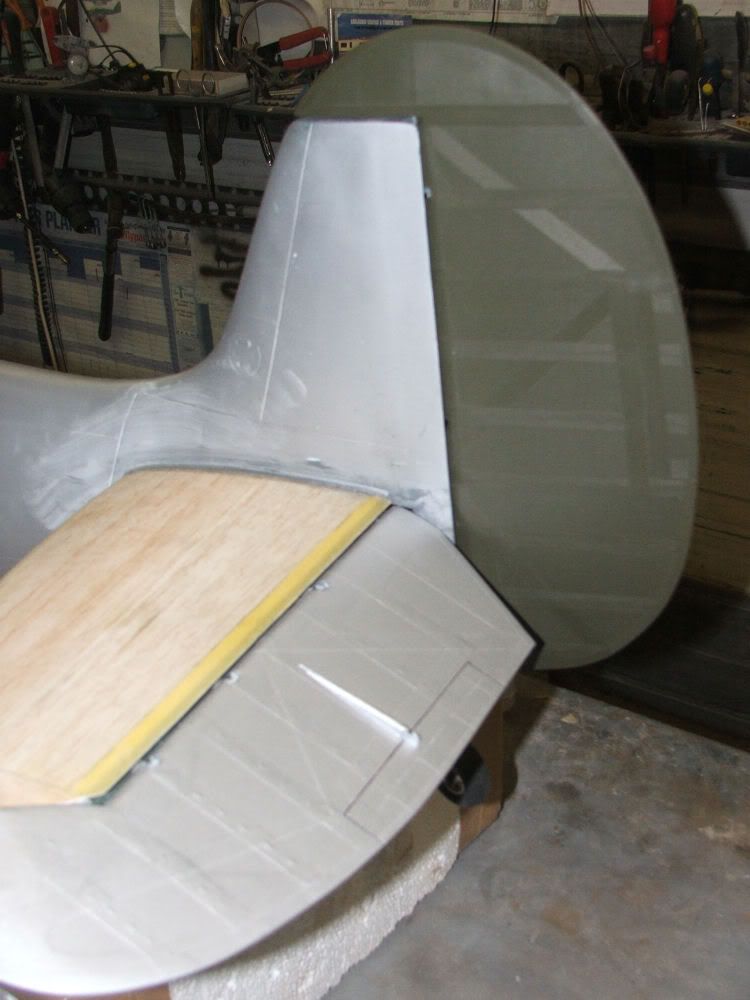
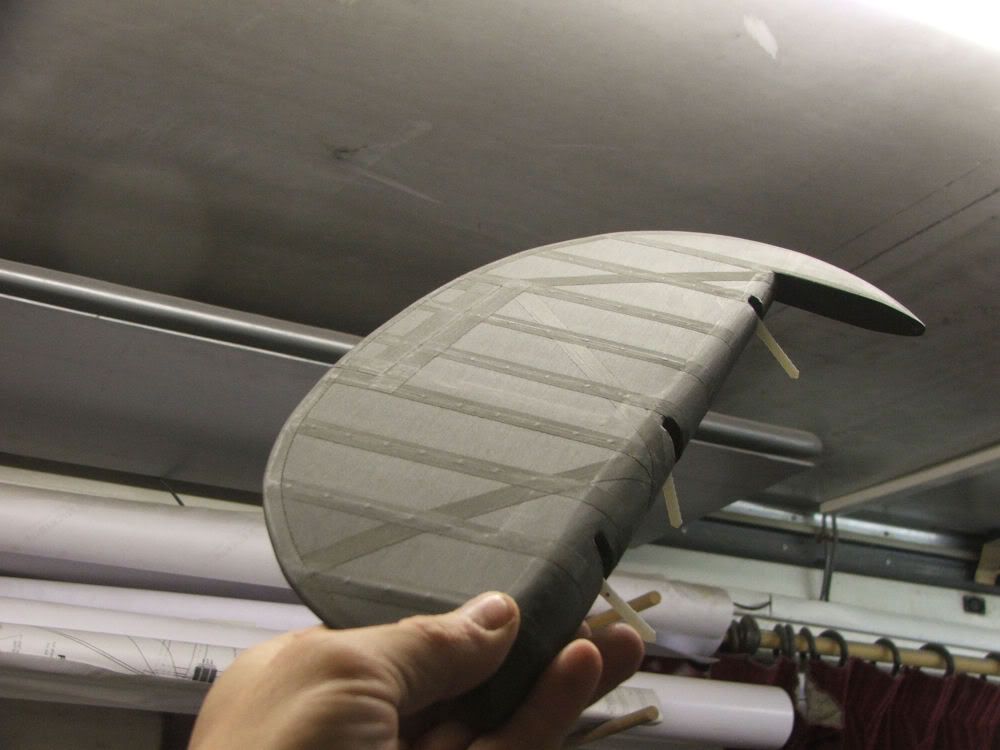
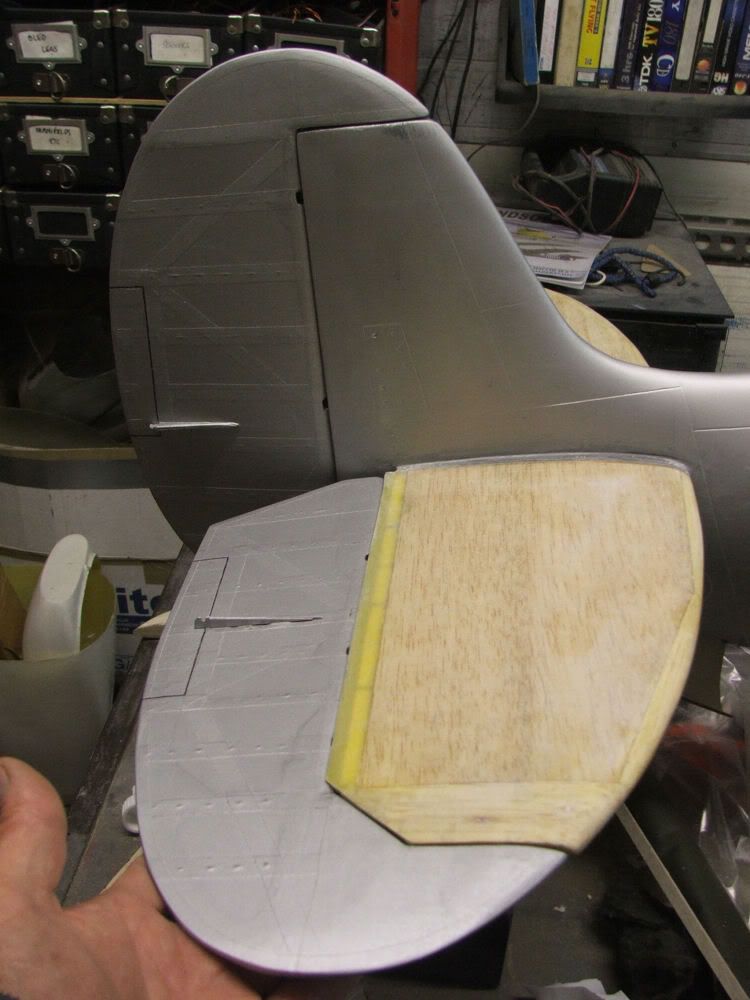
The rudder is covered in 'tex too, with the dummy stitching on, I might get to finish it later, but its bally cold and the the stitching might not be dry enough. I surprised to find that the new rudder weighs just over half of the original, winner!!!!
Ian.
Ian.


 12-19-2011, 03:08 PM
#28
Senior Member
Join Date: Jul 2004
Location: Chesterfieldderbyshire, UNITED KINGDOM
Posts: 238
Likes: 0
Received 0 Likes
on
0 Posts
Hi Ian
Good work on the spit,its nice to see a expert at work.[sm=thumbs_up.gif]Ive got the yellow aircraft Mk14 on the go but sidelined it for the corsair.Now Ive got the yt p51d on the go to replace a mustang i lost early on this year so the spits gonna have to wait a bit longer.As to Barkston if the weather looks half decent Il take corsair along,so see you there.
Cheers Nudge
12-20-2011, 04:48 AM
#29
Senior Member
Thread Starter
Join Date: Feb 2004
Location: Barrowhill, Staffordshire, UNITED KINGDOM
Posts: 586
Likes: 0
Received 0 Likes
on
0 Posts
Got the tapes on the rudder last night but forgot the camera, very pleased I bothered to replace the rudder, looks better, moves better and is loads lighter. I love using Solartex, must be one of my favourite modelling tasks.
Ian.
Ian.
 12-20-2011, 09:17 AM
#31
Senior Member
Thread Starter
Join Date: Feb 2004
Location: Barrowhill, Staffordshire, UNITED KINGDOM
Posts: 586
Likes: 0
Received 0 Likes
on
0 Posts
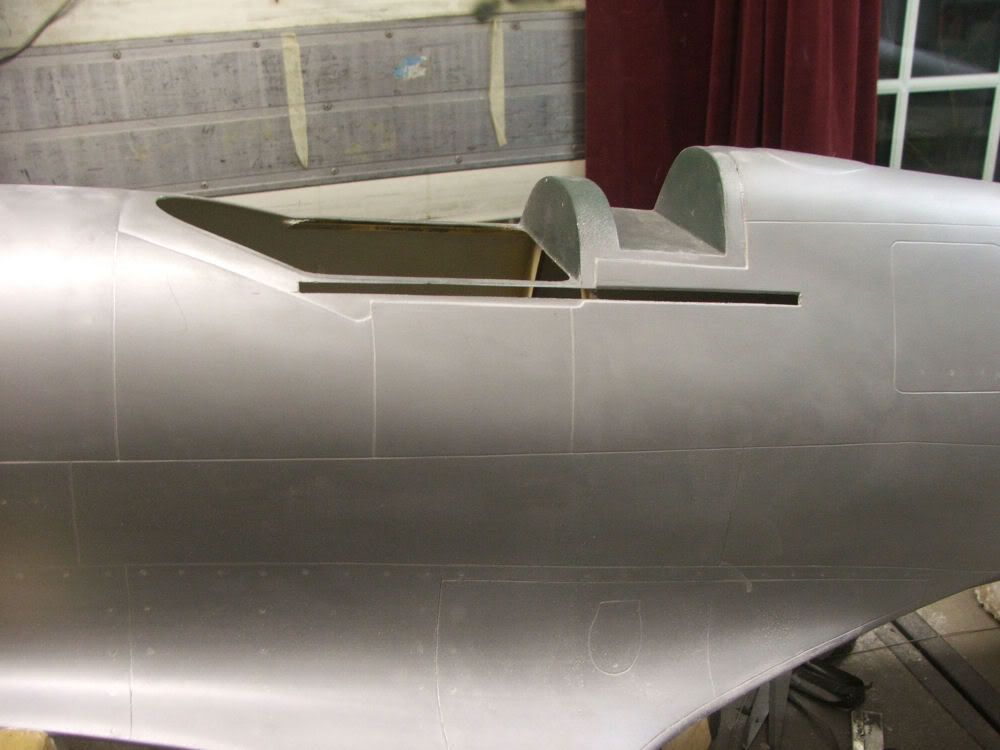
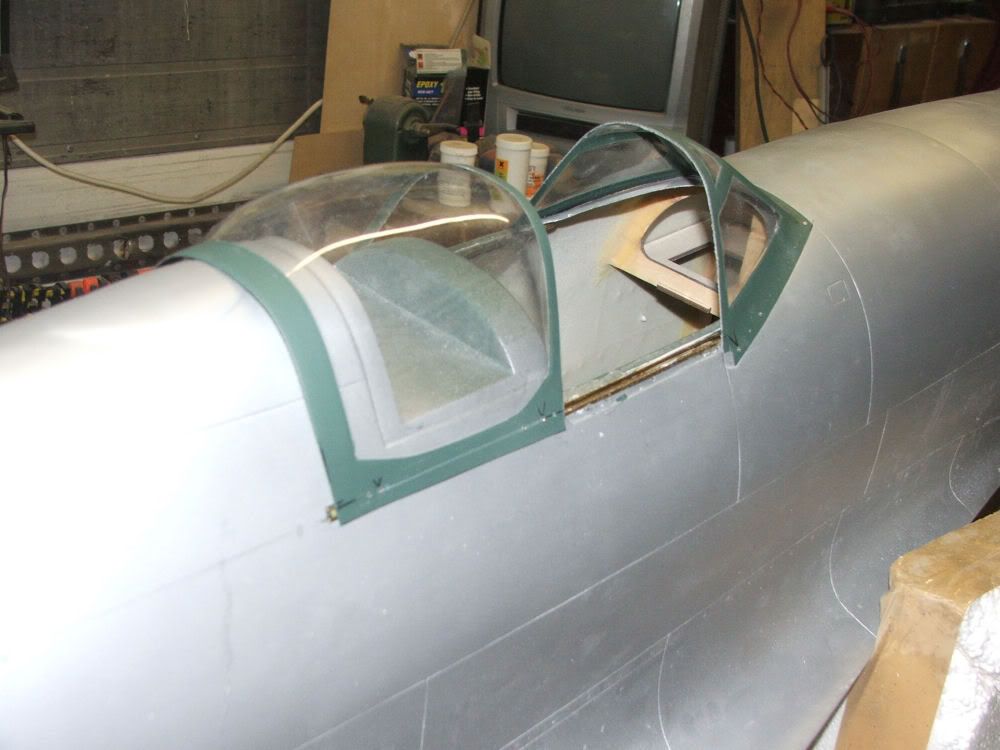
Cheers Casey, comments much appreciated  Moving up the fuselage, I've cut some slots for the canopy rails. These are brass, about 6mm square and available from Mick Reeves. With the slots cut, I'll shape the rails so the ends are 10 or 15mm over long on the inside. These will be glassed into place with a layer or two of cloth and resin. Not decided as to whether its going to be servo operated yet. I have an idea of how to do it without resorting to air rams etc, but we'll have to see if its workable when I get there. It may just be manual operation though, but then I need to make a catch up to keep it closed or open!!!! Any fancy ideas?
Ian.
Moving up the fuselage, I've cut some slots for the canopy rails. These are brass, about 6mm square and available from Mick Reeves. With the slots cut, I'll shape the rails so the ends are 10 or 15mm over long on the inside. These will be glassed into place with a layer or two of cloth and resin. Not decided as to whether its going to be servo operated yet. I have an idea of how to do it without resorting to air rams etc, but we'll have to see if its workable when I get there. It may just be manual operation though, but then I need to make a catch up to keep it closed or open!!!! Any fancy ideas?Ian.
12-20-2011, 10:02 AM
#32

My Feedback: (3)
Join Date: Feb 2003
Location: Jackson,
MS
Posts: 538
Likes: 0
Received 0 Likes
on
0 Posts
I would like to put a sliding canopy on my 30cc ESM Spitfire. What did you use to cut the slots? I am afraid the paint will chip. Also, not sure I can get a straight cut like you have.
Thanks.
Hal
Thanks.
Hal
12-20-2011, 11:59 AM
#33
Senior Member
Thread Starter
Join Date: Feb 2004
Location: Barrowhill, Staffordshire, UNITED KINGDOM
Posts: 586
Likes: 0
Received 0 Likes
on
0 Posts
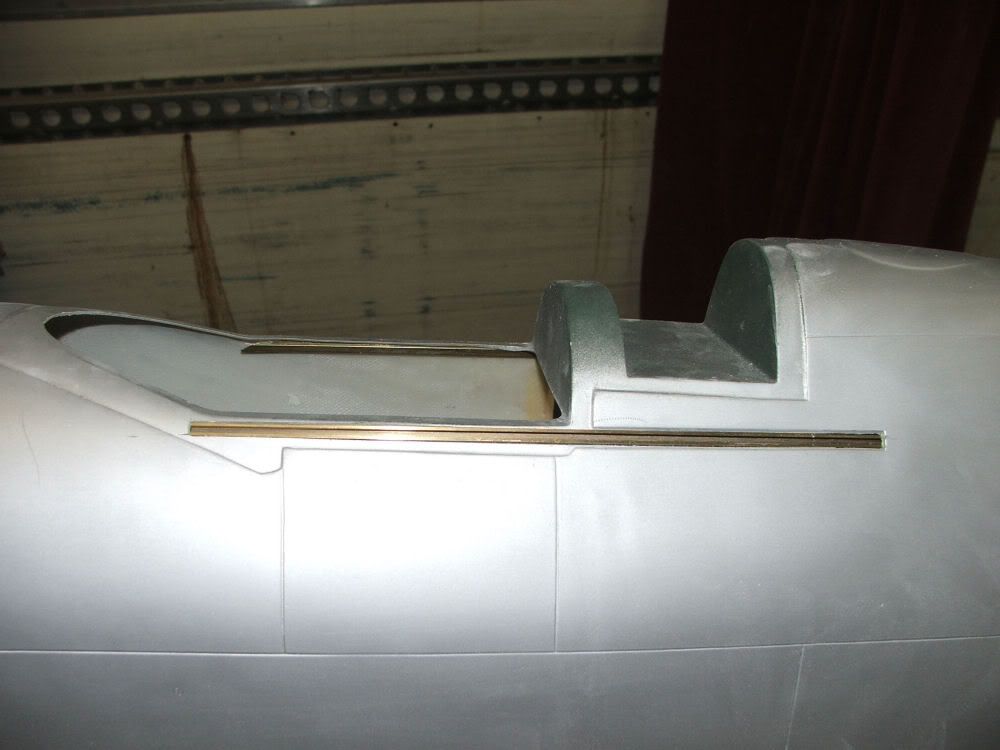
Hal, the slots were marked out, then 'chain drilled' with a much smaller drill size to remove a rough slot. Then, the slot was filed out using a wafer file, Permagrit made. This is about 3mm thick, 40mm wide and 250mm long. The was used to shape the slot to the marked lines. You could use a Dremel and cutting discs to good effect, I did the chain drilling method this time though. When chain drilling, do a bit as long as the file is wide, then leave 5mm or so, then another section, then go back and open out the thin bits you left in. File up the top edge as you go, don't pull when filing the edge or you'll run the risk of chipping. This way, the flimsy edge along the top stays fairly strong whilst being shaped. Trying to file the whole top edge would probably end up in it breaking out.
Cut the canopy up, sacrificing the simple rear part that needs to go underneath the sliding bit. There are moulded in cut lines on the canopy, accurate too. Cut to them and the canopy fits nicely into the recessed moulding on the fuselage. This was done and I realised the front part doesn't line up with the moulded door on the left side of the fuselage. So decided to move the front section forwards by 8mm or so, lining up the canopy lines to a scale drawing. This also means the front end needs trimming a second time to fit the recess again. No biggie, remembering the measure twice cut once theory. I'll glass the rails in tonight and hopefully sort the canopy out tomorrow. Also, the tailplane is now glassed and the rudder first coated.
Ian.
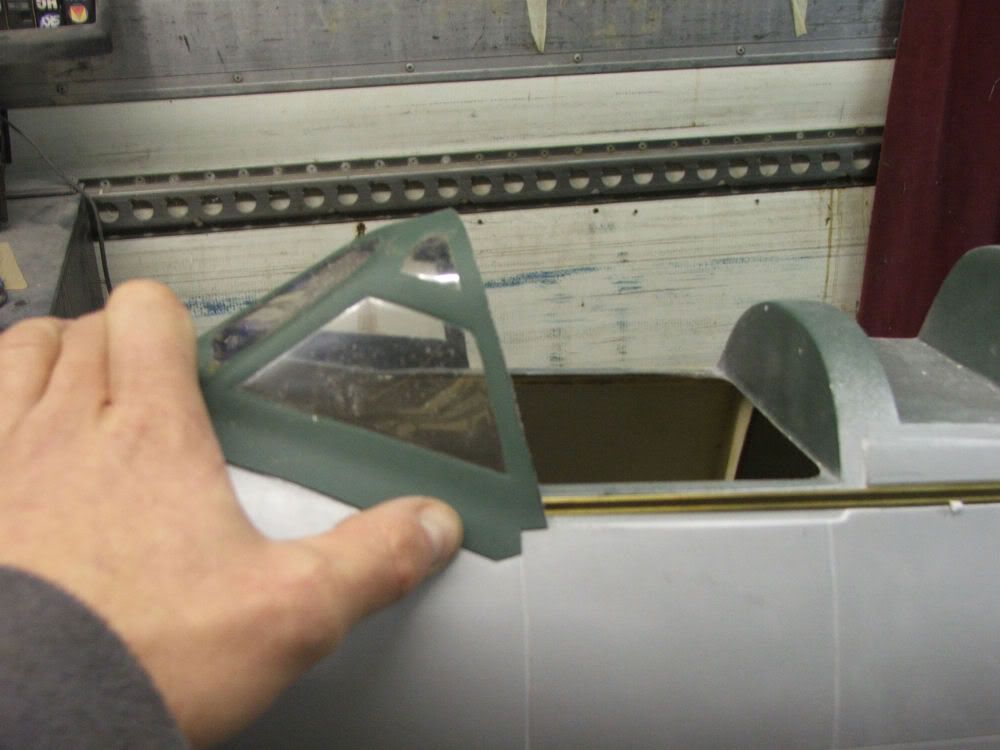
12-20-2011, 12:03 PM
#34
Senior Member
Thread Starter
Join Date: Feb 2004
Location: Barrowhill, Staffordshire, UNITED KINGDOM
Posts: 586
Likes: 0
Received 0 Likes
on
0 Posts
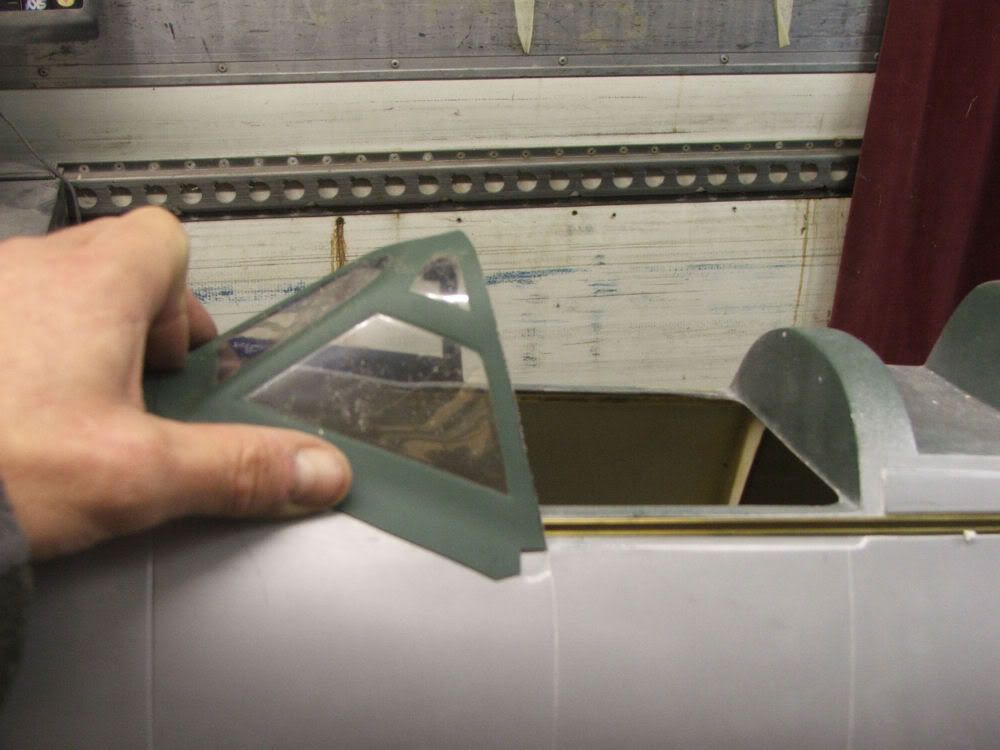
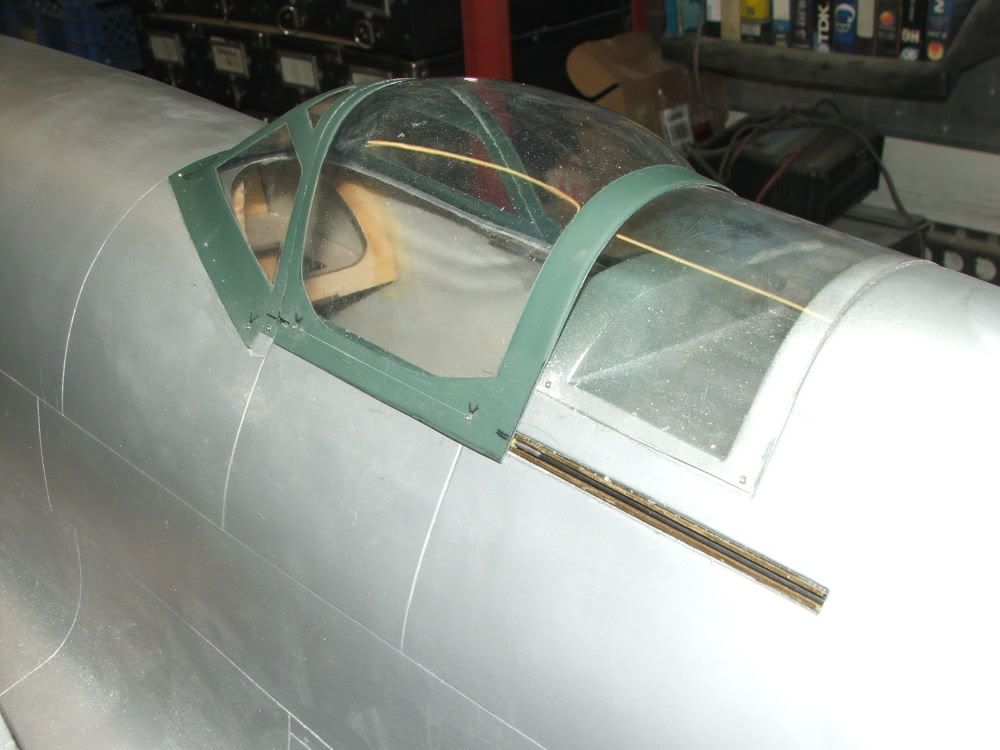
The sliding section is now taped in place with the rail lines marked on, then moved back to the open position to make sure it'll clear the rear decking as it slides.
Ian.

Ian.
12-21-2011, 09:32 AM
#37
Senior Member
Thread Starter
Join Date: Feb 2004
Location: Barrowhill, Staffordshire, UNITED KINGDOM
Posts: 586
Likes: 0
Received 0 Likes
on
0 Posts
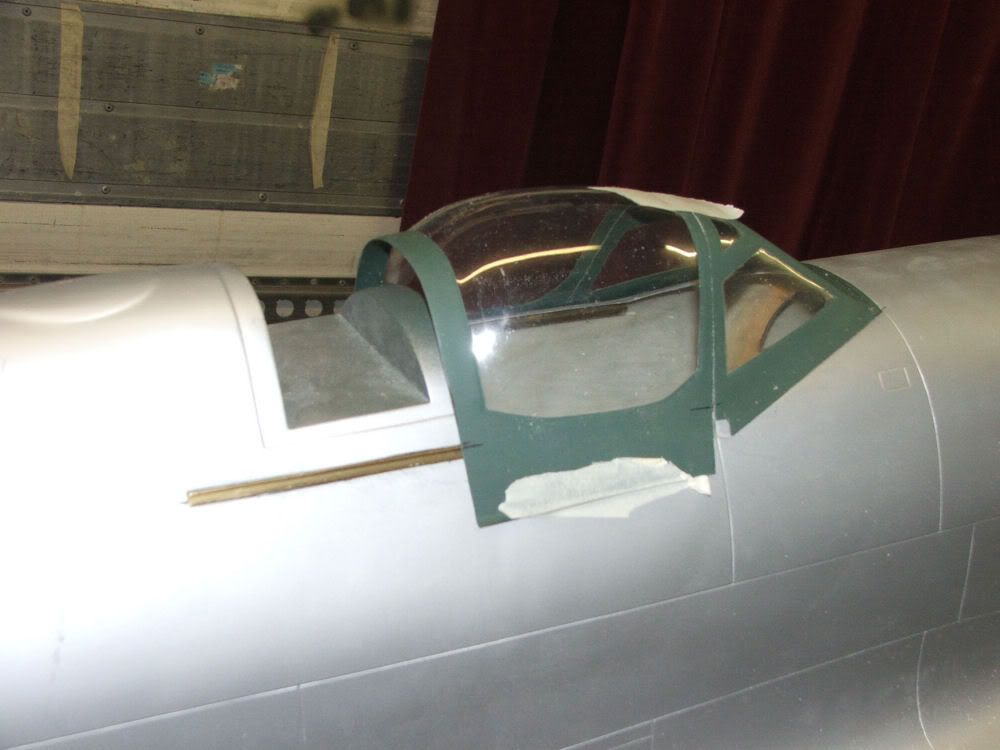
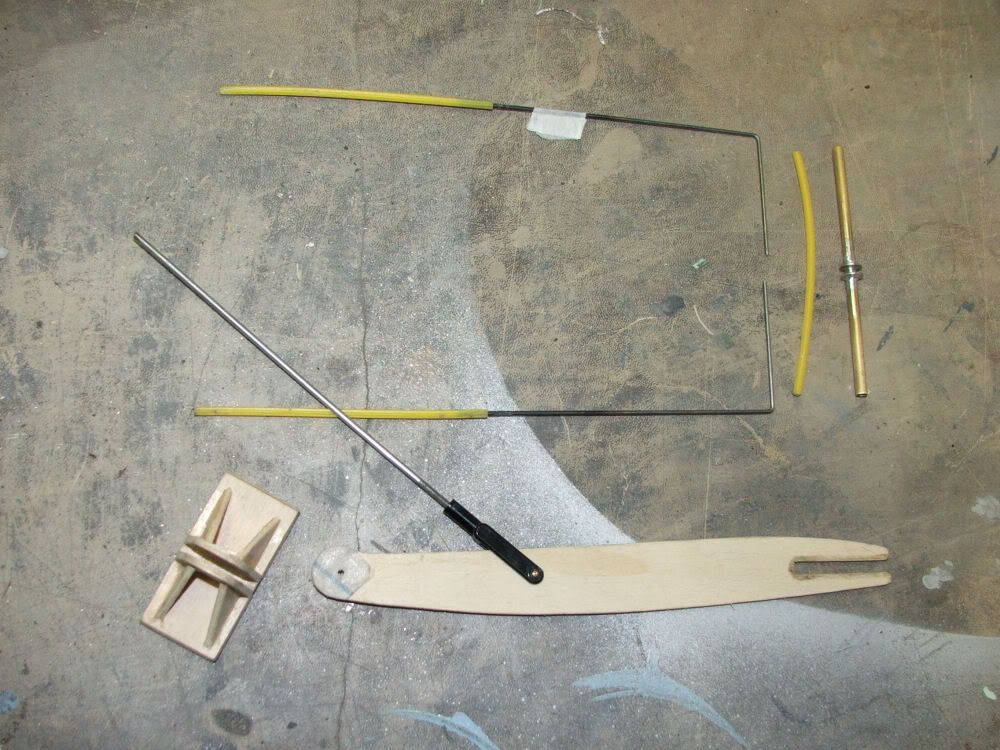
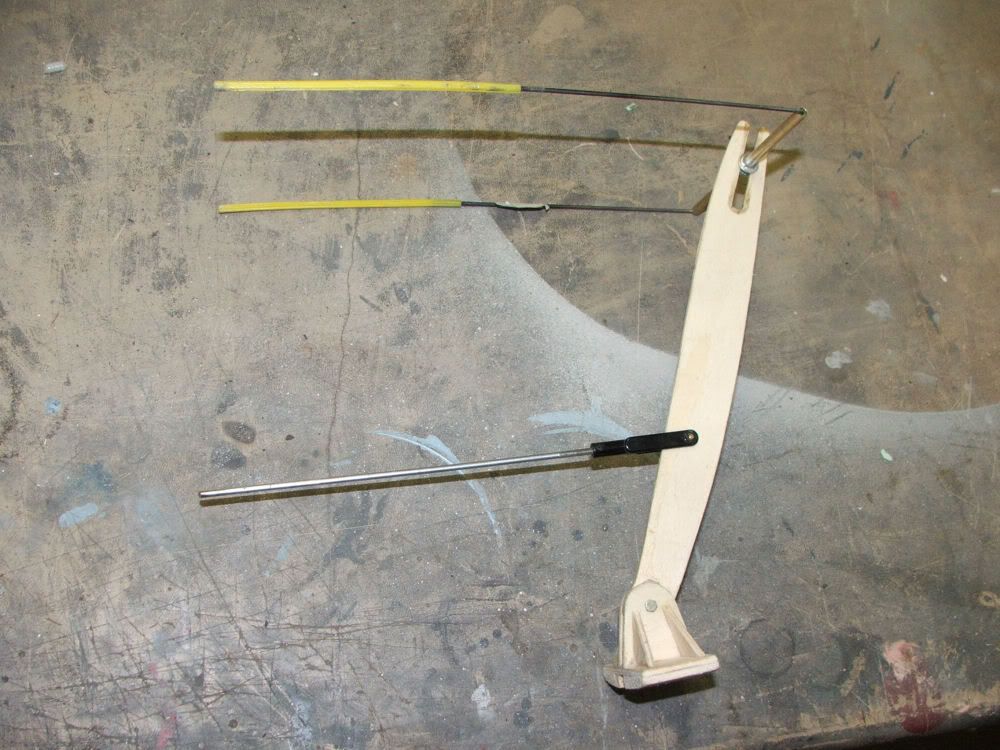
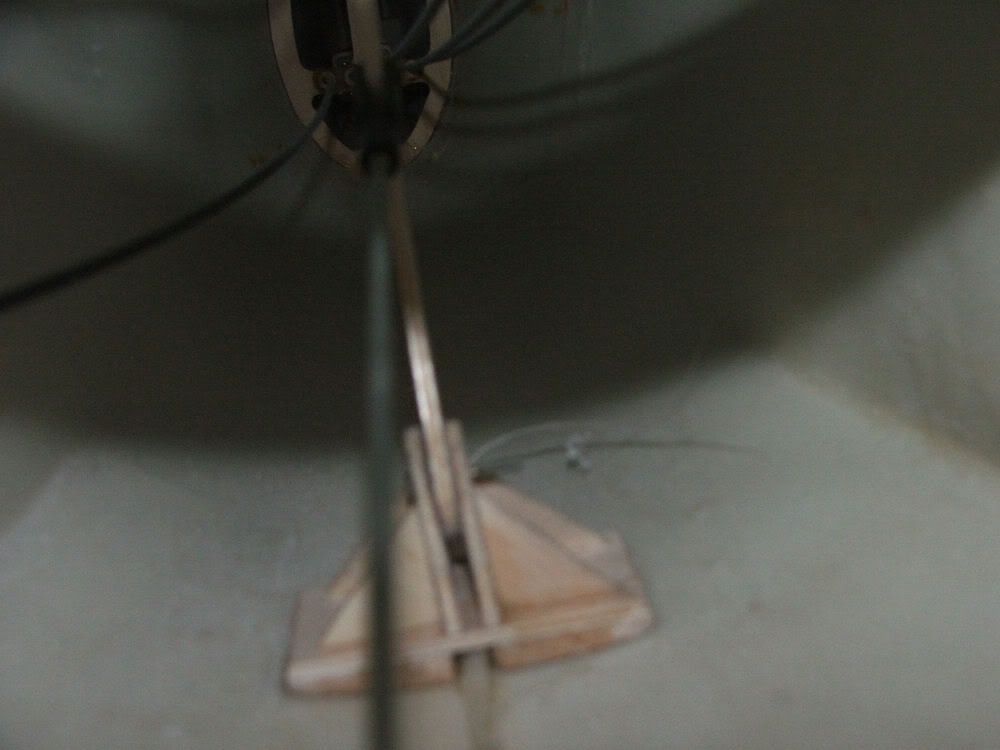
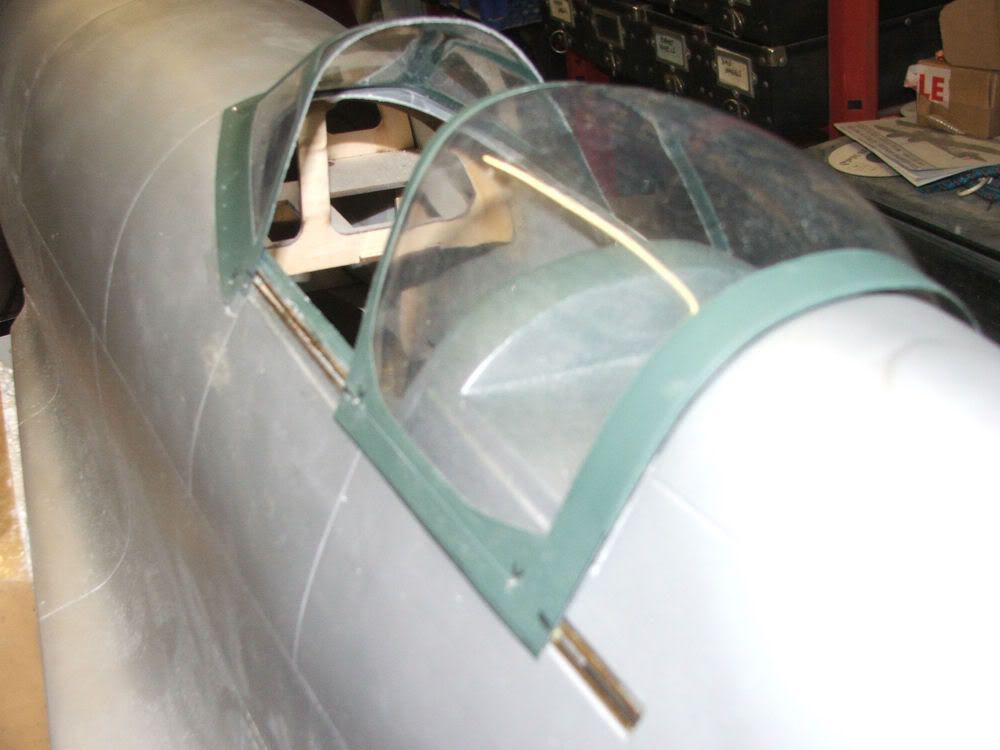
It aint getting a cockpit, but will have a pilot. Seems a bit of an odd decision considering the sliding bit and an expensive pilot, but it aint my decision to make. Glassed the rails in, then set to work out how I was going to make it work. I decided to make it servo operable, to save the work on hiding a latch to make it lock shut!! The pics are hopefully self explanatary. The inner slides are from control snake inner. The size I have runs smoothly in the brass runners. Into the rear end of these slides are a piece of 2mm wire, threaded into the snake. The right angle bend runs across the fuselage to meet the one from the other side. Another bit of snake slides over these wires to lign them up together. Over this snake is the brass drive tube. This has washers soldered on to keep the actuator arm running centrally. The actuator is 3mm liteply with two holes and a slot in it. The lower hole is the pivot, the middle the servo connection and the slot locates between the two washers on the drive tube. The mounting bracket is 3mm liteply too, with gussetts and a largish mounting footprint which mounts to the rear bottom skin of the fuselage. All of this gubbins is meant to be as light as possible since it is all just behind the c of g, so care is needed not to make it all too heavy. On other models, all of this could be mounted the other way round, ie infront of the canopy, but it wasn't a possibility on this model.
Ian.
Ian.
12-21-2011, 09:43 AM
#38
Senior Member
Thread Starter
Join Date: Feb 2004
Location: Barrowhill, Staffordshire, UNITED KINGDOM
Posts: 586
Likes: 0
Received 0 Likes
on
0 Posts
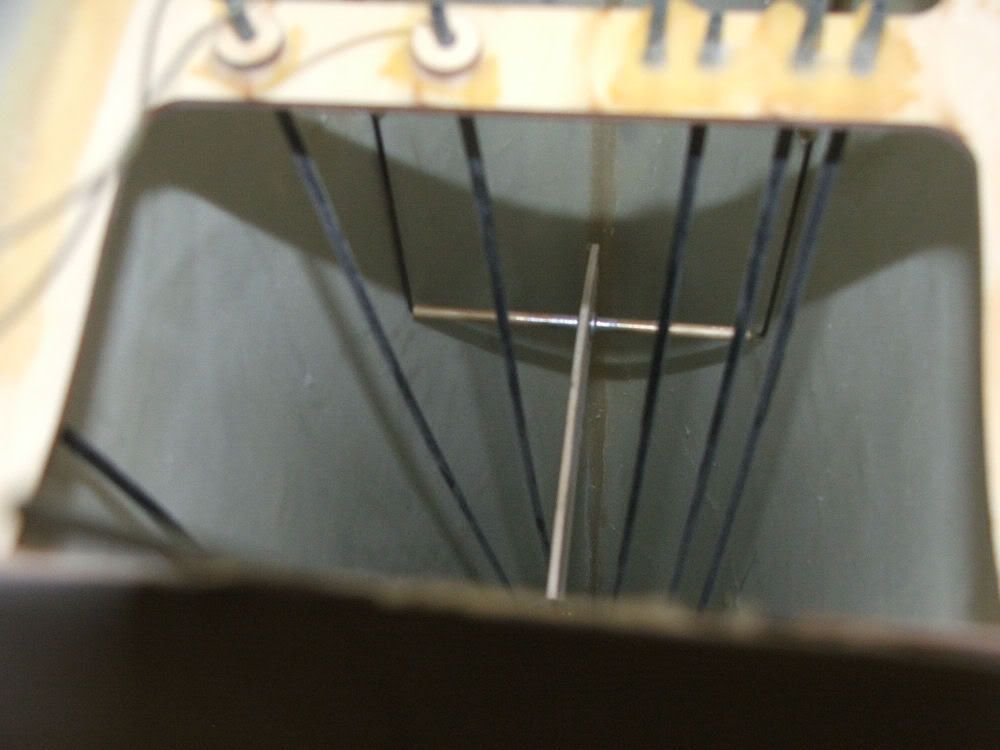
The reason for the long actuator is due to the amount of movement required at the canopy rail. It slides back 100mm so would need a large horn on a servo which would therefore take up a massive amount of space in the radio bay. Doing it this way, a standard servo and horn does the work in a normal amount of space, leaving the actuator to move the most well out of harms way. The whole set up is completely removable for servicing etc so should never need taking out!!!!
Ian.

Ian.
12-21-2011, 09:53 AM
#39
Senior Member
Thread Starter
Join Date: Feb 2004
Location: Barrowhill, Staffordshire, UNITED KINGDOM
Posts: 586
Likes: 0
Received 0 Likes
on
0 Posts
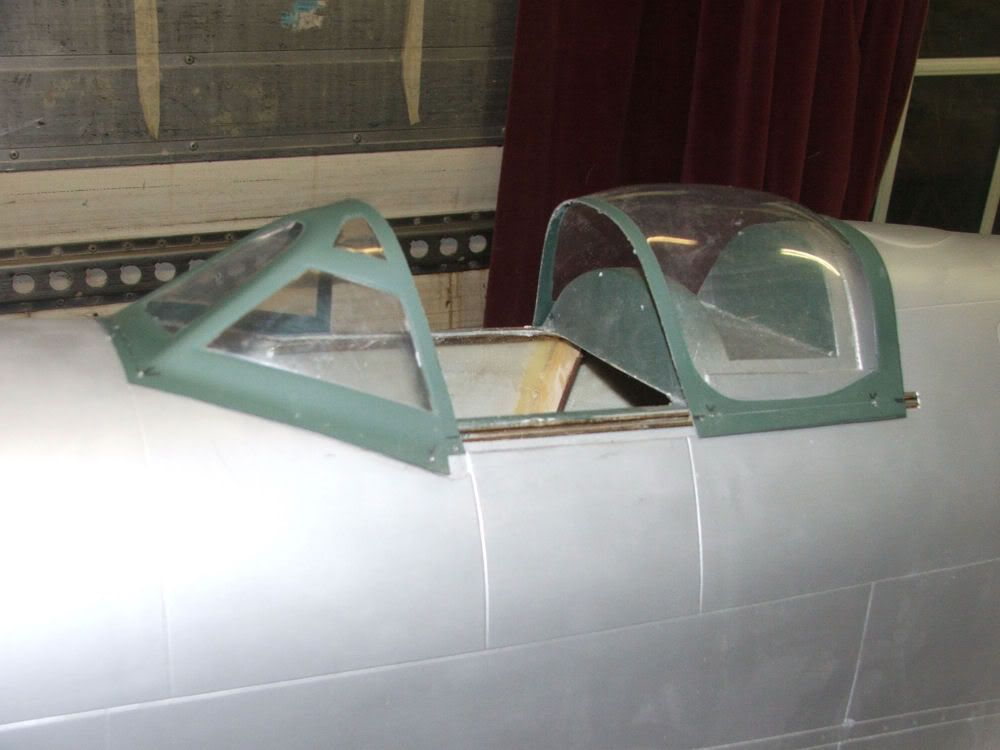
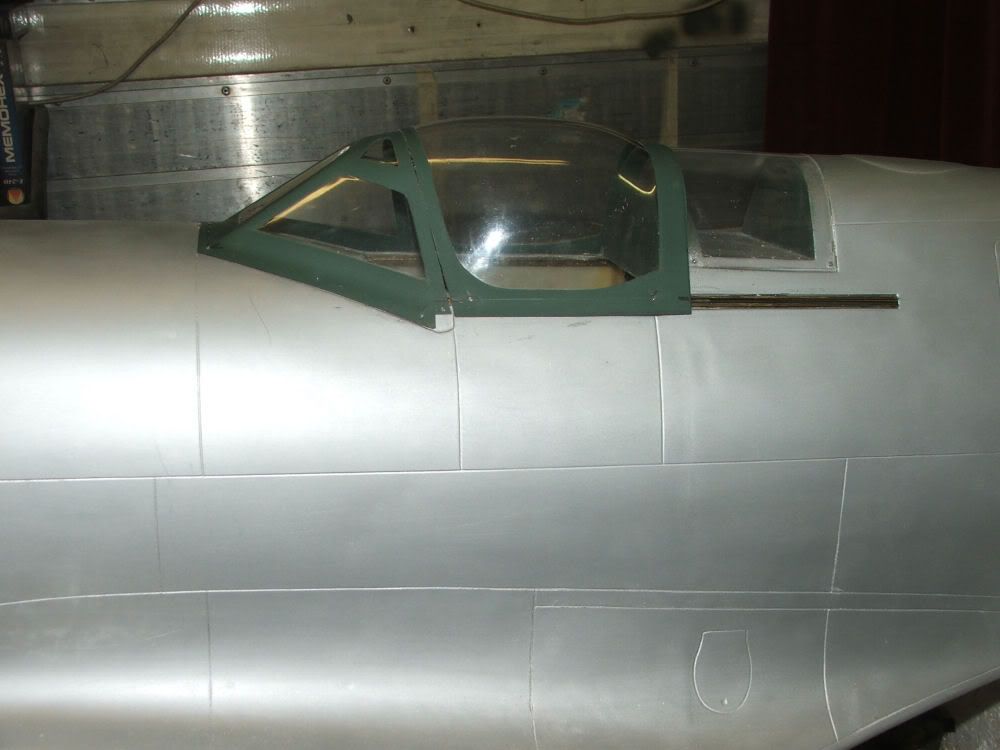
The canopy will need some stiffening around its opening edge, as will the windscreen, but I'm pleased with the way it all lines up as it is. The canopy is held on the rails using Mick Reeves tiny screws into the nylon snake. There is only 2 per side it the moment but it'll get 8 or so eventually. These screws, although very small, provide a very good, and very neat fixing. The round profile of the snake means that the canopy can pull tight against the snake without binding on the brass rails. Made a start on the rear glazing template, needs another one making but ran out of time for the days 'allowance'
Ian.

Ian.
12-21-2011, 01:51 PM
#40
Senior Member
Thread Starter
Join Date: Feb 2004
Location: Barrowhill, Staffordshire, UNITED KINGDOM
Posts: 586
Likes: 0
Received 0 Likes
on
0 Posts
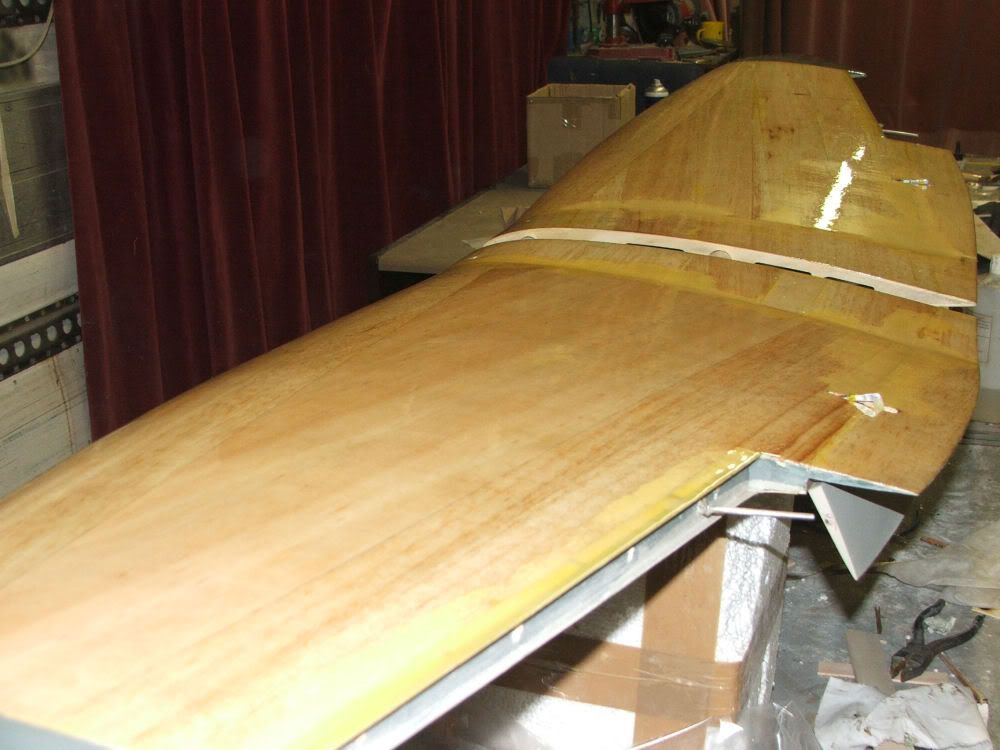
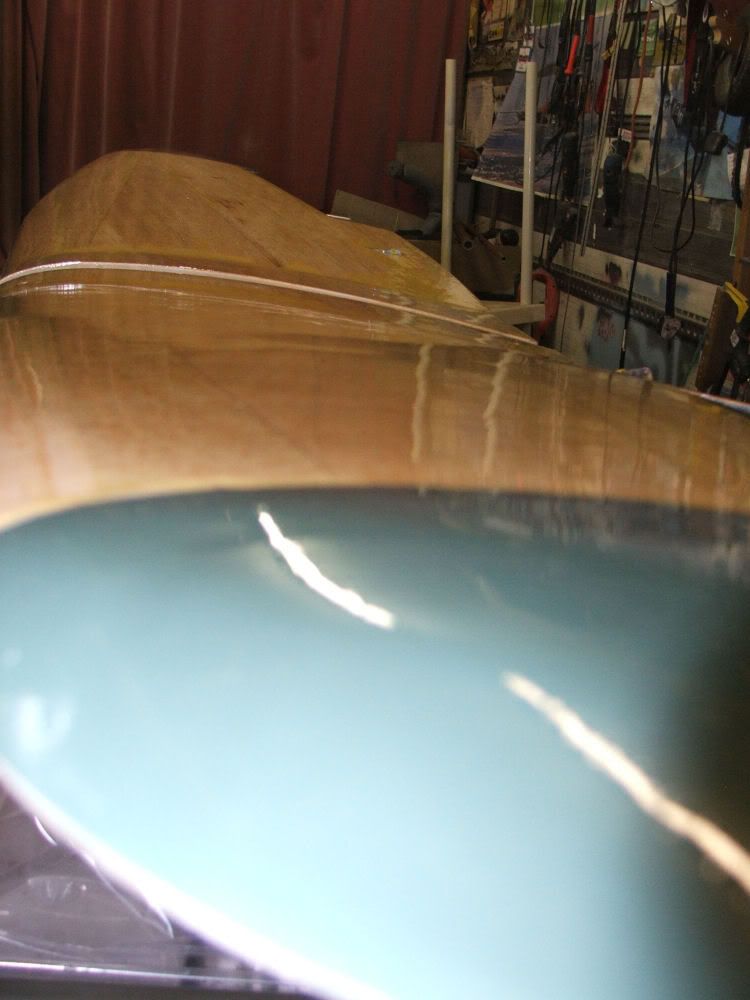
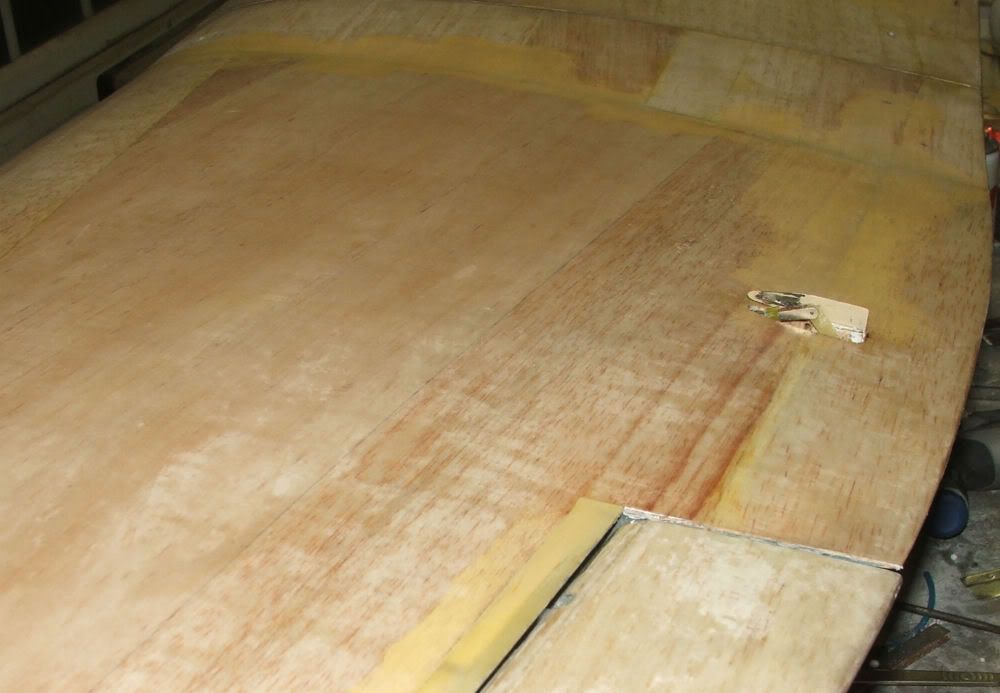
Moved back onto the wing tonight and got the top surfaces second coated, plus both sides of the tailplane. Flat it all off in the morning and do the undersides perhaps.
Ian.
Ian.
12-22-2011, 10:20 AM
#41
Senior Member
Thread Starter
Join Date: Feb 2004
Location: Barrowhill, Staffordshire, UNITED KINGDOM
Posts: 586
Likes: 0
Received 0 Likes
on
0 Posts
Got the tailwheel lower leg sorted. Made a lithoplate template. When it was right I made a tinplate one. Tinplate is ace stuff and readily available, though it is getting more scarse since ali cans and tins are more the norm now. I solders ace, is stronger that litho and isn't at all heavy used in moderation!! The standard kit wire was reshaped slightly, then this horseshoe shape was soldered onto the one sided wire leg. The other end of the horseshoe has the wheel retaining collet soldered to it. The collet end is simply flexed out of the way to slide the wheel on, then located on the wire and tightened up, making the tinplate suprisingly solid and fairly scale like.
Ian.
Ian.
12-22-2011, 10:45 AM
#43
Senior Member
Thread Starter
Join Date: Feb 2004
Location: Barrowhill, Staffordshire, UNITED KINGDOM
Posts: 586
Likes: 0
Received 0 Likes
on
0 Posts
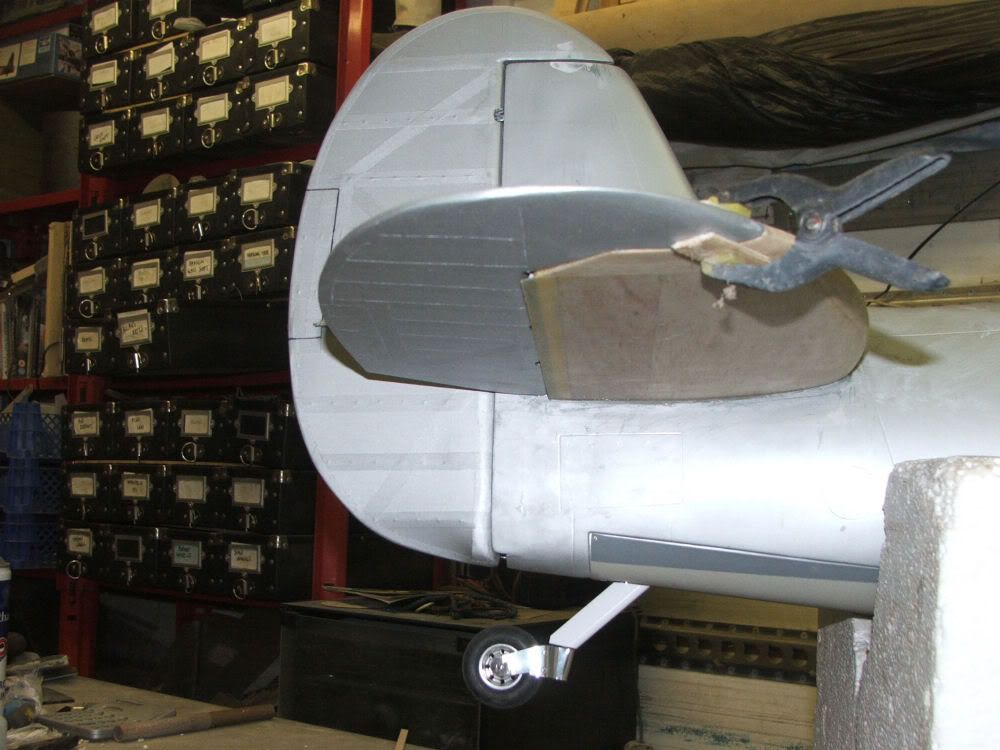
Cheers Casey.
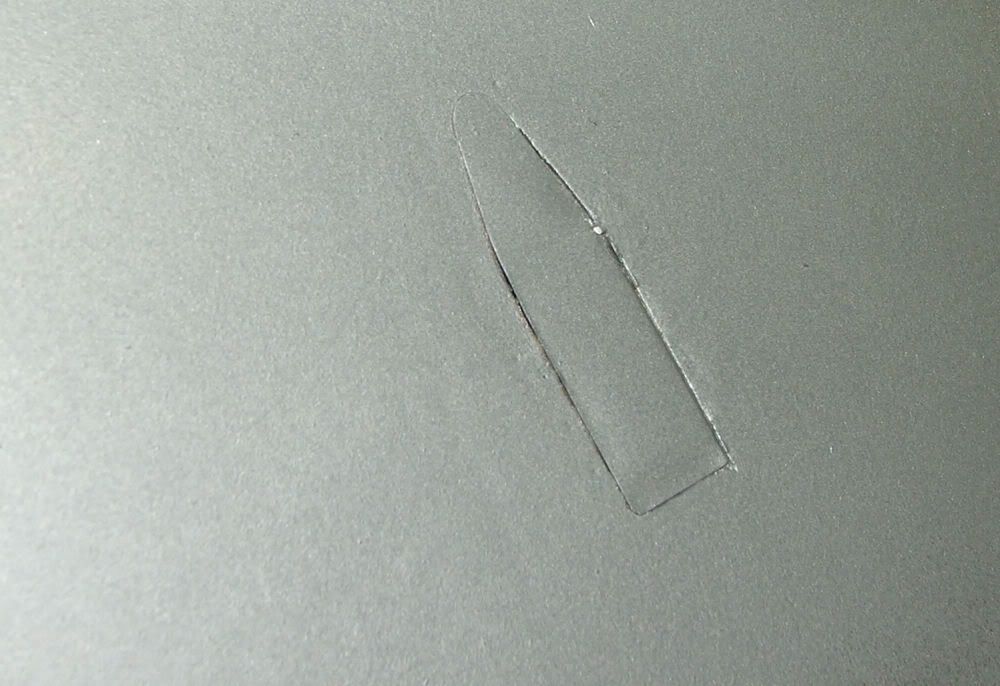
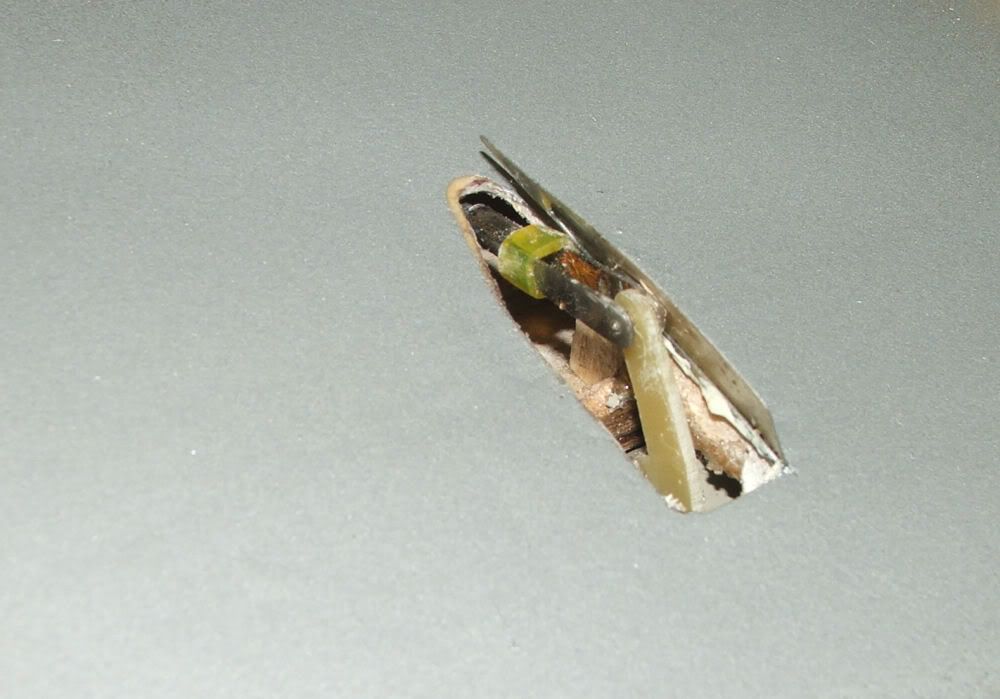
While I had the tinplate out, I made up one of the flap linkage doors, to make sure my ideas work. Tinplate boxes (old Strepsil type tins etc) have a rolled edge round the rim. This rim is ace for making little hinged doors etc. Simply use the rolled edge as the hinge line, the hinge formed by a piano wire pin down the middle. The doors on the Spitfire are spring loaded shut, and simply pushed open by the linkage. On this model the trailing edge is thick sheet and I didn't want to chop any more out to get a smooth reliable return spring installed. So I used the hinge pin as the spring too. The pic hopefully explains it well enough.
The hinge wire is one piece with two bends. Just using it as a hinge the two bends would be in the same line, simply glue the ends into the model. On these doors though, one bend goes into the airframe, the other bends in a different direction and lies, soldered to in fact, the underside of the door. The angle between the two bends depends on how much spring action you want. These are set up to pull the door shut, but not very tightly. Because I've used one end of the wire for closure, I need to introduce another mounting at that end, simply threading on a brass fitting (from model ship people) works great. The springing is from the length of the hinge and wire, if too short it'll simply not work. The longer the hinge the smoother the spring. When assembling, I rubber grease the hingeline and the hinge pin, just to ensure no glue gets into the hinge itself. Where the wire is soldered onto the door, I bent the wire forwards so it supported the what would be unsupported front end of the door. This also keeps the rest of the door smooth so the linkage rubs against a smooth surface.
Ian.
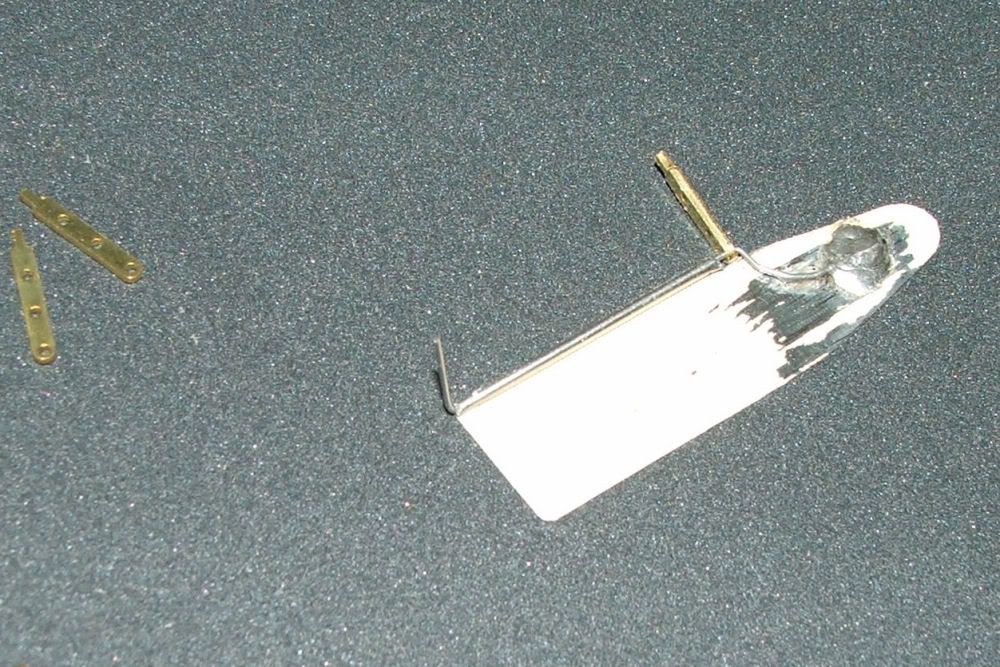
12-22-2011, 10:52 AM
#44
Senior Member
Thread Starter
Join Date: Feb 2004
Location: Barrowhill, Staffordshire, UNITED KINGDOM
Posts: 586
Likes: 0
Received 0 Likes
on
0 Posts
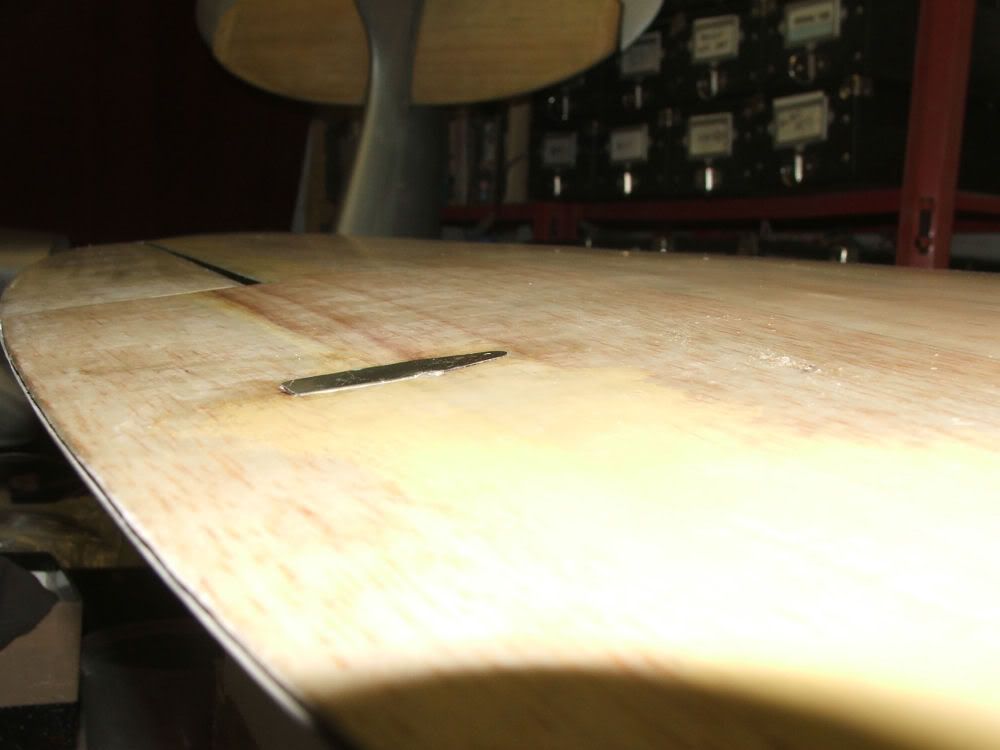
And a couple of pics with a drop of silver applied, just to check the fit so I move on to another area. This paint will mostly get flatted off in the prep for paint. I'll paint the linkage and the internal bits too, but theres lots of prep to do before then.
Ian.
Ian.
12-22-2011, 12:02 PM
#45
Senior Member
Join Date: Jul 2004
Location: Chesterfieldderbyshire, UNITED KINGDOM
Posts: 238
Likes: 0
Received 0 Likes
on
0 Posts
Love the flap indicators Ian.Most people leave these of ,but you have shown how its quite easy it is to do with a little thought put into it.Ill defintely will be adding them to my Mk 14.Keep up the good work.
Nudge
Nudge

 12-23-2011, 08:48 AM
#47
Senior Member
Thread Starter
Join Date: Feb 2004
Location: Barrowhill, Staffordshire, UNITED KINGDOM
Posts: 586
Likes: 0
Received 0 Likes
on
0 Posts
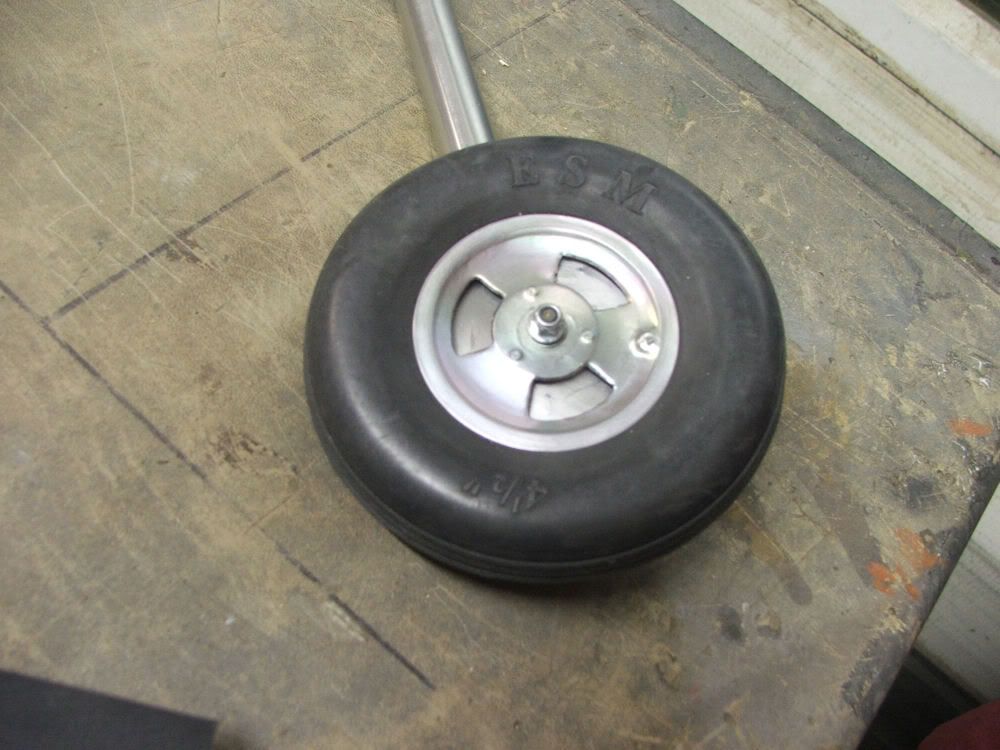
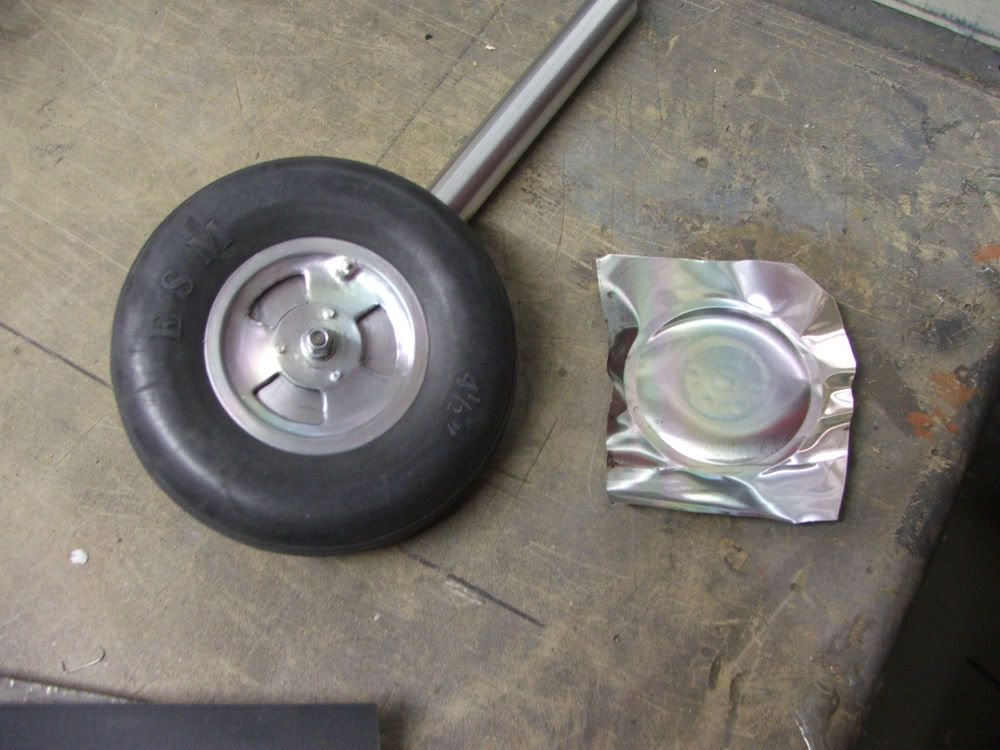
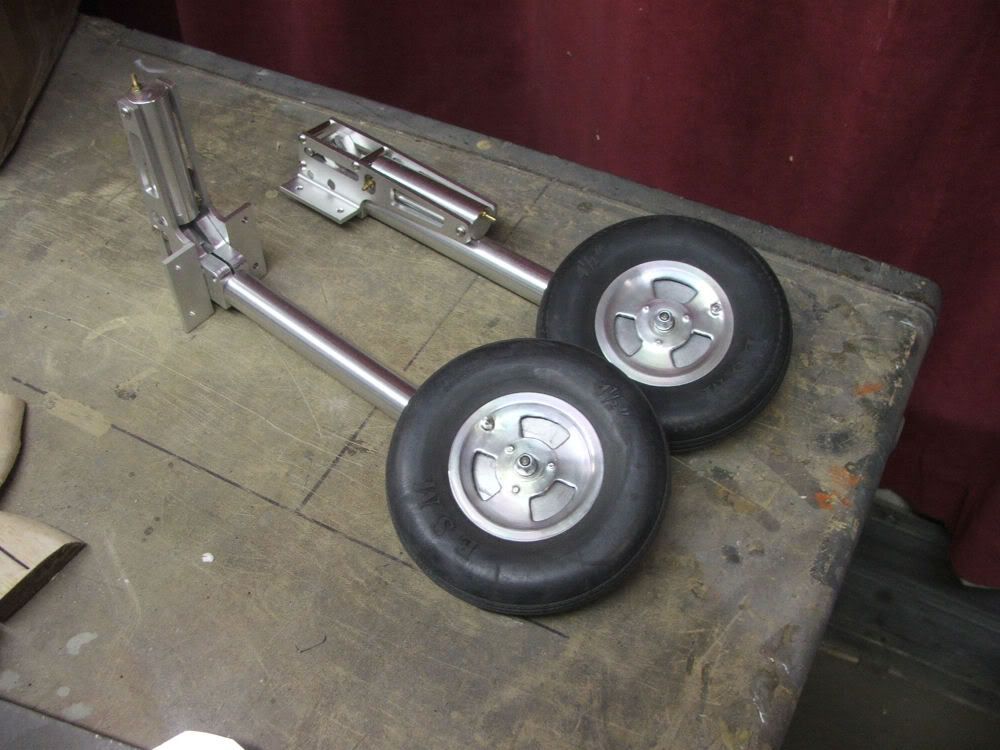
Haven't got much done on this one today, but I have finished the massive job of the lithoplate wheel covers!
Ian.
Ian.
12-23-2011, 10:29 AM
#48

Join Date: Dec 2010
Location: Birmingham, UNITED KINGDOM
Posts: 203
Likes: 0
Received 0 Likes
on
0 Posts
12-23-2011, 12:38 PM
#49
Senior Member
Thread Starter
Join Date: Feb 2004
Location: Barrowhill, Staffordshire, UNITED KINGDOM
Posts: 586
Likes: 0
Received 0 Likes
on
0 Posts
And just to prove I made two!!
Heres a really bad video of the sliding canopy, no servo on it yet, just my arm reaching through the firewall to operate the pushrod!! It has clearly proved that I aint no Spielberg!! I can't seem to get it to play in the site but theres a link below.
http://s1189.photobucket.com/albums/...t=DSCF8465.mp4
Ian.