


CY Models Giant P47 Thunderbolt

 07-22-2022, 02:19 AM
#52

Join Date: Jan 2016
Location: Napoli, Italy
Posts: 28
Likes: 0
Received 0 Likes
on
0 Posts


 08-13-2022, 12:31 AM
#54
Join Date: Jan 2016
Location: Napoli, Italy
Posts: 28
Likes: 0
Received 0 Likes
on
0 Posts
08-13-2022, 12:35 AM
#55
Junior Member
Join Date: Aug 2022
Posts: 2
Likes: 0
Received 0 Likes
on
0 Posts
I just ordered a Saito FG60 R3 and I was wondering if it will pull this bird for a scale flight. That one and the black horse arfs are the ones I consider. It seems a bit too small for that one though.
Last edited by Pandjarov; 08-13-2022 at 01:29 AM.
08-15-2022, 09:20 AM
#56

My Feedback: (14)
Join Date: May 2004
Location: Flower Mound,
Posts: 66
Likes: 0
Received 0 Likes
on
0 Posts
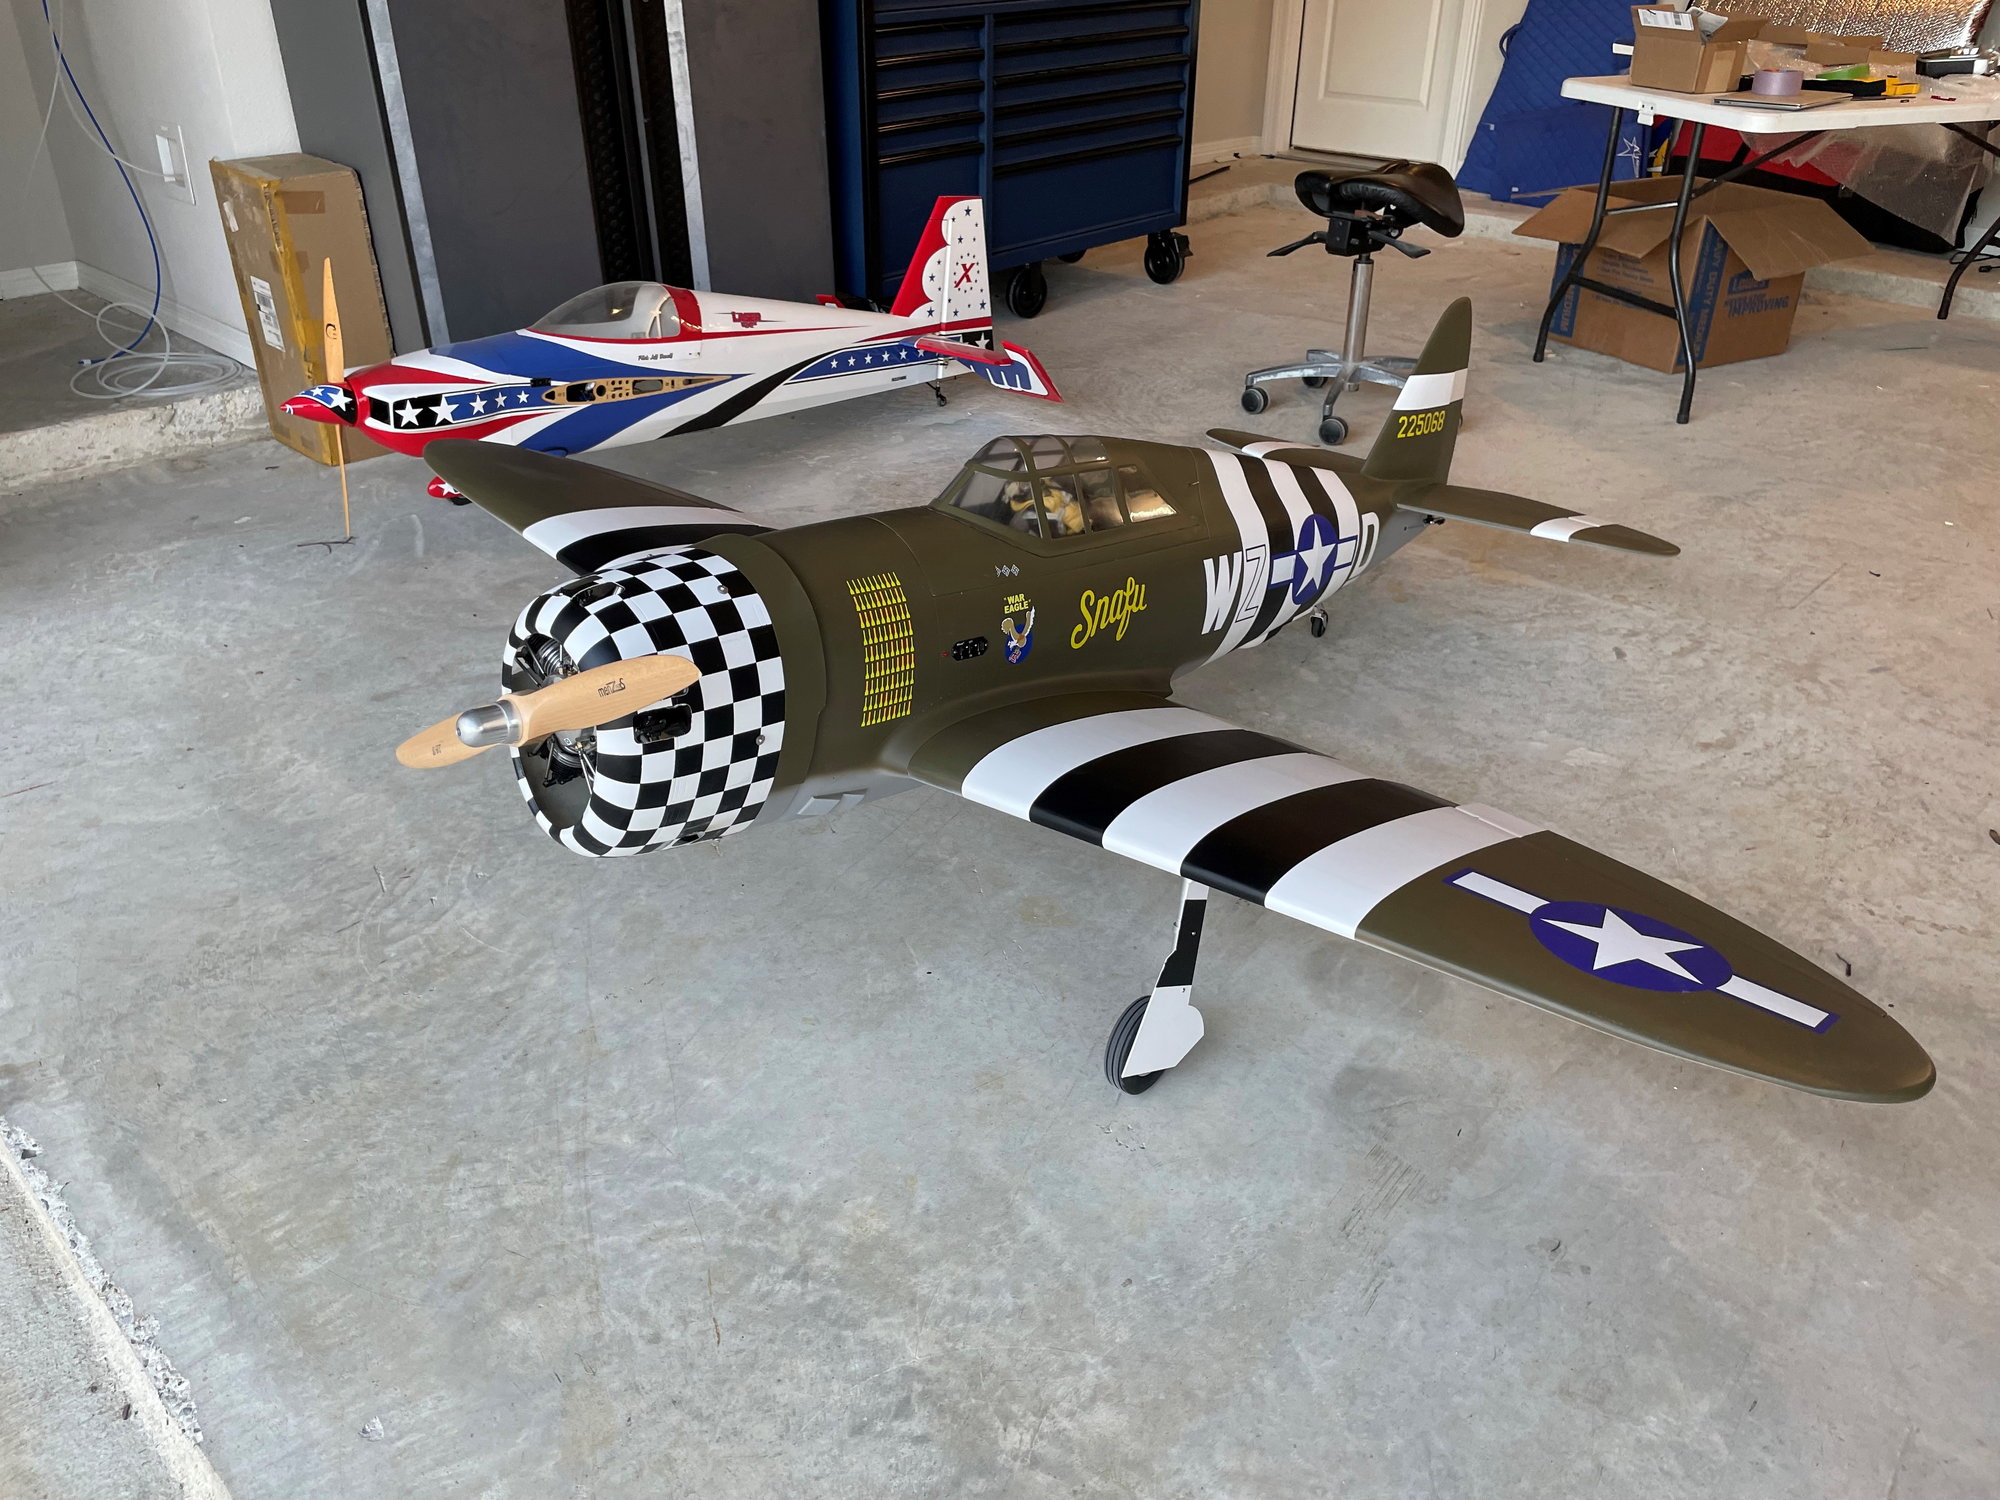
An update on my end....the plane is done. The engine is broken in. I had initially used a 25x14 prop (the one in the photos), but I was only getting 3800 rpm. I switched to a 2 blade Menz prop that is 28x8 as this was used at the factory for testing, and the engine roared to life at around 5800 RPM. I have a 26x10 4-blade that is on its way and I am hoping that this can get me around 4900 rpm. In any case, to be safe, my maiden will be done with the 2 blade 18x8. The engine is very reliable and idles really nicely. As for balancing, I did some reinforcement of the firewall and have 4 2400 mAh batteries (2 receiver, one ignition, and one for retracts). This, plus the engine yielded a well balanced plane for CG. No need to add any weight to it (or even to shift weight). Right now I have been flying some of my other planes to get my skills sharpened (and my courage raised)! Should maiden in the next 2-3 weeks depending upon the wind here in Texas.
PS. No need to point out that my pilot is upside down. My first attempt at attaching him with glue was a fail. He is now bolted to the bottom of the cowl.
PS. No need to point out that my pilot is upside down. My first attempt at attaching him with glue was a fail. He is now bolted to the bottom of the cowl.
05-22-2023, 12:28 PM
#57
I just got the Snafu version from Texas rc planes and I am building it. I encountered 2 issues, the right wing has 2 mm gap at the trailing edge at root and the left horizontal stab has 4 mm gap also at the trailing edge at root.
Has anyone have this problem?
Has anyone have this problem?
06-01-2023, 07:33 PM
#58
I just bought one at Joe Nall. I haven�t fitted the wings or stabs yet. I�ll fit them up this weekend and let you know what I find. What you powering yours with? I�ve got no manual with mine. Did you get one? Thanks, Jerry
06-08-2023, 08:02 AM
#59
The flaps are also longer than the wing fairing on the fuse and I don't know how to fix this. I use the DA85 engine and on initial balancing test, I would need about 7 lbs of nose weight.
06-08-2023, 08:09 AM
#60
I fitted the wings and stabs on mine last night and them seem ok. There is some gap but nothing serious. I spoke to a couple of folks at Nall regarding the TopRC and this kit. All of them indicated that I'd need about 8lbs in the nose. One pilot has both TopRC and CY and said he believed both were made at the same factory as the builds looked exactly the same. How did you deal with the tailwheel gear door? Any pictures you have of that would be appreciated. Thanks, Jerry.
06-08-2023, 08:16 AM
#61
My Feedback: (14)
Join Date: May 2004
Location: Flower Mound,
Posts: 66
Likes: 0
Received 0 Likes
on
0 Posts
I didn't have any issue with the wing or stab fit. @jbarnes - if you IM me, I can send you my manual. I do not need it. As for the weight, this makes sense. I put in a UMS 125 (5 cylinder) and I did not need any weight at all. Everything balanced fine. I also used the forum CG location. It flew nicely. I later lost this plane due to my own stupidity. I threw away the cheap chinese fuel pump that came with the UMS as everyone said that they fail all the time. I took this to mean that the engine flies fine WITHOUT a fuel pump. WRONG!!! It flew fine up until I backed off of the throttle and then it cut out. I lost the plane and now I have a nice german fuel pump for when I get the courage to get a new plane for my UMS125. Live and learn. At least it landed in a tree and did not strike the engine. (thank god) Unfortunately, the airframe was a total loss.
06-08-2023, 09:32 AM
#62
Sorry to hear about your loss. I've got a Saito FG90 I'm going to eventually put in this bird if it flies decent. Right now I'm throwing DA85 in it. Those radials do sound good. Thankyou for the build instructions but I've got it put together. The only thing I'm scratching my head around is the tail gear doors. What did you do in regards to operating them. I'm thinking a simple spring across the doors that the gear pulls down during retraction. Jerry.
06-09-2023, 07:40 AM
#63
My Feedback: (14)
Join Date: May 2004
Location: Flower Mound,
Posts: 66
Likes: 0
Received 0 Likes
on
0 Posts
Jerry,
I actually never installed them. This was going to be done after I had several flights in first. However, in previous builds, I have used the spring trick and it works nicely. You definitely don't want to add much tail weight. A spring will do nicely.
-Jeff
I actually never installed them. This was going to be done after I had several flights in first. However, in previous builds, I have used the spring trick and it works nicely. You definitely don't want to add much tail weight. A spring will do nicely.
-Jeff
06-09-2023, 07:45 AM
#64
Thats what I was going to do. The inner door on the mains will need a servo as I haven't come up with a good way to deal with those. You interested in selling your landing gear from your crashed bird? I'm assuming they are still in working order. Jerry.
06-09-2023, 08:29 AM
#65
My Feedback: (14)
Join Date: May 2004
Location: Flower Mound,
Posts: 66
Likes: 0
Received 0 Likes
on
0 Posts
Jerry,
Unfortunately, I have already earmarked these for a Byron P-47 that I am building. It will be my most challenging kit build yet. I keep procrastinating, but I will get started soon enough. Good luck with the gear doors. Post some pics and a flight report once you are done. For me, it flew a little sluggish but very scale. In hindsight, I should have flown with a 2 bladed prop and not gone for the 4 bladed one. But I couldn't help it. It was so beautiful with the 4 blade. As far as I could tell with the few flights I had, it didn't have any bad tendencies. Basically, it flew like a jug.
-Jeff
06-12-2023, 10:35 AM
#66
I guess I don't have to worry about the tail doors because my tail retract doesn't work. The electric actuator can only move the gear for about 3 mm in each directions. I don't know why the kit I got has all kind of problems. I never had any kit with this much problems. Just not worth the money I paid
06-13-2023, 12:00 AM
#67
My Feedback: (14)
Join Date: May 2004
Location: Flower Mound,
Posts: 66
Likes: 0
Received 0 Likes
on
0 Posts
That sucks. You definitely have not had luck. I had a bad controller that failed within the first 10 minutes of testing. But once I got the replacement, my retracts have been the best e-retracts I have ever owned. (Always actuate, never seem to get stuck or over current) I hope your maiden goes well to make all this hassle worth it. 
06-13-2023, 08:06 PM
#68
I guess I don't have to worry about the tail doors because my tail retract doesn't work. The electric actuator can only move the gear for about 3 mm in each directions. I don't know why the kit I got has all kind of problems. I never had any kit with this much problems. Just not worth the money I paid
06-15-2023, 04:00 PM
#70
I too using 2s lipo. Wondering if I can use 3s lipo instead. The jp controller said 8v. Most units supported 3s lipo.
Anyway, i found a local shop that sells scrap metal and i was able to get exactly 6 lbs of steel rectangular bricks in 4 pieces. Let's just hope that this will be enough for nose weights. I already have some ball bearing around the cowl ring.
I am using the DA85 and I found a side muffler on ebay for this engine for $50. It seems to fit in the cowl good. Don't know how long it will last on this engine, given that this engine is notorious for being a shaker.
06-16-2023, 06:07 AM
#72
I too have the all composite one. I have not tried a 3s on the gear. The gear is slow but seems to move ok. I'm going to document some of my issues I faced in this thread to make it easier for the next guy. Lack of a manual and a big bag of parts leaves you scratching your head when assembling this model. Jerry.
06-16-2023, 07:42 AM
#73
In an effort to help the next guy that is building this bird I'm going to document some of the things I encountered. This was my first all composite bird. In general the finish of it is great compared to your standard film finished ARF. How it compares to other all composite planes I have no clue. I'm sure offerings from CompARF are superior to the CY models. But, for $1500 the model seems reasonably finished. You can't forget it also comes with the landing gear as part of that package. However, there are no instructions that worth a hoot and all the hardware comes stuck in a bag with no clue what goes where. Its kind of like a builders ARF series.
I started on the fuse in my build. I kind of worked my way from the back to the front.
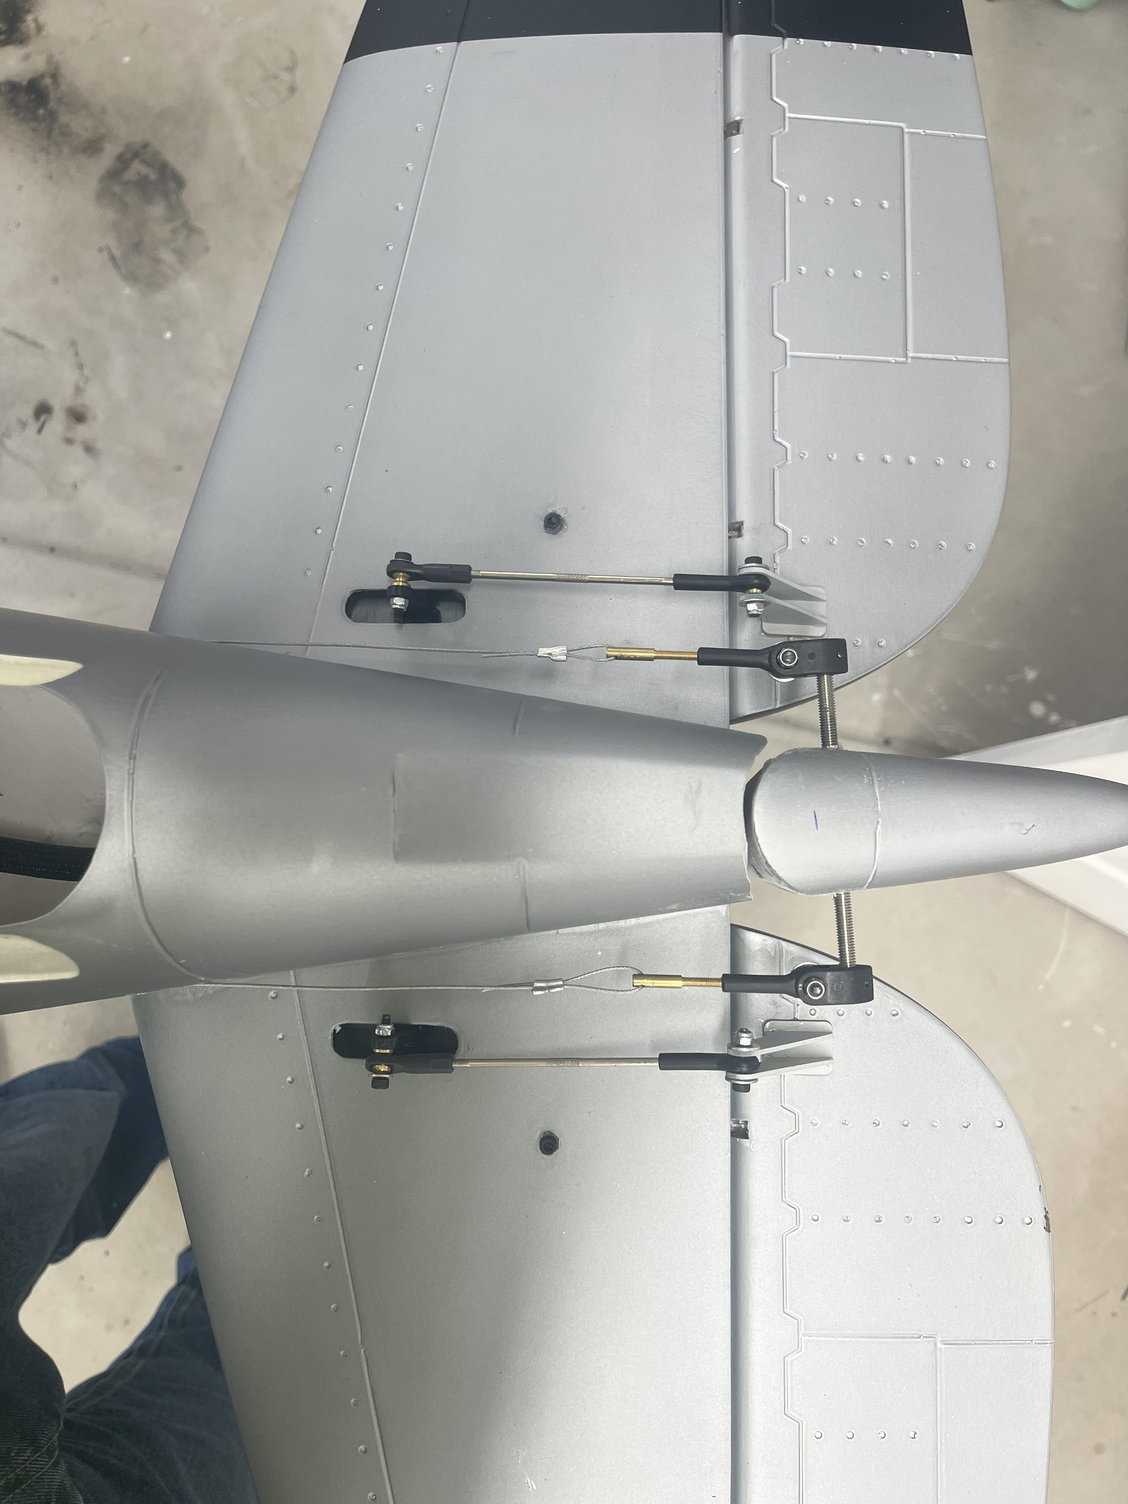
The horizontal stabs are built like most ARF's with the servo's internal in the stab. Unlike most ARF's the stabs do not fasten to the fuselage using mounting tabs. The underside of the stabs have a 3mm bolt that is threaded into the composite material and intended to capture the stab tube. The first thing I noticed was that those bolts were not a snug fit and given I'm using the DA85 I worried about them shaking loose. I don't intend to remove my stabs but didn't want to glue them to the fuse which would make it impossible to service the servo's. What I did was drill through the stab tube and tap the tube for a 3mm bolt so I could create a little more meat for the bolt to capture. I then siliconed the bolt into the stab. Hopefully this keeps the stabs attached!
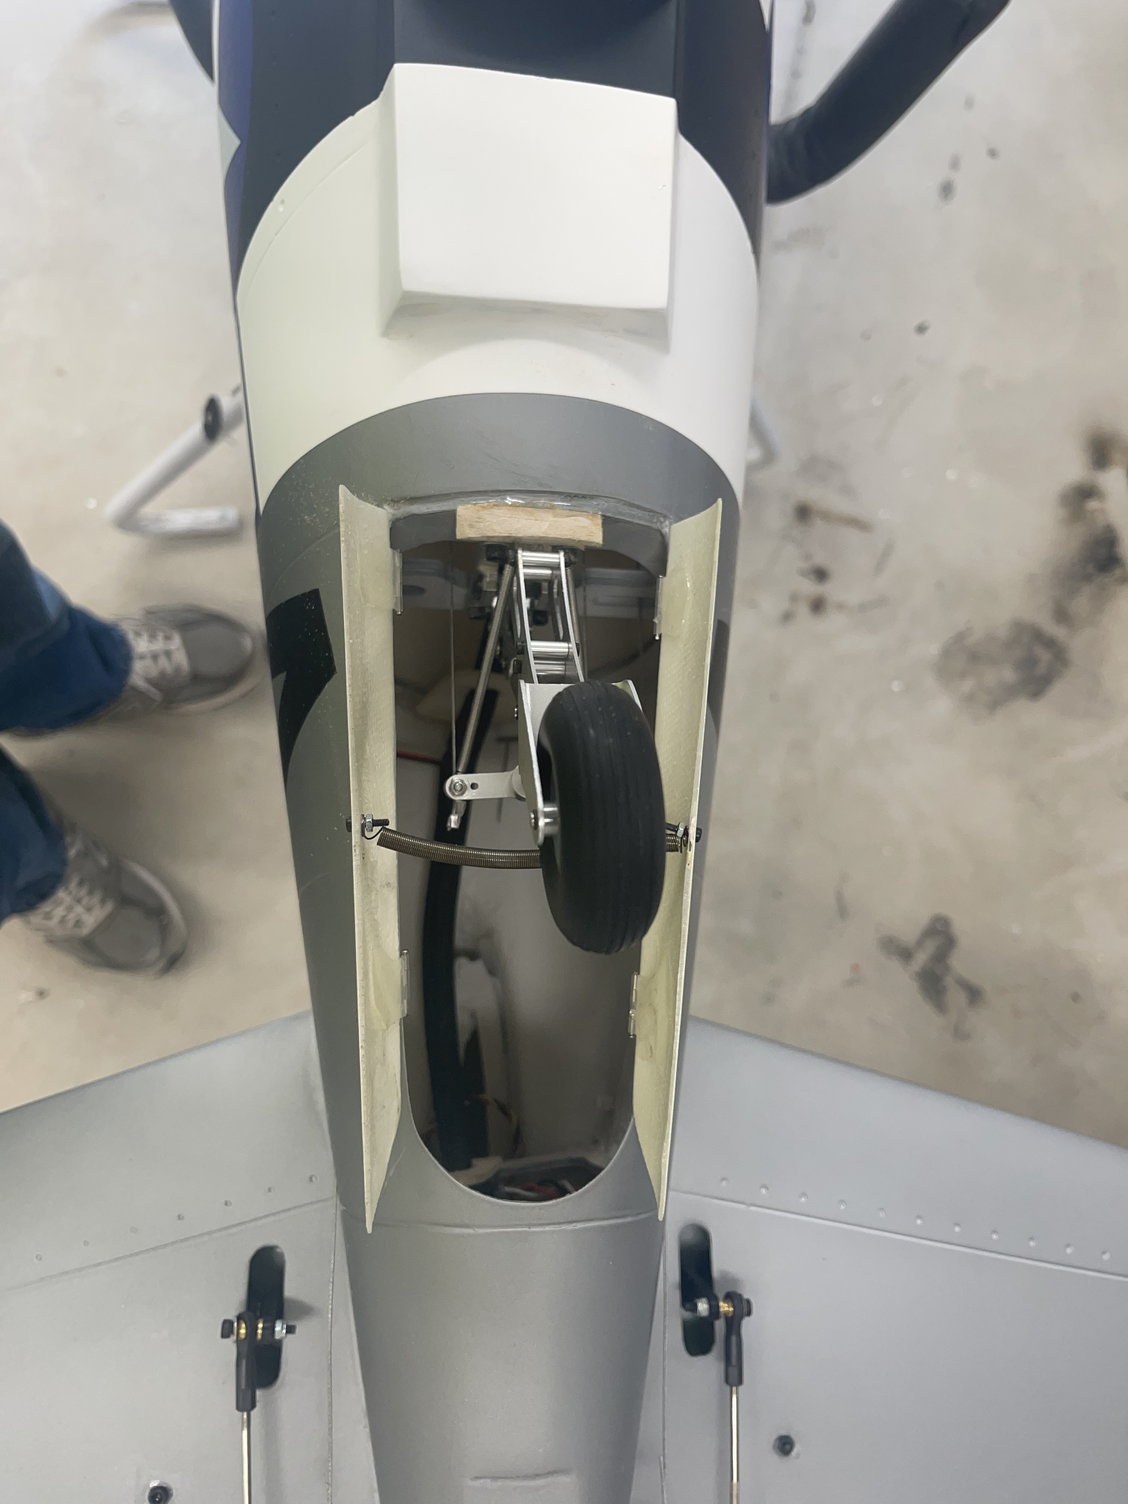
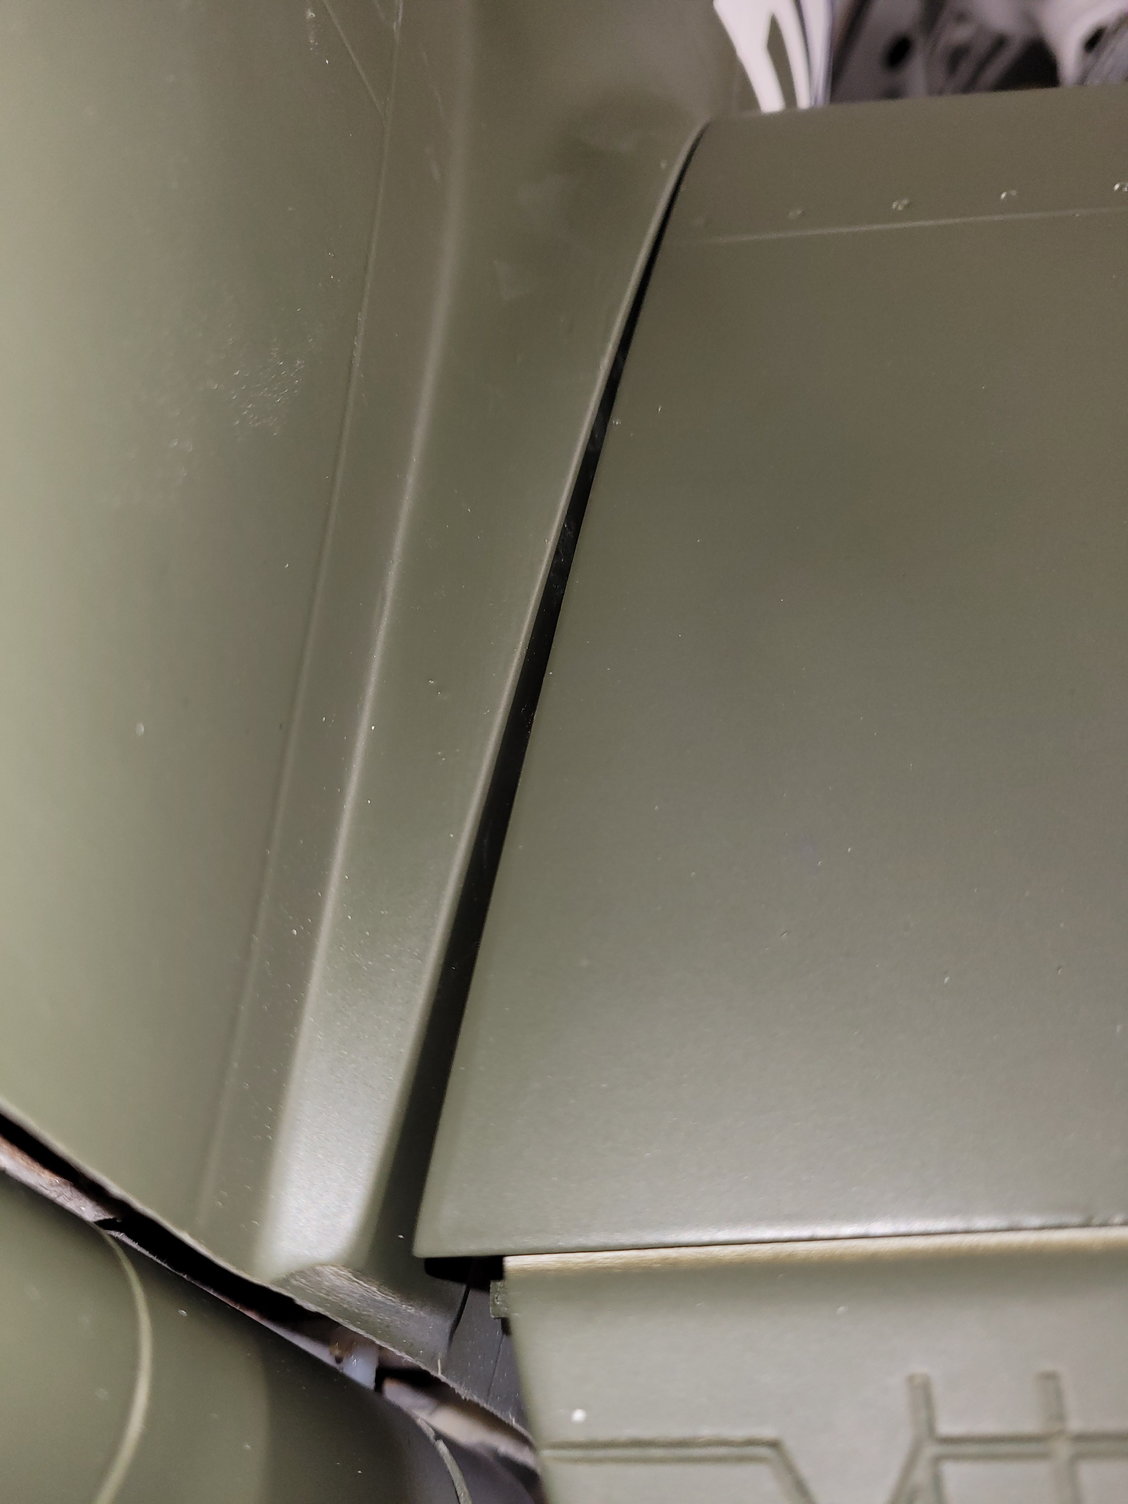
The tailwheel assembly bolted right up to the former with no issues. I ended up using some Dubro fittings to attach the wires to the control arms. There were two springs included in the hardware which I assumed were to be used on the tailwheel pull pull wires to the wires were taught regardless of the weight being placed on the tailwheel. In the past I had issues with this setup flying off our field with the springs being too soft you had limited ground control. I elected to skip the springs. The tailwheel door was another problem area. My door did not fit the opening very well. It was cut poorly and had over a 1/4'' gap all the way around the opening. I ended up putting a balsa block a the front of the tailwheel opening to act as a stop to keep the gear doors from falling into the opening. I'm not sure what hinges were supposed to be used for the gear doors but I ended up using a two Dubro flat hinges for each gear door. I then used a simple spring between the doors to actuate the doors.
I started on the fuse in my build. I kind of worked my way from the back to the front.
The horizontal stabs are built like most ARF's with the servo's internal in the stab. Unlike most ARF's the stabs do not fasten to the fuselage using mounting tabs. The underside of the stabs have a 3mm bolt that is threaded into the composite material and intended to capture the stab tube. The first thing I noticed was that those bolts were not a snug fit and given I'm using the DA85 I worried about them shaking loose. I don't intend to remove my stabs but didn't want to glue them to the fuse which would make it impossible to service the servo's. What I did was drill through the stab tube and tap the tube for a 3mm bolt so I could create a little more meat for the bolt to capture. I then siliconed the bolt into the stab. Hopefully this keeps the stabs attached!
The tailwheel assembly bolted right up to the former with no issues. I ended up using some Dubro fittings to attach the wires to the control arms. There were two springs included in the hardware which I assumed were to be used on the tailwheel pull pull wires to the wires were taught regardless of the weight being placed on the tailwheel. In the past I had issues with this setup flying off our field with the springs being too soft you had limited ground control. I elected to skip the springs. The tailwheel door was another problem area. My door did not fit the opening very well. It was cut poorly and had over a 1/4'' gap all the way around the opening. I ended up putting a balsa block a the front of the tailwheel opening to act as a stop to keep the gear doors from falling into the opening. I'm not sure what hinges were supposed to be used for the gear doors but I ended up using a two Dubro flat hinges for each gear door. I then used a simple spring between the doors to actuate the doors.
06-16-2023, 09:45 AM
#74
Knowing that this bird will require roughly 7lbs of nose weight I decided to beef up the firewall to better support the DA85 and provide a more solid surface for mounting weight. I cut out a 1/2" birch ply firewall which I epoxied and pinned to the existing firewall. I sanded the surface of the composite firewall to give the best possible adhesion. I used 1/4" hardwood dowels to pin the new firewall to the factory firewall. The additional firewall was treated in epoxy to seal it from fuel. I also used a 1 1/4" solid standoff for the motor. My experience with the DA85 is that its a shaker and not a good candidate for standard standoffs that you might use for some other motors. The motor is mounted at an angle to allow it to be encased completely in the cowl. I'm still working on an exhaust solution. A standard pitts muffler won't fit so I'm going to use and existing side mount exhaust. We'll have to see how that works out.
There is no provision for a throttle servo in the fuse formers. I used a standard servo box attached to the right side of the fuel tank floor with a 4/40 rod going to the carb. The ignition is located under the fuel shelf to protect it from heat. I used the supplied fuel tank as it seemed to be of reasonable quality. I decided that I would run a manual choke to cockpit area. The canopy is easy enough to remove so I'll simply use the pull rod to choke the engine. It avoids another servo and as it stands right now I have all 12 slots being used in the receiver. I also placed a TechAero IBEC on the fuel shelf for the ignition. Fuel fill will be via the cockpit with the vent line running to the firewall and exiting the engine cooling hole in the bottom of the cowl. The kit provides some hardwood blocks to put in the fuse where the cowl mounting fastners will go. The intent is you would use some screw to fasten the cowl to the fuse I guess? I doubled those blocks up and ran some epoxy and fiberglass tape over them to secure them to the fuse sidewall. My plan is to tap the blocks for 3mm bolts to secure the cowl to the fuse.
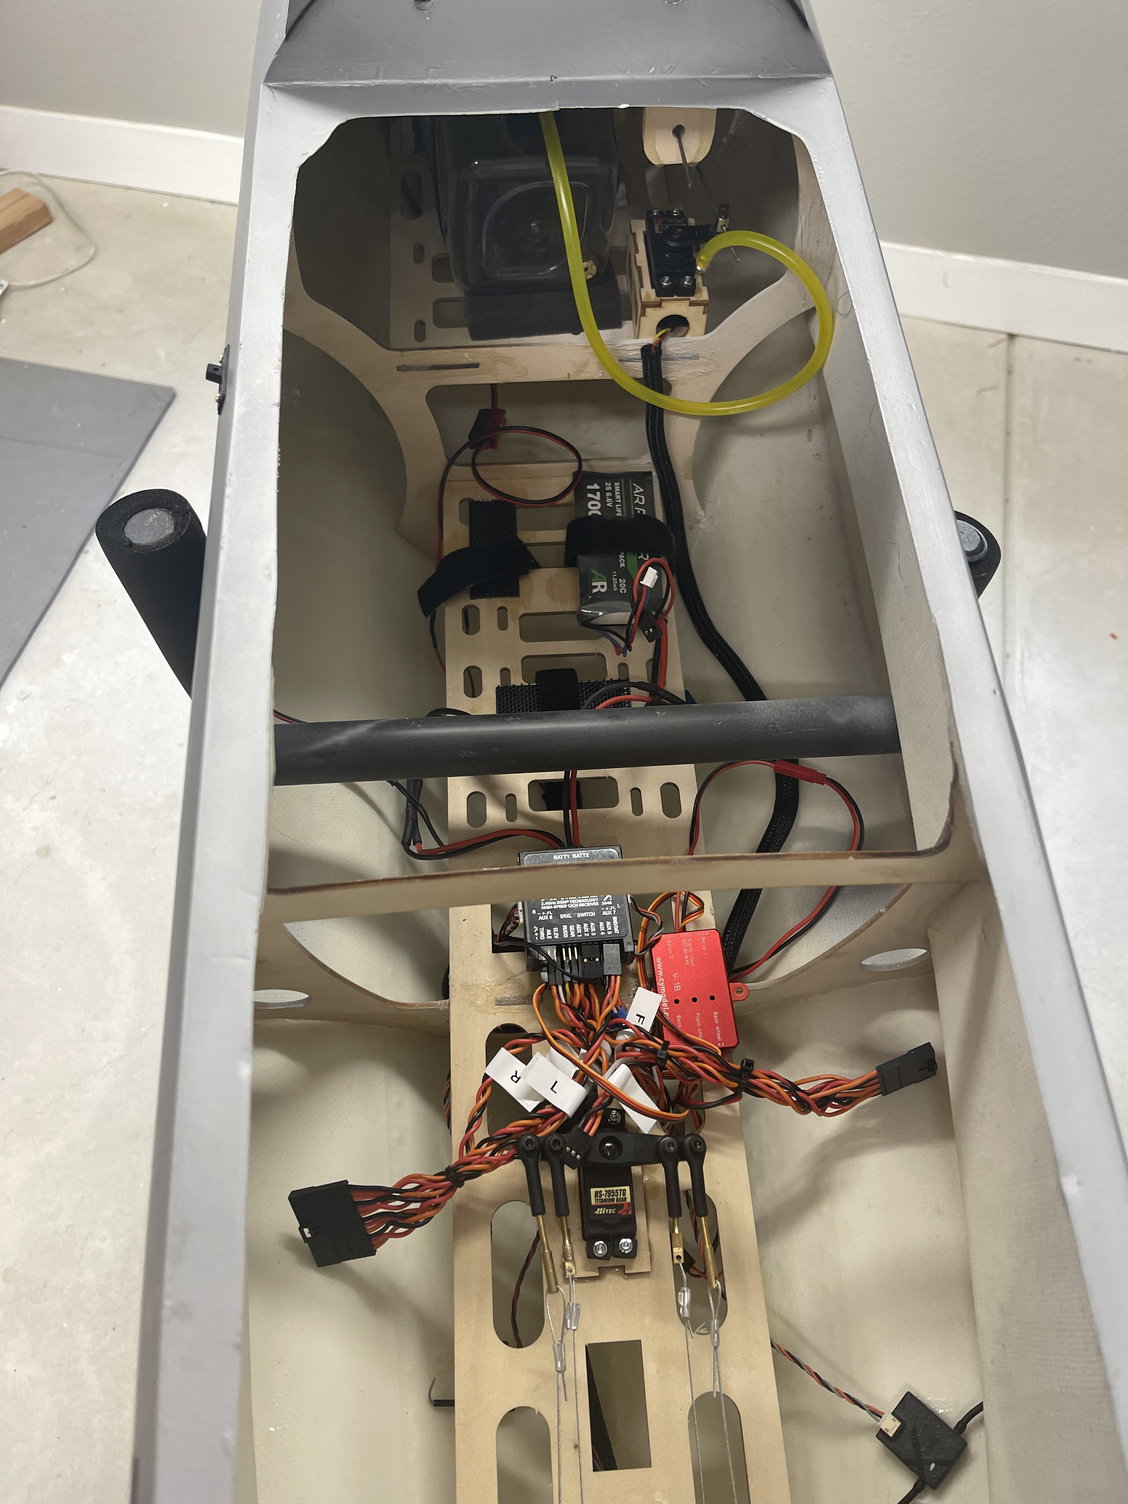
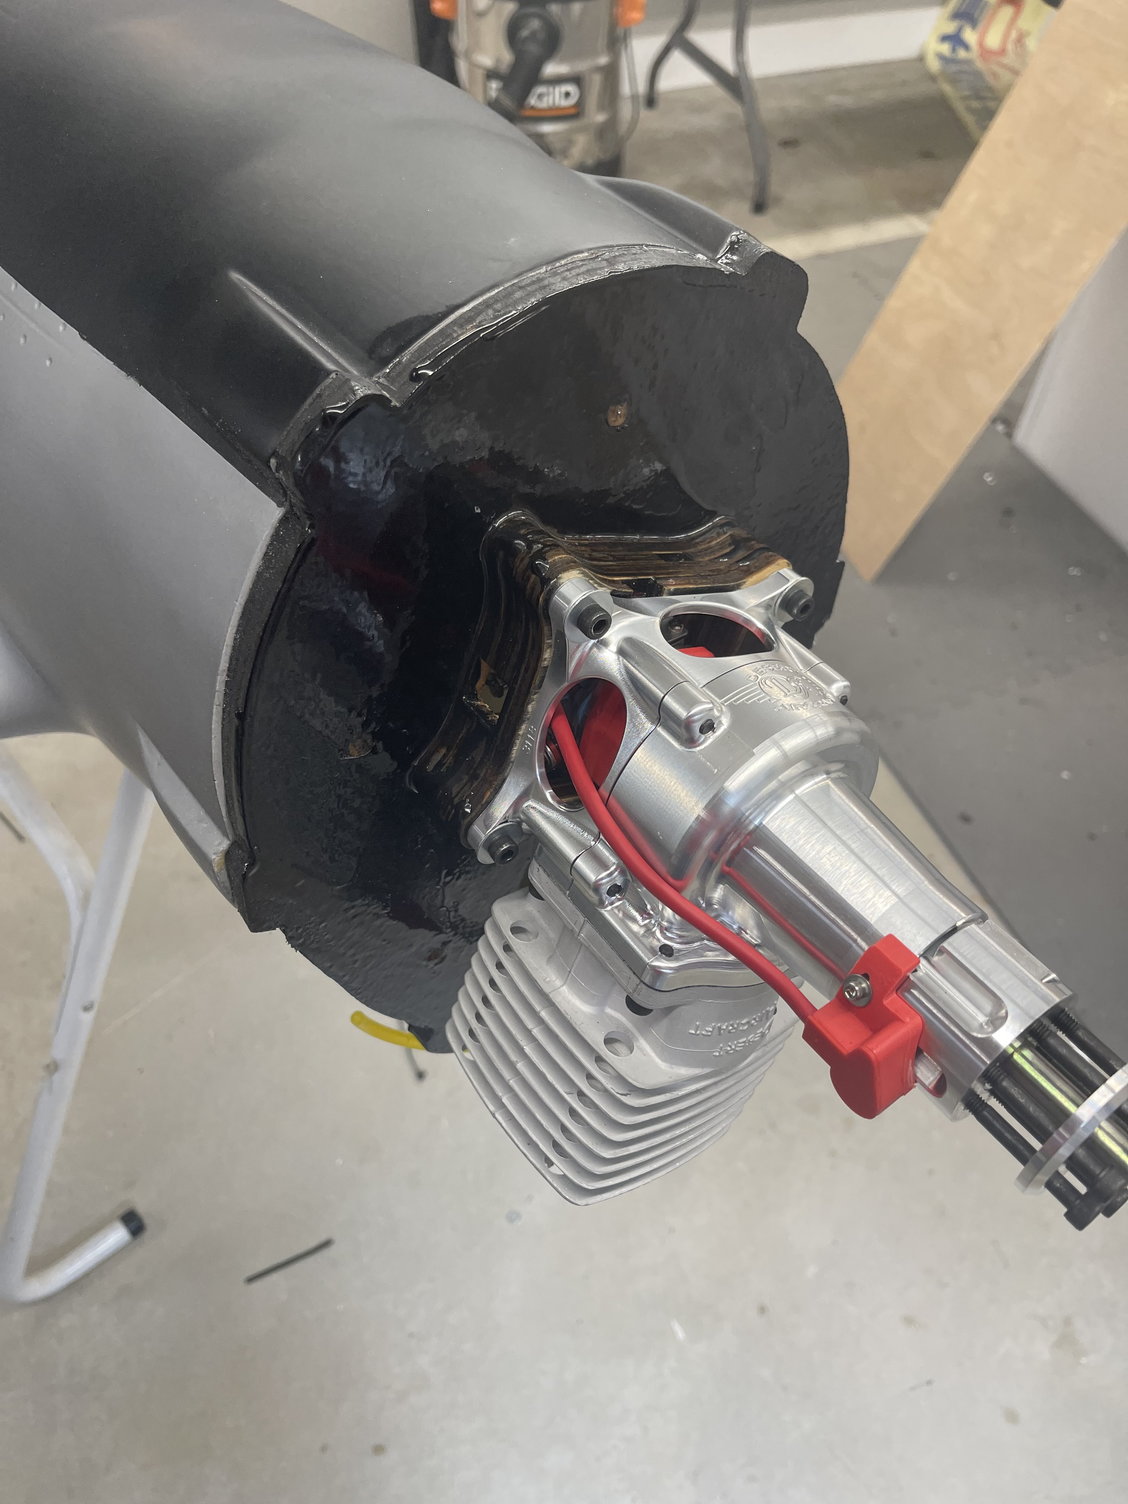
There is no provision for a throttle servo in the fuse formers. I used a standard servo box attached to the right side of the fuel tank floor with a 4/40 rod going to the carb. The ignition is located under the fuel shelf to protect it from heat. I used the supplied fuel tank as it seemed to be of reasonable quality. I decided that I would run a manual choke to cockpit area. The canopy is easy enough to remove so I'll simply use the pull rod to choke the engine. It avoids another servo and as it stands right now I have all 12 slots being used in the receiver. I also placed a TechAero IBEC on the fuel shelf for the ignition. Fuel fill will be via the cockpit with the vent line running to the firewall and exiting the engine cooling hole in the bottom of the cowl. The kit provides some hardwood blocks to put in the fuse where the cowl mounting fastners will go. The intent is you would use some screw to fasten the cowl to the fuse I guess? I doubled those blocks up and ran some epoxy and fiberglass tape over them to secure them to the fuse sidewall. My plan is to tap the blocks for 3mm bolts to secure the cowl to the fuse.
06-18-2023, 11:12 PM
#75
I tried to maiden the plane today but was having trouble with the radio. I also noticed that my right landing gear actuator motor is bad. First the tail gear and now the main. Also, the main gear strut cover was warped in the 75 degrees temperature with no sun. This is the 3D printed part so it can't take slightly warm temperature. I bent it back with the heat gun but I'm sure it will warp again.
Any one knows how to mount the bomb to the pylon? Do I need to drill a hole on the top side to drop the screw through?
Any one knows how to mount the bomb to the pylon? Do I need to drill a hole on the top side to drop the screw through?
Last edited by HiCurrent; 06-18-2023 at 11:14 PM.