


Top RC Zero from Gator R/C
 12-11-2015, 05:35 PM
#26

My Feedback: (5)
Join Date: Jan 2010
Location: vancouver, BC, CANADA
Posts: 131
Likes: 0
Received 0 Likes
on
0 Posts
yes dean ill agree i waited six months for this baby and it was really worth the wait. as per our flap discusion if got all the controll surfaces glued in and there perfect had do do a little work but thats part of the fun the flaps are glued in and holding strong that was my only concern didnt seem like much meet back there but used the old six 10 glue and no problems tomorrow installing the servos . ill do the same as hot rod and install the servos in the elevators instead of pushrods for easier transportation this suckers big dean need one of those transport cradels lol
 12-11-2015, 08:11 PM
#27
Thread Starter
Hey sal
Great to hear! Post some pics when you have a chance. Chris is working on the cradle design this weekend and should have them for guys to check out later next week.
We need to do some formation flying next year with these things! BTW Paul may be getting the P51! We can attack him together.....lol
D.W.
12-11-2015, 09:15 PM
#28
Senior Member
My Feedback: (3)
Join Date: Mar 2002
Location: Otis Orchards,
WA
Posts: 993
Likes: 0
Received 0 Likes
on
0 Posts
Well,
I have had a chance to look at Deans Zero and I have to say that I am pretty impressed. Packaging was absolutely top notch, far better than any multi thousand dollar jet aircraft I have built. Overall appearance is wonderful and most of all, the structural layout of critical structural components are well placed. Granted, there may be some cosmetic issues here and there but I am excited to get this beast started. The epoxy glass layup is very nice and light weight, not a lot of excess resin left to weigh her down. I do agree that the bottom of the fuse is a little flimsy but that will be rectified in the very near future with some support members. These will be key with the maintenance/support cradle that Dean and I are designing. Before replacing hinge points, I am going to do some testing to really validate that they need replacing. Anyway, I just wanted to say hi to the gang and am looking forward to working as a team with all of you to make this and all the aircraft top notch models!
Chris
12-11-2015, 09:17 PM
#29
Senior Member
My Feedback: (3)
Join Date: Mar 2002
Location: Otis Orchards,
WA
Posts: 993
Likes: 0
Received 0 Likes
on
0 Posts
Here is the plane on a universal stand that we crafted, there will be a custom one tailored to the Zero so that it may be safely transported, assembled and maintained.


12-12-2015, 07:04 AM
#31

My Feedback: (7)

Join Date: Oct 2003
Location: Edmonton,
AB, CANADA
Posts: 138
Likes: 0
Received 0 Likes
on
0 Posts
Hey sal
Great to hear! Post some pics when you have a chance. Chris is working on the cradle design this weekend and should have them for guys to check out later next week.
We need to do some formation flying next year with these things! BTW Paul may be getting the P51! We can attack him together.....lol
D.W.
Great to hear! Post some pics when you have a chance. Chris is working on the cradle design this weekend and should have them for guys to check out later next week.
We need to do some formation flying next year with these things! BTW Paul may be getting the P51! We can attack him together.....lol
D.W.
Looks like the Zero has some nice detail on the glass work. Should be a nice flying airplane.
12-12-2015, 08:51 AM
#32
Join Date: Aug 2006
Location: Austin, TX
Posts: 6
Likes: 0
Received 0 Likes
on
0 Posts
Hi Guys,
I'm new to RCU, and am really glad to see this thread. I received my Zero from Mike a couple of weeks ago, and I haven't even unboxed it yet. I'm ordering parts and making space in the garage to work on it. I should start assembling mine next weekend. I'm not a great builder / assembler, so I'm really looking forward to learning from some of you that are ahead of me. Also looking forward to some flight reports.
Looks like several of us are going with the EME 70 twin. I'm waiting for Mile High RC to get them back in stock.
Dean and Chris, I too will be interested in some of your products. Especially the maintenance / support cradle.
Martin
12-12-2015, 09:08 AM
#33
My Feedback: (5)
Join Date: Jan 2010
Location: vancouver, BC, CANADA
Posts: 131
Likes: 0
Received 0 Likes
on
0 Posts
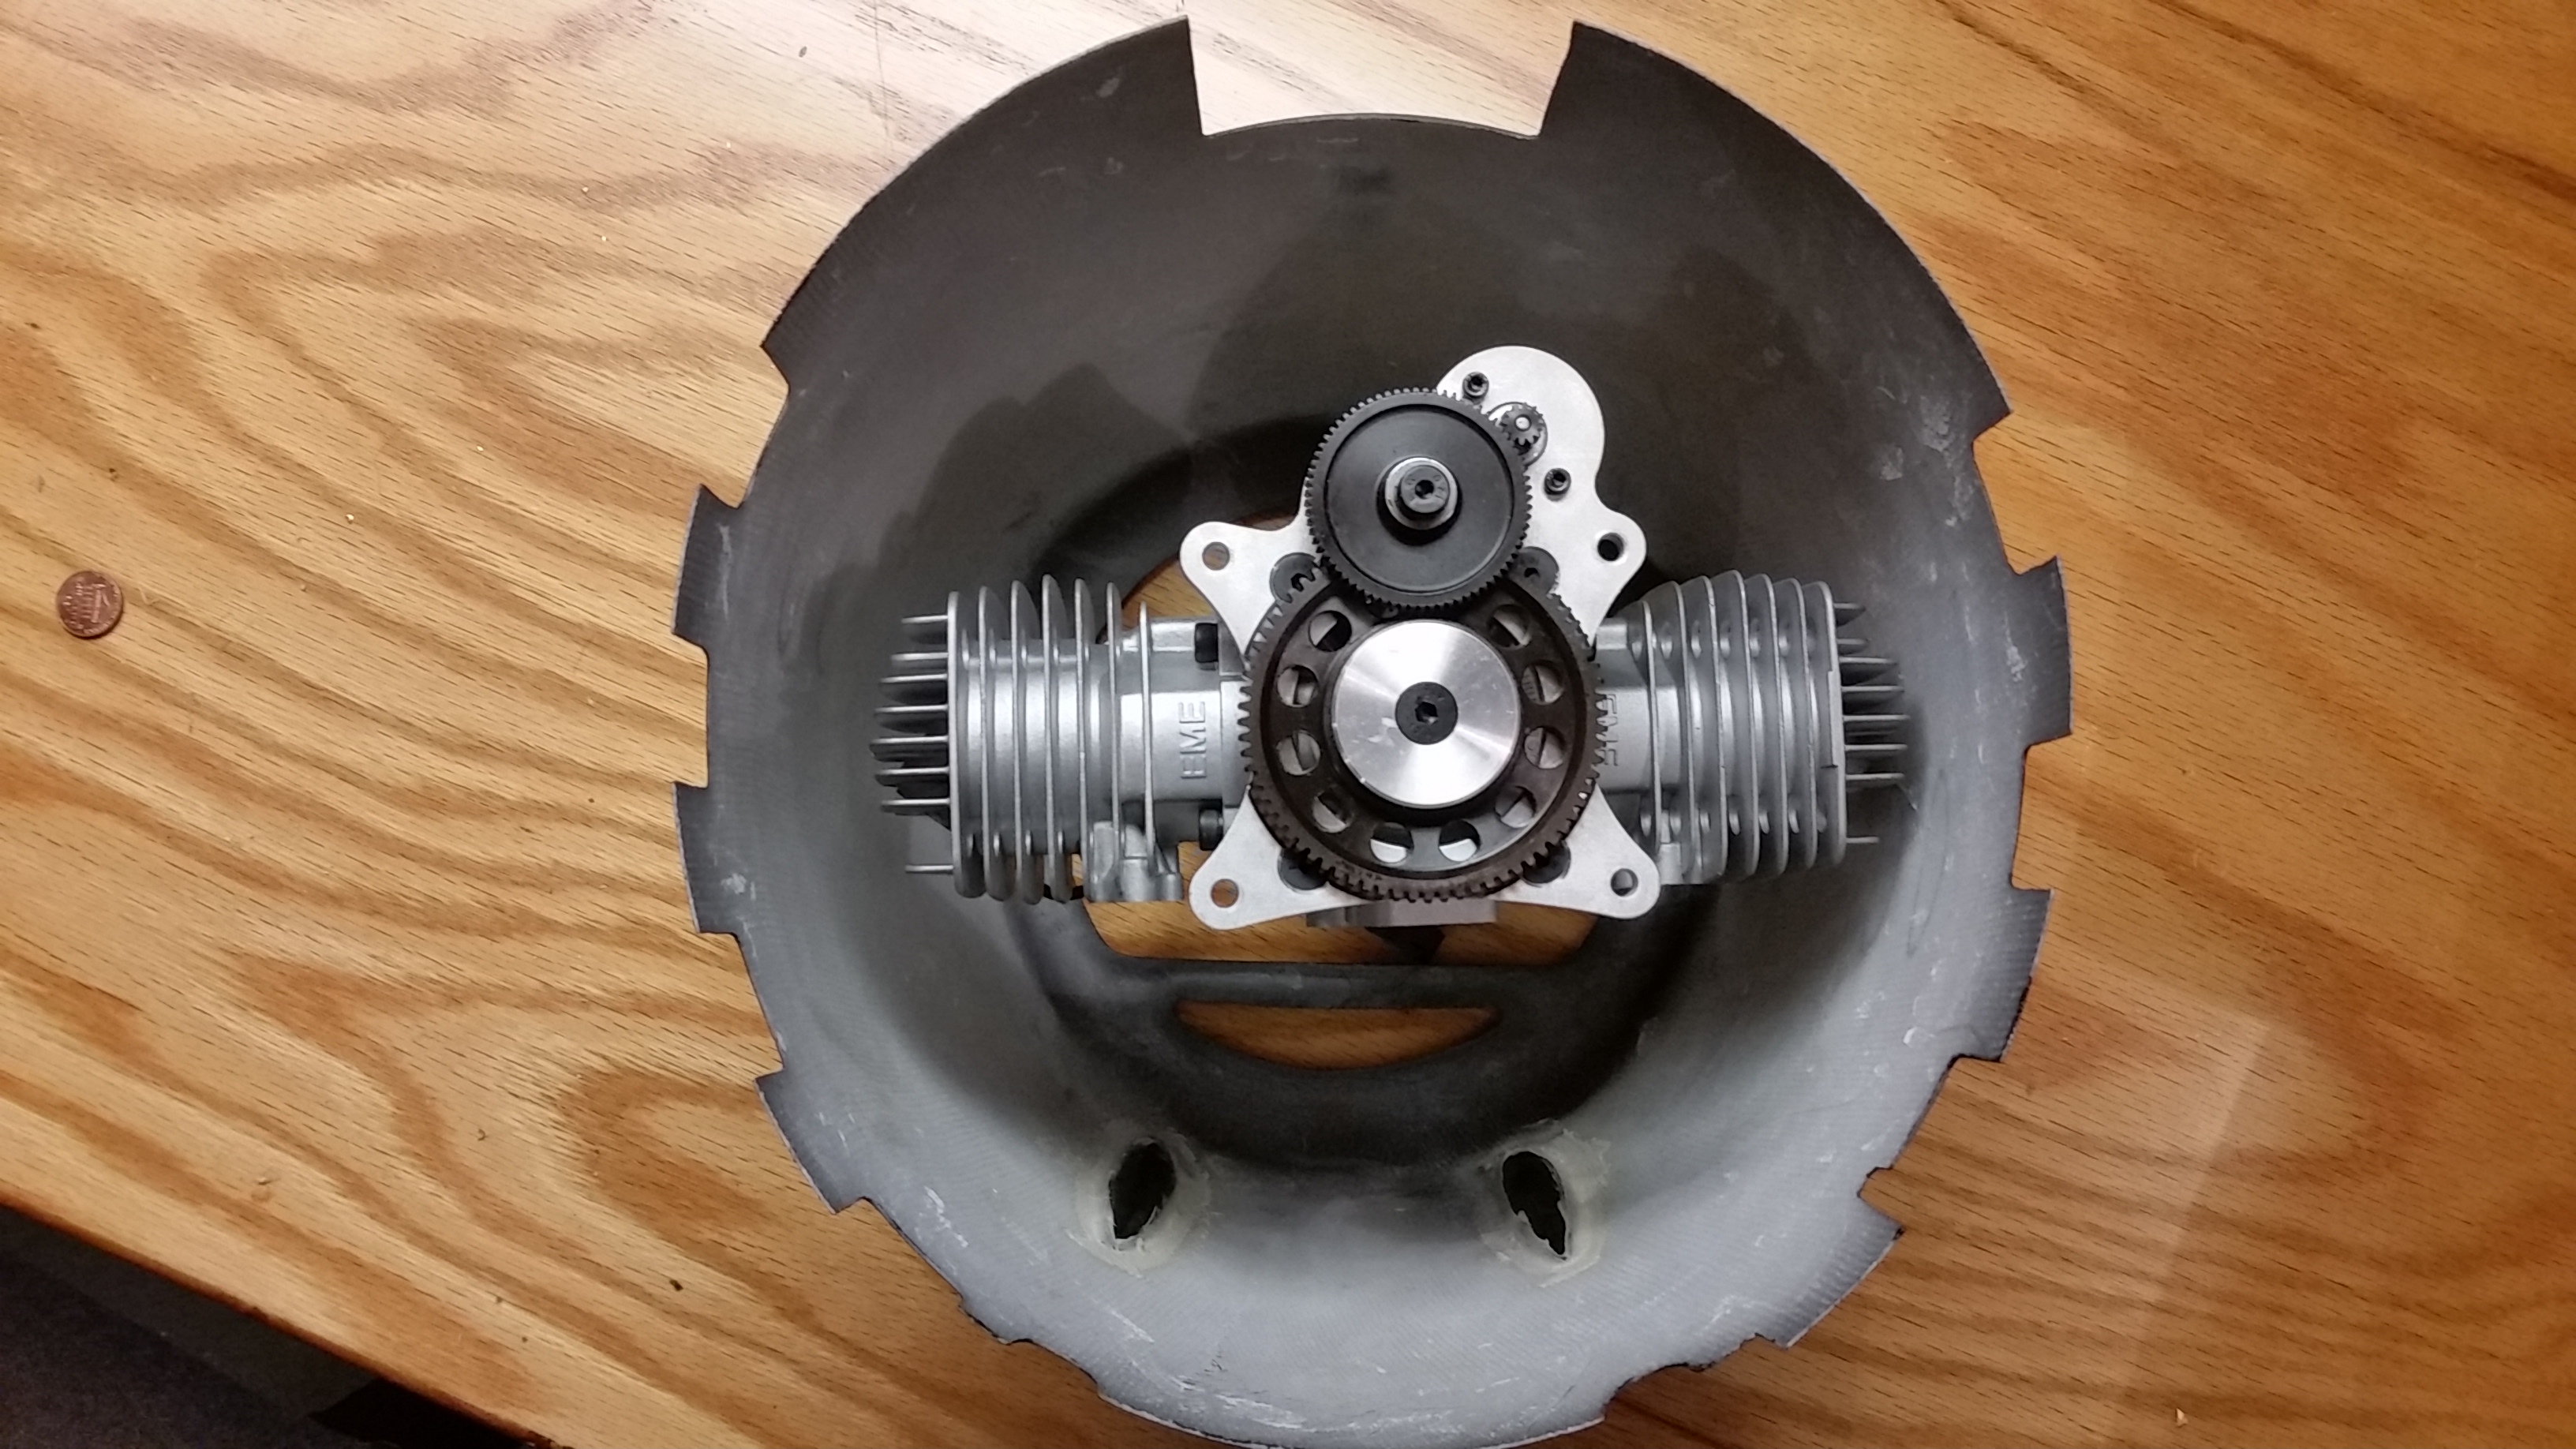
stratotanker the engine your going to be using the eme70 will the cowl need to be cut for the sparkplug boots ? i would like to get something that would fit in and not reqire anything sticking out a friend of mine is bringing over the saito 84 radial ill report back and see how it fits so far the one that does fit in neatly is the evo 77 radial but nitro yuck at almost 50 bucks a gallon here on the coast ill pass might try and take off the valve covers of the saito might give me the room i need .
12-12-2015, 09:41 AM
#34
My Feedback: (7)
Join Date: Oct 2003
Location: Edmonton,
AB, CANADA
Posts: 138
Likes: 0
Received 0 Likes
on
0 Posts
The Evo is a sweet running engine. One of the locals is using one and I am very impressed. I am not sure that the power would be suficent for this model. As to the price of the fuel, it is likely the lessor expense on a project like this. Lots of choices for a power plant. Really hard to pick one, but twins are very appealing because of the vibration issues with the larger gas jobs. In addition to adequate power, I would be looking to reliability above everything.
12-12-2015, 10:32 AM
#35
Thread Starter
Good to see you here Bruce. I still have my H9 Spitfire in the box. Looking at electrifying it though! I'll at least have something for the Edmonton event next year!
Its been my experience that any single over 50 - 55 cc becomes quite destructive on a scale airframe. The vibration causes all sorts of issues so I have been using twins recently and I am amazed as to how well they run and the low vibration benefits. I like the 4 stroke / radial option but just can't justify the cost and going back to nitro. The other reason I chose the EME 70 twin with the electric start is that this is a short nosed warbird. Its going to need a lot of weight up in the nose - so the EME package is at least useable weight.
My thinking anyway.....we'll see
D.W.
Last edited by Helijet; 12-12-2015 at 04:04 PM.
12-12-2015, 01:50 PM
#36
Senior Member
My Feedback: (3)
Join Date: Mar 2002
Location: Otis Orchards,
WA
Posts: 993
Likes: 0
Received 0 Likes
on
0 Posts
stratotanker the engine your going to be using the eme70 will the cowl need to be cut for the sparkplug boots ? i would like to get something that would fit in and not reqire anything sticking out a friend of mine is bringing over the saito 84 radial ill report back and see how it fits so far the one that does fit in neatly is the evo 77 radial but nitro yuck at almost 50 bucks a gallon here on the coast ill pass might try and take off the valve covers of the saito might give me the room i need .
 12-12-2015, 05:13 PM
#40
Senior Member
My Feedback: (3)
Join Date: Mar 2002
Location: Otis Orchards,
WA
Posts: 993
Likes: 0
Received 0 Likes
on
0 Posts
Interesting question! I would have to research if that was possible, I know that a thread adapter would be needed, easily made on the lathe though.
Chris
Chris
12-12-2015, 06:26 PM
#41
My Feedback: (7)
Join Date: Oct 2003
Location: Edmonton,
AB, CANADA
Posts: 138
Likes: 0
Received 0 Likes
on
0 Posts
Talk to C&H electronics. They have the adapters and could also provide information on the use of the smaller plugs. I have used them with methonal fuels with no problems and have seen them used successfully with gasoline as well.
12-12-2015, 07:01 PM
#42
My Feedback: (5)
Join Date: Jan 2010
Location: vancouver, BC, CANADA
Posts: 131
Likes: 0
Received 0 Likes
on
0 Posts
bruce i got a buddy thats selling a saito450 its nitro but tons of power for this plane the overall dimension i think is 9 1/2 inches wich is just about what the cowl is i was thinking of taking off the valve covers do u think it would give me the room i gota have a radial in this puppy
12-13-2015, 07:43 AM
#43
My Feedback: (7)
Join Date: Oct 2003
Location: Edmonton,
AB, CANADA
Posts: 138
Likes: 0
Received 0 Likes
on
0 Posts
bruce i got a buddy thats selling a saito450 its nitro but tons of power for this plane the overall dimension i think is 9 1/2 inches wich is just about what the cowl is i was thinking of taking off the valve covers do u think it would give me the room i gota have a radial in this puppy
12-13-2015, 09:03 AM
#44
Thread Starter
So, in a moment of weakness I ordered the man behind the sticks....
BEST PILOTS - Saburo Sakai 1/5 scale WWII Japanese Pilot PAINTED
Should look good in the office!
Dean
BEST PILOTS - Saburo Sakai 1/5 scale WWII Japanese Pilot PAINTED
Should look good in the office!
Dean
12-14-2015, 06:49 AM
#46

I've started to build, and as I mentioned I will try to post as much as I can. I've built a lot of planes, so I have certain ways I do things that may be different than some. I'll be addressing things as I find them, and will post my solutions.
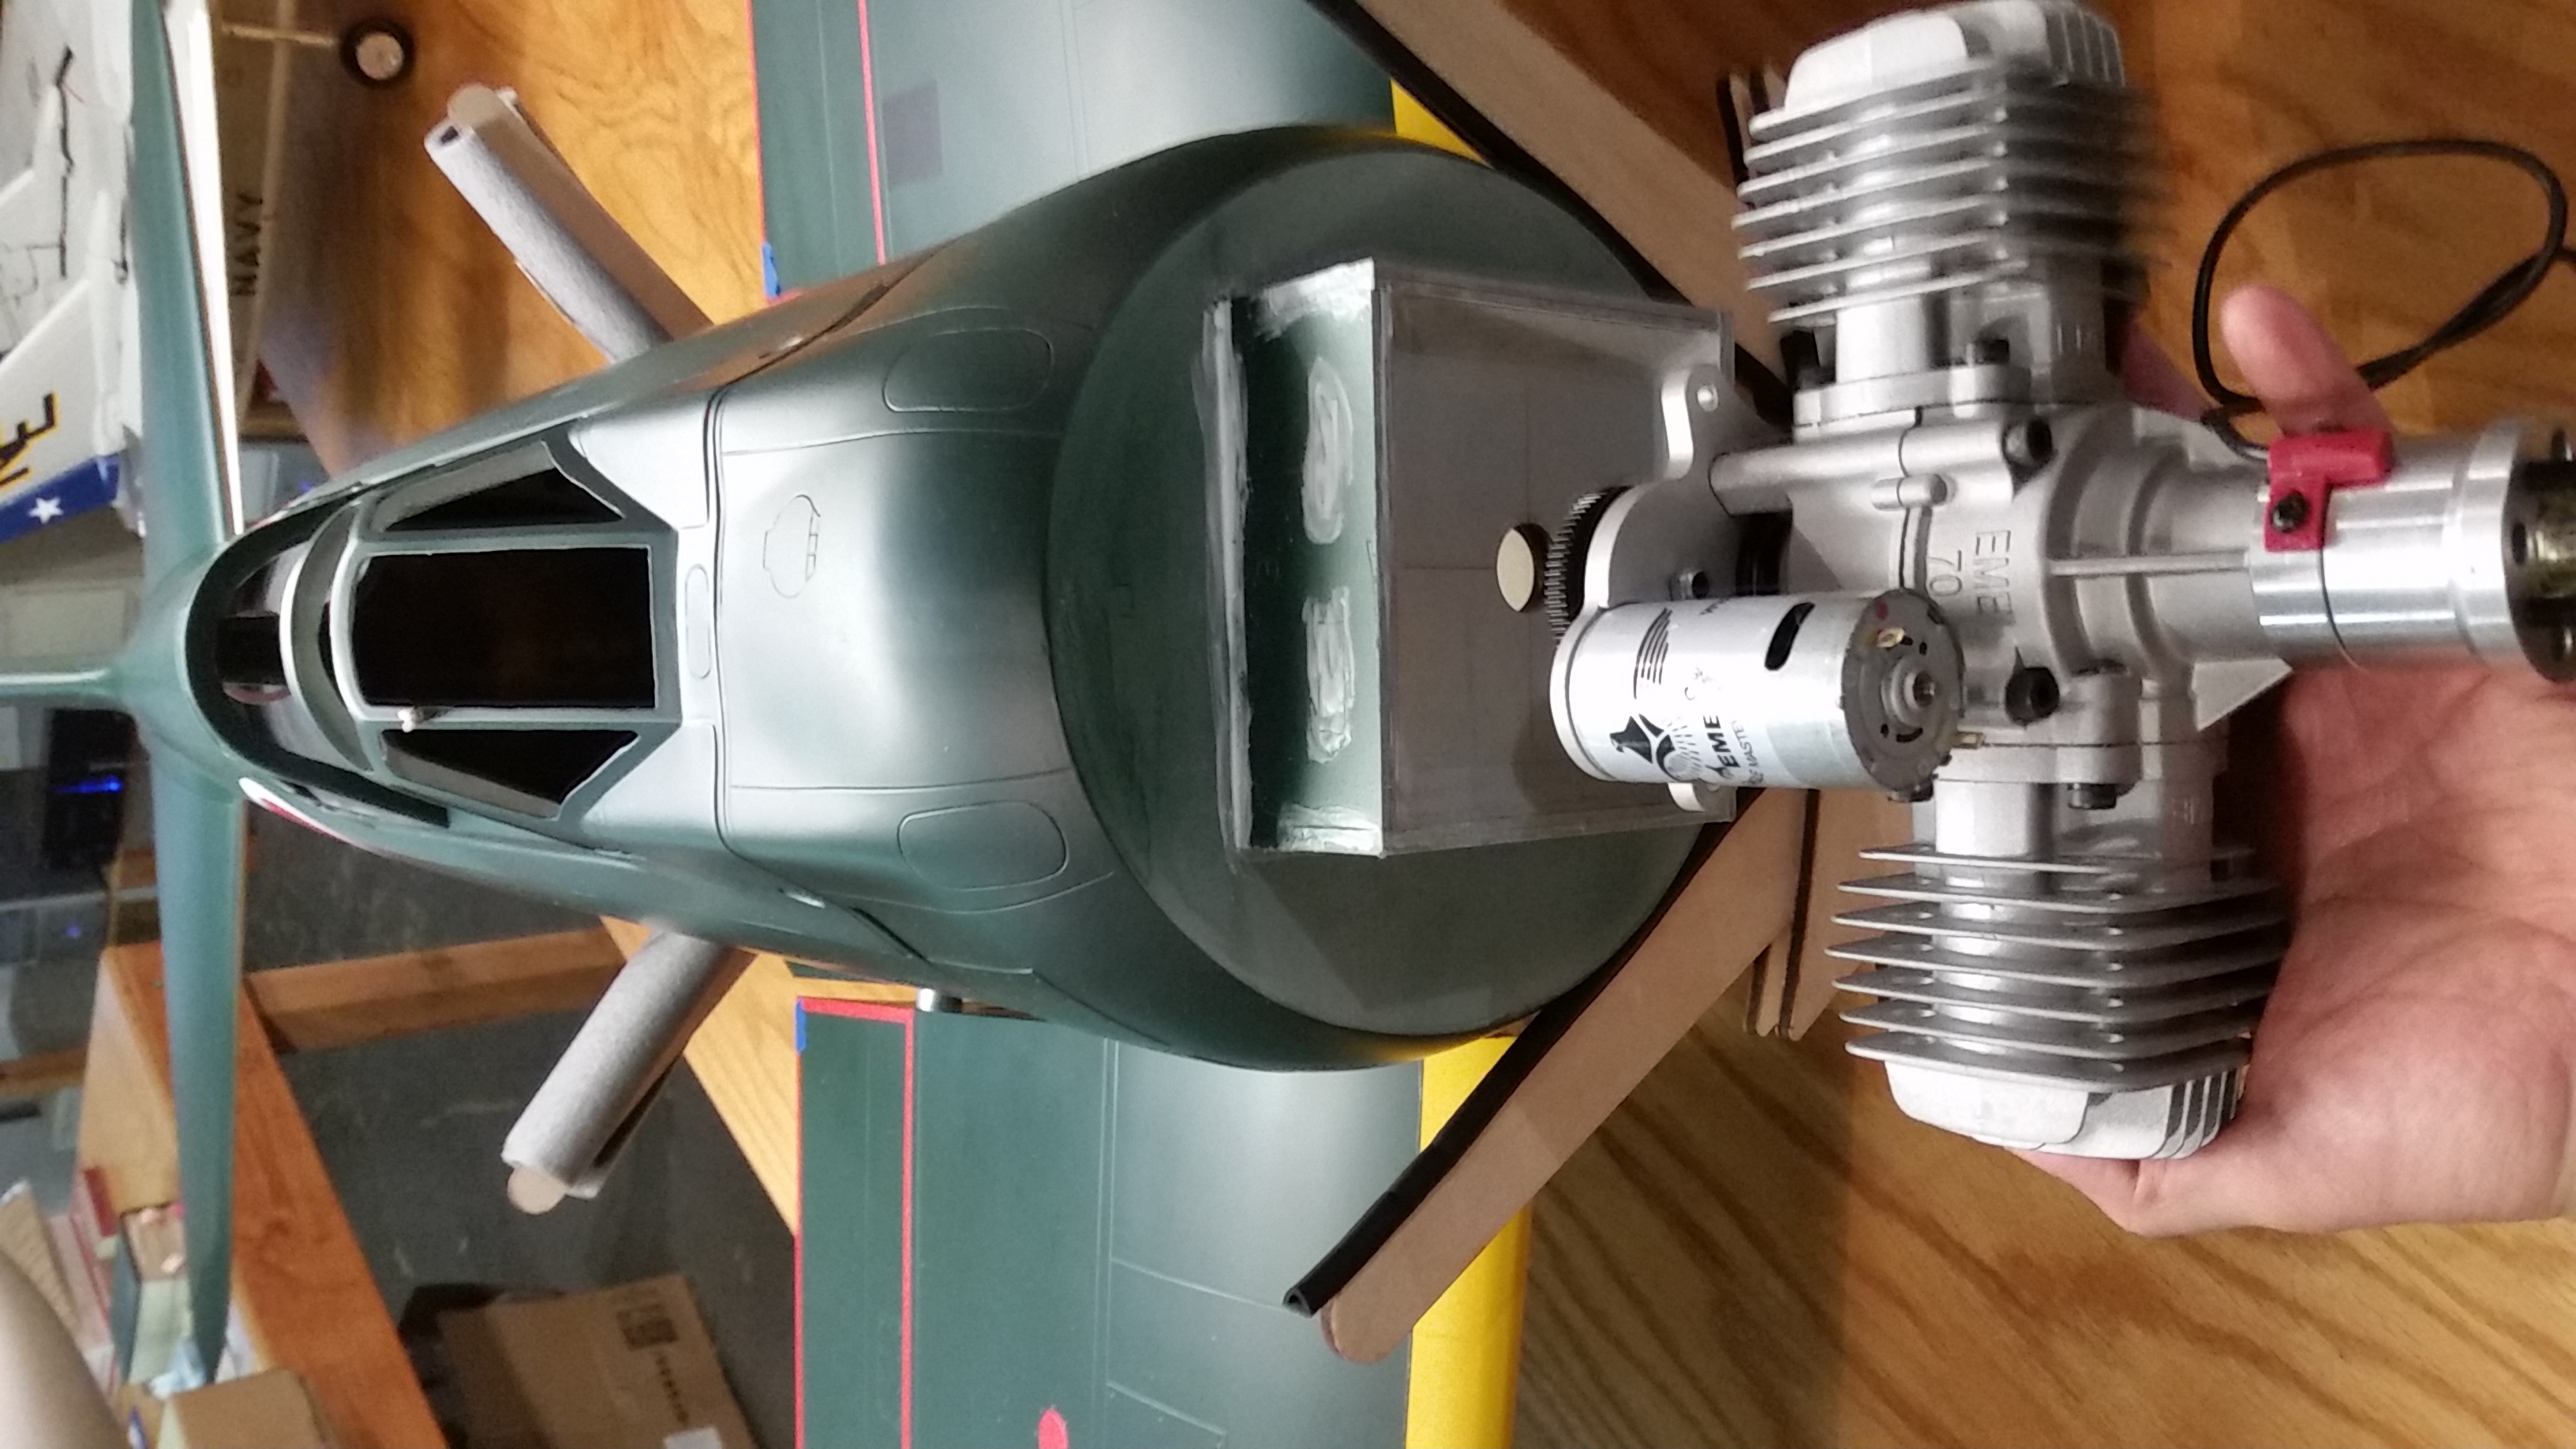
My build will use the EME-70cc twin. As some mentioned, the cowl will need just a bit of cutting to clear the plug boots. I'll paint the boots black and not worry about it. I'd rather keep the CM-6 style NGK plugs that I know will run well vs. swap to the tiny plugs that are unfamiliar to me. I've seen how much they stick out on the prototype, and I think it will look fine.
I'll be doing some work to improve the scale look of the plane. This will include some cockpit mods, scheme change, and any other steps I notice that would help the scale appearance. Most of this will be towards the end of the build, but I'll be hitting odds and ends as I go. My friend has a Best Pilots Saburo Sakai, so I'll be able to do a test fit. If he fits well enough I'll get one.
Here's the scheme I'll be doing. So let's get started!
Last edited by Hot Rod Todd; 12-14-2015 at 08:40 AM.
12-14-2015, 07:11 AM
#47
First off I will not be following the exact order of the instructions. Sometimes it's easier to do things in a certain order, but in some cases I just decide I want to work on one piece before another. I'll try not to jump around too much.
First thing I decided to do was glue the Control horns onto the surfaces. These horns appear to be well made and are much like many of the jet ARF's out there.
I decided to use 4-40 Dubro ball links instead of the stock ones. I don't think the stock ones would be a problem, just personal preference. The Dubro use a larger screw, so the first thing I had to do was drill out the horns to accept them. Still seems to be plenty of beef for them to be a very strong set up.

I then roughed up the surface to give the glue some help. I checked all of the slots in the surface to make sure they were ready. It took a bit of digging with an X-acto, but they weren't too bad. I noticed the spacing was not always the same between the dual slots.

I used Hysol Glue for this step. There is nothing better for gluing glass. It's not cheap, but it's the best.

Once I made sure the horns would all slide in I was ready to glue. A couple needed to be trimmed just a bit to make sure they would drop down all the way into the surface. I used the 4-40 bolts and put a ball link between two first, that way I could make sure the spacing was right as the glue dried. Also it's a good idea to align the two surface to make sure you have the same offset and hit the hinge line properly. The instructions show putting tape on the surface, but I found that I could do better without. I kind of like the bead of glue that forms when I stick them into the slots. Just take your time, and make sure you have some paper towels and alcohol handy in case you get glue on the nice paint job. Here's a photo of the horns glued in and set aside to cure.

Once they dried, I removed all of the ball links and decided to paint the horns. Testors Japan Navy Sky Gray is a good match, at least in areas without the green over spray. I'll match the paint perfectly later and take care of that over spray during the detailing process.

First thing I decided to do was glue the Control horns onto the surfaces. These horns appear to be well made and are much like many of the jet ARF's out there.
I decided to use 4-40 Dubro ball links instead of the stock ones. I don't think the stock ones would be a problem, just personal preference. The Dubro use a larger screw, so the first thing I had to do was drill out the horns to accept them. Still seems to be plenty of beef for them to be a very strong set up.
I then roughed up the surface to give the glue some help. I checked all of the slots in the surface to make sure they were ready. It took a bit of digging with an X-acto, but they weren't too bad. I noticed the spacing was not always the same between the dual slots.
I used Hysol Glue for this step. There is nothing better for gluing glass. It's not cheap, but it's the best.
Once I made sure the horns would all slide in I was ready to glue. A couple needed to be trimmed just a bit to make sure they would drop down all the way into the surface. I used the 4-40 bolts and put a ball link between two first, that way I could make sure the spacing was right as the glue dried. Also it's a good idea to align the two surface to make sure you have the same offset and hit the hinge line properly. The instructions show putting tape on the surface, but I found that I could do better without. I kind of like the bead of glue that forms when I stick them into the slots. Just take your time, and make sure you have some paper towels and alcohol handy in case you get glue on the nice paint job. Here's a photo of the horns glued in and set aside to cure.
Once they dried, I removed all of the ball links and decided to paint the horns. Testors Japan Navy Sky Gray is a good match, at least in areas without the green over spray. I'll match the paint perfectly later and take care of that over spray during the detailing process.
12-14-2015, 07:27 AM
#48
Next I decided to hinge the surfaces. I found that the Robart 3/16" hinge points are pretty much the same exact size. If you look at the Robarts, they have a stronger rivet, and are quite a bit tighter than the stock ones. It's not a lot of extra expense for such a critical component. The stockers might work fine, but once again I'll go with what I trust.

I'll be using some Z-poxy 30-minute epoxy to glue in the hinges. Make sure you use 30 minute or more for this step, and I would only mix up enough for one area. You don't want it to harden in the middle of the process.
First check fit all the hinges. You'll notice that some have to be shortened a bit due to the horiz. stab tube or the end of the elevator. Get everything to fit before you even mix up the glue. Have your paper towels and alcohol ready so you can wipe off any glue that gets on the paint.
The instructions show some type of tube on the hinges, then say to cut it out. I'll be using my method with vasoline. Apply vasolene to all of the hinge points hinging area. Be careful not to get any on the glue surface of the hinge point. Then I mix up the glue. The key here is to get plenty of glue inside the pockets, but don't have a bunch gushing out all over the place. I first put a bunch in each hinge holes, both sides.

Then put a layer of epoxy on one side of the hinge point. I then feed it into the stationary surface, using a bit of twisting action to try to work the glue down into the hole. Once all of the hinges are in for that surface, I put some glue on the other side of the point and slide the movable surface into the hinges. Once it's down all the way, make sure you move the surface the desired throw amount, and maintain alignment. At this point I set it aside and do the others.
After about 30 minutes I go back and check each surface. Make sure it moves free and still has the alignment and movement that I want. Also a good time to look for any "shiny" areas on the paint that can be wiped off with alcohol. After about another hour I'll check again to make sure they move freely. Normally you don't have to dig out any epoxy from the hinge areas if you used the correct amount of glue.


My hinge mounts were very well done. There was some slight mis-alignment where the surface might be a bit towards one side or the other, but nothing to worry about. They were drilled better than I usually do if I do it myself. Very happy with the hinging on my Zero. I'll be doing the flaps next.
I'll be using some Z-poxy 30-minute epoxy to glue in the hinges. Make sure you use 30 minute or more for this step, and I would only mix up enough for one area. You don't want it to harden in the middle of the process.
First check fit all the hinges. You'll notice that some have to be shortened a bit due to the horiz. stab tube or the end of the elevator. Get everything to fit before you even mix up the glue. Have your paper towels and alcohol ready so you can wipe off any glue that gets on the paint.
The instructions show some type of tube on the hinges, then say to cut it out. I'll be using my method with vasoline. Apply vasolene to all of the hinge points hinging area. Be careful not to get any on the glue surface of the hinge point. Then I mix up the glue. The key here is to get plenty of glue inside the pockets, but don't have a bunch gushing out all over the place. I first put a bunch in each hinge holes, both sides.
Then put a layer of epoxy on one side of the hinge point. I then feed it into the stationary surface, using a bit of twisting action to try to work the glue down into the hole. Once all of the hinges are in for that surface, I put some glue on the other side of the point and slide the movable surface into the hinges. Once it's down all the way, make sure you move the surface the desired throw amount, and maintain alignment. At this point I set it aside and do the others.
After about 30 minutes I go back and check each surface. Make sure it moves free and still has the alignment and movement that I want. Also a good time to look for any "shiny" areas on the paint that can be wiped off with alcohol. After about another hour I'll check again to make sure they move freely. Normally you don't have to dig out any epoxy from the hinge areas if you used the correct amount of glue.
My hinge mounts were very well done. There was some slight mis-alignment where the surface might be a bit towards one side or the other, but nothing to worry about. They were drilled better than I usually do if I do it myself. Very happy with the hinging on my Zero. I'll be doing the flaps next.
12-14-2015, 07:39 AM
#49
Hopefully the expert builders are not getting bored with the detail I'm providing. I took a detour and was messing with the tail wheel retract. I found a nice looking wheel (stock one is bad) that looks the part. The scale Zero tail wheel for carrier use was very small (5.75" diameter) solid rubber. My 1.75" diameter wheel is bigger than scale, but will provide better ground handling. I don't know what the wheel is, I had it in a box and it's off of some ARF. If I had to buy one I'd use the 1.5" Dubro. I might end up with one of those if my foamy wheel is not durable. It looks the part as well.

For the retract servo I used a Hitec HS-5087MG, light and powerful as well as programmable. You'll notice the hole in the mount is very long and thin, nothing really matches it. So I had to build up some wood on the one end to shorten the hole. Since the 5087 is a digital servo, I could bump up the travel using a programmer. This allows the horn to rotate farther, and come closer to locking out, thus reducing stress that the servo sees in the down locked or up position. I used a 2-56 threaded rod and some linkage to hook it up. Slowed it down a bit with my radio, and set the end points. Here's how it looks in the full down and full up positions.


Post if you have questions, I'll have more soon.
For the retract servo I used a Hitec HS-5087MG, light and powerful as well as programmable. You'll notice the hole in the mount is very long and thin, nothing really matches it. So I had to build up some wood on the one end to shorten the hole. Since the 5087 is a digital servo, I could bump up the travel using a programmer. This allows the horn to rotate farther, and come closer to locking out, thus reducing stress that the servo sees in the down locked or up position. I used a 2-56 threaded rod and some linkage to hook it up. Slowed it down a bit with my radio, and set the end points. Here's how it looks in the full down and full up positions.
Post if you have questions, I'll have more soon.
12-14-2015, 02:46 PM
#50
Thread Starter
Very informative and a great supplement to the on line manual - thank you. Finding the right paint for touch up is always a challenge on arfs. Great to see Testors is a match.
D.W.
D.W.