


CMP Zero Makeover
 05-13-2013 | 07:24 AM
#426


My Feedback: (1)
ORIGINAL: cswann821
Hello all,
do you think the newer DLE 55RA would be a better fit having the rear exhaust ? Deciding between this one or the side version.
http://www.troybuiltmodels.com/items/DLE55RENGINE.html
Sorry about the repost
Hello all,
do you think the newer DLE 55RA would be a better fit having the rear exhaust ? Deciding between this one or the side version.
http://www.troybuiltmodels.com/items/DLE55RENGINE.html
Sorry about the repost
Casey
 05-13-2013 | 07:32 AM
#427
My Feedback: (1)
Joe,
Sorry about the gear issues, good to know though, thank you. I have all the electronics installed. The motor is the last thing to go in before it's ready to balance. I've ordered the second set of 6000 MAH 6 cell lipo batteries. For the first time, I'm going to try running four sets of batteries. Two sets of batteries will be wired in parallel. Then the four batteries will be wired in series. This effectively will double my flight times, I should be able to get between 10 to 12 minutes per flight, maybe more as the 65cc equivalent is way to much, and should allow me to be rather gentile on the throttle. I can hopefully can balance the plane with the use of the four battery packs, and not have to add any deadweight. We'll see.
Casey
05-13-2013 | 11:20 AM
#428
My Feedback: (1)
Well, a little progress made. I've "faded out" the rear upper area of the fuse, bringing it down the sides just abit. I've also started messing with the panel lines, and weathering of the horizontal. I started by using a silver pen to draw them on, then painted over this using a sponge cut to a wedge. Then I would blot out a sponge until it was almost completely dry. This was what I used to "fade out" and wear down the paint.
Casey
Casey
05-16-2013 | 03:43 PM
#431
My Feedback: (1)
As the plane sits now, it is 13lb6oz. I have not weighed the motor and ESC, or for that matter the 4-6cell lipos. I'll try to do that later tonight. I'm still waiting on my spinner from Yellow aircraft. I need it before I can move forward with the motor install.
Casey
Casey
05-16-2013 | 03:54 PM
#432
My Feedback: (1)
well, lets see....
the motor, motor box, and ESC weigh in at 4lb 5oz.
two of the 6 cell lipo's weigh in at 4lb 3oz
all 4 lipo's weigh 8lbs 7oz.
all that together weighs 12lbs 1oz !!!
wow lol, well I should be able to use that weight to balance it anyways, and I'm sure it will handle it fine.
that's about 25lbs, 7oz total. It will probably end up just over 26 lbs...Not all that bad for a bird this size actually.
Casey
05-16-2013 | 04:00 PM
#433
Senior Member
Joined: Oct 2005
Posts: 850
Likes: 0
Received 0 Likes
on
0 Posts
From: Fresno,
CA
I am making more progress on my ASP 400 radial engine powered CMP Zero. It is nearing completion and should be ready for first engine runs in the near future. I completed installing the radio componets and the batteries today, adjusted the control throws and also checked the retracts before I glued the retract inserts into place. My luck continues to follow me though, because one of the retracts quit operating as soon as the inserts were glued into place. Oh well, I just have to have a few challenges in every build I do.
Best wishes and good safe flying.
Heli-NuBee (AKA Roger the radial rabbit)
Best wishes and good safe flying.
Heli-NuBee (AKA Roger the radial rabbit)
05-17-2013 | 04:03 PM
#434
Senior Member
Joined: Oct 2005
Posts: 850
Likes: 0
Received 0 Likes
on
0 Posts
From: Fresno,
CA
My ASP 400 radial engine powered CMP Zero is now ready for engine break-in runs. I pre-oiled the engine well. First I removed the valve rocker covers on all five cylinders and oiled the valve train well. I also placed oil in the crankcase vent and hung the engine nose down. Oil was seeping from the front prop bearing and the valve push rod tubes. I rotated the engine frequently to insure that oil was distributed through out the engine. I sure hope that the engine is now well lubed and I don't have any premature faliures due to lack of lubrication. I noticed that the valve train was quite dry so I'm sure it was wise to do the pre-lube. I still have a problem with one of the ESM electric retracts though. The motor runs continously and nothing happens. There does not appear to be any way to disassemble the retract so I guess I will have to return it to TBM.
Best wishes and good safe flying.
Heli-NuBee (AKA Roger the radial rabbit)
Best wishes and good safe flying.
Heli-NuBee (AKA Roger the radial rabbit)
05-18-2013 | 03:00 PM
#435
Senior Member
Joined: Oct 2005
Posts: 850
Likes: 0
Received 0 Likes
on
0 Posts
From: Fresno,
CA
I had the good fortune of running my ASP 400 five cylinder radial engine for the first time today. The engine started easy and ran quite well. I managed to get a full hour of run time today. The engine is running pretty well and I am not sure how much more break-in time will be necessary before beginning to fly the CMP Zero. Here is a short video on one of the latter engine runs http://www.youtube.com/watch?v=7u06n...ature=youtu.be
Best wishes and good safe flying.
Heli-NuBee (AKA Roger the radial rabbit)
Best wishes and good safe flying.
Heli-NuBee (AKA Roger the radial rabbit)
05-21-2013 | 07:21 PM
#436
Senior Member
Joined: Oct 2005
Posts: 850
Likes: 0
Received 0 Likes
on
0 Posts
From: Fresno,
CA
The maiden flight of my ASP 400 radial engine powered CMP Zero did not go well today. The flight started well, it took off nicely, had plenty of power and only required a small amount of left and down trim. However, a minute or two into the flight, the engine began to loose power. We pulled the power back and gained some power back but not much. We had plenty of altitude so we set up for landing. The weather was a bit on the breezy side with a quarting wind. Everything seemed OK on the landing aproach until about one foot above the runway we caught a strong gust that popped the plane up to about three feet above the runway at a speed that was too low resulting in a stall and fall to the runway. We could have prevented that if the engine would have responded to throttle but it would not. The fusalage is in perfect condition but the stall and fall did considerable damage to the wing. The landing gears went through the wing on both sides. My good friend and I do these maiden flights together and he felt so bad about the damage that he took the wing home to repair it (he was on the sticks for the landing). The plane seemed a bit on the tailheavy side for landing but seemed OK for flying with the CG set per manufactures specs at 145 mm. I am not sure why we lost power on the engine but the most likely cause would be going lean during the flight. I had the needle valve open two turns and the engine ran great on the ground. This was a disappointing day but all is not lost and the Zero will probably fly again.
Best wishes and good safe flying.
Heli-NuBee (AKA Roger the radial rabbit)
Best wishes and good safe flying.
Heli-NuBee (AKA Roger the radial rabbit)
05-22-2013 | 05:11 PM
#438
Senior Member
Joined: Oct 2005
Posts: 850
Likes: 0
Received 0 Likes
on
0 Posts
From: Fresno,
CA
I just got a call from my good friend - he says that the repairs are almost complete on the wing - I will need to cover and paint when he is done. Anyone have any ideas about what covering to use and how to do a paint match?
Best wishes and good safe flying.
Heli-NuBee (AKA Roger the radial rabbit)
Best wishes and good safe flying.
Heli-NuBee (AKA Roger the radial rabbit)
05-23-2013 | 01:55 PM
#439

If you need to recover the complete wing I would fiberglass it . If you are just patching the covering and repainting you can use most iron on coverings .
To paint it I would take a piece of the original covering to home depot or lowes and have them color match it with some exterior latex paint and spray it on . If you are using glow power you will need to fuel proof the latex paint with an epoxy clear coat or urethane clear coat.
To paint it I would take a piece of the original covering to home depot or lowes and have them color match it with some exterior latex paint and spray it on . If you are using glow power you will need to fuel proof the latex paint with an epoxy clear coat or urethane clear coat.
11-25-2013 | 10:34 AM
#441

My Feedback: (14)
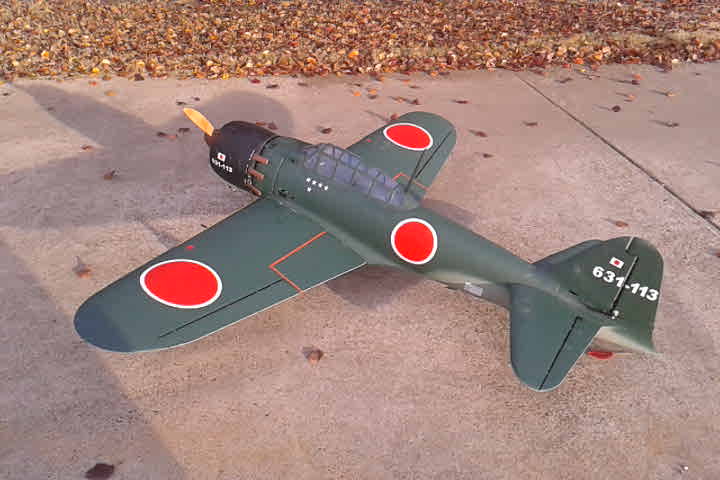
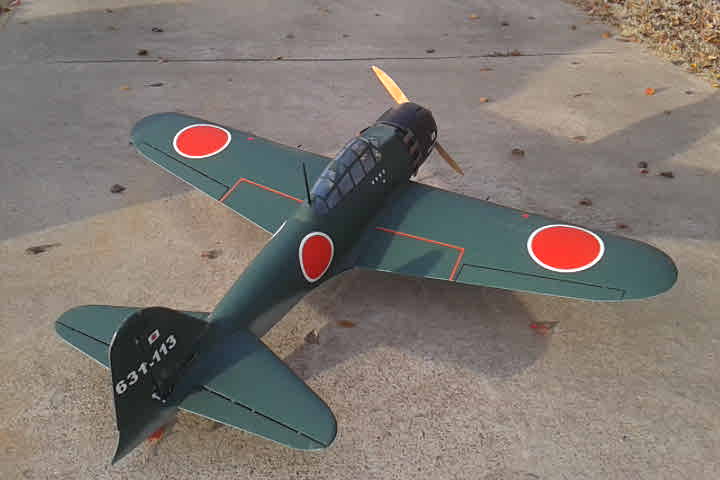
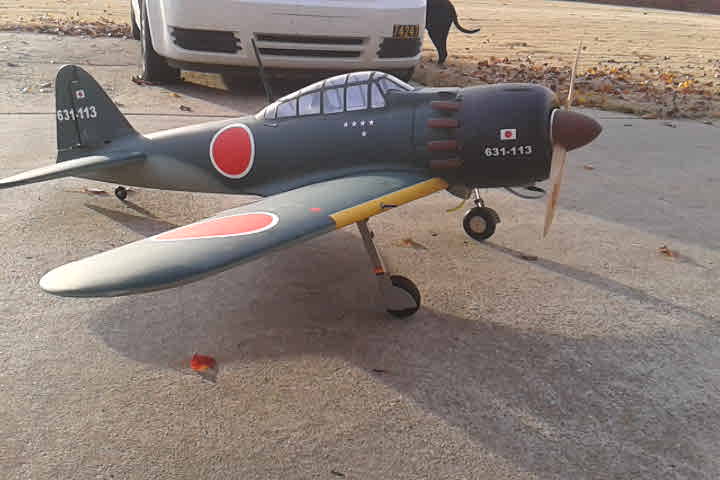
Well I am done with the plane and it weigh's in at 20lbs. I have an RCG 50 for power with a valley view 22x10 prop. I am getting 6700RPM on the high end and a good 1800RPM at idle. I have ESM electric retracts that work great. i have cycled them over 100 times with no issues. Here are a few pic's. I will going doing more detail after I do the maiden.

 11-25-2013 | 11:15 AM
#444
My Feedback: (14)
This is my second CMP Zero so I knew it needed a lot of weight up front. I desided to build up the cowl and firewall area with some Fiberglass to strengthen up the front. When we were done with the cowl it weighed 1.5 lbs and feels like it is as solid as a steel door. I also used 3/8" plywood and cut a new cowl ring from it. There are five layers of fiberglass on the inside of the fuslage nose area. All of that fiberglass added to make this Zero a lot stronger then the original one. After doing all of that and installing a RCG 50 for power I still had to add 6oz of weight to the front of the cowl to get it to balance at 6"(155mm). I hope this answers your question?
11-25-2013 | 11:24 AM
#445
Jim, if you decide for the third Zero (I hope it won�t be necessary), you could use RCGF 50 twin. Sometime I think, that this engine is made exactly for this Zero and ESM FW-190D.
11-26-2013 | 05:12 PM
#449
My Feedback: (14)
Prekin,
I will start an thread when I get started on the Dave Platt FW-190A8. I have not flown the Polikarpov I-16 yet because the wing loading is very heavy and I don't know if I am a good enough pilot to fly it yet. The plane has 720 sq in wing area and weigh's 21 lbs. That is very heavy for a plane that size.
I will start an thread when I get started on the Dave Platt FW-190A8. I have not flown the Polikarpov I-16 yet because the wing loading is very heavy and I don't know if I am a good enough pilot to fly it yet.
The plane has 720 sq in wing area and weigh's 21 lbs. That is very heavy for a plane that size.
04-20-2016 | 04:38 PM
#450
Member
Joined: Aug 2009
Posts: 63
Likes: 0
Received 0 Likes
on
0 Posts
From: Thurmont,
MD
Hi everyone! After having this bird in a box for YEARS now I am FINALLY building her. I got my Retracts installed , went with Century Jet, and I have a DLE55 rear exhaust.
So I ended up cutting down my Motor box so I could keep my engine carb fully exposed and not have to deal with cutting standoffs. Now I am trying to line up my motor box onto the front of the zero's fuse BUT the fuse has no hash marks like I've seen in other build pics and I believe the build diagram says that there should be. !!! I do have hash marks on my motor box..just not the fuse? the box hash marks do not center around the small circle in the fuse correct?? or do they?
Can anyone perhaps send me measurements in reference to the small fuse hole center to create my own hash marks?? WHAT TO DO?

