


CMPro Giles 202 - 50

 07-09-2007, 12:44 AM
#77
Senior Member
Still been slack and have not finished this model, how are the ones in this post holding together now it's a few more months down the track?
07-09-2007, 02:17 AM
#78

My Feedback: (14)
I got mine all put together with a YS .63 fourstroker. I had to put the 4-cell sub-C pack under the engine box for it to balance but I believe it is ready to fly.
Maybe tomorrow if the wind ever dies down around here.
The plane went together well. I'm not to nuts about the covering or the paint. Seem to chip easily and the covering is way to heavy.
I am anxious to fly it. If I like it I may recover it sometime in the future.
I did think that the overall quality of the kit is good.
08-04-2007, 08:18 AM
#79
Senior Member
"MAN I'M SLACK!" OK, wife is away for the week, weather too wet and windy to fly, I now have no excuse! I picked up an in cowl muffler today to keep the engine/ cowl that bit neater. I pulled the gear out of the Tuccano and fitted the servo's and hooked up the closed loop for the rudder and the push rod is in for the elevators. I also had to re-kit the dubro fuel valve which I will fit tomorrow. I'm on a misson to have it ready to fly this week.
09-23-2007, 11:26 PM
#80
Senior Member
Well I have finally found the time to get my Giles into the air, and it has now done four flights. The OS 50SX had not even been started when I went out to the field this morning, and after the first start with the starter, it was able to be started with just the back flip on the spinner. It is still being run rich at the moment but seems to be a good match for the model, no dead sticks and very low idle with good throttle response.
I found that the C of G was further back than what the book suggested but I just flew it were it was, it only needs a touch of down when inverted so it must be close to the right spot. In long verticals it will yaw off to the left so it could use a tad more right thrust, and it tends to push towards the belly in knife edge flight. Spins etc are fine on normal rates, mybe just a bit tame, on full rates it will need a lot of EXPO as it becomes a bit touchy but the spins become flater and more fun.
I found that the C of G was further back than what the book suggested but I just flew it were it was, it only needs a touch of down when inverted so it must be close to the right spot. In long verticals it will yaw off to the left so it could use a tad more right thrust, and it tends to push towards the belly in knife edge flight. Spins etc are fine on normal rates, mybe just a bit tame, on full rates it will need a lot of EXPO as it becomes a bit touchy but the spins become flater and more fun.
09-29-2007, 09:19 AM
#81
Junior Member
Join Date: Jan 2007
Location: MArulanNSW, AUSTRALIA
Posts: 2
Likes: 0
Received 0 Likes
on
0 Posts
Hey everyone,
This a really good thread on the Giles. I purchased the version 1 model and replaced the covering with Profilm, after I found that i was getting a few tears while assembling. My maiden flight is about 2 weeks away (weather permitting) and I'm really looking forward to it. The only thing of concern, is the blasted C of G setting. I have a Satio 65 mounted with a 2.5 inch aluminium spinner, and am following the suggested CG settings, but find it too nose heavy.
To avoid adding lead I'm going to move the flight battery back until it's level, then see if I can mount it in the fuselage at that point. Does any one have any other tips or experiences C of G for this model???
10-01-2007, 05:51 AM
#82
Junior Member
Join Date: Dec 2006
Location: Melbourne, AUSTRALIA
Posts: 7
Likes: 0
Received 0 Likes
on
0 Posts
I picked up mine for $80 AUD. It had cracks in three of the four wing panels (Top left, bottom left & bottom right). I covered those with some clear cover to maintain the snazzy colour scheme.
[link=http://www.flickr.com/photos/fangin/1463178898/in/set-72157602218592116/]

giles pics[/link]
Some photos of my slow building progress
http://www.flickr.com/photos/fangin/...7602218592116/
Photos of covering split
http://www.flickr.com/photos/fangin/...7602218592116/
http://www.flickr.com/photos/fangin/...7602218592116/

[link=http://www.flickr.com/photos/fangin/1463178898/in/set-72157602218592116/]
giles pics[/link]
Some photos of my slow building progress
http://www.flickr.com/photos/fangin/...7602218592116/
Photos of covering split
http://www.flickr.com/photos/fangin/...7602218592116/
http://www.flickr.com/photos/fangin/...7602218592116/
10-01-2007, 04:13 PM
#83
Senior Member
I found that the C of G could be a bit further back than what the instructions suggested, so I would add the lead if you need to. Don't forget to add a pilot.[8D] Matt
10-02-2007, 05:45 PM
#84
Junior Member
Join Date: Jan 2007
Location: MArulanNSW, AUSTRALIA
Posts: 2
Likes: 0
Received 0 Likes
on
0 Posts
That's a top looking model!
Thanks for your C of G tip too. I was going to move it back from 95mm to 90mm, but I think I'll leave it where it is. I'll try to organise some photo's too.
Thanks for your C of G tip too. I was going to move it back from 95mm to 90mm, but I think I'll leave it where it is. I'll try to organise some photo's too.
03-03-2008, 11:26 PM
#85
Member
Join Date: Jul 2007
Location: Newcastle, AUSTRALIA
Posts: 35
Likes: 0
Received 0 Likes
on
0 Posts
Hi All,
I posted this question last night but it seems to have disappeared during the recent site maintenance.
I started building a CMPro Giles 202 50 Version 2 a couple of weeks ago. The build has been straightforward so far. I carefully removed the covering from the opening for the horizontal stabiliser and after trial-fitting the stab, I was a bit concerned that it's quite a loose fit. The stab. in my previous model (a Thunder Tiger nitro trainer) fitted quite snug in the opening.
I've only built two planes before this but it doesn't seem reasonable to expect just the epoxy to fill up the gaps. Perhaps I'm missing something obvious as the assembly instructions leave a bit to be desired.
Any advice?
Thanks,
Paul.
03-04-2008, 10:05 AM
#86

Join Date: Nov 2005
Location: Poolesville, MD
Posts: 12,624
Likes: 0
Received 0 Likes
on
0 Posts
Epoxy should fill the gap.
Apply epoxy to both surfaces and finalize the position of the horizontal stab.
Let this dry.
If there are gaps visible after you are done you can always inject or force more epoxy into the area.
When this is needed I will apply a thick bead of epoxy along the joints, push as much in with a brush as possible, apply more then wipe the excess away with a paper towel soaked in alcohol. While the epoxy has not set, alcohol will eliminate all of the excess w/o problems.
If there is a relatively huge area open, I've resorted to balsa wedges, microballoon filler, or even taking balsa sawdust and mixing it in with epoxy to make a filler.
I remember a gap on the horizontal stab, but if I recall correctly the epoxy filled it in just fine.
03-05-2008, 05:47 PM
#87
Member
Join Date: Jul 2007
Location: Newcastle, AUSTRALIA
Posts: 35
Likes: 0
Received 0 Likes
on
0 Posts
Hi opjose,
The gap around the stab isn't very big - just enough to let it move around a bit. Your suggestions sound like they'll do the trick.
Thanks for the excellent advice.
Paul.
The gap around the stab isn't very big - just enough to let it move around a bit. Your suggestions sound like they'll do the trick.
Thanks for the excellent advice.
Paul.
03-06-2008, 03:47 AM
#88
Senior Member
I used a thin epoxy mixed with micro-balloons which worked nicely. I used plastic electrical tape on the fueslarge sides covering the tailplane cutout, then with a sharp knife, cut out the hole. Then after measuring the fit to make sure that the tailplane was square, I marked the position with pins and with drew the tailplane again. After using more of the tape, this time on the tailplane, I glued it in with the epoxy which was a slow setting type. I then wiped the joint with a finger to make a fillet. When the epoxy was starting to go off, I carefully removed the tape which left a nice looking joint.
03-06-2008, 12:10 PM
#89
Join Date: Nov 2005
Location: Poolesville, MD
Posts: 12,624
Likes: 0
Received 0 Likes
on
0 Posts
Matt13:
How did you find landings with your plane?
Mine seems to keep going forever and not want to land.
I have a T.H. .46 engine in it with a Pitts muffler, which seems to be a very strong combo for this plane.
I end up having to chop throttle WAAY out to get the plane to slow down.
It's a bit disconcerting if I start off flying something a bit more draggy then switch to this plane. I typically have to spend time learning how to land it again!
03-14-2008, 01:55 AM
#90
Member
Join Date: Jul 2007
Location: Newcastle, AUSTRALIA
Posts: 35
Likes: 0
Received 0 Likes
on
0 Posts
Hi again,
One more question. The instructions suggest that the aluminium joiners which position the leading edge of the wing should be epoxied into the round plastic inserts which are screwed to the fuse. Yet the next page seems to show them attached to the wing. Which is correct?
Thanks,
Paul.
One more question. The instructions suggest that the aluminium joiners which position the leading edge of the wing should be epoxied into the round plastic inserts which are screwed to the fuse. Yet the next page seems to show them attached to the wing. Which is correct?
Thanks,
Paul.
03-14-2008, 08:50 AM
#91
Join Date: Nov 2005
Location: Poolesville, MD
Posts: 12,624
Likes: 0
Received 0 Likes
on
0 Posts
No you have read it wrong.
The aluminum pegs are EPOXIED to the LE of the wings.
The plastic inserts are screwed ( and I also epoxied them after CA'ing the surrounding wood ) into the fuselage.
The idea is that when you go to mount the wings the aluminum pegs SLIDE into the holes protected by the plastic inserts.
The aluminum pegs are EPOXIED to the LE of the wings.
The plastic inserts are screwed ( and I also epoxied them after CA'ing the surrounding wood ) into the fuselage.
The idea is that when you go to mount the wings the aluminum pegs SLIDE into the holes protected by the plastic inserts.
03-14-2008, 12:37 PM
#92
Member
Join Date: Jul 2007
Location: Newcastle, AUSTRALIA
Posts: 35
Likes: 0
Received 0 Likes
on
0 Posts
Thanks opjose,
That's more in line with what I would have expected.
The holes in the wing are only 3mm deep, so I presume that means I need to drill them out.
How much of the joiners should protrude from the wing?
Thanks,
Paul.
That's more in line with what I would have expected.
The holes in the wing are only 3mm deep, so I presume that means I need to drill them out.
How much of the joiners should protrude from the wing?
Thanks,
Paul.
03-14-2008, 12:45 PM
#93
Join Date: Nov 2005
Location: Poolesville, MD
Posts: 12,624
Likes: 0
Received 0 Likes
on
0 Posts
Only about 1/3 to 1/2 of the joiner should protrude from the wing. I believe I have mine at 1/3.
Yup I had to ream the holes out a bit.
The plastic guard is a great idea though, and I have purchase planes of this size from the "big boys" that did not include this little safeguard.
You may want to harden the wood in the areas where the pin joints go into on both the wings and surfaces, with CA.
That will cause the wood to swell a bit so you may find that in turn you will need to sand or drill the holes back to the right size...
However this hardens the surrounding area, and preps it very well for final epoxy application.
Nice plane isn't it?
I'm VERY pleased with it...
An Exceptional Value...
I have not flown it enough yet to determine if a coat of Top Flight is absolutely necessary...
I purposely did not put any on this plane to see how the existing coating holds up.
03-14-2008, 03:33 PM
#94
Member
Join Date: Jul 2007
Location: Newcastle, AUSTRALIA
Posts: 35
Likes: 0
Received 0 Likes
on
0 Posts
Thanks for that, opjose.
Yes, I'm keen to get mine into the air. I've had mine in the box for over 6 months - bought it for my first plane. After flying helis for 12 months, I decided the plane guys were having lots of fun too, but they talked me into starting with a trainer first. Then I got a Mini Pulse XT and finally decided I was ready for the Giles. I also think it's good value - for the quality it didn't cost all that much.
I've got an OS 55 AX for it - sounds like it might be enough engine.
I was interested to read your comments on landing. I've read plenty of posts on tip stalls with a Giles so I've been mentally preparing myself to land it fairly fast.
03-14-2008, 03:59 PM
#95
Join Date: Nov 2005
Location: Poolesville, MD
Posts: 12,624
Likes: 0
Received 0 Likes
on
0 Posts
With your 55AX I'll bet it will seem like it just doesn't want to stop flying, and it will seem balistic.
With mine, I was somewhat worried about tip stalls.
When I slowed it down as much as possible in the air, I found that this was not a big problem if you are coming straight in.
I'd imagine that if you get far too slow it might get out of hand during a turn into final.
My first landing attempts had the plane floating over the runway many times then doing another go around dropping the throttle sooner.
I ended up chopping throttle on the base and gliding through to final with only a small amount of throttle, like a fairly fast idle.
This brought the plane down but it still bounced because it had too much lift.
On the next ( and best ) landing I brought it in likewise, but chopped the throttle to full idle, out from the threshold, then held the nose up ( it will want to drop when it gets slow ).
This worked very well. The plane sinks in at a slower speed than I had though. It took me all of the go-arounds to find it's sweet spot...
So when you fly it the first time, make sure the engine is rock solid.
Get it up and trimmed, then start to practice approaches.
Better to get the hang of it with some time on your hands, than during a deadstick or when you are low on fuel.
The plane tracks well on takeoff with very little yaw.
Mine does pull the nose down on throttle up in the air.
---
BTW: I stuck a 480 in my Mini-PulseXT... that's what E-Flite should have recommended.
03-14-2008, 04:29 PM
#96
Member
Join Date: Jul 2007
Location: Newcastle, AUSTRALIA
Posts: 35
Likes: 0
Received 0 Likes
on
0 Posts
Sounds like my first attempts to land my trainer. The first few had it floating the whole way down the runway. Now I just cut the throttle on late downwind and keep the nose pointed down a little. But of course it's very reluctant to stall.
Thanks again for your excellent advice.
I think I might have another question about mounting the engine - the instructions look a bit ambiguous there as well. It says to line up the marks on the mounts with the lines on the fuse but there are two vertical lines on the fuse. The trainer already had the blind nuts in the firewall so I didn't need to worry. My best guess is that I should align the end of the crankshft with the centre of the fuse horizontally and vertically taking into account the right and down thrust built into the firewall.
03-15-2008, 12:30 AM
#97
Join Date: Nov 2005
Location: Poolesville, MD
Posts: 12,624
Likes: 0
Received 0 Likes
on
0 Posts
ORIGINAL: paul49
I think I might have another question about mounting the engine - the instructions look a bit ambiguous there as well. It says to line up the marks on the mounts with the lines on the fuse but there are two vertical lines on the fuse. The trainer already had the blind nuts in the firewall so I didn't need to worry. My best guess is that I should align the end of the crankshft with the centre of the fuse horizontally and vertically taking into account the right and down thrust built into the firewall.
I think I might have another question about mounting the engine - the instructions look a bit ambiguous there as well. It says to line up the marks on the mounts with the lines on the fuse but there are two vertical lines on the fuse. The trainer already had the blind nuts in the firewall so I didn't need to worry. My best guess is that I should align the end of the crankshft with the centre of the fuse horizontally and vertically taking into account the right and down thrust built into the firewall.
If you are side mounting the engine, as I did, the bottom of the engine's metal mounting tabs should align with this line.
The right most line represents where the center of the crankshaft should be at the spinner.
Your best bet is to measure how far from the firewall you need to mount the engine to attain the required distance from the firewall to the spinner.
Then put the mounts on a flat table pointing straight up, as if the table is the firewall, measure UP from this distance to a temporarily affixed spinner, and clamp ( some people actually use a bit of CA ) the engine in place on the mounts. I use small but strong steel clamps for this...
Then make sure that the engine lines are perfectly square with the mount's centerlines... both top and bottom... remember that right and down thrust is controlled by the position of the mount and the firewall ultimately, not by the engine ON the mount...
Once I have this established, I again check the firewall to spinner distance again, and I finally use a GP center hole locator to start and mark the engine mount holes into the plastic ( or metal if I am using an Anti-Vibration mount, which I did with the Giles 202 ).
I then use a drill press with a small wood jig I built, to put the proper mounting holes into the mount, and I affix the engine to the mount in it's final state or position.
The mounts are effectively affixed now to the engine, NOT to the firewall.
( I always do all of this first before I do anything else to the plane )
I put the fuse nose up, standing it on the tail, and position the mount where it is supposed to go on the firewall. I clamp the fuse lightly to a workbench while I do this to keep my hands free.
If the cowl fits, or can be made to fit over the engine, by say leaving the muffler off, etc. I'll position that temporarily into place to check the prop disk centering.
I then adjust the position of the mount so that the tick marks on the mount bottom against the firewall align exactly with the lines on the firewall if they are provided ( as they are in most cases )... ( If there are no marks I center the cowl and work down from the prop disk position to find the proper location for the mount, but this is a bit harder and involves measuring the true centerline at the firewall and working from there ).
I then mark the mounting holes for the blind nuts, using the GP locator and drill and install the blind nuts, mount, and go to work on the cowl.
Since I find this the most time intensive part of putting an ARF together, putting the model together is downhill from here.
05-11-2008, 05:42 AM
#98
Junior Member
Join Date: Dec 2006
Location: Melbourne, AUSTRALIA
Posts: 7
Likes: 0
Received 0 Likes
on
0 Posts
Giles maiden flight - not without a hitch!.
For the complete story that lead to this photo - http://fangin.com/blog/?p=171
Giles Flickr pix
[link=http://www.flickr.com/photos/fangin/2481865855/in/set-72157602218592116/]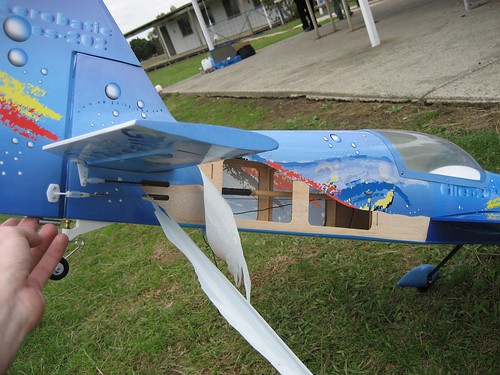 [/link]
[link=http://www.flickr.com/photos/fangin/2482678970/in/set-72157602218592116]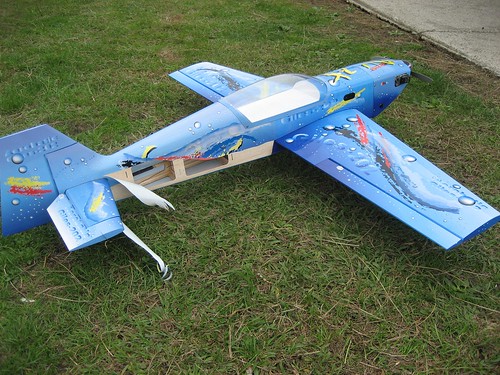 [/link]
[link=http://www.flickr.com/photos/fangin/sets/72157602218592116/]Flickr Pix[/link]
For the complete story that lead to this photo - http://fangin.com/blog/?p=171
Giles Flickr pix
[link=http://www.flickr.com/photos/fangin/2481865855/in/set-72157602218592116/]
[/link][link=http://www.flickr.com/photos/fangin/2482678970/in/set-72157602218592116]
[/link][link=http://www.flickr.com/photos/fangin/sets/72157602218592116/]Flickr Pix[/link]
05-11-2008, 12:22 PM
#99
Join Date: Nov 2005
Location: Poolesville, MD
Posts: 12,624
Likes: 0
Received 0 Likes
on
0 Posts
Dunno why you got such a tear in the covering. Couldn't it be carefully re-applied working from the side that still adheres?
Or are you missing segments now?
I've flown mine now quite extensively w/o problems with the covering.... though I think the paint over the covering may be "brittle".
I do recommend clear coating the covering with Top Flite clear coat to help prevent such things.
I haven't done it to my Giles yes though.
On other CMP and Asian ARF's this works very very well.
I have my low rates set to the recommended settings, but I don't find this to be too low.
On the other hand I can't see going below this either. That said the recommended settings produces fairly good response in pitch.
Expo is a requisite.
I've been pleased with the performance ( T.H. .46 engine ) and characteristics of this plane in flight... so much so that I may also purchase the larger version.

