


Yet, another Kadet LT40 build.


 02-06-2013 | 04:18 PM
#53

Thread Starter
Senior Member
Joined: Sep 2008
Posts: 2,101
Likes: 0
Received 0 Likes
on
0 Posts
From: Houston, TX
 RE: Yet, another Kadet LT40 build.
I used Krazy Glue once on a glider, then had a friend throw that 14 pound plane up at a 45 degree angle. My first flight back in 92. I call that the original Lawn Dart. 
I'm taking a break from this for the evening. I had somewhat of a busy day at work and I am a little bit under the weather. And I need to think out the dual servo set up a little more.

I'm taking a break from this for the evening. I had somewhat of a busy day at work and I am a little bit under the weather. And I need to think out the dual servo set up a little more.
02-07-2013 | 04:34 PM
#54
Thread Starter
Senior Member
Joined: Sep 2008
Posts: 2,101
Likes: 0
Received 0 Likes
on
0 Posts
From: Houston, TX
RE: Yet, another Kadet LT40 build.
Not much to report. I spent a couple of hours on it after work today. I got most of the port wing half tacked up. I decided against removing one wing bay when I realized how much wing chord the LT40 has and thought it would look a little "Stubby".


02-07-2013 | 04:36 PM
#55
Thread Starter
Senior Member
Joined: Sep 2008
Posts: 2,101
Likes: 0
Received 0 Likes
on
0 Posts
From: Houston, TX
RE: Yet, another Kadet LT40 build.
ORIGINAL: sensei
This should be a fun build thread to follow, I wish you the very best in your efforts.
Bob
This should be a fun build thread to follow, I wish you the very best in your efforts.
Bob
Thanks Bob. I have admired your work for years.
 02-07-2013 | 04:48 PM
#56
Thread Starter
Senior Member
Joined: Sep 2008
Posts: 2,101
Likes: 0
Received 0 Likes
on
0 Posts
From: Houston, TX
RE: Yet, another Kadet LT40 build.
BTW, I messed up. I was thinking of the 4*40 when I mentioned adding 1/4" tristock to the leading edges of the control surfaces. On the LT40 the leading edges are already shaped and they are thicker than a 1/4". Oh well, you can never have too much extra balsa. [&:]
02-08-2013 | 11:08 AM
#57

My Feedback: (1)
Joined: Aug 2002
Posts: 93
Likes: 0
Received 0 Likes
on
0 Posts
From: Allen,
TX
RE: Yet, another Kadet LT40 build.
Nice work on this build. To implment the dual servo set-up in the ailerons, you could mount both servos in the center of the wing and use each to drive 1 aileron. I did this for a Senior Telemaster and it worked out fine. The other way I have seen this done is to mount the servos in the wing panels (as you are doing) and drill half inch holes in each rib between where the servo is mounted and the center wing to run the servo wires (and extensions) back to the receiver. If you need some ideas as to how to mount the servos in the wing, take a look at the instructions for the Sig Four Star 120. The instructions will show you two methods to create the servo mounts.
02-08-2013 | 12:02 PM
#58
My Feedback: (-1)
RE: Yet, another Kadet LT40 build.
I tried using contact cement on the wrap around windshield/plastic on the Swoose build. Really holds well but you have to get the plastic on and in position first try. After giving it a try it's all I'm using now. Just no room for error when placing the plastic down, it doesn't slide at all, just sticks instantly. You may want to give it a try on your mod.
02-08-2013 | 02:27 PM
#59
Thread Starter
Senior Member
Joined: Sep 2008
Posts: 2,101
Likes: 0
Received 0 Likes
on
0 Posts
From: Houston, TX
RE: Yet, another Kadet LT40 build.
ORIGINAL: fix-n-fly
Nice work on this build. To implment the dual servo set-up in the ailerons, you could mount both servos in the center of the wing and use each to drive 1 aileron. I did this for a Senior Telemaster and it worked out fine. The other way I have seen this done is to mount the servos in the wing panels (as you are doing) and drill half inch holes in each rib between where the servo is mounted and the center wing to run the servo wires (and extensions) back to the receiver. If you need some ideas as to how to mount the servos in the wing, take a look at the instructions for the Sig Four Star 120. The instructions will show you two methods to create the servo mounts.
Nice work on this build. To implment the dual servo set-up in the ailerons, you could mount both servos in the center of the wing and use each to drive 1 aileron. I did this for a Senior Telemaster and it worked out fine. The other way I have seen this done is to mount the servos in the wing panels (as you are doing) and drill half inch holes in each rib between where the servo is mounted and the center wing to run the servo wires (and extensions) back to the receiver. If you need some ideas as to how to mount the servos in the wing, take a look at the instructions for the Sig Four Star 120. The instructions will show you two methods to create the servo mounts.
I'm actually coping the servo mount from the 4*60. I have built and flown one and have another near finished. The good thing about the LT40 is that the ailerons are so beefy that location shouldn't be an issue for flutter. For this build I'm in a little further more inboard than I was on my last 4*40. I think keeping the weight inboard will help with stability, but I'm prolly wrong.
Also rather than using servo extensions, I'm going to hardire them in from some pig tails I made. I just glued the wing tip in and will most likely spend the rest of the evening engineering my servo mounts and the front end of the bolt down wing. I will using 1/4" Oak dowl for that.
 02-08-2013 | 02:34 PM
#60
Thread Starter
Senior Member
Joined: Sep 2008
Posts: 2,101
Likes: 0
Received 0 Likes
on
0 Posts
From: Houston, TX
RE: Yet, another Kadet LT40 build.
ORIGINAL: Gray Beard
I tried using contact cement on the wrap around windshield/plastic on the Swoose build. Really holds well but you have to get the plastic on and in position first try. After giving it a try it's all I'm using now. Just no room for error when placing the plastic down, it doesn't slide at all, just sticks instantly. You may want to give it a try on your mod.
I tried using contact cement on the wrap around windshield/plastic on the Swoose build. Really holds well but you have to get the plastic on and in position first try. After giving it a try it's all I'm using now. Just no room for error when placing the plastic down, it doesn't slide at all, just sticks instantly. You may want to give it a try on your mod.
02-08-2013 | 03:48 PM
#61
Thread Starter
Senior Member
Joined: Sep 2008
Posts: 2,101
Likes: 0
Received 0 Likes
on
0 Posts
From: Houston, TX
RE: Yet, another Kadet LT40 build.
After realizing that the LT40 has "TWO" dihedral braces one being up front, I am altering my wing hold down idea until after joining the two wing halves. Deviating from the instructions, the upper inner balsa sheeting will wait until after I join the wing halves. In the mean time I will "Fillet" all the left wings glues joints with Titebond that have been just tacked with mostly thin CA so far. And start on the right wing tonight.

02-08-2013 | 06:48 PM
#63
RE: Yet, another Kadet LT40 build.
You sir are doing good! That is how I built my wings too, tack em up with CA then use Titebond for the joints. That Kadet wing has smacked several hard items in the past year, and only cracked the leading edge and ribs in front of the main spar. Easy fix and back in the air. <div>
</div><div>For the wing servos, if you built the 4* the mounts and cable run for that plane should work fine on this one. The ARF uses a plastic server tray that puts the servo on its side so the arm sticks out of the wing, and I copied that on the kit 4*120, and also using it for the Chipmunk I am building. </div><div>
</div><div>What you can do is glue some rails on two ribs where you plan to put the server, then make a plywood hatch to fit between the ribs to mount the servo to, then screw the hatch/mount to the rails, and wala, done. For the cable feed, just roll up some paper, and slide it through the holes. </div><div>
</div><div>You can sort of see what I am referring to on my 120 wing here,</div><div>
</div><div>
</div>
</div><div>For the wing servos, if you built the 4* the mounts and cable run for that plane should work fine on this one. The ARF uses a plastic server tray that puts the servo on its side so the arm sticks out of the wing, and I copied that on the kit 4*120, and also using it for the Chipmunk I am building. </div><div>
</div><div>What you can do is glue some rails on two ribs where you plan to put the server, then make a plywood hatch to fit between the ribs to mount the servo to, then screw the hatch/mount to the rails, and wala, done. For the cable feed, just roll up some paper, and slide it through the holes. </div><div>
</div><div>You can sort of see what I am referring to on my 120 wing here,</div><div>
</div><div>
</div>
02-09-2013 | 03:51 PM
#64
Thread Starter
Senior Member
Joined: Sep 2008
Posts: 2,101
Likes: 0
Received 0 Likes
on
0 Posts
From: Houston, TX
RE: Yet, another Kadet LT40 build.
ORIGINAL: acdii
You sir are doing good! That is how I built my wings too, tack em up with CA then use Titebond for the joints. That Kadet wing has smacked several hard items in the past year, and only cracked the leading edge and ribs in front of the main spar. Easy fix and back in the air. <div>
</div><div>For the wing servos, if you built the 4* the mounts and cable run for that plane should work fine on this one. The ARF uses a plastic server tray that puts the servo on its side so the arm sticks out of the wing, and I copied that on the kit 4*120, and also using it for the Chipmunk I am building. </div><div>
</div><div>What you can do is glue some rails on two ribs where you plan to put the server, then make a plywood hatch to fit between the ribs to mount the servo to, then screw the hatch/mount to the rails, and wala, done. For the cable feed, just roll up some paper, and slide it through the holes. </div><div>
</div><div>You can sort of see what I am referring to on my 120 wing here,</div><div>
</div><div>[img][/img]
</div>
You sir are doing good! That is how I built my wings too, tack em up with CA then use Titebond for the joints. That Kadet wing has smacked several hard items in the past year, and only cracked the leading edge and ribs in front of the main spar. Easy fix and back in the air. <div>
</div><div>For the wing servos, if you built the 4* the mounts and cable run for that plane should work fine on this one. The ARF uses a plastic server tray that puts the servo on its side so the arm sticks out of the wing, and I copied that on the kit 4*120, and also using it for the Chipmunk I am building. </div><div>
</div><div>What you can do is glue some rails on two ribs where you plan to put the server, then make a plywood hatch to fit between the ribs to mount the servo to, then screw the hatch/mount to the rails, and wala, done. For the cable feed, just roll up some paper, and slide it through the holes. </div><div>
</div><div>You can sort of see what I am referring to on my 120 wing here,</div><div>
</div><div>[img][/img]
</div>
Thanks bud. And that's what I'm doing. I tack it up then nail it down with Titebond. While waiting for the glue to dry on the left wing half using gravity, (Flip, Flop, yanno the drill) I'm working on the right wing half. I should have the wing finished tomorrow beside the filler in the center section.
 02-09-2013 | 04:30 PM
#65
Thread Starter
Senior Member
Joined: Sep 2008
Posts: 2,101
Likes: 0
Received 0 Likes
on
0 Posts
From: Houston, TX
RE: Yet, another Kadet LT40 build.
Just some pictures. This is the covering. Most will be Ultracote which I have never used before, colors are mostly Apple Green with dabs of Lime Green in the mix. Yellow Monokote will be used for trim using the Windex method.

I got a little fancy with the control horns. I like these! [8D]

The tail wheel.

The main landing gear. I already had this built up for another project. 3 1/2" wheels.

And some servos. I buy them in bulk. lol

I got a little fancy with the control horns. I like these! [8D]
The tail wheel.
The main landing gear. I already had this built up for another project. 3 1/2" wheels.
And some servos. I buy them in bulk. lol
02-10-2013 | 08:16 AM
#66
Thread Starter
Senior Member
Joined: Sep 2008
Posts: 2,101
Likes: 0
Received 0 Likes
on
0 Posts
From: Houston, TX
RE: Yet, another Kadet LT40 build.
Got the dual aileron set up engineered. And as the glue is drying on the wing halves and so forth, Ill be moving on to working on the fuselage. This will be the real challenge since I plan on taking a trike geared plane, with rubber banded wings, and no actual windows to a tail dragger, bolt down wing while trying to maintain structural integrity with the required material removal for the windows while increasing the strength that the fore section needs for a bolt down wing. I need to get on this quickly because I don't know if I have the proper material/bracing that Ill need, so I may have to order stuff asap. I have a feeling that Ill be covering the wing before I finish framing up the fuse.


02-10-2013 | 07:53 PM
#67
Thread Starter
Senior Member
Joined: Sep 2008
Posts: 2,101
Likes: 0
Received 0 Likes
on
0 Posts
From: Houston, TX
RE: Yet, another Kadet LT40 build.
In order to use a "Pull-Pull" cable system for the tail dragger design, I will be flipping the top rear section of the fuse so that the push rod exit for the rudder will now be on the starboard side instead of the port side. (Just like the LT25). This should be the easiest way to keep the rudder and the tail wheel going in the same direction. (Yes, I messed that up before).
The tiller will be designed as I go and as much as I would prefer to use the shortest cables possible, it will be much easier to work through the open section of the main area and also keeping the weight of the tiller as far forward as possible. The problem is fishing those cables through the fuse. I may add some outer housings for the cables.

The tiller will be designed as I go and as much as I would prefer to use the shortest cables possible, it will be much easier to work through the open section of the main area and also keeping the weight of the tiller as far forward as possible. The problem is fishing those cables through the fuse. I may add some outer housings for the cables.
02-10-2013 | 08:31 PM
#68
Thread Starter
Senior Member
Joined: Sep 2008
Posts: 2,101
Likes: 0
Received 0 Likes
on
0 Posts
From: Houston, TX
RE: Yet, another Kadet LT40 build.
On the main landing gear, I will be laminating at least two layers of ply backed with tristock just behind F2 and to counteract the forces in front of F2, at least one layer of ply backed with 3/4" tristock.

02-11-2013 | 11:53 AM
#70
Thread Starter
Senior Member
Joined: Sep 2008
Posts: 2,101
Likes: 0
Received 0 Likes
on
0 Posts
From: Houston, TX
RE: Yet, another Kadet LT40 build.
I jumped forward to work on the tail feathers since the first part of building the fuse required mounting of the engine which I didn't get until just now. Pics to follow on the tail feathers later. Titebond is drying.
My new Saito.

My new Saito.
02-11-2013 | 08:31 PM
#71
Thread Starter
Senior Member
Joined: Sep 2008
Posts: 2,101
Likes: 0
Received 0 Likes
on
0 Posts
From: Houston, TX
RE: Yet, another Kadet LT40 build.
Moving forward, I got the wing halves joined and ended up with a 1 1/4" of dihedral. Also framed up the tail feathers. And I'm tired.


02-12-2013 | 12:54 PM
#73
Thread Starter
Senior Member
Joined: Sep 2008
Posts: 2,101
Likes: 0
Received 0 Likes
on
0 Posts
From: Houston, TX
RE: Yet, another Kadet LT40 build.
Thanks Bob.
Moving on to building the fuse, I wanted to get the throttle linkage set up out of the way. So I built up a bellcrank design and no, that is NOT a popsickle stick. [&:] It sure looks like one, but it's fiberglass. I wanted some electrical insulation from the engine to the throttle servo. I have had "Glitch" problems before when I had no insulation between the two.
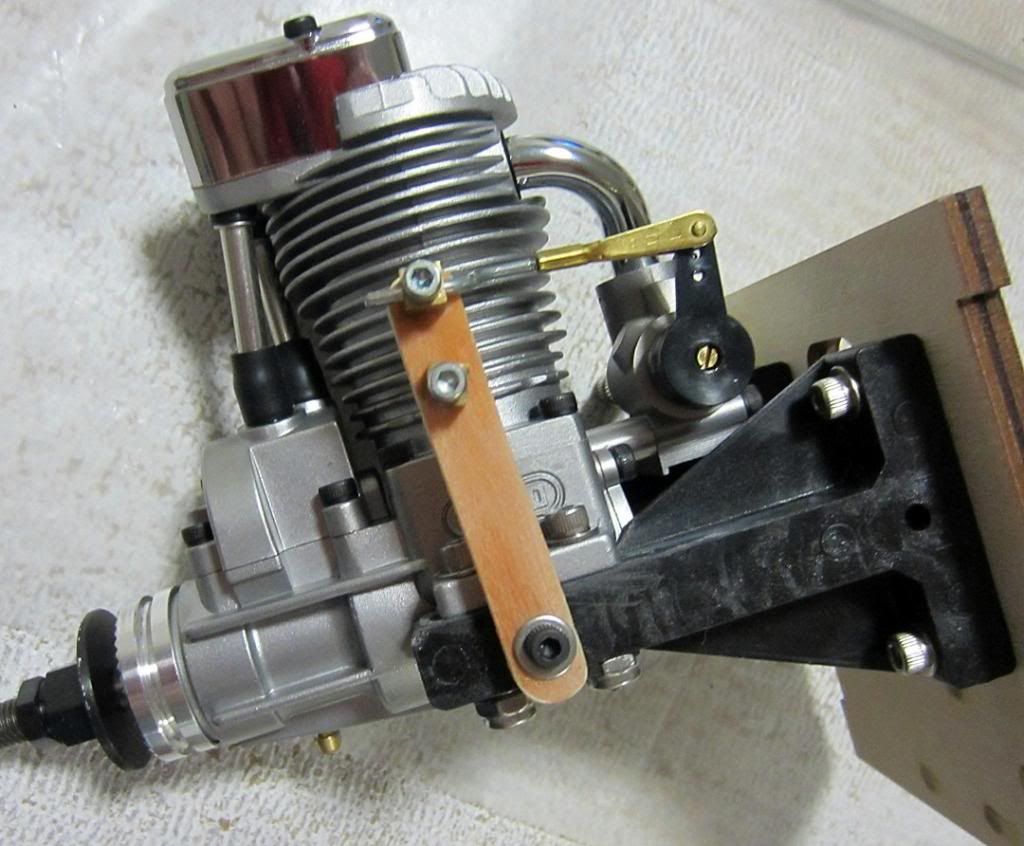
Moving on to building the fuse, I wanted to get the throttle linkage set up out of the way. So I built up a bellcrank design and no, that is NOT a popsickle stick. [&:] It sure looks like one, but it's fiberglass. I wanted some electrical insulation from the engine to the throttle servo. I have had "Glitch" problems before when I had no insulation between the two.
02-12-2013 | 02:41 PM
#74
My Feedback: (-1)
RE: Yet, another Kadet LT40 build.
Just for a laugh, the colors all look yellow to me except for the one roll. I'm using the plastic sheets from K&S and it says .010 but I measured the plastic I used last time and it is .015. I buy a couple packs of the stuff and may have mixed it together. Anyway, way thinner then what you are using. I stuck the canopy down on the Ultimate with the contact cement, it's holding well, even the front where it is just glued to the fuse without support. It doesn't dry clear though.
02-12-2013 | 02:52 PM
#75
Thread Starter
Senior Member
Joined: Sep 2008
Posts: 2,101
Likes: 0
Received 0 Likes
on
0 Posts
From: Houston, TX
RE: Yet, another Kadet LT40 build.
As I look closer, I'm having second thoughts on going with clear windows. It might delay my goal of finishing in 12 days and I don't see an easy way of going with clear windows at this time. Ill know more tomorrow after my fuse sides are dried and I start fitting everything together.

