how to glue this ?
 09-24-2019 | 09:36 AM
#1
Thread Starter

My Feedback: (1)
 how to glue this ?
edited,
guys, so I have a World Models Midget Mustang (the last model I will buy from them). the slot on this fuselage for the Horizontal Stabilizer has "a ceiling", and the slot has a rather tight fit to the Stab. so if I apply glue to the slot then install the Stab a vary good amount of glue will be pushed away as the Stab is installed,
my friend told me to make divots down the middle of the slot (top & bottom) and use Gorilla glue because it foams,, I didn't like this idea because when this glue foams it has many-many bubbles throughout the glue.
I don't see any other way to install the Stab, can I get some comments about this ?
see page 7 in the link for reference,
A072.pdf
thanks big time guys
Jim
guys, so I have a World Models Midget Mustang (the last model I will buy from them). the slot on this fuselage for the Horizontal Stabilizer has "a ceiling", and the slot has a rather tight fit to the Stab. so if I apply glue to the slot then install the Stab a vary good amount of glue will be pushed away as the Stab is installed,
my friend told me to make divots down the middle of the slot (top & bottom) and use Gorilla glue because it foams,, I didn't like this idea because when this glue foams it has many-many bubbles throughout the glue.
I don't see any other way to install the Stab, can I get some comments about this ?
see page 7 in the link for reference,
A072.pdf
thanks big time guys
Jim
Last edited by the Wasp; 09-24-2019 at 11:37 AM.
 09-24-2019 | 11:19 AM
#2

Take a popsicle stick, wrap it with a medium to fine grit sandpaper and use that to widen the slot slightly. Just make sure you don't angle the sides of the slot so the stab stays parallel to the wing. It won't take much to make the stab fit the way you want so be gentle with your sanding.
09-24-2019 | 08:02 PM
#3
I'm not too sure about that one. A tight wood to wood fit is the most important thing for a strong glue joint. Assuming the parts aren't in a bind, opening it up will just require filling the gap with glue. That doesn't ever make for a good build.
It's ok if some glue pushes out. Press it into the wood so it soaks into the pores on both the fuselage and the tail. Wipe off what smears and press it into the joint after it's in place. Clean the residue with alcohol before it starts to cure.
It's ok if some glue pushes out. Press it into the wood so it soaks into the pores on both the fuselage and the tail. Wipe off what smears and press it into the joint after it's in place. Clean the residue with alcohol before it starts to cure.
09-24-2019 | 08:17 PM
#4
Thread Starter
My Feedback: (1)
I'm not too sure about that one. A tight wood to wood fit is the most important thing for a strong glue joint. Assuming the parts aren't in a bind, opening it up will just require filling the gap with glue. That doesn't ever make for a good build.
It's ok if some glue pushes out. Press it into the wood so it soaks into the pores on both the fuselage and the tail. Wipe off what smears and press it into the joint after it's in place. Clean the residue with alcohol before it starts to cure.
It's ok if some glue pushes out. Press it into the wood so it soaks into the pores on both the fuselage and the tail. Wipe off what smears and press it into the joint after it's in place. Clean the residue with alcohol before it starts to cure.
thanks for replying
Jim
09-24-2019 | 11:31 PM
#5
I'm not too sure about that one. A tight wood to wood fit is the most important thing for a strong glue joint. Assuming the parts aren't in a bind, opening it up will just require filling the gap with glue. That doesn't ever make for a good build.
It's ok if some glue pushes out. Press it into the wood so it soaks into the pores on both the fuselage and the tail. Wipe off what smears and press it into the joint after it's in place. Clean the residue with alcohol before it starts to cure.
It's ok if some glue pushes out. Press it into the wood so it soaks into the pores on both the fuselage and the tail. Wipe off what smears and press it into the joint after it's in place. Clean the residue with alcohol before it starts to cure.
09-25-2019 | 04:05 AM
#6

My Feedback: (29)
I would not use Tite Bond, being water based it could swell the wood leaving you with too tight a fit as you slide the stab into the slot. I have two options for you. For the guys who would feel better about using epoxy, use epoxy laminating/finishing resin brushed on both the stab center and the interior of the slot. Let the resin soak in a minute or two, slide the stab into place and clean any resin that may have gotten on the covering with alcohol. Option 2, slide the stab into place and wick some thin CA into the joint. There is so much contact area there that the CA would hold that stab into place just fine. You can easily expect a 3/8" to 1/2" penetration of CA into the joint.

 09-25-2019 | 02:09 PM
#8

Junior Member
Joined: Sep 2019
Posts: 16
Likes: 0
Received 0 Likes
on
0 Posts
Same here.
I would probably slide the stabilizer so it is about a glue-joint-width from being in place (i.e. most of the way).
Then apply a bit of slow-setting CA right along the joint, push the stab through so it's the same distance out on the other side, and apply another line of glue.
Finally center the stab in the fuselage (maybe even move back and forth a few times to get the glue spread out inside the joint) and let the glue set.
My bad. I thought the stab slotted in from the side...
I see from the manual it slots in from the rear (sorry, I can't post an image or link...)
Same basic suggestion. The idea is to get glue onto the stab and then distribute it between the two (hidden) surfaces.
In this case I would probably try to get glue inside the fuselage slot using a hypodermic needle or just carrying small bits from the glue dispenser tip into the slot on the end of a bit of solid wire. Then push the stab in place and align it.
Alternatively, you could try a modification of my first suggestion and slide the stab in dry, then slide it slightly to one side, apply glue, slide it to the other side, apply glue, and then put it in position.
A thin epoxy (like WEST System) would also work. You can clean excess off before it cures with denatured alcohol, if you get a little too much in and some of it oozes out.
If you're concerned about the joint's strength after that, you could apply a small fillet of CA or epoxy between the stab and fuselage-sides after the first glue has cured.
Then apply a bit of slow-setting CA right along the joint, push the stab through so it's the same distance out on the other side, and apply another line of glue.
Finally center the stab in the fuselage (maybe even move back and forth a few times to get the glue spread out inside the joint) and let the glue set.
My bad. I thought the stab slotted in from the side...
I see from the manual it slots in from the rear (sorry, I can't post an image or link...)
Same basic suggestion. The idea is to get glue onto the stab and then distribute it between the two (hidden) surfaces.
In this case I would probably try to get glue inside the fuselage slot using a hypodermic needle or just carrying small bits from the glue dispenser tip into the slot on the end of a bit of solid wire. Then push the stab in place and align it.
Alternatively, you could try a modification of my first suggestion and slide the stab in dry, then slide it slightly to one side, apply glue, slide it to the other side, apply glue, and then put it in position.
A thin epoxy (like WEST System) would also work. You can clean excess off before it cures with denatured alcohol, if you get a little too much in and some of it oozes out.
If you're concerned about the joint's strength after that, you could apply a small fillet of CA or epoxy between the stab and fuselage-sides after the first glue has cured.
Last edited by GeoffS; 09-25-2019 at 02:45 PM. Reason: Didn't understand the assembly geometery...
09-25-2019 | 05:18 PM
#9
Thread Starter
My Feedback: (1)
thanks guys for replying,
I will just have to find some thinner epoxy or epoxy with a longer working time.
I have been using epoxy since the 90s for many different things, I have found that one of it's biggest secrets is good mixing.
I have had very good luck with Devcon 2 Ton epoxy, but it's work time is rated for 30 minutes, but I mix very well and I find it's work time is really only 10 minutes or less.
mixing epoxy and applying it and thin aligning the horizontal stab correctly takes longer than 10 minutes, so I will get some that has a longer rated work time. .
thanks again for replying, you all conferred in what I was thinking
Jim
I will just have to find some thinner epoxy or epoxy with a longer working time.
I have been using epoxy since the 90s for many different things, I have found that one of it's biggest secrets is good mixing.
I have had very good luck with Devcon 2 Ton epoxy, but it's work time is rated for 30 minutes, but I mix very well and I find it's work time is really only 10 minutes or less.
mixing epoxy and applying it and thin aligning the horizontal stab correctly takes longer than 10 minutes, so I will get some that has a longer rated work time. .
thanks again for replying, you all conferred in what I was thinking
Jim
09-25-2019 | 05:48 PM
#10
My Feedback: (29)
Jim, I haven't had any epoxy " glue " in my shop for two decades. I do a fair amount epoxy fiberglass fabrication so I always have a gallon of laminating resin around. When I need an epoxy glue I mix up some of my laminating resin and add some fillers such as milled fiber and cabosil. This thickens the resin so it can be used as a paste adhesive like the Devcon 30 minute but is much stronger due to the fiber that was added to the matrix. It also gives you close to an hour working time.
09-25-2019 | 08:13 PM
#11
Thread Starter
My Feedback: (1)
Jim, I haven't had any epoxy " glue " in my shop for two decades. I do a fair amount epoxy fiberglass fabrication so I always have a gallon of laminating resin around. When I need an epoxy glue I mix up some of my laminating resin and add some fillers such as milled fiber and cabosil. This thickens the resin so it can be used as a paste adhesive like the Devcon 30 minute but is much stronger due to the fiber that was added to the matrix. It also gives you close to an hour working time.
edited> laminating resin epoxy, OK, I see.
an hour working time sounds good, you have good time there to get things just how they need to be. I am going to look into buy some, most likely I will have to order it.
to add, most times I use epoxy I mix in some milled fiberglass to thicken it some. I have even used it with J&B Weld.
Jim
Last edited by the Wasp; 09-25-2019 at 08:16 PM.
09-25-2019 | 08:24 PM
#12
Thread Starter
My Feedback: (1)
Jim, I haven't had any epoxy " glue " in my shop for two decades. I do a fair amount epoxy fiberglass fabrication so I always have a gallon of laminating resin around. When I need an epoxy glue I mix up some of my laminating resin and add some fillers such as milled fiber and cabosil. This thickens the resin so it can be used as a paste adhesive like the Devcon 30 minute but is much stronger due to the fiber that was added to the matrix. It also gives you close to an hour working time.
Jim
09-26-2019 | 01:53 AM
#13
Junior Member
Joined: Sep 2019
Posts: 16
Likes: 0
Received 0 Likes
on
0 Posts
For wood joints, cotton fibers are the best generic filler. They have basically the same properties as wood (both are cellulose fibers), so the filled epoxy joint flexes very much like the material it's bonded to.
Fumed (or "colodial") silica is a great thickener, but it is very heavy and also very hard to sand.
The Gougeon Brothers WEST System® epoxy (westsystem.com/) is specifically designed for wood bonding. Its viscosity is higher than laminating resin, but that's due to the formulation and not fillers. In fact, WEST has some of their own fillers that I really like:
- 404 High Density
- 410 Microlight
High Density has similar mixing behavior. It does not thicken the mixture anywhere the same as something like fumed silica (sometimes I will add "just a pinch" of silica to a high-density mix just to thicken it a bit when I don't want it to run).
One of the major advantages of epoxy (in general) is that it can fill a relatively large gap with good strength (in fact, it's important not to clamp an epoxy joint too tightly and squeeze out all the resin).
Last edited by GeoffS; 09-26-2019 at 01:55 AM.
09-26-2019 | 02:05 AM
#14
Junior Member
Joined: Sep 2019
Posts: 16
Likes: 0
Received 0 Likes
on
0 Posts
This is because when epoxy cures it gives off heat.
In a container the heat causes the mixture to react even faster, giving off more heat...
You get the idea...
Once the epoxy is spread out, its temperature is held essentially constant by the higher mass of the substrate.
Whenever I'm working on a large joint or surface, the first thing I do is pour out the epoxy from the container across the workpiece.
From that point on you have a lot more time to spread it out to the desired thickness since it's not curing as quickly as it would in the pot.
Another advantage of high-performance epoxies is that many of them have a number of different hardeners that will change the cure-time (and also usually the viscosity).
For example, WEST's 105 System has three hardneners: fast, slow, and super-slow "tropical".
Last edited by GeoffS; 09-26-2019 at 02:11 AM.
09-26-2019 | 04:10 PM
#15
A trick for working with epoxy is that it cures much (much!) faster in a container than when spread out on a surface.
This is because when epoxy cures it gives off heat.
In a container the heat causes the mixture to react even faster, giving off more heat...
You get the idea...
Once the epoxy is spread out, its temperature is held essentially constant by the higher mass of the substrate.
Whenever I'm working on a large joint or surface, the first thing I do is pour out the epoxy from the container across the workpiece.
From that point on you have a lot more time to spread it out to the desired thickness since it's not curing as quickly as it would in the pot.
Another advantage of high-performance epoxies is that many of them have a number of different hardeners that will change the cure-time (and also usually the viscosity).
For example, WEST's 105 System has three hardneners: fast, slow, and super-slow "tropical".
This is because when epoxy cures it gives off heat.
In a container the heat causes the mixture to react even faster, giving off more heat...
You get the idea...
Once the epoxy is spread out, its temperature is held essentially constant by the higher mass of the substrate.
Whenever I'm working on a large joint or surface, the first thing I do is pour out the epoxy from the container across the workpiece.
From that point on you have a lot more time to spread it out to the desired thickness since it's not curing as quickly as it would in the pot.
Another advantage of high-performance epoxies is that many of them have a number of different hardeners that will change the cure-time (and also usually the viscosity).
For example, WEST's 105 System has three hardneners: fast, slow, and super-slow "tropical".
205 is fast
206 is slow
207 is for coating or glassing
209 is extra slow
I have and use all four when building boats and planes
09-26-2019 | 04:51 PM
#16
My Feedback: (29)

Although West Systems will work for most applications if you ever feel the need for something better, check into US Composites resins. I currently use their 635 resin along with the medium hardener for just about everything. This fuselage was just recently made with the US composites resin and weighs a mere 31oz. Not bad for a fuselage that is 73" long.
09-26-2019 | 05:30 PM
#17
Thread Starter
My Feedback: (1)
well I just bought some LockTite epoxy, it's set time is 1 hour, I will test it before I glue the stabs. if it works it will give me time to align the stab and clean up too..
I have West's #403 Microfibers thickener (thought it was milled fiberglass), I know it's not the best for everything, but it work well for me for the hobby
thanks for all the help and info
Jim
I have West's #403 Microfibers thickener (thought it was milled fiberglass), I know it's not the best for everything, but it work well for me for the hobby
thanks for all the help and info
Jim
09-26-2019 | 06:00 PM
#19
There's no need to add filler or strengthener to epoxy for this application. You are gluing balsa to balsa. As long as the glue joint is stronger than the surrounding wood, it's strong enough. All you need is a good wood fit and glue that will stay liquid long enough to let you get it put together.
09-26-2019 | 06:30 PM
#20
My Feedback: (29)
Jester, while you are essentially correct, what he is gluing together is wood to epoxy. Typically when using epoxy you have to maintain a bond line. Usually in the industry that would be a gap between .005 and .015. If the fits are extremely tight when using epoxy it will greatly reduce the sheer strength of the joint. Now that being said, our models are very overbuilt and if the OP correctly mixes his epoxy, applies it and slides his stab into place it will be secure enough to outlast the lifespan of the airplane. The intent of the information I just posted is when someone does have a situation when a critical bond must be done.
09-27-2019 | 01:48 PM
#21
Junior Member
Joined: Sep 2019
Posts: 16
Likes: 0
Received 0 Likes
on
0 Posts

I don't think I have much other than Fast and Slow (but I do use of the Gougeon bulk-dispensing positive-displacement pump, so that should count for something...)
westsystem.com/305-positive-displacement-pump/
For laminating WEST 105 isn't really very good (even with the super low-viscosity hardener).
You're much better off using Gougeon's ProSet (prosetepoxy.com/).
BTW, there are actually even other WEST 105 combinations possible by mixing G-Flex epoxy into a 105 resin/hardener mix:
.epoxyworks.com/index.php/mixing-gflex-with-other-west-system-epoxies/
G/flex further expands the versatility of WEST SYSTEM 105 Resin-based epoxies. G/flex can be used with 105 Resin and one of its four standard Resin combinations, the resulting cured epoxy will be more flexible and able to deflect more before cracking, but it will also have slightly lower strength.
09-27-2019 | 01:52 PM
#22
Junior Member
Joined: Sep 2019
Posts: 16
Likes: 0
Received 0 Likes
on
0 Posts
09-27-2019 | 05:16 PM
#23
Thread Starter
My Feedback: (1)
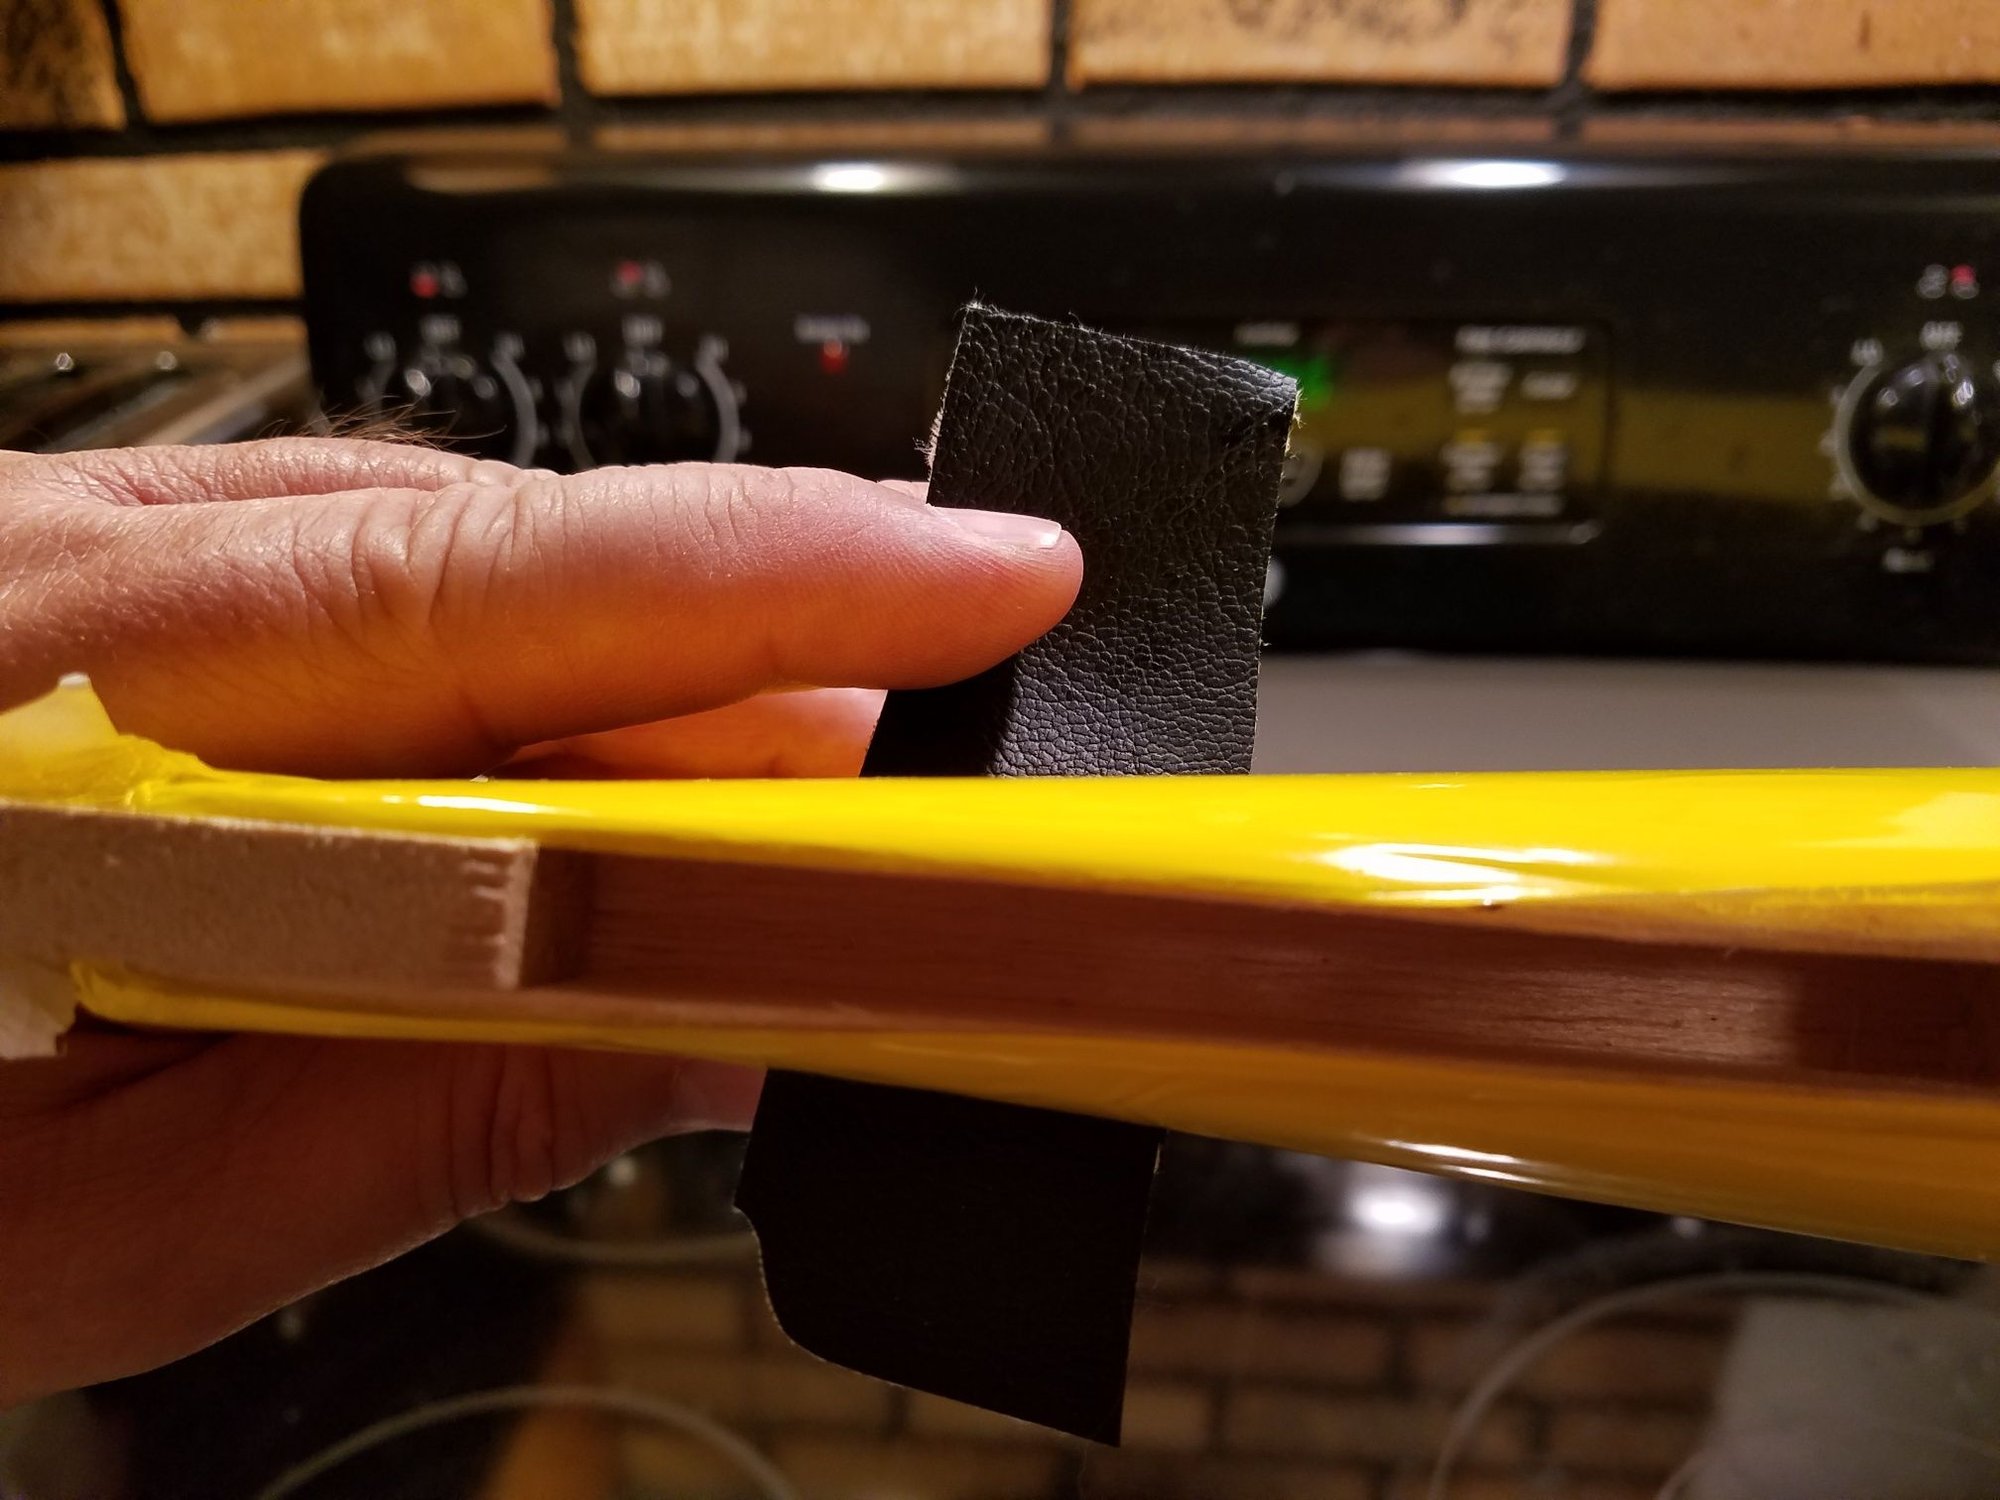
too add to that, as I said, the horizontal slot has a ceiling as well as a floor, and it's fit is so good to the stab I think I could just drill 3 or 4 tiny holes in the slot's ceiling and add CA to glue the stab threw the holes, then add CA around the out side joints. then mount the vertical stab.
the photo shows the bottom of the slot for the vertical stab, I could drill the tiny holes threw for CA. I added the fake leather so you can see the 2 slots do not inter-join
Jim