


1/10th scale Hydro Build
 06-24-2021, 05:07 AM
#101

I'm thinking I'll revert back to 4S now. The 3S batteries are just too big, I think it's overkill and the big motor is too much. I'm pretty annoyed that I was given a bum steer.
I'm going to use the bigger setup in a new mono hull.
Now I need to figure out what the best motor is going to be for the hydro. There is several standard options that clubs use in their rules in the US but as far as I can tell they're no longer available.
More research required.
In the meantime, I've had to move my little workshop, which is why things have been moving slowly. That should be finished this weekend and I can get on with it.
 06-24-2021, 05:17 AM
#102
This is probably the closest thing I've found:
https://hobbyking.com/en_us/turnigy-...ucts_analytics
I haven't been able to find much information, so I figured looking up competition rules and mimicing the allowed motors would be a good option. This is from the ERCU rules:
2-ercurulebook_final_-_2021.pdf
https://hobbyking.com/en_us/turnigy-...ucts_analytics
I haven't been able to find much information, so I figured looking up competition rules and mimicing the allowed motors would be a good option. This is from the ERCU rules:
2-ercurulebook_final_-_2021.pdf
06-24-2021, 05:24 AM
#103
Or perhaps this, slightly bigger than the above rules allow (but legal here because motors are open and we only have to adhere to battery counts) but available here in Aus.
https://rcboatbitz.com/product/sss-3...hless-motor-2/
https://rcboatbitz.com/product/sss-3...hless-motor-2/
06-24-2021, 08:28 AM
#104


If you're not going to be racing, fudging a little on what the rules allow isn't a big deal. Since my scale boats are going to be raced, I do need to follow the rules. That being said, even my sport 20 that I posted pictures of earlier in this thread is race legal. I probably won't ever race it since it's small(too small for me to really want to race it since it will be hard to see).
In the case of my Pay'N Pak build, I've not made much progress as I ordered a new set of plan sheets since the ones I have are getting very faded and hard to see. This was a few weeks ago so I may have to contact the vendor again to see what the word is on getting a new set of plans
In the case of my Pay'N Pak build, I've not made much progress as I ordered a new set of plan sheets since the ones I have are getting very faded and hard to see. This was a few weeks ago so I may have to contact the vendor again to see what the word is on getting a new set of plans
06-27-2021, 09:24 PM
#105
I'm starting to think about mounting the strut/motor etc.
I have the depth of the strut on the plans so I think I know that, and I know that the prop needs to be partly under the transom front to back, but what angle does it need to be on? In the plans it's on a huge angle (see below) but everything I see elsewhere has the strut basically flat with the running surface.
I assume then I mount the motor per the mount (which has some adjustability) and go straight out of the hull from the motor, and bend up to the level of the strut?
06-27-2021, 10:12 PM
#106
This is what I'm thinking about for the motor. Trying to get it as far forward as possible.
This isn't the traditional method for this mount, but since it's got a tunnel this will allow me to mount it out of the tunnel but use the tunnel for the motor to sit down in.
How does the angle for the stuffing tube look?

This isn't the traditional method for this mount, but since it's got a tunnel this will allow me to mount it out of the tunnel but use the tunnel for the motor to sit down in.
How does the angle for the stuffing tube look?
Last edited by Vilante; 06-27-2021 at 10:14 PM. Reason: Englash
06-28-2021, 02:19 AM
#108
Are you using a hard shaft(otherwise known as music wire) or a flex cable for your prop shaft? Which one you go with will determine what your prop shaft angle needs to be. My boats both use flex cables, I run a 4.75mm cable inside of a 7.93mm ID brass tube that fits into the front of the strut, at least on the Pak. Here's a shot of the strut showing the inside brackets

As for what I sealed everything up with, I coated the entire Pak hull with epoxy, inside and out. Your other option would be to use silicone caulking, as I did to install the stuffing tube in my Elam Plus. The difference between the boats and what I used to install the stuffing tubes is the material the boats are built with. My little Pak is plywood while the Elam is fiberglass.
I was hoping to have some work done on my build by now but this weekend has been HOT!!!!!! Yesterday topped out at 40c with it being 22c now, being 3:35am. Today it's supposed to hit 39c but it will probably be higher since it was only supposed to get up to 35 yesterday. Needless to say, those kind of temperatures don't give much working time with epoxy. I might get a couple of minutes with the slow cure instead of the 20 or so I normally get
Last edited by Hydro Junkie; 06-28-2021 at 02:40 AM.
06-28-2021, 02:43 AM
#109
Cheers HJ.
I've got a flex drive. I think I'll have to buy a prop to make sure I've got it for/aft correctly. Now to figure out a good starting prop!
I'll be sealing with epoxy, just thinking it might be best not to epoxy in the strut till I've run it.
40 degrees, ouch!
I've got a flex drive. I think I'll have to buy a prop to make sure I've got it for/aft correctly. Now to figure out a good starting prop!
I'll be sealing with epoxy, just thinking it might be best not to epoxy in the strut till I've run it.
40 degrees, ouch!
06-28-2021, 03:30 AM
#110
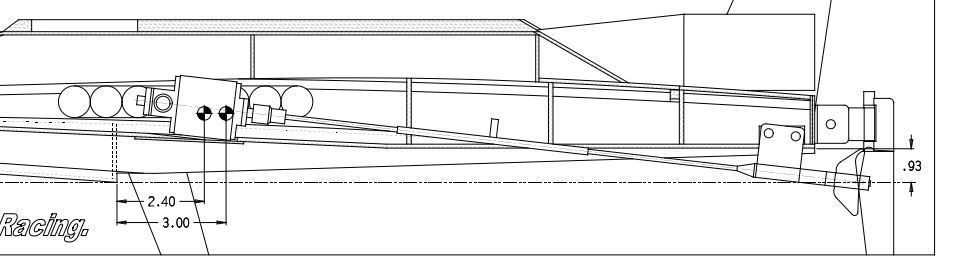
The strut I posted the picture of above is mounted through 4.5mm of plywood, 1.5mm of bottom skin and a 3mm doubler. Since you're using a flex cable, I would install the strut parallel to the bottom of the boat initially. You also don't want to mount the stuffing tube straight. You want to give it a slight "S" curve so that the cable doesn't "whip" inside of the tube. Line up the inner end so that the cable goes into the center of the tube, give it a gentle downward bend to take it through the boat bottom and then another gentle upward bend to line up with the strut. You mentioned needing a prop to know how long to cut the cable. Actually, you need a thin walled drive dog instead. This is what the prop locks into to get it to spin. When you cut the cable, be sure to cut it long enough to allow one cable thickness between the front of the drive dog and the rear of the strut to allow for shrinkage when the prop is loaded or you will burn up your motor, strut or other parts due to excess load. As for strut depth, line up the strut tube center with the bottom of the sponson transoms. This is normally a good starting point but, unfortunately, I don't have a recommendation for you as far as what prop to use.
06-28-2021, 03:39 AM
#111
Brilliant, thanks for that HJ, awesome information. You're right, I can probably get away with the dog for now (I have one) to get it lined up.
I'll ask some opinions but there are some examples of props used on the Thunder Boats site (1/10 scale hydro comp in the States) so that's a good start. 47mm though, bigger than I thought.
I'll ask some opinions but there are some examples of props used on the Thunder Boats site (1/10 scale hydro comp in the States) so that's a good start. 47mm though, bigger than I thought.
06-28-2021, 11:45 AM
#112
A 47mm prop isn't that big. I run an Octura X440 on my Sport 20 Pak. It is a 40mm prop with a 57mm pitch. That means, theoretically, that my boat(with its 3.5cc nitro engine spinning at 35K rpm with no load) should be capable of 117.5KPH. That said, reality will be lower. You have to figure roughly 20% reduction due to prop slippage, add to that aerodynamic and hydrodynamic drag as well as mechanical friction. Real world would be more like upper 70s to mid 80s. My scale boat will only do 100-110 KPH with an 11cc CMB engine and Prather 250 prop (58.4X91.4mm)
07-02-2021, 03:31 AM
#114
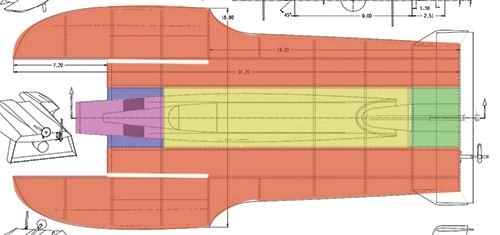
Depends on the shape of the deck more than anything. If you look at this picture, you can see that the deck is one piece on each side. With my scale Pak build, I will need to use a third piece for the deck between the sponsons where it drops below the sponson inside tops due to the deck's shape. It's got a compound curve that can't be done using just one piece per side
07-02-2021, 03:51 AM
#115
Depends on the shape of the deck more than anything. If you look at this picture, you can see that the deck is one piece on each side. With my scale Pak build, I will need to use a third piece for the deck between the sponsons where it drops below the sponson inside tops due to the deck's shape. It's got a compound curve that can't be done using just one piece per side
This image shows the different deck pieces per the plan. The red sections are split where I've drawn a white line, as the centre section dips down at the front. The red is all one piece though. The purple section is higher so that makes sense, but the blue and green sections (and the yellow section, though that's the hatch of course) are all on the same plane. The yellow is meant to be fixed, but I think part of it will have to be openable to allow access to the strut.
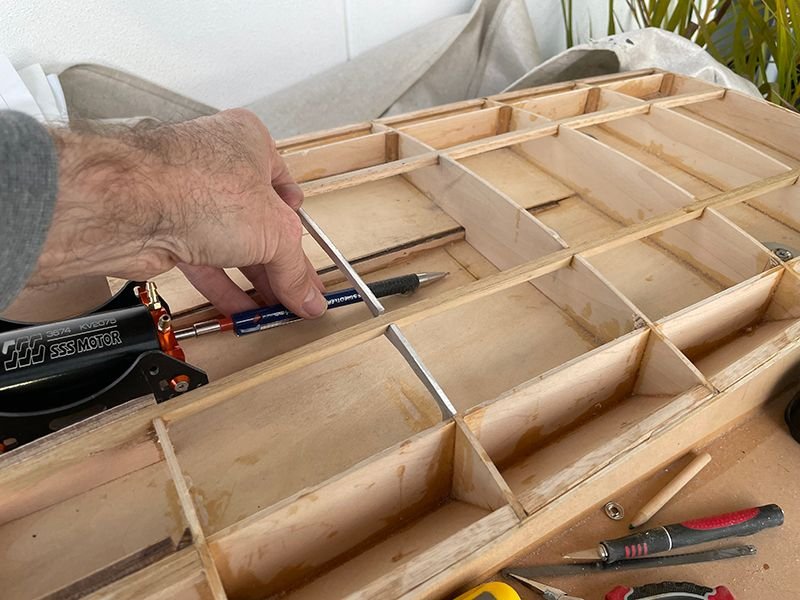
Recently I've:
- Completed the support for the battery area
- Strengthened the sponsons, though I will add a little carbon here around the split to make it solid
- Doubled the rear of the sponson for the turn fin
- Started installing the strut mount
- The boat needs to turn right, am I right in saying I mount the turn fin and the rudder on the right?
- As I want to get the motor forward as far as possible, the standard stuffing tube length of 300mm (1 foot) won't be long enough. Can I join them with solder?
07-02-2021, 04:50 AM
#116
That's weird, considering I took it from my build thread. Let me try again:
https://www.rcuniverse.com/forum/att...3&d=1375582323
Let's see if that works.
Now, as for your colored deck layout, let me go over it as this isn't a big issue, regardless of how it looks:
RED, one piece each. Make sure you cut them both oversized since the part that drops down in front between the sponsons will be longer than shown. Same thing for all of the deck edges, they will require more material than shown due to the arcing shape of the deck
BLUE, hard mount it to the hull, just like the red. Make sure to extend this area back to where the purple and yellow meet up and become flush. This is important for sealing the hull with tape when you are running it later, that is unless you install an internal water resistant cover and tape it up instead.
PURPLE, YELLOW AND GREEN, make this all one piece. The purple could be hard mounted to the hull if you want, it's really your choice. As far as the yellow and green, you will want to make that all one piece and permanently attach the cockpit, engine cover and exhaust pipe to it. What you need to remember is that the tighter you make things, the harder it will be to work on later. If you look at the picture of my scale Elam Plus in post 5, you can see the cowl covers everything except the very rear of the boat. Unlike your boat, mine has a metal cover that matches the heat shield on the full sized boat. This was not the case on your boat since there was less decking between the exhaust and the rear of the boat so it wasn't needed.
07-02-2021, 05:24 AM
#117
Now, getting to your recent work and questions on set up:
- Completed the support for the battery area Okay, would love to see what you did there
- Strengthened the sponsons, though I will add a little carbon here around the split to make it solid If you need to beef that area up, stick to a light to medium weight fiberglass. Carbon fiber is actually very brittle and can easily break along the grain. If you can get your hands on some CF cloth, it would be better but will require a significant amount of resin to fill the weave, meaning more weight and weight is something you need to try to avoid
- Doubled the rear of the sponson for the turn fin Doubled with what? Correct me if I'm wrong but it looks like you have been using lite ply for the structure. If that is the case, you could have a problem with the fin mounting bracket and sponson transom but nothing that can't be dealt with. The problem with lite ply is that it's got birch skin with a balsa core. Balsa is relatively spongy, thus meaning that if the birch facing fails or cracks, the fin bracket will start smashing the balsa every time you turn the boat. I'll hold off on going into this further until I hear from you
- Started installing the strut mount Cool, would love to see what you've done
- The boat needs to turn right, am I right in saying I mount the turn fin and the rudder on the right? Turn fin goes on the rear of the right sponson as far out as you can get it. This is for stability as the closer to the hull you are, the harder it is to get the fin to hold the boat down. As for the rudder, I would almost install it as shown. My preference would be to have it directly behind the engine bay wall as that area, depending on the rudder mount used, is more stable than other locations My Pak hull has the rudder in that location, but for a different reason. I wanted to be able to pull the rudder to turn the boat as it's easier on the control rod. Pushing a rudder to get it to turn can, if the rod isn't very strong, cause the rod to bend or flex while turning, reducing how much control you have https://www.rcuniverse.com/forum/att...4&d=1375582324
- As I want to get the motor forward as far as possible, the standard stuffing tube length of 300mm (1 foot) won't be long enough. Can I join them with solder? You can, though it would require a sleeve of a larger size of tubing added to the outside of the joint. I know longer lengths of tubing are available since I used longer on both the cooling line(from transom to engine bay) and stuffing tube on several of my boats. The cooling line is visible in the picture linked below. The black line is actually a long drill bit inserted into the end of the line to keep it at the angle I wanted it to be until the epoxy holding it in cured. IIRC, the line was part of a 900mm long tube but, at this time, I don't have a full service hobby shop in my area so I'll have to see what I can find and get back to you on that
Last edited by Hydro Junkie; 07-02-2021 at 05:36 AM.
07-02-2021, 05:54 AM
#118
Just put out a request in another forum for a new source of 900mm long tubing. I'll let you know as soon as I get a reply since I made sure to let them know someone in Australia needed tubing as well. Who knows, we might both get lucky on this one
07-02-2021, 06:10 AM
#119
Got a hit already. Check this site out as they list 1meter long K&S brass tubing starting at the bottom of page 2
https://hobbiesaustralia.com.au/coll...s/brass?page=2
https://hobbiesaustralia.com.au/coll...s/brass?page=2
07-02-2021, 08:21 PM
#120
Thanks for all this HJ, you're a bloody legend!
I'm not using a light ply, it's just basswood rather than beech. I'm sure it's not quite as strong but it's not balsa in the centre, it's timber. I've actually triple skinned the back of the sponsons per the design, and have some nice little hits to epoxy in to mount the turn fin and rudder.
It was carbon cloth I meant, I have some on the way. One reason I wanted to use it was that it looks cool haha, but also am thinking I'll use it down the centre of the boat as the design has a tub running the whole length of the boat, which doesn't seem like a very strong method of construction. Thinking it'll be much stronger this way. I am wary of weight but more worried about strength.
The strut mount needs a box to mount the strut to as it can't mount to the floor. I'll show you once I've got it mocked up. Will have to lop the top off the strut too, this design is so shallow!
Thanks for the info on the turn fin and rudder. I have the fin but have to make the mount so will keep that in mind. Interesting you see the rudder mounted on both sides but your post makes a lot of sense. The rudder I have can be pulled/pushed from both sides, so would you still mount on that side?
Thanks for the lead on the stuffing tube, I'll get onto that for sure!
Thanks again!
Edit - I'm also drawing up the wing in CAD and considering 3D printing it. Also try to design a driver to run on the 3D printer. They are my late night after the kids have gone to bed fiddlings.
07-05-2021, 04:11 PM
#121
This is the brace I made for the batteries to fit under. The hull is so short top to bottom that I figured aluminium was the only way to get some strength in there without adding too much weight. Batteries can now slide under each wing.

This is the strut mount. Now I just have to figure out what angle and depth to set it at......

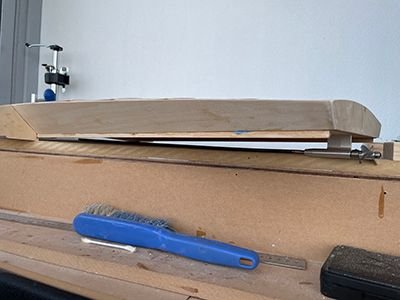
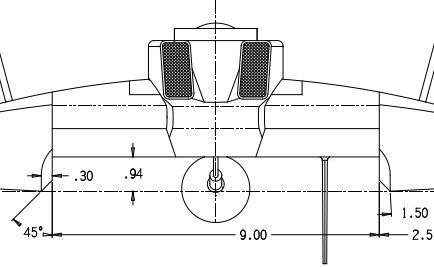
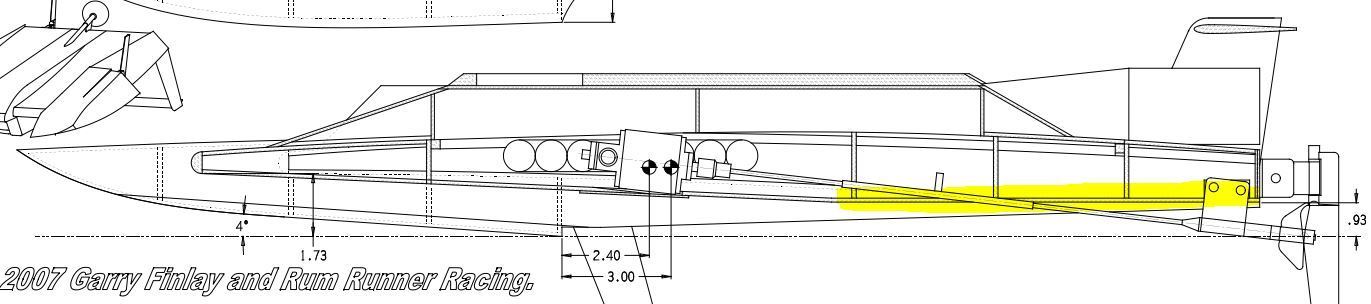
The boat is flat only at the rear, around the prop, and then it ramps up. Am I right in saying that the boat should plane on the same plane as the flat bit? So if I set up the boat level with that rear flat bit, I can then set the centre of the prop to be in line with the bottom of the sponons? What's your thought on the strut angle?
I think I just answered my own question, the plan shows it just as I was explaining. The yellow is the flat bit I was talking about. I'm using a flex shaft so the angle of the strut obviously won't be that extreme.
This is the strut mount. Now I just have to figure out what angle and depth to set it at......
The boat is flat only at the rear, around the prop, and then it ramps up. Am I right in saying that the boat should plane on the same plane as the flat bit? So if I set up the boat level with that rear flat bit, I can then set the centre of the prop to be in line with the bottom of the sponons? What's your thought on the strut angle?
I think I just answered my own question, the plan shows it just as I was explaining. The yellow is the flat bit I was talking about. I'm using a flex shaft so the angle of the strut obviously won't be that extreme.
07-05-2021, 06:14 PM
#122
To begin with, the strut tube should be parallel with the area you highlighted in yellow. The point that the bottom angles up from is, in most cases, referred to as the bottom break. All dimensions are calculated in comparison to the rear bottom, behind the break. Since the diagram shows 23.6mm(yes, I converted it for you), that is where the sponson bottoms should be at the transoms and where the center of the drive shaft should be below the bottom. To get that depth, you will probably need to angle the motor down a bit more than shown so you can get a smooth curve in the stuffing tube. The boat may be too short to use a full "S" curve but that's not a huge issue with this boat
Last edited by Hydro Junkie; 07-05-2021 at 06:17 PM.
07-05-2021, 06:17 PM
#123
Thanks for the conversion. That's the first one I ever memorized because may Grandfather would only ever work in inches so I had to learn  I loved working with him, he was a carpenter and builder.
Thanks again for your help. Trying to get it to the point I can seal it and put foam in it ready to put the decks on. So many little things to do though!
I loved working with him, he was a carpenter and builder.Thanks again for your help. Trying to get it to the point I can seal it and put foam in it ready to put the decks on. So many little things to do though!
07-05-2021, 06:20 PM
#124
PS - What grease do you use for your shaft? Can I just buy general marine grease or does it have to be RC specific?
I was going to get a little to use on the water jacket as I understand they can stick to the can if not.
I was going to get a little to use on the water jacket as I understand they can stick to the can if not.
07-05-2021, 06:28 PM
#125
I bought a jar of Grimracer marine grease several years back for the cable but, for the strut, I use a whitish colored lithium based grease from the auto parts store. I found that it and the Grimracer were, more or less, the same stuff. Some people prefer to use a heavier grease used in outboard engines and outdrives, others a mix of transmission fluid with other lubricants. Just remember, the heavier the grease, the more power it will take to spin the cable and the shorter the life of the batteries and motor will be