


THE NEW APPROACH
 07-11-2007, 05:59 AM
#1
Member
Thread Starter
Join Date: Apr 2006
Location: merrimacqueensland, AUSTRALIA
Posts: 41
Likes: 0
Received 0 Likes
on
0 Posts
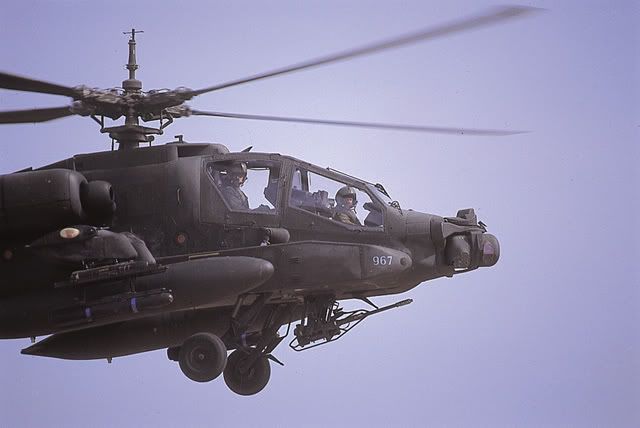
hi guys , i have been working towards building an Approach Engineering kit for quite some time now . It all started about eight months when i first saw pictures of the Approach Engineering kits as i was then flying a couple of ep8 electric helis and Tim and Kieth from the aussie importers for Quick of Japan ep helis sent me some pics of a conventional balsa \ply scale cobra and apache that would fit my ep8 http://www.totalerc.com/shop/index.php , from that day on i have wanted to build one of these kits .
The guys told me to contact James from Approach Engineering and have a chat as the ep8 kits where still in development , but that he had other kits in the works and that he was a very approachable guy , well after being in contact with james on and off over the last 6 months and having just finished my md530 little bird ,i found i was desperately needing something to go on with . i have been following a couple of builds on various sites that continued to impress me with the kits . So i have set about giving myself a goal this year of building each of the Approach Engineering kits on offer starting with the 30-46 size Boeing AH64A Apache ,followed by the ep8 e-cobra with hopefully the swift sized apache and cobra then finishing up with the 60-90 size cobra over the xmas break , so stick with me as i fully imerse myself in the world of Approach Engineering . http://www.approachengineering.com/index.html
With talking back and forth to James from Approach Engineering over the last 6 months , and finally deciding to build one ond share my experience with others ,it dawned on me that it would be interesting to get to know the man behind teh kits so i possed some questions to James which he kindly took teh time out to reply to .
Hello James and thanks for taking the time out of your busy schedule to let us know a bit about you.
Word is getting around the scale heli scene all over the world about your company Approach Engineering and for those that haven’t heard, they manufacture scale cobra and apache fuse kits for r\c helis using conventional balsa \ply construction methods used in r\c aircraft construction ,definitely not a new technique in radio control aircraft, but in the world of scale helis it is new and exciting.
Approach Engineering’s range currently include the 50 size apache ,a soon to be released and much anticipated 60-90 size cobra and the just released smaller e-cobra and e-apache designed for the 550 size electric heli scale modeler .
For those interested in any of Approach Engineering’s range you can become very familiar with them at the web site
http://www.approachengineering.com/index.html and for sales inquiries contact Al at Starwood Scale Models
http://www.starwoodmodels.com/products/ap/ .
Firstly James rumor has it that you have a rather exciting job away from Approach Engineering that gives you first hand access so to speak of the attack helis that you have designed ,can you firstly give us all an insight into what that is and secondly about your career flying these helis?
JAMES>>>>>
Thanks and I appreciate your time. In addition to Approach Engineering I have the opportunity as being a full time flight instructor in the AH-64A Apache. We are located in West Jordan, Utah and have one of the best areas to fly and train in. It is a great unit and we have top notch aviators and crew chiefs that make up our unit. We were deployed fairly recently in Operation Enduring Freedom to help out the efforts in Afghanistan. We spent a year in country doing what was needed of us. There was so many good things happening there for the people that you never heard about on the news. I did have the time to do a lot of the time consuming design work on many of these fuselages while I was over there and even built a few of the prototype aircraft.
James, have helicopters always been a big passion of yours? Or is flying in general your passion?
JAMES>>>>>
I have always loved aviation from as long as I could remember. Being a part of aviation was very important to me so my life followed that path. After high school I looked to go into the service so I could fly but it was right after Desert Storm and there were very little opportunities to be an aviator due to the down sizing going on. So I continued on with my schooling and completed my bachelors degree in mechanical engineering at the University of Utah. Once finished I looked back into the military and the rest is history. I have always been amazed with helicopters and many of the guys here asked why I did not go into the Air Force and it was because this is where I want to be.
How long have you been involved in the world of radio control flight and do you remember what got you started?
JAMES>>>>>>
I have been involved with RC from the time I was about five. I did not have anyone around me that did it so I started off in cars. As I got older and started to earn money mowing lawns I was able to get some better racing cars. The airplanes were still out of my reach and without anyone to help it seemed like a huge step. Finally when I was about 13 I purchased my first airplane, a *****cat glider. Very inexpensive, about $80 for everything I needed to fly, and more simple. My very first flight was with me at the controls trying to figure things out. I did realize pretty quick that my CG was too far aft and made for a fairly short flight. I continued to learn on that aircraft fixing it many times until it was finally beyond repair.
My first aircraft was a Senorita and learned quickly on that. Great builders plane. I could go on and on about all the different gliders and aircraft I built and re-kitted over the years, lots of stories. Well finally I had saved up enough to get into the world of RC helicopters. My first one was a Schluter Magic. I bought it used with a Rossi 60 and a Futaba super 7 radio. The gyro was the old mechanical one. It was like flying all over again.
So did being a real world heli pilot make it any easier to learn to fly r\c helis when you started?
JAMES>>>>>
I flew RC helicopters long before the real ones. I would have to say that flying the RC ones helped me fly the real ones.
How long ago did the idea come to reproduce the amazing helis that you fly for real?
JAMES>>>>>>
I have been working on this idea for about seven years. I had been building my own scratch built aircraft for years. My first prototype was built off some poster board with hand drawn plans. Still have it flying actually. It has a Kyosho Nexus giving it life. I am sure that many of you know Emile Sherrif better known as Copter Doctor and he was a great inspiration to me.
Having just received my Approach Engineering 50 size ah64 apache, and seeing first hand the amount of thought and detail that has gone into this kit, can you give us some insight into the time line and process that has happened from its inception, to the kit that I now have, and what ideas you have for it in the future?
JAMES>>>>>>
It took about three years to go through the prototypes, pictures, building instruction manuals, ect to go from the drawing board to the kitted box. I learned a lot from each prototype and used those ideas for the future kits helping to speed things along. The first one that I did for the plans of production was the 60 size Cobra fuselage. It was built with some friends of mine over in Afghanistan and is a great flyer. There still had a lot of detail work to be done on it and that is why it is not yet available. Some good news on that is I am currently working hard on that design again and hope to have it ready by the big IRCHA event in Muncie.
There has been a lot of work put into the smaller helicopters such as the Quick of Japan EP-8 V2 helicopter that is out being field tested in order to make sure the kit is ready for production. Great aircraft and a lot of fun.
I have so many ideas going on right now I do not even know where to start. Everything from some fixed wing to many more helicopters. I have a prototype Comanche built, working on some Hueys, F-14, F-18, P-38, Mirage 5, and on and on. Right now I am focused on the helicopters and will continue there. The time line is tough to say. I work very hard on the kits and there is so much work to be done on each aircraft that I do not have a set timeline. I have been trying to get one out but just set the priority of the aircraft to be built and go from there. Right now I am committed to finishing up the 60 size Cobra and the EP-8 size Cobra.
I have also just released a Swift and Logo size Apache as well that is a great kit. Lots of scale details added in with it. Check it out on Starwood Scale’s website www.starwoodmodels.com along with the others.
Do you do every thing yourself as far as continuing r&d and manufacturing of the kits or do you have others involved in the company these days?
JAMES>>>>>>>
Right now I do everything. I now have my inventory of parts set up where I have been able to employ my son to help me put together some of the sub assemblies. That has been a lot of fun working with him.
You must have one of the best setup garages out of all of us can you tease us with what your setup is like ?
JAMES>>>>>>
Well I have about 3/4 of my entire basement dedicated to this. I have everything from my laser cutter, drill press, spot welder for batteries, band saw, scroll saw, soldering equipment, belt sanders, disk sanders, dust collectors, a large array of shelving, four work benches, vacuum forming station, inventory of wood and misc parts, injection molder, pressurized air, and a tooling center and lathe for making all of the additional parts and for making the molds. I am starting to move more to outside vendors to allow me more time to do the design work and keep things progressing along.
All of the kits are designed in Solid Works which is a solid modeling software. It allows me to put together all the parts in 3D to make sure that everything fits well.
For those of us out there that are already jealous, how many helis do you have and what are they, oh and do you actually get much time to fly them?
JAMES>>>>>>
That is a good question, I still have my Schluter magic, nexus, ECO8, a swift, 2 logo 10’s, 2 X-Cell 60, Falcon 50, Raptor 50, and even some of my own designs. Almost all of them are still flying. The funny thing is that I could use a lot more to see how they all fit inside the different fuselages. For those of you that like E power I just came up with a great little conversion for X-cell 60 aircraft that just drop right in. That is still in testing. I still get out and fly as much as I can. It is fun to go out with my boys and share it with them.
With such a busy life do you suffer the same issues that plague the mere mortal’s amongst us ,and that being the evil look from the other half every time we so much as take a ;step in the direction of the garage\hanger ?
JAMES>>>>>>
Of course I do but who needs sleep anyway? My family is very supportive and I always make sure that they are not being left out.
So out of all the different sized cobra and apaches, which one is your favorite to fly and why?
JAMES>>>>>>
I would have to say the electric Apache. Part of it is because it is a great kit, the real one has a place in my life, and I just love the ease of electric helicopters. Just a flip of a switch and you are spooling up. No messy fuel to clean up after and no smoke bellowing out of the aircraft making it look like it just took a round! Even the sound is more real.
What does the future hold for James Linder and Approach Engineering, where do you see yourself in five years?
JAMES>>>>>>
Well I never have a crystal ball but I hope to be here still doing this, well of course with a lot more kits to offer. I am working with the possibility of making the kits with a fiberglass version so there is a lot of learning to do there as well. I am working on a few fixed wing designs as well that I hope to release in the near future. So keep your eye out for them as well. I just hope to be able to provide a high quality aircraft that others can enjoy as much as I have.
Thank you James for your time, and giving us an insight in to the world of Approach Engineering .
now that i have finally put my money where my mouth is and contacted Al Wert over at http://www.starwoodmodels.com/products/ap/ who sells the kits for Approach Engineering , Al gave me a price with shipping ,which i found to be very agreable , so i gave the credit card a thrashing and sat back for the long hard wait .I was expecting a 2-3 week wait , but man was i pumped when after 7 days i got a nice parcel slip from the postman to come pick up an international parcel,was that excited that i shot over the next lunch time to get it and had a quick look before going back to work , man that afternoon went slow i can tell ya .That was friday teh 22nd june ,so here i am a little over a week later with an apache that is about to be preped for painting .
So with out any more teasing here is how i got to where i am today with teh kit.
Welcome to the Approach Engineering AH64A Apache for .30-.46 size mechanics
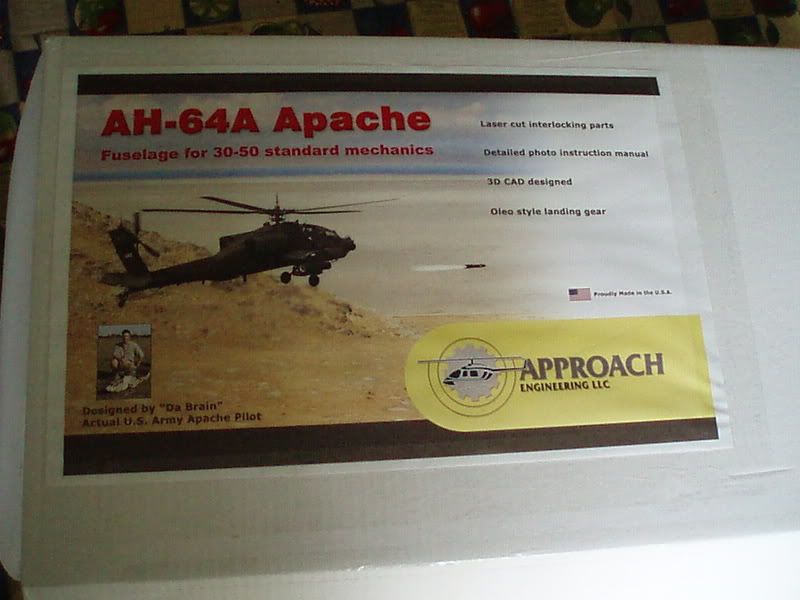
This is what you are greeted with on arrival , a very inspireing couple of picks of an apache in action with a pic of james below,but then who ponders on teh box covering for long hey lol,
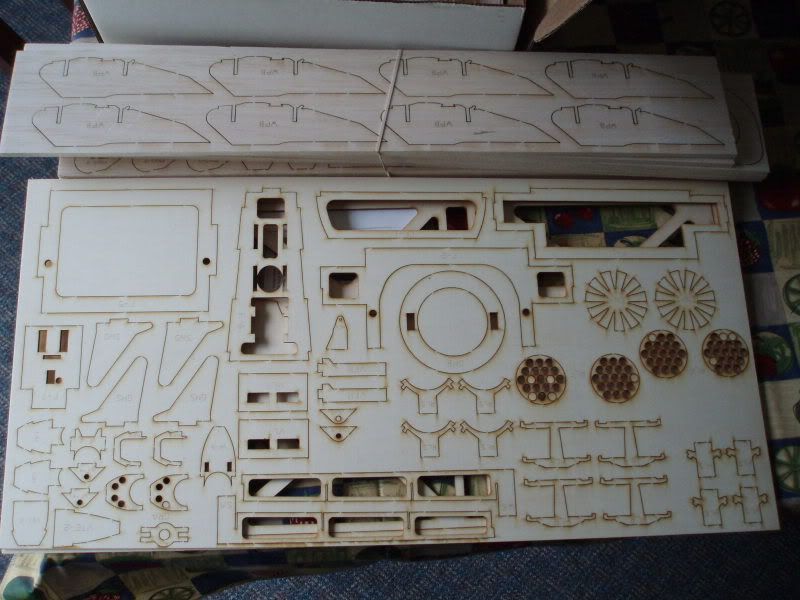
so off comes the box top , every thing is well paded ,and nicely packaged , with teh laser cut parts kept in seperate bundles depending on there build process ,if you have never built a laser cut kit before then man get out there and do it , gone are the days of spending hours cutting out parts and sanding them , hte over all quality of this kit is second to non , i have built a few topflyte scale fighters over the years which i have put at the top of teh ladder for quality ,and hte Approach Engineering kits are right there with them , the quality of the balsa and ply is superb ,and an important factor in the final finish and build of a kit ,every thing you need is there in the kit , no more spend a couple of days ringing hobby shops chasing hardware for your model before you start it .
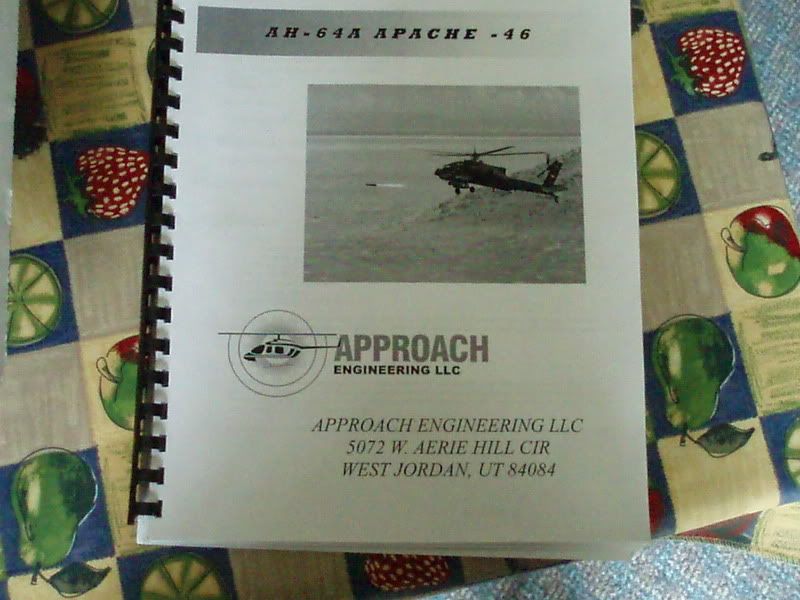
If you have not built a conventional balsa ply scale kit before ,hten a lot of people might be a nervous ,when opening a kit of this nature for teh first time , but all worries are put aside when you open up the 46 page fully ilustrated and well thought out construction manual , have a good read through it so you understand the order that it all goes together in , it really does make this kit look easy to construct , and that is becuase it is . a novice builder could easily put this kit together ,with out any issues ,the manual is that well thought out
the pages are very clear and simple to understand , James has spent an amazing amount of time on this so that you dont have to ,this is no fly by the seat of the pants kit that was thrown together by a company ,this is a very well thought out kit that has seen a lot of design processes put into it nothing comes up short in the kit ,it impresses me with quality of the design more and more with every page i turn in the manual
When you take a closer look at the contents you clearly see the stamped id of each part so there is no mixxing parts up as you go
Another standout feature of these kits is that they come with a disk full of real world apache photos ,showing in great detail each of the modelled subjects ,at first you look through it and go "yeah thats super cool" but once you are well into the build you find yourself falling back to the photos for scale shapping and details ,and this is just another aspect that makes these kits stand out from the rest , never before have i built a kit that has such scale documentaion included with it ,the phots are truely awesome and have saved me hours searching the net looking for scale documentation to improve the overall finish of my apache ,after all whats the point of building such a kit and not giving it the best finish you can .
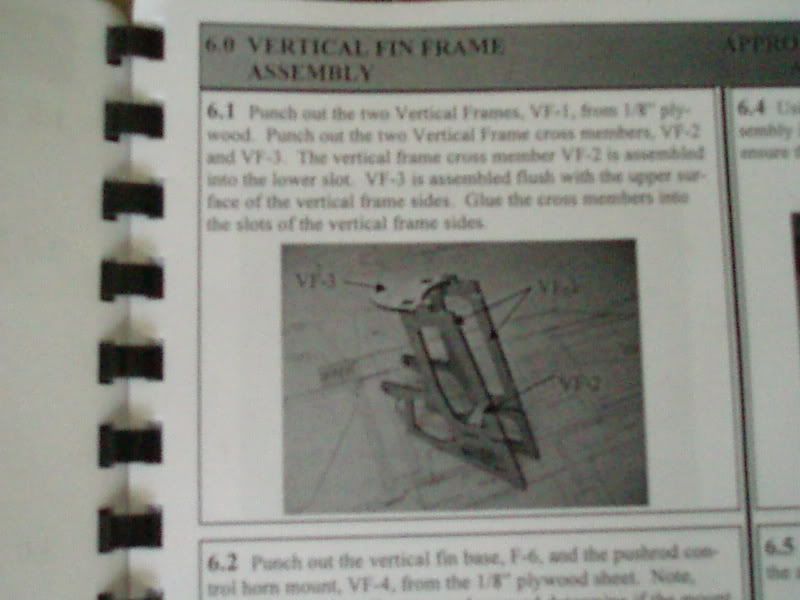
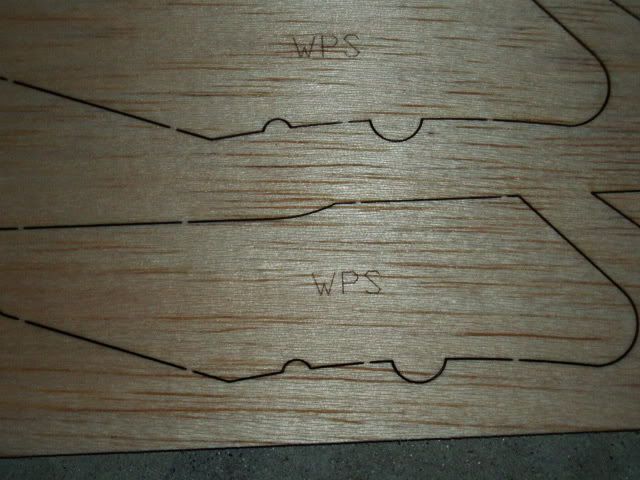
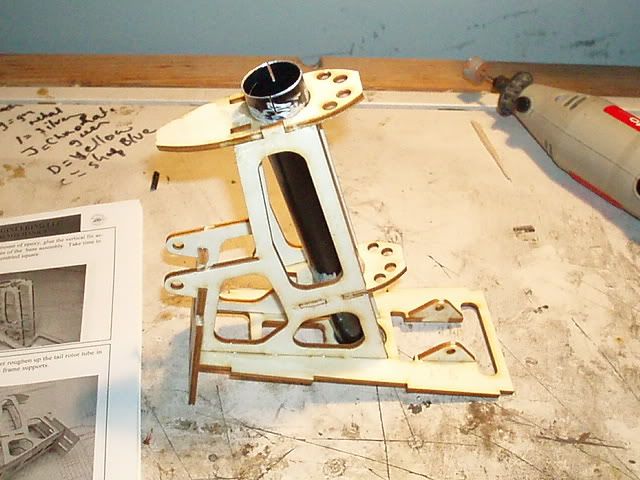
Openning the manual again ,after sitting down with a coffee and going through the whole thing , we are presented with the assembly details for teh vertical tail fin frame , and this is where you really start to appreciate just how much design effort has gone into this kit and how straight forward and easy they are to build . so take out teh parts required ,and test fit the parts to make sure you have a good fit before applyiing any CA ,as a carpenter we have a saying ," check twice cut once " in other words double check everything before you apply any CA then you wont have any issues ,especially as most of the build will be happening later at night lol,any way no problems here , all teh parts went together perfectly and in a straight forward manner , it really is as easy as reading the manual , and in a very short time your are presented with teh completed tail fin frame
The guys told me to contact James from Approach Engineering and have a chat as the ep8 kits where still in development , but that he had other kits in the works and that he was a very approachable guy , well after being in contact with james on and off over the last 6 months and having just finished my md530 little bird ,i found i was desperately needing something to go on with . i have been following a couple of builds on various sites that continued to impress me with the kits . So i have set about giving myself a goal this year of building each of the Approach Engineering kits on offer starting with the 30-46 size Boeing AH64A Apache ,followed by the ep8 e-cobra with hopefully the swift sized apache and cobra then finishing up with the 60-90 size cobra over the xmas break , so stick with me as i fully imerse myself in the world of Approach Engineering . http://www.approachengineering.com/index.html
With talking back and forth to James from Approach Engineering over the last 6 months , and finally deciding to build one ond share my experience with others ,it dawned on me that it would be interesting to get to know the man behind teh kits so i possed some questions to James which he kindly took teh time out to reply to .
Hello James and thanks for taking the time out of your busy schedule to let us know a bit about you.
Word is getting around the scale heli scene all over the world about your company Approach Engineering and for those that haven’t heard, they manufacture scale cobra and apache fuse kits for r\c helis using conventional balsa \ply construction methods used in r\c aircraft construction ,definitely not a new technique in radio control aircraft, but in the world of scale helis it is new and exciting.
Approach Engineering’s range currently include the 50 size apache ,a soon to be released and much anticipated 60-90 size cobra and the just released smaller e-cobra and e-apache designed for the 550 size electric heli scale modeler .
For those interested in any of Approach Engineering’s range you can become very familiar with them at the web site
http://www.approachengineering.com/index.html and for sales inquiries contact Al at Starwood Scale Models
http://www.starwoodmodels.com/products/ap/ .
Firstly James rumor has it that you have a rather exciting job away from Approach Engineering that gives you first hand access so to speak of the attack helis that you have designed ,can you firstly give us all an insight into what that is and secondly about your career flying these helis?
JAMES>>>>>
Thanks and I appreciate your time. In addition to Approach Engineering I have the opportunity as being a full time flight instructor in the AH-64A Apache. We are located in West Jordan, Utah and have one of the best areas to fly and train in. It is a great unit and we have top notch aviators and crew chiefs that make up our unit. We were deployed fairly recently in Operation Enduring Freedom to help out the efforts in Afghanistan. We spent a year in country doing what was needed of us. There was so many good things happening there for the people that you never heard about on the news. I did have the time to do a lot of the time consuming design work on many of these fuselages while I was over there and even built a few of the prototype aircraft.
James, have helicopters always been a big passion of yours? Or is flying in general your passion?
JAMES>>>>>
I have always loved aviation from as long as I could remember. Being a part of aviation was very important to me so my life followed that path. After high school I looked to go into the service so I could fly but it was right after Desert Storm and there were very little opportunities to be an aviator due to the down sizing going on. So I continued on with my schooling and completed my bachelors degree in mechanical engineering at the University of Utah. Once finished I looked back into the military and the rest is history. I have always been amazed with helicopters and many of the guys here asked why I did not go into the Air Force and it was because this is where I want to be.
How long have you been involved in the world of radio control flight and do you remember what got you started?
JAMES>>>>>>
I have been involved with RC from the time I was about five. I did not have anyone around me that did it so I started off in cars. As I got older and started to earn money mowing lawns I was able to get some better racing cars. The airplanes were still out of my reach and without anyone to help it seemed like a huge step. Finally when I was about 13 I purchased my first airplane, a *****cat glider. Very inexpensive, about $80 for everything I needed to fly, and more simple. My very first flight was with me at the controls trying to figure things out. I did realize pretty quick that my CG was too far aft and made for a fairly short flight. I continued to learn on that aircraft fixing it many times until it was finally beyond repair.
My first aircraft was a Senorita and learned quickly on that. Great builders plane. I could go on and on about all the different gliders and aircraft I built and re-kitted over the years, lots of stories. Well finally I had saved up enough to get into the world of RC helicopters. My first one was a Schluter Magic. I bought it used with a Rossi 60 and a Futaba super 7 radio. The gyro was the old mechanical one. It was like flying all over again.
So did being a real world heli pilot make it any easier to learn to fly r\c helis when you started?
JAMES>>>>>
I flew RC helicopters long before the real ones. I would have to say that flying the RC ones helped me fly the real ones.
How long ago did the idea come to reproduce the amazing helis that you fly for real?
JAMES>>>>>>
I have been working on this idea for about seven years. I had been building my own scratch built aircraft for years. My first prototype was built off some poster board with hand drawn plans. Still have it flying actually. It has a Kyosho Nexus giving it life. I am sure that many of you know Emile Sherrif better known as Copter Doctor and he was a great inspiration to me.
Having just received my Approach Engineering 50 size ah64 apache, and seeing first hand the amount of thought and detail that has gone into this kit, can you give us some insight into the time line and process that has happened from its inception, to the kit that I now have, and what ideas you have for it in the future?
JAMES>>>>>>
It took about three years to go through the prototypes, pictures, building instruction manuals, ect to go from the drawing board to the kitted box. I learned a lot from each prototype and used those ideas for the future kits helping to speed things along. The first one that I did for the plans of production was the 60 size Cobra fuselage. It was built with some friends of mine over in Afghanistan and is a great flyer. There still had a lot of detail work to be done on it and that is why it is not yet available. Some good news on that is I am currently working hard on that design again and hope to have it ready by the big IRCHA event in Muncie.
There has been a lot of work put into the smaller helicopters such as the Quick of Japan EP-8 V2 helicopter that is out being field tested in order to make sure the kit is ready for production. Great aircraft and a lot of fun.
I have so many ideas going on right now I do not even know where to start. Everything from some fixed wing to many more helicopters. I have a prototype Comanche built, working on some Hueys, F-14, F-18, P-38, Mirage 5, and on and on. Right now I am focused on the helicopters and will continue there. The time line is tough to say. I work very hard on the kits and there is so much work to be done on each aircraft that I do not have a set timeline. I have been trying to get one out but just set the priority of the aircraft to be built and go from there. Right now I am committed to finishing up the 60 size Cobra and the EP-8 size Cobra.
I have also just released a Swift and Logo size Apache as well that is a great kit. Lots of scale details added in with it. Check it out on Starwood Scale’s website www.starwoodmodels.com along with the others.
Do you do every thing yourself as far as continuing r&d and manufacturing of the kits or do you have others involved in the company these days?
JAMES>>>>>>>
Right now I do everything. I now have my inventory of parts set up where I have been able to employ my son to help me put together some of the sub assemblies. That has been a lot of fun working with him.
You must have one of the best setup garages out of all of us can you tease us with what your setup is like ?
JAMES>>>>>>
Well I have about 3/4 of my entire basement dedicated to this. I have everything from my laser cutter, drill press, spot welder for batteries, band saw, scroll saw, soldering equipment, belt sanders, disk sanders, dust collectors, a large array of shelving, four work benches, vacuum forming station, inventory of wood and misc parts, injection molder, pressurized air, and a tooling center and lathe for making all of the additional parts and for making the molds. I am starting to move more to outside vendors to allow me more time to do the design work and keep things progressing along.
All of the kits are designed in Solid Works which is a solid modeling software. It allows me to put together all the parts in 3D to make sure that everything fits well.
For those of us out there that are already jealous, how many helis do you have and what are they, oh and do you actually get much time to fly them?
JAMES>>>>>>
That is a good question, I still have my Schluter magic, nexus, ECO8, a swift, 2 logo 10’s, 2 X-Cell 60, Falcon 50, Raptor 50, and even some of my own designs. Almost all of them are still flying. The funny thing is that I could use a lot more to see how they all fit inside the different fuselages. For those of you that like E power I just came up with a great little conversion for X-cell 60 aircraft that just drop right in. That is still in testing. I still get out and fly as much as I can. It is fun to go out with my boys and share it with them.
With such a busy life do you suffer the same issues that plague the mere mortal’s amongst us ,and that being the evil look from the other half every time we so much as take a ;step in the direction of the garage\hanger ?
JAMES>>>>>>
Of course I do but who needs sleep anyway? My family is very supportive and I always make sure that they are not being left out.
So out of all the different sized cobra and apaches, which one is your favorite to fly and why?
JAMES>>>>>>
I would have to say the electric Apache. Part of it is because it is a great kit, the real one has a place in my life, and I just love the ease of electric helicopters. Just a flip of a switch and you are spooling up. No messy fuel to clean up after and no smoke bellowing out of the aircraft making it look like it just took a round! Even the sound is more real.
What does the future hold for James Linder and Approach Engineering, where do you see yourself in five years?
JAMES>>>>>>
Well I never have a crystal ball but I hope to be here still doing this, well of course with a lot more kits to offer. I am working with the possibility of making the kits with a fiberglass version so there is a lot of learning to do there as well. I am working on a few fixed wing designs as well that I hope to release in the near future. So keep your eye out for them as well. I just hope to be able to provide a high quality aircraft that others can enjoy as much as I have.
Thank you James for your time, and giving us an insight in to the world of Approach Engineering .
now that i have finally put my money where my mouth is and contacted Al Wert over at http://www.starwoodmodels.com/products/ap/ who sells the kits for Approach Engineering , Al gave me a price with shipping ,which i found to be very agreable , so i gave the credit card a thrashing and sat back for the long hard wait .I was expecting a 2-3 week wait , but man was i pumped when after 7 days i got a nice parcel slip from the postman to come pick up an international parcel,was that excited that i shot over the next lunch time to get it and had a quick look before going back to work , man that afternoon went slow i can tell ya .That was friday teh 22nd june ,so here i am a little over a week later with an apache that is about to be preped for painting .
So with out any more teasing here is how i got to where i am today with teh kit.
Welcome to the Approach Engineering AH64A Apache for .30-.46 size mechanics
This is what you are greeted with on arrival , a very inspireing couple of picks of an apache in action with a pic of james below,but then who ponders on teh box covering for long hey lol,
so off comes the box top , every thing is well paded ,and nicely packaged , with teh laser cut parts kept in seperate bundles depending on there build process ,if you have never built a laser cut kit before then man get out there and do it , gone are the days of spending hours cutting out parts and sanding them , hte over all quality of this kit is second to non , i have built a few topflyte scale fighters over the years which i have put at the top of teh ladder for quality ,and hte Approach Engineering kits are right there with them , the quality of the balsa and ply is superb ,and an important factor in the final finish and build of a kit ,every thing you need is there in the kit , no more spend a couple of days ringing hobby shops chasing hardware for your model before you start it .
If you have not built a conventional balsa ply scale kit before ,hten a lot of people might be a nervous ,when opening a kit of this nature for teh first time , but all worries are put aside when you open up the 46 page fully ilustrated and well thought out construction manual , have a good read through it so you understand the order that it all goes together in , it really does make this kit look easy to construct , and that is becuase it is . a novice builder could easily put this kit together ,with out any issues ,the manual is that well thought out
the pages are very clear and simple to understand , James has spent an amazing amount of time on this so that you dont have to ,this is no fly by the seat of the pants kit that was thrown together by a company ,this is a very well thought out kit that has seen a lot of design processes put into it nothing comes up short in the kit ,it impresses me with quality of the design more and more with every page i turn in the manual
When you take a closer look at the contents you clearly see the stamped id of each part so there is no mixxing parts up as you go
Another standout feature of these kits is that they come with a disk full of real world apache photos ,showing in great detail each of the modelled subjects ,at first you look through it and go "yeah thats super cool" but once you are well into the build you find yourself falling back to the photos for scale shapping and details ,and this is just another aspect that makes these kits stand out from the rest , never before have i built a kit that has such scale documentaion included with it ,the phots are truely awesome and have saved me hours searching the net looking for scale documentation to improve the overall finish of my apache ,after all whats the point of building such a kit and not giving it the best finish you can .
Openning the manual again ,after sitting down with a coffee and going through the whole thing , we are presented with the assembly details for teh vertical tail fin frame , and this is where you really start to appreciate just how much design effort has gone into this kit and how straight forward and easy they are to build . so take out teh parts required ,and test fit the parts to make sure you have a good fit before applyiing any CA ,as a carpenter we have a saying ," check twice cut once " in other words double check everything before you apply any CA then you wont have any issues ,especially as most of the build will be happening later at night lol,any way no problems here , all teh parts went together perfectly and in a straight forward manner , it really is as easy as reading the manual , and in a very short time your are presented with teh completed tail fin frame
 07-11-2007, 06:00 AM
#2
Member
Thread Starter
Join Date: Apr 2006
Location: merrimacqueensland, AUSTRALIA
Posts: 41
Likes: 0
Received 0 Likes
on
0 Posts
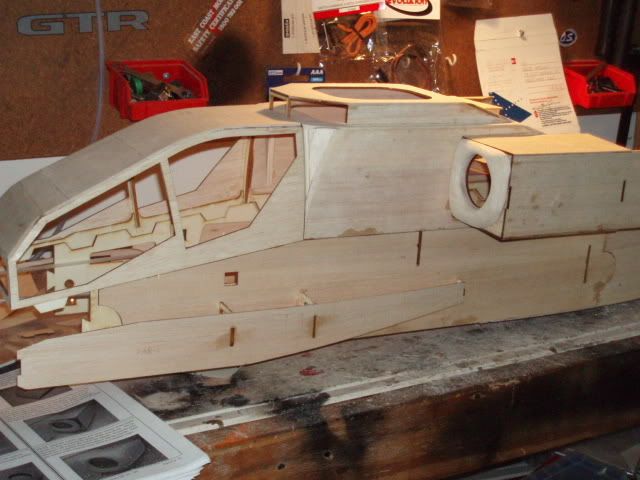
putting the tail fin frame aside for now we move straight into teh fuselage assembly procedure .this is done by pulling out teh the 3 frame side peices for a left and a right side ,again this is easy to do but make sure you have the a side and the b side which is clearly marked ,test fit all parts on a flat building board or work bench now if happy which i was as they fit perfectly CA them along their joints and sit flat ,i actually placed a large book on top of each just to hold it while the glue went off and set ,now find teh ply fuse supports on one of teh 3 ply laser cut sheetss ,did i meantion how much i like laser cut kits lol, place tehm on top of teh fuse sides to check for fit ,there is no specific left or right here so just make sure hte fit is neat ,then mix up some epoxy and spread over the ply doublers and place down on teh balsa fuse sides making sure thta the joints of teh front and rear doubler is neat ,again i placed them on a flat surface and layed a large book on top to keep it straight .
With the sides dry locate the triangle stock thatis required for teh rear of teh fuse and simply follow the directions in the manual ,this is use so that the desired rear fuse shape can be achieved ,as teh apache has a rounded rear fuse but a square front ,all pretty straight forward ,and simple .now we get to the start of the exciting part where we locate teh ply formers and mate the two sides together ,i have a jig made up for this from my sclae fighter days that i can set to the desired width to keep teh fuse square ,again test fit everything and double check teh manual to make sure you have each former in teh correct place ,when you are happy witht eh fit ,CA each former in place ,once set , turn over the fuse and locate the ply fuse bottom , special note here is to make sure you have the bottoom facing the correct way , and james has made this simple by putting an arrow and the words front on teh ply so just locate this and you will be all good ,epoxy htis in place when you are happy with the fit and placement ,turn her back over and you have the start of the main fuse complete ,one of the things i like about this kit is the order in which you construct it , its llike a great book that starts of good but builds with excitement as you get deeper into it so that you dont want to put it down .
With the sides dry locate the triangle stock thatis required for teh rear of teh fuse and simply follow the directions in the manual ,this is use so that the desired rear fuse shape can be achieved ,as teh apache has a rounded rear fuse but a square front ,all pretty straight forward ,and simple .now we get to the start of the exciting part where we locate teh ply formers and mate the two sides together ,i have a jig made up for this from my sclae fighter days that i can set to the desired width to keep teh fuse square ,again test fit everything and double check teh manual to make sure you have each former in teh correct place ,when you are happy witht eh fit ,CA each former in place ,once set , turn over the fuse and locate the ply fuse bottom , special note here is to make sure you have the bottoom facing the correct way , and james has made this simple by putting an arrow and the words front on teh ply so just locate this and you will be all good ,epoxy htis in place when you are happy with the fit and placement ,turn her back over and you have the start of the main fuse complete ,one of the things i like about this kit is the order in which you construct it , its llike a great book that starts of good but builds with excitement as you get deeper into it so that you dont want to put it down .
07-11-2007, 06:01 AM
#3
Member
Thread Starter
Join Date: Apr 2006
Location: merrimacqueensland, AUSTRALIA
Posts: 41
Likes: 0
Received 0 Likes
on
0 Posts
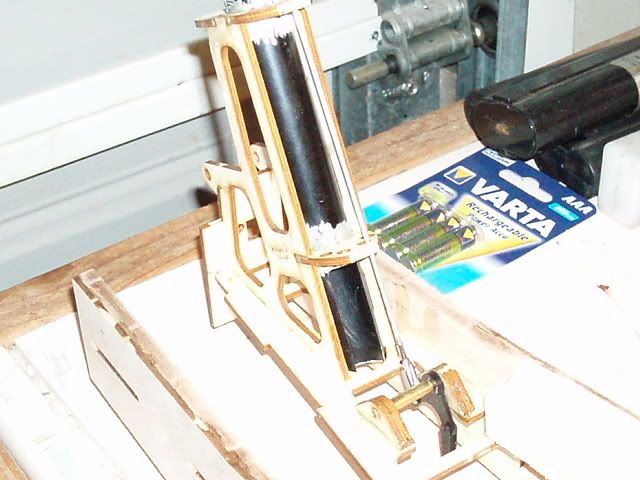
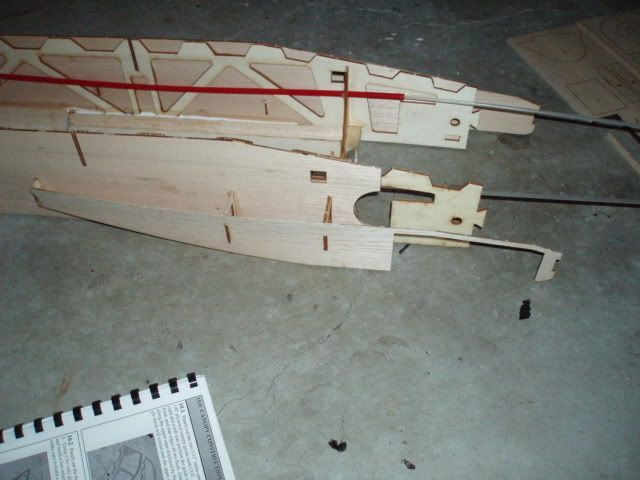
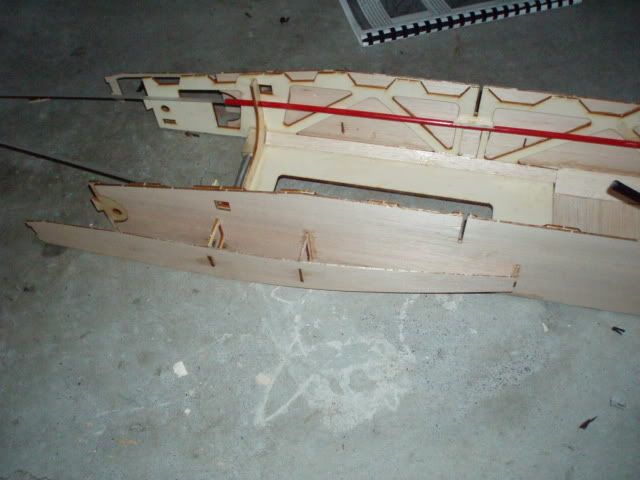
From this stage on it really gets exciting as the overall shape of teh apache starts to emerge and you just want to keep building .Retreive the tail frame assembly from teh start and test fit it into teh slots at the rear of the fuse ,whe happy with the placement epoxy just teh left side when looking from the rear in place .only one side is donr now so that we can get in side to place the push rods for teh tail rotor pitch and and the tail plane push rod on the right ,once the epoxy has set follow the simple instructions for placing teh rotor pitch rod into teh rear of the left side fuse and use teh required pushrod blocks to support it now move to teh right side and the tail plane pushrods ,and again use the required supports to hold it in placxee makeing sure to control rod is bent sufficiantly to move through the slots with out bindind, a note here that if you dont intend to have teh tail planes working in conjunction with the collective then this pushrod is not needed, as the more collective you feed in hte closer to level plane it becomes , but in flight the tail plane will swivel up as the forward speed increases , i intend to keep it scale so am having this connected.
With that complete its time to epoxy teh right side of teh fuse to the tail assembly and use tape to hold it all together when happy
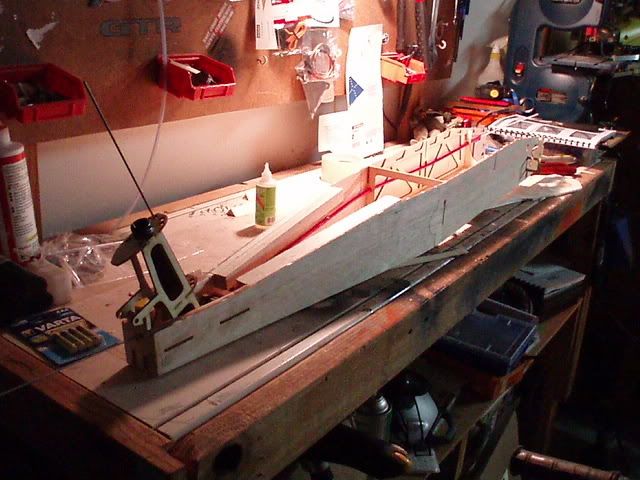
At this point we simply sheet the bottom of the fuse ,starting from teh rear of the ply bottom to the tail the balsa provided in this kit is of very high standard so again james has done his home work ,and there is enough balsa sheeting to build this kit with a little left over , but still be conservative as you never now when you might need some more .

With this job complete locate the tail rotor tube outer housing for the flex drive to take power to teh rear rotor ,again simply follow the manual on where and how to instal this and you will be sweet ,it is held in place with some triangle stock in the middle of teh rear fuse
,once in place you need to add the small triangle stock just infront of the tail fin assembly for later shapping
With that complete its time to epoxy teh right side of teh fuse to the tail assembly and use tape to hold it all together when happy
At this point we simply sheet the bottom of the fuse ,starting from teh rear of the ply bottom to the tail the balsa provided in this kit is of very high standard so again james has done his home work ,and there is enough balsa sheeting to build this kit with a little left over , but still be conservative as you never now when you might need some more .
With this job complete locate the tail rotor tube outer housing for the flex drive to take power to teh rear rotor ,again simply follow the manual on where and how to instal this and you will be sweet ,it is held in place with some triangle stock in the middle of teh rear fuse
,once in place you need to add the small triangle stock just infront of the tail fin assembly for later shapping
 07-12-2007, 01:51 AM
#5
Member
Thread Starter
Join Date: Apr 2006
Location: merrimacqueensland, AUSTRALIA
Posts: 41
Likes: 0
Received 0 Likes
on
0 Posts
you know the beauty of this kit is that it is not actually a big build i recieved my kit 2 weeks ago today and with a fair bit of work over teh first few days and a bit each night since then i am up to glassing teh whole fuse and undercoating it , i will endevour to catch up with the build as i wait for resin to go off ect ,and the technic to build this kit is rather simple , the hardest part would be deciding which mechanics to run in her , and as i am using an older jr ergo which is actually one of teh larger 50 size helis around , then most should fit ,especially if you go with teh tail adaptor ,
07-12-2007, 05:05 AM
#6
Member
Thread Starter
Join Date: Apr 2006
Location: merrimacqueensland, AUSTRALIA
Posts: 41
Likes: 0
Received 0 Likes
on
0 Posts
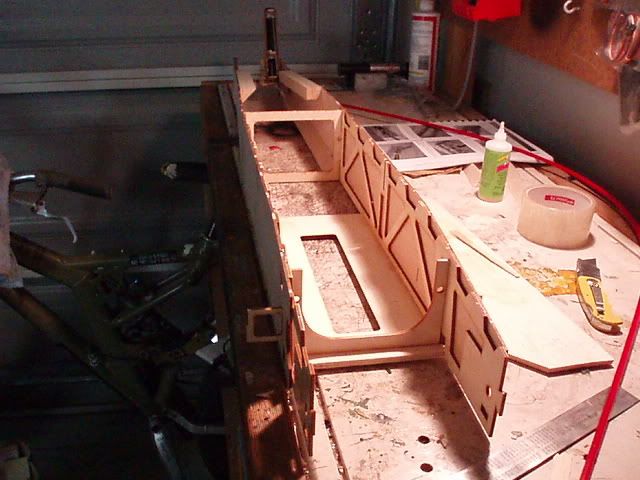
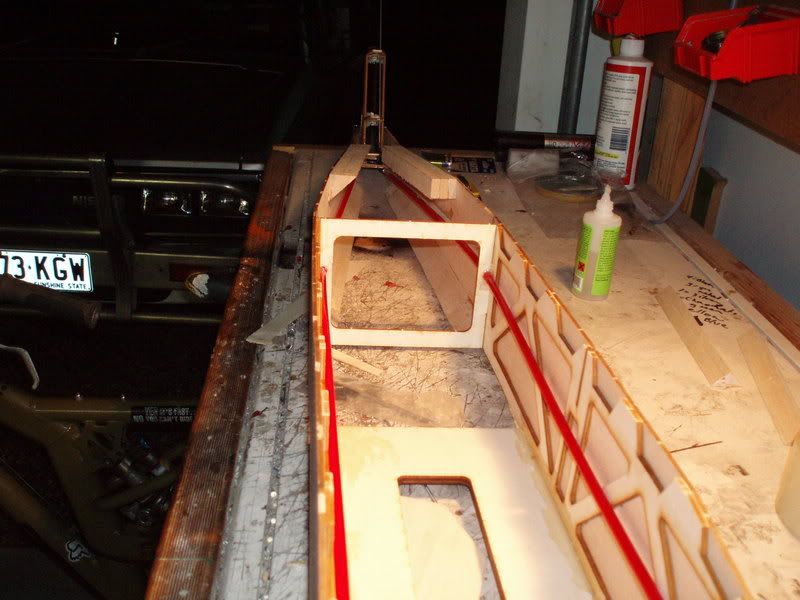
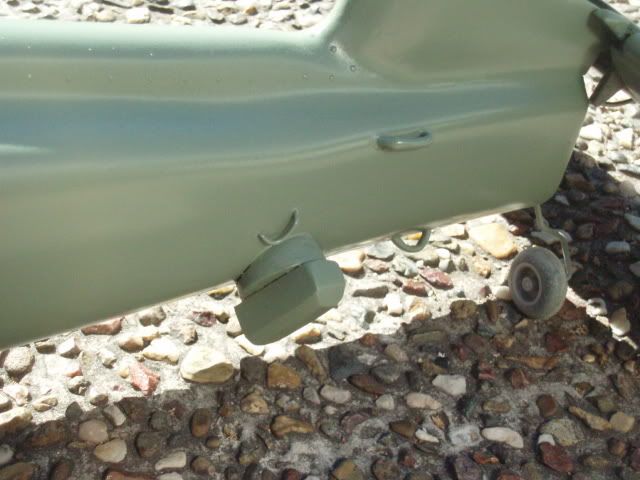
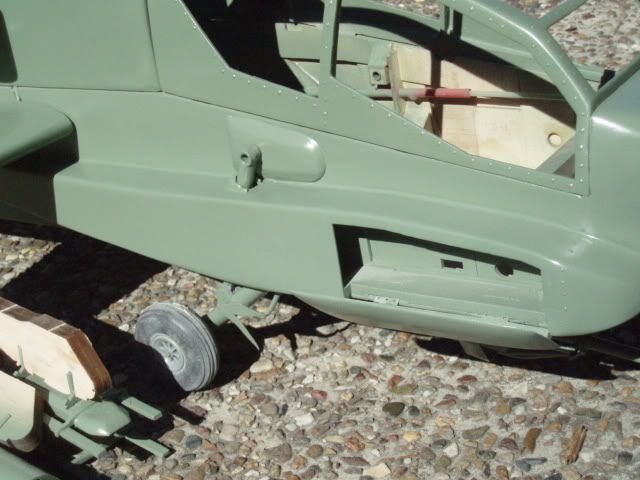
the next job we have to do is place various triangle stock through out teh fuse abs efor strength and for shapping the fuse sides .now just when you thought it was slowing down again along comes the front landing gear ,one of the reasons i really wanted to model the apache was because i wanted a model with landing gear as opossed to skids for something different and th apache is perfect , so not mauch to tell here other than you need to epoxy teh supplied predrilled blocks into place to hold the landing gear tube in place htese blocks then require triangle stock to be epoxied on top to strengthen them and then you simply slide the gear tube in place
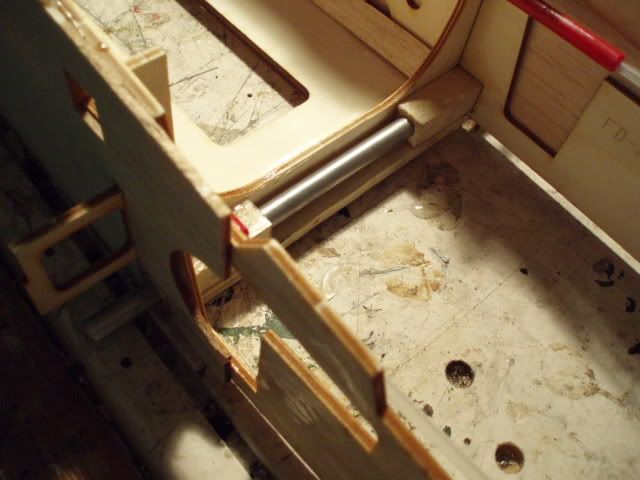
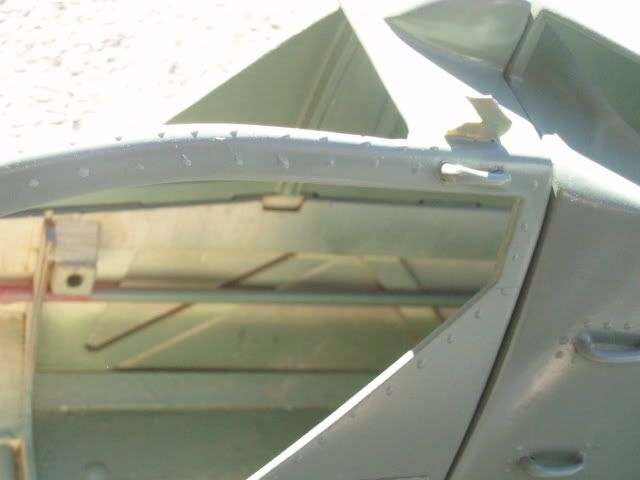
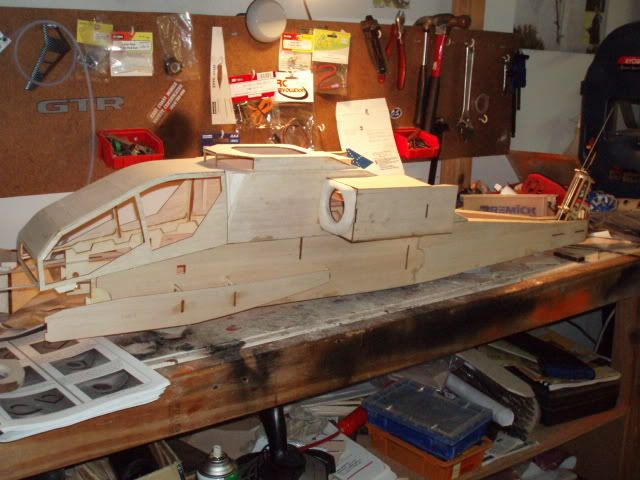
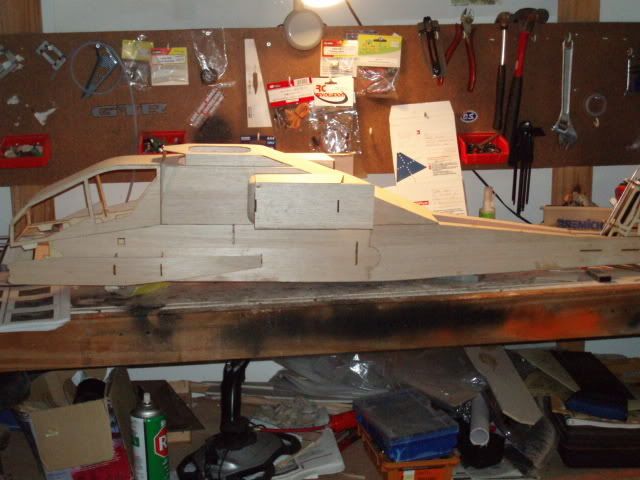
from here allthat is required to finish this part of the fuse is complete the forward transmission bay and canopy support section ,this is also where you find out how the transmission bay and canopy are held in place , using recessed teeth in the chanel ,ie the transmission bay and canopy have teeth that simply slide into these then a bolt is used to at a couple of secure points and there you have it , really simple and very secure ,in teh next pic you can see the chanels
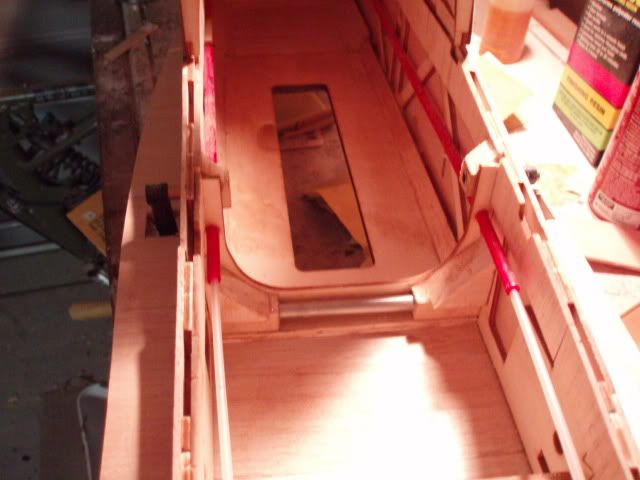
and jumping ahead a bit heres the transmission bay showing the teeth that slot in ,again everything fits perfect
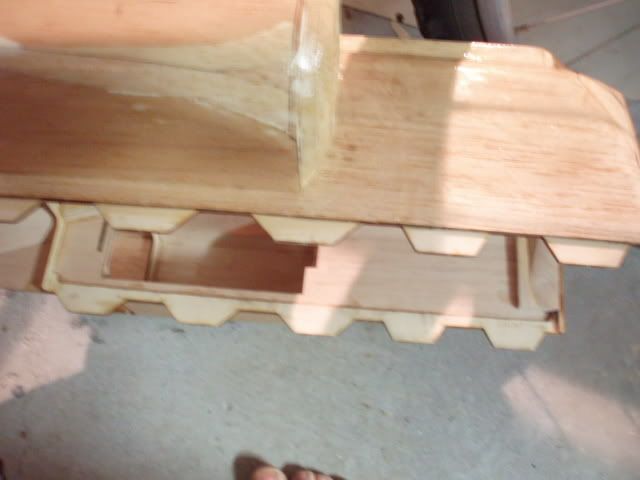
from here allthat is required to finish this part of the fuse is complete the forward transmission bay and canopy support section ,this is also where you find out how the transmission bay and canopy are held in place , using recessed teeth in the chanel ,ie the transmission bay and canopy have teeth that simply slide into these then a bolt is used to at a couple of secure points and there you have it , really simple and very secure ,in teh next pic you can see the chanels
and jumping ahead a bit heres the transmission bay showing the teeth that slot in ,again everything fits perfect
07-17-2007, 02:49 AM
#7
Member
Thread Starter
Join Date: Apr 2006
Location: merrimacqueensland, AUSTRALIA
Posts: 41
Likes: 0
Received 0 Likes
on
0 Posts
ok now to finsih off the fuselage assembly procedure there is two more things needed to do ,depending on what mechanics you intend to run in the Apache ,First off is the forward servo rails for teh tail pitch servo and the tail plane servo depending on if you are going to have it working with the collective ie as you increase the pitch angle the tail plane comes up so that in fuorward flight the tail plane is level , for a simpler set up you can just let it free wheel so to speak as i have seen on some others and the air going over it in forward flight will lift it up , i am running the extra servo as i want the extra scale effects ,there are servo rails included in teh kit for this and the way i achieved the corect placement was to screw teh servos on to teh rails and then epoxy them in ,simple , just leave teh servo rails slightly apart when screwing teh servos on so that after you can remove the servos .
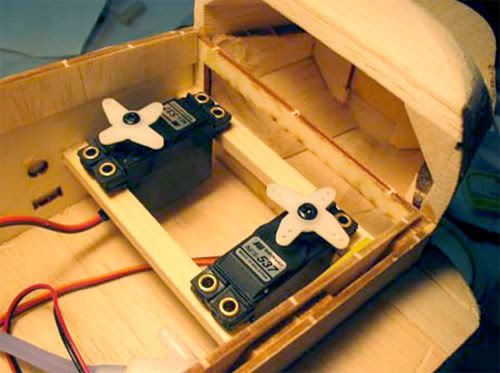
the above phot is from teh manual as i didnt get one of this ,but it will also show you the quality and clarity of teh pics in the manual
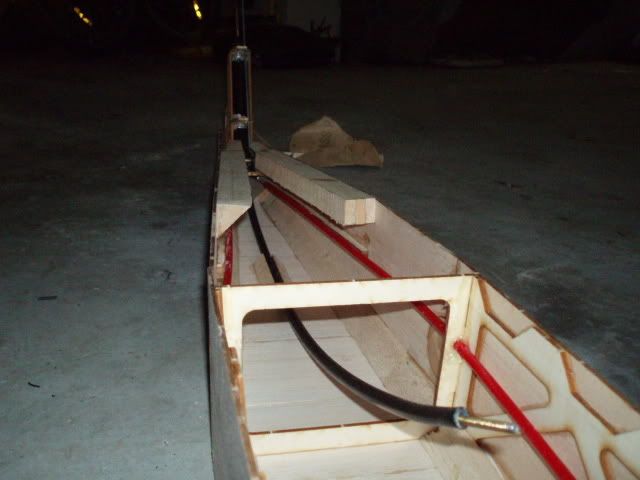
Ok and now for the last part of this section , and as i meantioned above this will depend on your choice in mechanics , and that is dependant on you having a heli that has either a shaft or torque tube or a heli that has a tail belt , now dont get worried as both can be used ,the main issue is that the apache has a raised tail so to simplifiy things you run a flex drive system which consists of a flexible inner cable running through a stiffer outer casing ,similar to a speedo drive on a car .The flex drive is included in the kit and all nessesary parts to installit on a shaft driven heli ,but if you have a belt driven tail ,as i do in my jr ergo , then dont fret as James has sorted it all out for you too, i will go into more detail on this at the time of instalation , but suffice to say you need to convert your belt driven helit to a shaft driven and this is achieved by purchasing teh raptor tail adaptor which as it sounds was designed for teh thunder tiger raptor but will suit most belt driven helis
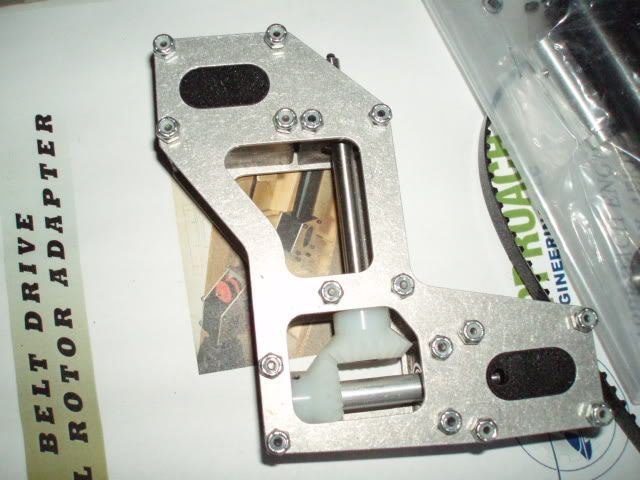
so you need to consider this at the time of purchase , the kit was origanally designed around the century hawk mechanics i believe ,ie being shaft driven ,and while on this subject if you have a belt driven tail then along with teh adaptor you can either request teh conversion details from James for the parts needed to convert a raptor tail to accept teh shaft setup or as i am doing just find a complete shaft driven tail set up ,currently i am going to use a kyosho concept 30 tail setup which i have been told should be good , but failing that i will get a century hawk tail if the concept 30 doesnt work out for me .
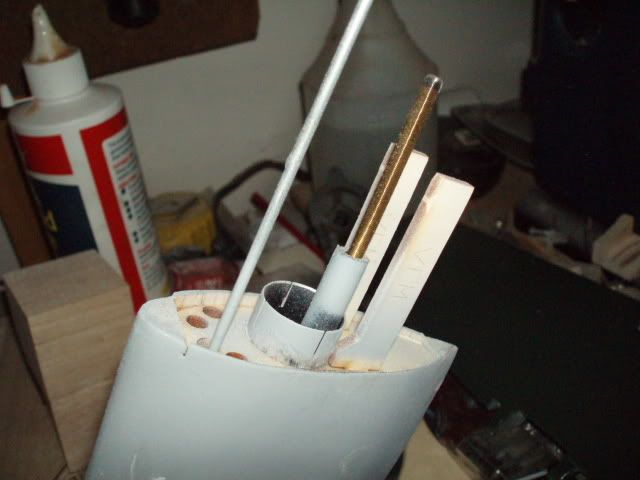
Ok so back to teh final stage ,for this part ,of the build , which is if you have a shaft driven tail then you will need to place hte rquired part with the flexdrive hole in it into the start of the tail section at the end of teh triangle stock that you glued in before and you will need to run your shaft drive through this so that it supports it comming up to the rear of the mechs ,and thats it
the pic below shows the end of teh flex drive comming out of the tail tube
the above phot is from teh manual as i didnt get one of this ,but it will also show you the quality and clarity of teh pics in the manual
Ok and now for the last part of this section , and as i meantioned above this will depend on your choice in mechanics , and that is dependant on you having a heli that has either a shaft or torque tube or a heli that has a tail belt , now dont get worried as both can be used ,the main issue is that the apache has a raised tail so to simplifiy things you run a flex drive system which consists of a flexible inner cable running through a stiffer outer casing ,similar to a speedo drive on a car .The flex drive is included in the kit and all nessesary parts to installit on a shaft driven heli ,but if you have a belt driven tail ,as i do in my jr ergo , then dont fret as James has sorted it all out for you too, i will go into more detail on this at the time of instalation , but suffice to say you need to convert your belt driven helit to a shaft driven and this is achieved by purchasing teh raptor tail adaptor which as it sounds was designed for teh thunder tiger raptor but will suit most belt driven helis
so you need to consider this at the time of purchase , the kit was origanally designed around the century hawk mechanics i believe ,ie being shaft driven ,and while on this subject if you have a belt driven tail then along with teh adaptor you can either request teh conversion details from James for the parts needed to convert a raptor tail to accept teh shaft setup or as i am doing just find a complete shaft driven tail set up ,currently i am going to use a kyosho concept 30 tail setup which i have been told should be good , but failing that i will get a century hawk tail if the concept 30 doesnt work out for me .
Ok so back to teh final stage ,for this part ,of the build , which is if you have a shaft driven tail then you will need to place hte rquired part with the flexdrive hole in it into the start of the tail section at the end of teh triangle stock that you glued in before and you will need to run your shaft drive through this so that it supports it comming up to the rear of the mechs ,and thats it
the pic below shows the end of teh flex drive comming out of the tail tube
07-24-2007, 06:19 AM
#8
Member
Thread Starter
Join Date: Apr 2006
Location: merrimacqueensland, AUSTRALIA
Posts: 41
Likes: 0
Received 0 Likes
on
0 Posts
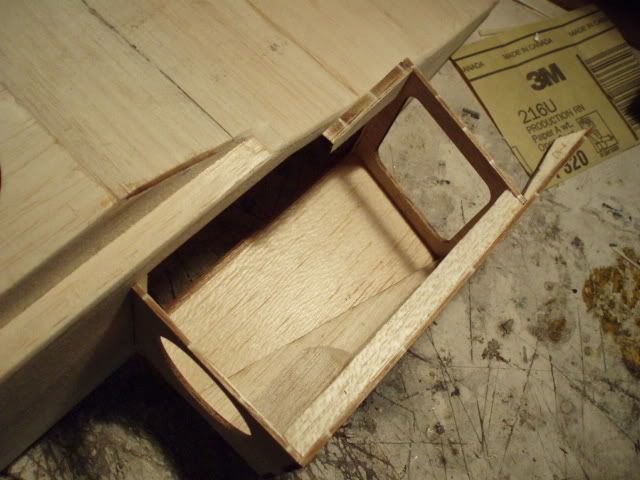
sorry its been a few days all , have 3 scale projects going at once so have been building like crazy, anyway things are starting to get really exciting from here on in as you can start to see the apache take shape ,the next step is to construct the nose but i will add that next due to a technical hitch with my camera ,so with out any more waiting we move onto the F.A.B or forward avionics bay construction .
Again we find that this part is rather simple ,and quick to complete ,find the required parts , which are the 3 formers for each side , test fit to make sure you have htem in teh correct place and that they a re a good fit , but dont glue at this stage . Whike we are on the subject of glue i want to meantion that james has made it easy for someone not used to building conventional ply \ balsa build up kits by telling you which parts to epoxy and which you can use CA (ZAP) on ,so that the main structural components are boned well, it really doesnt get any easier than that .
ok now locate the fab side from the balsa sheets now make sure you have the correct side , looking from the rear of teh fuse the fab side with teh cutout goes on the right side and the cut out is so that you can have your switches and fast fuel steup in here as james has already taken the hard work out and made a scale like access hatch for you . ok so here is what the left side fab component should look like
and here is the other side (right) side with teh cutout for the scale hatch
,ok so now that we have the correct parts on the side go ahead and glue teh 6 formers in (3 either side ) then starting fromthe rear glue teh fab sides in place , take care from this point on with teh fab front on teh right side as it can be broken off easily , i know cause i did lol, not problems just CA back into place and dont do it again .
07-24-2007, 10:00 AM
#9
Member
Thread Starter
Join Date: Apr 2006
Location: merrimacqueensland, AUSTRALIA
Posts: 41
Likes: 0
Received 0 Likes
on
0 Posts
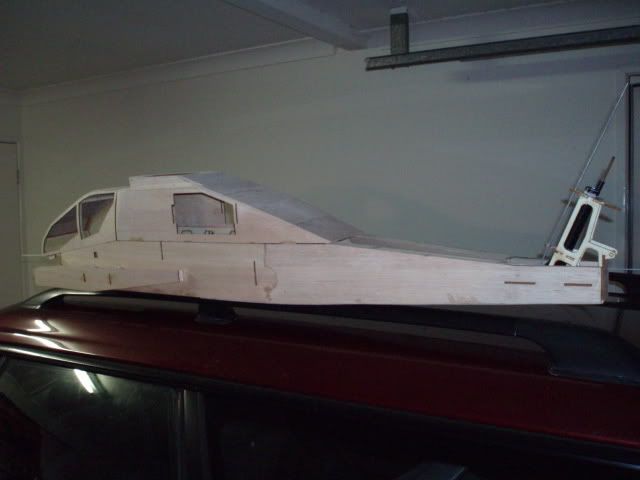
ok at this point in teh fabs i was waiting on the rest of the nose parts to trun up so i took a side step and moved on to the canopy ,luckily for me though teh parts arrived from the states in only 4 days , wish out postal service was that good lol.
ok now i have to stress how important it is to be careful while building teh canopy as the parts are fragile until you have it together, so dont do as i did and make it after midnight ,in a cluttered busy work shop ,lol i have 3 lage scale projects on the go at the same time , hey isnt this the normal lol.
SO locate the canopy formers cf1 ,cf2 , cf3 ,then teh canopy sides CGT *2 ,,i decided to cut these out with a sharp blade just to be safe even though teh laser cutting is superb,im th cautious type .now locate the smaller triangle stock and follow the manual and glue teh correct length stock to teh canopy sides on teh line maked .
ok now , on a smooth clean surface (yeah right lol),using CA glue only the first inch of teh sides to the 3 formers to create a box structure ,let teh CA go off and then glue teh tops or teh curved parts of teh canopy sides to the formers , take your time here to produce a straight canopy .
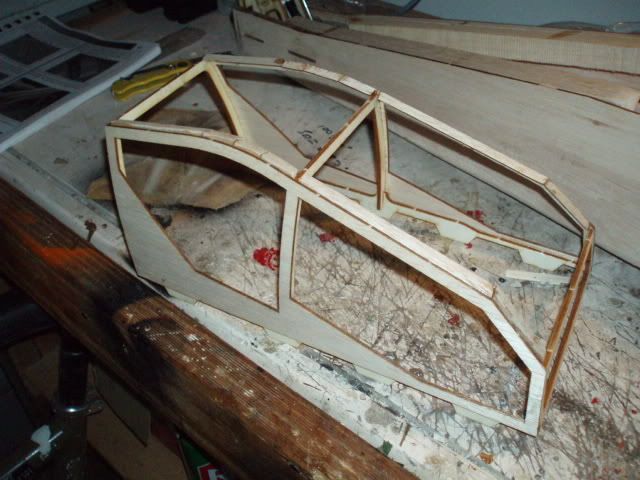
ok next step is to sand the overlapping stock fromthe canopy sdes and top ,then bigin sheeting the canopy ,first of to keep teh canopy true and straight , place it into teh fuse to hod it ,and starting from teh back work forward ,when glueing teh forward sheeting on have it slightly over lap the lats peice so that when you sand it you get a good smooth corner that is not too thin .
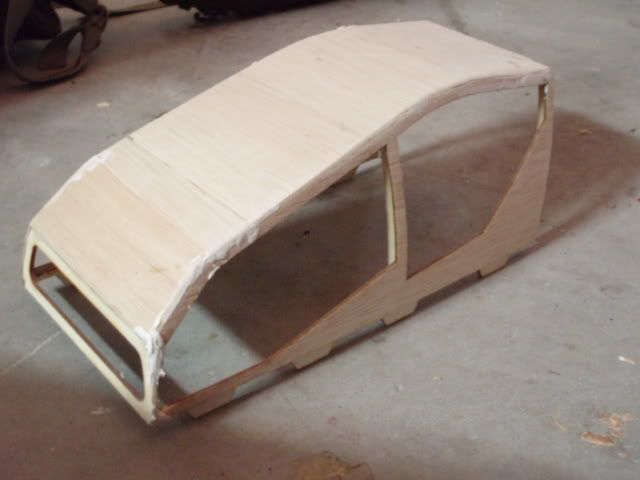

next , using a sanding block , sand the canopy to remove any over hang ,and as meantioned in teh manual apply a small amount of glue to teh inside sheeting along the canopy to help add strength .
things start to look really exciting here as the apache starts to look like it should ,but before we get too excited lets just finsh off the canopy ,by locating teh transmission nose block pieces , glue the 3 together the with teh pics shown in the manual sand to the desired shape ,as the shot below shows
alll thats left now is to locate and copy the templates for teh top canopy cutouts .
what i do in this situation is to photo copy the templates glue with pva and while still wet , use my dremel with a cutting disk and cut out along the lines ,simple no fuss and you cant go wrong
and here she is with teh canopy in place ,and in the back ground is my thundertiger md530 that i converted to a littlebird for size reference
ok now i have to stress how important it is to be careful while building teh canopy as the parts are fragile until you have it together, so dont do as i did and make it after midnight ,in a cluttered busy work shop ,lol i have 3 lage scale projects on the go at the same time , hey isnt this the normal lol.
SO locate the canopy formers cf1 ,cf2 , cf3 ,then teh canopy sides CGT *2 ,,i decided to cut these out with a sharp blade just to be safe even though teh laser cutting is superb,im th cautious type .now locate the smaller triangle stock and follow the manual and glue teh correct length stock to teh canopy sides on teh line maked .
ok now , on a smooth clean surface (yeah right lol),using CA glue only the first inch of teh sides to the 3 formers to create a box structure ,let teh CA go off and then glue teh tops or teh curved parts of teh canopy sides to the formers , take your time here to produce a straight canopy .
ok next step is to sand the overlapping stock fromthe canopy sdes and top ,then bigin sheeting the canopy ,first of to keep teh canopy true and straight , place it into teh fuse to hod it ,and starting from teh back work forward ,when glueing teh forward sheeting on have it slightly over lap the lats peice so that when you sand it you get a good smooth corner that is not too thin .
next , using a sanding block , sand the canopy to remove any over hang ,and as meantioned in teh manual apply a small amount of glue to teh inside sheeting along the canopy to help add strength .
things start to look really exciting here as the apache starts to look like it should ,but before we get too excited lets just finsh off the canopy ,by locating teh transmission nose block pieces , glue the 3 together the with teh pics shown in the manual sand to the desired shape ,as the shot below shows
alll thats left now is to locate and copy the templates for teh top canopy cutouts .
what i do in this situation is to photo copy the templates glue with pva and while still wet , use my dremel with a cutting disk and cut out along the lines ,simple no fuss and you cant go wrong
and here she is with teh canopy in place ,and in the back ground is my thundertiger md530 that i converted to a littlebird for size reference
07-30-2007, 12:58 AM
#10
Member
Thread Starter
Join Date: Apr 2006
Location: merrimacqueensland, AUSTRALIA
Posts: 41
Likes: 0
Received 0 Likes
on
0 Posts
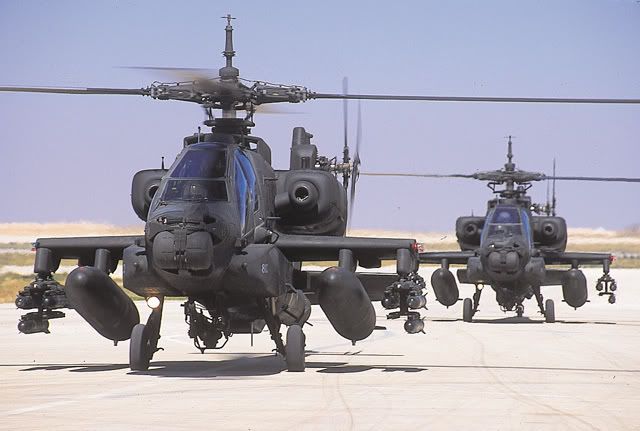
well the apache has been going well and am nearly finished the build so will have more time to post this week as all my builds are coming to a close ,but i thought id post up some info on the full size apache AH64A in teh mean time .
Primary Role: Twin seat combat helicopter
Origin: USA
Dimensions: Length: 17.75 m, Height: 5.11 m, Main rotor span: 14.63 m, Tail rotor span: 2.79 m
Capabilities: Max. speed: 365 kph, Ceiling: 6.4 km, Max. range: 689 km
Weight: Empty: 4,881 kg , Max. weight: 9,525 kg
Power Plant: Two General Electric T700-GE-701 engines rated at 1,536 hp each.
Weapon: 30 mm single barreled M230 cannon with 1,200 rounds, up to 16 Hellfire air-to-surface missiles, four unguided rocket packs, detachable fuel tanks
The A Model
The a model carried out its maiden flight in September of 1975, and was seen as a very advanced helicopter for its time. It was considered to be immune to machine gun bullets with a caliber of up to 12.7 mm., and most of its systems could take hits from 23 mm. mortar shells as well. The Apache A boasted an advanced night vision system which made it the first combat helicopter to have full night-fighting and low visibility capabilities.
The AH-64A - as the model is designated in the US Army - is equipped with two General Electric T700-GE-701 engines, supplying 1,723 hp. each. These engines are what gives the Apache its unrivaled maneuverability and cargo carry capacity. 925 units have been produced to date, most of them for the US Army.
On January 17th 1991, the A-Model Apache fired the opening shots of the Gulf War in an attack on Iraqi radar posts. The Apache's destroyed hundreds of Iraqi tanks in the course of the war.
Hughes developed the Apache in the mid-1970s, after weighing the lessons learned in Vietnam. The advanced attack helicopter was intended to block the Warsaw Pact's large armored force, in the event that it mounted an invasion of West Germany.
The Apache is robust enough to take direct hits from a large number of shells and keep on going. Its strong engines enable it to fly at over 360 kph and to climb very quickly, even in reverse flight.
Several systems combine to create the Apache's night fighting capability. A PVNS night vision system gives the pilot the ability to see, even in conditions of total darkness. It accomplishes this by sensing heat given off by various objects, generating a picture and displaying it on the monitor in the cockpit and in on the eyepiece in the pilot's helmet.
An optical TADS system for laser targeting and designation guides the Apache's Hellfires to their targets. The Hellfire missiles - the Apache's chief armament - is intended for use against armor and buildings. It is highly accurate, even from long range. The Apache is armed with up to 16 missiles, or four rocket packs. Its armament includes a single-barreled M230 30 mm. cannon with up to 1,200 rounds. In addition, the helicopter can carry detachable fuel tanks, for augmenting its range and the time it can spend in the scene of the action before turning back to refuel.
07-30-2007, 05:04 AM
#11
Member
Thread Starter
Join Date: Apr 2006
Location: merrimacqueensland, AUSTRALIA
Posts: 41
Likes: 0
Received 0 Likes
on
0 Posts
well while waiting for teh rest of the nose to arrive i decided to move onto the transmission bay .
so first , locate teh T-1 sides and the tgt plywood teeth , these are how the fuse is integrated together ,which i discussed earlier , again give each part a light sand and following the instrauctions ,CA the ply teeth to teh sides of teh transmission bay aligning the teeth with teh front and bottom of teh side parts .
next find the ply formers and again glue with CA making sure to keep it all square ,now locate teh top section and glue in place with CA again .from here we cut out the larger trriangle stock to place i teh front either side , this is so we can sand the curve to meet teh canopy ,so first i sand the inside of the triangle stock to match teh front former shape then i sand the curve in teh front of teh transmission bay , there is a line scribed into the former to show you how much to sand , this is where a dremel or bench sander comes into its own other wise get soem 80 grit paper and a sanding block and start shaping .get it close to teh shape marked on the former then you can do teh final shape when its mounted with the canopy .
So with that complete we move on to the top deck of the transmision bay ,locate the sides ,DHS and teh top sheet DHT which is actually called the dog house ,CA the sides to teh top sheet then CA to teh ply former that comes out the top at teh front of the transmission bay then CA the sides down to teh transmission bay ,now we sand the back edge of teh complete assembly to the angle of teh rear transmission bay ,now comes the exciting part , place the transmission bay onto the fuse to hold while you sheet it , CA a piece of cut off sheeting to teh rear of the transmission bay to hold it into teh shape of teh fuse for sheeting ,then startingfrom the rear cross sheet forward sand any over hanging sheet to teh sides shape ,now locate some more large triangle stock and glue to teh inside of the rear decking for shaping purposes , ,give a complete sand then mount it back onto teh fuse to see your apache start to come alive , man this is where you can really get excited as this is when your apache comes to life
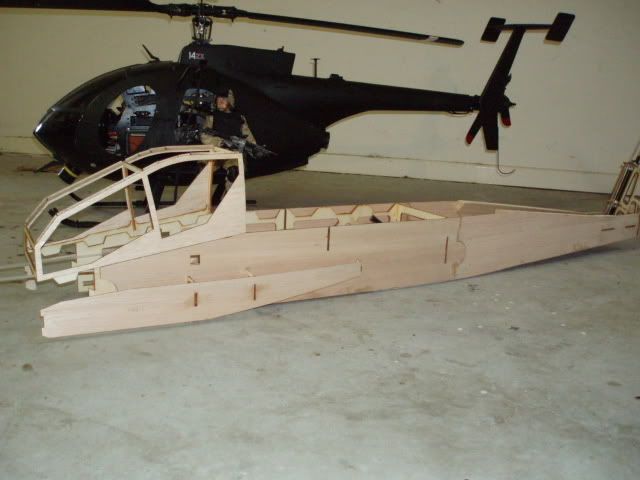
below is the completed transmission bay
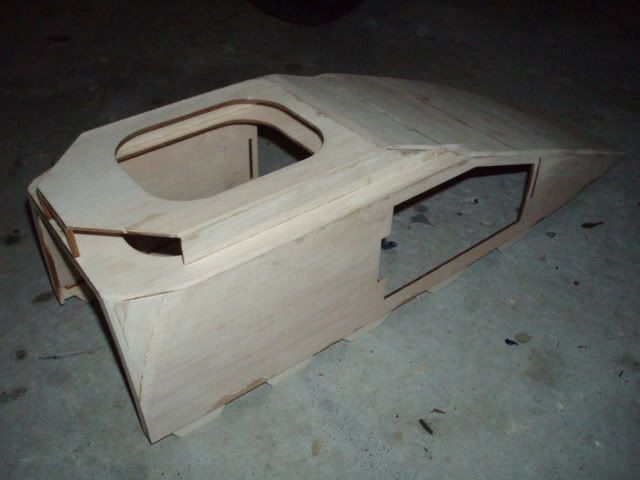
now she is starting to come alive and you get to see just how big she is going to be

so first , locate teh T-1 sides and the tgt plywood teeth , these are how the fuse is integrated together ,which i discussed earlier , again give each part a light sand and following the instrauctions ,CA the ply teeth to teh sides of teh transmission bay aligning the teeth with teh front and bottom of teh side parts .
next find the ply formers and again glue with CA making sure to keep it all square ,now locate teh top section and glue in place with CA again .from here we cut out the larger trriangle stock to place i teh front either side , this is so we can sand the curve to meet teh canopy ,so first i sand the inside of the triangle stock to match teh front former shape then i sand the curve in teh front of teh transmission bay , there is a line scribed into the former to show you how much to sand , this is where a dremel or bench sander comes into its own other wise get soem 80 grit paper and a sanding block and start shaping .get it close to teh shape marked on the former then you can do teh final shape when its mounted with the canopy .
So with that complete we move on to the top deck of the transmision bay ,locate the sides ,DHS and teh top sheet DHT which is actually called the dog house ,CA the sides to teh top sheet then CA to teh ply former that comes out the top at teh front of the transmission bay then CA the sides down to teh transmission bay ,now we sand the back edge of teh complete assembly to the angle of teh rear transmission bay ,now comes the exciting part , place the transmission bay onto the fuse to hold while you sheet it , CA a piece of cut off sheeting to teh rear of the transmission bay to hold it into teh shape of teh fuse for sheeting ,then startingfrom the rear cross sheet forward sand any over hanging sheet to teh sides shape ,now locate some more large triangle stock and glue to teh inside of the rear decking for shaping purposes , ,give a complete sand then mount it back onto teh fuse to see your apache start to come alive , man this is where you can really get excited as this is when your apache comes to life
below is the completed transmission bay
now she is starting to come alive and you get to see just how big she is going to be
07-30-2007, 08:48 AM
#12
Member
Thread Starter
Join Date: Apr 2006
Location: merrimacqueensland, AUSTRALIA
Posts: 41
Likes: 0
Received 0 Likes
on
0 Posts
well from here on in the build gets easier and easier , you really get a sense of what you are building and its hard not to get too excited ,as i have done and build late into teh night lol i often find myself building and forgetting to get pics as i go ,just because im having too much fun .
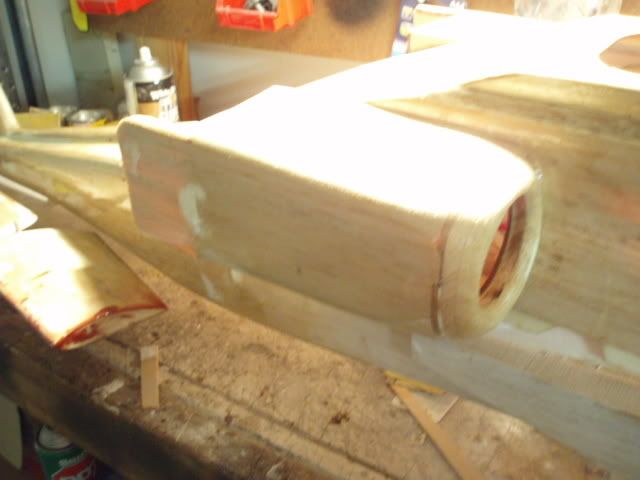
So now we fnalise the engine houseings on the sides of the transmission bay.this is a simple procedure ,and is also where we start with the sanding and shaping that bring the apache to life,so locate the required parts which are the two ply formers for each side E1 and E2 .
firstly CA E1 perpendicular with the transmission bay in the front slot on the side ,then WITHOUT glueing mount E2 into its slot as it needs to be at an angle which is determined when you mount the side of the housing on .once you are happy with teh fit of teh side frame then CA it to E1 and then once mounted to E2 and you are happy with its placemnet then go ahead and CA E2 to teh slot and tehn CA the side frame to E2 ,now repeat on teh other side

Now flip it over so you are looking at teh bottom , then locate and CA EN 1 into place on both sides , this is where you will find if you glued teh first former on perpendicular , you can move slightly to align the bottom EN 1 for a correct fit ,so with this done on both sides place back up the right way ,so that you are looking at this
now , following teh manual we locate the lower nacelle build up pieces which are placed inside teh front lower outside section of teh engine housing , then we CA some larger triangle stock in on top , this is so we can sand and shape the curves needed to get teh scale engine housing . Now glue smaller triangle stock to teh top outside edge of the housing ,full length, again this is so we can round the housing off .these you can see in the above photo.
ok nearly done just find the balsa nacelle filler EN3 that is then mounted to teh inside rear of the housing ,then CA EN4 to the top and bottom of the of the rear nacelle side ,now you are ready to sheet the top of the housing and this is what you should have

So now we fnalise the engine houseings on the sides of the transmission bay.this is a simple procedure ,and is also where we start with the sanding and shaping that bring the apache to life,so locate the required parts which are the two ply formers for each side E1 and E2 .
firstly CA E1 perpendicular with the transmission bay in the front slot on the side ,then WITHOUT glueing mount E2 into its slot as it needs to be at an angle which is determined when you mount the side of the housing on .once you are happy with teh fit of teh side frame then CA it to E1 and then once mounted to E2 and you are happy with its placemnet then go ahead and CA E2 to teh slot and tehn CA the side frame to E2 ,now repeat on teh other side
Now flip it over so you are looking at teh bottom , then locate and CA EN 1 into place on both sides , this is where you will find if you glued teh first former on perpendicular , you can move slightly to align the bottom EN 1 for a correct fit ,so with this done on both sides place back up the right way ,so that you are looking at this
now , following teh manual we locate the lower nacelle build up pieces which are placed inside teh front lower outside section of teh engine housing , then we CA some larger triangle stock in on top , this is so we can sand and shape the curves needed to get teh scale engine housing . Now glue smaller triangle stock to teh top outside edge of the housing ,full length, again this is so we can round the housing off .these you can see in the above photo.
ok nearly done just find the balsa nacelle filler EN3 that is then mounted to teh inside rear of the housing ,then CA EN4 to the top and bottom of the of the rear nacelle side ,now you are ready to sheet the top of the housing and this is what you should have
08-05-2007, 02:28 AM
#13
Member
Thread Starter
Join Date: Apr 2006
Location: merrimacqueensland, AUSTRALIA
Posts: 41
Likes: 0
Received 0 Likes
on
0 Posts
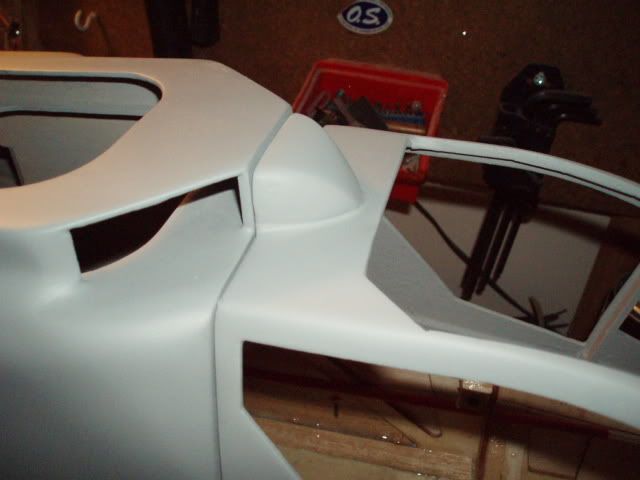
sorry for not updating at a more regular inteval but work is balistic and the only time i have left is small so i have been concentrating on the apache ,dont worry i will still continue with teh build but just wanted to give you all a bit of a sneak previeew of where she is at right now
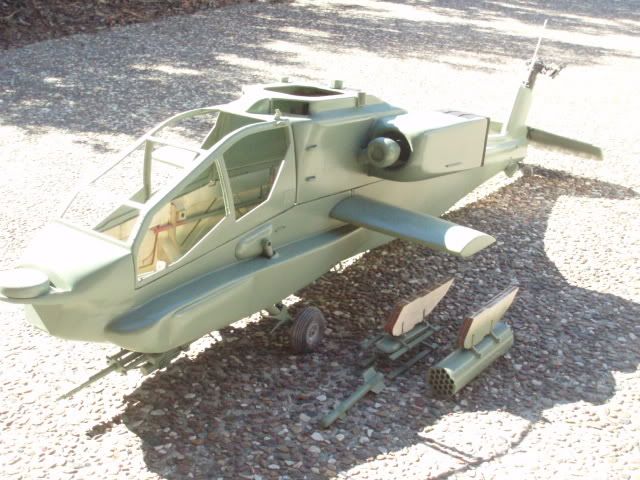

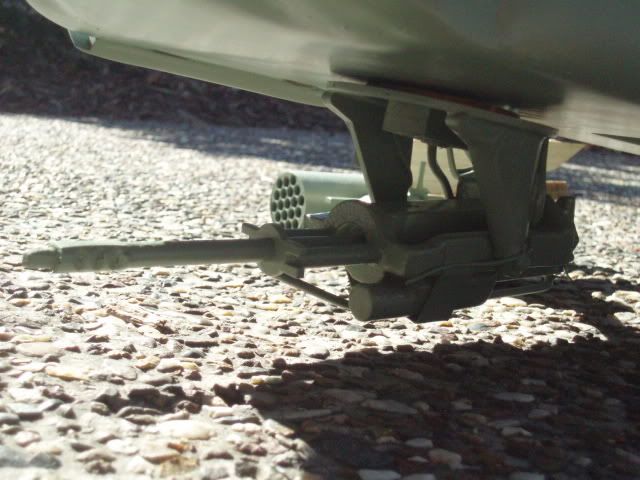
and some of the detail i have started to add ,alos added a fair bit of detail to the chain gun but still have more to go


and some of the detail i have started to add ,alos added a fair bit of detail to the chain gun but still have more to go
08-08-2007, 08:49 AM
#14
Member
Thread Starter
Join Date: Apr 2006
Location: merrimacqueensland, AUSTRALIA
Posts: 41
Likes: 0
Received 0 Likes
on
0 Posts
ok i have spent the last couple of hours adding a lot more detail to the fuse ,the tads system is almosy=t ready to mount ,and will work in sync with teh m239 30mm chain gun, i am also closer to working out my lighting setup , also , over the last week i have aquired a helitronics light controller , with a heap of luxeon lights and leds ,i have also bought a lighting kit from http://www.ncweb.com/biz/dan/RCLights.html i the states ,which arrived last night, i had a quick play with it in my quick of japan ep8 cobra ,and it is a ready made easy to use light set up which is great for those amongst us that would like to have a simple no hassles or fuss basic light set up on our model , i am also in contact with ross from http://www.lightingforaeromodellers.co.uk/ who is sending me his product list and is going to help me get a lighting setup sorted out also , in short i am going to try all three setups and go with the one that best suits th apache , the other two will then end up in the e-cobra from approach engineering and teh 90 size cobra ,,i am favouring teh helitronics for teh 90 size cobra as i want to put a lot of detail into it ,so once i have a bit more time with each setup i will put my thoughts down here .
So back to the building there is little to do to finish of the nacelles so this is where i will start.so next on teh list is sheeting teh top of teh nacelle , simple and quick , there is plenty of 3mm sheet so you can overlap a bit then sand back , im the cuastious type so i loke to give a little excess then sand off
then just to show you how she is taking shape here is what she looks loke with teh canopy ,every step just gets more and more exciting and the shape of teh apache takes form

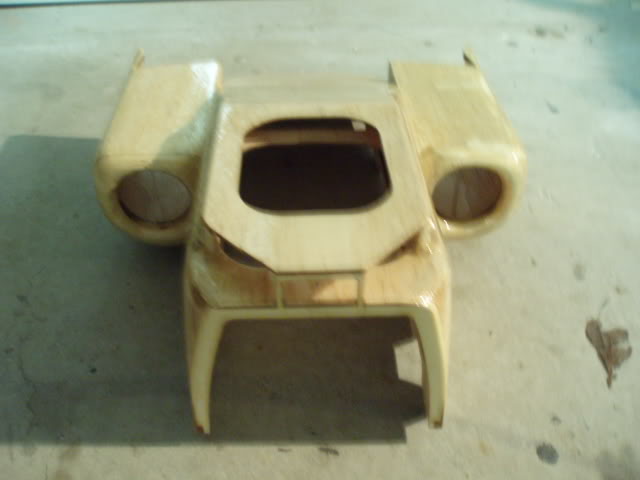
right then , locate the two engine nose blocks ENB for either side ,glue the two parts together for each side , now the important bit make sure you make a right and a left when you start to sand to teh final shape .

i kept refering back teh the cd that james includes in teh kit , there is over 200 pics there of teh apache he flies , and you simply cant find anymore detailed reference when starting to sand and shape for teh correct detail, and especially now as i am adding the final detail ,i have it open on my desk top all the time , im lucky enough to have my computer out in teh gargae so i can refer to it always .
so have a good look through teh pics as it will give you the best perspective on how to have the final shape of teh engine blocks at the front of teh nacell , again i start of with 80 grit to get teh basic shape tehn use 120 ro smooth it up and finally 320 to get it perfect for the resin coats .
one thing i did change or add as it may be was the top turtle deck sides ,on the full size heli its a smoother and less pronounced step from the side of teh top deck to teh transmission bay sides so i added 5 mm of balsa to teh side of the top deck to bring it out closer to the side of the transmission bay , then i jsut sanded and shaped to get a good curve , so finally we end up here
this is where i have to say that i really got excited and i think i built well past midnight this night as i didnt realize the time
this pic shows the nacelle shape starting to form , i used a razor plane to get a head start here
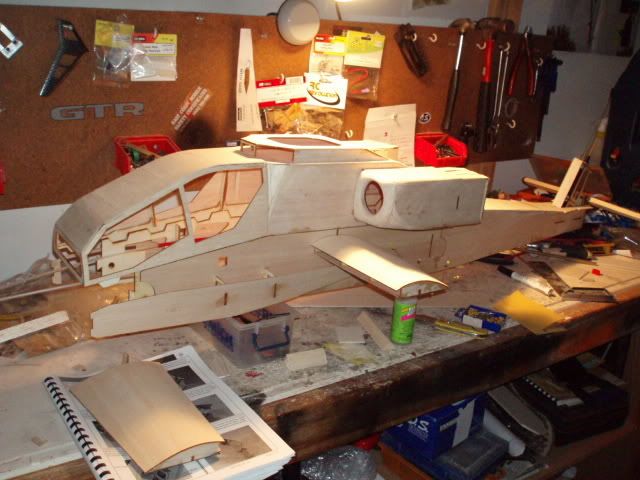
So back to the building there is little to do to finish of the nacelles so this is where i will start.so next on teh list is sheeting teh top of teh nacelle , simple and quick , there is plenty of 3mm sheet so you can overlap a bit then sand back , im the cuastious type so i loke to give a little excess then sand off
then just to show you how she is taking shape here is what she looks loke with teh canopy ,every step just gets more and more exciting and the shape of teh apache takes form
right then , locate the two engine nose blocks ENB for either side ,glue the two parts together for each side , now the important bit make sure you make a right and a left when you start to sand to teh final shape .
i kept refering back teh the cd that james includes in teh kit , there is over 200 pics there of teh apache he flies , and you simply cant find anymore detailed reference when starting to sand and shape for teh correct detail, and especially now as i am adding the final detail ,i have it open on my desk top all the time , im lucky enough to have my computer out in teh gargae so i can refer to it always .
so have a good look through teh pics as it will give you the best perspective on how to have the final shape of teh engine blocks at the front of teh nacell , again i start of with 80 grit to get teh basic shape tehn use 120 ro smooth it up and finally 320 to get it perfect for the resin coats .
one thing i did change or add as it may be was the top turtle deck sides ,on the full size heli its a smoother and less pronounced step from the side of teh top deck to teh transmission bay sides so i added 5 mm of balsa to teh side of the top deck to bring it out closer to the side of the transmission bay , then i jsut sanded and shaped to get a good curve , so finally we end up here
this is where i have to say that i really got excited and i think i built well past midnight this night as i didnt realize the time
this pic shows the nacelle shape starting to form , i used a razor plane to get a head start here
08-11-2007, 12:50 PM
#15
Member
Thread Starter
Join Date: Apr 2006
Location: merrimacqueensland, AUSTRALIA
Posts: 41
Likes: 0
Received 0 Likes
on
0 Posts
just thought id show you guys teh mechanics that i am using in hte apache . she was designed around century hawk mechanics , but seing as i have a couple of ergo 30s that i have converted to 50s sitting here ,that is what i am using ,have been waiting on my clutch and it arrived yesterday from pete at http://powergrunthobbies.com.au/.so i finally got to fit my os hyper 50 today with teh hatori 541 manifold and teh 540 tunned pipe , this will give me the clearence i need
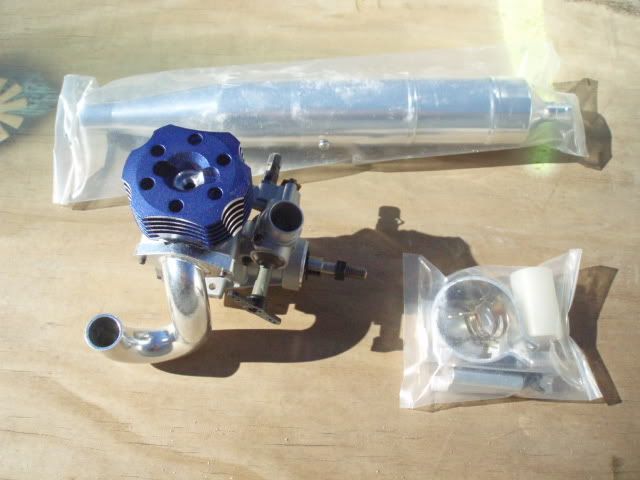
as i only have experience with tt 50 pro motors in my scale helis i was interested to see just how good these motors are ,well i have to say that i have always had a pretty reliable performance from my tt50s , but the moment i spun teh starter on hte hyper for teh first time she sang straight into life and into a smooth stable idle , definatley think my littlebird will be getting stripped down after teh apache is finished and getting an up grade to a hyper ,,so for teh first tank i just set the needles and let her idle over for half a tank then sowely increased teh throttle to about 50% for teh last half ,got her light on the skids but didnt go any further ,will run another tank in her tomorrow doing the same then ill get her up into teh hover .
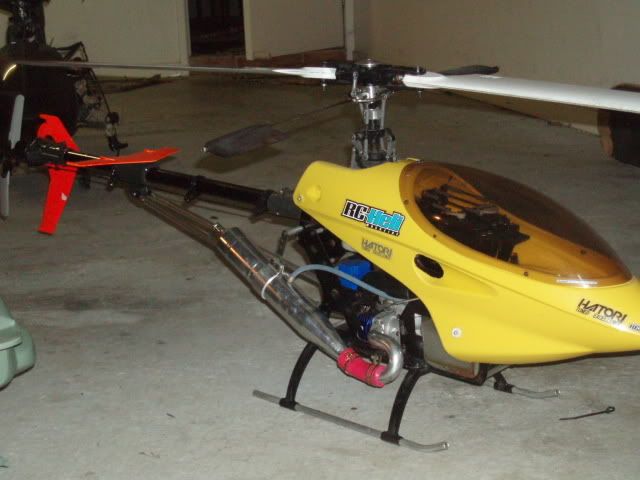
heres another pic of teh apache , have started working on the tail now ,as soon as i am happy with teh ergo flying and have the hyper run in , ill start putting the mechs in
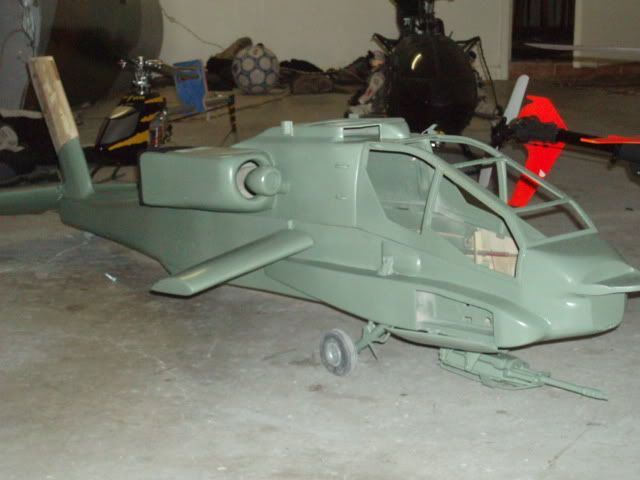
as i only have experience with tt 50 pro motors in my scale helis i was interested to see just how good these motors are ,well i have to say that i have always had a pretty reliable performance from my tt50s , but the moment i spun teh starter on hte hyper for teh first time she sang straight into life and into a smooth stable idle , definatley think my littlebird will be getting stripped down after teh apache is finished and getting an up grade to a hyper ,,so for teh first tank i just set the needles and let her idle over for half a tank then sowely increased teh throttle to about 50% for teh last half ,got her light on the skids but didnt go any further ,will run another tank in her tomorrow doing the same then ill get her up into teh hover .
heres another pic of teh apache , have started working on the tail now ,as soon as i am happy with teh ergo flying and have the hyper run in , ill start putting the mechs in
08-19-2007, 09:06 AM
#16
Member
Thread Starter
Join Date: Apr 2006
Location: merrimacqueensland, AUSTRALIA
Posts: 41
Likes: 0
Received 0 Likes
on
0 Posts
sorry for not keeping this up on a regular basis guys ,just been carried away detailing ,hte fuse plus putting time into teh ergo 50 to set her up to go in ,ill go into a brief discription of the nose assembly,which i skipped ealier as i was waiting for some parts ,you might remeber that i was waiting for the forward fuse formers to complete the fuse and nose setup ,so when they arrived it was a simple process of using epoxy to glue the left and right side fuse sides in place , this then allowed my to finish off the fab (forward avioncs bay)and then the nose section ,
this is how it looked leading up to the completeion of the forward fuse
so with teh forward section complete i was then able to move on and construct the nose section ,and also the TADS and PNVS equipemnet which sits out teh front of teh nose ,locate the four sides to teh nose ,and CA together following the manual so that you have the correct parts top and botoom .next you need to add extra fillets and stock inside to allow you to then shape the nose section to teh scale outline ,next place the front plate over teh structure so that the top and bottom of teh plate are flush ,trace the outline then remove ,now sand to that shape ,and using teh pics on the disk james includes in teh kit .
once you are happy glue the front plate in place and tehn the support plate ,you now have the complete nose section
08-22-2007, 05:44 AM
#17
Member
Thread Starter
Join Date: Apr 2006
Location: merrimacqueensland, AUSTRALIA
Posts: 41
Likes: 0
Received 0 Likes
on
0 Posts
hi all . today i have some very sad news as i have recieved a lot of emails that seem to have confirmed that james linder , who is approach engineering , lost his life in a training exercise on the 20th of this month ,the details are a bit sketchy but both he nad his gunner passed away after an incident while he was training with the utah national guard, as i get more info i will let you all know ,htrough my wanting to build his kits , i have comunicated back and forth with james over teh last 6or so months and have a huge repect for him , and thank him for the time he has taken to answer my questions and the interview i did with him earlier ,he has always found time to comunicate with me and answer all my questions , my heart goes out to his partner and sons ,he was a real insiration to myself and others and will be missed
10-17-2007, 05:12 AM
#20
Member
Thread Starter
Join Date: Apr 2006
Location: merrimacqueensland, AUSTRALIA
Posts: 41
Likes: 0
Received 0 Likes
on
0 Posts
well guys it has been way too long since i posted about the apache , i have not stopped her altogether although things have slowed down somewhat due to work , but the good news is that she is a lot closer to flying now , pretty much all i need now is to source out a custom length belt to go from the ergo mechs to the tail adapter as it was designed for a raptor that has a much larger final drive gear ,so i am currently searching out a belt , then all i need is a new engine as i had to use my hyper in my md530 littlebird as the old tt50 pro finally gave up the ghost .here are a few pics to show the progress i have made over the last few months ,the helitronics light controller is in and superb with the luxeon lights , although i still have to put in the landing light , the mechs have been fitted and the tail adapter and flex drive are in and set up , have connected the tads and ihads to the rudder servo and the tail plane works off the collective ,and the m230 will be set up to work off the roll axis,i have also made a suspended ,swiveling tail wheel thanks to Emile for his setup.
for size comparison her she is next to my 450 ep dragonus
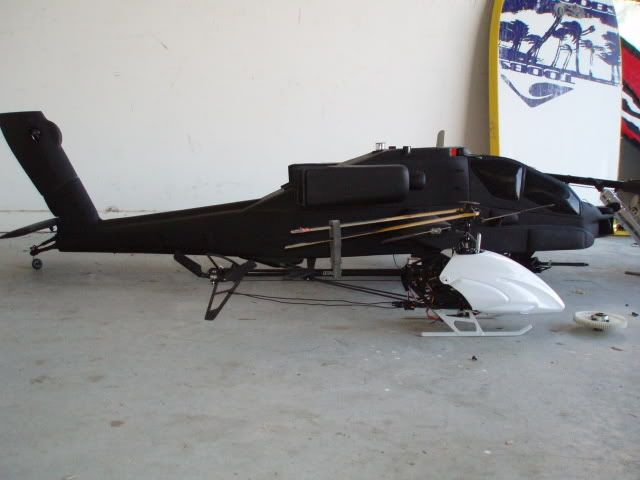
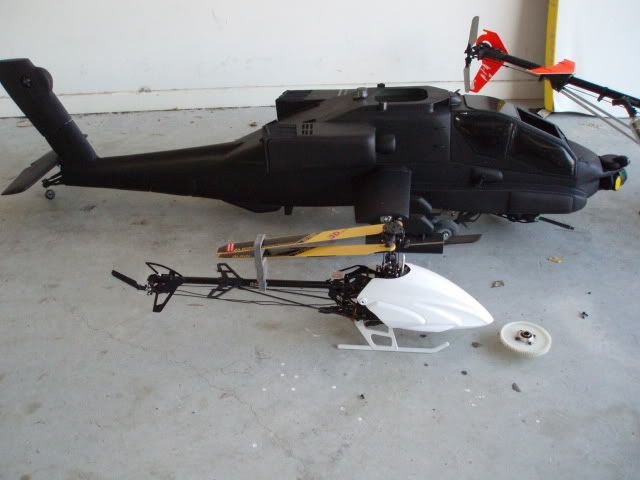
front on showing the tads and ihads
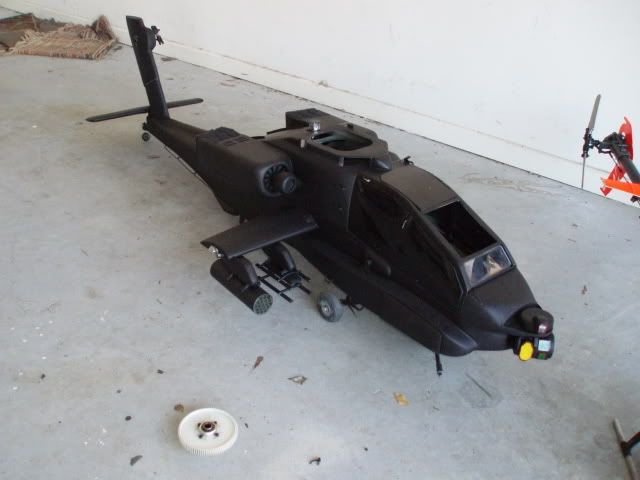
in this pic you can see the rudder servo ,which has the ihads and tads connected to it , closest ,and the other servo is for teh tail plane that will be coupled off the collective the wiring is for the helitronics light setup

this next one shows you just how tight it all is and how much larger the ergo mechs are ,is a good indication of how helis used to be 5 years ago

and here she is , almost complete , still have some more surface detail and decals to add ,but pretty much if i had the new hyper and the belt she would be able to fly
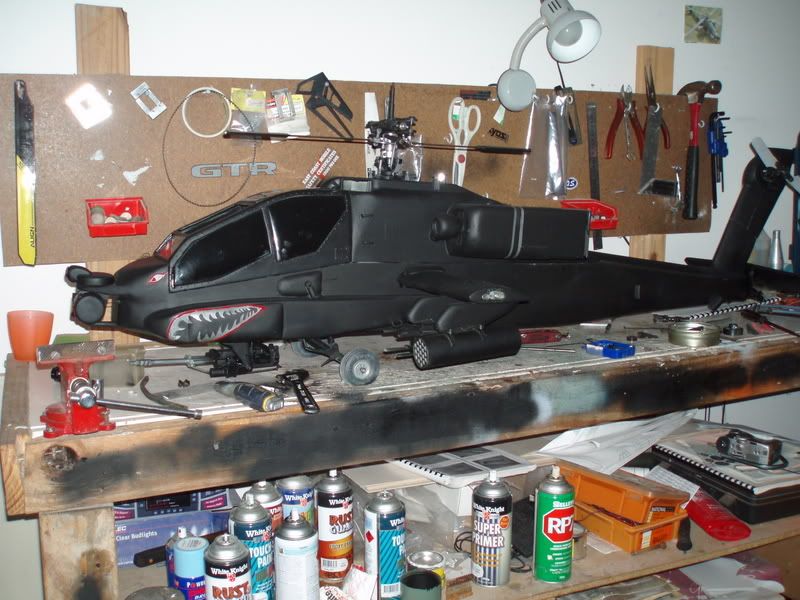
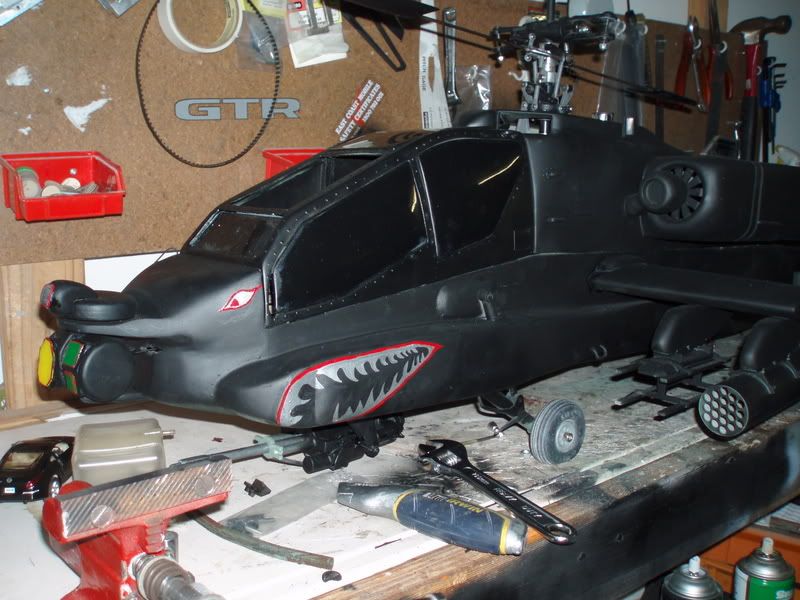
i will get back into the construction post so that you can see just how easy it was to get to this stage
for size comparison her she is next to my 450 ep dragonus
front on showing the tads and ihads
in this pic you can see the rudder servo ,which has the ihads and tads connected to it , closest ,and the other servo is for teh tail plane that will be coupled off the collective the wiring is for the helitronics light setup
this next one shows you just how tight it all is and how much larger the ergo mechs are ,is a good indication of how helis used to be 5 years ago
and here she is , almost complete , still have some more surface detail and decals to add ,but pretty much if i had the new hyper and the belt she would be able to fly
i will get back into the construction post so that you can see just how easy it was to get to this stage
10-23-2007, 07:32 AM
#21
Member
Thread Starter
Join Date: Apr 2006
Location: merrimacqueensland, AUSTRALIA
Posts: 41
Likes: 0
Received 0 Likes
on
0 Posts
well guys finally got around to taking a vid of teh apache , showing the helitronics light controller with luxeons
http://www.youtube.com/watch?v=Un-71R8Qarw
http://www.youtube.com/watch?v=Un-71R8Qarw
06-17-2008, 11:05 PM
#22
Banned
Join Date: May 2008
Location: CHONGQING, CHINA
Posts: 21
Likes: 0
Received 0 Likes
on
0 Posts
