


COMP-ARF A-4 BUILD
 01-12-2011 | 08:57 AM
#51

My Feedback: (15)
Joined: Sep 2003
Posts: 128
Likes: 0
Received 0 Likes
on
0 Posts
From: Conroe, TX
Yes, The gear will drop in from the Top and all holes will ling up perfectly. You will need to remove some wood from the fwd bulkhead temporally to make it an easy drop in. You may be able to find a way to clear all obstacles with out this cut, I just see the need for this gear to removed many times during construction... Save the removed pice and make it a removable bridge later . If mounted on the top rail you will find the nose gear clearance on retraction is perfect, and you will also have clearance for the air cylinder on the aft lower fuselage when your gear is down. Bolt holes from the old style gear and new gear are identical, no need to drill or cut into your fiber glass fuse.
 01-12-2011 | 11:09 AM
#52
Member
Joined: Oct 2006
Posts: 63
Likes: 0
Received 0 Likes
on
0 Posts
From: Copenhagen S, DENMARK
Hello !
On mine I just used my small Lipo Dremel with a 90 deg gearbox from the top and "adjusted" the predrilled holes in the frames.
Front gear fitted underside as per CARF instruction (also the right and only way to spread the load on the intire woodrail) - first through the canopy -> all forward in the nose section withhout the electronic tray fitted (slightly angled nose wheel) -> backwards clearing the wood former and under the rail - bingo :-)
Hoses fitted before the assy is shoehorned in .-)
Peace of cake when you have worked with old italian cars for ages :-)
It one needs to be fitted 2 times from my point of view - one trial and next painted and hoses fitted !
David S : Before I fitted the tanks , I glued the intakes in place, trimmed the complete ducting and fitted the rear carbon duct and then adjusted the tanks with respect to spacing and equal distance to the ducting - just a small comment .-)
Regards from Denmark
Peter Bang
01-12-2011 | 11:37 AM
#53
My Feedback: (15)
Joined: Sep 2003
Posts: 128
Likes: 0
Received 0 Likes
on
0 Posts
From: Conroe, TX
C-Arf A4 instructions, Where? Please post some photos of your nose wheel instal when you have time... As I understand your post you have no clearance issues when mounting gear on lower rail. Mine will hit nose wheel on fuse when retracting and when extended the air cylinder binds on aft lower section of fuse. Can their be this much variance between models?
Phil<br type="_moz" />
Phil<br type="_moz" />
01-12-2011 | 03:42 PM
#54
Thread Starter
My Feedback: (49)
Joined: Apr 2002
Posts: 2,182
Likes: 0
Received 0 Likes
on
0 Posts
From: SANTA ANA, CA
ORIGINAL: invertmast
Looking good dave. couple of questions.
1. Was it not possible to install the gear on top of the nose gear rails and drill from the top side, instead of the bottom?
Thomas, It was possible, but would have been very awkward for me. And, given the choice between cutting and then replacing a portion of a structural bulkhead or drilling a couple of holes, which could later be easily filled as to never know they were there, I decided to go with the holes.
2. What did you use to fill the fuselage to vertical fin joint?
I use two products. Split Second Glazing Putty & Evercoat MetalWorks Glazing Putty. The Evercoat is a thinner consistency for finer fills. I used it on the vertical fin joint.
David S
01-12-2011 | 03:56 PM
#55
Thread Starter
My Feedback: (49)
Joined: Apr 2002
Posts: 2,182
Likes: 0
Received 0 Likes
on
0 Posts
From: SANTA ANA, CA
ORIGINAL: Dave Wilshere
This is a link to the first A4 we sold, posted on the Danish Jet Forum, its being built by my friend Peter Bang...very slowly
http://www.jetdanmark.dk/e107_plugin...pic.php?506.10
Dave Wilshere
This is a link to the first A4 we sold, posted on the Danish Jet Forum, its being built by my friend Peter Bang...very slowly
http://www.jetdanmark.dk/e107_plugin...pic.php?506.10
Dave Wilshere
Dave,
Thanks for the post of this site. Considering that there aren't yet any instructions, those pics were actually very useful in helping me to figure out a couple of items I had questions about!
David S
01-12-2011 | 04:09 PM
#56
Thread Starter
My Feedback: (49)
Joined: Apr 2002
Posts: 2,182
Likes: 0
Received 0 Likes
on
0 Posts
From: SANTA ANA, CA
ORIGINAL: bang68
Hello !
On mine I just used my small Lipo Dremel with a 90 deg gearbox from the top and ''adjusted'' the predrilled holes in the frames.
Front gear fitted underside as per CARF instruction (also the right and only way to spread the load on the intire woodrail) - first through the canopy -> all forward in the nose section withhout the electronic tray fitted (slightly angled nose wheel) -> backwards clearing the wood former and under the rail - bingo :-)
Hoses fitted before the assy is shoehorned in .-)
Peace of cake when you have worked with old italian cars for ages :-)
It one needs to be fitted 2 times from my point of view - one trial and next painted and hoses fitted !
David S : Before I fitted the tanks , I glued the intakes in place, trimmed the complete ducting and fitted the rear carbon duct and then adjusted the tanks with respect to spacing and equal distance to the ducting - just a small comment .-)
Regards from Denmark
Peter Bang
Beautiful work! Thanks for the observation. I can use all of the help I can get!
 My intake ductings were not evenly installed on the intakes from the factory, so no way to get the tanks exactly even, other than to push them both further to the rear, which I didn't want to do. I don't have ducting that extends to the turbine duct enclosure.
 I'm going to try and have my intakes remain removable. The access to the equipment area is much better through those openings for the future. I have rather large hands and trying to access everything down through the cockpit opening would be impossible.
How many & how did you distribute your air tanks? Looks like you've got one tank servicing 2-3 different valves. I currently have my system separated, such that each LG strut has it's own separate air tank & valve =3 tanks. The wheel brakes & wing speed brakes share a tank & the fuse speed brakes & tail hook share a tank. 5 total
David S
01-12-2011 | 04:18 PM
#57
Thread Starter
My Feedback: (49)
Joined: Apr 2002
Posts: 2,182
Likes: 0
Received 0 Likes
on
0 Posts
From: SANTA ANA, CA
ORIGINAL: JustJets
C-Arf A4 instructions, Where? Please post some photos of your nose wheel instal when you have time... As I understand your post you have no clearance issues when mounting gear on lower rail. Mine will hit nose wheel on fuse when retracting and when extended the air cylinder binds on aft lower section of fuse. Can their be this much variance between models?
Phil<br type=''_moz'' />
My gear is mounted from the bottom. This way the entire block/framework distributes the load. If you mount from the top, the bolts are carrying the load. Technical but better from the bottom. You have to slide the gear all the way back to the rear bulkhead to get the nose gear wheel to clear the front of the fuse & yes this did cause binding of the bottom cylinder against the fuse. My plan is simply to cut the area approx 1/2 inch back from the current door opening & then extend the bottom reardoor, which attaches to the cylinder an equal distance. Might not be museum scale, but it'll work.

David S
01-12-2011 | 06:09 PM
#58
My Feedback: (15)
Joined: Sep 2003
Posts: 128
Likes: 0
Received 0 Likes
on
0 Posts
From: Conroe, TX
Hi Dave,<div>Yes , agreed a top mounted gear will need some carbon fiber to help distribute the load. The rails do protrude through the fwd and aft firewall but still not a safe bet. I guess I will slide some 1/16" fiber rails and then add some 90 deg brackets to add some additional strength. My opinion is when the CAD program meet Reality Comp ARF had already setup the Jigs. In short, they saw this and let go... I did notice that on their prototype they also made the same cut that your speaking of. Good luck on the rest of your build lets stay in-touch on these....</div><div></div><div>Phil</div>
01-16-2011 | 12:14 AM
#59

Joined: Apr 2003
Posts: 106
Likes: 0
Received 0 Likes
on
0 Posts
From: Ariccia, ITALY
Hi there,
I have been wondering for long time if a thread with this subject would ever be made or not!
I am actually a little bit surprised that a big company like Composite-Arf, that have great success and reputation, put out this expensive masterpiece without a real manual.
Is this the treatment they reserve for their most rich customers???
There must be something underneath because I cannot explain why after 2 years they haven't been able to send out a manual!
I will be following this very interesting thread, please keep posting as many pictures as possible, they can clear things much better and faster then any word!
My best wishes to the proud owner of this model.
Gianluca

 02-02-2011 | 06:14 AM
#63
Thread Starter
My Feedback: (49)
Joined: Apr 2002
Posts: 2,182
Likes: 0
Received 0 Likes
on
0 Posts
From: SANTA ANA, CA
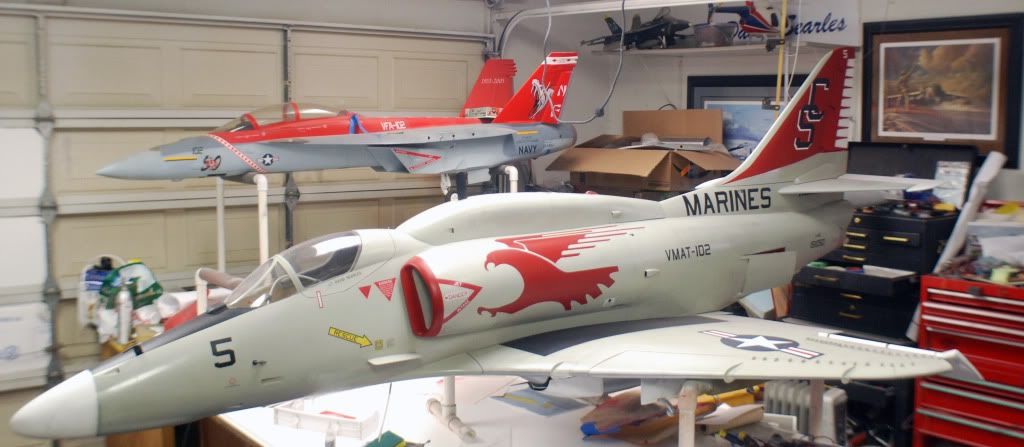
All is well! A new year, getting back to work etc kinda slowed me down on this. I also decided to insert a Boomerang Torus build in front of the A-4, which is just about finished, so I'll be back full time on the A-4. I plan to maiden the Torus this weekend, if weather permits.
I did experience a problem with one of the main LG cylinders, which leaked horribly during the retract cycle(shades of FEJ)[:@] Completely un-use-able as is. So that has to get worked out. The rest of the build should go fairly quickly. I'll post new pics of progress later in the week or early next.
David S
A new year, getting back to work etc kinda slowed me down on this. I also decided to insert a Boomerang Torus build in front of the A-4, which is just about finished, so I'll be back full time on the A-4. I plan to maiden the Torus this weekend, if weather permits.I did experience a problem with one of the main LG cylinders, which leaked horribly during the retract cycle(shades of FEJ)[:@] Completely un-use-able as is. So that has to get worked out. The rest of the build should go fairly quickly. I'll post new pics of progress later in the week or early next.
David S
04-02-2011 | 02:28 PM
#64
Thread Starter
My Feedback: (49)
Joined: Apr 2002
Posts: 2,182
Likes: 0
Received 0 Likes
on
0 Posts
From: SANTA ANA, CA
WOW! It's been 2 months since the last post. I caught hall trying to find this thread again. It apparently is not listed in the database. I tried every search topic available and it wouldn't come up. Finally had to go to my user page and do a search of every message I've posted.
Oh well, here's the latest status: Things are moving along slowly. Life has been getting in the way of my fun![:@] I did get great help and service from Andreas at CompArf and IntairCo regarding getting a new replacement LG retract cylinder shipped to me quickly.
I won't have it ready to fly in time for CA Jets though! Just not enough time to get everything checked out and finished.

David S
Oh well, here's the latest status: Things are moving along slowly. Life has been getting in the way of my fun![:@] I did get great help and service from Andreas at CompArf and IntairCo regarding getting a new replacement LG retract cylinder shipped to me quickly.
I won't have it ready to fly in time for CA Jets though! Just not enough time to get everything checked out and finished.
David S


 04-03-2011 | 07:27 AM
#69
Thread Starter
My Feedback: (49)
Joined: Apr 2002
Posts: 2,182
Likes: 0
Received 0 Likes
on
0 Posts
From: SANTA ANA, CA
ORIGINAL: GSR
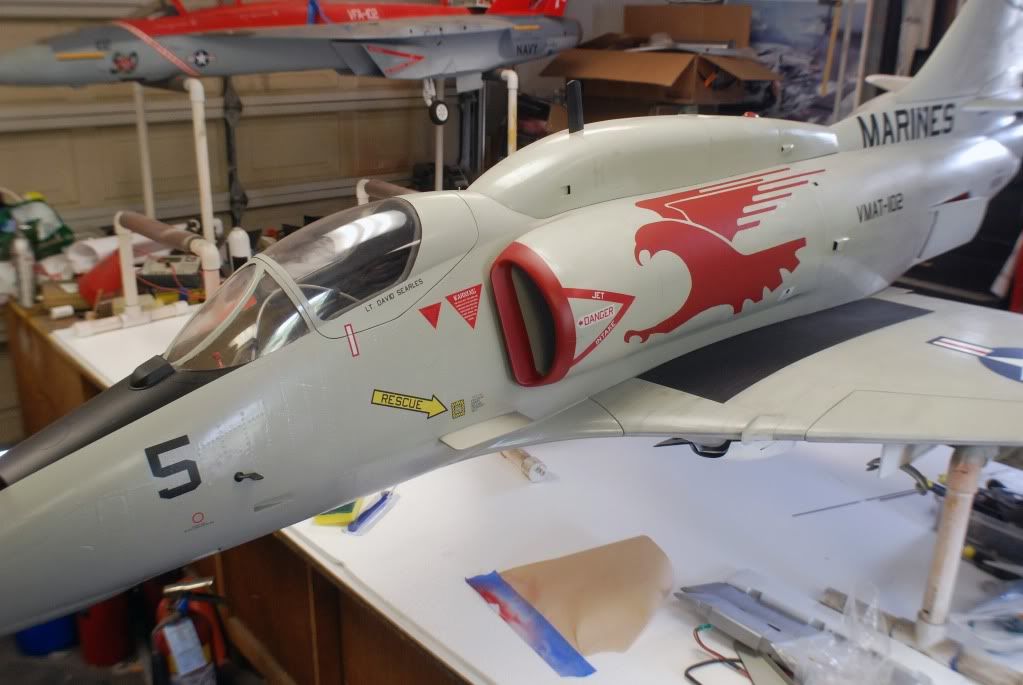
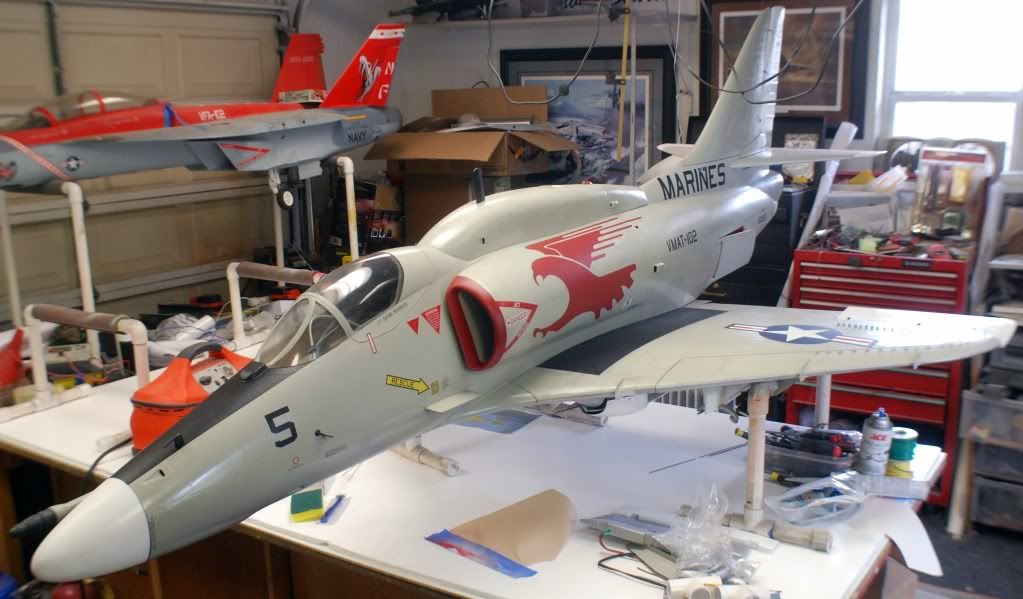
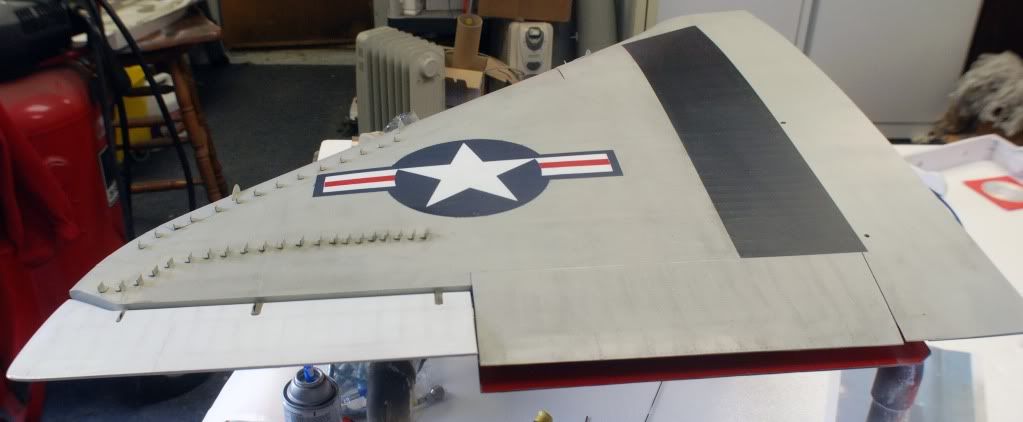
Looks fantastic Dave, Are the graphics paint mask or rub on?? Who did you get them from? Scotty
Looks fantastic Dave, Are the graphics paint mask or rub on?? Who did you get them from? Scotty
David S


 04-06-2011 | 12:36 PM
#73
Thread Starter
My Feedback: (49)
Joined: Apr 2002
Posts: 2,182
Likes: 0
Received 0 Likes
on
0 Posts
From: SANTA ANA, CA
ORIGINAL: olnico
Hey David, you didn't wait for me to finish it ! Well done !!!
So I guess that we can maiden on Saturday
Hey David, you didn't wait for me to finish it ! Well done !!!
So I guess that we can maiden on Saturday
OHH, there's plenty left for you to help with, trust me!
I'm waiting for UPS to drop off the AirWorld F-100 now. Dan has had it the past couple months working on a long list of goodies.
I've got two rolls of FliteMetal, a handful of Sharpies, a box of new Exacto blades and a gal of mineral spirits! We're gonna be busy
See ya,
David S
04-06-2011 | 12:59 PM
#74
Ok, but I am not sure that I'd be able to do any kind of work with that thing sitting next to me. I guess that we'd have to maiden it first before going to the FM stuff 
04-06-2011 | 03:56 PM
#75
Thread Starter
My Feedback: (49)
Joined: Apr 2002
Posts: 2,182
Likes: 0
Received 0 Likes
on
0 Posts
From: SANTA ANA, CA
ORIGINAL: olnico
Ok, but I am not sure that I'd be able to do any kind of work with that thing sitting next to me. I guess that we'd have to maiden it first before going to the FM stuff
Ok, but I am not sure that I'd be able to do any kind of work with that thing sitting next to me. I guess that we'd have to maiden it first before going to the FM stuff
David S

