


Paritech Natrix Build
 04-04-2015, 05:45 PM
#1

Thread Starter
My Feedback: (35)
Join Date: Apr 2002
Location: Mansfield,
OH
Posts: 190
Likes: 0
Received 0 Likes
on
0 Posts
As this is the first Paritech Natrix in the US I thought I would post my experience with the model as well as a short build thread (not much to build!).
Dad and I first discovered the quality of Paritech through the Tomhawk Viper XXL (the pink one) which is made in part by Paritech. The Natrix is a new sport jet and this particular one is the carbon version with electric retracts/brakes and a paint/vinyl scheme. The model options included the high quality lined fabric/zipper bags. The pictures are shortly after unboxing the model, as it arrives from them, everything basically done. Paritech could not have been nicer to work with on the transaction. Always professional and very quick to respond to email.
For reference I am 6'3". The model as shown in the pictures with retracts/wheels/brakes and the fuel tank installed is exactly 26lbs. I should be able to make it around 36 lb dry with the rest of the gear.
I dont routinely have access to RCU but will update this thread with pictures throughout the build as well as the specifics like setup, CG, throws ect.
With any luck the model will be flown before and at First in Flight.
Scott
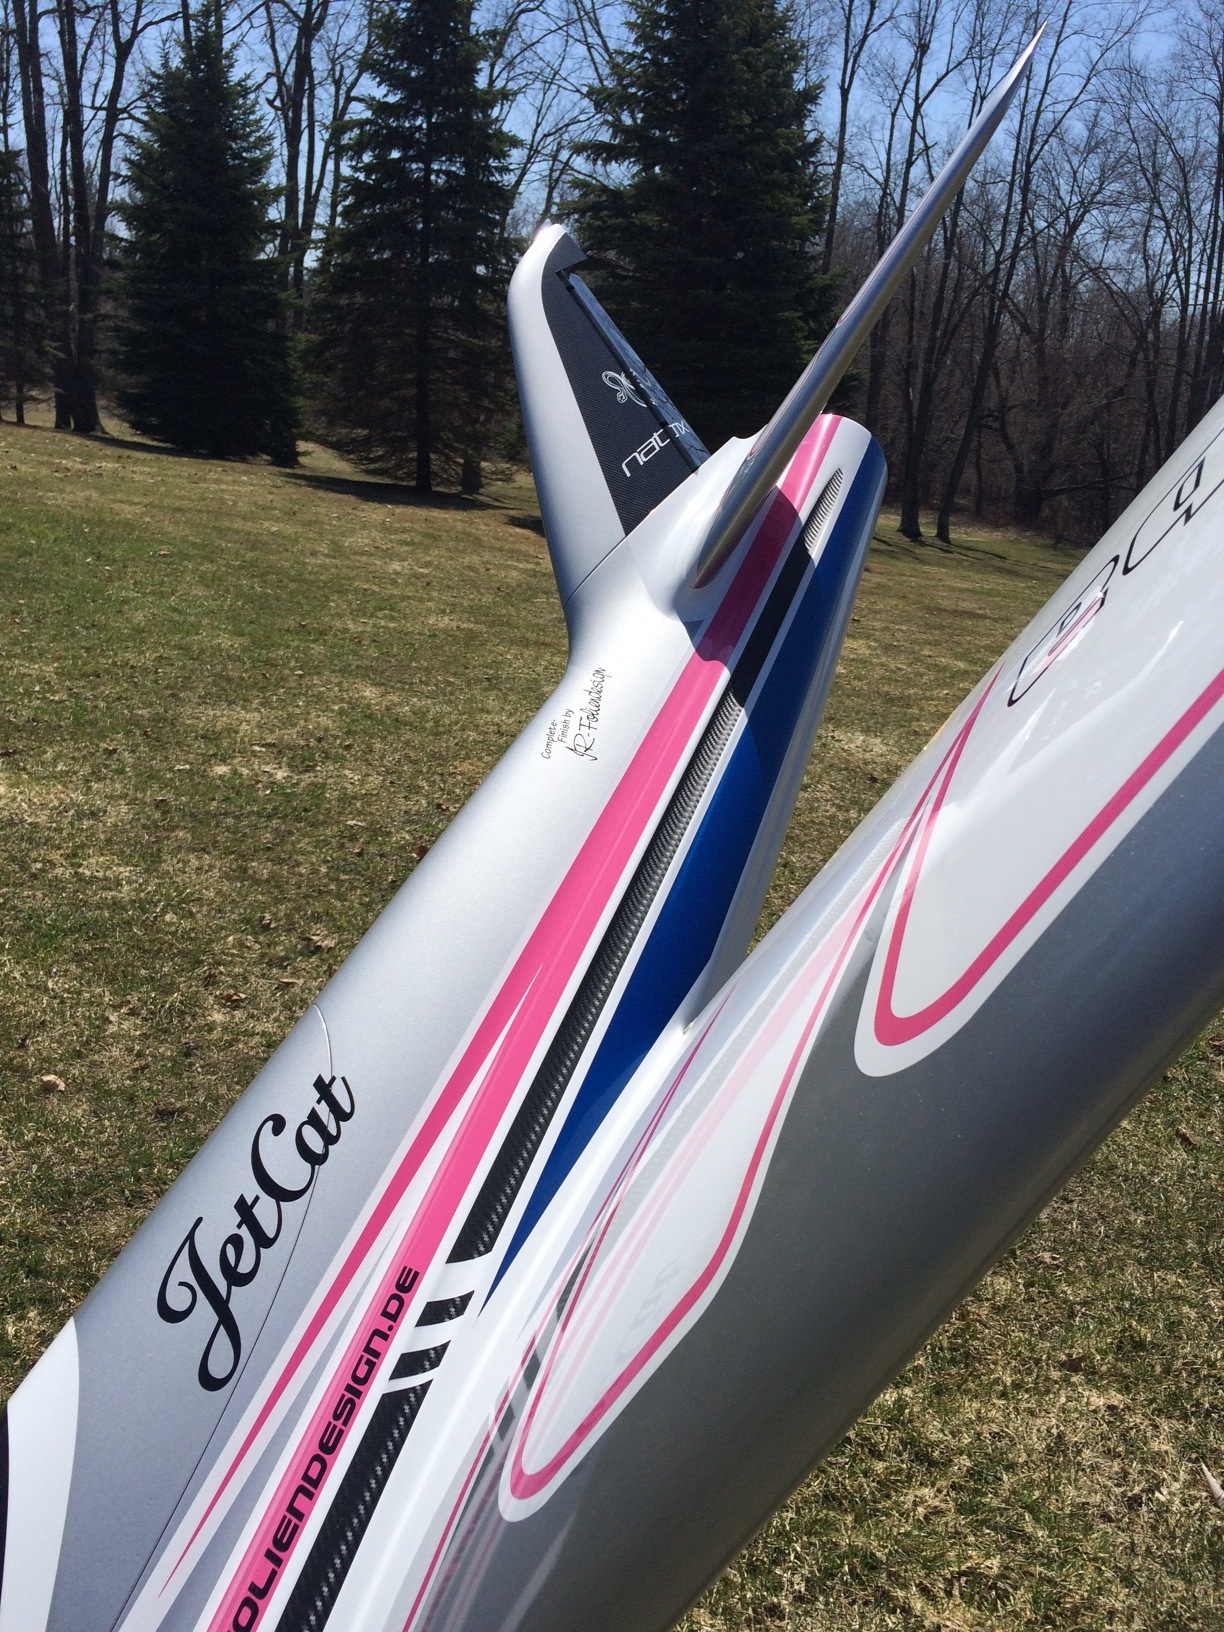

 04-15-2015, 04:59 PM
#3
Thread Starter
My Feedback: (35)
Join Date: Apr 2002
Location: Mansfield,
OH
Posts: 190
Likes: 0
Received 0 Likes
on
0 Posts
I've started with the stab and elevator while I await for some parts for the fuse.
Overall quality is excellent. Light, strong. Appears to be top shelf material and craftsmenship.
The rudder servo mount needs installed. It fits the Futaba HV BLS servo perfectly. It had a very light and neat way to mount it to the servo holder but I modified that to something more traditional by adding some maple blocks, 3mm x 30 mm bolts, and a ply strap. The servo arm is a 20 mm thin Futaba servo arm mounted on the second arm out for max ATV/throw. I did have to open up some of the vertical former to allow for the servo arm.


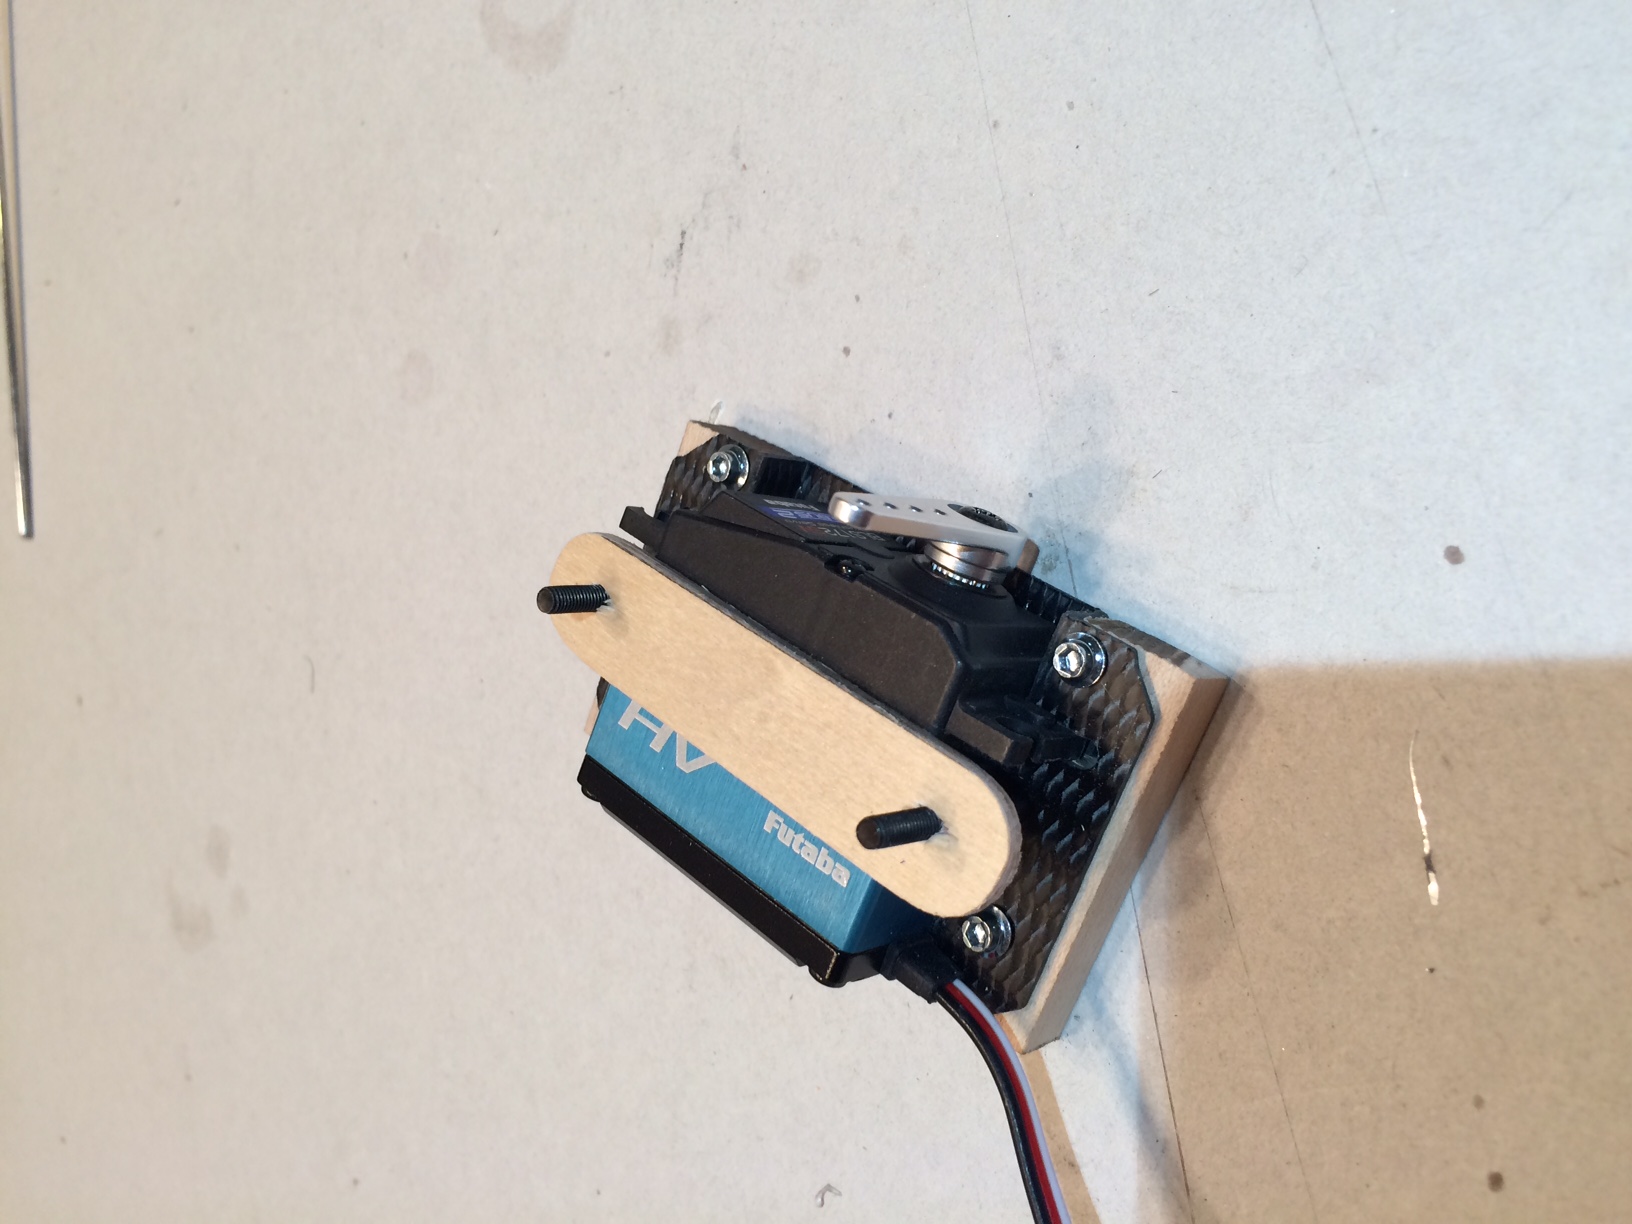


I also added a dowel in the main rudder alu tube for long term durability. Next, I added 4 ply corners and button head screws to attach servo covers vs tape.
Finally, to connect the rudder servo at the fuse junction I had to dremel a small hole in the vertical former that supports the main alu tube to pass the servo extension wire up into the round hole at the base of the rudder. This is not shown, unable to get a picture.
Overall quality is excellent. Light, strong. Appears to be top shelf material and craftsmenship.
The rudder servo mount needs installed. It fits the Futaba HV BLS servo perfectly. It had a very light and neat way to mount it to the servo holder but I modified that to something more traditional by adding some maple blocks, 3mm x 30 mm bolts, and a ply strap. The servo arm is a 20 mm thin Futaba servo arm mounted on the second arm out for max ATV/throw. I did have to open up some of the vertical former to allow for the servo arm.
I also added a dowel in the main rudder alu tube for long term durability. Next, I added 4 ply corners and button head screws to attach servo covers vs tape.
Finally, to connect the rudder servo at the fuse junction I had to dremel a small hole in the vertical former that supports the main alu tube to pass the servo extension wire up into the round hole at the base of the rudder. This is not shown, unable to get a picture.
Last edited by berthoud; 04-15-2015 at 05:03 PM.
04-15-2015, 05:09 PM
#4
Thread Starter
My Feedback: (35)
Join Date: Apr 2002
Location: Mansfield,
OH
Posts: 190
Likes: 0
Received 0 Likes
on
0 Posts
I then started the stab. Much less work. Just had to open up the servo holes to accept the Futaba BLS HV servos, make a small oval to pass the servo wire out towards the fuse, and make the pushrod. I Aeropoxy a CF sleeve over the running length of the 3mm threaded rod. I also added a tube to the alu tube where it is taped to prevent stripping of the thin alu with time.
Plenty of high quality materials and glue in the critical areas.


Plenty of high quality materials and glue in the critical areas.
05-05-2015, 08:48 AM
#5
Thread Starter
My Feedback: (35)
Join Date: Apr 2002
Location: Mansfield,
OH
Posts: 190
Likes: 0
Received 0 Likes
on
0 Posts
So the next step was the wings. I used 400mm length servo extensions for the flap and ailerons. The gear and brakes were included.
The aileron servos are typical door/cover mounts. Minimal work was necessary to fit the Futaba servo. I aeropoxy carbon over all of the horns. I used SeCraft 20mm servo arms (2mm thick) with 2mm pin holes. I replaced the stock 1.6mm MPJet connects with 2mm pins as I couldnt find any horns with holes less than 2mm.
The flap servos were a bit more difficult to get too. I had to use the Dremel attachement and chuck to be able to get a drill into the wheel well. Some work was done here to open it up to accept the Futaba servos. Although not final, this was the basic geometry I was looking for for the flaps. With the flaps in the down position the servo arm is full extended so the load is minimal to the servo motor.
The retract bays were painted black and coated with a finishing epoxy for waterproofing. There was already a glass covering some of the critical parts on the l/g blocks.
05-05-2015, 08:53 AM
#6
Thread Starter
My Feedback: (35)
Join Date: Apr 2002
Location: Mansfield,
OH
Posts: 190
Likes: 0
Received 0 Likes
on
0 Posts
Now shown are the flap servos and the Dremel attachment positioned to drill a hole. The entire (visible wood) wheel well bay was painted black and coated with finishing resin.
05-05-2015, 09:00 AM
#8
Thread Starter
My Feedback: (35)
Join Date: Apr 2002
Location: Mansfield,
OH
Posts: 190
Likes: 0
Received 0 Likes
on
0 Posts
First thing on the fuse was to wire the back end. I used an aluminum tape to hold down the wires. I put a small CF rod bracket in the back to ziptie servo ends onto to prevent them from falling towards the exposed pipe. I also added a dowel rod in the Alu tube where the servo holds it. Just more meat for the servo to hold onto with repetitive trips to the flying field. Sorry for the rotated pics...
05-05-2015, 09:10 AM
#9
Thread Starter
My Feedback: (35)
Join Date: Apr 2002
Location: Mansfield,
OH
Posts: 190
Likes: 0
Received 0 Likes
on
0 Posts
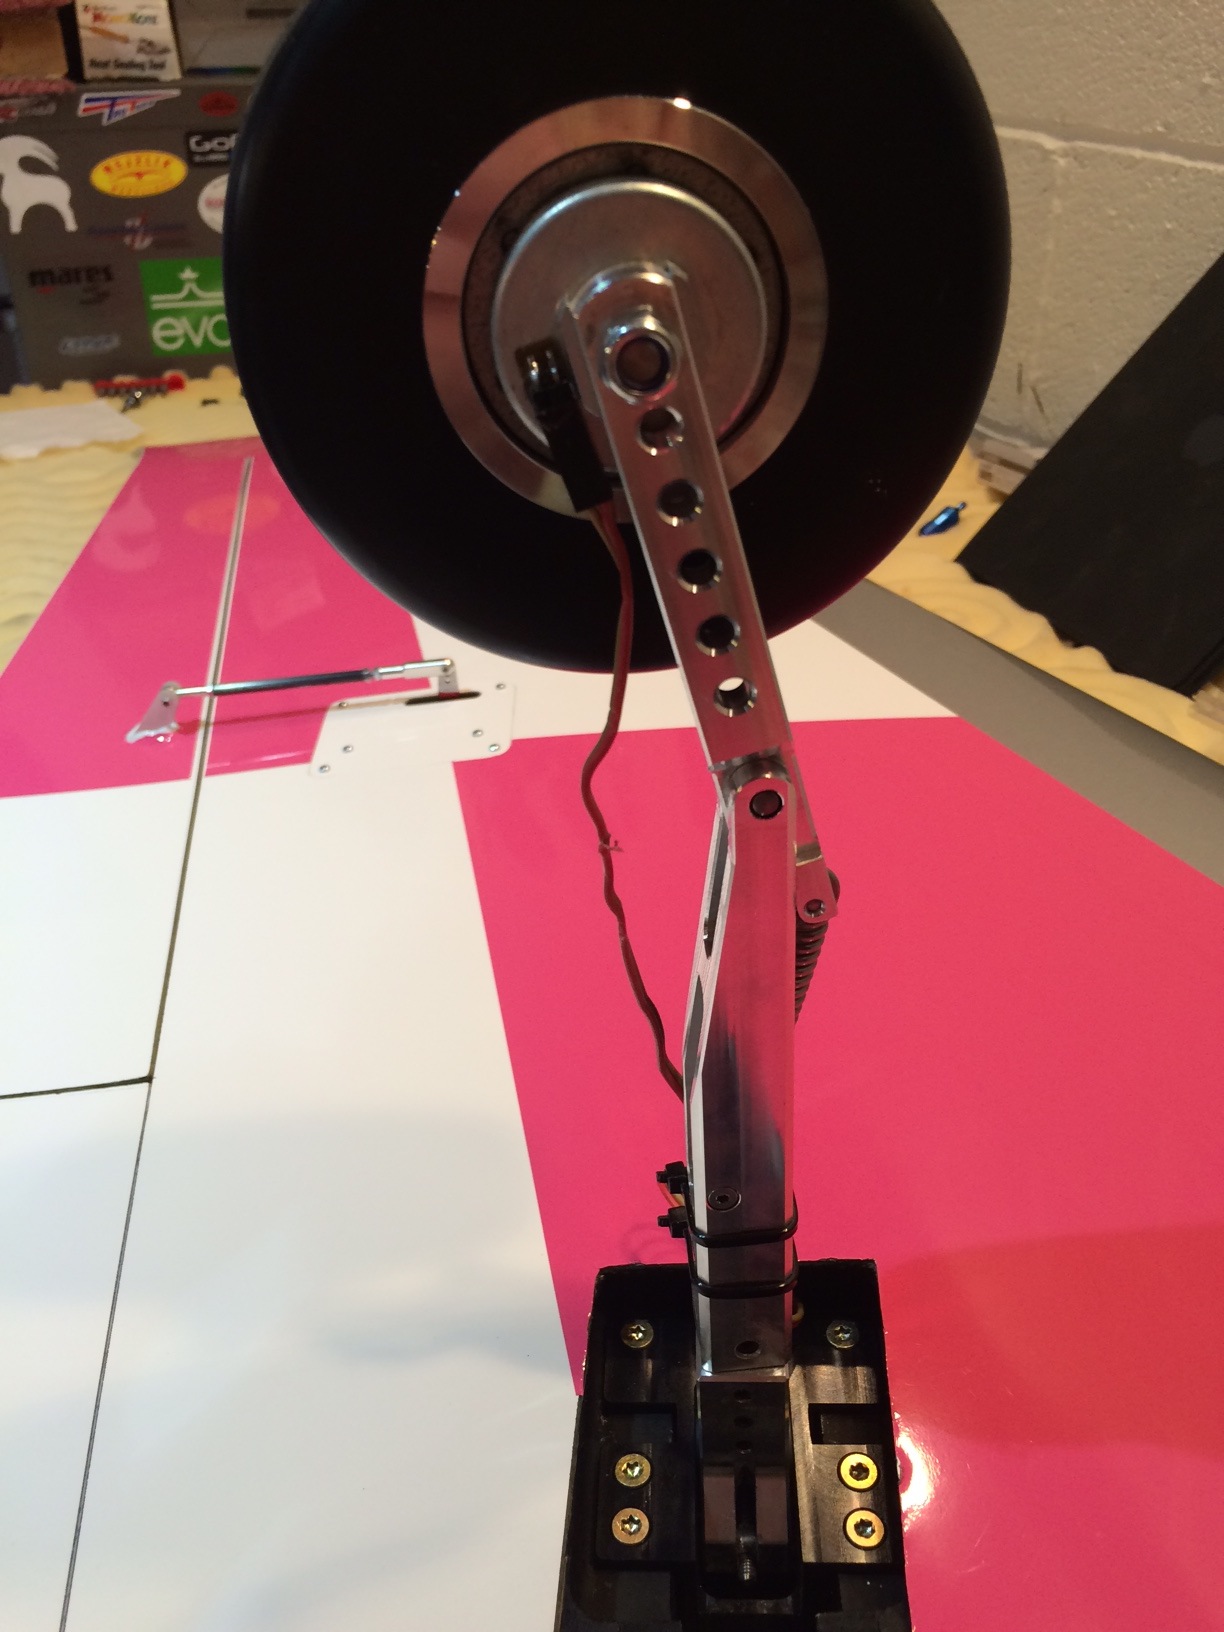
The next step was to install the steering servo and nose gear. The key is to have the servo centered with the arm tilted somewhat forward to allow room for the arm to swing up out of the way of the formers during retraction. I also went through and applied lock tite to all nuts, bolts, and set screws on the l/g at this time.
*** The picture does not show the correct center position for the servo arm. Again this needs to be angled forward perhaps 30 degrees with the wheel in a neutral position to allow room during retraction ***
*** The picture does not show the correct center position for the servo arm. Again this needs to be angled forward perhaps 30 degrees with the wheel in a neutral position to allow room during retraction ***
05-05-2015, 09:30 AM
#10
Thread Starter
My Feedback: (35)
Join Date: Apr 2002
Location: Mansfield,
OH
Posts: 190
Likes: 0
Received 0 Likes
on
0 Posts
So with the model assembled and balanced it appears its tail heavy with a standard install. However, it is able to be balanced without nose weight but it required some customized battery mounting solutions. I used a total of 4 batteries in this jet. 2 2s2p 3800 mah TP RX lipos, 1 ECU LiFE or Lipo, 1 retract 2s 2700 lipo. With the bigger and less critical ECU pack mounted in the very nose as shown (no jokes) I was able to achieve balance without nose weight. From here the receiver packs went on some tabbed trays that fit into the F1 former and the rest of the install as much forward as possible but convenient for frequent use.
 05-05-2015, 11:54 AM
#12
Join Date: Jul 2006
Location: Norfolk , UNITED KINGDOM
Posts: 1,409
Likes: 0
Received 0 Likes
on
0 Posts
I see that you are fitting the hugely expensive and powerful Futaba BLS 172. I wonder why you chose to fit them to all surfaces including the steering when the manufacturers recommend the Hitec 5585MG which cost a fifth of the Futaba ones?
John
John
05-05-2015, 12:39 PM
#13
Thread Starter
My Feedback: (35)
Join Date: Apr 2002
Location: Mansfield,
OH
Posts: 190
Likes: 0
Received 0 Likes
on
0 Posts
Scott-I looked into that way but the Tomahawk Futura was setup that and we had alot of flipping of the geometry when pushing the model around with the power off (nose wheel rotating enough to flip the servo arm the other way). So far it seems to work as is, doesnt turn, and has enough throw. In one of the last pictures posted you can see my neutral position of the servo and retract arm with the nose gear retracted.
John-Several reasons for the overkill actually. I lost a preowned model several years ago to a bad steering servo on takeoff. Totaled it. For that reason alone I no longer skimp on the steering servo. Taking off and landing is a dangerous activity for the model and spectator and I enjoy the extra peace of mind I have by having a top shelf servo on that function. The rest of the model is also run at HV which, to some extent, limits servo selection (not the Hitec you mentioned). The final reason is I try to build these sport jets with the same servo on all surfaces so that I essentially am always carrying around a "spare" servo. I've been at meets before and have had primary surface servos go bad without a suitable replacement available. Although I try to carry spare servos around with me now I know at the least if something were to happen to an elevator or aileron servo I could just pull the steering servo and use it on the wing without compromise.
John-Several reasons for the overkill actually. I lost a preowned model several years ago to a bad steering servo on takeoff. Totaled it. For that reason alone I no longer skimp on the steering servo. Taking off and landing is a dangerous activity for the model and spectator and I enjoy the extra peace of mind I have by having a top shelf servo on that function. The rest of the model is also run at HV which, to some extent, limits servo selection (not the Hitec you mentioned). The final reason is I try to build these sport jets with the same servo on all surfaces so that I essentially am always carrying around a "spare" servo. I've been at meets before and have had primary surface servos go bad without a suitable replacement available. Although I try to carry spare servos around with me now I know at the least if something were to happen to an elevator or aileron servo I could just pull the steering servo and use it on the wing without compromise.
Last edited by berthoud; 05-06-2015 at 08:48 AM.
 05-13-2015, 03:03 AM
#17
Junior Member
Join Date: Aug 2013
Posts: 16
Likes: 0
Received 0 Likes
on
0 Posts
Scott hows the build going ? I gave mine its maiden voyage today ( first in Australia) and it flies great . I have fitted a Jets Munts 200xbl which gave it ample power to carry its 17.4 kg dry weight. Jr 28x at the helm Powerbox Royal and NX8921's all round. Intairco 250ml super trap power box smoke pump and custom made oil tanks holding 4lt oil. Does everything you tell it to and landings are at walking pace. In one word Awsome !!!!


 05-15-2015, 01:40 AM
#20
Junior Member
Join Date: Aug 2013
Posts: 16
Likes: 0
Received 0 Likes
on
0 Posts
Chris what engine are you planning to use ?? I am using the Jets Munts 200XBL which sits perfectly in the saddle and is a great match for the model. I am Impressed with the performance and get an easy 7 mins out of the supplied 4.8 lt tank. It has more than enough power to match the performance of the model. Phil Celima from Jet Products Australia knows his stuff and has been a great help during the set up and installation. Jets Munts back their products 100% and I have experienced THE best after sales service from any supplier in the hobby
.
.
05-16-2015, 09:05 AM
#21
Thread Starter
My Feedback: (35)
Join Date: Apr 2002
Location: Mansfield,
OH
Posts: 190
Likes: 0
Received 0 Likes
on
0 Posts
Attached are the final install pictures with the KingTech 210.
I added carbon plates to the undersurface of the motor mount rails to for durability and I added a hardwood removable stop (black) in front of the tank. The tank is otherwise secured in the back with a single bolt. I added a second second vent line to the tank and went around the seam with carbon fiber. Finally, I changed the metric canopy screw in the front to the classic BVM nylon bolt ala King Cat/Bobcat/Bandit.
The model weighs in at 39.5-40 lbs dry (rough estimate, me holding it on a scale) and has no added weight.
After flying it I was able to move the landing gear/brakes battery back to the main tray in the cockpit. I will report back on my CG when I can get an accurate reading but as is, I think I can move it back further by exchanging the heavier ECU pack for the landing gear battery or even moving them both in the cockpit.
I have probably 25 flights on it now and am feeling pretty comfortable that it will be ready for some heavy use at First in Flight.
I am currently carrying about 3mm up trim in the model and hope to decrease this as I fine tune the CG.
I use triple rates on aileron and elevator:
My low rate aileron is 21.5 up, 15 down and 40 mm up, 27.5 down for the high rate. Middle rate in between and all rates have -25 to -40 expo.
For the elevator I am using 13 mm up and down for low, 23 mm for the middle rate and 30 for the high rate. I carry -15 to -40 expo for these rates.
Above are all measured at the inner edge of the respective surface.
For the rudder I am using 33 mm for low, 44 mm for high rate and the flaps have 130 for full throw.
I have settled in with 8.5% down elevator/flap mix as the model climbs with flaps.
05-16-2015, 09:23 AM
#22
Thread Starter
My Feedback: (35)
Join Date: Apr 2002
Location: Mansfield,
OH
Posts: 190
Likes: 0
Received 0 Likes
on
0 Posts
So how does it fly?
Pretty well actually :-)
It is a very comfortable model to fly. It is VERY strong. I can compare it to the 2.5m Futura and 3.5m Viper XXL and it's a nice blend.
It has an incredibly powerful tail, not surprising given the long tail moment. The elevator will just pull the nose around even with full flaps and low airspeed very much like the big Viper although it will gently stall a little easier then the viper when doing these slow tight loops with full flap(which has a much larger wing and stab). Otherwise the elevator pulls it very nicely at speed and the nose tracks very predictably.
The rudder is very effective. I am not sure yet if I can do a KE loop but it certainly has alot of KE climbout and is a more powerful rudder than the Viper or the Futura. One turn rolling loops are no problem. KE is without aileron mix and a touch (1%) of elevator mix.
With the differential dialed in the rolls are as axial as the Futura and Viper if not more.
The model will do outside snaps and spins and winds up nicely, about like a Futura.
Slow flight is rock solid and it cruises around nicely at probably 125-150 mph. Faster flight is somewhat limited. Top end seems around 180, not Shockwave/Ultra Bandit fast but I havent really cranked on it and have nothing else in the air to compare it too. I know an official set of inlets are being designed now which will certainly help and a full bypass would probably be just the ticket.
The retracts work as expected and the e-brakes are nicely smoothed out by adding a servo delay in and out (20 for Futaba).
Last edited by berthoud; 05-16-2015 at 09:45 AM.
05-16-2015, 09:43 AM
#23
Thread Starter
My Feedback: (35)
Join Date: Apr 2002
Location: Mansfield,
OH
Posts: 190
Likes: 0
Received 0 Likes
on
0 Posts
So after the first 8 flights or so I had an eventful landing when after applying brakes, the model veered off the runway. I later found a severed brake wire and after soldering this back up I added heatshrink to it where the articulation is. I dont have much prior experience with electric brakes so this was a good lesson.
I also have had the spring(s) soften up considerably in the first 20 flights likely due to this severed brake line event. Fortunately Mathias at Paritech and Gotz were able to express mail a set over for the event next week. The main struts do seem fairly soft and I am looking into an alternative compression option for them.
On the note of these Xicoy type electric retracts. I have found it is very important to either have all of the retracts plugged in when you are working on them OR when you do not have all three plugged in allow, an extra amount of time after deployment or retraction for the "lock" that occurs. When all units are plugged in there is an audible and mechanical electric "lock" that occurs when all three motors have amped out at the end of extension or retraction. This normally happens within a few seconds of retraction or extension. When you do not have all of them plugged in the ECU seems to have a delay of 20-30 seconds programmed into it while it "waits" before it does this lock. If for some reason you unplug turn it off before this "lock" you will end up with one or more struts out of sequence when you plug the other unit in. Clear as mud right?
Last edited by berthoud; 05-16-2015 at 09:46 AM.
05-16-2015, 04:31 PM
#24
Thanks for the great pics and discussion Berthoud.
The Natrix is an amazing looking aircraft.
The Natrix is an amazing looking aircraft.

