


UMS Evolution Radial Care and Operation


 05-29-2016 | 03:45 PM
#1877


Lars, Thank you for the great pictures. That engine looks to be just the right size for that plane. I bet that Stearman loves the near zero vibration. Pete thanks for your better directions helping Lars.
My topic for today has to do with corrosion prevention. I do like running my radials on 8% oil and 7% nitro. That is part of the reason I do not use one-board glow power. When I am finished for the day I will start the engine after the tank is drained and let it quit on its own. I will then start it again and it will run a bit and quit. I will do this until it will not fire. Now I know there is no residual fuel in the engine. Now I remove one of the top pushrods and the follower so I have a hole directly over the cam ring and the rear main bearing. Into that hole I squirt about 10 ml of air tool oil chased with 2 ml of Evolutions Blue-block. I put the follower and the pushrod back and turn the prop over 3 to 5 times. The engine several days later is still creamy smooth indicating no corrosion. A major discovery I found. DO NOT use exhaust back pressure. The exhaust has highly corrosive effects on the engine. The carbs on these engines have plenty of draw if the tank is at the correct height and close to the engine. -Tom
My topic for today has to do with corrosion prevention. I do like running my radials on 8% oil and 7% nitro. That is part of the reason I do not use one-board glow power. When I am finished for the day I will start the engine after the tank is drained and let it quit on its own. I will then start it again and it will run a bit and quit. I will do this until it will not fire. Now I know there is no residual fuel in the engine. Now I remove one of the top pushrods and the follower so I have a hole directly over the cam ring and the rear main bearing. Into that hole I squirt about 10 ml of air tool oil chased with 2 ml of Evolutions Blue-block. I put the follower and the pushrod back and turn the prop over 3 to 5 times. The engine several days later is still creamy smooth indicating no corrosion. A major discovery I found. DO NOT use exhaust back pressure. The exhaust has highly corrosive effects on the engine. The carbs on these engines have plenty of draw if the tank is at the correct height and close to the engine. -Tom
So when there was nothing left to try, I shipped the engine back to India (from Japan) for repair. After it was disassembled it was clear that corrosion of the piston rings and o-rings along with rust on other parts, was the culprit. When the engine was on the stand, I would sometimes (but not always) end the run by squirting Technoplate synthetic oil (the same oil I was mixing with the methanol) into the open carb while hand-cranking the prop. While Tom's procedure sounds good, it would be a major PITA with the engine mounted in a scale cowl.
After the first couple of runs, I installed the KELEO ring exhaust and was much happier with the sound and the smoothness. But Tom might be right about the corrosive exhaust. It seems like a no-win situation.
05-30-2016 | 02:22 AM
#1878
Senior Member
Hello
I discovered that I had different valve springs on my 7-35 (weak & hard)
I bought 14 new springs updated, for all is a bit harder.
Result, the engine runs better and more responsive throttle.
So you who have an early motor 7-35 chek if the springs are soft.
You will notice a difference
I bought my engine in December 2010
I have made a tool for changing the springs without taking the engine apart
Lars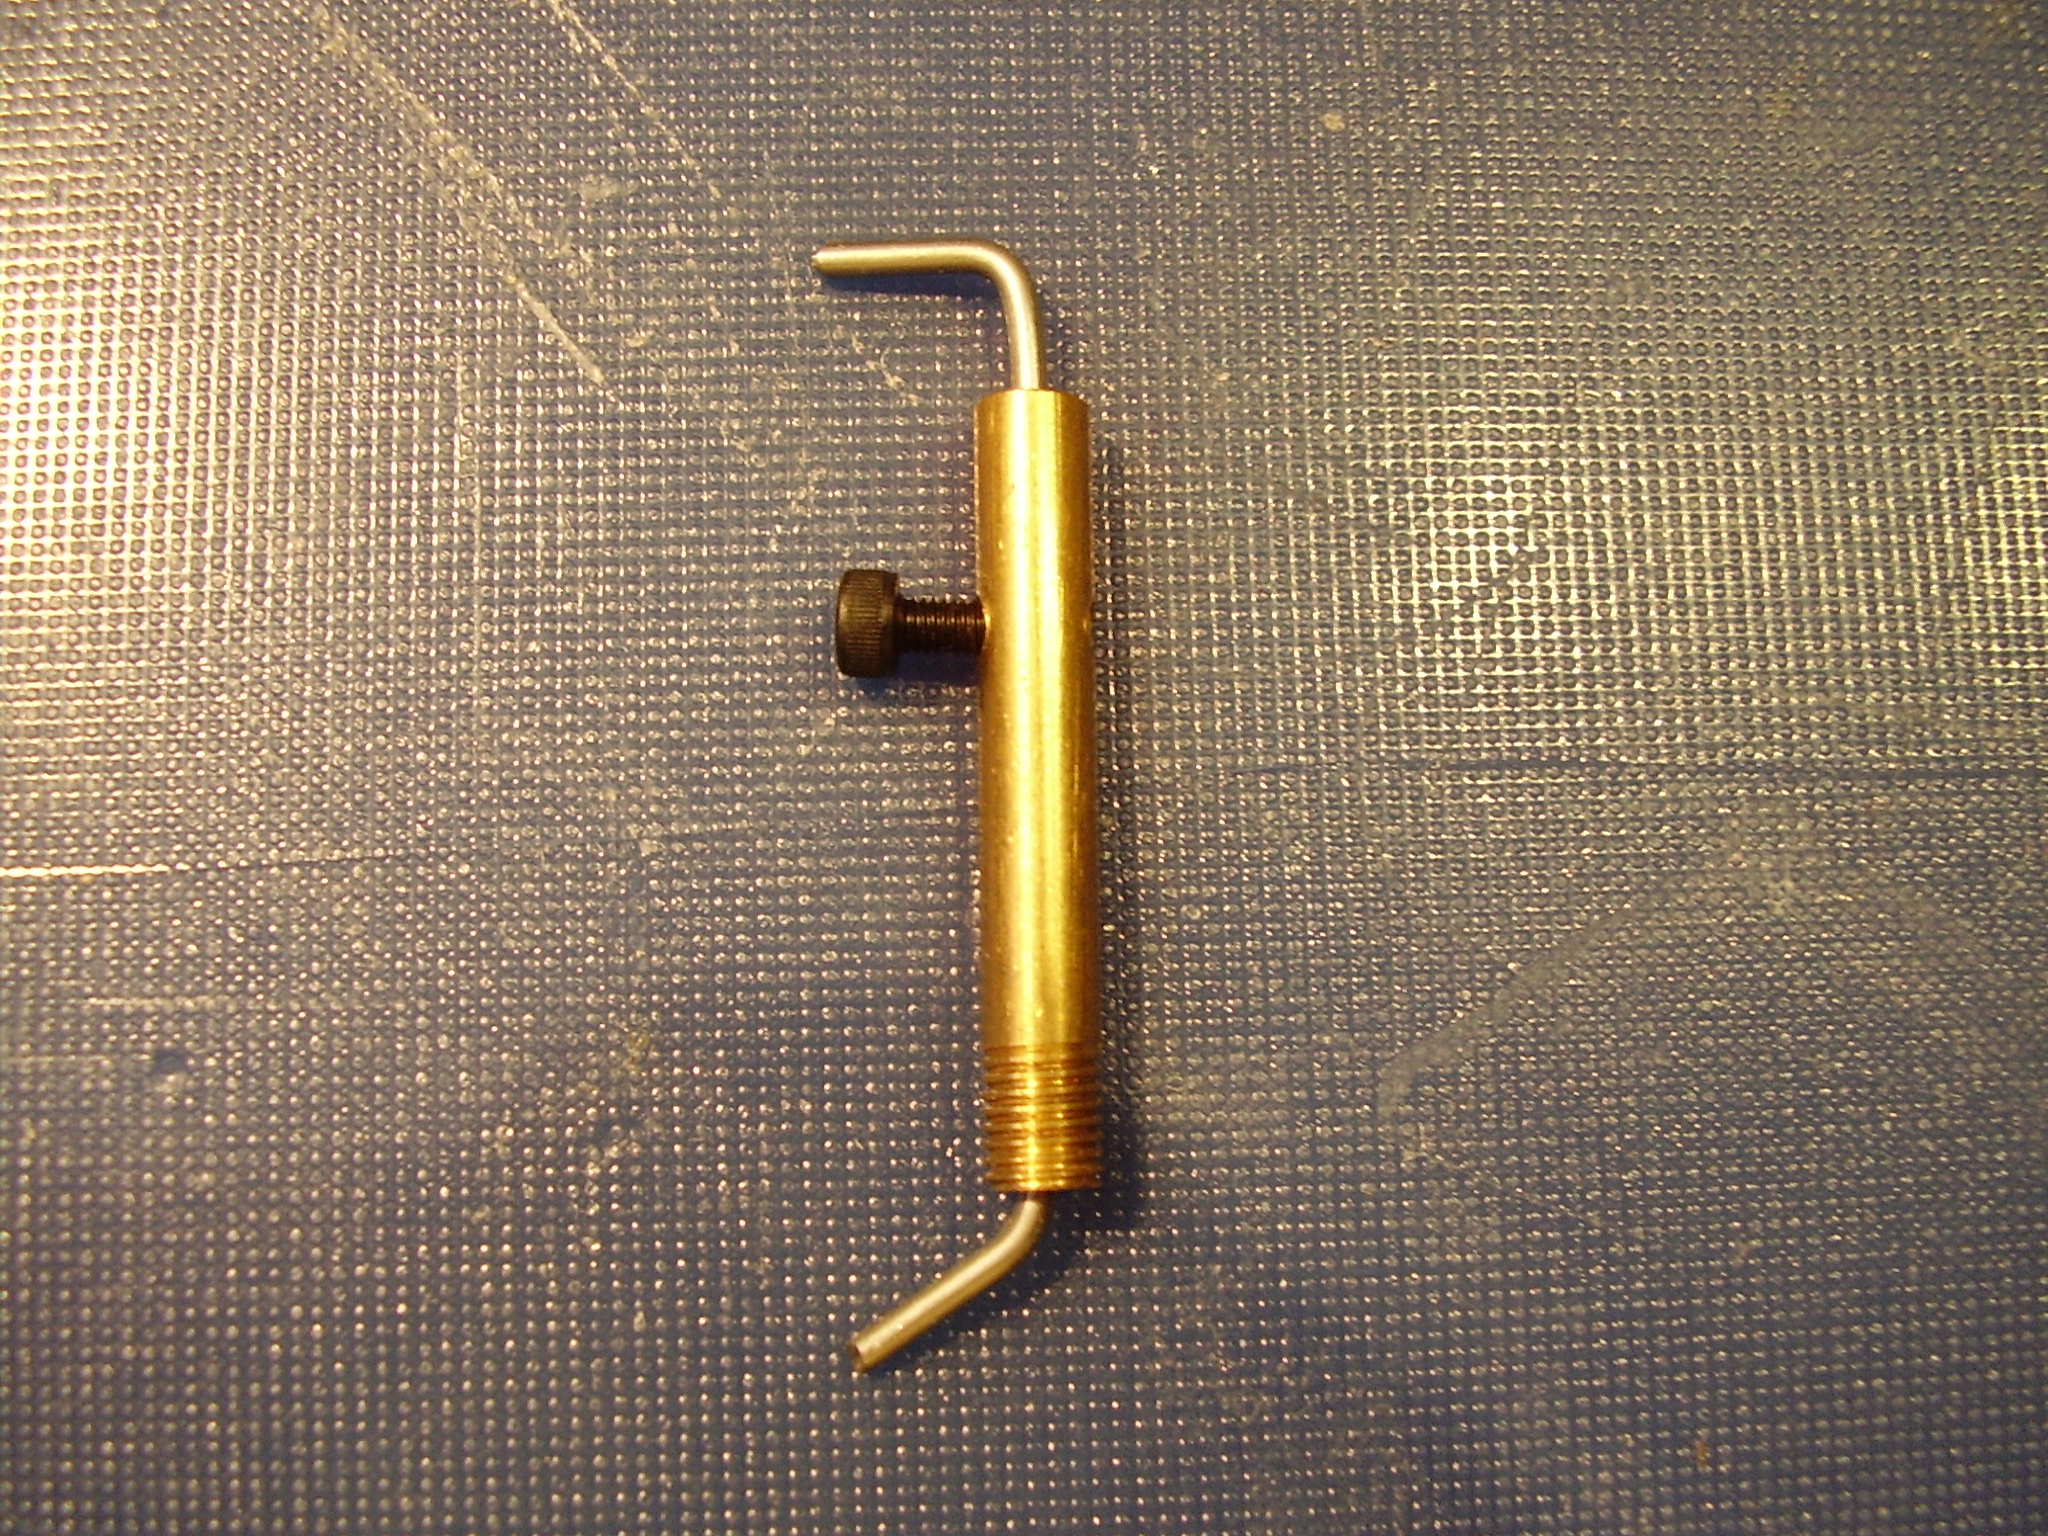


I discovered that I had different valve springs on my 7-35 (weak & hard)
I bought 14 new springs updated, for all is a bit harder.
Result, the engine runs better and more responsive throttle.
So you who have an early motor 7-35 chek if the springs are soft.
You will notice a difference
I bought my engine in December 2010
I have made a tool for changing the springs without taking the engine apart
Lars
06-01-2016 | 07:03 AM
#1879

My Feedback: (4)
well I ordered 2 packages of spare push rods (just in case) for my 9-99, got them in and the cam followers are different, has a ball on the one end and the other end is the same as the old ones, so worried they were going to be different, called Horizon, and they say you can use the new ones with the old ones, hope they are correct, just a FYI.
 06-01-2016 | 02:54 PM
#1881


My Feedback: (207)
well I ordered 2 packages of spare push rods (just in case) for my 9-99, got them in and the cam followers are different, has a ball on the one end and the other end is the same as the old ones, so worried they were going to be different, called Horizon, and they say you can use the new ones with the old ones, hope they are correct, just a FYI.
06-03-2016 | 04:38 PM
#1883
im about to start this thing up and need some guidance on tuning the carb...
.
I know the HS needle is the big knurled one, but that's all I know. I don't know where the LS needle is or the idle adjust, or if there is a mid-speed adjust. I don't know what to do 1st.
...are the factory settings on the OS carb good to start with (however they are set when purchased)? is the startup procedure in the manual good (but it assumes the EVO carb)?
.
I have the CH ignition, the os carb with CH adapater. running pure methanol with klotz super technoplate. evo exhaust ring.
.
ill be tuning on a stand. ...I noticed chorner and others mention a carb orientation - not sure what that is about. mine has the HS adjust facing to the right when viewed from behind (cockpit view).
.
I know the HS needle is the big knurled one, but that's all I know. I don't know where the LS needle is or the idle adjust, or if there is a mid-speed adjust. I don't know what to do 1st.
...are the factory settings on the OS carb good to start with (however they are set when purchased)? is the startup procedure in the manual good (but it assumes the EVO carb)?
.
I have the CH ignition, the os carb with CH adapater. running pure methanol with klotz super technoplate. evo exhaust ring.
.
ill be tuning on a stand. ...I noticed chorner and others mention a carb orientation - not sure what that is about. mine has the HS adjust facing to the right when viewed from behind (cockpit view).
Last edited by Pretendpilot; 06-03-2016 at 05:53 PM.
06-03-2016 | 04:52 PM
#1884
My Feedback: (11)
Before you run those engines guys....if you did not do it....I STRONGLY recommend that you take one push road from top and one from bottom OFF, unscrew the brass part with the push rod needle and pump some good grease in until you get it out to the other end.
They do not come greased almost at all, seen several failures on the cams on ready .
When you adjust the valves....make sure you go on the same cylinder 3 THREE times before you move to the next.
It has 3 sets of cams inside and I think they machined not quite the same.
If you adjust one and you see it is good and all OK then you have all the chances to find it to sloppy to the other cam set or to tight...you may need to find a happy medium.
Had several trough my hands and looks that all do the same thing.
Thanks
Adrian
They do not come greased almost at all, seen several failures on the cams on ready .
When you adjust the valves....make sure you go on the same cylinder 3 THREE times before you move to the next.
It has 3 sets of cams inside and I think they machined not quite the same.
If you adjust one and you see it is good and all OK then you have all the chances to find it to sloppy to the other cam set or to tight...you may need to find a happy medium.
Had several trough my hands and looks that all do the same thing.
Thanks
Adrian
06-03-2016 | 06:02 PM
#1885
Before you run those engines guys....if you did not do it....I STRONGLY recommend that you take one push road from top and one from bottom OFF, unscrew the brass part with the push rod needle and pump some good grease in until you get it out to the other end.
They do not come greased almost at all, seen several failures on the cams on ready .
When you adjust the valves....make sure you go on the same cylinder 3 THREE times before you move to the next.
It has 3 sets of cams inside and I think they machined not quite the same.
If you adjust one and you see it is good and all OK then you have all the chances to find it to sloppy to the other cam set or to tight...you may need to find a happy medium.
Had several trough my hands and looks that all do the same thing.
Thanks
Adrian
They do not come greased almost at all, seen several failures on the cams on ready .
When you adjust the valves....make sure you go on the same cylinder 3 THREE times before you move to the next.
It has 3 sets of cams inside and I think they machined not quite the same.
If you adjust one and you see it is good and all OK then you have all the chances to find it to sloppy to the other cam set or to tight...you may need to find a happy medium.
Had several trough my hands and looks that all do the same thing.
Thanks
Adrian
.
also, as a side note, do I need to add some kind of sealant between the OS carb and the adapter? the stock o-ring fits between the adapter and crankcase backplate for a 'seal', but I didn't see any kind of seal between the adapter and carb - is it needed?
06-07-2016 | 12:12 AM
#1887
Before you run those engines guys....if you did not do it....I STRONGLY recommend that you take one push road from top and one from bottom OFF, unscrew the brass part with the push rod needle and pump some good grease in until you get it out to the other end.
They do not come greased almost at all, seen several failures on the cams on ready .
When you adjust the valves....make sure you go on the same cylinder 3 THREE times before you move to the next.
It has 3 sets of cams inside and I think they machined not quite the same.
If you adjust one and you see it is good and all OK then you have all the chances to find it to sloppy to the other cam set or to tight...you may need to find a happy medium.
Had several trough my hands and looks that all do the same thing.
Thanks
Adrian
They do not come greased almost at all, seen several failures on the cams on ready .
When you adjust the valves....make sure you go on the same cylinder 3 THREE times before you move to the next.
It has 3 sets of cams inside and I think they machined not quite the same.
If you adjust one and you see it is good and all OK then you have all the chances to find it to sloppy to the other cam set or to tight...you may need to find a happy medium.
Had several trough my hands and looks that all do the same thing.
Thanks
Adrian
Hello Adrian.
Do you mean really grease or oil? that's a big difference.
Timo
06-07-2016 | 04:41 AM
#1888
Thread Starter
My Feedback: (62)
The timing chest is not isolated from the crankcase. Any oil or grease injected will mix with the fuel. When the fuel methanol to oil ratio is high enough the drained oil from the timing chest after flying for the day should run out crystal clear and not black. This is why I run 9% oil and 7.5% nitro to offset the extra oil. My engines are over 150 flights with no problems. The air tool oil that was added will come right out the exhaust at the beginning of the flying session like a two stroke glow until it is burned off. This demonstrates any added oil or grease will affect the fuel.
06-09-2016 | 07:45 PM
#1890
understanding the os carb...
.
can one of you guys that understand this kindly explain what these parts are on the OS carb... there are 3 scews (2 slotted and 1 allen) that are uncertain to me....
.

there is an allen screw in the center of the black throttle arm - what is it? on some carbs this is the LS mixture adjust.
notice the bump just above the throttle arm - it has a slotted screw on either side. what are these? notice the "+" signs with an arrow pointing to them - what does that mean?
.
.
now one of the slotted screws from rear view of carb...

.
and the other (smaller) from the front view of carb...

.
can one of you guys that understand this kindly explain what these parts are on the OS carb... there are 3 scews (2 slotted and 1 allen) that are uncertain to me....
.
there is an allen screw in the center of the black throttle arm - what is it? on some carbs this is the LS mixture adjust.
notice the bump just above the throttle arm - it has a slotted screw on either side. what are these? notice the "+" signs with an arrow pointing to them - what does that mean?
.
.
now one of the slotted screws from rear view of carb...
.
and the other (smaller) from the front view of carb...
06-11-2016 | 04:52 PM
#1893
strange, when I try to 'adjust' the LS screw (according to this notated pic) the allen screw was tightened down pretty tight to begin with. when it loosened, it felt immediately very loose as if it were small and inconsequential (as if it were not meant to hold any position except for fully tightened).
.
timd, have you adjusted this carb 'LS needle' as indicated? and what does an "air bleed adjustment" do?
.
timd, have you adjusted this carb 'LS needle' as indicated? and what does an "air bleed adjustment" do?
06-11-2016 | 05:01 PM
#1894
lol.... at last and just after I typed a response to timd.  thx pondus, that manual describes the screw in the photo that timd label "air bleed adjustment" as the LS adjustment. great. this helps a LOT. thanks all for the help.
thx pondus, that manual describes the screw in the photo that timd label "air bleed adjustment" as the LS adjustment. great. this helps a LOT. thanks all for the help.
06-14-2016 | 04:02 PM
#1896
Joined: Mar 2006
Posts: 79
Likes: 0
Received 0 Likes
on
0 Posts
From: East Aurora,
NY
I need help,
My 9-99 ran very well last year in myZiroli 87 inch Stearman. Over the winter I put in a new carb as suggested and adjusted the valves. Now it won't start. Previously it hand started easily after using an electric starter for the first start. I have an on board glo system with an external booster pack both 5000 MA. Al are Mc Daniels I believe. I have opened the needle vale 21/2 turns to 3 turns. The engine seems to be getting fuel. I suspect that I have a problem in the ignition system. The ignition system incorporates a switch between the on board battery and the plugs , with a deans three pin into which I can plug the booster pack. All seemed to work well last year. Today I spent hours trying to start with no luck.
My 9-99 ran very well last year in myZiroli 87 inch Stearman. Over the winter I put in a new carb as suggested and adjusted the valves. Now it won't start. Previously it hand started easily after using an electric starter for the first start. I have an on board glo system with an external booster pack both 5000 MA. Al are Mc Daniels I believe. I have opened the needle vale 21/2 turns to 3 turns. The engine seems to be getting fuel. I suspect that I have a problem in the ignition system. The ignition system incorporates a switch between the on board battery and the plugs , with a deans three pin into which I can plug the booster pack. All seemed to work well last year. Today I spent hours trying to start with no luck.
06-15-2016 | 02:59 PM
#1898
Joined: Mar 2006
Posts: 79
Likes: 0
Received 0 Likes
on
0 Posts
From: East Aurora,
NY
Hello Maxam,
Thanks for your reply. I treid what you suggested and got a mild glo response from the plug. I tried another plug from which I got no response.. the plugs are the original which came with the engine and have about 15 flights on them. I think that I flooded the engine on the first attempt to start because I had the switch to the plugs in the wrong position. After determining the correct position for the switch I was still unable to get even a cough from it. I think that the ignition battery may have been run down. My question now is can one expect the plugs (OS F1) to last more than one season.? Is the Mc Daniels system with a 5000 MA on board pack and a 5000 MA booster pack a sufficiently robust set up ? Mind you the solution to my problem may lie with just making sure that both packs are correctly charged.
Thanks for your reply. I treid what you suggested and got a mild glo response from the plug. I tried another plug from which I got no response.. the plugs are the original which came with the engine and have about 15 flights on them. I think that I flooded the engine on the first attempt to start because I had the switch to the plugs in the wrong position. After determining the correct position for the switch I was still unable to get even a cough from it. I think that the ignition battery may have been run down. My question now is can one expect the plugs (OS F1) to last more than one season.? Is the Mc Daniels system with a 5000 MA on board pack and a 5000 MA booster pack a sufficiently robust set up ? Mind you the solution to my problem may lie with just making sure that both packs are correctly charged.
06-15-2016 | 05:03 PM
#1899
My Feedback: (207)
Hello Maxam,
Thanks for your reply. I treid what you suggested and got a mild glo response from the plug. I tried another plug from which I got no response.. the plugs are the original which came with the engine and have about 15 flights on them. I think that I flooded the engine on the first attempt to start because I had the switch to the plugs in the wrong position. After determining the correct position for the switch I was still unable to get even a cough from it. I think that the ignition battery may have been run down. My question now is can one expect the plugs (OS F1) to last more than one season.? Is the Mc Daniels system with a 5000 MA on board pack and a 5000 MA booster pack a sufficiently robust set up ? Mind you the solution to my problem may lie with just making sure that both packs are correctly charged.
Thanks for your reply. I treid what you suggested and got a mild glo response from the plug. I tried another plug from which I got no response.. the plugs are the original which came with the engine and have about 15 flights on them. I think that I flooded the engine on the first attempt to start because I had the switch to the plugs in the wrong position. After determining the correct position for the switch I was still unable to get even a cough from it. I think that the ignition battery may have been run down. My question now is can one expect the plugs (OS F1) to last more than one season.? Is the Mc Daniels system with a 5000 MA on board pack and a 5000 MA booster pack a sufficiently robust set up ? Mind you the solution to my problem may lie with just making sure that both packs are correctly charged.
06-16-2016 | 07:35 AM
#1900
speaking of glow plugs...
.
im having a bit of trouble getting this new 777 running correctly. looking like a couple cylinders are not firing (staying cold, spark plug clean/shiny). SO...i am thinking of putting a glow plug or two in the problematic cylinders to see if it cures the problem - testing for ignition problems.
.
i have no 'glow' equipment, so im wondering if i can just use a duracell D to run the glow plug(s) on the stand? the manual says the plugs take 1.2v, but the D cell is 1.5v - will that burn the plug(s) out? can i just hook the D cell straight across the plug(s) without any additional circuitry?
.
im having a bit of trouble getting this new 777 running correctly. looking like a couple cylinders are not firing (staying cold, spark plug clean/shiny). SO...i am thinking of putting a glow plug or two in the problematic cylinders to see if it cures the problem - testing for ignition problems.
.
i have no 'glow' equipment, so im wondering if i can just use a duracell D to run the glow plug(s) on the stand? the manual says the plugs take 1.2v, but the D cell is 1.5v - will that burn the plug(s) out? can i just hook the D cell straight across the plug(s) without any additional circuitry?

