


Comp ARF BAE Hawk build thread
 11-06-2013 | 10:56 AM
#1601
Thread Starter

Exactly! It was built very early before anyone complained and its never been changed as it flys fine as it is. BUT I'm sure with some people they have a little flap in, which add to the problem. you need to clean up the seat and back of the flap to ensure it goes up fully.
Dave
Dave
 11-06-2013 | 05:44 PM
#1602

My Feedback: (3)
To reiterate (that's a proper word right?) If you don't want your Hawk to climb, or DIVE if you are inverted, at full thrust, you will want a small P mix in your radio. So mount your turbine however you like, fly it, then mix to suit. The mix works great, I was surprised at how true it flies with that, it ends up being a very "clean" mix, you won't notice it when flying.
11-08-2013 | 02:14 PM
#1604

My Feedback: (25)
I noticed 7 wooden pieces on the main wooden tray that appear to be used to back up the servo screws on the servo mounts. Where would those go? there are only 7? also no mention in the manual of this either buy im assuming you use blind nuts (t nuts) to attach the elevator servo tray to the mount?
11-08-2013 | 02:29 PM
#1605
Thread Starter
It was just the available free wood. You don't need to use them anywhere, but people over tighten the big screws and can strip threads...back up fixes that. You don't "need" them.
Yes, three T nuts under the fuse tray.
Dave
Yes, three T nuts under the fuse tray.
Dave
11-09-2013 | 12:22 AM
#1608
My Feedback: (3)
There's some discussion back in the thread. After I trimmed mine I drilled holes down thru the ply support and CF tube and used a couple long socket head screws, probably 2-56 or 2mm down thru and countersunk. It's just pinned really, you could use anything, but screws are removable.
11-09-2013 | 07:40 AM
#1609
Thread Starter
I didn't put anything in the manual as I couldn't decide on a perfect solution and by the time I'd finished the manual I'd seen 3 or 4 different methods that all worked! I put a single screw in one side and that's still good after 4 years!
Dave
Dave

 11-11-2013 | 04:59 AM
#1615
My Feedback: (24)
http://www.dreamworksrc.com/catalog/Ashlok-176
You can get the unassembled JR connectors from Todd too so you can make ends that plug into the servos and RX:
http://www.dreamworksrc.com/catalog/...Set-Jr-%284%29
http://www.dreamworksrc.com/catalog/...Set-Jr-%284%29
The same crimper as the Ashlok will work for those too.
Bob
11-11-2013 | 11:46 AM
#1616
My Feedback: (3)
I usually make up my own extensions, (unless Servo City is doing a sale), those JR connectors are pricey though. I wish I had seen the Ashlok connectors, of course I just ordered from Dreamworks a few days ago... It looks like I can use my el cheapo crimping pliers with the Ashlok pins, they look the same as regular servo connector pins. But the el cheapo crimpers are a fiddle to use, it is hard to control the pins until you actually do the crimp, are the expensive ones any better?
11-11-2013 | 12:01 PM
#1617
My Feedback: (24)
I usually make up my own extensions, (unless Servo City is doing a sale), those JR connectors are pricey though. I wish I had seen the Ashlok connectors, of course I just ordered from Dreamworks a few days ago... It looks like I can use my el cheapo crimping pliers with the Ashlok pins, they look the same as regular servo connector pins. But the el cheapo crimpers are a fiddle to use, it is hard to control the pins until you actually do the crimp, are the expensive ones any better?
http://www.hansenhobbies.com/product...rvoconnectors/
Keeping the pins on the wire until you crimp is sometimes a bit$#. You can get crimpers from Molex that hold the pin in place and allow you to insert the wire easily without dropping the pin. However, they are really pricey (> $200)
What I do is, hold the wire in the pin at the proper place, and then, using a small set of needle nose pliers, I squeeze the part of the pin that goes around the insulation just enough that it holds the pin on the wire. Then its easy to insert it onto the crimper the proper distance and do the final crimping. Squeezing the pin a bit like this doesn't effect the final crimping at all, but it makes getting the wire, pin, and crimper all lined up as necessary for a good, secure crimp *much* easier.
BTW, the proper crimper is an "all in one" that does the whole pin in one shot and has the ratchet release - like the one that Todd sells. If that is what you mean by an "expensive" one, then, yes, by all means, make that investment. Its much cheaper and neater to make your own in the long run.
Bob
Last edited by rhklenke; 11-11-2013 at 12:05 PM.
11-11-2013 | 12:08 PM
#1619
Ashlok are actually Molex, took me a whole evening to source the correct bodies and pins male/female also you can choose type of material that pins/sockets are made out of, I went with the 22AWG that are gold plated I do have all the part numbers saved. I get mine from RS components but you can get them from Digikey in the US. I have made my own connections on all my models since about 2004 never had a failure also use them for my lighting sets.
Alan
Bob
Picture of PCB note resistance for strobes @5.1v supply
Cannot up load any pics... RCU not working at moment..well not on my PC but iPad worked...
Alan
Bob
Picture of PCB note resistance for strobes @5.1v supply
Cannot up load any pics... RCU not working at moment..well not on my PC but iPad worked...
Last edited by fireblade5437; 11-11-2013 at 12:58 PM.
11-11-2013 | 12:39 PM
#1621
My Feedback: (18)
Joined: Jun 2002
Posts: 3,021
Likes: 0
Received 0 Likes
on
0 Posts
From: New City, NY
I bought the crimper that Hansen sells and for the most part, it holds the pin while you push the wire into it. It crimps both parts most of the time. Sometimes it leaves one of the legs up that crimps the insulation and then you use the needle nose.
Last edited by afterburner; 11-11-2013 at 01:01 PM.
 11-11-2013 | 02:59 PM
#1623
http://www.youtube.com/watch?v=MLHsYGiAc04
Bob
Think I already posted this but you get the idea of the two strobes, the reason I put the white rear LED in the centre was that the full size has it positioned to the right and I would not have had room for the 10mm LED that I used there is not a lot of room between fuselage and elevator, I guess you could squeeze in a white Rebel but again would need heat sink making. The heat sink assemblies that I make for the red/green are around 3.5" long
Alan
Last edited by fireblade5437; 11-11-2013 at 03:05 PM.
11-11-2013 | 08:34 PM
#1624
My Feedback: (24)
Alan,
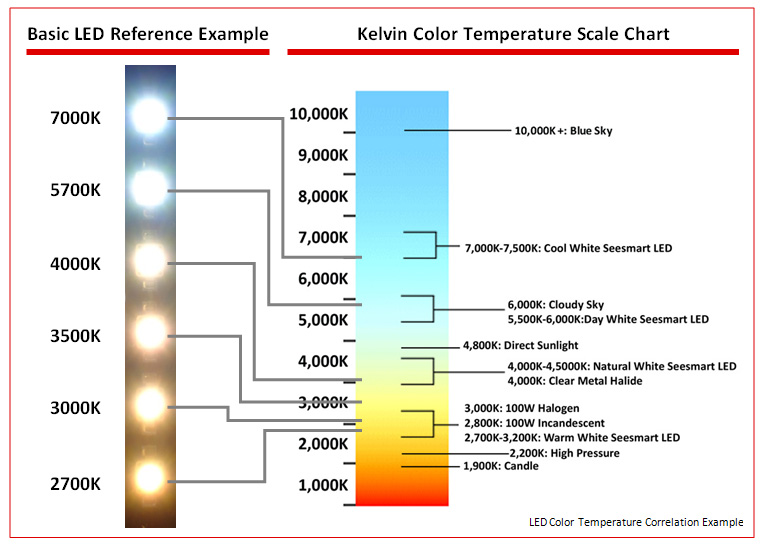
That looks great. What temperature of white LEDs did you use for the strobes and the landing light? From this chart, 4100k looks fairly neutral. We bought some 5000k CFL's for the kitchen the other day and it made it look like a Dr's office - too blue...
Bob
That looks great. What temperature of white LEDs did you use for the strobes and the landing light? From this chart, 4100k looks fairly neutral. We bought some 5000k CFL's for the kitchen the other day and it made it look like a Dr's office - too blue...
Bob
11-12-2013 | 09:23 AM
#1625
Bob
The strobes if I remember right were around 5700k-6000K I will check on my invoices. Strobes are obviously not incandescent lamps so are usually a cool white which is normally up to 6000K, one of my orders I had to send back as the rebels were definatley not 6000k like they were advertised, in fact compared with my strobes they positively looked yellow, the strobes need to be a cool white. Now the headlight I had same problem, my headlamp in the video is a 6000k K2 which you can not buy anymore, I did try a warm white which is more off white but then again the full size lamp is incandescent but in the air the cool white just appears to stand out more. I am currently getting lists together of parts for more lighting kits.
Also some leds I'm not so sure that the temp rating on some are not strictly correct. 6000k is 6000k and some definitely vary in colour.... Well strictly speaking white and black are not colours
Did if you get my pm?
Alan
Last edited by fireblade5437; 11-12-2013 at 09:32 AM.

