


Ugly Stick Build
 02-17-2009 | 01:29 PM
#26
Thread Starter
Senior Member
Joined: Jun 2008
Posts: 428
Likes: 0
Received 0 Likes
on
0 Posts
From: , GA
I finally got around to checking with Action Hobbies/Lazer Works on the four parts mentioned above. It looks like my guesses were mostly on target.
The 1/4 hole is meant as a starting point for whatever size dowel you like. He said he used a 5/16, which sounds good to me!
The 1/4 hole is meant as a starting point for whatever size dowel you like. He said he used a 5/16, which sounds good to me!
 02-17-2009 | 03:39 PM
#27

Senior Member
My Feedback: (1)
Joined: Aug 2005
Posts: 1,152
Likes: 0
Received 0 Likes
on
0 Posts
From: Eugene, Or
I did a rehab job on my old Midwest Sweet Stick last year..
This re-build thread shows how I converted it to dual in-wing servos and tail dragger.
http://www.rcuniverse.com/forum/m_59..._1/key_/tm.htm
It was built with 0° dihedral
Don't fear the dual servo flap option.. setup is dead simple. It'll land at a crawl and roll to a stop in 5-10 feet.
I still fly it with it's original OS .45 FSR.. I think it could use a little more motor
02-17-2009 | 04:06 PM
#28
Thread Starter
Senior Member
Joined: Jun 2008
Posts: 428
Likes: 0
Received 0 Likes
on
0 Posts
From: , GA
I notice that you extended the wing tips down and clipped the ailerons at the wing tip. I've heard some where that it helps with aileron flutter? I know my Sweet Stik would flutter when the .46AX was on full throttle, and you gave it a sec to get up to speed. (Probably what ultimately caused its demise.)
However, my 4*60 has ailerons out to the edge, and I don't seem to have any trouble with it. (.75AX in there)
My thought was the bellcrank system just had too much slop in it? Did you fly yours with the kit supplied bellcranks?
However, my 4*60 has ailerons out to the edge, and I don't seem to have any trouble with it. (.75AX in there)
My thought was the bellcrank system just had too much slop in it? Did you fly yours with the kit supplied bellcranks?
02-17-2009 | 05:09 PM
#29
Senior Member
My Feedback: (1)
Joined: Aug 2005
Posts: 1,152
Likes: 0
Received 0 Likes
on
0 Posts
From: Eugene, Or
It never had bell cranks. When we built it in 87 we used torque rods and a single servo.
I thought the tips were built to plan but it's been a long time.. I"ll pull the plans out and check tonight.
I haven't had any flutter issues.. I was thinking of getting a MACS muffler and maybe get a bit more out of it.
I thought the tips were built to plan but it's been a long time.. I"ll pull the plans out and check tonight.
I haven't had any flutter issues.. I was thinking of getting a MACS muffler and maybe get a bit more out of it.
02-17-2009 | 05:30 PM
#30
Thread Starter
Senior Member
Joined: Jun 2008
Posts: 428
Likes: 0
Received 0 Likes
on
0 Posts
From: , GA
I had to re-order my plans from AMA, but they matched the parts I had fine.
The torque rod probably fixed the problem. Every connection adds a tiny bit of slop to a control surface. The bellcranks added basically three more connections, which left them just too loose. (one for each end of the bellcrank, and one where the bellcrank attached to the airframe.)
It is possible they modified the kit? Mine would have been a few years older. (It sat around half finished for a very long time.)
02-22-2009 | 10:02 PM
#31
Thread Starter
Senior Member
Joined: Jun 2008
Posts: 428
Likes: 0
Received 0 Likes
on
0 Posts
From: , GA
Decided to do some easy stuff this week, so I framed up the stab.
Plans say to build the frame on the sheeting. However, I like the method the 4 Star uses. There, you build up the frame, separately glue the sheeting together, sand everything nice and flat, and then finally glue the sheeting on.
The plans only had half the stab, I guess since you aren't supposed to use them for this anyway. I decided since I had the plans in digital format, I could print a flipped stab half on a normal sheet of paper. (I printed one flipped and one normal, just in case my printer was off a bit, things would still line up.)
I've heard people complain about warping using methods like this. I stack a couple books on mine, and let them dry for at least overnight. I've never noticed any warping. (Of course, this only works if your build pace is slow enough!)
02-22-2009 | 10:05 PM
#32
Thread Starter
Senior Member
Joined: Jun 2008
Posts: 428
Likes: 0
Received 0 Likes
on
0 Posts
From: , GA
I've also been slowly gluing up various bits for the fuselage as I go.
The Lazer Works kit came with two firewalls of half thickness. (Each cut cross grain to the other.)
I'm assuming one is supposed to laminate the two to create one very strong firewall of the correct width.
The Lazer Works kit came with two firewalls of half thickness. (Each cut cross grain to the other.)
I'm assuming one is supposed to laminate the two to create one very strong firewall of the correct width.
02-22-2009 | 10:13 PM
#33
Thread Starter
Senior Member
Joined: Jun 2008
Posts: 428
Likes: 0
Received 0 Likes
on
0 Posts
From: , GA
So, Sunday morning the Stab came out from under the books (weights), and I started laying out the pieces for the Fuselage.
I had already glued up the Fuselage sides at this point. Lazer cut kit came with a nice splice joint, which should be stronger than the wood!
I also have epoxied the mysterious single 1/4 hole plywood piece to front of F2.
I pinned the bottom sheets down and used a little epoxy to join them together. I started gluing up the bulkheads until I realized I still had to drill the firewall for the nose wheel and engine mounts.
I have to admit, I hate this part. The holes never seem to line up right! However, I managed to do OK this time. Nose wheel mount only required a very slight widening of the original top two holes, and the engine mount actually came out perfect.
02-23-2009 | 06:05 PM
#34

Senior Member
My Feedback: (1)
Joined: Jun 2004
Posts: 105
Likes: 0
Received 0 Likes
on
0 Posts
From: Blairstown,
NJ
I found a set of plans on line for the Das Ugly stik and decided to laser cut it to the original design. I made a couple improvements, such as 1/16 ply doubler inside the fuse to allow wing bolts, included servo boxes in the wings for ailerons, beefed up wing with hardwood spars and stringers, no dihedral, but you can add it if you want. I precut the ailerons and elevator with the scalloped edges. I'll offer the short kit for $70.00 plus $10.00 S&H the kit includes building plans for the wing, tail and fuse. All the hard work is done just put it together. I'm glad I read your post. I provide the tabs for the ribs to ease assembly, I cut the 1/2" hole through the ribs for a small paper tube to hold the aileron servo wire, I provide plywood ribs where you have the 1/4" thick ones. I stick in plenty of spare parts so you can build to suite your taste.
02-24-2009 | 11:00 AM
#35
Thread Starter
Senior Member
Joined: Jun 2008
Posts: 428
Likes: 0
Received 0 Likes
on
0 Posts
From: , GA
Well, I already have my parts, but that sounds good. My short kit was a little cheaper, but it didn't include plans or anything for the aileron servos - except for an extra set of wing ribs. It does include the scalloped edges. Probably doesn't fly as well with these, but it sure looks better!
Any chance you'll post some pictures of the details?
Any chance you'll post some pictures of the details?
03-01-2009 | 12:17 AM
#36
Thread Starter
Senior Member
Joined: Jun 2008
Posts: 428
Likes: 0
Received 0 Likes
on
0 Posts
From: , GA
Quick update:
Glued on the fuselage sides and started reinforcing the front two bays.
It's good to have lots of clamps, but I'm pretty sure I need more!
Glued on the fuselage sides and started reinforcing the front two bays.
It's good to have lots of clamps, but I'm pretty sure I need more!
03-02-2009 | 12:44 PM
#38
Thread Starter
Senior Member
Joined: Jun 2008
Posts: 428
Likes: 0
Received 0 Likes
on
0 Posts
From: , GA
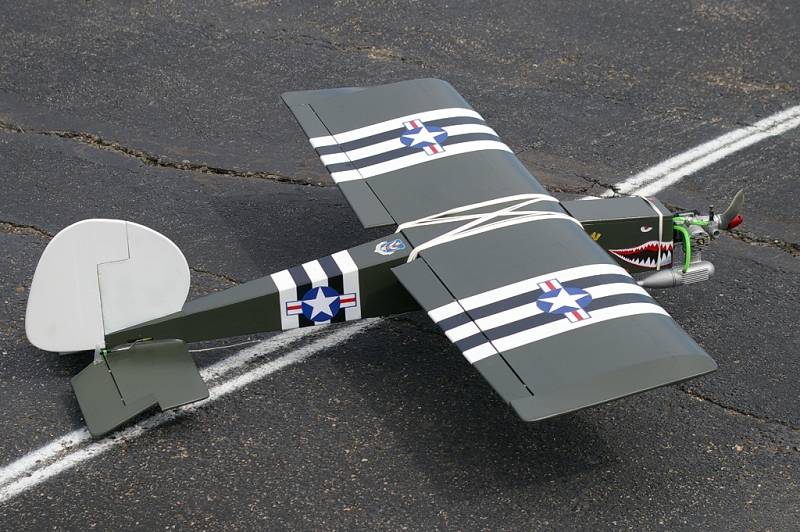
What happened to the machine guns when you got out to the field?
Where did you get the tail graphic and did you build or buy those machine guns?
I'm also kinda curious how you mounted the aileron servos.
Where did you get the tail graphic and did you build or buy those machine guns?
I'm also kinda curious how you mounted the aileron servos.
03-03-2009 | 04:23 AM
#39


Joined: Dec 2006
Posts: 551
Likes: 0
Received 0 Likes
on
0 Posts
From: Des Moines IA
ORIGINAL: Nergall
What happened to the machine guns when you got out to the field?
Where did you get the tail graphic and did you build or buy those machine guns?
I'm also kinda curious how you mounted the aileron servos.
What happened to the machine guns when you got out to the field?
Where did you get the tail graphic and did you build or buy those machine guns?
I'm also kinda curious how you mounted the aileron servos.
My aileron servos are on hatches in my wings on each side (dual servo) as are all my planes quick simple and the best way to do it see photos. Counter sink screw hole in hatch for the screws for nice no drag flush quality look. Use hard wood for the rails between the rib bays. This method for mounting dual aileron servos is really standard practice for most planes beyond trainers. Beats the torque rod method by far nix those and do this you can even program your radio to use flaperons way fun for slow aproches and short field take-offs.
The decals are even easier! Are you an artist or can you use Photoshop or some graphic imaging software? (I can do one for you if not) Once you have a design simply print them on regular paper in full color from your printer trim to fit on the plane. Spray glue the back (lightly don’t soak it) and stick it on the covered plane then fuel proof by covering with clear Ultracote covering. Overlap decal 1" all around paper edge with the clear Ultracote iron on low heat just to seal it up that's it easy way cool and looks great.
See You Tube flight video and a plans overview video as well link below.
http://www.youtube.com/watch?v=mqxakYJ8LLI
http://www.youtube.com/watch?v=zIBfRaYlTSA
03-03-2009 | 01:32 PM
#40
Thread Starter
Senior Member
Joined: Jun 2008
Posts: 428
Likes: 0
Received 0 Likes
on
0 Posts
From: , GA
I started on the front hatch here.
My style is to build a frame inside the existing fuselage, lift it out, and glue it onto a blank. Later, I will trim the blank to the fuselage and then cut the front of the blank at a 45 degree and glue that piece onto the fuselage. This gives the firewall a little extra strength and the 45 degree angle should hold the front of the hatch down. This method is from the Sweet Stick plans. On that, the rear is held in place by the wing. I was thinking on this one, I'd add a tab that would engage the front wing hold down pin.
My style is to build a frame inside the existing fuselage, lift it out, and glue it onto a blank. Later, I will trim the blank to the fuselage and then cut the front of the blank at a 45 degree and glue that piece onto the fuselage. This gives the firewall a little extra strength and the 45 degree angle should hold the front of the hatch down. This method is from the Sweet Stick plans. On that, the rear is held in place by the wing. I was thinking on this one, I'd add a tab that would engage the front wing hold down pin.
03-03-2009 | 01:37 PM
#41
Thread Starter
Senior Member
Joined: Jun 2008
Posts: 428
Likes: 0
Received 0 Likes
on
0 Posts
From: , GA
I installed the wing bolt blocks here.
The eccentric shape of the plywood below is because I used some leftover plywood pop outs from a 4*60 fuse side. However, it does what I want - which is to connect the forces on those hardwood blocks to the F4 bulkhead, a larger area of the 1/4 balsa sides, and to the base of the fuselage.
The eccentric shape of the plywood below is because I used some leftover plywood pop outs from a 4*60 fuse side. However, it does what I want - which is to connect the forces on those hardwood blocks to the F4 bulkhead, a larger area of the 1/4 balsa sides, and to the base of the fuselage.
03-03-2009 | 05:18 PM
#43
Thread Starter
Senior Member
Joined: Jun 2008
Posts: 428
Likes: 0
Received 0 Likes
on
0 Posts
From: , GA
Oops!
Sorry, the servo mounting is exactly like the 4*60 I just built, so, like you said, it is a standard. My only slight issue with it on the 4*60 is that you end up having to use a longer servo arm, which in turn means my ailerons are real sensitive - even connected to the outside hole on the control arm. (I have them on about 70% dual rate, so maybe this is a good thing?) It also probably takes a bit longer than surface mounting them.
The machine guns look great! If I do them, then your idea of creating an extra hatch sounds like the way to go.
I never thought of using clear ???-kote to attach artwork. I am no artist, but there is the Internet after all... What adhesive did you use?
I used these on the Sweet Stick:
http://www3.towerhobbies.com/cgi-bin...EARCH=STICKERS
Whatever might have came with the kit, I had lost long ago.
03-03-2009 | 05:27 PM
#45
Thread Starter
Senior Member
Joined: Jun 2008
Posts: 428
Likes: 0
Received 0 Likes
on
0 Posts
From: , GA
What # of 3M adhesive?
btw, does anyone know if Vinyl waterproof stickers like the ones linked below will hold up to Nitro fuel??
http://www.flagstickershop.com/koreasouth.html
btw, does anyone know if Vinyl waterproof stickers like the ones linked below will hold up to Nitro fuel??
http://www.flagstickershop.com/koreasouth.html
03-08-2009 | 12:22 AM
#47
Thread Starter
Senior Member
Joined: Jun 2008
Posts: 428
Likes: 0
Received 0 Likes
on
0 Posts
From: , GA
More progress to report:
I cut the hatch blank as described above and epoxied the front bit onto the firewall. Fits nicely, so I just have to give it a final sanding now. (And decide if I need a piece to hook onto the wing pin.)
I cut the hatch blank as described above and epoxied the front bit onto the firewall. Fits nicely, so I just have to give it a final sanding now. (And decide if I need a piece to hook onto the wing pin.)
03-08-2009 | 12:25 AM
#48
Thread Starter
Senior Member
Joined: Jun 2008
Posts: 428
Likes: 0
Received 0 Likes
on
0 Posts
From: , GA
I also got a little sanding done during the week. The vertical fin/rudder are ready to cover, the horizontal stab / elevator still need hinge slots and control surface bevel.
03-08-2009 | 12:27 AM
#49
Thread Starter
Senior Member
Joined: Jun 2008
Posts: 428
Likes: 0
Received 0 Likes
on
0 Posts
From: , GA
Today, I got started by drilling the hole for the nose wheel. I needed the bracket to measure the hole, so once that was done, I could then install the bracket.
03-08-2009 | 12:31 AM
#50
Thread Starter
Senior Member
Joined: Jun 2008
Posts: 428
Likes: 0
Received 0 Likes
on
0 Posts
From: , GA
I went on to work on the wing pin. I had to re-drill the hole because it had filled with epoxy when I glued the plywood piece to F2.
It ended up not quite where it needed to be, unfortunately.
In the first picture, I'm refilling the hole with epoxy and shims to keep the pin snug. In the second picture, I'm gluing the pin into the wing.
I'll let this dry overnight, and then I can re-measure everything and drill the rear wing bolt holes.

