


BUSA QS Sopwith Camel


 12-23-2014 | 03:03 PM
#77
Thread Starter

Joined: Apr 2006
Posts: 263
Likes: 0
Received 0 Likes
on
0 Posts
From: Philadelphia,
PA
Before I go to the build, the doctor must make a prognosis: I fear the Camel will not be done for New Years Day. This is not due ot lack of time but of delays due to the doctor's health. In the past two months I've dealth with bronchial pneumonia and am now having back spasm caused by adjusting inflatable lawn ornaments. Had I not had these health issues to deal with, I would be farther along than I am right now. This is not to say I won't keep plugging along but I like to be realistic. Therefore, I will definately make plans to have the Camel finished in time for the WRAM show which is in late February. Wish me luck. Now on to the build.
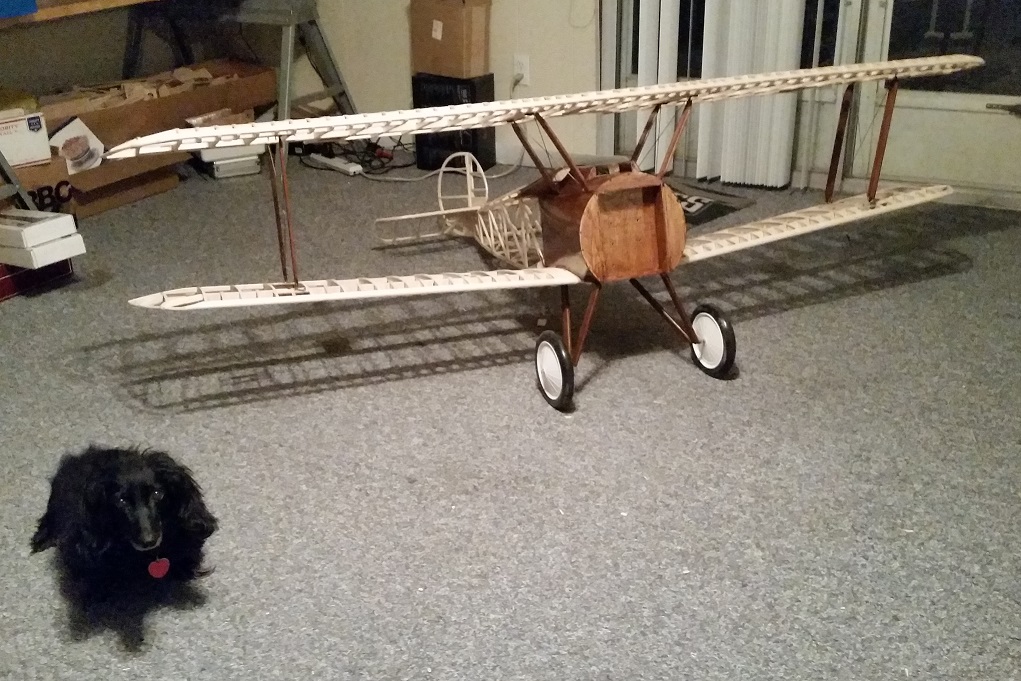
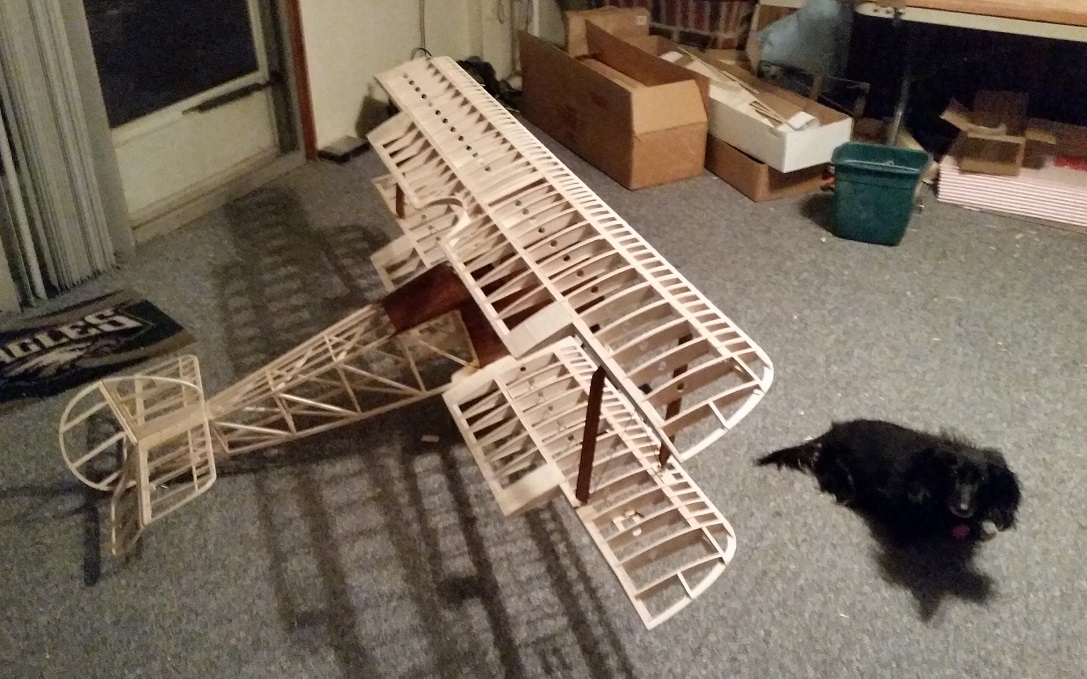
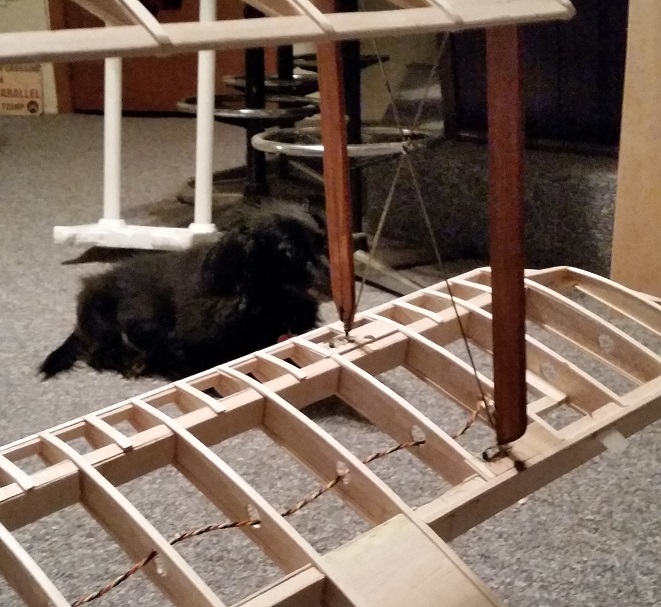

Today's photos have two models in them; the Camel and my dog Zoey who is a 15 year old long haired mini Dashchund. She follow me everywhere and is more than happy to pose for a picture and stare at you. That's what they do. Photo #1 is of the front view of the Camel and the wing struts are installed and stained. Photo #2 gives a side view of the struts plus all the other work that has been done thus far. Photo #3 shows the struts where they attach to the lower wing. The strut tips will be stained when the model is disassembled. Zoey is displaying her demure side. In photo #4 you can see where the struts attach to the top wing. You've probably noticed the lack of ailerons on the wings. They're built and ready but won't be installed until after the model has been covered. BTW, the cutout behind Zoey is not the door for a dog house. That is the 1/2" plywood I cut the firewall out of for a 1/3rd scale I built earlier this year. Zoey is a purebred princess and only goes outside when necessary!
Before I end today, I'd like to talk some more about staining for the guys who've never done it before. Your wood surface must be completely clean with no glue, dirt, sawdust, or oil for you to get a good stain finish. Especially keep this in mind when working with glue. Glue seals the wood and prevents the stain from penetrating the wood. When working with polyurethane that has a colorant in it, make sure you stir it often as the pigment has a tendency to settle to the bottom of the can. And, don't forget to lightly buff the surface with OOOO steel wool between coats and wipe the surface clean with a tack rag before applying the next coat. By the third coat, you'll have a nice smooth surface.
With tomorrow being the 24th, I'll probably just put a second coat on the struts and cabanes so I'll see you on the 26th. At this time, The Plane Doctor wants to wish you and yours a very Merry Christmas and I hope Santa brings you lots of stuff to build and fly. For those who do not celebrate Christmas, I wish you a very Merry Christmahanukwanzaka!
12-23-2014 | 03:49 PM
#78

My Feedback: (17)
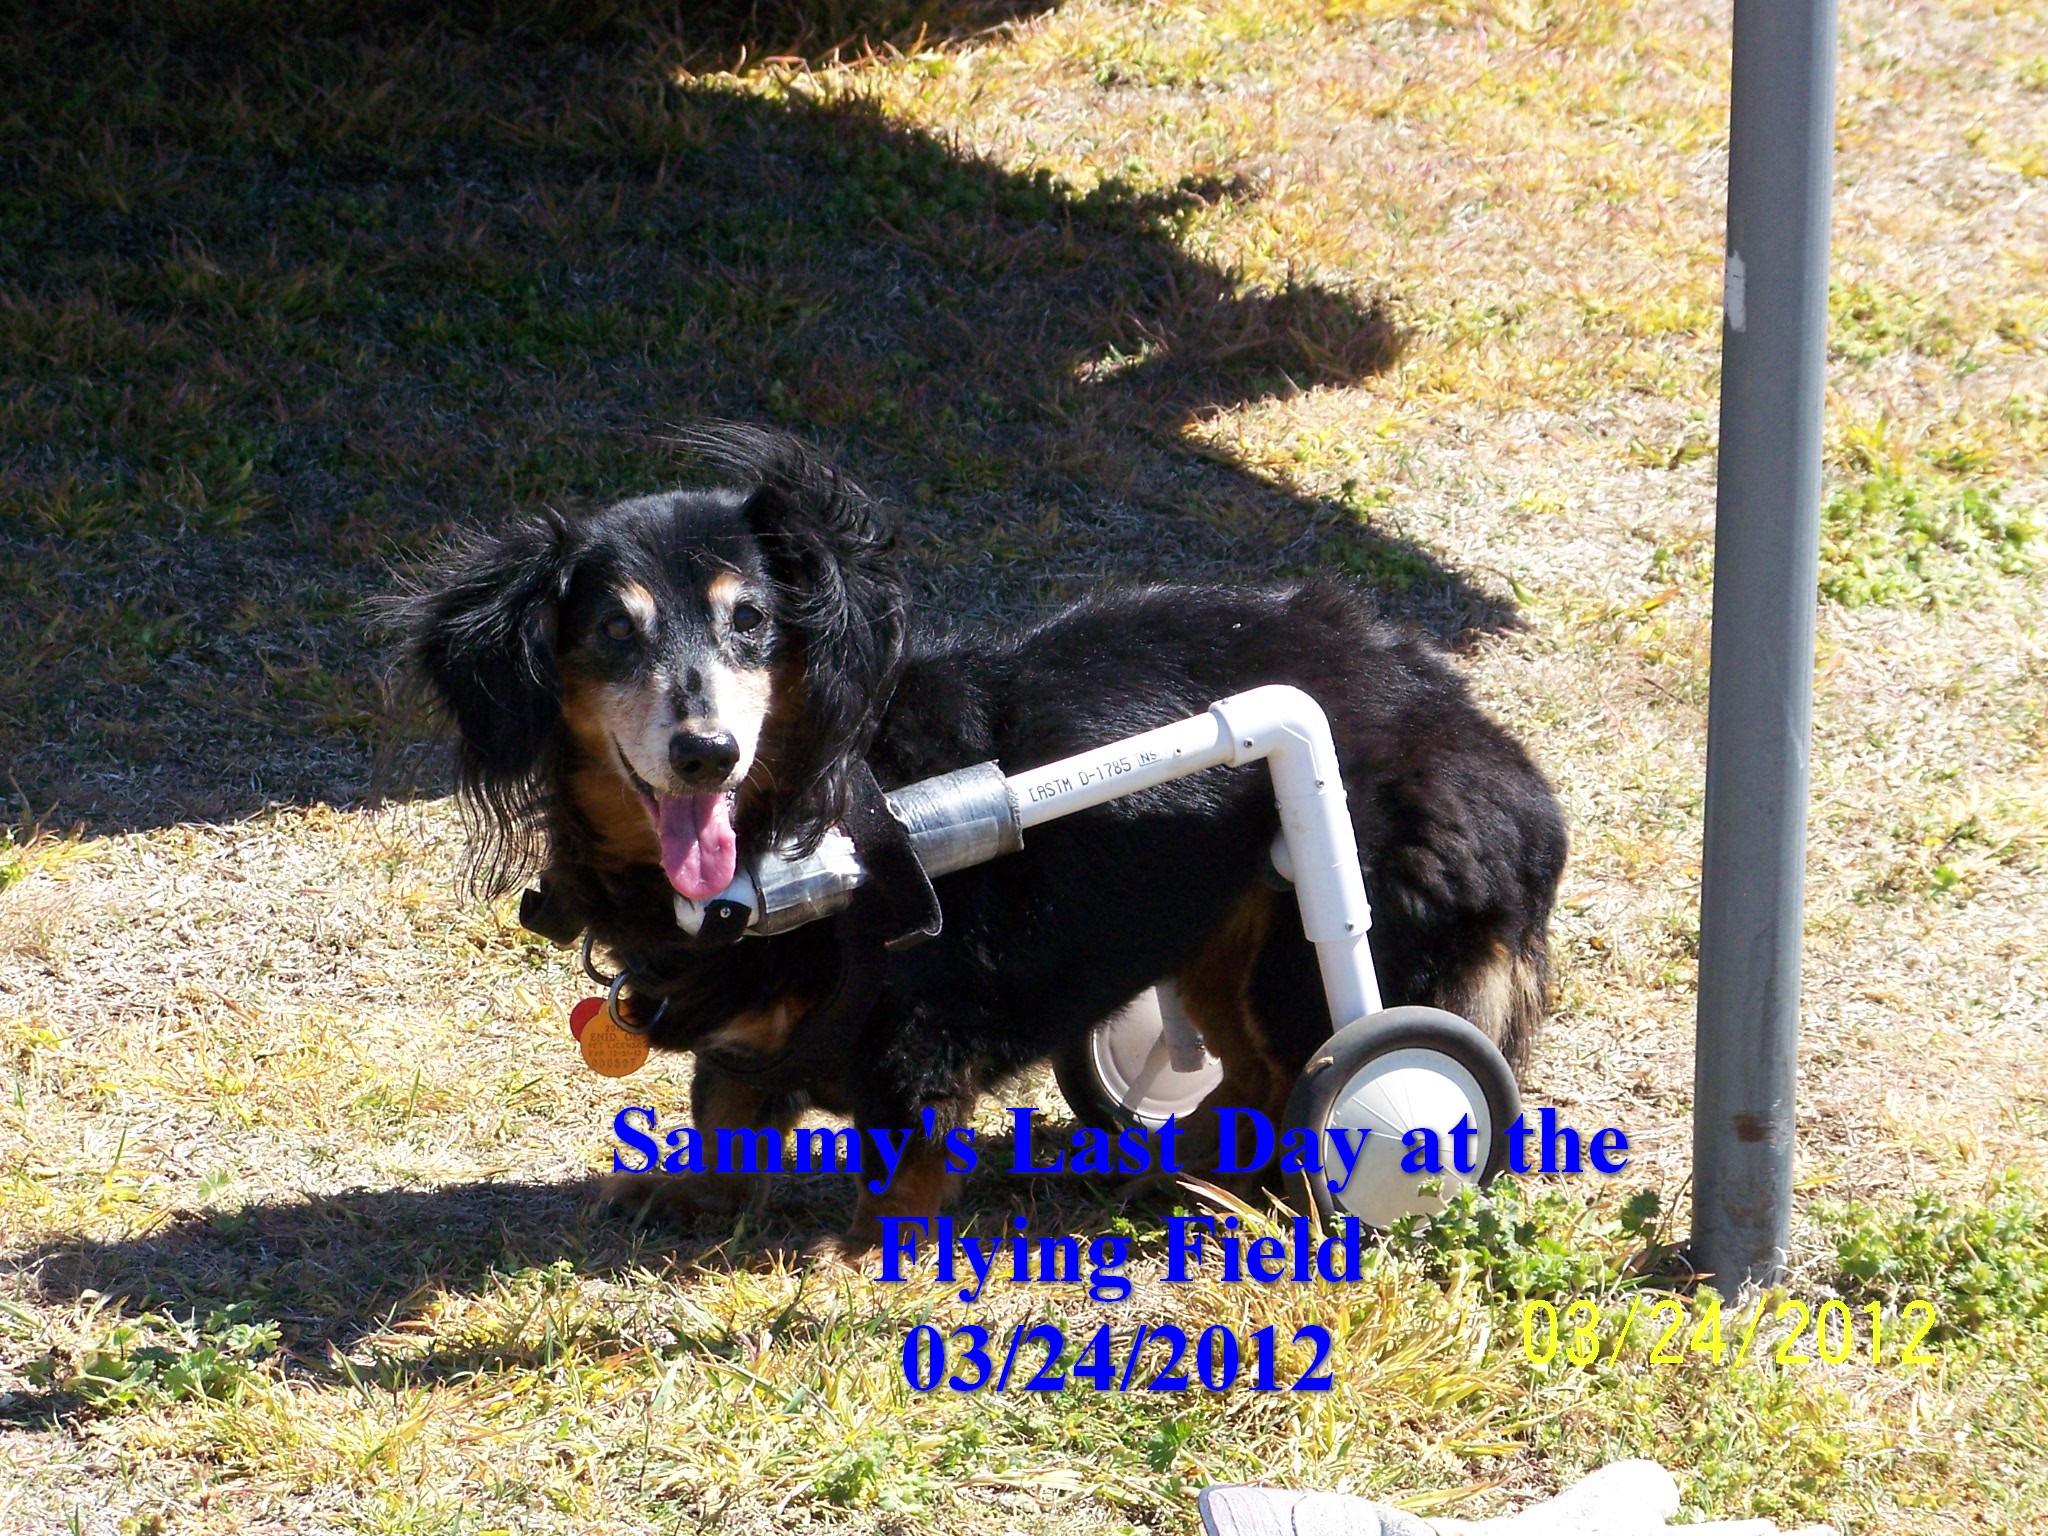
My flying buddy was a long haired mini Dachshund also. Sammy always wanted to go with me to the flying field from when she was just a puppy and until she passed. The last few years I made some wheels so she could get around, she still wanted want to go. Sammy pasted two days after the last picture she was 17 years old. Her pictures are hung in the flight shack at the field, the clubs members loved Sammy almost as much as I did. We still have Dutch, Jake and Molly all are Long Haired mini Dachshunds.

Merry Christmas
Rich
Merry Christmas
Rich
 12-26-2014 | 06:38 PM
#82
Thread Starter
Joined: Apr 2006
Posts: 263
Likes: 0
Received 0 Likes
on
0 Posts
From: Philadelphia,
PA
Greetings and a Merry Day After Christmas to all. I hope you got what you wanted and didn't get what you didn't want. On to the build.
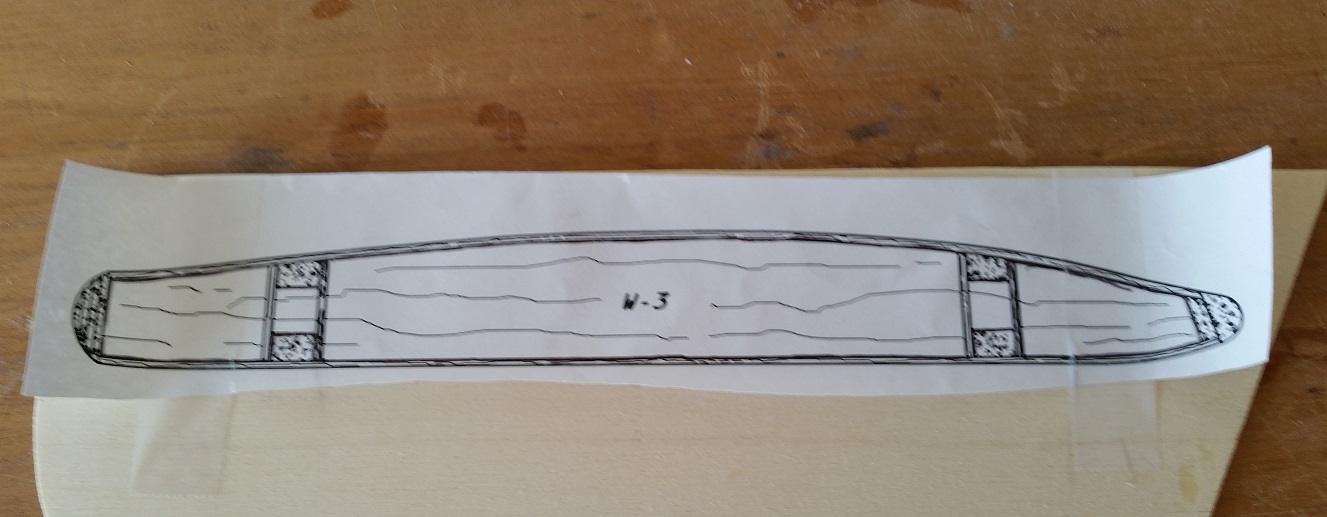
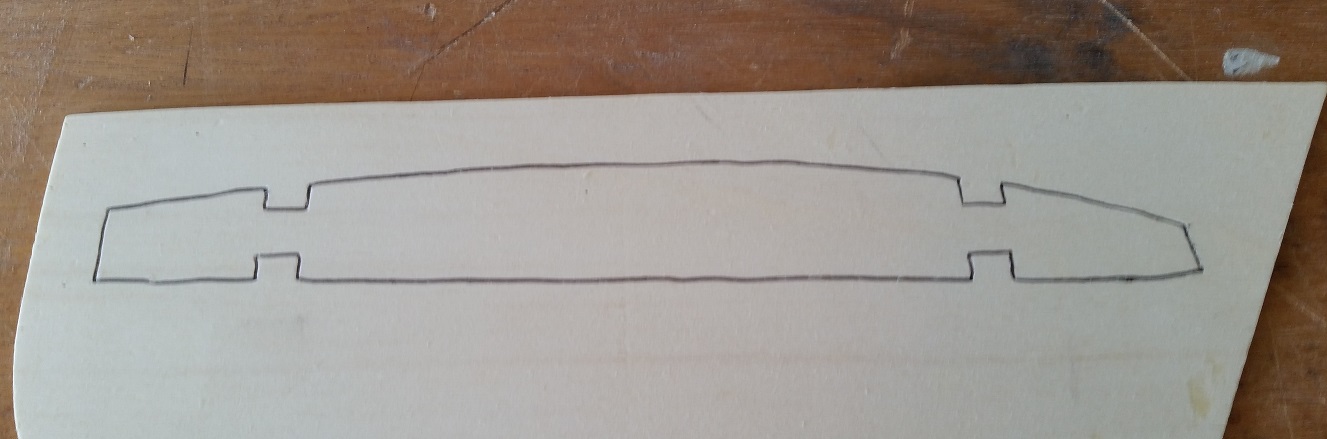
This may not look like much but photos 1 and 2 are of a cutout of the plans taped onto a 1/8" piece of lite plywood and the tracing of rib W-3 which is the center rib of the top wing. I am doing the top wing of my Camel with the center section open with no plastic cover. I also want this rib to be a spot to grab the plane as suggested in the instructions. I took a real hard look at what was there and decided it wasn't good enough to be stained and open for public inspection. I removed the center W-3 rib plus all the shear webs, made a W-3 rib from lite plywood and installed it in the center of the wing, replaced the shear webs, boxed in the area with cap stripping, sanded everything to perfection, and gave the center area a coating of varnish stain. It'll look real good when the covering is ironed on and the box is cap stripped. Now the sermon.
The cutting out of the W-3 rib was a piece of cake using my bench band saw. It would have been time consuming if I had to do it by hand. In the past year I've purchased a scroll saw, band saw, grinder, and a drill press. My building techniques have improved considerably since purchasing these tools and they weren't all that expensive as the band saw and the scroll saw were purchased at flea markets and the grinding wheel and drill press were purchased at Harbor Freight on sale. I've come a long way since my only power tools were a hand drill and a sabre saw. Tune in tomorrow when I drone on and on about something else. The sermon has ended; glue in peace.
12-28-2014 | 05:51 PM
#83
Thread Starter
Joined: Apr 2006
Posts: 263
Likes: 0
Received 0 Likes
on
0 Posts
From: Philadelphia,
PA
Only 4 more days left in 2014. On New Years Eve I'll go to a hockey game with my wife and best friend then come home and watch TV with my wife and dog until 2015 arrives. What a wild and crazy life I lead. Our club's Frosty Finger Fun Fly is set for New Years Day and is an annual tradition. VP me is bringing authentic Polish Kielbasa with rolls, sauerkraut, and industrial strength horseradish. There's gonna be lots of sore buttholes on Friday morning! On to the build.
Photo's # 1 and 2 show the landing gear, cabanes, and struts built and finished with varnish stain. They look and feel great. Photo #3 is of the fuselage front and, as you can see, it's ready to accept the engine. The battery box has also been built and stained. I'll be able to mount my 6.0 NiMi C cell battery plus hide any weight I may need to add to this beauty. In photo #4 we see that the horizontal stab has been installed after making sure it's square and level with the wing. I'll install the elevator halves, ailerons and rudder after they've been covered. I like to make my flight surfaces removeable just in case I need to do some work on them. And, speaking of removeability, photo #5 show where I've installed servo brass grommets in the holes where the tail support wires get installed. They're installed on the top and bottom of the horizontal stab and on both sides of the vertical stab. The 2-56 bolt goes through perfectly and this way, the wood won't be crushed when I put the nut on the other side. Photo #6 shows the almost finished fuselage with the cowl installed. I may leave the cowl in its unpainted white form for forward visibility when the plane is flying towards me. Looooooooooooooooooooking Goooooooooooooooooooood! And now the sermon.
Certainly, if you're building your plane for scale competition, you'll have to stay strictly with the color scheme of your topic. However, if you're just building for your own private use, you might want to think long and hard on your color scheme. It's funny how that 1/4 scale airplane can look so small when it's flying but it's not funny if you can't tell whether it's coming towards you, going away, right side up, or upside down. Your color scheme of a green and tan airplane looks great on the ground but how great will it be when you duck below the tree level and you plane suddenly disappears? This is why I'm keeping the cowl white. I will definitely see that white cowl when I'm on final approach and I'll be able to tell what's going on with a white cowl on the front and a red, white, and blue tail on the back. I've also been known to make the right wing tip green and the left red. I may do that on this plane also. It's my signature touch. Here's my 1/4 scale DR-1 which is covered in black Solartex. Please notice the overabundance of white graphics on the model and the white cowl. The cowl on the full scale airplane is black. You better believe I can see that cowl when the model is on final! Tune in tomorrow when I ramble on about something else. The sermon is ended; glue in peace.
12-29-2014 | 11:39 PM
#85
Thread Starter
Joined: Apr 2006
Posts: 263
Likes: 0
Received 0 Likes
on
0 Posts
From: Philadelphia,
PA
Greetings my fellow night owls. I got bored watching the hockey game and the wife fell asleep so I decided to go work on my plane. I'd like you to notice how much sharper and clearer the photos are. I broke out my Nikon Coolpix and used that to take the pictures. I'll use it for NYD photos at the fun fly. Things are moving along quickly but the plane will not be ready for the fun fly. I figure I have about another week or so which is ok as I can now add more detail for the wow factor. Now, on to the build.
Photo #1 shows that the tail has been squared off and attached with 5 minute epoxy. Can't have that falling off. In photo #2 you'll notice the nyrods have been braced at every former and have been kept as straight as possible to prevent flexing. At the bottom of photo #3 you can see the servos that have been installed on bass wood rails. There's a left and right elevator, rudder, and throttle servo. These are HD Power 1201MG servos which are metal gear, high torque, analog servos. They provide 187 oz. of torque at 6.0 volts and they're only $12 plus shipping from Hobby King. I've been using them for a couple of years now and they're great. They're Futaba splined, have a universal plug, and are now the only servo I use for planes that call for standard sized servos. I get them from Hobby King but Troy Built also sells them. They're a great value and worth checking into. In photo #4 you can see the hole on the bottom left panel. That's where the fuel filler will go. And, on the right, is my receiver off and on switch which means IT'S ALIVE! Yep, there's a 7 channel Spektrum receiver installed along with a 4200ma NiMi 6.0 Sub-C battery pack. When the engine goes in, so will a battery eliminator board which allows me to run the receiver and engine off of one battery. There will be a light installed to tell me when the engine power is on and the board will be operated by the unused gear switch and the gear port on the receiver. It's a handy little gadget that costs $50 from Troy Built Models which I have been using for years with no problem. Photo #5 is of the finely detailed dash I put in my model. Looks good, doesn't it? Actually it's a picture I found on the internet. I believe it's from a flight simulator. It works for me. Which brings me to photos # 6 and 7. These two are the finalists for the job of test pilot. They're running chin and chin as #6 has the advantage of having hands and fingers while #7, who has hoofs, has the advantage of greater horse sense. When I build the cockpit, I'll see who fits best and make my decision then.
There's no sermon tonight so you get a break. It's 2:30 in the morning so I'm going to have another beer and then go to bed. Until next time: Keep on glueing!
12-30-2014 | 05:08 PM
#86
Thread Starter
Joined: Apr 2006
Posts: 263
Likes: 0
Received 0 Likes
on
0 Posts
From: Philadelphia,
PA
The doctor has been busy. I'll be spending tomorrow getting ready for NYE and NYD so I doubt I'll have any time to work on the Camel so I spent all day in the shop. She's now to the point that one or two weeks worth of work will have her in the air. Photo #1 is of the servos I used in the Camel which are HD Power 1201 MG's. They're available from Hobby King and Troy Built Models and with 187 oz. of torque at 6.0 volts and only $12 plus shipping, they're a real bargain. Ok, they're analog servos but sport flyers don't need expensive digital servos. Expensive equipment doesn't make you a better flyer. Photo #2 shows the tail feathers installed and the wire braces in place while photo #3 shows the engine standoffs in place. Photos #4 and 5 are of the plastic "hump" that must be trimmed to fit. It'll probably get painted aluminum to match the aluminum side panels and blended in. Photos # 6, 7, 8, and 9 show the "bare bones" fully assembled and ready for finishing. The Camel "to do" list includes covering and decals, install and plumb in the fuel system, do all the electrical work for the engine, build and install the guns, put the pilot in the cockpit, adjust surface movements and balance the plane, completed airplane photo shoot, and finally the test flight. I can't wait.
At this time, The Plane Doctor would like to wish all his friends and clients (yeah, that guy) a very Happy New Year. Have fun and be safe.
01-01-2015 | 06:52 AM
#88
Joined: Mar 2006
Posts: 87
Likes: 0
Received 0 Likes
on
0 Posts
From: Peculiar, MO, AMERICAN SAMOA (USA)
Lookin awesome Can't wait to see it covered.
I realize it's a scale plane,and to get the right looks that landing gear has to be the way it is.
But for me,if I build one I would at least have to put balloon low bounce wheels on it for everyday flying. The landing gear doesn't look very forgiving. Of course I have yet to build a Balsa USA plane,and maybe scale landing gear is more forgiving than it looks.
Fred
Can't wait to see it covered.I realize it's a scale plane,and to get the right looks that landing gear has to be the way it is.
But for me,if I build one I would at least have to put balloon low bounce wheels on it for everyday flying. The landing gear doesn't look very forgiving. Of course I have yet to build a Balsa USA plane,and maybe scale landing gear is more forgiving than it looks.
Fred
01-01-2015 | 01:18 PM
#89
Thread Starter
Joined: Apr 2006
Posts: 263
Likes: 0
Received 0 Likes
on
0 Posts
From: Philadelphia,
PA
The supplied bolts for the Camel are 2/56 which fits perfectly through the brass servo grommets. Also, I'm cheap so I like to use what I have laying around for quick fixes. As for landing gear, I've flown BUSA planes with fixed gear with no cushioning whatsoever installed and it held up fine. The trick is to sneak up on the Earth and not collide into it!
01-02-2015 | 02:34 PM
#90
Thread Starter
Joined: Apr 2006
Posts: 263
Likes: 0
Received 0 Likes
on
0 Posts
From: Philadelphia,
PA
Happy January 2, 2015! I write one check a month and that's not until the end of the month so I'll let you know if I remember to write 15 and not 14. My club's Frosty Finger Fun Fly was a huge success. There wasn't much flying, just lots of eating. We served hot dogs, donuts, coffee, soda, cookies, brownies, pizza, and yours truly brought authentic Polish kielbasa served on a club roll with sauerkraut and industrial strength horseradish. Everybody who ate a kielbasa sandwich with horseradish had no sinus or breathing problems for the rest of the day. On to the build.
I've decided to use Williams Brothers guns on my plane as I feel they look more authentic and they're on their way from Mother Tower. There's not much to do on the Camel but it's all that tedious stuff that just takes up time. I built and stained the windshield and that'll go on tomorrow. The aluminum panels are cut and waiting to be installed. I'm going to buy some flat paint and try to make the panels blend in with the wood. If not, I'll just flip them over and we'll have shiny aluminum panels. Photo #1 shows the underside of "the hump" where I've coated it with epoxy to try and make it a little bit stiffer. On a BUSA model, the cabane struts just go into channels in the fuselage and are held by a friction fit but mine had much more play than I was happy with. So, I drilled the channels out so the 5/32" I.D. brass tubes would fit through the channels, cut 4 pieces of the brass to cover the wires on the cabanes (photo #2), and soldered them onto the cabane wires and presto; no more sloppy play. Sloppy play is asking for stuff to start ocillating in the air and eventually break apart. That won't happen now. Tune in tomorrow when I talk on end about something else. Bye.
01-05-2015 | 03:13 PM
#91
Thread Starter
Joined: Apr 2006
Posts: 263
Likes: 0
Received 0 Likes
on
0 Posts
From: Philadelphia,
PA
Greetings and welcome to the first Monday of January 2015. The work on the Camel is rapidly coming to a close. Today saw the business end of the airplane being finished. Photo #1 shows the engine installed along with the CDI, the throttle pushrod, and the choke pushrod. If you look close at photo #1 you'll see the throttle and choke levers have been replaced with red anodized levers that I got from Troy Built Models. It's a lot easier than futzing around with the levers that come with the engine. What you can't see in photo #1 is the fuel tank, fuel filler, overflow, switch, and fuel lines have been installed. This little tedious stuff take up time but must be done. What's being featured in photo #2 is the power light for the battery elimination board that has been installed on the left side inspection plate. The board is installed in the battery box and supplies the ignition power through the receiver and works off the gear switch. When I flip the gear switch, the red light comes on and tells me the engine ignition is on. You can use any unused channel for the board so I use the gear channel as WWI aircraft don't have retracts. That's another reason why I like WWI aircraft; no retracts! They're a royal pain in the you know what. I've decided my Camel is from the Royal Canadian Air Force so I've chosen Dudley Doright of the Mounties as my pilot. He makes an imposing figure as he stares through the windscreen in photo #4, doesn't he? Another thing you can't see is my rudder, which is covered in white Solartex, is in the works of being painted, so it will be red, white, and blue. My guns arrived from Mother Tower so I'll be able to build and install then and start covering the fuselage. It's interesting that the wings are usually the first thing I build and the last thing I cover. Oh well!
Tune in tomorrow when I talk on end about something else. The sermon is ended, glue in peace.
01-07-2015 | 06:51 PM
#92
Thread Starter
Joined: Apr 2006
Posts: 263
Likes: 0
Received 0 Likes
on
0 Posts
From: Philadelphia,
PA
Todays photo doesn't due justice to the work I've accomplished in the last couple of days. The wing bottoms have been covered as well as the aileron bottoms. The fuselage has been covered with the exception of the elevators. As you can see much progress has been made on the fuselage. The only things left to do on the fuselage is to cover and install the elevators, finish painting and install the rudder, re-install the pushrods, and glue the guns into place. I decided to use Williams brothers guns instead of BUSA guns. They're cheaper and much easier to build. I have a set of Vickers QS BUSA guns for sale. If you're interested just write me and I'll make you a deal. The graphics are BUSA except for the hearts and numbers which came from Callie Graphics which are superior and I'll be using them exclusively from now on. I plan on having the Camel done by the end of the week so stay tuned for the big wrapup!
01-08-2015 | 10:24 AM
#93

Junior Member
Joined: Nov 2005
Posts: 18
Likes: 0
Received 0 Likes
on
0 Posts
From: Liberty Twp., OH
What did you use for the aluminum section on the nose? I'm building a slightly smalled Camel - 77" from Jonh Tanzer plans. I've been trying to come up with how to finish the metal section of the nose.
Thanks,
Chuck
Thanks,
Chuck
01-08-2015 | 11:36 AM
#94
Thread Starter
Joined: Apr 2006
Posts: 263
Likes: 0
Received 0 Likes
on
0 Posts
From: Philadelphia,
PA
Hi Chuck,
The BUSA kit comes with thin aluminum panels that you use a template and then trim to size. You could probably get some at your local hobby store. You could also use aluminum tape to simulate the panels which is available at Aero Accessories. Their website is below.
Good luck, Ken.
http://www.aero-accessories.com/Builders.html
01-10-2015 | 09:45 AM
#95

You can buy a smallish roll of roofing tin/aluminum at hardware or Menards type places for under 20 bucks... and you will have enough for the rest of your modeling career most likely.
Last edited by foodstick; 01-11-2015 at 12:46 PM.
01-10-2015 | 06:45 PM
#96
My Feedback: (5)
I have used the thin roof flashing from the local hardware store. It cuts with scissors and the sharp edges are easy to dull with sandpaper. Great stuff, and I used CA to stick it to the wood surface. After 2 years of flying, it still is stuck in the same place.
01-11-2015 | 04:05 PM
#98
Thread Starter
Joined: Apr 2006
Posts: 263
Likes: 0
Received 0 Likes
on
0 Posts
From: Philadelphia,
PA
You'll never guess what I did today? I finished my BUSA QS Sopwith Camel. She balances 5" back from the leading edge of the top wing and the plans call for 4 so I'll have to add a little weight to the battery box. Everything is as far forward as it can go so adding weight is my only option. I may even try and fly it the way it is as I don't think it'll make that much difference. We'll see. The only issue I have to deal with is to order new decals from Callie Graphics as the ones from BUSA refuse to lay flat or even adhere well. I know it's rough to get good adhesion on the top of the wing what with the ribs and all but I had to use canopy glue to get one of the roundels to adhere to the fuselage side and this is on unpainted Solartex. From now on, all my graphics will come from Callie. She does such good work and she's such a cutie! Anyway, photos #1 thru 4 show the Camel from its four sides. Photo #5 shows the business end highlighting the engine, guns, and my pilot Dudley Doright of the Mounties. Don't forget, this is a Canadian plane! Photo #6 show the just reward for a job well done. I've been saving that bottle for a special occasion and I think this is one. The next will be either in March or April when my grandson is born. Photos #7 and 8 are of The Plane Doctor all suited up in his flying gear and ready to take off and do battle with Snidley Whiplash in his Fokker DR-1. I'll have to wait for the snow to melt on our field and with temperatures hovering in the 20's, I don't think I'll be flying her until spring. I also plan on entering her in the static contest at the WRAM show. When I do the test flight, I'll post the final pictures. Until then, keep on glueing. The sermon is ended, clean up in peace!
01-11-2015 | 04:30 PM
#99
My Feedback: (-1)
Great build, not to mention fast. One suggestion, we had a lady in our club that used to paint pilots for people, look alike pilots. You should get a mini you for it. I have seen look alike pilot painting advertised someplace. One of my friends did one for me, looks good but he has crashed the two planes I put him in. Survived both crashes too!!!
01-11-2015 | 06:11 PM
#100
Thread Starter
Joined: Apr 2006
Posts: 263
Likes: 0
Received 0 Likes
on
0 Posts
From: Philadelphia,
PA
Thanks Gray Beard. I prefer my cartoon characters. The last one was a Salnier Moraine A1 with Pepe Lepew for a pilot. A French pilot for a French plane, right? BTW, I have a cousin who lives in Henderson. He's a taxedermist and his name is Tom Fuller. He's a retired Las Vegas cop.

