


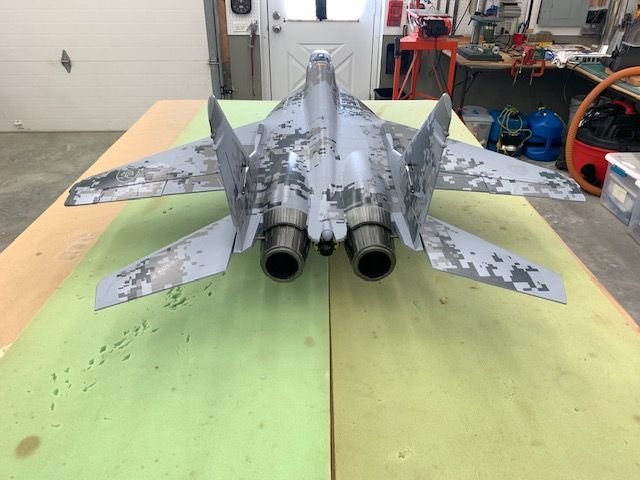
Freewing Mig 29 EDF to Turbine Conversion
 11-14-2020 | 05:31 PM
#26

Equipment install
Everybody will do this different but here is what I did.

Access hole cut in front for airspeed module and then enlarged for battery. This allows the battery to move about 6 inches for CG adjustments

Hack saw blade used to make the deep cuts

Battery slides in on left side. AIrspeed module on right side. Air trap tank and pump on wood floor

The pump is mounted on top of the air trap tank. This is a 2 oz 3D printed tank by Keith that has the pump mounts on top. I use a Digitech CTU in all my jets and is mounted behind pump. A Castle 20 amp BEC supplies 5.7v power direct to the receiver and Freewing blue box. The ECU is next to the rear.

Velcro is applied to the blue box

The blue box is to the left of the header hank. The Jeti 12A receiver is where the stock blue box was mounted.

Here is the final layout. Note the vent line from the centerline tank comes up inside the fuse and wraps around the front of the Dubro tank and then back down and out the bottom of the jet. This is to prevent fuel siphon from the higher mounted header tank.

Turbine wires and fuel line goes through the right nacelle.

The fuel filter is loose mounted vertically for air bubble avoidance

The wires and fuel tube comes out the air inlet hole to the turbine
Everybody will do this different but here is what I did.
Access hole cut in front for airspeed module and then enlarged for battery. This allows the battery to move about 6 inches for CG adjustments
Hack saw blade used to make the deep cuts
Battery slides in on left side. AIrspeed module on right side. Air trap tank and pump on wood floor
The pump is mounted on top of the air trap tank. This is a 2 oz 3D printed tank by Keith that has the pump mounts on top. I use a Digitech CTU in all my jets and is mounted behind pump. A Castle 20 amp BEC supplies 5.7v power direct to the receiver and Freewing blue box. The ECU is next to the rear.
Velcro is applied to the blue box
The blue box is to the left of the header hank. The Jeti 12A receiver is where the stock blue box was mounted.
Here is the final layout. Note the vent line from the centerline tank comes up inside the fuse and wraps around the front of the Dubro tank and then back down and out the bottom of the jet. This is to prevent fuel siphon from the higher mounted header tank.
Turbine wires and fuel line goes through the right nacelle.
The fuel filter is loose mounted vertically for air bubble avoidance
The wires and fuel tube comes out the air inlet hole to the turbine
Last edited by Viper1GJ; 11-14-2020 at 05:35 PM.


 11-14-2020 | 05:56 PM
#28
Ribbon cable signal wires
There are multiple ways to hook up the electronics from stock to multiple mods. I wanted to have every flight control on a separate channel for adjustment and mixing. I use a 12 channel Jeti Assist receiver with internal gyro. However I still wanted to use the ribbon cable plugs to the wings to make it easy to attach the wings. And I wanted to bypass the blue box for elevator control and power since it had been flagged as a possible problem. To accomplish this I split off the signal wires from the ribbon cable for flaps and ailerons and main gear doors. The signals come through individual channels but the wing servo and lights power comes from the blue box. In additon I wanted to use the Double Stage Door seequencer but there was only one outlet so I needed a Y for the gear door signal wires.

The signal for flaps and ailerons come from the receiver and power from the blue box. The rudders and stabs plug directly into the receiver for both signal and power.

The result was 3 signal wires on each ribbon cable were separate
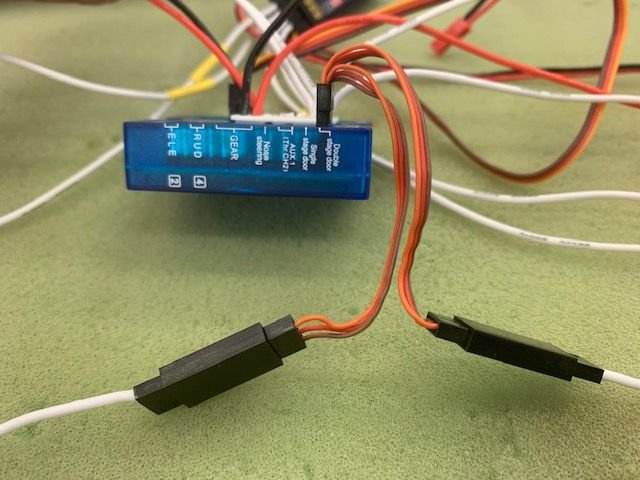
The Y harness operated the main gear doors since there was only one outlet on the blue box for the double stage door controller.
There are multiple ways to hook up the electronics from stock to multiple mods. I wanted to have every flight control on a separate channel for adjustment and mixing. I use a 12 channel Jeti Assist receiver with internal gyro. However I still wanted to use the ribbon cable plugs to the wings to make it easy to attach the wings. And I wanted to bypass the blue box for elevator control and power since it had been flagged as a possible problem. To accomplish this I split off the signal wires from the ribbon cable for flaps and ailerons and main gear doors. The signals come through individual channels but the wing servo and lights power comes from the blue box. In additon I wanted to use the Double Stage Door seequencer but there was only one outlet so I needed a Y for the gear door signal wires.
The signal for flaps and ailerons come from the receiver and power from the blue box. The rudders and stabs plug directly into the receiver for both signal and power.
The result was 3 signal wires on each ribbon cable were separate
The Y harness operated the main gear doors since there was only one outlet on the blue box for the double stage door controller.
11-14-2020 | 06:07 PM
#29
Preflight testing

Fuel system tested using the pump test function to check the fuel feed from the centerline tank, to header tank, to air trap, to pump and back to jug. Everything checked good and the pump sucked it all out as planned

Pump running at PW 232. Header tank air was constant till the center line tank emptied

Turbine start and run worked great. No issues. I picked up the jet and held nose up vertical at full thrust and shook it hard. Not a burb and pump kept sucking the fuel from the centerline tank. A little less than 1 to 1 thrust but it really wanted to go!

No heat issues at all after start, run, shut off and cool down. Jet is ready to fly!
Fuel system tested using the pump test function to check the fuel feed from the centerline tank, to header tank, to air trap, to pump and back to jug. Everything checked good and the pump sucked it all out as planned
Pump running at PW 232. Header tank air was constant till the center line tank emptied
Turbine start and run worked great. No issues. I picked up the jet and held nose up vertical at full thrust and shook it hard. Not a burb and pump kept sucking the fuel from the centerline tank. A little less than 1 to 1 thrust but it really wanted to go!
No heat issues at all after start, run, shut off and cool down. Jet is ready to fly!
Last edited by Viper1GJ; 11-14-2020 at 07:09 PM.
The following users liked this post:
yeahbaby (11-14-2020)
11-14-2020 | 06:11 PM
#30
All programming complete and double checked.
Factory EDF weight is said to be 13.5 lbs
Factor CG is recommended at 140mm behind leading edge at wing root which has been shown to be grossly nose heavy
My target CG for first flight is 155 mm based on multiple recommendations in other forums
Weight and balance done with the XIcoy CG Machine
My conversion weight and balance:
Empty weight before fuel 10.73 lbs
Empty weight with air trap full 10.89 lbs and CG 164mm
Air trap full and header tank full 11.58 lbs and CG is 161mm
Weight with all tanks full is 13.47 lbs and CG is 163 mm
CG moves only 2mm with centerline tank fuel
Take off weight is equal to the EDF version
Weight after defuel with air trap full is 11.00 lbs and CG is 161mm
This is about 2 oz of unusable fuel in header and centerline tank
Weight after defuel with air trap full and 2 oz in the nose is 11.13 lbs and CG is 152 mm
This is a good empty CG for first flight
Landing should be about 2 lbs lighter than the EDF version
Total useable fuel is estimated to be 1.55 Liters or 52 oz based on my punch jug markings.
This should easily give a 6-8 min flight time or possibly more depending on thrust settings
Jet is ready to fly.


Hope to fly this week. Stay tuned!
Factory EDF weight is said to be 13.5 lbs
Factor CG is recommended at 140mm behind leading edge at wing root which has been shown to be grossly nose heavy
My target CG for first flight is 155 mm based on multiple recommendations in other forums
Weight and balance done with the XIcoy CG Machine
My conversion weight and balance:
Empty weight before fuel 10.73 lbs
Empty weight with air trap full 10.89 lbs and CG 164mm
Air trap full and header tank full 11.58 lbs and CG is 161mm
Weight with all tanks full is 13.47 lbs and CG is 163 mm
CG moves only 2mm with centerline tank fuel
Take off weight is equal to the EDF version
Weight after defuel with air trap full is 11.00 lbs and CG is 161mm
This is about 2 oz of unusable fuel in header and centerline tank
Weight after defuel with air trap full and 2 oz in the nose is 11.13 lbs and CG is 152 mm
This is a good empty CG for first flight
Landing should be about 2 lbs lighter than the EDF version
Total useable fuel is estimated to be 1.55 Liters or 52 oz based on my punch jug markings.
This should easily give a 6-8 min flight time or possibly more depending on thrust settings
Jet is ready to fly.
Hope to fly this week. Stay tuned!
Last edited by Viper1GJ; 11-14-2020 at 07:05 PM.
The following users liked this post:
yeahbaby (11-14-2020)
11-14-2020 | 07:06 PM
#33
Let me know if I can help when you get started. Sorry I have no ability to 3D print anything. I'm using stock wheels on grass for first flights. Not sure what to do about brakes yet. What did you get from Xicoy?
Gary
Last edited by Viper1GJ; 11-14-2020 at 07:11 PM.
11-15-2020 | 11:25 AM
#35
Hello
Nice Work!
A good Friend Marco and i trying the same
But we do a different way to conversion to Turbine
as simple as possibel with Fuelbags
no needing for airtrap or Separate Tank
just gravel some Epo out on the CG and install the Fuelbag inside the rear off the Cockpit
weight with Full Tank 5,5Kg
Fuel Capacity 1,4 Liter
Other Mods are MKS Servos with HV
and a bit Reinforcement on the Rear
But the Idea with the Undercarriage Tank are really Nice!
Fred
The following users liked this post:
tibor simon (08-24-2023)
11-16-2020 | 05:56 PM
#38


My Feedback: (17)
The 3D printed semi scale external fuel tank is the heart of this turbine conversion and is what made it so easy since there was very little foam carving needed to fit in the fuel near the CG. This was my first time to do an external tank so I basically followed Keith's lead and advice.
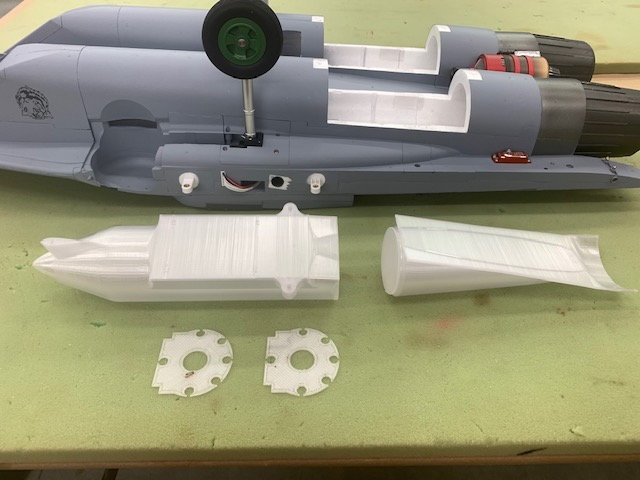
The tank comes out of the printer in 5 pieces. Front, rear, 2 baffles, and a fuel tube holder (not shown here). The tank is printed out of clear PETG filament which Keith says is fuel proof. It is later sealed with a coat of epoxy resin inside and out.
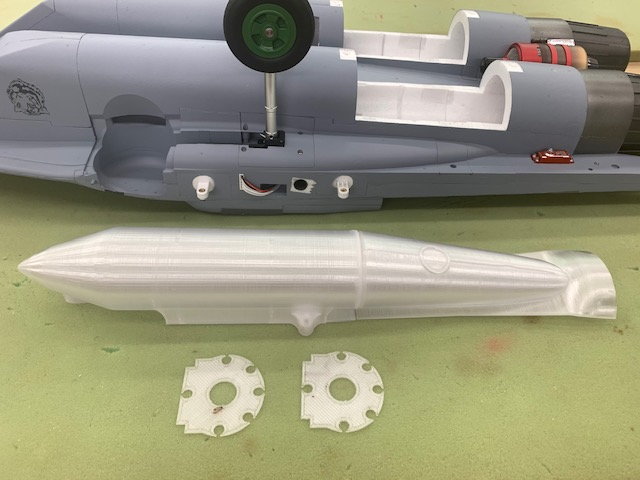
The rear section has a flat front face that forms the rear wall of the tank when the rear section is joined to the front section. The rear section is hollow and is the FOD shield for the turbine. Only the front section holds fuel. We estimate it holds 40oz of fuel. With the 14oz header tank inside the fuse the total fuel capacity is about 54oz plus air trap fuel.
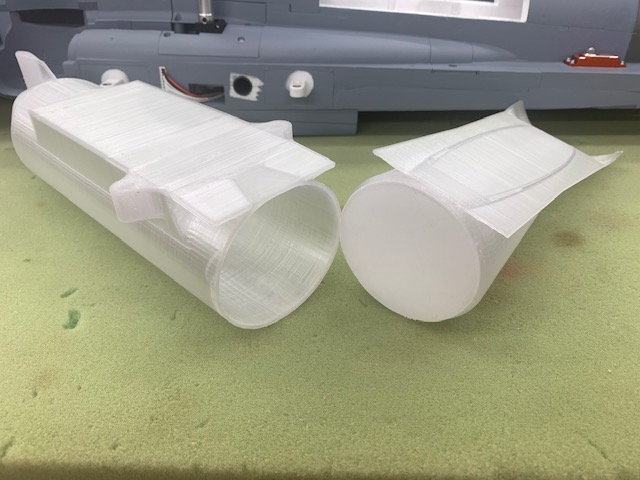
The rear section plugs into the front section with about a 3mm overlap and forms the back of the tank
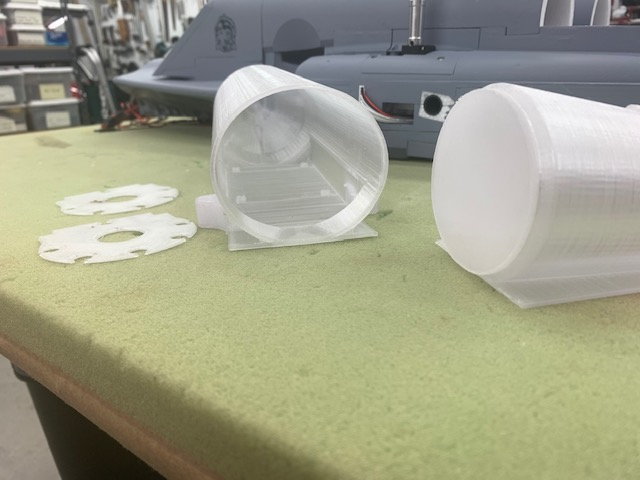
The two baffles are indexed on small tabs inside the front section
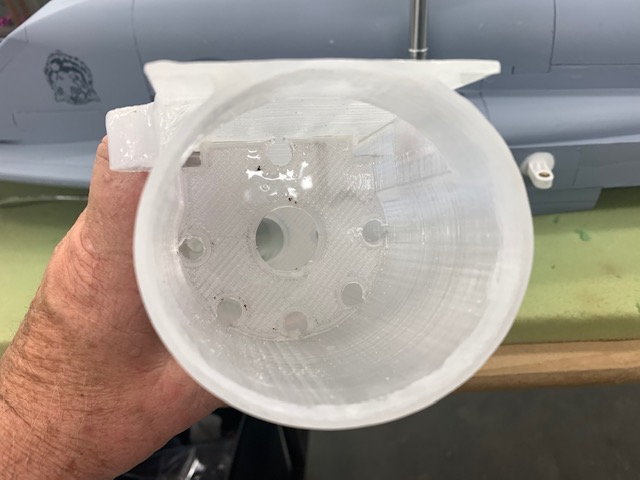
This shows baffles tacked in position with CA
The tank comes out of the printer in 5 pieces. Front, rear, 2 baffles, and a fuel tube holder (not shown here). The tank is printed out of clear PETG filament which Keith says is fuel proof. It is later sealed with a coat of epoxy resin inside and out.
The rear section has a flat front face that forms the rear wall of the tank when the rear section is joined to the front section. The rear section is hollow and is the FOD shield for the turbine. Only the front section holds fuel. We estimate it holds 40oz of fuel. With the 14oz header tank inside the fuse the total fuel capacity is about 54oz plus air trap fuel.
The rear section plugs into the front section with about a 3mm overlap and forms the back of the tank
The two baffles are indexed on small tabs inside the front section
This shows baffles tacked in position with CA
-TSM
11-17-2020 | 03:43 PM
#39
Originally Posted by [email protected]
Can you print my up a tank? I'll Zelle you the payment. Want to use it as you do as a functional fuel tank.
-TSM
-TSM
11-17-2020 | 03:53 PM
#40
Test flights to day. Went well. Flew 4 sorties. Video is of last flight.

Prior to first flight

Third flight start up.
Video is just an iPhone camera and got fuzzy after takeoff but gets better after 0:50
Prior to first flight
Third flight start up.
Video is just an iPhone camera and got fuzzy after takeoff but gets better after 0:50
Last edited by Viper1GJ; 11-17-2020 at 04:49 PM.
11-17-2020 | 04:46 PM
#41
Flight Reports
The first flight was a little challenging because there was not quite enough down thrust, not enough down trim to compensate at first, and the roll rate was way too high. Rotation was smooth but required a little forward stick to hold proper pitch attitude and then down trim to compensate. From level flight when full thrust was applied the jet would pitch up and climb but it was easily manageable. CG check was good and at lower thrust settings it flew well. I got the flight mode trims set for half flaps and full flaps. Jeti Assist gyro gain was at 40% for all axis when turned on. Gyro helped the jet smooth out a lot in the wind. Speed did not exceed 72mph and final was flown comfortably at 40-45mph. Landing was uneventful. Flight was for 6 minutes and did not use any internal fuel. No video of this one.
For the second flight two washers (2mm) were inserted under the aft turbine mount screws and the aileron rates were reduced. Takeoff rotation was normal and showed no tendency to pitch up. Full thrust did not seem to climb and 5 clicks of the previous nose down trim were removed to maintain level flight hands off. The jet started to feel normal and it became fun. Some slow to fast accelerations were flow and they were almost perfect with just a slight pitch up when thrust applied but mostly just straight ahead. I plan to add another washer of down thrust. Not sure about the speeds because my speed sensor did not log in at startup and I didn't catch it. The jet flies very smooth and was easy to fly and easy to land. This flight was extended to 7 minutes and still did not use any internal fuel.
The third flight was fun but short. Takeoff and climb out was normal and I started to add speed and climbs and rolling maneuvers. My speed warning kept going off telling me I was exceeding 80mph where I had left it from the first flight. I was having too much fun. Then in a pull to vertical with full thrust and rolling I threw out the trapped air bubble and flamed out. I was in a good position for a hi key, low key downwind to base turn with gear down and half flaps. As I rolled out on final the turbine restarted so I just landed and taxied back. I checked the air trap and header tank and they were full. I ran up the power to 100% and then picked up the jet and held it nose up and then nose down and shook it as hard as I could. Turbine ran smoothly. (You can't do that with a 1/5 scale F-16) I like these small jets!
The fourth flight. So with turbine still running, I reset the speed warning to 100mph, reset the timer for 4 minutes, and took off again. This flight got the video. At about 2:00 I did 2 laps in slow flight with half flaps, and full flaps with speed at 40-45. Final was flown at 40-45 and reduced to 35 just prior to touchdown. Worst landing of the day but there is is. I really like the jet and it will fly great when the thrust line is finally dialed in.
Last edited by Viper1GJ; 11-17-2020 at 07:08 PM.
The following users liked this post:
raydar (11-17-2020)
11-17-2020 | 04:59 PM
#42
Back in the shop after flying

I rechecked the weight and balance after flying. I found the empty weight with air trap full and unusable fuel in tanks was 11.13 lbs and CG was at 155mm or -15 mm from factory recommendation. I took 1 oz out of the nose and will test fly next at 11.04 lbs and CG at 160mm or -20mm from factory.

I am flying with about 3mm reflex in ailerons and flaps on both wings based on recommendations in other forums.

My trim setting flaps up. This trim setting is probably due to the reflex in the wing and the aft of factory CG.

Trim setting flaps down.
I rechecked the weight and balance after flying. I found the empty weight with air trap full and unusable fuel in tanks was 11.13 lbs and CG was at 155mm or -15 mm from factory recommendation. I took 1 oz out of the nose and will test fly next at 11.04 lbs and CG at 160mm or -20mm from factory.
I am flying with about 3mm reflex in ailerons and flaps on both wings based on recommendations in other forums.
My trim setting flaps up. This trim setting is probably due to the reflex in the wing and the aft of factory CG.
Trim setting flaps down.
11-17-2020 | 05:07 PM
#43
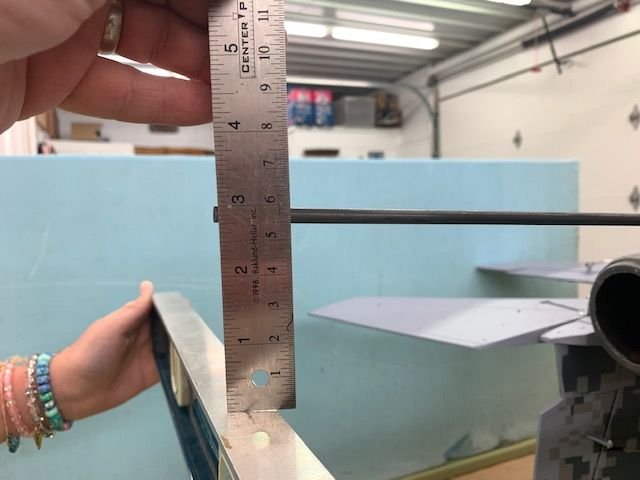
I tried to figure out a way to show the down thrust used in the flights

I taped a 6mm carbon rod to the turbine case

Rod should be parallel to the thrust line

Pins were placed in the fuse on the "zero" line where the EDF fans bolt to the fuse

Pin forward of gear strut

A ruler was set on the pins and compared to the carbon rod. I planned in the build to add 2 degrees down thrust. I added 2 washers (2mm) under the rear screws and got this angle. I have no idea what it was but I planned to add another washer.
I taped a 6mm carbon rod to the turbine case
Rod should be parallel to the thrust line
Pins were placed in the fuse on the "zero" line where the EDF fans bolt to the fuse
Pin forward of gear strut
A ruler was set on the pins and compared to the carbon rod. I planned in the build to add 2 degrees down thrust. I added 2 washers (2mm) under the rear screws and got this angle. I have no idea what it was but I planned to add another washer.
11-17-2020 | 05:15 PM
#44
Down thrust increased.
I added a third washer under the aft screws (3mm) and wanted to try and figure out the angle.

Turbine re mounted and carbon rod attached

The angle is a little larger than before. The rod and ruler extend aft of the nozzle 11".
With the help of my granddaughter the distance at the ends is 2.75"

The distance at the nozzles is 1 5/8"

View from the rear
I added a third washer under the aft screws (3mm) and wanted to try and figure out the angle.
Turbine re mounted and carbon rod attached
The angle is a little larger than before. The rod and ruler extend aft of the nozzle 11".
With the help of my granddaughter the distance at the ends is 2.75"
The distance at the nozzles is 1 5/8"
View from the rear
11-17-2020 | 05:21 PM
#45
High tech computer operations

I put this data into my high tech computer shown here

And the answer is 6 degrees. I guess I had around 2 degrees to start. Probably got to around 4 or 5 degrees with 2 washers at the field. Now about 6 degrees for next flights. We will see if this is too much and will go back to 2 washers if it is. Use this info at your own risk! Actually its probably close at 4-6 and nothing bad will happen.

Turbine can just below the nozzle shrouds.
I put this data into my high tech computer shown here
And the answer is 6 degrees. I guess I had around 2 degrees to start. Probably got to around 4 or 5 degrees with 2 washers at the field. Now about 6 degrees for next flights. We will see if this is too much and will go back to 2 washers if it is. Use this info at your own risk! Actually its probably close at 4-6 and nothing bad will happen.
Turbine can just below the nozzle shrouds.
The following users liked this post:
yeahbaby (11-18-2020)
11-18-2020 | 08:07 PM
#47

Flight Reports
The first flight was a little challenging because there was not quite enough down thrust, not enough down trim to compensate at first, and the roll rate was way too high. Rotation was smooth but required a little forward stick to hold proper pitch attitude and then down trim to compensate. From level flight when full thrust was applied the jet would pitch up and climb but it was easily manageable. CG check was good and at lower thrust settings it flew well. I got the flight mode trims set for half flaps and full flaps. Jeti Assist gyro gain was at 40% for all axis when turned on. Gyro helped the jet smooth out a lot in the wind. Speed did not exceed 72mph and final was flown comfortably at 40-45mph. Landing was uneventful. Flight was for 6 minutes and did not use any internal fuel. No video of this one.
For the second flight two washers (2mm) were inserted under the aft turbine mount screws and the aileron rates were reduced. Takeoff rotation was normal and showed no tendency to pitch up. Full thrust did not seem to climb and 5 clicks of the previous nose down trim were removed to maintain level flight hands off. The jet started to feel normal and it became fun. Some slow to fast accelerations were flow and they were almost perfect with just a slight pitch up when thrust applied but mostly just straight ahead. I plan to add another washer of down thrust. Not sure about the speeds because my speed sensor did not log in at startup and I didn't catch it. The jet flies very smooth and was easy to fly and easy to land. This flight was extended to 7 minutes and still did not use any internal fuel.
The third flight was fun but short. Takeoff and climb out was normal and I started to add speed and climbs and rolling maneuvers. My speed warning kept going off telling me I was exceeding 80mph where I had left it from the first flight. I was having too much fun. Then in a pull to vertical with full thrust and rolling I threw out the trapped air bubble and flamed out. I was in a good position for a hi key, low key downwind to base turn with gear down and half flaps. As I rolled out on final the turbine restarted so I just landed and taxied back. I checked the air trap and header tank and they were full. I ran up the power to 100% and then picked up the jet and held it nose up and then nose down and shook it as hard as I could. Turbine ran smoothly. (You can't do that with a 1/5 scale F-16) I like these small jets!
The fourth flight. So with turbine still running, I reset the speed warning to 100mph, reset the timer for 4 minutes, and took off again. This flight got the video. At about 2:00 I did 2 laps in slow flight with half flaps, and full flaps with speed at 40-45. Final was flown at 40-45 and reduced to 35 just prior to touchdown. Worst landing of the day but there is is. I really like the jet and it will fly great when the thrust line is finally dialed in.
The first flight was a little challenging because there was not quite enough down thrust, not enough down trim to compensate at first, and the roll rate was way too high. Rotation was smooth but required a little forward stick to hold proper pitch attitude and then down trim to compensate. From level flight when full thrust was applied the jet would pitch up and climb but it was easily manageable. CG check was good and at lower thrust settings it flew well. I got the flight mode trims set for half flaps and full flaps. Jeti Assist gyro gain was at 40% for all axis when turned on. Gyro helped the jet smooth out a lot in the wind. Speed did not exceed 72mph and final was flown comfortably at 40-45mph. Landing was uneventful. Flight was for 6 minutes and did not use any internal fuel. No video of this one.
For the second flight two washers (2mm) were inserted under the aft turbine mount screws and the aileron rates were reduced. Takeoff rotation was normal and showed no tendency to pitch up. Full thrust did not seem to climb and 5 clicks of the previous nose down trim were removed to maintain level flight hands off. The jet started to feel normal and it became fun. Some slow to fast accelerations were flow and they were almost perfect with just a slight pitch up when thrust applied but mostly just straight ahead. I plan to add another washer of down thrust. Not sure about the speeds because my speed sensor did not log in at startup and I didn't catch it. The jet flies very smooth and was easy to fly and easy to land. This flight was extended to 7 minutes and still did not use any internal fuel.
The third flight was fun but short. Takeoff and climb out was normal and I started to add speed and climbs and rolling maneuvers. My speed warning kept going off telling me I was exceeding 80mph where I had left it from the first flight. I was having too much fun. Then in a pull to vertical with full thrust and rolling I threw out the trapped air bubble and flamed out. I was in a good position for a hi key, low key downwind to base turn with gear down and half flaps. As I rolled out on final the turbine restarted so I just landed and taxied back. I checked the air trap and header tank and they were full. I ran up the power to 100% and then picked up the jet and held it nose up and then nose down and shook it as hard as I could. Turbine ran smoothly. (You can't do that with a 1/5 scale F-16) I like these small jets!
The fourth flight. So with turbine still running, I reset the speed warning to 100mph, reset the timer for 4 minutes, and took off again. This flight got the video. At about 2:00 I did 2 laps in slow flight with half flaps, and full flaps with speed at 40-45. Final was flown at 40-45 and reduced to 35 just prior to touchdown. Worst landing of the day but there is is. I really like the jet and it will fly great when the thrust line is finally dialed in.
11-19-2020 | 06:18 AM
#48
I'm really enjoying these smaller and CHEAPER jets. Its a lot of fun to convert them and I get just as much fun flying them as with the big mega $$ jets. Humm... can I see where this is going?
Gary
The following users liked this post:
ddfwaj (11-30-2020)

