


Top Flite B-25 - Wingspan Models Add-ons Build Thread
 07-06-2008 | 08:39 PM
#1

A build thread in the ARF/RTF forum?? Well, “build thread” has become a generic term for a thread that documents the building/assembling/putting together of a plane, whether it be a kit or an ARF. And since the plane we started with is an ARF I decided to go ahead and post this “build thread” here in the ARF/RTF forum. 
As many of you may already know I recently finished reviewing the [link=http://www.rcuniverse.com/magazine/article_display.cfm?article_id=1011]RCU Review of the Top Flite B-25J Mitchell ARF[/link] for RC Universe. I really enjoyed doing this review and this is a very nice plane and is a joy to fly. As I mentioned in my review, this plane really lends itself to doing “add-ons”. There have already been several members that have used the plane as a starting point to adding on scale details to result in a very detailed scale plane. And we are now staring to see some of the commercial companies out there release “add-ons” for this plane, as we see here in this build thread.
While covering the 2008 Weak Signals Show in Toledo this year I was standing at the Hobbico booth on the floor with fellow RCU member Minnflyer, and we were standing in front of and discussing the Top Flite B-25. As we stood there talking another gentleman came up beside Mike and I. As we were talking this new guy commented that he had built a bomb bay and working “bomb drop” for this plane. Now I’ll be honest there that I was a bit skeptical as I heard this as sometimes guys will brag to impress others when they really don’t have anything at all. But as I talked to him a bit more I decided that maybe he really did have something worked out, maybe!! So about this time he invited Mike and I over to his booth so we could see exactly what he was talking about. Ok, I’ll be honest that I did feel bad that I doubted him in the first place. But anyway, that person I was talking to was Michael Kramer with [link=http://www.wingspanmodels.com]www.wingspanmodels.com[/link]. At his booth he showed us the working bomb bay and bomb drop that he had engineered for the Top Flite B-25. Both Mike and I were so impressed with this that we decided to shoot a booth visit for the RCU Coverage of the [link=http://www.rcuniverse.com/magazine/article_display.cfm?article_id=994]Weak Signals Show[/link]. That booth visit can be seen here: [link]http://videoserver.rcuniverse.com/rcuvideos/magazine/reviews/994/wsm.wmv[/link].
After we finished up the visit I talked with Michael and explained that I was doing the review of the B-25 for RCU and asked him if he was interested in letting do a review of his bomb bay as well. At first he was a little hesitant because he had actually just finished the bomb bay 2 nights before he left for Toledo and hadn’t even started production on them yet. But after talking with him a bit he agreed to send one out once he got back home after the show. So at that time I left him my card and went on covering the show. When I got home from the show Michael called me and we talked about it Michael told me he was actually sending me three separate products; [link=http://wingspanmodels.com/Products/Electronics/ERS.html]The Bomb Release System[/link], [link=http://wingspanmodels.com/Products/Accessories/TF%20B-25%20BBD%20Demo%20Video.html]The B-25 Bomb Bay Add-On[/link], and [link=http://wingspanmodels.com/Products/Accessories/TF%20B-25%20TT%20Demo%20Video.html]The B-25 Rotating Top Turret[/link]

Michael Kramer and Wingspan Models have always been know for very highly detailed scale kits of mostly warbirds, so these add-ons make an interesting new type of product to come to the market. His products allow ARF pilots to add scale, semi-scale, and working features to their ARF warbirds with a minimal amount of hassles. I know that some ARF owners would be very nervous about simply cutting into the skin of their treasured plane and trying to figure out how to make a bomb bay work. With these new products they don’t need to worry any more. Michael has done all the “sweat work” and “guess work” so the end user can easily repeat his work. As ARF’s become more popular I think we’ll see more of these Add-ons for existing ARF’s.
So with that being said, let’s get started with this build thread.
Pictures
1. Here is my B-25 that I used for the review.
Until next time
Ken
As many of you may already know I recently finished reviewing the [link=http://www.rcuniverse.com/magazine/article_display.cfm?article_id=1011]RCU Review of the Top Flite B-25J Mitchell ARF[/link] for RC Universe. I really enjoyed doing this review and this is a very nice plane and is a joy to fly. As I mentioned in my review, this plane really lends itself to doing “add-ons”. There have already been several members that have used the plane as a starting point to adding on scale details to result in a very detailed scale plane. And we are now staring to see some of the commercial companies out there release “add-ons” for this plane, as we see here in this build thread.
While covering the 2008 Weak Signals Show in Toledo this year I was standing at the Hobbico booth on the floor with fellow RCU member Minnflyer, and we were standing in front of and discussing the Top Flite B-25. As we stood there talking another gentleman came up beside Mike and I. As we were talking this new guy commented that he had built a bomb bay and working “bomb drop” for this plane. Now I’ll be honest there that I was a bit skeptical as I heard this as sometimes guys will brag to impress others when they really don’t have anything at all. But as I talked to him a bit more I decided that maybe he really did have something worked out, maybe!!
So about this time he invited Mike and I over to his booth so we could see exactly what he was talking about. Ok, I’ll be honest that I did feel bad that I doubted him in the first place. But anyway, that person I was talking to was Michael Kramer with [link=http://www.wingspanmodels.com]www.wingspanmodels.com[/link]. At his booth he showed us the working bomb bay and bomb drop that he had engineered for the Top Flite B-25. Both Mike and I were so impressed with this that we decided to shoot a booth visit for the RCU Coverage of the [link=http://www.rcuniverse.com/magazine/article_display.cfm?article_id=994]Weak Signals Show[/link]. That booth visit can be seen here: [link]http://videoserver.rcuniverse.com/rcuvideos/magazine/reviews/994/wsm.wmv[/link].After we finished up the visit I talked with Michael and explained that I was doing the review of the B-25 for RCU and asked him if he was interested in letting do a review of his bomb bay as well. At first he was a little hesitant because he had actually just finished the bomb bay 2 nights before he left for Toledo and hadn’t even started production on them yet. But after talking with him a bit he agreed to send one out once he got back home after the show. So at that time I left him my card and went on covering the show. When I got home from the show Michael called me and we talked about it Michael told me he was actually sending me three separate products; [link=http://wingspanmodels.com/Products/Electronics/ERS.html]The Bomb Release System[/link], [link=http://wingspanmodels.com/Products/Accessories/TF%20B-25%20BBD%20Demo%20Video.html]The B-25 Bomb Bay Add-On[/link], and [link=http://wingspanmodels.com/Products/Accessories/TF%20B-25%20TT%20Demo%20Video.html]The B-25 Rotating Top Turret[/link]
Michael Kramer and Wingspan Models have always been know for very highly detailed scale kits of mostly warbirds, so these add-ons make an interesting new type of product to come to the market. His products allow ARF pilots to add scale, semi-scale, and working features to their ARF warbirds with a minimal amount of hassles. I know that some ARF owners would be very nervous about simply cutting into the skin of their treasured plane and trying to figure out how to make a bomb bay work. With these new products they don’t need to worry any more. Michael has done all the “sweat work” and “guess work” so the end user can easily repeat his work. As ARF’s become more popular I think we’ll see more of these Add-ons for existing ARF’s.
So with that being said, let’s get started with this build thread.
Pictures
1. Here is my B-25 that I used for the review.
Until next time
Ken
 07-06-2008 | 08:40 PM
#2
As we get started let’s take a look at each package.
The first package is for the Rotating Top turret. The packaging (as with all the products I looked at) is a simply plastic bag containing all the parts with a cardboard label on the top of the bag. Opening up the bag we find 6 laser cut parts made out of light ply and a long strip of 1/64” ply. We also find a small electric motor and gear drive unit, a plastic drive wheel, an AA battery holder, and a small bag of screws. The instructions included are laid out and written so that they are similar to the instructions written for the TF B-25 itself. Also included it a cutting template used to properly place the top turret on the fuselage.
Before we continue let me make a short note about the instructions. The instructions that I received are actually a work in progress. Michael Kramer sent these to me before he had a chance to complete them. He still needs pictures to illustrate the manual. In order to get the kits to me quickly he asked if I could work without the pictures in the manual. I told him that would be no problem at all. So the instructions you see in the pictures does not fully represent what will be included in the final production version of the kits.
The next package is for the Bomb Bay Door Kit. This package is set up in the same was as the Top Turret. Laying out this package shows several laser cut light ply pieces, a couple of wood blocks, and several pieces of straight wood. All of the arms, control horns, and gear included are either Dubro or Great Planes so there is no question about quality of the parts. The metal parts contained in the bag are 2 brass metal piano hinges, a control rod, and a piece of all thread. The instructions here are the same style as the Top Turret. Included are two templates as well. On template is for placement of the bomb drop pylons in the bomb bay, which includes setup for both 8 bomb and 6 bomb setups. The other template is used for cutting the bomb bay out of the fuselage.
As there is only room for posting 12 pictures at a time I will discuss the last packages in the next post.
Pictures
1. Top Turret packaging.
2. All of the Top Turret parts laid out.
3.The wood parts for the Top Turret.
4. The mechanical parts for the top turret.
5. Instructions for Top Turret.
6. Turret cutting template.
7. Bomb Bay packaging.
8. All of the parts for the Bomb Bay.
9. Instructions for the Bomb Bay
10. Instructions for the Bomb Bay
11. Bomb bay bomb pylon template
12. Bomb bay cutting template.
Until next time
Ken
07-06-2008 | 08:41 PM
#3
The last two packages are basically the same, but they are different items. They are the Electronic Release System and a Twin Pylon Pack. The first package contains the actual release mechanism and electronics, as well as 2 pylons and bombs. For additional bomb capabilities the Twin Pylon Packs need to be purchased, with each pack containing two pylons and bombs. For this setup Michael sent me two additional Twin Pylon Packs, which will give me a total of 6 bombs in my bomb bay. The Electronic Release System contains the actual control unit that controls the release of the bombs as well as cycling the gear doors, two bomb mount pylons, 4 vacuum molded bomb halves, the wood parts needed to construct two bombs, and the instructions sheet. The Twin Pylon pack contains the same pylons and bomb halves as the Electronic Release System, and has enough materials to construct two bombs. The instructions here are a single page of instructions printed on both sides of the sheet. The written instructions contain all the information needed to install, setup, and operate the bomb release system.
Pictures
1. Electronic Release System package.
2. Twin Pylon Pack package.
3. Parts included with the Electronic Release System.
4. Parts included with the Twin Pylon Pack.
5. Front side of the instruction sheet.
6. Back side of the instruction sheet.
Until next time
Ken
Pictures
1. Electronic Release System package.
2. Twin Pylon Pack package.
3. Parts included with the Electronic Release System.
4. Parts included with the Twin Pylon Pack.
5. Front side of the instruction sheet.
6. Back side of the instruction sheet.
Until next time
Ken
07-07-2008 | 02:48 PM
#4
Alright then, let’s get started with our build/modification here. To start off with, I am going to be doing the Top Turret.
As we get started you’ll want to bring the plane in to your bench/work area. I removed the complete wings from the fuselage, including the inboard wing sections that contain the engine nacelles. This is done to make it easier to move the fuselage around as we work on it. Also remove the tail section for the same reasons. Also, as we move on to installing the bomb bay we’ll need to remove the wiring going to the tail so that we can reroute it around the bay, so go ahead and do it now. With the fuselage on the bench let’s get it opened up to work on. Remove the cockpit canopy, the cockpit floor, and the nose canopy. Technically the nose canopy really doesn’t need to be removed right now, but it’s a lot easier to just get it out of the way so it doesn’t get scratched or damaged.
Now here is where I run into a bit of a dilemma, and had to put some thought in to solving before I even started. In the first release of the Top Flite B-25’s there was a misprint in the instruction manual for which air tank was needed if retracts were being installed in the plane. The plane was designed to use a small Robart’s air tank, but the instruction manual gave the part # for the larger Robart tank. So if the tank was ordered per the instruction manual the tank sent is too large. The plane was designed with cutouts in the fuselage formers forward of the cockpit that the small tank would fit in. When Top Flite discovered the misprint the of course corrected it, but as a work around for those that had the wrong tank they recommended mounting the air tank directly behind the cockpit. They recommended cutting to mounts out of light ply and gluing these in to the top of the fuselage behind the cockpit. And this is what I did on my installation. And here’s the problem. As you can see in picture #3 the air tank is mounted directly underneath the top turret, so it’s going to have to be relocated in order to mount the top turret. I didn’t really want to switch and use the smaller air tank because I like having the extra reserves for the retract system that I get from the large air tank. Also, if you look at picture #9 you can see that my battery is mounted in the area designed for the small air tank. So I needed to find a place for the large tank. I really scratched my head for a while and was drawing a blank about where to put it. Until I realized that the bomb bay mounts UNDER the wing tubes mid-fuselage. Viola’ I now had a place to mount the tank. My plans are to move the tank back to where the bomb bay will mount, mounting the tank above the wing tube. Having the bomb bay there will give me access to that area be able to mount the tank there. Now if somebody out there is only planning on mounting the Top Turret and not the bomb bay I am at a loss to recommend a place to mount the tank.
Next up is to get the original top turret off. When I assembled my plane I used RC-56 Canopy Glue to attach the turret. I wasn’t real excited about the idea of using CA on the turret as the instructions called for because I just don’t like using CA around clear parts like this. Because I used the RC-56 it was really pretty easy to get the canopy off of the fuselage. I was able to get a hobby knife up under the turret and simply work it around the turret to cut it loose. I ran into another small problem here though. The TF B-25 includes a black Monokote circle that is placed under the turret when it’s mounted. One of my pet peeves on ARF’s is there is no extra covering included to do small repairs with (this not just Hobbico, as all manufacturers do this), so I always seem to need covering to do small repairs. With this in mind, before I put the black disk in place I cut the OD green Monokote and removed it from the fuselage. This gave me a small piece of covering I can use elsewhere for repairs. So when I was removing the turret it pulled up some of the covering and made for a rough edge on the covering, this can be seen in the pictures. The guns were attached with medium CA so it was pretty easy to pull these up. In the last picture you can see that I removed the black Monokote disk. While it’s not absolutely necessary to remove it I think it’s a good idea to go ahead and pull it up. Getting down to bear wood is good because it lets you identify the centerline of the fuselage, which will help in positioning the cutting template later on.
Of course, if somebody is putting in the top turret as they assemble the plane they won’t have to go about these steps of removing these parts.
Pictures
1. The fuselage on the bench ready to get started.
2. Remove the cockpit canopy and floor.
3. The large capacity air tank is in the way when mounted directly behind the cockpit.
4. Remove the large capacity tank.
5. Remove the mounting rings used to mount the large capacity air tank.
6. Use a hobby knife to gently remove the top turret from the top of the fuselage.
7. Pull the canopy away from the fuselage.
8. The guns will need to be removed next.
9. The fuselage with the turret guns removed.
10. Remove the black Monokote disk.
Until next time
Ken


 07-07-2008 | 03:59 PM
#6
Ok, with the old turret off the fuselage and the fuselage prepped we’re going to push it aside for now. Next we will be building the cylinder that the new turret will be riding on. Pulling out all the wood pieces we find 3 wood disks (Labeled TT1, TT2, and TT3), two partial fuselage formers, and the wood piece that will be the deck floor for mounting the new turret in place. Since these parts were laser cut there is going to be a bit of charring on the edges of the parts. Some people will say it doesn’t matter, but myself I prefer to remove this charring before I assemble them. A quick swipe with a fine grit sandpaper will make short work of getting the charring off of the parts.
To start our turret cylinder we will need TT1 and the small plastic drive disk. Now the instructions indicate that TT1 will have a circle “scored” into the wood to indicate the mounting location for the plastic disk. I’m not sure what they meant by “scoring” because the part I received had a circle cut clear through the wood with a laser cutter, which was retained in place by four “tabs” around the circle. Before we mount the drive wheel on the TT1 we need to identify the correct side of the disk. Looking at the disk you will see that one side has a small hole in it and the other side has a “D” shaped hole in it. It’s very important to make sure that the “D” shaped hole is on the bottom of the drive disk as this is the part that will mount to the drive motor. Prior to gluing the disk in place I used some 200 grit sandpaper to rough up the disk in order for the CA to better stick to the disk. Apply medium CA to the outside “ring” of the drive disk and then place on TT1. As you can see in the pictures, I inserted several small pins in the scored ring of TT1. I did this to help properly position the plastic drive disk on the wood part.
The instructions do not call for this, but I decided to fill the scored ring with thick CA. I wasn’t really happy with the entire turret being retained by the small wood “tabs” left in the scored ring, and I wanted to strengthen this up some. So I used thick CA to fill this ring.
Pictures
1. The wood parts for the Top Turret kit.
2. The bottom of the cylinder (TT1) and the plastic drive disk.
3. This side of the disk has the small hole in it, DO NOT USE this side.
4. This side of the disk has the “D” shaped hole in it. This side is mounted so it shows on the bottom of the cylinder.
5. Use sandpaper to rough the plastic prior to gluing.
6. The outer ring is now roughed up.
7. Apply medium CA to the outer ring.
8. Position the drive disk on TT1. Note using straight pins to position the part.
9. Fill the scored ring in with thick CA.
10. Use find sandpaper to remove the charring left from laser cutting.
Until next time
Ken
07-07-2008 | 04:51 PM
#7
With the bottom disk prepared it’s time to start building the cylinder. The body, or walls, of the cylinder are constructed out of the long piece of 1/64” light ply. This will be glued to the edge of the bottom disk to form the cylinder. Start out by tacking on edge of the ply strip to the outer edge of TTI; make sure that the edge of the ply is flush with the bottom of the disk. Make sure to wait for the CA to completely dry on this first tack before moving. Now work around the disk and attach the ply strip to the edge of TT1. I found it was easier to work about an inch at a time. Put down a bead of CA and then line up the ply on TTI and hold in place until the CA sets. Keep working around the cylinder. But don’t go all the way around, leave about 1”-2” from the end of the strip unglued for right now. As you can see in picture #5 the edges of the ply strip overlap. I had test fit the strip and had thought that they did line up. But it was difficult to really hold that strip in place around the disk and in the end I wound up with about 1/16” overlap as can be seen in the picture. To correct this I had to cut off that portion that overlapped. This is why I say to stop gluing before you get to the end of the strip, this will give you enough room to place the strip on a cutting surface and cut off the portion that overlaps. Once the end of the strip ends butted up to the beginning spot go ahead and use medium CA to finish gluing it to the edge of TT1. When I had the entire strip glued around the edge of TT1 I went ahead and ran a bead of CA around the joint inside of the cylinder to add a little extra strength. Although, in hindsight I really didn’t need to do this step.
Pictures
1. Parts needed for this step.
2. Start by tacking one end in place.
3. Let CA set before continuing.
4. Work around the disk using CA to glue the strip in place.
5. Overlap at end of strip.
6. With overlap removed strip fits properly on the disk.
7. Another view of finished strip.
8. Run a bead of CA around the bottom of the strip inside of the cylinder.
9. Completed strip in place.
10. Completed strip in place.
11. Bottom view of cylinder with light ply strip installed.
Until next time
Ken
07-07-2008 | 11:34 PM
#8
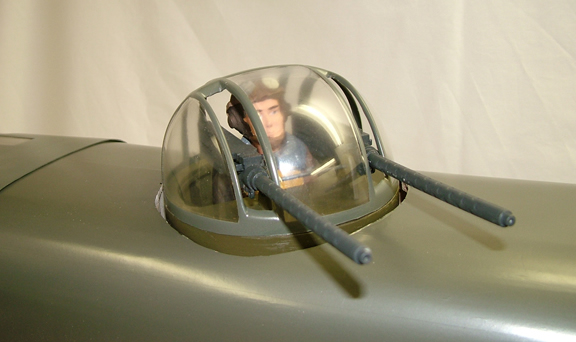
With the base part of the turret cylinder built it’s time to finish it off. The two remaining light ply disks will be used finish out the top turret. There is a cutout in each of these pieces that will be removed. This area needs to be open mainly because a sheet metal screw is used to hold secure the turret in place and it’s put in place through the inside of the cylinder. Also, Wingspan also has available [link=http://wingspanmodels.com/Products/Accessories/Bomber_Pilot.html]scale figures[/link] that can be placed in the turret. Other figures should work here as well. Unfortunately I didn’t receive one of these figures, as it would have made a nice touch to the turret. Anyway, cut through the tabs holding the wood in place and remove the cutouts. It’s easier to place the TT2 in the cylinder and then glue it in place. TT2 should be place in the cylinder with the edge of the light ply strip even with the top of TT2. When happy with the placement of TT2 use medium CA to glue in to place. Work in small sections as was done when gluing TT1 in place, and work your way around the cylinder. With the top of the cylinder glued to TT2 the joint line will need some work. As you can see in the pictures it has a pretty good “pucker” where the light ply strip meets. I worked as hard as I could when gluing the strip in place but I still wound up with the pucker. I finally decided on a pretty simple fix for it. I cut ¼”x ¼” balsa stock a length that would fit inside the cylinder. With this in place I was able to glue the light ply strip to the balsa stock. As you can see in picture #7 it removed most of the pucker, but there was still a bit left to deal with. To remove this I filled the gap with medium CA, and when that was dry I sanded the joint until it was smooth and even with the rest of the cylinder. Lastly TT3 is glued in place on top of TT2. Simply spread medium CA on TT2 and place TT3 on top of TT2, and then hold in place until the CA dries.
With that the major part of construct of the cylinder is finished. Up next we’ll start cutting in to the fuselage to place the turret.
Pictures
1. Remove the cutouts from TT2 and TT3
2. Dry fit TT2 in place in the cylinder
3. When satisfied with the fit use medium CA to glue TT2 in place
4. The “pucker” left where the light ply strip meets
5. Measure a ¼” x ¼” stick to fit inside of the cylinder at the joint.
6. Glue the strip in place inside the cylinder, gluing the ends of the ply strip to the balsa stock
7. Use medium CA to fill the gap left
8. Use a sanding block to sand down the joint so that it is smooth and flush with the cylinder
9. Cylinder sanded flush
10. Another view of the joint sanded flush
11. Apply medium CA to the top of TT2
12. Glue TT3 in place on top of TT2
Until next time
Ken
07-08-2008 | 09:13 AM
#9
Ok, up to now we’ve done the easy part!  Now it’s time to actually cut into the skin of the plane. I know that some guys out there will probably get sick in the stomach at the thought of cutting in to the their beautiful warbird. But trust me here. As I said earlier, Michael at Wingspan models has definitely done his homework. With his guidance it’s a simple matter of getting the cutting done in exactly the right spot on the plane. So……. Take a deep breath, get a sharp X-Acto blade, and let’s start cutting.
Michael’s instructions state that the cutting template needs to be placed on the centerline of the fuselage. While the instructions don’t call of this I thing it’s easier if we identify the centerline first before we place the template in place. As I mentioned in an earlier post, go ahead and remove the MonoKote in the area we are going to cut. This will allow us to see the centerline in the wood of the fuselage. Now it’s a simple task of using a ruler to extend this line down the fuselage (NOTE: When making any marks on the covering I prefer to use Sharpie Fine Line Markers. These make easy to see marks that can be cleaned up with a bit of a alcohol on a paper towel). Although I didn’t do it here, the centerline can be verified pretty easily if you’re nervous about getting it set properly. Simply use a straight pin and push it though the fuselage on the centerline you just marked. Looking inside the fuselage you can verify that the pin does indeed come though in the center of the stringer that is in the center of the fuselage.
The cutting template is marked on one edge to indicate which end goes behind the cockpit. Place this line on the very edge of the backside of the cockpit. On the other end of the template align the mark with the centerline mark on the fuselage. Use tape to secure the cutting template in place on the fuselage. Make sure to tape down the sides as well. This is important to get the template secured because we will be cutting down the curve of the fuselage. For the initial cut we don’t want to cut all the way through the wood of the fuselage, but rather we only want to score the wood to mark were we need to cut. Use enough pressure to cut through the paper of the template and to mark the wood. In picture #5 you can see my score line, I have highlighted with a black marker to make it easier to see. Now we can cut through the wood of the fuselage. It’s easier to make several light cuts than try to cut it all at once. If you try to cut it all at once you will rip the wood from the outer edge of the cut, which will detract from the overall quality of the final product. Also, I found it easier to use a small razor saw to cut through the stringers. But if a proper razor saw is not available the cuts can be made with a hobby knife, simply take your time and make smaller cuts until you have cut through the stringers. Once the cuts have all been made you can lift away the cutout portion of the fuselage.
If needed now would be a great time to clean up the wiring inside the fuselage. With this cutout area it’s easy to get to this area of the fuselage to clean it all up.
Now, see how easy that was??
Pictures
1. Use a marker to extend the centerline from the cutout area of the turret.
2. The new mark indicates the centerline of the fuselage.
3. Line up the cutting template with the back of the cockpit and the centerline.
4. Securely tape the cutting template in position.
5. Use a sharp hobby knife to cut through the template and score the wood underneath.
6. The scored line should indicate where to cut.
7. Use a hobby knife to cut through the wood of the fuselage.
8. A small razor saw makes it easy to cut through the stringers.
9. Lift the cut out section out of the fuselage.
10. Lift the cut out section out of the fuselage.
11. With the cutout section gone it’s easy to access and clean up your wiring inside the fuselage.
12. The fuselage is now ready for the Top Turret installation.
Until next time
Ken
Now it’s time to actually cut into the skin of the plane. I know that some guys out there will probably get sick in the stomach at the thought of cutting in to the their beautiful warbird. But trust me here. As I said earlier, Michael at Wingspan models has definitely done his homework. With his guidance it’s a simple matter of getting the cutting done in exactly the right spot on the plane. So……. Take a deep breath, get a sharp X-Acto blade, and let’s start cutting.Michael’s instructions state that the cutting template needs to be placed on the centerline of the fuselage. While the instructions don’t call of this I thing it’s easier if we identify the centerline first before we place the template in place. As I mentioned in an earlier post, go ahead and remove the MonoKote in the area we are going to cut. This will allow us to see the centerline in the wood of the fuselage. Now it’s a simple task of using a ruler to extend this line down the fuselage (NOTE: When making any marks on the covering I prefer to use Sharpie Fine Line Markers. These make easy to see marks that can be cleaned up with a bit of a alcohol on a paper towel). Although I didn’t do it here, the centerline can be verified pretty easily if you’re nervous about getting it set properly. Simply use a straight pin and push it though the fuselage on the centerline you just marked. Looking inside the fuselage you can verify that the pin does indeed come though in the center of the stringer that is in the center of the fuselage.
The cutting template is marked on one edge to indicate which end goes behind the cockpit. Place this line on the very edge of the backside of the cockpit. On the other end of the template align the mark with the centerline mark on the fuselage. Use tape to secure the cutting template in place on the fuselage. Make sure to tape down the sides as well. This is important to get the template secured because we will be cutting down the curve of the fuselage. For the initial cut we don’t want to cut all the way through the wood of the fuselage, but rather we only want to score the wood to mark were we need to cut. Use enough pressure to cut through the paper of the template and to mark the wood. In picture #5 you can see my score line, I have highlighted with a black marker to make it easier to see. Now we can cut through the wood of the fuselage. It’s easier to make several light cuts than try to cut it all at once. If you try to cut it all at once you will rip the wood from the outer edge of the cut, which will detract from the overall quality of the final product. Also, I found it easier to use a small razor saw to cut through the stringers. But if a proper razor saw is not available the cuts can be made with a hobby knife, simply take your time and make smaller cuts until you have cut through the stringers. Once the cuts have all been made you can lift away the cutout portion of the fuselage.
If needed now would be a great time to clean up the wiring inside the fuselage. With this cutout area it’s easy to get to this area of the fuselage to clean it all up.
Now, see how easy that was??
Pictures
1. Use a marker to extend the centerline from the cutout area of the turret.
2. The new mark indicates the centerline of the fuselage.
3. Line up the cutting template with the back of the cockpit and the centerline.
4. Securely tape the cutting template in position.
5. Use a sharp hobby knife to cut through the template and score the wood underneath.
6. The scored line should indicate where to cut.
7. Use a hobby knife to cut through the wood of the fuselage.
8. A small razor saw makes it easy to cut through the stringers.
9. Lift the cut out section out of the fuselage.
10. Lift the cut out section out of the fuselage.
11. With the cutout section gone it’s easy to access and clean up your wiring inside the fuselage.
12. The fuselage is now ready for the Top Turret installation.
Until next time
Ken
07-09-2008 | 08:32 AM
#10
Now that the fuselage is ready we now need to get the mounting plate ready. The mounting plate (part FL1) is a 1/8” light ply part that is cut to fit inside the fuselage. It has the mounting holes for the drive motor drilled and cut in to it. The turret is driven by a small electric motor that has a reduction gear on it to slow down the output of the motor. The motor is mounted on FL1 using two 4-40 x 1” machine screws and 4-40 lock nuts. While there are two output shafts on the motor, only one side will fit the drive disk on the turret. If you look at the motor in picture #1 you will notice that there is an alignment tab next to the output shaft, this helps identify the proper side of the motor to mount. Mounting the motor is a simple matter of placing the screw through FL1 and the motor and then tightening the lock nuts. There’s not much else to write here about this, it’s a pretty straightforward step.
Pictures
1. The turret drive motor and mounting hardware.
2. Part FL1
3. Placing the motor on FL1.
4. Placing the motor on FL1.
5. Placing the motor on FL1.
6. Insert the 4-40 x 1” machine screws through FL1 and the motor.
7. Tighten the mounting screws
8. Drive motor in place on FL1
9. Drive motor in place on FL1
Until next time
Ken
07-10-2008 | 11:30 AM
#11
When we cut through the skin of the fuselage we need to make sure that the turret cylinder fits cleanly through the hole. There is a fuselage former that runs directly under the area we cut, and after I cut through it there was some trimming needed. Also, there are stringers that run right next to the hole that may need trimmed as well. Using a rotary tool with a sanding drum on it makes for quick work to trim back anything protruding into the hole. Trim these until the turret can be inserted into the hole without anything interfering with it.
Sometimes when working on projects like this I’ll get an idea and then before I finish I’ll decide that it’s not right, or that there is a better way of doing it. If you look at picture #5 you see exactly one of these moments. As I said earlier, the turret can be controlled with the radio, but because I didn’t have a spare channel I had decided to use a manual switch to control the top turret. My initial plans were to put a switch directly on FL1 and have a pushrod to control it, as you can see in the picture. The pushrod was to extend out to the side of the fuselage where I could switch the turret on and off. But the more that I thought about the rod extending out of the side of the fuselage the less I liked the idea. It just didn’t “feel” right. So I changed my mind and placed it elsewhere. As you’ll see further on in the build thread I put the switch extension so that it exited right next to the turret itself. So why did I have the moment of confession to my “mistake”. First to show that your first ideas may not always be the best, so keep looking for better ways. Second, simply to explain why the switch in these pictures changes later on. I had already taken the pictures with the first switch location and there was no way to go back and retake the pictures.
Back to the build now. If you look at picture #6 you can see that they board FL1 is a bit warped. Included in the kit is a piece of ¼” x ¼” balsa stock that is used to strengthen FL1. The plans call for one piece on the forward end of the part. But after applying that piece I still noticed that there was a bit of a warp in the piece at the rear of the part. Unfortunately there was not enough balsa stock in the kit to make a second brace so I had to use my own wood here. I cut a second piece and glued in place behind where the drive motor attaches. This took the warp out of FL1 and made it strong enough to support the turret.
FL1 can now be test fit inside of the fuselage. I did find that getting the part in to the plane was a bit like solving a puzzle. FL1 needs to be inserted through the back of the cockpit, but because of the size of the opening it will have to be inserted at an angle. In order to rotate the part into place the sides of the fuselage need to be “flexed” outward just a bit to allow the part to rotate in to place. Once I figured this out it was a very simple process of getting FL1 in and out of the fuselage.
Pictures
1. Trim off any parts of former or stringers that interfere with the turret being inserted in to the hole.
2. Trim off any parts of former or stringers that interfere with the turret being inserted in to the hole.
3. Test fit the turret to ensure it moves freely inside the fuselage.
4. Test fit the turret to ensure it moves freely inside the fuselage.
5. First placement of an on/off switch. See further on in the thread for new switch location.
6. Part FL1 is slightly warped.
7. Apply medium CA to balsa stock used to strengthen FL1.
8. Forward and rear stock added to FL1.
9. Test fit FL1 in fuselage
10. Test fit FL1 in fuselage
Until next time
Ken
07-10-2008 | 12:14 PM
#12
I didn’t mention this on the last post, but don’t glue in FL1 quite yet. There are a few other things we need to do first.
Now I ran into my next “glitch” on this build, and please understand that this one is in no way Michael or Wingspan Model’s fault. In fact, it was Michael that told me I was going to run into this problem was I built. But that problem is finding paint for the turret. Now of course we are going to want to paint the turret so that it matches the color of the fuselage, but good luck finding a matching paint. The TF B-25 is covered in Olive Drab Monokote, but the shade is just a bit off from readily available paint. I had on hand Testors Model Master Olive Drab spray paint which I was hoping would be “close”. But it you look at picture #1 you can see that it’s not even close. So next I tried Medium Green hoping it would be close, and once again not even (picture #2). So I put my thinking cap on trying to come up with a solution. I really wanted the color on the turret to match otherwise I was afraid it would stick out like a sore thumb. In fact, if you look at my first post in this thread you can see the picture I posted from Wingspan Model’s website, and you can see the same color mismatch. I finally came up with the solution; cover it with the same covering as the fuselage is covered in. In picture #3 you can see that I saved the covering I cut out when I installed the side pack guns on the side of the B-25. Perfect!!!!! There’s the OD green Monokote I needed. Once again, this goes back to my frustration with the plane manufacturers not providing a small amount of covering with an ARF. SO…… if any manufacturers are reading this, how about a 12”x12” square of the colors used on the plane included in the box??? Wink wink hint hint beg beg please please!!!! It would make life so much easier!!!! Anyway, off the soapbox. I cut approximately 1” of the covering and then ironed it on the top portion of the turret. This is all that I needed to do, as only this part of the turret will show above the fuselage. I know that the inside of the turret is still off color, but that is going to be hard to see when the plane is flying overhead!!!! Now I’m much happier as the turret will match the fuselage when it’s installed.
Now back to the on/off switch. As I said earlier, I decided to mount the switch so that the extension would come down beside the turret. To do this I used the switch portion of a Du-Bro mounting jack. This was perfect as it held the switch in the proper position and was very easy to install. I placed FL1 in the fuselage and then put the turret in place on the drive motor. I think used a sharpened pushrod to mark on FL1 where the switch would be mounted by pushing the pushrod down to FL1 and then turning it to score the mark. Then I drilled a 1/8” hole in FL1 to mount the switch. A couple of zip ties were used to gather up and secure all the wiring under FL1. As you can see in picture #11, a small notch was carved to allow the extension to exit the fuselage without interfering with the turret.
Pictures
1. Olive Drab spray paint does not mach
2. Medium Green paint does not match either
3. Monokote removed during assembly of the TF B-25
4. Iron a ~1” strip of covering on to the turret.
5. Monokote strip in place.
6. Turret in position.
7. Switch mount portion of a Dubro remote mount
8. Drill 1/8” hole to mount switch
9. On/Off switch in place
10. Use zip ties to secure the wiring.
11. Notch carved in fuselage so extension will not interfere with the turret.
12. Switch extension and turret in place.
Now I ran into my next “glitch” on this build, and please understand that this one is in no way Michael or Wingspan Model’s fault. In fact, it was Michael that told me I was going to run into this problem was I built. But that problem is finding paint for the turret. Now of course we are going to want to paint the turret so that it matches the color of the fuselage, but good luck finding a matching paint. The TF B-25 is covered in Olive Drab Monokote, but the shade is just a bit off from readily available paint. I had on hand Testors Model Master Olive Drab spray paint which I was hoping would be “close”. But it you look at picture #1 you can see that it’s not even close. So next I tried Medium Green hoping it would be close, and once again not even (picture #2). So I put my thinking cap on trying to come up with a solution. I really wanted the color on the turret to match otherwise I was afraid it would stick out like a sore thumb. In fact, if you look at my first post in this thread you can see the picture I posted from Wingspan Model’s website, and you can see the same color mismatch. I finally came up with the solution; cover it with the same covering as the fuselage is covered in. In picture #3 you can see that I saved the covering I cut out when I installed the side pack guns on the side of the B-25. Perfect!!!!! There’s the OD green Monokote I needed. Once again, this goes back to my frustration with the plane manufacturers not providing a small amount of covering with an ARF. SO…… if any manufacturers are reading this, how about a 12”x12” square of the colors used on the plane included in the box??? Wink wink hint hint beg beg please please!!!! It would make life so much easier!!!! Anyway, off the soapbox. I cut approximately 1” of the covering and then ironed it on the top portion of the turret. This is all that I needed to do, as only this part of the turret will show above the fuselage. I know that the inside of the turret is still off color, but that is going to be hard to see when the plane is flying overhead!!!!
Now I’m much happier as the turret will match the fuselage when it’s installed.Now back to the on/off switch. As I said earlier, I decided to mount the switch so that the extension would come down beside the turret. To do this I used the switch portion of a Du-Bro mounting jack. This was perfect as it held the switch in the proper position and was very easy to install. I placed FL1 in the fuselage and then put the turret in place on the drive motor. I think used a sharpened pushrod to mark on FL1 where the switch would be mounted by pushing the pushrod down to FL1 and then turning it to score the mark. Then I drilled a 1/8” hole in FL1 to mount the switch. A couple of zip ties were used to gather up and secure all the wiring under FL1. As you can see in picture #11, a small notch was carved to allow the extension to exit the fuselage without interfering with the turret.
Pictures
1. Olive Drab spray paint does not mach
2. Medium Green paint does not match either
3. Monokote removed during assembly of the TF B-25
4. Iron a ~1” strip of covering on to the turret.
5. Monokote strip in place.
6. Turret in position.
7. Switch mount portion of a Dubro remote mount
8. Drill 1/8” hole to mount switch
9. On/Off switch in place
10. Use zip ties to secure the wiring.
11. Notch carved in fuselage so extension will not interfere with the turret.
12. Switch extension and turret in place.
07-10-2008 | 01:22 PM
#13
Now we’re ready to glue FL1 in place in the fuselage. Place FL1 inside the fuselage and position the turret cylinder on the drive motor output shaft. Make sure that the cylinder is firmly seated on the motor shaft so that the cylinder is properly positioned in the fuselage hole. Mark the position of FL1 inside of the fuselage and remove the cylinder. Now verify the position of FL1 and then use medium CA to glue FL1 in place inside of the fuselage.
As I stated earlier when I removed the original turret assembly from the fuselage, the Monokote took a bit of a beating. If you look at picture #5 you can see that the covering is a bit torn up around the edges of the hole. Once again I used a bit of covering I saved from earlier assembly of the plane to repair the rough edges. If you didn’t save the covering when assembling the plane and are in need for a bit to do these repairs, I know of a “super secret” place you can get some on the plane. On each wing remove the fiberglass nacelle covers on the top of the wing. Underneath these is an area where you can steal a bit of covering. I would recommend recovering any area you take the OD covering off of with black Monokote so that the bare wood isn’t exposed. But there is plenty of covering in this area to do small repairs.
Pictures
1. Position FL1 inside the fuselage.
2. Ensure that FL1 is in the correct position.
3. Place the cylinder on the output shave of the drive motor.
4. Use medium CA to glue FL1 inside the fuselage.
5. FL1 glued in place.
6. Use scrap covering to repair damaged area around the turret hole.
7. Repaired covering.
Until next time
Ken
07-10-2008 | 01:44 PM
#14
We’re in the home stretch now on completing the Top Turret. The Wingspan Model’s add-on reuses the original turret, but we’ll need to cut it down a bit. I found that the easiest way to get a good straight line to cut on was to use tape. Since the original turret went around the curve of the fuselage it isn’t straight around across the bottom. Looking at the turret you can see that the front and the back of the turret have less material than the sides, so we’ll use those as the guideline for cutting. I placed blue painter’s tape around the turret to get a good straight line, and then used a Sharpie marker to mark the cut line. I then used scissors to cut the turret off at the line. Take you time and cut slowly as to not cut too far. A pair of curved shears works much better when doing this work as it’s easier to get in and cut along the line (I loaned my pair out and never got them back, that’s why I’m stuck still using straight scissors). Test fit the cut turret on the cylinder and trim if needed.
Wingspan does have a scale gun assembly available for this turret, but unfortunately I did not have one at the time that I did this build. The guns that come with the B-25 can be reused here if the scale guns aren’t used. I first dry fit the guns to make sure that everything fit well, a piece of blue painters tape works good to hold the guns in place while test fitting. When I was removing the original guns at the start of this build I did notice that they glue I had used did not hold one side of the gun had come loose. There really isn’t that much material to actually glue the guns down with. With that in mind I decided to go for a simple secure mounting for the guns, zip ties. I did this for two reasons. One, it was simple and secure. Two, I am planning on getting the scale guns later and using zip ties will make it easier to get the guns off of the turret. When the zip ties are snipped off though, it’s still pretty hard to see that they are there though.
Pictures
1. Use tape to establish a line around the turret.
2. Use the tape line to mark the turret for cutting.
3. Cut line marked on the turret.
4. Use scissors, or curved shears, to cut the turret on the marked line.
5. Cut the turret on the marked line.
6. Completed turret.
7. Completed turret.
8. Test fit the turret on the cylinder.
9. Use tape to hold the guns in place while dry fitting.
10. Zip ties used to secure guns on the turret cylinder.
11. Completed gun mounting.
12. Completed gun mounting.
Until next time
Ken
07-10-2008 | 02:15 PM
#15
Since we cut a large hole in the top of the fuselage it might leave the fuselage a bit weak. Wingspan has taken that into account and provides two half formers that are reinserted into the fuselage on either side of the turret in order to strengthen the fuselage.
One thing about working with an early release of any plane is that sometimes things change as the manufacturer moves into production. I think that is what happened here. If you look at picture one you will see that there is no cutout in the formers to take into account the antenna tube that is ran down the inside of the fuselage. I phone call to Michael confirmed that the plane he was working off of did not have this tube installed. But it’s no big deal either, as it’s a very simple matter of using a rotary tool to cut out a notch to clear the antenna tube. I had to use a file to widen the cutouts for the stringers in order to get the former to go in to the fuselage. Here was another part that took a bit to figure out how to get it installed. I found that best way was the get the formers in the fuselage and “square” them up across the fuselage under the turret hole, and then push them back into place on the edges of the hole. Otherwise it was very difficult to get the formers in over the stringers. Position each former so that it is just past the edges of the turret hole. Once the former is in place then they are glued in place using medium CA.
Pictures
1. No cutout in former for the antenna tube.
2. Use a rotary tool to make a cutout for the antenna tube.
3. File the former to get it to fit over the stringers.
4. Square the former in the fuselage.
5. Push the former back in to place over the stringers.
6. Rear former in place.
7. Turn the fuselage up to apply CA.
8. Apply CA to the formers to glue into place.
Until next time
Ken
07-10-2008 | 02:18 PM
#16
We’re in the home stretch now on completing the Top Turret. The Wingspan Model’s add-on reuses the original turret, but we’ll need to cut it down a bit. I found that the easiest way to get a good straight line to cut on was to use tape. Since the original turret went around the curve of the fuselage it isn’t straight around across the bottom. Looking at the turret you can see that the front and the back of the turret have less material than the sides, so we’ll use those as the guideline for cutting. I placed blue painter’s tape around the turret to get a good straight line, and then used a Sharpie marker to mark the cut line. I then used scissors to cut the turret off at the line. Take you time and cut slowly as to not cut too far. A pair of curved shears works much better when doing this work as it’s easier to get in and cut along the line (I loaned my pair out and never got them back, that’s why I’m stuck still using straight scissors). Test fit the cut turret on the cylinder and trim if needed.
Wingspan does have a scale gun assembly available for this turret, but unfortunately I did not have one at the time that I did this build. The guns that come with the B-25 can be reused here if the scale guns aren’t used. I first dry fit the guns to make sure that everything fit well, a piece of blue painters tape works good to hold the guns in place while test fitting. When I was removing the original guns at the start of this build I did notice that they glue I had used did not hold one side of the gun had come loose. There really isn’t that much material to actually glue the guns down with. With that in mind I decided to go for a simple secure mounting for the guns, zip ties. I did this for two reasons. One, it was simple and secure. Two, I am planning on getting the scale guns later and using zip ties will make it easier to get the guns off of the turret. When the zip ties are snipped off though, it’s still pretty hard to see that they are there though.
Pictures
1. Use tape to establish a line around the turret.
2. Use the tape line to mark the turret for cutting.
3. Cut line marked on the turret.
4. Use scissors, or curved shears, to cut the turret on the marked line.
5. Cut the turret on the marked line.
6. Completed turret.
7. Completed turret.
8. Test fit the turret on the cylinder.
9. Use tape to hold the guns in place while dry fitting.
10. Zip ties used to secure guns on the turret cylinder.
11. Completed gun mounting.
12. Completed gun mounting.
Until next time
Ken
Wingspan does have a scale gun assembly available for this turret, but unfortunately I did not have one at the time that I did this build. The guns that come with the B-25 can be reused here if the scale guns aren’t used. I first dry fit the guns to make sure that everything fit well, a piece of blue painters tape works good to hold the guns in place while test fitting. When I was removing the original guns at the start of this build I did notice that they glue I had used did not hold one side of the gun had come loose. There really isn’t that much material to actually glue the guns down with. With that in mind I decided to go for a simple secure mounting for the guns, zip ties. I did this for two reasons. One, it was simple and secure. Two, I am planning on getting the scale guns later and using zip ties will make it easier to get the guns off of the turret. When the zip ties are snipped off though, it’s still pretty hard to see that they are there though.
Pictures
1. Use tape to establish a line around the turret.
2. Use the tape line to mark the turret for cutting.
3. Cut line marked on the turret.
4. Use scissors, or curved shears, to cut the turret on the marked line.
5. Cut the turret on the marked line.
6. Completed turret.
7. Completed turret.
8. Test fit the turret on the cylinder.
9. Use tape to hold the guns in place while dry fitting.
10. Zip ties used to secure guns on the turret cylinder.
11. Completed gun mounting.
12. Completed gun mounting.
Until next time
Ken
07-11-2008 | 11:01 AM
#17
The turret canopy is attached to the turret cylinder by using 5 #0 x 1/8” pan head screws. One quick note here is to be very very careful with these screws as they are very small, and if one is dropped you can probably kiss it goodbye!! The instructions call for spacing the 5 screws equally around the turret to secure it. I made a quick “cheat guide” for getting 5 screws equally spaced. I used Photoshop to create a 5-pointed star and used that to mark the locations for the 5 screws. With the hole locations marked I used a 1/32” drill bit to drill a pilot hole through the canopy and in to the wood of the turret cylinder. After drilling the pilot holes I used a 1/16” drill bit to enlarge the holes in the canopy only. Using one of the #0 x 1/8” screws thread it into each hole in order to cut threads the pilot holes. Wick thin CA into each hole to harden the threads of each screw hole. Make sure to wait until the CA is completely cured before putting a screw into the hole, otherwise it may never come back out.
In the last two pictures I show the canopy in place and secured with the screws. I am showing this simply to illustrate the completed steps here. I suggest to not attaching the canopy right now, as it will need to be removed for the next step. It’s easier to simply leave it off the turret until the last step is completed.
Pictures
1. Mark 5 equally spaced locations for the mounting screws.
2. Use a 1/32” drill bit to drill pilot holes through the canopy and into the turret cylinder.
3. Use a 1/16” drill bit to enlarge the holes in the turret canopy.
4. Use a #0 x 1/8” pan head screw to cut threads into the pilot holes.
5. Wick thin CA into each hole to harden the threads
6. Canopy attached (see text)
7. Canopy attached (see text)
Until next time
Ken
The instructions call for spacing the 5 screws equally around the turret to secure it. I made a quick “cheat guide” for getting 5 screws equally spaced. I used Photoshop to create a 5-pointed star and used that to mark the locations for the 5 screws. With the hole locations marked I used a 1/32” drill bit to drill a pilot hole through the canopy and in to the wood of the turret cylinder. After drilling the pilot holes I used a 1/16” drill bit to enlarge the holes in the canopy only. Using one of the #0 x 1/8” screws thread it into each hole in order to cut threads the pilot holes. Wick thin CA into each hole to harden the threads of each screw hole. Make sure to wait until the CA is completely cured before putting a screw into the hole, otherwise it may never come back out.In the last two pictures I show the canopy in place and secured with the screws. I am showing this simply to illustrate the completed steps here. I suggest to not attaching the canopy right now, as it will need to be removed for the next step. It’s easier to simply leave it off the turret until the last step is completed.
Pictures
1. Mark 5 equally spaced locations for the mounting screws.
2. Use a 1/32” drill bit to drill pilot holes through the canopy and into the turret cylinder.
3. Use a 1/16” drill bit to enlarge the holes in the turret canopy.
4. Use a #0 x 1/8” pan head screw to cut threads into the pilot holes.
5. Wick thin CA into each hole to harden the threads
6. Canopy attached (see text)
7. Canopy attached (see text)
Until next time
Ken
07-11-2008 | 02:26 PM
#18
Well, we’re in the home stretch on finishing up the Top Turret add-on. Where we are at now is the time to double check the operation of the turret drive unit and make sure that everything works properly. If there is anything that needs adjusted now is the time to take care of it. The instructions at this point state that if desired the inside of the fuselage could be painted. If it was needed I would have done that, but I really wanted to avoid the hassle of doing that if I could. I was able to cut the hole for the top turret pretty tight and it’s difficult to see any of the wood from inside the fuselage when the turret is in place. Because of that I decided to not paint the inside of the fuselage.
Then last step in the installation is to secure the turret to the drive unit and install the canopy on the turret cylinder. Place the turret on the drive unit output shaft, making sure to seat the drive disk of the cylinder on the shaft. A small sheet metal screw is then used to secure the cylinder to the drive unit. To install the screw it is place in the hole in the bottom of the cylinder floor (this is why I indicated to leave the turret canopy off in the last step). Use a screwdriver to tighten the screw to secure the cylinder. Now the canopy can be installed. Feed the gun barrels through the slots in the canopy and then seat the canopy on the turret cylinder. Use the 5 #0 x 1/8” pan head screws to secure the canopy to the cylinder. And that’s it; the Top Turret Assembly is completed.
One last item to mention here. I did not talk about the battery for the drive unit. I did not install it at this time for a reason. I want to install the battery in an area that will be easy to put a battery in to the battery holder. It’s not good to leave batteries installed like this if not in use and I want to make it easy to get to, as well as easy to install the battery when it’s time to fly. I didn’t want to have to take apart parts of the plane in order to access the battery. Because of this I have decided to install the battery above the bomb bay when I get to that installation. This way it’s a simple matter of opening the bomb bay to access the drive battery for the Top Turret. But if a bomb bay is not being installed the battery can easily be installed under the cockpit floor, inside the nose gunner canopy, or another spot I had considered for the installation was inside the front landing gear bay. So there are options for where this battery can be installed.
I’ve put together a small video of the completed Top Turret to show it working. That can be found here:
[link=http://review.infinityok.com/top_turret_add_on.wmv]WingSpan Models Top Turret Add-On Video[/link]
A couple of notes here. I was very impressed with the quality of this Add-On kit provided by WingSpan Models. Michael has done a great job of putting together a kit that will make easy for everybody to be able to do a quality installation of the Top Turret. I have no doubt that many people with the TF B-25 will look forward to being able to add working features such as this without the worry of “screwing up” their beautiful warbird. This Add-On is perfectly suited to help them. I am hoping that later on I will be able to get the scale gun kit and the pilot figure to add in to the turret to help improve the look of the turret.
Pictures
1. Install the cylinder on the drive unit.
2. Sheet metal screw used to secure the cylinder to the drive unit.
3. Tighten the screw.
4. Feed the gun barrels through the slots in the canopy.
5. Place the canopy on the cylinder.
6. Install the small pan screws to secure the canopy in place.
7. Turning the turret drive motor on.
8. Turning the turret drive motor off.
9. The drive battery will be installed in the bomb bay later on.
Until next time
Ken
07-18-2008 | 03:25 PM
#19
I apologize for the delay in getting more of this build thread posted. It’s been a pretty hectic week for me and I just haven’t had much time to sit down on a keyboard. But now let’s see if we can’t get the next step in this build going.
To start the bomb bay add-on we’ll need to get access to the bottom of the fuselage, but we’ll be turning the fuselage over a few times as we do this. With the top turret we just installed the fuselage will sit in the provided cradle stand if the guns point to the rear, but it would be possible damage the turret if not careful. The fuselage gets moved around quite a bit for this add-on so I would suggest removing the turret during all of this.
The first step is to mark the centerline of the fuselage bottom. To do this we need to stick a pin through the middle of the stringer directly behind the nose wheel steering servo. Now it’s not difficult to reach in through the cockpit and get the pin behind the steering servo, but getting it in the middle of the stringer can be a bit tricky. Also, if the pin isn’t inserted straight through the stringer it is going to come out off-center for the stringer. I kind of scratched my head on this one to come up with a way to do this accurately, until I realized that you could see the stringer and servo through the hole in the side of the fuselage for the wing wiring to exit from. It’s a bit hard to see it in picture #2, but you can see the angle that you need to look through to see the pin. Once you look through here it’s really easy to make sure that the pin is inserted straight through the stinger. Make sure that the pin goes all the way through and is visible from the bottom of the fuselage. Next the instructions called for placing the cutting template on the centerline, but I felt like this could come out a bit off, so I wanted to more accurately mark the centerline. To do this I went back the tail section of the fuselage and inserted another pin through the centerline of the middle stringer. With these two pins in place I could now accurately mark the centerline of the fuselage using a long straightedge and a Sharpie marker.
Next, measure back 16-1/2” from the first bulkhead on the fuselage and mark this location. This should be approximately 1/8” an inch from the pin we placed behind the steering servo. As you can see in picture #10 this is to allow room for the former we will place in the fuselage during our installation. If there isn’t 1/8” adjust the mark behind the pin to allow for room for the former. This is important, as we need to leave enough room to glue the former in later.
The cutting template is marked for the front and back edges of the template. For the forward edge I cut the excess paper off of the template to make it easier to place it on the mark on the fuselage. Also, at the rear of the template I extended the centerline mark out to make it easier to place the template on the centerline of the fuselage.
Pictures
1. Turn the fuselage over to start the bomb-bay add-on.
2. When placing the pin in the middle stringer look through the hole in the side of the fuselage to aid in installation.
3. Push the pin through the stringer and out of the bottom of the fuselage.
4. Place a pin in the middle stringer at the rear of the fuselage.
5. Use a long straightedge to mark the centerline.
6. Make sure the marks pass through the pins.
7. Measure from the front bulkhead.
8. Measure 16-1/2” and mark the fuselage.
9. The mark should be 1/8” behind the pin.
10. Ensure that there is enough room for the forward former.
11. Cut the template off to aid in placement.
12. Extend the centerline mark to the edge of the paper.
Until next time
Ken
07-18-2008 | 04:17 PM
#20
Start by taping the front edge of the cutting template to the centerline at the mark we made earlier. Then place the rear of the cutting template to the centerline of the fuselage. Once you are certain the template is properly positioned it needs to be taped down completely to the fuselage, including over the sides of the fuselage.
Before starting to cut it’s a good idea to put a new blade in your hobby knife. Nothing is a substitute for a sharp blade, and not having one will just make a huge mess of your cuts. Just as we did on the top turret, start by cutting through the template and scoring the fuselage underneath. Once you have cut the entire template marked go ahead and remove the cutting template. Take the hobby knife and continue cutting out the fuselage. Don’t try to cut through the formers and stringers at this time. In the pictures I have marked where the formers and stingers are located. Do this to make it easier to find them when we come back to cut them with a razor saw.
Pictures
1. Place the front edge of the template on the mark previously made.
2. Align the centerline of the template with the marked centerline of the fuselage.
3. Verifying the position of the template.
4. Completely tape down the cutting template.
5. Tape down the sides of the template.
6. Before cutting the fuselage put a new blade in the hobby knife.
7. Cut through the template and score the fuselage below.
8. Cut through the template and score the fuselage below.
9. Use the score lines to cut through the outer skin of the fuselage.
10. Use the score lines to cut through the outer skin of the fuselage.
11. Mark the stringers to make is easier to cut them with a razor saw.
12. Mark the formers to make it easier to cut them with a razor saw.
Until next time
Ken
07-18-2008 | 04:32 PM
#21
To continue on, we now need to cut the formers and stringers. My razor saw is pretty thin (If you don’t have a Zona razor saw definitely get one. They are worth every penny) and I could get it in to the cut marks made with the hobby knife. But if your saw isn’t this thin them you will want to pull up the covering around the area so that the saw doesn’t rip it.
Since the location of the stringers and formers are marked it’s pretty easy to cut down through the with a razor saw. After cutting them all I went to pull the cut section away and found that it was still attached. After looking through the holes in the fuselage I found that there was still parts of the formers left that I could not reach with the razor saw, there was a small section in the middle of the fuselage still securing the bottom in place. In picture #3 you can see that I have a small blade from a hole saw that I use to cut areas like this. With this blade I was able to work down inside the fuselage and cut the remaining portions of the formers. With these cut the bottom area comes away freely. When removing the cut out section mark it so that we can keep track of with end is forward.
Use a razor saw to cut away the two cross sections of the formers.
Pictures
1. Use a razor saw to cut through the stringers.
2. Use a razor saw to cut through the formers.
3. A hole saw blade can be used to cut away portions not accessible by the razor saw.
4. Use the blade to completely cut away the section.
5. Remove the cut away section.
6. Remove the cut away section.
7. Remove the cut away section.
8. Remove the cut away section.
9. Mark the front portion of the cut away section.
10. Two cross braces remain.
11. Use a razor saw to cut away the two cross braces.
12. Bomb bay section opened up.
Until next time
Ken
07-26-2008 | 01:37 AM
#22
With the fuselage opened up for the bomb bay the first thing I wanted to do was mount the air tank for the retracts that we removed when installing the top turret. Have you ever had that sinking feeling in the pit of your stomach when you realize that you screwed up? Looking in to the fuselage that feeling was rapidly setting on me. Because of the spacing of the cross braces on the fuselage formers there was no way for me to get the tank inserted into the area above the wing tubes, And because of the former braces that were installed when the top turret was put in there was no way to slide the tank in from the front of the fuselage either. This one was tougher to solve than a Rubik’s Cube. I spent an entire evening trying different methods of trying to get the air tank where I wanted it to go, with absolutely no luck. My initial intentions were to install the tank so that I could get to in the event it needed to be removed for any maintenance. It was rapidly looking like that wasn’t going to be the case here. Finally I came to the realization that I was going to need to disassemble part of the fuselage to get the tank in. Doing some dry fitting with the tank and evaluating the inside of the fuselage I decided that the best way to accomplish this was to remove the rear wing tube and cut the former that was located immediately forward of that. I wasn’t worried too much about the way I removed the former cross section because I could easily rebuild that member, but the wing tube was another story. Since the tube was made out of fiberglass I really wanted to get it out without destroying it if possible.
Looking at the fiberglass tube it looked like it was installed with simple epoxy. So, this was a good thing. About the only thing that will “undo” set epoxy is heat, so I pulled out my covering heat gun. Using the heat gun I worked the area on the end of each wing tube to soften the epoxy. As the epoxy was softened a hobby knife was used to remove the epoxy from the tube and the side of the fuselage. It really came off a lot quicker than I first thought it would. But with all the epoxy off of the tube inside the fuselage the wing tube still was not free so that I could remove it. Apparently epoxy was in the area where the tube was in contact with the fuselage. There really wasn’t any easy way to use a hobby knife to cut the tube loose, the tube is really pretty thin and a sharp knife would cut through it if a mistake were made. So, a custom cutting tool was needed. For this I turned to a bag of brass tubing I keep to find a brass tube that was just bigger than the wing tube that needed to be cut out. As a side note, if anybody lives near a Hobby Lobby (I am referring to the craft stores and not the hobby shops) you need buy a bag of tubing there. They sell a bag of various sized tubing for about $15, and it’s worth every penny. No matter what size tubing I need I always seem to find it in that bag of goodies, so get one for your shop!! Trust me!!!! Anyway, back to the job at hand. I found a piece of tubing that had an inside diameter that was just a hair bigger than the outside diameter of the wing tube, so this was perfect. I first used a hobby knife to shave down the inside edge of the tubing to sharpen it up. Then I used a rotary tool with a cutting disk to cut teeth into the tube. The last step was to wrap some tape around the other end so my hand wouldn’t get cut up as I used the tool. I was now ready to finish up getting the wing tube out. The brass tube cutter I made was perfect for the job. It made small work of cutting the epoxy loose around the outside of the wing tube. With it cut loose the tube slid right out. It needed just a little work to finish cleaning off the rest of the epoxy on the outside of it, which was accomplished with a heat gun and a hobby knife. The last step was to cut through the cross member on the fuselage former. Using a razor saw this was easy to do.
With the fuselage opened up I now reused the mounting rings I removed when preparing to install the top turret. Medium CA was used to glue the rings in place to hold the air tank. The airline was extended back to reach this new install location and the tank was then secured in the ring mounts. A little bit if thick CA was used to secure the tank to the mounting rings.
Before moving on to the next step let me make this comments. I would have much rather have avoided having to do these steps, but I honestly thought this wouldn’t be so difficult. So if anybody is planning on doing these add-ons I hope that they can benefit from my mistakes. If I was to redo this installation I would have removed the air tank, cut open the bomb bay section, and then installed the air tank in the new location BEFORE installing the top turret. By doing this the tank can easily be slid backwards through the fuselage in to it’s new location. Oh well, lesson learned and I hope that I help some others out there.
Pictures
1. With the fuselage open the cross members prevented installing the air tank in the fuselage
2. Using a heat gun to soften up the epoxy on the wing tube.
3. With the epoxy soft use a hobby knife to remove the epoxy.
4. Making a circular cutter from bass tube.
5. Using the cutter to cut away the fiberglass wing tube.
6. The fiberglass wing tube removed intact.
7. Use a razor saw to cut away the cross member.
8. Install the tank mounting rings.
9. Install the rear ring.
10. Extend the air tube back to the new tank location.
11. Place the tank in position and secured with thick CA
Until next time
Ken
07-27-2008 | 11:42 PM
#23
With the air tank in place above the wing tubes it’s time now to repair what had to be removed to get the tank in place. I started off by rebuilding the cross-member for the fuselage former. First step was to cut a cross piece out of lite ply material. I epoxied it in place first so that I had a base to rebuild the rest of the former on. After the epoxy was cured I then epoxied the original piece that was cut out back in place. Of course this wasn’t going to be a perfect fit because of the area where that was cut away. For those two saw kerfs I filled the area with epoxy. And then a final step I epoxied a ¼” square piece of basswood across the member. When the epoxy dried the member looked to be at least as strong, if not stronger, than the original cross-member. Replacing the wing tube that was removed is a simple step of inserting it back in place and using epoxy to secure it in place.
Running the length of the fuselage is a plastic tube that was originally used to route the servo extension wires from the rear of the plane up to the receivers. This will need to be removed for the installation of the bomb bay. Simply cut the tube at the forward and rear formers and sand the tube flush with the forum. The last step here was to cut off the loops that secured the tube in place; this can be easily accomplished with a razor saw.
Pictures
1. Epoxy a lite ply cross brace to start rebuilding the cross member.
2. Epoxy the original cut piece in place and glue a ¼” piece over that to complete the rebuild.
3. The cross-member has been rebuilt.
4. Use epoxy to re-glue the wing tube in place.
5. Cut the loops that secured the wiring tube.
Until next time
Ken
09-15-2008 | 07:52 AM
#24


Joined: Dec 2002
Posts: 47
Likes: 0
Received 0 Likes
on
0 Posts
From: Riverton, WY
Ken,
But where is the "Rest of the Story". It's the making it work set-up that I'm most interested in hearing before I order!!
Absolutely Great info so far....
BadBob
But where is the "Rest of the Story". It's the making it work set-up that I'm most interested in hearing before I order!!
Absolutely Great info so far....
BadBob
09-29-2008 | 06:34 AM
#25
Joined: Oct 2005
Posts: 229
Likes: 0
Received 0 Likes
on
0 Posts
From: Lost Creek ,
PA
ORIGINAL: rnordeck
Ken,
But where is the "Rest of the Story". It's the making it work set-up that I'm most interested in hearing before I order!!
Absolutely Great info so far....
BadBob
Ken,
But where is the "Rest of the Story". It's the making it work set-up that I'm most interested in hearing before I order!!
Absolutely Great info so far....
BadBob
bob,
i have installed the bomb system on mine about 8 months ago. it works great and looks even better in the air. nothing comes close to it. i put mine to release one at time until all six bombs are released. sorry no pics my camera is MIA! you wont be sorry trusted me!!!
dan

