


Modellsport Schweighofer Alpha Jet Project


 06-03-2013 | 01:32 AM
#27
Thread Starter
Member
Joined: Apr 2013
Posts: 30
Likes: 0
Received 0 Likes
on
0 Posts
From: DeutschlandsbergNon, AUSTRIA
<p class="MsoNormal" style="MARGIN: 0cm 0cm 10pt"><b style="mso-bidi-font-weight: normal"><span lang="EN-GB" style="mso-ansi-language: EN-GB"><font size="3"><font face="Calibri">Schweighofer Alpha Jet Project (Part 9)
</p></font></font></span>[/b]</p><span lang="EN-GB" style="LINE-HEIGHT: 115%; FONT-FAMILY: "Calibri","sans-serif"; FONT-SIZE: 11pt; mso-ansi-language: EN-GB; mso-ascii-theme-font: minor-latin; mso-fareast-font-family: Calibri; mso-fareast-theme-font: minor-latin; mso-hansi-theme-font: minor-latin; mso-bidi-font-family: 'Times New Roman'; mso-bidi-theme-font: minor-bidi; mso-fareast-language: EN-US; mso-bidi-language: AR-SA">In the meanwhile some time has passed, the fuselage slowly gets its shape. This work is very satisfying because after some ours of cutting and sanding you can see the change.


<span lang="EN-GB" style="LINE-HEIGHT: 115%; FONT-FAMILY: "Calibri","sans-serif"; FONT-SIZE: 11pt; mso-ansi-language: EN-GB; mso-ascii-theme-font: minor-latin; mso-fareast-font-family: Calibri; mso-fareast-theme-font: minor-latin; mso-hansi-theme-font: minor-latin; mso-bidi-font-family: "Times New Roman"; mso-bidi-theme-font: minor-bidi; mso-fareast-language: EN-US; mso-bidi-language: AR-SA">The production of the wings has also progressed. Peter has his own method. A small strip of foam remains at the bottom side of the wing parts. This allows to place all the parts exactly flat on the working surface. Before planking these stripes will be cut and sanded.
</span>


<p class="MsoNormal" style="MARGIN: 0cm 0cm 10pt"><span lang="EN-GB" style="mso-ansi-language: EN-GB">Peter’s work bench measures 1x2 meters!
</p></span></p>


<span lang="EN-GB" style="LINE-HEIGHT: 115%; FONT-FAMILY: "Calibri","sans-serif"; FONT-SIZE: 11pt; mso-ansi-language: EN-GB; mso-ascii-theme-font: minor-latin; mso-fareast-font-family: Calibri; mso-fareast-theme-font: minor-latin; mso-hansi-theme-font: minor-latin; mso-bidi-font-family: "Times New Roman"; mso-bidi-theme-font: minor-bidi; mso-fareast-language: EN-US; mso-bidi-language: AR-SA">Maybe we should change to a Horten – this would save a lot of work on the fuselage.
</span>
<p class="MsoNormal" style="MARGIN: 0cm 0cm 10pt"><span lang="EN-GB" style="mso-ansi-language: EN-GB">Next step – laminating of the wings and fuselage.
</p></span></p><p class="MsoNormal" style="MARGIN: 0cm 0cm 10pt"><span lang="EN-GB" style="mso-ansi-language: EN-GB">
</p></span></p><p class="MsoNormal" style="MARGIN: 0cm 0cm 10pt"><span lang="EN-GB" style="mso-ansi-language: EN-GB">Regards,
</p></span></p><p class="MsoNormal" style="MARGIN: 0cm 0cm 10pt"><span lang="EN-GB" style="mso-ansi-language: EN-GB">Mario Walter
</p></span></p><p class="MsoNormal" style="MARGIN: 0cm 0cm 10pt"><span lang="EN-GB" style="mso-ansi-language: EN-GB">Modellsport Schweighofer
</p></span></p><p class="MsoNormal" style="MARGIN: 0cm 0cm 10pt"><span lang="EN-GB" style="LINE-HEIGHT: 115%; FONT-FAMILY: "Arial","sans-serif"; COLOR: #6ca524; FONT-SIZE: 9pt; mso-ansi-language: EN-GB">www.alphajet-projekt.at</span><span lang="EN-GB" style="LINE-HEIGHT: 115%; FONT-FAMILY: "Arial","sans-serif"; COLOR: #777777; FONT-SIZE: 9pt; mso-ansi-language: EN-GB">
</p></span></p>
</span>
</p></font></font></span>[/b]</p><span lang="EN-GB" style="LINE-HEIGHT: 115%; FONT-FAMILY: "Calibri","sans-serif"; FONT-SIZE: 11pt; mso-ansi-language: EN-GB; mso-ascii-theme-font: minor-latin; mso-fareast-font-family: Calibri; mso-fareast-theme-font: minor-latin; mso-hansi-theme-font: minor-latin; mso-bidi-font-family: 'Times New Roman'; mso-bidi-theme-font: minor-bidi; mso-fareast-language: EN-US; mso-bidi-language: AR-SA">In the meanwhile some time has passed, the fuselage slowly gets its shape. This work is very satisfying because after some ours of cutting and sanding you can see the change.
<span lang="EN-GB" style="LINE-HEIGHT: 115%; FONT-FAMILY: "Calibri","sans-serif"; FONT-SIZE: 11pt; mso-ansi-language: EN-GB; mso-ascii-theme-font: minor-latin; mso-fareast-font-family: Calibri; mso-fareast-theme-font: minor-latin; mso-hansi-theme-font: minor-latin; mso-bidi-font-family: "Times New Roman"; mso-bidi-theme-font: minor-bidi; mso-fareast-language: EN-US; mso-bidi-language: AR-SA">The production of the wings has also progressed. Peter has his own method. A small strip of foam remains at the bottom side of the wing parts. This allows to place all the parts exactly flat on the working surface. Before planking these stripes will be cut and sanded.
</span>
<p class="MsoNormal" style="MARGIN: 0cm 0cm 10pt"><span lang="EN-GB" style="mso-ansi-language: EN-GB">Peter’s work bench measures 1x2 meters!
</p></span></p>
<span lang="EN-GB" style="LINE-HEIGHT: 115%; FONT-FAMILY: "Calibri","sans-serif"; FONT-SIZE: 11pt; mso-ansi-language: EN-GB; mso-ascii-theme-font: minor-latin; mso-fareast-font-family: Calibri; mso-fareast-theme-font: minor-latin; mso-hansi-theme-font: minor-latin; mso-bidi-font-family: "Times New Roman"; mso-bidi-theme-font: minor-bidi; mso-fareast-language: EN-US; mso-bidi-language: AR-SA">Maybe we should change to a Horten – this would save a lot of work on the fuselage.
</span>
<p class="MsoNormal" style="MARGIN: 0cm 0cm 10pt"><span lang="EN-GB" style="mso-ansi-language: EN-GB">Next step – laminating of the wings and fuselage.
</p></span></p><p class="MsoNormal" style="MARGIN: 0cm 0cm 10pt"><span lang="EN-GB" style="mso-ansi-language: EN-GB">
</p></span></p><p class="MsoNormal" style="MARGIN: 0cm 0cm 10pt"><span lang="EN-GB" style="mso-ansi-language: EN-GB">Regards,
</p></span></p><p class="MsoNormal" style="MARGIN: 0cm 0cm 10pt"><span lang="EN-GB" style="mso-ansi-language: EN-GB">Mario Walter
</p></span></p><p class="MsoNormal" style="MARGIN: 0cm 0cm 10pt"><span lang="EN-GB" style="mso-ansi-language: EN-GB">Modellsport Schweighofer
</p></span></p><p class="MsoNormal" style="MARGIN: 0cm 0cm 10pt"><span lang="EN-GB" style="LINE-HEIGHT: 115%; FONT-FAMILY: "Arial","sans-serif"; COLOR: #6ca524; FONT-SIZE: 9pt; mso-ansi-language: EN-GB">www.alphajet-projekt.at</span><span lang="EN-GB" style="LINE-HEIGHT: 115%; FONT-FAMILY: "Arial","sans-serif"; COLOR: #777777; FONT-SIZE: 9pt; mso-ansi-language: EN-GB">
</p></span></p>
</span>
06-25-2013 | 06:00 AM
#28
Thread Starter
Member
Joined: Apr 2013
Posts: 30
Likes: 0
Received 0 Likes
on
0 Posts
From: DeutschlandsbergNon, AUSTRIA
<p class="MsoNormal" style="margin: 0cm 0cm 10pt"><b style="mso-bidi-font-weight: normal"><span lang="EN-GB" style="mso-ansi-language: EN-GB"><font size="3"><font face="Calibri">
Schweighofer Alpha Jet Project (Part 10)</font></font></span>[/b]</p>
</p><p class="MsoNormal" style="margin: 0cm 0cm 10pt"><span lang="EN-GB" style="mso-ansi-language: EN-GB"><font face="Calibri"><font size="3">Finally we were able to set all the puzzle parts together in the open area. Some minor grindings at the intake area have to be done next. As you can see in the picture are the control surfaces already covered with glass and ready for sealing.
</font></font></span></p>
</p><p class="MsoNormal" style="margin: 0cm 0cm 10pt"><span lang="EN-GB" style="mso-ansi-language: EN-GB"><font size="3">This will be the tallness of the model when it will be on the undercarriage.</font></span></p>
</p><p class="MsoNormal" style="margin: 0cm 0cm 10pt">


</p><p class="MsoNormal" style="margin: 0cm 0cm 10pt"></p>
</p><p class="MsoNormal" style="margin: 0cm 0cm 10pt">


</p><p class="MsoNormal" style="margin: 0cm 0cm 10pt">


</p>

</p><p class="MsoNormal" style="margin: 0cm 0cm 10pt"><span lang="EN-GB" style="mso-ansi-language: EN-GB"><font size="3">Once again the technical specification:</font></span></p>
<span lang="EN-GB" style="mso-ansi-language: EN-GB"><font size="3">Scale: 1:2,58</font></span></p>
<span lang="EN-GB" style="mso-ansi-language: EN-GB"><font size="3">Fuselage length without Rudder: 4600 mm</font></span></p>
<span lang="EN-GB" style="mso-ansi-language: EN-GB"><font size="3">Fuselage length with Rudder: 4653 mm</font></span></p>
<span lang="EN-GB" style="mso-ansi-language: EN-GB"><font size="3">Fuselage width: 702 mm</font></span></p>
<span lang="EN-GB" style="mso-ansi-language: EN-GB"><font size="3">Fuselage tallness without rudder: 673 mm</font></span></p>
<span style="font-size: small"><span lang="EN-GB" new="" style="line-height: 115%; font-family: ">Tallness of the model when standing on the undercarriage: 1627 mm
</span></span>
<span lang="EN-GB" style="mso-ansi-language: EN-GB"><font size="3">Wingspan: 3530 mm</font></span></p>
<span lang="EN-GB" style="mso-ansi-language: EN-GB"><font size="3">Length of each wing: 1531 mm</font></span></p>
<span lang="EN-GB" style="mso-ansi-language: EN-GB"><font size="3">Wing root: 1027 mm</font></span></p>
<span lang="EN-GB" style="mso-ansi-language: EN-GB"><font size="3">Thickness of the wing at the root: 103 mm</font></span></p>
<span lang="EN-GB" style="mso-ansi-language: EN-GB"><font size="3">Elevator wingspan: 1676 mm</font></span></p>
<span lang="EN-GB" style="mso-ansi-language: EN-GB"><font size="3">Wing profile: RG 15</font></span></p>
<span lang="EN-GB" style="mso-ansi-language: EN-GB"><font size="3">Elevator profile: NACA 009</font></span></p>
</p><p class="MsoNormal" style="margin: 0cm 0cm 10pt"><span lang="EN-GB" style="mso-ansi-language: EN-GB"><font size="3">The next step will be to finish the basic surface, after this we can start making the details. In the meanwhile the team has decided Peter Glück has to do this part too.
</font></span>
</p><p class="MsoNormal" style="margin: 0cm 0cm 10pt"><span lang="EN-GB" style="color: #002060; mso-ansi-language: EN-GB; mso-bidi-font-family: Calibri; mso-bidi-theme-font: minor-latin"><font size="3">More information will follow.</font></span></p><p class="MsoNormal" style="margin: 0cm 0cm 10pt"><span style="font-family: "><font size="3">Modellsport Schweighofer</font></span><span style="color: #002060; mso-bidi-font-family: Calibri; mso-bidi-theme-font: minor-latin">
<font size="3">Wirtschaftspark 9 • 8530 Deutschlandsberg
</font><span style="color: #002060"><font size="3">[email protected]</font></span></span></p>
Schweighofer Alpha Jet Project (Part 10)</font></font></span>[/b]</p>
</p><p class="MsoNormal" style="margin: 0cm 0cm 10pt"><span lang="EN-GB" style="mso-ansi-language: EN-GB"><font face="Calibri"><font size="3">Finally we were able to set all the puzzle parts together in the open area. Some minor grindings at the intake area have to be done next. As you can see in the picture are the control surfaces already covered with glass and ready for sealing.
</font></font></span></p>
</p><p class="MsoNormal" style="margin: 0cm 0cm 10pt"><span lang="EN-GB" style="mso-ansi-language: EN-GB"><font size="3">This will be the tallness of the model when it will be on the undercarriage.</font></span></p>
</p><p class="MsoNormal" style="margin: 0cm 0cm 10pt">
</p><p class="MsoNormal" style="margin: 0cm 0cm 10pt"></p>
</p><p class="MsoNormal" style="margin: 0cm 0cm 10pt">
</p><p class="MsoNormal" style="margin: 0cm 0cm 10pt">
</p>
</p><p class="MsoNormal" style="margin: 0cm 0cm 10pt"><span lang="EN-GB" style="mso-ansi-language: EN-GB"><font size="3">Once again the technical specification:</font></span></p>
<span lang="EN-GB" style="mso-ansi-language: EN-GB"><font size="3">Scale: 1:2,58</font></span></p>
<span lang="EN-GB" style="mso-ansi-language: EN-GB"><font size="3">Fuselage length without Rudder: 4600 mm</font></span></p>
<span lang="EN-GB" style="mso-ansi-language: EN-GB"><font size="3">Fuselage length with Rudder: 4653 mm</font></span></p>
<span lang="EN-GB" style="mso-ansi-language: EN-GB"><font size="3">Fuselage width: 702 mm</font></span></p>
<span lang="EN-GB" style="mso-ansi-language: EN-GB"><font size="3">Fuselage tallness without rudder: 673 mm</font></span></p>
<span style="font-size: small"><span lang="EN-GB" new="" style="line-height: 115%; font-family: ">Tallness of the model when standing on the undercarriage: 1627 mm
</span></span>
<span lang="EN-GB" style="mso-ansi-language: EN-GB"><font size="3">Wingspan: 3530 mm</font></span></p>
<span lang="EN-GB" style="mso-ansi-language: EN-GB"><font size="3">Length of each wing: 1531 mm</font></span></p>
<span lang="EN-GB" style="mso-ansi-language: EN-GB"><font size="3">Wing root: 1027 mm</font></span></p>
<span lang="EN-GB" style="mso-ansi-language: EN-GB"><font size="3">Thickness of the wing at the root: 103 mm</font></span></p>
<span lang="EN-GB" style="mso-ansi-language: EN-GB"><font size="3">Elevator wingspan: 1676 mm</font></span></p>
<span lang="EN-GB" style="mso-ansi-language: EN-GB"><font size="3">Wing profile: RG 15</font></span></p>
<span lang="EN-GB" style="mso-ansi-language: EN-GB"><font size="3">Elevator profile: NACA 009</font></span></p>
</p><p class="MsoNormal" style="margin: 0cm 0cm 10pt"><span lang="EN-GB" style="mso-ansi-language: EN-GB"><font size="3">The next step will be to finish the basic surface, after this we can start making the details. In the meanwhile the team has decided Peter Glück has to do this part too.
</font></span>
</p><p class="MsoNormal" style="margin: 0cm 0cm 10pt"><span lang="EN-GB" style="color: #002060; mso-ansi-language: EN-GB; mso-bidi-font-family: Calibri; mso-bidi-theme-font: minor-latin"><font size="3">More information will follow.</font></span></p><p class="MsoNormal" style="margin: 0cm 0cm 10pt"><span style="font-family: "><font size="3">Modellsport Schweighofer</font></span><span style="color: #002060; mso-bidi-font-family: Calibri; mso-bidi-theme-font: minor-latin">
<font size="3">Wirtschaftspark 9 • 8530 Deutschlandsberg
</font><span style="color: #002060"><font size="3">[email protected]</font></span></span></p>
07-03-2013 | 11:27 PM
#29
Thread Starter
Member
Joined: Apr 2013
Posts: 30
Likes: 0
Received 0 Likes
on
0 Posts
From: DeutschlandsbergNon, AUSTRIA
<p class="MsoNormal" style="MARGIN: 0cm 0cm 10pt"><b style="mso-bidi-font-weight: normal"><span lang="EN-GB" style="mso-ansi-language: EN-GB"><font size="3"><font face="Calibri">Schweighofer Alpha Jet Project (Part 11)
</p></font></font></span>[/b]</p><p class="MsoNormal" style="MARGIN: 0cm 0cm 10pt"><span lang="EN-GB" style="mso-ansi-language: EN-GB"><font size="3"><font face="Calibri">As I’ve already written are now the tail surfaces ready for covering. I’ll explain the next steps which are done with the fuselage a little bit more detailed, maybe this could help you for your next moulds.
</p></font></font></span></p><p class="MsoNormal" style="MARGIN: 0cm 0cm 10pt"><span lang="EN-GB" style="mso-ansi-language: EN-GB"><font size="3"><font face="Calibri">If you sand the Styrofoam down to the wooden formers there’s always the risk of seeing them through the glass covering. To avoid this Peter mills away 1mm of the formers before levelling. Nad covering.
</p></font></font></span></p><p class="MsoNormal" style="MARGIN: 0cm 0cm 10pt"><span lang="EN-GB" style="mso-ansi-language: EN-GB">
 </p></span></p><p class="MsoNormal" style="MARGIN: 0cm 0cm 10pt"><span lang="EN-GB" style="mso-ansi-language: EN-GB"><a href="http://alphajet-projekt.at/content/teil11_07_big.jpg"><font face="Calibri" size="3">
</font></a> </span></p><p class="MsoNormal" style="MARGIN: 0cm 0cm 10pt"><span lang="EN-GB" style="mso-ansi-language: EN-GB"><a href="http://alphajet-projekt.at/content/teil11_06_big.jpg"><font face="Calibri" size="3">
</font></a> </span></p><p class="MsoNormal" style="MARGIN: 0cm 0cm 10pt"><span lang="EN-GB" style="mso-ansi-language: EN-GB"><a href="http://alphajet-projekt.at/content/teil11_05_big.jpg"><font face="Calibri" size="3">
</font></a> </span></p><p class="MsoNormal" style="MARGIN: 0cm 0cm 10pt"><span lang="EN-GB" style="mso-ansi-language: EN-GB"><a href="http://alphajet-projekt.at/content/teil11_04_big.jpg"><font face="Calibri" size="3">
</font></a> </span></p><p class="MsoNormal" style="MARGIN: 0cm 0cm 10pt"><span lang="EN-GB" style="mso-ansi-language: EN-GB"><font size="3"><font face="Calibri">In the meanwhile all parts are ready covered and we can come to this result:
</p></font></font></span></p><p class="MsoNormal" style="MARGIN: 0cm 0cm 10pt"><span lang="EN-GB" style="mso-ansi-language: EN-GB"><font face="Calibri" size="3"> </font></span></p><p class="MsoNormal" style="MARGIN: 0cm 0cm 10pt"><span lang="EN-GB" style="mso-ansi-language: EN-GB"><font size="3"><font face="Calibri">Until now Peter has used 50m² glass textile (213g/m²) and 14 kg of Epoxy adhesive for the building of the master model
</p></font></font></span></p><p class="MsoNormal" style="MARGIN: 0cm 0cm 10pt"><span lang="EN-GB" style="mso-ansi-language: EN-GB"><font size="3"><font face="Calibri">From now on our Alpha Jet will be filled with normal body filler, this step takes a long time to achieve a good result.
</p></font></font></span></p><p class="MsoNormal" style="MARGIN: 0cm 0cm 10pt"><span lang="EN-GB" style="mso-ansi-language: EN-GB"><font size="3"><font face="Calibri">More information next week…
</p></font></font></span></p><p class="MsoNormal" style="MARGIN: 0cm 0cm 10pt"><span lang="EN-GB" style="mso-ansi-language: EN-GB"><font size="3"><font face="Calibri">The building of the master model is almost finished and we had to decide which company gets the assignment to make the moulds and the models. After checking thoroughly all the possible companies we have decided to make our Alpha Jet with Paritech. Many of you will know this company, but I’ll use this opportunity to introduce this company.
</p></font></font></span></p><p class="MsoNormal" style="MARGIN: 0cm 0cm 10pt"><span lang="EN-GB" style="mso-ansi-language: EN-GB"><font face="Calibri" size="3"> </font></span></p><p class="MsoNormal" style="MARGIN: 0cm 0cm 10pt"><span lang="EN-GB" style="mso-ansi-language: EN-GB">
<font face="Calibri" size="3"> </font></p></span></p><p class="MsoNormal" style="MARGIN: 0cm 0cm 10pt"><span lang="EN-GB" style="mso-ansi-language: EN-GB"><font size="3"><font face="Calibri">Company portrait Paritech
</p></font></font></span></p><p class="MsoNormal" style="MARGIN: 0cm 0cm 10pt"><span lang="EN-GB" style="mso-ansi-language: EN-GB"><font size="3"><font face="Calibri">Modelling as a hobby – this conducts Uwe Rihm sins his childhood and caused him to make his hobby to his profession.
</p></font></font></span></p><p class="MsoNormal" style="MARGIN: 0cm 0cm 10pt"><span lang="EN-GB" style="mso-ansi-language: EN-GB"><font face="Calibri" size="3"> </font></span></p><p class="MsoNormal" style="MARGIN: 0cm 0cm 10pt"><span lang="EN-GB" style="mso-ansi-language: EN-GB"><font size="3"><font face="Calibri">Picture: paritech.de
</p></font></font></span></p><p class="MsoNormal" style="MARGIN: 0cm 0cm 10pt"><span lang="EN-GB" style="mso-ansi-language: EN-GB">
<font face="Calibri" size="3"> </font></p></span></p><p class="MsoNormal" style="MARGIN: 0cm 0cm 10pt"><span lang="EN-GB" style="mso-ansi-language: EN-GB"><font size="3"><font face="Calibri">In the year 1984 Uwe began to produce fuselages for most of the German model companies in hand laminating procedure. The large demand of the marked leaded to a business cooperation with his nephew Matthias Paul. Paul is also a modeller since his childhood, he was 7 times German junior champion.
</p></font></font></span></p><p class="MsoNormal" style="MARGIN: 0cm 0cm 10pt"><span lang="EN-GB" style="mso-ansi-language: EN-GB"><font face="Calibri" size="3"> </font></span></p><p class="MsoNormal" style="MARGIN: 0cm 0cm 10pt"><span lang="EN-GB" style="mso-ansi-language: EN-GB"><font size="3"><font face="Calibri">Picture: paritech.de
</p></font></font></span></p><p class="MsoNormal" style="MARGIN: 0cm 0cm 10pt"><span lang="EN-GB" style="mso-ansi-language: EN-GB">
<font face="Calibri" size="3"> </font></p></span></p><p class="MsoNormal" style="MARGIN: 0cm 0cm 10pt"><span lang="EN-GB" style="mso-ansi-language: EN-GB"><font size="3"><font face="Calibri">Since this time both work together as equal shareholder and technical supervisor for Üaritech GmbH.
</p></font></font></span></p><p class="MsoNormal" style="MARGIN: 0cm 0cm 10pt"><span lang="EN-GB" style="mso-ansi-language: EN-GB"><font size="3"><font face="Calibri">2004 Paritech started to produce recon drones. Due to the increasing space requirements Paritech relocated to the industrial Area of Herxheim near Landau.
</p></font></font></span></p><p class="MsoNormal" style="MARGIN: 0cm 0cm 10pt"><span lang="EN-GB" style="mso-ansi-language: EN-GB"><font size="3"><font face="Calibri">Since 2010 Partitech is the first German model company with DIN EN ISO 9001 certificate, this allows the realization of Industrial orders.
</p></font></font></span></p><p class="MsoNormal" style="MARGIN: 0cm 0cm 10pt"><span lang="EN-GB" style="mso-ansi-language: EN-GB"><font size="3"><font face="Calibri">The highlights of the model palette of Paritec is the very large DG1000 S, Fox MDM-1, a Jodel Robin and the Viper MK II, the largest RC Viper worldwide.
</p></font></font></span></p><p class="MsoNormal" style="MARGIN: 0cm 0cm 10pt"><span lang="EN-GB" style="mso-ansi-language: EN-GB"><font face="Calibri" size="3"> </font></span></p><p class="MsoNormal" style="MARGIN: 0cm 0cm 10pt"><font size="3"><font face="Calibri"><span lang="EN-GB" style="mso-ansi-language: EN-GB">Picture</span>: Bernhard Kager
</p></font></font></p><p class="MsoNormal" style="MARGIN: 0cm 0cm 10pt"><font face="Calibri" size="3"> </font></p><p class="MsoNormal" style="MARGIN: 0cm 0cm 10pt"><font size="3"><font face="Calibri"><span lang="EN-GB" style="mso-ansi-language: EN-GB">Picture</span>: Udo Dettelbacher
</p></font></font></p><p class="MsoNormal" style="MARGIN: 0cm 0cm 10pt"><font face="Calibri" size="3"> </font></p><p class="MsoNormal" style="MARGIN: 0cm 0cm 10pt"><span lang="EN-GB" style="mso-ansi-language: EN-GB"><font size="3"><font face="Calibri">Picture: Paritech.de
</p></font></font></span></p><p class="MsoNormal" style="MARGIN: 0cm 0cm 10pt"><span lang="EN-GB" style="mso-ansi-language: EN-GB"><font size="3"><font face="Calibri">I think no other company could reach these quality standards. This is the reason we’ve decided to work together with Paritech for our Alpha Jet.
</p></font></font></span></p><p class="MsoNormal" style="MARGIN: 0cm 0cm 10pt"><span lang="EN-GB" style="mso-ansi-language: EN-GB"><font face="Calibri" size="3">More information on </font><font face="Calibri" size="3">www.partitech.de</font>
</p></span></p><p class="MsoNormal" style="MARGIN: 0cm 0cm 10pt"><span lang="EN-GB" style="mso-ansi-language: EN-GB">
<font face="Calibri" size="3"> </font></p></span></p><p class="MsoNormal" style="MARGIN: 0cm 0cm 10pt"><span lang="EN-GB" style="mso-ansi-language: EN-GB">
<font face="Calibri" size="3"> </font></p></span></p><p class="MsoNormal" style="MARGIN: 0cm 0cm 10pt"><span style="FONT-FAMILY: "Calibri","sans-serif"; COLOR: #002060; mso-bidi-theme-font: minor-latin; mso-ascii-theme-font: minor-latin; mso-hansi-theme-font: minor-latin"><font size="3">Modellsport Schweighofer</font></span><span style="COLOR: #002060; mso-bidi-font-family: Calibri; mso-bidi-theme-font: minor-latin">
<font face="Calibri" size="3">Wirtschaftspark 9 • 8530 Deutschlandsberg
</font></span><span style="COLOR: #002060; mso-bidi-font-family: Calibri; mso-bidi-theme-font: minor-latin"><font face="Calibri" size="3">[email protected]</font></span><span style="COLOR: #002060; mso-bidi-font-family: Calibri; mso-bidi-theme-font: minor-latin">
</p></span></p>
</p></font></font></span>[/b]</p><p class="MsoNormal" style="MARGIN: 0cm 0cm 10pt"><span lang="EN-GB" style="mso-ansi-language: EN-GB"><font size="3"><font face="Calibri">As I’ve already written are now the tail surfaces ready for covering. I’ll explain the next steps which are done with the fuselage a little bit more detailed, maybe this could help you for your next moulds.
</p></font></font></span></p><p class="MsoNormal" style="MARGIN: 0cm 0cm 10pt"><span lang="EN-GB" style="mso-ansi-language: EN-GB"><font size="3"><font face="Calibri">If you sand the Styrofoam down to the wooden formers there’s always the risk of seeing them through the glass covering. To avoid this Peter mills away 1mm of the formers before levelling. Nad covering.
</p></font></font></span></p><p class="MsoNormal" style="MARGIN: 0cm 0cm 10pt"><span lang="EN-GB" style="mso-ansi-language: EN-GB">
</p></span></p><p class="MsoNormal" style="MARGIN: 0cm 0cm 10pt"><span lang="EN-GB" style="mso-ansi-language: EN-GB"><a href="http://alphajet-projekt.at/content/teil11_07_big.jpg"><font face="Calibri" size="3"></font></a>
</span></p><p class="MsoNormal" style="MARGIN: 0cm 0cm 10pt"><span lang="EN-GB" style="mso-ansi-language: EN-GB"><a href="http://alphajet-projekt.at/content/teil11_06_big.jpg"><font face="Calibri" size="3"></font></a>
</span></p><p class="MsoNormal" style="MARGIN: 0cm 0cm 10pt"><span lang="EN-GB" style="mso-ansi-language: EN-GB"><a href="http://alphajet-projekt.at/content/teil11_05_big.jpg"><font face="Calibri" size="3"></font></a>
</span></p><p class="MsoNormal" style="MARGIN: 0cm 0cm 10pt"><span lang="EN-GB" style="mso-ansi-language: EN-GB"><a href="http://alphajet-projekt.at/content/teil11_04_big.jpg"><font face="Calibri" size="3"></font></a>
</span></p><p class="MsoNormal" style="MARGIN: 0cm 0cm 10pt"><span lang="EN-GB" style="mso-ansi-language: EN-GB"><font size="3"><font face="Calibri">In the meanwhile all parts are ready covered and we can come to this result:</p></font></font></span></p><p class="MsoNormal" style="MARGIN: 0cm 0cm 10pt"><span lang="EN-GB" style="mso-ansi-language: EN-GB"><font face="Calibri" size="3">
</font></span></p><p class="MsoNormal" style="MARGIN: 0cm 0cm 10pt"><span lang="EN-GB" style="mso-ansi-language: EN-GB"><font size="3"><font face="Calibri">Until now Peter has used 50m² glass textile (213g/m²) and 14 kg of Epoxy adhesive for the building of the master model</p></font></font></span></p><p class="MsoNormal" style="MARGIN: 0cm 0cm 10pt"><span lang="EN-GB" style="mso-ansi-language: EN-GB"><font size="3"><font face="Calibri">From now on our Alpha Jet will be filled with normal body filler, this step takes a long time to achieve a good result.
</p></font></font></span></p><p class="MsoNormal" style="MARGIN: 0cm 0cm 10pt"><span lang="EN-GB" style="mso-ansi-language: EN-GB"><font size="3"><font face="Calibri">More information next week…
</p></font></font></span></p><p class="MsoNormal" style="MARGIN: 0cm 0cm 10pt"><span lang="EN-GB" style="mso-ansi-language: EN-GB"><font size="3"><font face="Calibri">The building of the master model is almost finished and we had to decide which company gets the assignment to make the moulds and the models. After checking thoroughly all the possible companies we have decided to make our Alpha Jet with Paritech. Many of you will know this company, but I’ll use this opportunity to introduce this company.
</p></font></font></span></p><p class="MsoNormal" style="MARGIN: 0cm 0cm 10pt"><span lang="EN-GB" style="mso-ansi-language: EN-GB"><font face="Calibri" size="3">
</font></span></p><p class="MsoNormal" style="MARGIN: 0cm 0cm 10pt"><span lang="EN-GB" style="mso-ansi-language: EN-GB"><font face="Calibri" size="3"> </font></p></span></p><p class="MsoNormal" style="MARGIN: 0cm 0cm 10pt"><span lang="EN-GB" style="mso-ansi-language: EN-GB"><font size="3"><font face="Calibri">Company portrait Paritech
</p></font></font></span></p><p class="MsoNormal" style="MARGIN: 0cm 0cm 10pt"><span lang="EN-GB" style="mso-ansi-language: EN-GB"><font size="3"><font face="Calibri">Modelling as a hobby – this conducts Uwe Rihm sins his childhood and caused him to make his hobby to his profession.
</p></font></font></span></p><p class="MsoNormal" style="MARGIN: 0cm 0cm 10pt"><span lang="EN-GB" style="mso-ansi-language: EN-GB"><font face="Calibri" size="3">
</font></span></p><p class="MsoNormal" style="MARGIN: 0cm 0cm 10pt"><span lang="EN-GB" style="mso-ansi-language: EN-GB"><font size="3"><font face="Calibri">Picture: paritech.de</p></font></font></span></p><p class="MsoNormal" style="MARGIN: 0cm 0cm 10pt"><span lang="EN-GB" style="mso-ansi-language: EN-GB">
<font face="Calibri" size="3"> </font></p></span></p><p class="MsoNormal" style="MARGIN: 0cm 0cm 10pt"><span lang="EN-GB" style="mso-ansi-language: EN-GB"><font size="3"><font face="Calibri">In the year 1984 Uwe began to produce fuselages for most of the German model companies in hand laminating procedure. The large demand of the marked leaded to a business cooperation with his nephew Matthias Paul. Paul is also a modeller since his childhood, he was 7 times German junior champion.
</p></font></font></span></p><p class="MsoNormal" style="MARGIN: 0cm 0cm 10pt"><span lang="EN-GB" style="mso-ansi-language: EN-GB"><font face="Calibri" size="3">
</font></span></p><p class="MsoNormal" style="MARGIN: 0cm 0cm 10pt"><span lang="EN-GB" style="mso-ansi-language: EN-GB"><font size="3"><font face="Calibri">Picture: paritech.de</p></font></font></span></p><p class="MsoNormal" style="MARGIN: 0cm 0cm 10pt"><span lang="EN-GB" style="mso-ansi-language: EN-GB">
<font face="Calibri" size="3"> </font></p></span></p><p class="MsoNormal" style="MARGIN: 0cm 0cm 10pt"><span lang="EN-GB" style="mso-ansi-language: EN-GB"><font size="3"><font face="Calibri">Since this time both work together as equal shareholder and technical supervisor for Üaritech GmbH.
</p></font></font></span></p><p class="MsoNormal" style="MARGIN: 0cm 0cm 10pt"><span lang="EN-GB" style="mso-ansi-language: EN-GB"><font size="3"><font face="Calibri">2004 Paritech started to produce recon drones. Due to the increasing space requirements Paritech relocated to the industrial Area of Herxheim near Landau.
</p></font></font></span></p><p class="MsoNormal" style="MARGIN: 0cm 0cm 10pt"><span lang="EN-GB" style="mso-ansi-language: EN-GB"><font size="3"><font face="Calibri">Since 2010 Partitech is the first German model company with DIN EN ISO 9001 certificate, this allows the realization of Industrial orders.
</p></font></font></span></p><p class="MsoNormal" style="MARGIN: 0cm 0cm 10pt"><span lang="EN-GB" style="mso-ansi-language: EN-GB"><font size="3"><font face="Calibri">The highlights of the model palette of Paritec is the very large DG1000 S, Fox MDM-1, a Jodel Robin and the Viper MK II, the largest RC Viper worldwide.
</p></font></font></span></p><p class="MsoNormal" style="MARGIN: 0cm 0cm 10pt"><span lang="EN-GB" style="mso-ansi-language: EN-GB"><font face="Calibri" size="3">
</font></span></p><p class="MsoNormal" style="MARGIN: 0cm 0cm 10pt"><font size="3"><font face="Calibri"><span lang="EN-GB" style="mso-ansi-language: EN-GB">Picture</span>: Bernhard Kager</p></font></font></p><p class="MsoNormal" style="MARGIN: 0cm 0cm 10pt"><font face="Calibri" size="3">
</font></p><p class="MsoNormal" style="MARGIN: 0cm 0cm 10pt"><font size="3"><font face="Calibri"><span lang="EN-GB" style="mso-ansi-language: EN-GB">Picture</span>: Udo Dettelbacher</p></font></font></p><p class="MsoNormal" style="MARGIN: 0cm 0cm 10pt"><font face="Calibri" size="3">
</font></p><p class="MsoNormal" style="MARGIN: 0cm 0cm 10pt"><span lang="EN-GB" style="mso-ansi-language: EN-GB"><font size="3"><font face="Calibri">Picture: Paritech.de</p></font></font></span></p><p class="MsoNormal" style="MARGIN: 0cm 0cm 10pt"><span lang="EN-GB" style="mso-ansi-language: EN-GB"><font size="3"><font face="Calibri">I think no other company could reach these quality standards. This is the reason we’ve decided to work together with Paritech for our Alpha Jet.
</p></font></font></span></p><p class="MsoNormal" style="MARGIN: 0cm 0cm 10pt"><span lang="EN-GB" style="mso-ansi-language: EN-GB"><font face="Calibri" size="3">More information on </font><font face="Calibri" size="3">www.partitech.de</font>
</p></span></p><p class="MsoNormal" style="MARGIN: 0cm 0cm 10pt"><span lang="EN-GB" style="mso-ansi-language: EN-GB">
<font face="Calibri" size="3"> </font></p></span></p><p class="MsoNormal" style="MARGIN: 0cm 0cm 10pt"><span lang="EN-GB" style="mso-ansi-language: EN-GB">
<font face="Calibri" size="3"> </font></p></span></p><p class="MsoNormal" style="MARGIN: 0cm 0cm 10pt"><span style="FONT-FAMILY: "Calibri","sans-serif"; COLOR: #002060; mso-bidi-theme-font: minor-latin; mso-ascii-theme-font: minor-latin; mso-hansi-theme-font: minor-latin"><font size="3">Modellsport Schweighofer</font></span><span style="COLOR: #002060; mso-bidi-font-family: Calibri; mso-bidi-theme-font: minor-latin">
<font face="Calibri" size="3">Wirtschaftspark 9 • 8530 Deutschlandsberg
</font></span><span style="COLOR: #002060; mso-bidi-font-family: Calibri; mso-bidi-theme-font: minor-latin"><font face="Calibri" size="3">[email protected]</font></span><span style="COLOR: #002060; mso-bidi-font-family: Calibri; mso-bidi-theme-font: minor-latin">
</p></span></p>
07-08-2013 | 04:10 AM
#30
Thread Starter
Member
Joined: Apr 2013
Posts: 30
Likes: 0
Received 0 Likes
on
0 Posts
From: DeutschlandsbergNon, AUSTRIA
<p class="MsoNormal" style="MARGIN: 0cm 0cm 10pt"><b style="mso-bidi-font-weight: normal"><span lang="EN-GB" style="mso-ansi-language: EN-GB"><font size="3"><font face="Calibri">Schweighofer Alpha Jet Project (Part 12)
</p></font></font></span>[/b]</p><p class="MsoNormal" style="MARGIN: 0cm 0cm 10pt"><span lang="EN-GB" style="mso-ansi-language: EN-GB"><font size="3"><font face="Calibri">All the parts of our Alpha Jet are now covered with glass, sanded and filled. With this method all roughness can be removed and all edges are defined in this way.
</p></font></font></span></p><p class="MsoNormal" style="MARGIN: 0cm 0cm 10pt"> </p><p class="MsoNormal" style="MARGIN: 0cm 0cm 10pt"><span lang="EN-GB" style="mso-ansi-language: EN-GB">
 </p></span></p><p class="MsoNormal" style="MARGIN: 0cm 0cm 10pt"><span lang="EN-GB" style="mso-ansi-language: EN-GB">
<font face="Calibri" size="3"> </font></p></span></p><p class="MsoNormal" style="MARGIN: 0cm 0cm 10pt"><span lang="EN-GB" style="mso-ansi-language: EN-GB"><font size="3"><font face="Calibri">You can plan everything in theory but the reality shows where the way leads. The problem with the wings is the outline with all the buckles and interruptions which causes different profile widths.
</p></font></font></span></p><p class="MsoNormal" style="MARGIN: 0cm 0cm 10pt"> </p><p class="MsoNormal" style="MARGIN: 0cm 0cm 10pt"><span lang="EN-GB" style="mso-ansi-language: EN-GB">
 </p></span></p><p class="MsoNormal" style="MARGIN: 0cm 0cm 10pt"><span lang="EN-GB" style="mso-ansi-language: EN-GB">
 </p></span></p><p class="MsoNormal" style="MARGIN: 0cm 0cm 10pt"><span lang="EN-GB" style="mso-ansi-language: EN-GB">
 </p></span></p><p class="MsoNormal" style="MARGIN: 0cm 0cm 10pt"><span lang="EN-GB" style="mso-ansi-language: EN-GB">
 </p></span></p><p class="MsoNormal" style="MARGIN: 0cm 0cm 10pt"><span lang="EN-GB" style="mso-ansi-language: EN-GB">
<font face="Calibri" size="3"> </font></p></span></p><p class="MsoNormal" style="MARGIN: 0cm 0cm 10pt"><span lang="EN-GB" style="mso-ansi-language: EN-GB"><font size="3"><font face="Calibri">Here you can see Peters armada of sanding tools. Without these tools a flat sanding of the large wings would not be possible.
</p></font></font></span></p><p class="MsoNormal" style="MARGIN: 0cm 0cm 10pt"> </p><p class="MsoNormal" style="MARGIN: 0cm 0cm 10pt"><span lang="EN-GB" style="mso-ansi-language: EN-GB"><font size="3"><font face="Calibri">Again and again the lines have to be checked. For this Peter has this levelling board.
</p></font></font></span></p><p class="MsoNormal" style="MARGIN: 0cm 0cm 10pt"> </p><p class="MsoNormal" style="MARGIN: 0cm 0cm 10pt"><span lang="EN-GB" style="mso-ansi-language: EN-GB"><font size="3"><font face="Calibri">The exact planning of Peter made it easier to assemble the elevator. The box is built of CNC milled parts and is dowelled to the elevator base with 8mm wooden dowels. Thereby all the angles fit and the screwing is more precise and easier.
</p></font></font></span></p><p class="MsoNormal" style="MARGIN: 0cm 0cm 10pt"> </p><p class="MsoNormal" style="MARGIN: 0cm 0cm 10pt">
 </p><p class="MsoNormal" style="MARGIN: 0cm 0cm 10pt"><span lang="EN-GB" style="mso-ansi-language: EN-GB">
 </p></span></p><p class="MsoNormal" style="MARGIN: 0cm 0cm 10pt">
 </p><p class="MsoNormal" style="MARGIN: 0cm 0cm 10pt"><span lang="EN-GB" style="mso-ansi-language: EN-GB">
<font face="Calibri" size="3"> </font></p></span></p><p class="MsoNormal" style="MARGIN: 0cm 0cm 10pt"><span lang="EN-GB" style="mso-ansi-language: EN-GB"><font size="3"><font face="Calibri">For all theorists some adjustment values:
</p></font></font></span></p><p class="MsoNormal" style="MARGIN: 0cm 0cm 10pt"><span lang="EN-GB" style="mso-ansi-language: EN-GB"><font size="3"><font face="Calibri">anhedral wings: 6 degree per wing
</p></font></font></span></p><p class="MsoNormal" style="MARGIN: 0cm 0cm 10pt"><span lang="EN-GB" style="mso-ansi-language: EN-GB"><font size="3"><font face="Calibri">anhedral elevator: 8 degree per elevator
</p></font></font></span></p><p class="MsoNormal" style="MARGIN: 0cm 0cm 10pt"><span lang="EN-GB" style="mso-ansi-language: EN-GB"><font size="3"><font face="Calibri">angle wing: 0,5 degree
</p></font></font></span></p><p class="MsoNormal" style="MARGIN: 0cm 0cm 10pt"><span lang="EN-GB" style="mso-ansi-language: EN-GB"><font size="3"><font face="Calibri">angle elevator: 0 degree
</p></font></font></span></p><p class="MsoNormal" style="MARGIN: 0cm 0cm 10pt"><span lang="EN-GB" style="mso-ansi-language: EN-GB">
<font face="Calibri" size="3"> </font></p></span></p><p class="MsoNormal" style="MARGIN: 0cm 0cm 10pt"><span lang="EN-GB" style="mso-ansi-language: EN-GB"><font size="3"><font face="Calibri">This stage of the building is very complex and needs more time Peter has thought. After all the parts are finished Peter will settle to the painting cabin.
</p></font></font></span></p><p class="MsoNormal" style="MARGIN: 0cm 0cm 10pt"><span lang="EN-GB" style="mso-ansi-language: EN-GB">
<font face="Calibri" size="3"> </font></p></span></p><span style="LINE-HEIGHT: 115%; FONT-FAMILY: "Calibri","sans-serif"; COLOR: #002060; FONT-SIZE: 11pt; mso-ansi-language: DE-AT; mso-bidi-theme-font: minor-latin; mso-ascii-theme-font: minor-latin; mso-fareast-font-family: Calibri; mso-fareast-theme-font: minor-latin; mso-hansi-theme-font: minor-latin; mso-fareast-language: EN-US; mso-bidi-language: AR-SA">Modellsport Schweighofer</span><span style="LINE-HEIGHT: 115%; FONT-FAMILY: "Calibri","sans-serif"; COLOR: #002060; FONT-SIZE: 11pt; mso-ansi-language: DE-AT; mso-bidi-theme-font: minor-latin; mso-ascii-theme-font: minor-latin; mso-fareast-font-family: Calibri; mso-fareast-theme-font: minor-latin; mso-hansi-theme-font: minor-latin; mso-fareast-language: EN-US; mso-bidi-language: AR-SA">
Wirtschaftspark 9 • 8530 Deutschlandsberg
</span><span style="LINE-HEIGHT: 115%; FONT-FAMILY: "Calibri","sans-serif"; FONT-SIZE: 11pt; mso-ansi-language: DE-AT; mso-bidi-font-family: "Times New Roman"; mso-bidi-theme-font: minor-bidi; mso-ascii-theme-font: minor-latin; mso-fareast-font-family: Calibri; mso-fareast-theme-font: minor-latin; mso-hansi-theme-font: minor-latin; mso-fareast-language: EN-US; mso-bidi-language: AR-SA"><span style="COLOR: #002060; mso-bidi-font-family: Calibri; mso-bidi-theme-font: minor-latin">[email protected]</span></span>
</p></font></font></span>[/b]</p><p class="MsoNormal" style="MARGIN: 0cm 0cm 10pt"><span lang="EN-GB" style="mso-ansi-language: EN-GB"><font size="3"><font face="Calibri">All the parts of our Alpha Jet are now covered with glass, sanded and filled. With this method all roughness can be removed and all edges are defined in this way.
</p></font></font></span></p><p class="MsoNormal" style="MARGIN: 0cm 0cm 10pt">
</p><p class="MsoNormal" style="MARGIN: 0cm 0cm 10pt"><span lang="EN-GB" style="mso-ansi-language: EN-GB"></p></span></p><p class="MsoNormal" style="MARGIN: 0cm 0cm 10pt"><span lang="EN-GB" style="mso-ansi-language: EN-GB"><font face="Calibri" size="3"> </font></p></span></p><p class="MsoNormal" style="MARGIN: 0cm 0cm 10pt"><span lang="EN-GB" style="mso-ansi-language: EN-GB"><font size="3"><font face="Calibri">You can plan everything in theory but the reality shows where the way leads. The problem with the wings is the outline with all the buckles and interruptions which causes different profile widths.
</p></font></font></span></p><p class="MsoNormal" style="MARGIN: 0cm 0cm 10pt">
</p><p class="MsoNormal" style="MARGIN: 0cm 0cm 10pt"><span lang="EN-GB" style="mso-ansi-language: EN-GB"></p></span></p><p class="MsoNormal" style="MARGIN: 0cm 0cm 10pt"><span lang="EN-GB" style="mso-ansi-language: EN-GB"></p></span></p><p class="MsoNormal" style="MARGIN: 0cm 0cm 10pt"><span lang="EN-GB" style="mso-ansi-language: EN-GB"></p></span></p><p class="MsoNormal" style="MARGIN: 0cm 0cm 10pt"><span lang="EN-GB" style="mso-ansi-language: EN-GB"></p></span></p><p class="MsoNormal" style="MARGIN: 0cm 0cm 10pt"><span lang="EN-GB" style="mso-ansi-language: EN-GB"><font face="Calibri" size="3"> </font></p></span></p><p class="MsoNormal" style="MARGIN: 0cm 0cm 10pt"><span lang="EN-GB" style="mso-ansi-language: EN-GB"><font size="3"><font face="Calibri">Here you can see Peters armada of sanding tools. Without these tools a flat sanding of the large wings would not be possible.
</p></font></font></span></p><p class="MsoNormal" style="MARGIN: 0cm 0cm 10pt">
</p><p class="MsoNormal" style="MARGIN: 0cm 0cm 10pt"><span lang="EN-GB" style="mso-ansi-language: EN-GB"><font size="3"><font face="Calibri">Again and again the lines have to be checked. For this Peter has this levelling board.</p></font></font></span></p><p class="MsoNormal" style="MARGIN: 0cm 0cm 10pt">
</p><p class="MsoNormal" style="MARGIN: 0cm 0cm 10pt"><span lang="EN-GB" style="mso-ansi-language: EN-GB"><font size="3"><font face="Calibri">The exact planning of Peter made it easier to assemble the elevator. The box is built of CNC milled parts and is dowelled to the elevator base with 8mm wooden dowels. Thereby all the angles fit and the screwing is more precise and easier.</p></font></font></span></p><p class="MsoNormal" style="MARGIN: 0cm 0cm 10pt">
</p><p class="MsoNormal" style="MARGIN: 0cm 0cm 10pt"></p><p class="MsoNormal" style="MARGIN: 0cm 0cm 10pt"><span lang="EN-GB" style="mso-ansi-language: EN-GB"></p></span></p><p class="MsoNormal" style="MARGIN: 0cm 0cm 10pt"></p><p class="MsoNormal" style="MARGIN: 0cm 0cm 10pt"><span lang="EN-GB" style="mso-ansi-language: EN-GB"><font face="Calibri" size="3"> </font></p></span></p><p class="MsoNormal" style="MARGIN: 0cm 0cm 10pt"><span lang="EN-GB" style="mso-ansi-language: EN-GB"><font size="3"><font face="Calibri">For all theorists some adjustment values:
</p></font></font></span></p><p class="MsoNormal" style="MARGIN: 0cm 0cm 10pt"><span lang="EN-GB" style="mso-ansi-language: EN-GB"><font size="3"><font face="Calibri">anhedral wings: 6 degree per wing
</p></font></font></span></p><p class="MsoNormal" style="MARGIN: 0cm 0cm 10pt"><span lang="EN-GB" style="mso-ansi-language: EN-GB"><font size="3"><font face="Calibri">anhedral elevator: 8 degree per elevator
</p></font></font></span></p><p class="MsoNormal" style="MARGIN: 0cm 0cm 10pt"><span lang="EN-GB" style="mso-ansi-language: EN-GB"><font size="3"><font face="Calibri">angle wing: 0,5 degree
</p></font></font></span></p><p class="MsoNormal" style="MARGIN: 0cm 0cm 10pt"><span lang="EN-GB" style="mso-ansi-language: EN-GB"><font size="3"><font face="Calibri">angle elevator: 0 degree
</p></font></font></span></p><p class="MsoNormal" style="MARGIN: 0cm 0cm 10pt"><span lang="EN-GB" style="mso-ansi-language: EN-GB">
<font face="Calibri" size="3"> </font></p></span></p><p class="MsoNormal" style="MARGIN: 0cm 0cm 10pt"><span lang="EN-GB" style="mso-ansi-language: EN-GB"><font size="3"><font face="Calibri">This stage of the building is very complex and needs more time Peter has thought. After all the parts are finished Peter will settle to the painting cabin.
</p></font></font></span></p><p class="MsoNormal" style="MARGIN: 0cm 0cm 10pt"><span lang="EN-GB" style="mso-ansi-language: EN-GB">
<font face="Calibri" size="3"> </font></p></span></p><span style="LINE-HEIGHT: 115%; FONT-FAMILY: "Calibri","sans-serif"; COLOR: #002060; FONT-SIZE: 11pt; mso-ansi-language: DE-AT; mso-bidi-theme-font: minor-latin; mso-ascii-theme-font: minor-latin; mso-fareast-font-family: Calibri; mso-fareast-theme-font: minor-latin; mso-hansi-theme-font: minor-latin; mso-fareast-language: EN-US; mso-bidi-language: AR-SA">Modellsport Schweighofer</span><span style="LINE-HEIGHT: 115%; FONT-FAMILY: "Calibri","sans-serif"; COLOR: #002060; FONT-SIZE: 11pt; mso-ansi-language: DE-AT; mso-bidi-theme-font: minor-latin; mso-ascii-theme-font: minor-latin; mso-fareast-font-family: Calibri; mso-fareast-theme-font: minor-latin; mso-hansi-theme-font: minor-latin; mso-fareast-language: EN-US; mso-bidi-language: AR-SA">
Wirtschaftspark 9 • 8530 Deutschlandsberg
</span><span style="LINE-HEIGHT: 115%; FONT-FAMILY: "Calibri","sans-serif"; FONT-SIZE: 11pt; mso-ansi-language: DE-AT; mso-bidi-font-family: "Times New Roman"; mso-bidi-theme-font: minor-bidi; mso-ascii-theme-font: minor-latin; mso-fareast-font-family: Calibri; mso-fareast-theme-font: minor-latin; mso-hansi-theme-font: minor-latin; mso-fareast-language: EN-US; mso-bidi-language: AR-SA"><span style="COLOR: #002060; mso-bidi-font-family: Calibri; mso-bidi-theme-font: minor-latin">[email protected]</span></span>
07-12-2013 | 12:10 AM
#31
Thread Starter
Member
Joined: Apr 2013
Posts: 30
Likes: 0
Received 0 Likes
on
0 Posts
From: DeutschlandsbergNon, AUSTRIA
<p class="MsoNormal" style="MARGIN: 0cm 0cm 10pt"><b style="mso-bidi-font-weight: normal"><span lang="EN-GB" style="mso-ansi-language: EN-GB"><font size="3"><font face="Calibri">Schweighofer Alpha Jet Project (Part 13)
</p></font></font></span>[/b]</p><p class="MsoNormal" style="MARGIN: 0cm 0cm 10pt"><span lang="EN-GB" style="mso-ansi-language: EN-GB"><font size="3"><font face="Calibri">Not everything works perfect…
</p></font></font></span></p><p class="MsoNormal" style="MARGIN: 0cm 0cm 10pt"><span lang="EN-GB" style="mso-ansi-language: EN-GB"><font size="3"><font face="Calibri">Peter was a little bit too motivated while sanding the fuselage on some points and sanded the cover down to the foam on some points. To repair these points he had to cut out the glass and he had to cover and fill these areas again. Work which takes long and delays the project.
</p></font></font></span></p><p class="MsoNormal" style="MARGIN: 0cm 0cm 10pt"><span lang="EN-GB" style="mso-ansi-language: EN-GB">
 </p></span></p><p class="MsoNormal" style="MARGIN: 0cm 0cm 10pt"><span lang="EN-GB" style="mso-ansi-language: EN-GB">
 </p></span></p><p class="MsoNormal" style="MARGIN: 0cm 0cm 10pt"><span lang="EN-GB" style="mso-ansi-language: EN-GB"><font size="3"><font face="Calibri">As you can see on these pictures we have good news as well. The Alpha Jet slowly gets its final surface and already looks edged. Time is short and the Alpha Jet has to go to the painting cabin. Peter had to do many overtime hours to catch the timetable.
</p></font></font></span></p><p class="MsoNormal" style="MARGIN: 0cm 0cm 10pt"><span lang="EN-GB" style="mso-ansi-language: EN-GB">
 </p></span></p><p class="MsoNormal" style="MARGIN: 0cm 0cm 10pt"><span lang="EN-GB" style="mso-ansi-language: EN-GB">
 </p></span></p><p class="MsoNormal" style="MARGIN: 0cm 0cm 10pt"><span lang="EN-GB" style="mso-ansi-language: EN-GB">
 </p></span></p><p class="MsoNormal" style="MARGIN: 0cm 0cm 10pt"><span lang="EN-GB" style="mso-ansi-language: EN-GB">
 </p></span></p><p class="MsoNormal" style="MARGIN: 0cm 0cm 10pt"><span lang="EN-GB" style="mso-ansi-language: EN-GB">
 </p></span></p><p class="MsoNormal" style="MARGIN: 0cm 0cm 10pt"><span lang="EN-GB" style="mso-ansi-language: EN-GB">
 </p></span></p><p class="MsoNormal" style="MARGIN: 0cm 0cm 10pt"><span lang="EN-GB" style="mso-ansi-language: EN-GB">
 </p></span></p><p class="MsoNormal" style="MARGIN: 0cm 0cm 10pt"><span lang="EN-GB" style="mso-ansi-language: EN-GB">
 </p></span></p><p class="MsoNormal" style="MARGIN: 0cm 0cm 10pt">
 </p><p class="MsoNormal" style="MARGIN: 0cm 0cm 10pt"><span lang="EN-GB" style="mso-ansi-language: EN-GB"><font size="3"><font face="Calibri">Our Alpha Jet has many edges and corners. For applying the filler Peter uses one way injections. The drawing is done with his fingers or suitable tubes.
</p></font></font></span></p><p class="MsoNormal" style="MARGIN: 0cm 0cm 10pt"><span lang="EN-GB" style="mso-ansi-language: EN-GB">
 </p></span></p><p class="MsoNormal" style="MARGIN: 0cm 0cm 10pt"><span lang="EN-GB" style="mso-ansi-language: EN-GB">
 </p></span></p><p class="MsoNormal" style="MARGIN: 0cm 0cm 10pt"><span lang="EN-GB" style="mso-ansi-language: EN-GB">
 </p></span></p><p class="MsoNormal" style="MARGIN: 0cm 0cm 10pt"><span lang="EN-GB" style="mso-ansi-language: EN-GB">
 </p></span></p><p class="MsoNormal" style="MARGIN: 0cm 0cm 10pt"><span lang="EN-GB" style="mso-ansi-language: EN-GB">
 </p></span></p><p class="MsoNormal" style="MARGIN: 0cm 0cm 10pt"><span lang="EN-GB" style="mso-ansi-language: EN-GB"><font size="3"><font face="Calibri">The last pictures for today – peters sanding tube for concaved areas. Until now we have uses 16 kg of filler and many meters of sanding paper.
</p></font></font></span></p><p class="MsoNormal" style="MARGIN: 0cm 0cm 10pt">
 </p><p class="MsoNormal" style="MARGIN: 0cm 0cm 10pt"><span lang="EN-GB" style="mso-ansi-language: EN-GB">
<font face="Calibri" size="3"> </font></p></span></p><span style="LINE-HEIGHT: 115%; FONT-FAMILY: "Calibri","sans-serif"; COLOR: #002060; FONT-SIZE: 11pt; mso-ansi-language: DE-AT; mso-bidi-theme-font: minor-latin; mso-ascii-theme-font: minor-latin; mso-fareast-font-family: Calibri; mso-fareast-theme-font: minor-latin; mso-hansi-theme-font: minor-latin; mso-fareast-language: EN-US; mso-bidi-language: AR-SA">Modellsport Schweighofer</span><span style="LINE-HEIGHT: 115%; FONT-FAMILY: "Calibri","sans-serif"; COLOR: #002060; FONT-SIZE: 11pt; mso-ansi-language: DE-AT; mso-bidi-theme-font: minor-latin; mso-ascii-theme-font: minor-latin; mso-fareast-font-family: Calibri; mso-fareast-theme-font: minor-latin; mso-hansi-theme-font: minor-latin; mso-fareast-language: EN-US; mso-bidi-language: AR-SA">
Wirtschaftspark 9 • 8530 Deutschlandsberg
</span><span style="LINE-HEIGHT: 115%; FONT-FAMILY: "Calibri","sans-serif"; FONT-SIZE: 11pt; mso-ansi-language: DE-AT; mso-bidi-font-family: "Times New Roman"; mso-bidi-theme-font: minor-bidi; mso-ascii-theme-font: minor-latin; mso-fareast-font-family: Calibri; mso-fareast-theme-font: minor-latin; mso-hansi-theme-font: minor-latin; mso-fareast-language: EN-US; mso-bidi-language: AR-SA"><span style="COLOR: #002060; mso-bidi-font-family: Calibri; mso-bidi-theme-font: minor-latin">[email protected]</span></span>
</p></font></font></span>[/b]</p><p class="MsoNormal" style="MARGIN: 0cm 0cm 10pt"><span lang="EN-GB" style="mso-ansi-language: EN-GB"><font size="3"><font face="Calibri">Not everything works perfect…
</p></font></font></span></p><p class="MsoNormal" style="MARGIN: 0cm 0cm 10pt"><span lang="EN-GB" style="mso-ansi-language: EN-GB"><font size="3"><font face="Calibri">Peter was a little bit too motivated while sanding the fuselage on some points and sanded the cover down to the foam on some points. To repair these points he had to cut out the glass and he had to cover and fill these areas again. Work which takes long and delays the project.
</p></font></font></span></p><p class="MsoNormal" style="MARGIN: 0cm 0cm 10pt"><span lang="EN-GB" style="mso-ansi-language: EN-GB">
</p></span></p><p class="MsoNormal" style="MARGIN: 0cm 0cm 10pt"><span lang="EN-GB" style="mso-ansi-language: EN-GB"></p></span></p><p class="MsoNormal" style="MARGIN: 0cm 0cm 10pt"><span lang="EN-GB" style="mso-ansi-language: EN-GB"><font size="3"><font face="Calibri">As you can see on these pictures we have good news as well. The Alpha Jet slowly gets its final surface and already looks edged. Time is short and the Alpha Jet has to go to the painting cabin. Peter had to do many overtime hours to catch the timetable.</p></font></font></span></p><p class="MsoNormal" style="MARGIN: 0cm 0cm 10pt"><span lang="EN-GB" style="mso-ansi-language: EN-GB">
</p></span></p><p class="MsoNormal" style="MARGIN: 0cm 0cm 10pt"><span lang="EN-GB" style="mso-ansi-language: EN-GB"></p></span></p><p class="MsoNormal" style="MARGIN: 0cm 0cm 10pt"><span lang="EN-GB" style="mso-ansi-language: EN-GB"></p></span></p><p class="MsoNormal" style="MARGIN: 0cm 0cm 10pt"><span lang="EN-GB" style="mso-ansi-language: EN-GB"></p></span></p><p class="MsoNormal" style="MARGIN: 0cm 0cm 10pt"><span lang="EN-GB" style="mso-ansi-language: EN-GB"></p></span></p><p class="MsoNormal" style="MARGIN: 0cm 0cm 10pt"><span lang="EN-GB" style="mso-ansi-language: EN-GB"></p></span></p><p class="MsoNormal" style="MARGIN: 0cm 0cm 10pt"><span lang="EN-GB" style="mso-ansi-language: EN-GB"></p></span></p><p class="MsoNormal" style="MARGIN: 0cm 0cm 10pt"><span lang="EN-GB" style="mso-ansi-language: EN-GB"></p></span></p><p class="MsoNormal" style="MARGIN: 0cm 0cm 10pt"></p><p class="MsoNormal" style="MARGIN: 0cm 0cm 10pt"><span lang="EN-GB" style="mso-ansi-language: EN-GB"><font size="3"><font face="Calibri">Our Alpha Jet has many edges and corners. For applying the filler Peter uses one way injections. The drawing is done with his fingers or suitable tubes.</p></font></font></span></p><p class="MsoNormal" style="MARGIN: 0cm 0cm 10pt"><span lang="EN-GB" style="mso-ansi-language: EN-GB">
</p></span></p><p class="MsoNormal" style="MARGIN: 0cm 0cm 10pt"><span lang="EN-GB" style="mso-ansi-language: EN-GB"></p></span></p><p class="MsoNormal" style="MARGIN: 0cm 0cm 10pt"><span lang="EN-GB" style="mso-ansi-language: EN-GB"></p></span></p><p class="MsoNormal" style="MARGIN: 0cm 0cm 10pt"><span lang="EN-GB" style="mso-ansi-language: EN-GB"></p></span></p><p class="MsoNormal" style="MARGIN: 0cm 0cm 10pt"><span lang="EN-GB" style="mso-ansi-language: EN-GB"></p></span></p><p class="MsoNormal" style="MARGIN: 0cm 0cm 10pt"><span lang="EN-GB" style="mso-ansi-language: EN-GB"><font size="3"><font face="Calibri">The last pictures for today – peters sanding tube for concaved areas. Until now we have uses 16 kg of filler and many meters of sanding paper.</p></font></font></span></p><p class="MsoNormal" style="MARGIN: 0cm 0cm 10pt">
</p><p class="MsoNormal" style="MARGIN: 0cm 0cm 10pt"><span lang="EN-GB" style="mso-ansi-language: EN-GB"><font face="Calibri" size="3"> </font></p></span></p><span style="LINE-HEIGHT: 115%; FONT-FAMILY: "Calibri","sans-serif"; COLOR: #002060; FONT-SIZE: 11pt; mso-ansi-language: DE-AT; mso-bidi-theme-font: minor-latin; mso-ascii-theme-font: minor-latin; mso-fareast-font-family: Calibri; mso-fareast-theme-font: minor-latin; mso-hansi-theme-font: minor-latin; mso-fareast-language: EN-US; mso-bidi-language: AR-SA">Modellsport Schweighofer</span><span style="LINE-HEIGHT: 115%; FONT-FAMILY: "Calibri","sans-serif"; COLOR: #002060; FONT-SIZE: 11pt; mso-ansi-language: DE-AT; mso-bidi-theme-font: minor-latin; mso-ascii-theme-font: minor-latin; mso-fareast-font-family: Calibri; mso-fareast-theme-font: minor-latin; mso-hansi-theme-font: minor-latin; mso-fareast-language: EN-US; mso-bidi-language: AR-SA">
Wirtschaftspark 9 • 8530 Deutschlandsberg
</span><span style="LINE-HEIGHT: 115%; FONT-FAMILY: "Calibri","sans-serif"; FONT-SIZE: 11pt; mso-ansi-language: DE-AT; mso-bidi-font-family: "Times New Roman"; mso-bidi-theme-font: minor-bidi; mso-ascii-theme-font: minor-latin; mso-fareast-font-family: Calibri; mso-fareast-theme-font: minor-latin; mso-hansi-theme-font: minor-latin; mso-fareast-language: EN-US; mso-bidi-language: AR-SA"><span style="COLOR: #002060; mso-bidi-font-family: Calibri; mso-bidi-theme-font: minor-latin">[email protected]</span></span>
07-15-2013 | 05:47 AM
#32
Thread Starter
Member
Joined: Apr 2013
Posts: 30
Likes: 0
Received 0 Likes
on
0 Posts
From: DeutschlandsbergNon, AUSTRIA
<p class="MsoNormal" style="MARGIN: 0cm 0cm 10pt"><b style="mso-bidi-font-weight: normal"><span lang="EN-GB" style="mso-ansi-language: EN-GB"><font size="3"><font face="Calibri">Schweighofer Alpha Jet Project (Part 14)
</p></font></font></span>[/b]</p><p class="MsoNormal" style="MARGIN: 0cm 0cm 10pt"><span lang="EN-GB" style="mso-ansi-language: EN-GB"><font size="3"><font face="Calibri">Finally the model is ready for spray filling.
</p></font></font></span></p><p class="MsoNormal" style="MARGIN: 0cm 0cm 10pt"><span lang="EN-GB" style="mso-ansi-language: EN-GB"><font size="3"><font face="Calibri">Many hours, a lot of sweat and material have been burned up until now – but the result was worth it.
</p></font></font></span></p><p class="MsoNormal" style="MARGIN: 0cm 0cm 10pt"><span lang="EN-GB" style="mso-ansi-language: EN-GB"><font size="3"><font face="Calibri">Impressions of our Alpha Jet – now the way leads to the sprayer cabin:
</p></font></font></span></p><p class="MsoNormal" style="MARGIN: 0cm 0cm 10pt"><span lang="EN-GB" style="mso-ansi-language: EN-GB">
 </p></span></p><p class="MsoNormal" style="MARGIN: 0cm 0cm 10pt"><span lang="EN-GB" style="mso-ansi-language: EN-GB">
 </p></span></p><p class="MsoNormal" style="MARGIN: 0cm 0cm 10pt"><span lang="EN-GB" style="mso-ansi-language: EN-GB">
 </p></span></p><p class="MsoNormal" style="MARGIN: 0cm 0cm 10pt">
 </p><p class="MsoNormal" style="MARGIN: 0cm 0cm 10pt"><span lang="EN-GB" style="mso-ansi-language: EN-GB">
 </p></span></p><p class="MsoNormal" style="MARGIN: 0cm 0cm 10pt"><span lang="EN-GB" style="mso-ansi-language: EN-GB">
 </p></span></p><p class="MsoNormal" style="MARGIN: 0cm 0cm 10pt">
 </p><p class="MsoNormal" style="MARGIN: 0cm 0cm 10pt"><span lang="EN-GB" style="mso-ansi-language: EN-GB">
 </p></span></p><p class="MsoNormal" style="MARGIN: 0cm 0cm 10pt">
 </p><p class="MsoNormal" style="MARGIN: 0cm 0cm 10pt"><span lang="EN-GB" style="mso-ansi-language: EN-GB">
 </p></span></p><p class="MsoNormal" style="MARGIN: 0cm 0cm 10pt"><span lang="EN-GB" style="mso-ansi-language: EN-GB">
 </p></span></p><p class="MsoNormal" style="MARGIN: 0cm 0cm 10pt"><span lang="EN-GB" style="mso-ansi-language: EN-GB">
<font face="Calibri" size="3"> </font></p></span></p><p class="MsoNormal" style="MARGIN: 0cm 0cm 10pt"><span lang="EN-GB" style="mso-ansi-language: EN-GB"><font size="3"><font face="Calibri">The model is one part, the undercarriage another. Until now we had no appointment with Red Bull. I think these guys had too much work in the last months to organize the Airpower show. Congratulations from my side.
</p></font></font></span></p><p class="MsoNormal" style="MARGIN: 0cm 0cm 10pt"><span lang="EN-GB" style="mso-ansi-language: EN-GB"><font size="3"><font face="Calibri">This delay is not tragically but it causes concern we still have no documentations of the undercarriage.
</p></font></font></span></p><p class="MsoNormal" style="MARGIN: 0cm 0cm 10pt"><span lang="EN-GB" style="mso-ansi-language: EN-GB"><font size="3"><font face="Calibri">We took apart the Jett meeting in Fürstenfeld this year; there we got known with Markus Lützenburger. This meeting was a lucky strike. I haven’t known there are people who spend week lasting holidays, dinners and most spare time in Airplanes. Nobody knows the Alpha Jet as good as Markus.
</p></font></font></span></p><p class="MsoNormal" style="MARGIN: 0cm 0cm 10pt"><span lang="EN-GB" style="mso-ansi-language: EN-GB"><font size="3"><font face="Calibri">He had his Alpha Jet in Fürstenfeld, I got many useful hints from him for our Project. I’d like to use this opportunity to introduce Markus.
</p></font></font></span></p><p class="MsoNormal" style="MARGIN: 0cm 0cm 10pt"><span lang="EN-GB" style="mso-ansi-language: EN-GB">
 </p></span></p><p class="MsoNormal" style="MARGIN: 0cm 0cm 10pt"><span lang="EN-GB" style="mso-ansi-language: EN-GB"><font size="3"><font face="Calibri">Picture: Markus Lützenburger
</p></font></font></span></p><p class="MsoNormal" style="MARGIN: 0cm 0cm 10pt"><span lang="EN-GB" style="mso-ansi-language: EN-GB"><font size="3"><font face="Calibri">Markus Lützenberger is a modeller since his childhood. He started his career with a “kleiner UHU” from Graupner. Since the beginning he had the attention to construct and to build everything on his own. To do this his education as a plastic technician helped him.
</p></font></font></span></p><p class="MsoNormal" style="MARGIN: 0cm 0cm 10pt"><span lang="EN-GB" style="mso-ansi-language: EN-GB"><font size="3"><font face="Calibri">Later Markus has built his own models, for example a 4meter competition soaring plane Sphinxx with carbon wings.
</p></font></font></span></p><p class="MsoNormal" style="MARGIN: 0cm 0cm 10pt"><span lang="EN-GB" style="mso-ansi-language: EN-GB"><font size="3"><font face="Calibri">His home was directly on the approach path of the Fürstenfeldbruck Airbase, where he was infected by the fascination of the Alpha Jets of the JaBoG 49. Since this time Markus dreamed of a jet engine for models. 204 he build his own KJ66 turbine, since this event Markus suffered of the “turbine fever”.
</p></font></font></span></p><p class="MsoNormal" style="MARGIN: 0cm 0cm 10pt"><span lang="EN-GB" style="mso-ansi-language: EN-GB"><font size="3"><font face="Calibri">2005 Markus developed the Fuelwatch system which is used by many jet pilots until today.
</p></font></font></span></p><p class="MsoNormal" style="MARGIN: 0cm 0cm 10pt"><span lang="EN-GB" style="mso-ansi-language: EN-GB"><font size="3"><font face="Calibri">Now Markus has realized his dream of a turbine powered Alpha Jet. He has collected a lot of information in the last years and he has spent many hours under the full size plane which guards the doors of the former airbase Fürstenfeldbruck.
</p></font></font></span></p><p class="MsoNormal" style="MARGIN: 0cm 0cm 10pt"><span lang="EN-GB" style="mso-ansi-language: EN-GB"><font size="3"><font face="Calibri">Based on the drawings and pictures Markus has collected we have enough material to start the construction of the undercarriage.
</p></font></font></span></p><p class="MsoNormal" style="MARGIN: 0cm 0cm 10pt"><span lang="EN-GB" style="mso-ansi-language: EN-GB">
<font face="Calibri" size="3"> </font></p></span></p><span style="LINE-HEIGHT: 115%; FONT-FAMILY: "Calibri","sans-serif"; COLOR: #002060; FONT-SIZE: 11pt; mso-ansi-language: DE-AT; mso-bidi-theme-font: minor-latin; mso-ascii-theme-font: minor-latin; mso-fareast-font-family: Calibri; mso-fareast-theme-font: minor-latin; mso-hansi-theme-font: minor-latin; mso-fareast-language: EN-US; mso-bidi-language: AR-SA">Modellsport Schweighofer</span><span style="LINE-HEIGHT: 115%; FONT-FAMILY: "Calibri","sans-serif"; COLOR: #002060; FONT-SIZE: 11pt; mso-ansi-language: DE-AT; mso-bidi-theme-font: minor-latin; mso-ascii-theme-font: minor-latin; mso-fareast-font-family: Calibri; mso-fareast-theme-font: minor-latin; mso-hansi-theme-font: minor-latin; mso-fareast-language: EN-US; mso-bidi-language: AR-SA">
Wirtschaftspark 9 • 8530 Deutschlandsberg
</span><span style="LINE-HEIGHT: 115%; FONT-FAMILY: "Calibri","sans-serif"; FONT-SIZE: 11pt; mso-ansi-language: DE-AT; mso-bidi-font-family: "Times New Roman"; mso-bidi-theme-font: minor-bidi; mso-ascii-theme-font: minor-latin; mso-fareast-font-family: Calibri; mso-fareast-theme-font: minor-latin; mso-hansi-theme-font: minor-latin; mso-fareast-language: EN-US; mso-bidi-language: AR-SA"><span style="COLOR: #002060; mso-bidi-font-family: Calibri; mso-bidi-theme-font: minor-latin">[email protected]</span></span>
</p></font></font></span>[/b]</p><p class="MsoNormal" style="MARGIN: 0cm 0cm 10pt"><span lang="EN-GB" style="mso-ansi-language: EN-GB"><font size="3"><font face="Calibri">Finally the model is ready for spray filling.
</p></font></font></span></p><p class="MsoNormal" style="MARGIN: 0cm 0cm 10pt"><span lang="EN-GB" style="mso-ansi-language: EN-GB"><font size="3"><font face="Calibri">Many hours, a lot of sweat and material have been burned up until now – but the result was worth it.
</p></font></font></span></p><p class="MsoNormal" style="MARGIN: 0cm 0cm 10pt"><span lang="EN-GB" style="mso-ansi-language: EN-GB"><font size="3"><font face="Calibri">Impressions of our Alpha Jet – now the way leads to the sprayer cabin:
</p></font></font></span></p><p class="MsoNormal" style="MARGIN: 0cm 0cm 10pt"><span lang="EN-GB" style="mso-ansi-language: EN-GB">
</p></span></p><p class="MsoNormal" style="MARGIN: 0cm 0cm 10pt"><span lang="EN-GB" style="mso-ansi-language: EN-GB"></p></span></p><p class="MsoNormal" style="MARGIN: 0cm 0cm 10pt"><span lang="EN-GB" style="mso-ansi-language: EN-GB"></p></span></p><p class="MsoNormal" style="MARGIN: 0cm 0cm 10pt"></p><p class="MsoNormal" style="MARGIN: 0cm 0cm 10pt"><span lang="EN-GB" style="mso-ansi-language: EN-GB"></p></span></p><p class="MsoNormal" style="MARGIN: 0cm 0cm 10pt"><span lang="EN-GB" style="mso-ansi-language: EN-GB"></p></span></p><p class="MsoNormal" style="MARGIN: 0cm 0cm 10pt"></p><p class="MsoNormal" style="MARGIN: 0cm 0cm 10pt"><span lang="EN-GB" style="mso-ansi-language: EN-GB"></p></span></p><p class="MsoNormal" style="MARGIN: 0cm 0cm 10pt"></p><p class="MsoNormal" style="MARGIN: 0cm 0cm 10pt"><span lang="EN-GB" style="mso-ansi-language: EN-GB"></p></span></p><p class="MsoNormal" style="MARGIN: 0cm 0cm 10pt"><span lang="EN-GB" style="mso-ansi-language: EN-GB"></p></span></p><p class="MsoNormal" style="MARGIN: 0cm 0cm 10pt"><span lang="EN-GB" style="mso-ansi-language: EN-GB"><font face="Calibri" size="3"> </font></p></span></p><p class="MsoNormal" style="MARGIN: 0cm 0cm 10pt"><span lang="EN-GB" style="mso-ansi-language: EN-GB"><font size="3"><font face="Calibri">The model is one part, the undercarriage another. Until now we had no appointment with Red Bull. I think these guys had too much work in the last months to organize the Airpower show. Congratulations from my side.
</p></font></font></span></p><p class="MsoNormal" style="MARGIN: 0cm 0cm 10pt"><span lang="EN-GB" style="mso-ansi-language: EN-GB"><font size="3"><font face="Calibri">This delay is not tragically but it causes concern we still have no documentations of the undercarriage.
</p></font></font></span></p><p class="MsoNormal" style="MARGIN: 0cm 0cm 10pt"><span lang="EN-GB" style="mso-ansi-language: EN-GB"><font size="3"><font face="Calibri">We took apart the Jett meeting in Fürstenfeld this year; there we got known with Markus Lützenburger. This meeting was a lucky strike. I haven’t known there are people who spend week lasting holidays, dinners and most spare time in Airplanes. Nobody knows the Alpha Jet as good as Markus.
</p></font></font></span></p><p class="MsoNormal" style="MARGIN: 0cm 0cm 10pt"><span lang="EN-GB" style="mso-ansi-language: EN-GB"><font size="3"><font face="Calibri">He had his Alpha Jet in Fürstenfeld, I got many useful hints from him for our Project. I’d like to use this opportunity to introduce Markus.
</p></font></font></span></p><p class="MsoNormal" style="MARGIN: 0cm 0cm 10pt"><span lang="EN-GB" style="mso-ansi-language: EN-GB">
</p></span></p><p class="MsoNormal" style="MARGIN: 0cm 0cm 10pt"><span lang="EN-GB" style="mso-ansi-language: EN-GB"><font size="3"><font face="Calibri">Picture: Markus Lützenburger</p></font></font></span></p><p class="MsoNormal" style="MARGIN: 0cm 0cm 10pt"><span lang="EN-GB" style="mso-ansi-language: EN-GB"><font size="3"><font face="Calibri">Markus Lützenberger is a modeller since his childhood. He started his career with a “kleiner UHU” from Graupner. Since the beginning he had the attention to construct and to build everything on his own. To do this his education as a plastic technician helped him.
</p></font></font></span></p><p class="MsoNormal" style="MARGIN: 0cm 0cm 10pt"><span lang="EN-GB" style="mso-ansi-language: EN-GB"><font size="3"><font face="Calibri">Later Markus has built his own models, for example a 4meter competition soaring plane Sphinxx with carbon wings.
</p></font></font></span></p><p class="MsoNormal" style="MARGIN: 0cm 0cm 10pt"><span lang="EN-GB" style="mso-ansi-language: EN-GB"><font size="3"><font face="Calibri">His home was directly on the approach path of the Fürstenfeldbruck Airbase, where he was infected by the fascination of the Alpha Jets of the JaBoG 49. Since this time Markus dreamed of a jet engine for models. 204 he build his own KJ66 turbine, since this event Markus suffered of the “turbine fever”.
</p></font></font></span></p><p class="MsoNormal" style="MARGIN: 0cm 0cm 10pt"><span lang="EN-GB" style="mso-ansi-language: EN-GB"><font size="3"><font face="Calibri">2005 Markus developed the Fuelwatch system which is used by many jet pilots until today.
</p></font></font></span></p><p class="MsoNormal" style="MARGIN: 0cm 0cm 10pt"><span lang="EN-GB" style="mso-ansi-language: EN-GB"><font size="3"><font face="Calibri">Now Markus has realized his dream of a turbine powered Alpha Jet. He has collected a lot of information in the last years and he has spent many hours under the full size plane which guards the doors of the former airbase Fürstenfeldbruck.
</p></font></font></span></p><p class="MsoNormal" style="MARGIN: 0cm 0cm 10pt"><span lang="EN-GB" style="mso-ansi-language: EN-GB"><font size="3"><font face="Calibri">Based on the drawings and pictures Markus has collected we have enough material to start the construction of the undercarriage.
</p></font></font></span></p><p class="MsoNormal" style="MARGIN: 0cm 0cm 10pt"><span lang="EN-GB" style="mso-ansi-language: EN-GB">
<font face="Calibri" size="3"> </font></p></span></p><span style="LINE-HEIGHT: 115%; FONT-FAMILY: "Calibri","sans-serif"; COLOR: #002060; FONT-SIZE: 11pt; mso-ansi-language: DE-AT; mso-bidi-theme-font: minor-latin; mso-ascii-theme-font: minor-latin; mso-fareast-font-family: Calibri; mso-fareast-theme-font: minor-latin; mso-hansi-theme-font: minor-latin; mso-fareast-language: EN-US; mso-bidi-language: AR-SA">Modellsport Schweighofer</span><span style="LINE-HEIGHT: 115%; FONT-FAMILY: "Calibri","sans-serif"; COLOR: #002060; FONT-SIZE: 11pt; mso-ansi-language: DE-AT; mso-bidi-theme-font: minor-latin; mso-ascii-theme-font: minor-latin; mso-fareast-font-family: Calibri; mso-fareast-theme-font: minor-latin; mso-hansi-theme-font: minor-latin; mso-fareast-language: EN-US; mso-bidi-language: AR-SA">
Wirtschaftspark 9 • 8530 Deutschlandsberg
</span><span style="LINE-HEIGHT: 115%; FONT-FAMILY: "Calibri","sans-serif"; FONT-SIZE: 11pt; mso-ansi-language: DE-AT; mso-bidi-font-family: "Times New Roman"; mso-bidi-theme-font: minor-bidi; mso-ascii-theme-font: minor-latin; mso-fareast-font-family: Calibri; mso-fareast-theme-font: minor-latin; mso-hansi-theme-font: minor-latin; mso-fareast-language: EN-US; mso-bidi-language: AR-SA"><span style="COLOR: #002060; mso-bidi-font-family: Calibri; mso-bidi-theme-font: minor-latin">[email protected]</span></span>
07-17-2013 | 12:41 AM
#33
Thread Starter
Member
Joined: Apr 2013
Posts: 30
Likes: 0
Received 0 Likes
on
0 Posts
From: DeutschlandsbergNon, AUSTRIA
<p class="MsoNormal" style="MARGIN: 0cm 0cm 10pt"><b style="mso-bidi-font-weight: normal"><span lang="EN-GB" style="mso-ansi-language: EN-GB"><font size="3"><font face="Calibri">Schweighofer Alpha Jet Project (Part 15)
</p></font></font></span>[/b]</p><p class="MsoNormal" style="MARGIN: 0cm 0cm 10pt"><span lang="EN-GB" style="mso-ansi-language: EN-GB; mso-bidi-font-family: Calibri; mso-bidi-theme-font: minor-latin"><font size="3"><font face="Calibri">Peter Glück has been in the painter chamber with our Alpha Jet. Now everything looks much better.
</p></font></font></span></p><p class="MsoNormal" style="MARGIN: 0cm 0cm 10pt"><span lang="EN-GB" style="LINE-HEIGHT: 115%; COLOR: #1f497d; FONT-SIZE: 10.5pt; mso-ansi-language: EN-GB; mso-bidi-font-family: Calibri; mso-ascii-font-family: Calibri; mso-hansi-font-family: Calibri">
 </p></span></p><p class="MsoNormal" style="MARGIN: 0cm 0cm 10pt">
 </p><p class="MsoNormal" style="MARGIN: 0cm 0cm 10pt"><span lang="EN-GB" style="LINE-HEIGHT: 115%; COLOR: #1f497d; FONT-SIZE: 10.5pt; mso-ansi-language: EN-GB; mso-bidi-font-family: Calibri; mso-ascii-font-family: Calibri; mso-hansi-font-family: Calibri">
 </p></span></p><p class="MsoNormal" style="MARGIN: 0cm 0cm 10pt"><span lang="EN-GB" style="LINE-HEIGHT: 115%; COLOR: #1f497d; FONT-SIZE: 10.5pt; mso-ansi-language: EN-GB; mso-bidi-font-family: Calibri; mso-ascii-font-family: Calibri; mso-hansi-font-family: Calibri">
 </p></span></p><p class="MsoNormal" style="MARGIN: 0cm 0cm 10pt"><span lang="EN-GB" style="LINE-HEIGHT: 115%; COLOR: #1f497d; FONT-SIZE: 10.5pt; mso-ansi-language: EN-GB; mso-bidi-font-family: Calibri; mso-ascii-font-family: Calibri; mso-hansi-font-family: Calibri">
 </p></span></p><p class="MsoNormal" style="MARGIN: 0cm 0cm 10pt"><span lang="EN-GB" style="LINE-HEIGHT: 115%; COLOR: #1f497d; FONT-SIZE: 10.5pt; mso-ansi-language: EN-GB; mso-bidi-font-family: Calibri; mso-ascii-font-family: Calibri; mso-hansi-font-family: Calibri">
<font face="Calibri"> </font></p></span></p><p class="MsoNormal" style="MARGIN: 0cm 0cm 10pt"><span lang="EN-GB" style="mso-ansi-language: EN-GB; mso-bidi-font-family: Calibri; mso-bidi-theme-font: minor-latin"><font size="3"><font face="Calibri">Now it’s time for sanding. First the model is with large sanding boards with 40K Paper to remove the last remaining roughnesses and waves. During this progress the rough surface is planned. After this progress the sanding paper gets finer and finer. All above K320 Peter sands with water. At the end Peter sands with K2000 to prepare the model for polishing.
</p></font></font></span></p><p class="MsoNormal" style="MARGIN: 0cm 0cm 10pt"><span lang="EN-GB" style="mso-ansi-language: EN-GB; mso-bidi-font-family: Calibri; mso-bidi-theme-font: minor-latin"><font size="3"><font face="Calibri">Next Step…
</p></font></font></span></p><p class="MsoNormal" style="MARGIN: 0cm 0cm 10pt"><span lang="EN-GB" style="mso-ansi-language: EN-GB; mso-bidi-font-family: Calibri; mso-bidi-theme-font: minor-latin"><font size="3"><font face="Calibri">Detailing of the nose cone and casting of the negative.
</p></font></font></span></p><p class="MsoNormal" style="MARGIN: 0cm 0cm 10pt"><span lang="EN-GB" style="COLOR: #1f497d; mso-ansi-language: EN-GB; mso-bidi-font-family: Calibri; mso-ascii-font-family: Calibri; mso-hansi-font-family: Calibri">
<font face="Calibri" size="3"> </font></p></span></p><p class="MsoNormal" style="MARGIN: 0cm 0cm 10pt"><span style="FONT-FAMILY: "Calibri","sans-serif"; COLOR: #002060; mso-bidi-theme-font: minor-latin; mso-ascii-theme-font: minor-latin; mso-hansi-theme-font: minor-latin"><font size="3">Modellsport Schweighofer</font></span><span style="COLOR: #002060; mso-bidi-font-family: Calibri; mso-bidi-theme-font: minor-latin">
<font face="Calibri" size="3">Wirtschaftspark 9 • 8530 Deutschlandsberg
</font></span><span style="COLOR: #002060; mso-bidi-font-family: Calibri; mso-bidi-theme-font: minor-latin"><font face="Calibri" size="3">[email protected]</font></span><span style="COLOR: #002060; mso-bidi-font-family: Calibri; mso-bidi-theme-font: minor-latin">
</p></span></p>
</p></font></font></span>[/b]</p><p class="MsoNormal" style="MARGIN: 0cm 0cm 10pt"><span lang="EN-GB" style="mso-ansi-language: EN-GB; mso-bidi-font-family: Calibri; mso-bidi-theme-font: minor-latin"><font size="3"><font face="Calibri">Peter Glück has been in the painter chamber with our Alpha Jet. Now everything looks much better.
</p></font></font></span></p><p class="MsoNormal" style="MARGIN: 0cm 0cm 10pt"><span lang="EN-GB" style="LINE-HEIGHT: 115%; COLOR: #1f497d; FONT-SIZE: 10.5pt; mso-ansi-language: EN-GB; mso-bidi-font-family: Calibri; mso-ascii-font-family: Calibri; mso-hansi-font-family: Calibri">
</p></span></p><p class="MsoNormal" style="MARGIN: 0cm 0cm 10pt"></p><p class="MsoNormal" style="MARGIN: 0cm 0cm 10pt"><span lang="EN-GB" style="LINE-HEIGHT: 115%; COLOR: #1f497d; FONT-SIZE: 10.5pt; mso-ansi-language: EN-GB; mso-bidi-font-family: Calibri; mso-ascii-font-family: Calibri; mso-hansi-font-family: Calibri"></p></span></p><p class="MsoNormal" style="MARGIN: 0cm 0cm 10pt"><span lang="EN-GB" style="LINE-HEIGHT: 115%; COLOR: #1f497d; FONT-SIZE: 10.5pt; mso-ansi-language: EN-GB; mso-bidi-font-family: Calibri; mso-ascii-font-family: Calibri; mso-hansi-font-family: Calibri"></p></span></p><p class="MsoNormal" style="MARGIN: 0cm 0cm 10pt"><span lang="EN-GB" style="LINE-HEIGHT: 115%; COLOR: #1f497d; FONT-SIZE: 10.5pt; mso-ansi-language: EN-GB; mso-bidi-font-family: Calibri; mso-ascii-font-family: Calibri; mso-hansi-font-family: Calibri"></p></span></p><p class="MsoNormal" style="MARGIN: 0cm 0cm 10pt"><span lang="EN-GB" style="LINE-HEIGHT: 115%; COLOR: #1f497d; FONT-SIZE: 10.5pt; mso-ansi-language: EN-GB; mso-bidi-font-family: Calibri; mso-ascii-font-family: Calibri; mso-hansi-font-family: Calibri"><font face="Calibri"> </font></p></span></p><p class="MsoNormal" style="MARGIN: 0cm 0cm 10pt"><span lang="EN-GB" style="mso-ansi-language: EN-GB; mso-bidi-font-family: Calibri; mso-bidi-theme-font: minor-latin"><font size="3"><font face="Calibri">Now it’s time for sanding. First the model is with large sanding boards with 40K Paper to remove the last remaining roughnesses and waves. During this progress the rough surface is planned. After this progress the sanding paper gets finer and finer. All above K320 Peter sands with water. At the end Peter sands with K2000 to prepare the model for polishing.
</p></font></font></span></p><p class="MsoNormal" style="MARGIN: 0cm 0cm 10pt"><span lang="EN-GB" style="mso-ansi-language: EN-GB; mso-bidi-font-family: Calibri; mso-bidi-theme-font: minor-latin"><font size="3"><font face="Calibri">Next Step…
</p></font></font></span></p><p class="MsoNormal" style="MARGIN: 0cm 0cm 10pt"><span lang="EN-GB" style="mso-ansi-language: EN-GB; mso-bidi-font-family: Calibri; mso-bidi-theme-font: minor-latin"><font size="3"><font face="Calibri">Detailing of the nose cone and casting of the negative.
</p></font></font></span></p><p class="MsoNormal" style="MARGIN: 0cm 0cm 10pt"><span lang="EN-GB" style="COLOR: #1f497d; mso-ansi-language: EN-GB; mso-bidi-font-family: Calibri; mso-ascii-font-family: Calibri; mso-hansi-font-family: Calibri">
<font face="Calibri" size="3"> </font></p></span></p><p class="MsoNormal" style="MARGIN: 0cm 0cm 10pt"><span style="FONT-FAMILY: "Calibri","sans-serif"; COLOR: #002060; mso-bidi-theme-font: minor-latin; mso-ascii-theme-font: minor-latin; mso-hansi-theme-font: minor-latin"><font size="3">Modellsport Schweighofer</font></span><span style="COLOR: #002060; mso-bidi-font-family: Calibri; mso-bidi-theme-font: minor-latin">
<font face="Calibri" size="3">Wirtschaftspark 9 • 8530 Deutschlandsberg
</font></span><span style="COLOR: #002060; mso-bidi-font-family: Calibri; mso-bidi-theme-font: minor-latin"><font face="Calibri" size="3">[email protected]</font></span><span style="COLOR: #002060; mso-bidi-font-family: Calibri; mso-bidi-theme-font: minor-latin">
</p></span></p>
 07-22-2013 | 03:22 AM
#35
Thread Starter
Member
Joined: Apr 2013
Posts: 30
Likes: 0
Received 0 Likes
on
0 Posts
From: DeutschlandsbergNon, AUSTRIA
<p class="MsoNormal" style="MARGIN: 0cm 0cm 10pt"><b style="mso-bidi-font-weight: normal"><span lang="EN-GB" style="mso-ansi-language: EN-GB"><font size="3"><font face="Calibri">Schweighofer Alpha Jet Project (Part 16)
</p></font></font></span>[/b]</p><p class="MsoNormal" style="MARGIN: 0cm 0cm 10pt"><span lang="EN-GB" style="mso-ansi-language: EN-GB"><font size="3"><font face="Calibri">This part describes the detailing and moulding of the nose cone. For detailing Peter uses his special tool. With this he can perfectly scratch the details in the master model.
</p></font></font></span></p><p class="MsoNormal" style="MARGIN: 0cm 0cm 10pt"><span lang="EN-GB" style="mso-ansi-language: EN-GB">
 </p></span></p><p class="MsoNormal" style="MARGIN: 0cm 0cm 10pt"><span lang="EN-GB" style="mso-ansi-language: EN-GB"><font size="3"><font face="Calibri">For the rivets and screw imitations Peter has drilled through a miller and has cut spikes into it.
</p></font></font></span></p><p class="MsoNormal" style="MARGIN: 0cm 0cm 10pt"><span lang="EN-GB" style="mso-ansi-language: EN-GB">
 </p></span></p><p class="MsoNormal" style="MARGIN: 0cm 0cm 10pt"><span lang="EN-GB" style="mso-ansi-language: EN-GB"><font size="3"><font face="Calibri">In the meanwhile the nose cone is finished.
</p></font></font></span></p><p class="MsoNormal" style="MARGIN: 0cm 0cm 10pt"><span lang="EN-GB" style="mso-ansi-language: EN-GB">
 </p></span></p><p class="MsoNormal" style="MARGIN: 0cm 0cm 10pt"><span lang="EN-GB" style="mso-ansi-language: EN-GB">
 </p></span></p><p class="MsoNormal" style="MARGIN: 0cm 0cm 10pt"><span lang="EN-GB" style="mso-ansi-language: EN-GB">
 </p></span></p><p class="MsoNormal" style="MARGIN: 0cm 0cm 10pt"><span lang="EN-GB" style="mso-ansi-language: EN-GB">
 </p></span></p><p class="MsoNormal" style="MARGIN: 0cm 0cm 10pt"><span lang="EN-GB" style="mso-ansi-language: EN-GB">
 </p></span></p><p class="MsoNormal" style="MARGIN: 0cm 0cm 10pt"><span lang="EN-GB" style="mso-ansi-language: EN-GB"><font size="3"><font face="Calibri">Now the building of the negative mould can begin.
</p></font></font></span></p><p class="MsoNormal" style="MARGIN: 0cm 0cm 10pt"><span lang="EN-GB" style="mso-ansi-language: EN-GB">
 </p></span></p><p class="MsoNormal" style="MARGIN: 0cm 0cm 10pt"><span lang="EN-GB" style="mso-ansi-language: EN-GB"><font face="Calibri" size="3">To prevent the have the joint on the upside we’ve decided to make the junction horizontal.
</font></span><span lang="EN-GB" style="mso-ansi-language: EN-GB"><font size="3"><font face="Calibri">
The nose cone and the parting line have to be polished with wax at least 4 times per side with at least one hour drying time. This procedure costs a lot of time.
</p></font></font></span></p><p class="MsoNormal" style="MARGIN: 0cm 0cm 10pt"><span lang="EN-GB" style="mso-ansi-language: EN-GB"><font size="3"><font face="Calibri">After this work the gap between the master model and the parting line is filled with plastiline.
</p></font></font></span></p><p class="MsoNormal" style="MARGIN: 0cm 0cm 10pt"> </p><p class="MsoNormal" style="MARGIN: 0cm 0cm 10pt"><span lang="EN-GB" style="mso-ansi-language: EN-GB">
 </p></span></p><p class="MsoNormal" style="MARGIN: 0cm 0cm 10pt"><span lang="EN-GB" style="mso-ansi-language: EN-GB"><font size="3"><font face="Calibri">After this the screw sockets and adjusting pins are mounted from the downside with M6 screws.
</p></font></font></span></p><p class="MsoNormal" style="MARGIN: 0cm 0cm 10pt"><span lang="EN-GB" style="mso-ansi-language: EN-GB"><font size="3"><font face="Calibri">These parts are used later to connect the two form halves.
</p></font></font></span></p><p class="MsoNormal" style="MARGIN: 0cm 0cm 10pt"><span lang="EN-GB" style="mso-ansi-language: EN-GB">
 </p></span></p><p class="MsoNormal" style="MARGIN: 0cm 0cm 10pt"><span lang="EN-GB" style="mso-ansi-language: EN-GB"><font size="3"><font face="Calibri">Now it’s time to attach the resin with a brush. For this we use very pasty epoxy which has a very hard and tough surface after hardened.
</p></font></font></span></p><p class="MsoNormal" style="MARGIN: 0cm 0cm 10pt"><span lang="EN-GB" style="mso-ansi-language: EN-GB">
 </p></span></p><p class="MsoNormal" style="MARGIN: 0cm 0cm 10pt"><span lang="EN-GB" style="mso-ansi-language: EN-GB"><font size="3"><font face="Calibri">Before the forming resin gets completely dry, the first layer is laminated with standard resign and a 165g glass. This layer protects the thick resin of the 445 glass which is laminated finally five times.
</p></font></font></span></p><p class="MsoNormal" style="MARGIN: 0cm 0cm 10pt"><span lang="EN-GB" style="mso-ansi-language: EN-GB">
 </p></span></p><p class="MsoNormal" style="MARGIN: 0cm 0cm 10pt"><span lang="EN-GB" style="mso-ansi-language: EN-GB"><font size="3"><font face="Calibri">Two days after completely curing the mould, the parting line is removed and the edge is cleaned with an angle grinder.
</p></font></font></span></p><p class="MsoNormal" style="MARGIN: 0cm 0cm 10pt"> </p><p class="MsoNormal" style="MARGIN: 0cm 0cm 10pt"><span lang="EN-GB" style="mso-ansi-language: EN-GB">
 </p></span></p><p class="MsoNormal" style="MARGIN: 0cm 0cm 10pt"><span lang="EN-GB" style="mso-ansi-language: EN-GB">
 </p></span></p><p class="MsoNormal" style="MARGIN: 0cm 0cm 10pt"><span lang="EN-GB" style="mso-ansi-language: EN-GB"><font size="3"><font face="Calibri">The same procedure is done for the second side of the mould, beginning with wax polishing.
</p></font></font></span></p><p class="MsoNormal" style="MARGIN: 0cm 0cm 10pt"><span lang="EN-GB" style="mso-ansi-language: EN-GB">
<font face="Calibri" size="3"> </font></p></span></p><p class="MsoNormal" style="MARGIN: 0cm 0cm 10pt"><span style="FONT-FAMILY: "Calibri","sans-serif"; COLOR: #002060; mso-bidi-theme-font: minor-latin; mso-ascii-theme-font: minor-latin; mso-hansi-theme-font: minor-latin"><font size="3">Modellsport Schweighofer</font></span><span style="COLOR: #002060; mso-bidi-font-family: Calibri; mso-bidi-theme-font: minor-latin">
<font face="Calibri" size="3">Wirtschaftspark 9 • 8530 Deutschlandsberg
</font></span><span style="COLOR: #002060; mso-bidi-font-family: Calibri; mso-bidi-theme-font: minor-latin"><font face="Calibri" size="3">[email protected]</font></span><span style="COLOR: #002060; mso-bidi-font-family: Calibri; mso-bidi-theme-font: minor-latin">
</p></span></p>
</p></font></font></span>[/b]</p><p class="MsoNormal" style="MARGIN: 0cm 0cm 10pt"><span lang="EN-GB" style="mso-ansi-language: EN-GB"><font size="3"><font face="Calibri">This part describes the detailing and moulding of the nose cone. For detailing Peter uses his special tool. With this he can perfectly scratch the details in the master model.
</p></font></font></span></p><p class="MsoNormal" style="MARGIN: 0cm 0cm 10pt"><span lang="EN-GB" style="mso-ansi-language: EN-GB">
</p></span></p><p class="MsoNormal" style="MARGIN: 0cm 0cm 10pt"><span lang="EN-GB" style="mso-ansi-language: EN-GB"><font size="3"><font face="Calibri">For the rivets and screw imitations Peter has drilled through a miller and has cut spikes into it.</p></font></font></span></p><p class="MsoNormal" style="MARGIN: 0cm 0cm 10pt"><span lang="EN-GB" style="mso-ansi-language: EN-GB">
</p></span></p><p class="MsoNormal" style="MARGIN: 0cm 0cm 10pt"><span lang="EN-GB" style="mso-ansi-language: EN-GB"><font size="3"><font face="Calibri">In the meanwhile the nose cone is finished.</p></font></font></span></p><p class="MsoNormal" style="MARGIN: 0cm 0cm 10pt"><span lang="EN-GB" style="mso-ansi-language: EN-GB">
</p></span></p><p class="MsoNormal" style="MARGIN: 0cm 0cm 10pt"><span lang="EN-GB" style="mso-ansi-language: EN-GB"></p></span></p><p class="MsoNormal" style="MARGIN: 0cm 0cm 10pt"><span lang="EN-GB" style="mso-ansi-language: EN-GB"></p></span></p><p class="MsoNormal" style="MARGIN: 0cm 0cm 10pt"><span lang="EN-GB" style="mso-ansi-language: EN-GB"></p></span></p><p class="MsoNormal" style="MARGIN: 0cm 0cm 10pt"><span lang="EN-GB" style="mso-ansi-language: EN-GB"></p></span></p><p class="MsoNormal" style="MARGIN: 0cm 0cm 10pt"><span lang="EN-GB" style="mso-ansi-language: EN-GB"><font size="3"><font face="Calibri">Now the building of the negative mould can begin.</p></font></font></span></p><p class="MsoNormal" style="MARGIN: 0cm 0cm 10pt"><span lang="EN-GB" style="mso-ansi-language: EN-GB">
</p></span></p><p class="MsoNormal" style="MARGIN: 0cm 0cm 10pt"><span lang="EN-GB" style="mso-ansi-language: EN-GB"><font face="Calibri" size="3">To prevent the have the joint on the upside we’ve decided to make the junction horizontal. </font></span><span lang="EN-GB" style="mso-ansi-language: EN-GB"><font size="3"><font face="Calibri">
The nose cone and the parting line have to be polished with wax at least 4 times per side with at least one hour drying time. This procedure costs a lot of time.
</p></font></font></span></p><p class="MsoNormal" style="MARGIN: 0cm 0cm 10pt"><span lang="EN-GB" style="mso-ansi-language: EN-GB"><font size="3"><font face="Calibri">After this work the gap between the master model and the parting line is filled with plastiline.
</p></font></font></span></p><p class="MsoNormal" style="MARGIN: 0cm 0cm 10pt">
</p><p class="MsoNormal" style="MARGIN: 0cm 0cm 10pt"><span lang="EN-GB" style="mso-ansi-language: EN-GB"></p></span></p><p class="MsoNormal" style="MARGIN: 0cm 0cm 10pt"><span lang="EN-GB" style="mso-ansi-language: EN-GB"><font size="3"><font face="Calibri">After this the screw sockets and adjusting pins are mounted from the downside with M6 screws.</p></font></font></span></p><p class="MsoNormal" style="MARGIN: 0cm 0cm 10pt"><span lang="EN-GB" style="mso-ansi-language: EN-GB"><font size="3"><font face="Calibri">These parts are used later to connect the two form halves.
</p></font></font></span></p><p class="MsoNormal" style="MARGIN: 0cm 0cm 10pt"><span lang="EN-GB" style="mso-ansi-language: EN-GB">
</p></span></p><p class="MsoNormal" style="MARGIN: 0cm 0cm 10pt"><span lang="EN-GB" style="mso-ansi-language: EN-GB"><font size="3"><font face="Calibri">Now it’s time to attach the resin with a brush. For this we use very pasty epoxy which has a very hard and tough surface after hardened. </p></font></font></span></p><p class="MsoNormal" style="MARGIN: 0cm 0cm 10pt"><span lang="EN-GB" style="mso-ansi-language: EN-GB">
</p></span></p><p class="MsoNormal" style="MARGIN: 0cm 0cm 10pt"><span lang="EN-GB" style="mso-ansi-language: EN-GB"><font size="3"><font face="Calibri">Before the forming resin gets completely dry, the first layer is laminated with standard resign and a 165g glass. This layer protects the thick resin of the 445 glass which is laminated finally five times. </p></font></font></span></p><p class="MsoNormal" style="MARGIN: 0cm 0cm 10pt"><span lang="EN-GB" style="mso-ansi-language: EN-GB">
</p></span></p><p class="MsoNormal" style="MARGIN: 0cm 0cm 10pt"><span lang="EN-GB" style="mso-ansi-language: EN-GB"><font size="3"><font face="Calibri">Two days after completely curing the mould, the parting line is removed and the edge is cleaned with an angle grinder.</p></font></font></span></p><p class="MsoNormal" style="MARGIN: 0cm 0cm 10pt">
</p><p class="MsoNormal" style="MARGIN: 0cm 0cm 10pt"><span lang="EN-GB" style="mso-ansi-language: EN-GB"></p></span></p><p class="MsoNormal" style="MARGIN: 0cm 0cm 10pt"><span lang="EN-GB" style="mso-ansi-language: EN-GB"></p></span></p><p class="MsoNormal" style="MARGIN: 0cm 0cm 10pt"><span lang="EN-GB" style="mso-ansi-language: EN-GB"><font size="3"><font face="Calibri">The same procedure is done for the second side of the mould, beginning with wax polishing.</p></font></font></span></p><p class="MsoNormal" style="MARGIN: 0cm 0cm 10pt"><span lang="EN-GB" style="mso-ansi-language: EN-GB">
<font face="Calibri" size="3"> </font></p></span></p><p class="MsoNormal" style="MARGIN: 0cm 0cm 10pt"><span style="FONT-FAMILY: "Calibri","sans-serif"; COLOR: #002060; mso-bidi-theme-font: minor-latin; mso-ascii-theme-font: minor-latin; mso-hansi-theme-font: minor-latin"><font size="3">Modellsport Schweighofer</font></span><span style="COLOR: #002060; mso-bidi-font-family: Calibri; mso-bidi-theme-font: minor-latin">
<font face="Calibri" size="3">Wirtschaftspark 9 • 8530 Deutschlandsberg
</font></span><span style="COLOR: #002060; mso-bidi-font-family: Calibri; mso-bidi-theme-font: minor-latin"><font face="Calibri" size="3">[email protected]</font></span><span style="COLOR: #002060; mso-bidi-font-family: Calibri; mso-bidi-theme-font: minor-latin">
</p></span></p>
07-23-2013 | 11:18 PM
#36
Thread Starter
Member
Joined: Apr 2013
Posts: 30
Likes: 0
Received 0 Likes
on
0 Posts
From: DeutschlandsbergNon, AUSTRIA
<p class="MsoNormal" style="MARGIN: 0cm 0cm 10pt"><b style="mso-bidi-font-weight: normal"><span lang="EN-GB" style="mso-ansi-language: EN-GB"><font size="3"><font face="Calibri">Schweighofer Alpha Jet Project (Part 17)
</p></font></font></span>[/b]</p><p class="MsoNormal" style="MARGIN: 0cm 0cm 10pt"><span lang="EN-GB" style="mso-ansi-language: EN-GB"><font size="3"><font face="Calibri">In the meanwhile the second side is finished. We are completely satisfied with the result. The winding of the adjusting pins are drilled out with 6mm, then the pins of the second side are fixed with 6mm screws.
</p></font></font></span></p><p class="MsoNormal" style="MARGIN: 0cm 0cm 10pt"> </p><p class="MsoNormal" style="MARGIN: 0cm 0cm 10pt"><span lang="EN-GB" style="mso-ansi-language: EN-GB"><font size="3"><font face="Calibri">Demolding has worked fine the master model has survived the process without being damaged.
</p></font></font></span></p><p class="MsoNormal" style="MARGIN: 0cm 0cm 10pt"><span lang="EN-GB" style="COLOR: #002060; mso-ansi-language: EN-GB; mso-bidi-font-family: Calibri; mso-bidi-theme-font: minor-latin">
 </p></span></p><p class="MsoNormal" style="MARGIN: 0cm 0cm 10pt"><span lang="EN-GB" style="COLOR: #002060; mso-ansi-language: EN-GB; mso-bidi-font-family: Calibri; mso-bidi-theme-font: minor-latin">
 </p></span></p><p class="MsoNormal" style="MARGIN: 0cm 0cm 10pt"><span lang="EN-GB" style="COLOR: #002060; mso-ansi-language: EN-GB; mso-bidi-font-family: Calibri; mso-bidi-theme-font: minor-latin">
 </p></span></p><p class="MsoNormal" style="MARGIN: 0cm 0cm 10pt">
 </p><p class="MsoNormal" style="MARGIN: 0cm 0cm 10pt"><span lang="EN-GB" style="COLOR: #002060; mso-ansi-language: EN-GB; mso-bidi-font-family: Calibri; mso-bidi-theme-font: minor-latin"><font size="3"><font face="Calibri">Now it’s time to make the first nose cone.
</p></font></font></span></p><p class="MsoNormal" style="MARGIN: 0cm 0cm 10pt"><span lang="EN-GB" style="COLOR: #002060; mso-ansi-language: EN-GB; mso-bidi-font-family: Calibri; mso-bidi-theme-font: minor-latin"><font size="3"><font face="Calibri">First the moulds are being waxed and brushed with a special pasty resin. This one is not for flying we need this cone for making another mould. The part of the series is made of complete other material and techniques. We’ll place pictures of these techniques later.
</p></font></font></span></p><p class="MsoNormal" style="MARGIN: 0cm 0cm 10pt"><span lang="EN-GB" style="COLOR: #002060; mso-ansi-language: EN-GB; mso-bidi-font-family: Calibri; mso-bidi-theme-font: minor-latin">
 </p></span></p><p class="MsoNormal" style="MARGIN: 0cm 0cm 10pt"><span lang="EN-GB" style="COLOR: #002060; mso-ansi-language: EN-GB; mso-bidi-font-family: Calibri; mso-bidi-theme-font: minor-latin"><font size="3"><font face="Calibri">After a curing time of 1 day the next 3 layer 165 glass are laminated, then the connecting area has the correct thickness.
</p></font></font></span></p><p class="MsoNormal" style="MARGIN: 0cm 0cm 10pt"><span lang="EN-GB" style="COLOR: #002060; mso-ansi-language: EN-GB; mso-bidi-font-family: Calibri; mso-bidi-theme-font: minor-latin">
 </p></span></p><p class="MsoNormal" style="MARGIN: 0cm 0cm 10pt"><span lang="EN-GB" style="COLOR: #002060; mso-ansi-language: EN-GB; mso-bidi-font-family: Calibri; mso-bidi-theme-font: minor-latin"><font size="3"><font face="Calibri">Now both halves are screwed together.
</p></font></font></span></p><p class="MsoNormal" style="MARGIN: 0cm 0cm 10pt"><span lang="EN-GB" style="COLOR: #002060; mso-ansi-language: EN-GB; mso-bidi-font-family: Calibri; mso-bidi-theme-font: minor-latin">
 </p></span></p><p class="MsoNormal" style="MARGIN: 0cm 0cm 10pt">
 </p><p class="MsoNormal" style="MARGIN: 0cm 0cm 10pt"><span lang="EN-GB" style="COLOR: #002060; mso-ansi-language: EN-GB; mso-bidi-font-family: Calibri; mso-bidi-theme-font: minor-latin"><font size="3"><font face="Calibri">After 2 days curing time the edge is cut with a sharp knife.
</p></font></font></span></p><p class="MsoNormal" style="MARGIN: 0cm 0cm 10pt"><span lang="EN-GB" style="COLOR: #002060; mso-ansi-language: EN-GB; mso-bidi-font-family: Calibri; mso-bidi-theme-font: minor-latin">
 </p></span></p><p class="MsoNormal" style="MARGIN: 0cm 0cm 10pt"><span lang="EN-GB" style="COLOR: #002060; mso-ansi-language: EN-GB; mso-bidi-font-family: Calibri; mso-bidi-theme-font: minor-latin"><font size="3"><font face="Calibri">Now the nose cone can be dismoulded.
</p></font></font></span></p><p class="MsoNormal" style="MARGIN: 0cm 0cm 10pt"><span lang="EN-GB" style="COLOR: #002060; mso-ansi-language: EN-GB; mso-bidi-font-family: Calibri; mso-bidi-theme-font: minor-latin">
 </p></span></p><p class="MsoNormal" style="MARGIN: 0cm 0cm 10pt"><span lang="EN-GB" style="COLOR: #002060; mso-ansi-language: EN-GB; mso-bidi-font-family: Calibri; mso-bidi-theme-font: minor-latin"><font size="3"><font face="Calibri">
 During the curing times Peter has finished the fuselage so far that he can begin with the detailing. He has spent many hours with sanding. Here you can see the tail part of the fuselage which is blacked with contrast powder.
</p></font></font></span></p><p class="MsoNormal" style="MARGIN: 0cm 0cm 10pt"> </p><p class="MsoNormal" style="MARGIN: 0cm 0cm 10pt"><span lang="EN-GB" style="COLOR: #002060; mso-ansi-language: EN-GB; mso-bidi-font-family: Calibri; mso-bidi-theme-font: minor-latin"><font size="3"><font face="Calibri">The powder is rubbed on the parts with a sponge. During sanding with 600 paper small scratches and holes get visible much better. Now Peter has to sand as long as all of these holes and scratched are removed. On the picture you can see Peter’s favourite grinding machine which is used with papers above K120.
</p></font></font></span></p><p class="MsoNormal" style="MARGIN: 0cm 0cm 10pt"><span lang="EN-GB" style="COLOR: #002060; mso-ansi-language: EN-GB; mso-bidi-font-family: Calibri; mso-bidi-theme-font: minor-latin"><font size="3"><font face="Calibri">Finally after detailing The parts are sandes again with 1200 paper and then they are polished.
</p></font></font></span></p><p class="MsoNormal" style="MARGIN: 0cm 0cm 10pt"><span lang="EN-GB" style="COLOR: #002060; mso-ansi-language: EN-GB; mso-bidi-font-family: Calibri; mso-bidi-theme-font: minor-latin">
 </p></span></p><p class="MsoNormal" style="MARGIN: 0cm 0cm 10pt">
 </p><p class="MsoNormal" style="MARGIN: 0cm 0cm 10pt">
 </p><p class="MsoNormal" style="MARGIN: 0cm 0cm 10pt"><span lang="EN-GB" style="COLOR: #002060; mso-ansi-language: EN-GB; mso-bidi-font-family: Calibri; mso-bidi-theme-font: minor-latin">
 </p></span></p><p class="MsoNormal" style="MARGIN: 0cm 0cm 10pt"><span lang="EN-GB" style="COLOR: #002060; mso-ansi-language: EN-GB; mso-bidi-font-family: Calibri; mso-bidi-theme-font: minor-latin">
 </p></span></p><p class="MsoNormal" style="MARGIN: 0cm 0cm 10pt"><span lang="EN-GB" style="COLOR: #002060; mso-ansi-language: EN-GB; mso-bidi-font-family: Calibri; mso-bidi-theme-font: minor-latin">
 </p></span></p><p class="MsoNormal" style="MARGIN: 0cm 0cm 10pt">
 </p><p class="MsoNormal" style="MARGIN: 0cm 0cm 10pt"><span lang="EN-GB" style="COLOR: #002060; mso-ansi-language: EN-GB; mso-bidi-font-family: Calibri; mso-bidi-theme-font: minor-latin">
<font face="Calibri" size="3"> </font></p></span></p><p class="MsoNormal" style="MARGIN: 0cm 0cm 10pt"><span lang="EN-GB" style="COLOR: #002060; mso-ansi-language: EN-GB; mso-bidi-font-family: Calibri; mso-bidi-theme-font: minor-latin"><font size="3"><font face="Calibri">More information will follow.
</p></font></font></span></p><p class="MsoNormal" style="MARGIN: 0cm 0cm 10pt"><span lang="EN-GB" style="COLOR: #002060; mso-ansi-language: EN-GB; mso-bidi-font-family: Calibri; mso-bidi-theme-font: minor-latin"><font size="3"><font face="Calibri">I wish you all a good week and thank you for the good feedback on our project.
</p></font></font></span></p><p class="MsoNormal" style="MARGIN: 0cm 0cm 10pt"><span lang="EN-GB" style="COLOR: #002060; mso-ansi-language: EN-GB; mso-bidi-font-family: Calibri; mso-bidi-theme-font: minor-latin">
<font face="Calibri" size="3"> </font></p></span></p><p class="MsoNormal" style="MARGIN: 0cm 0cm 10pt"><span style="FONT-FAMILY: "Calibri","sans-serif"; COLOR: #002060; mso-bidi-theme-font: minor-latin; mso-ascii-theme-font: minor-latin; mso-hansi-theme-font: minor-latin"><font size="3">Modellsport Schweighofer</font></span><span style="COLOR: #002060; mso-bidi-font-family: Calibri; mso-bidi-theme-font: minor-latin">
<font face="Calibri" size="3">Wirtschaftspark 9 • 8530 Deutschlandsberg
</font></span><span style="COLOR: #002060; mso-bidi-font-family: Calibri; mso-bidi-theme-font: minor-latin"><font face="Calibri" size="3">[email protected]</font></span><span class="MsoHyperlink"><span style="COLOR: #002060; mso-bidi-font-family: Calibri; mso-bidi-theme-font: minor-latin">
</p></span></span></p>
</p></font></font></span>[/b]</p><p class="MsoNormal" style="MARGIN: 0cm 0cm 10pt"><span lang="EN-GB" style="mso-ansi-language: EN-GB"><font size="3"><font face="Calibri">In the meanwhile the second side is finished. We are completely satisfied with the result. The winding of the adjusting pins are drilled out with 6mm, then the pins of the second side are fixed with 6mm screws.
</p></font></font></span></p><p class="MsoNormal" style="MARGIN: 0cm 0cm 10pt">
</p><p class="MsoNormal" style="MARGIN: 0cm 0cm 10pt"><span lang="EN-GB" style="mso-ansi-language: EN-GB"><font size="3"><font face="Calibri">Demolding has worked fine the master model has survived the process without being damaged.</p></font></font></span></p><p class="MsoNormal" style="MARGIN: 0cm 0cm 10pt"><span lang="EN-GB" style="COLOR: #002060; mso-ansi-language: EN-GB; mso-bidi-font-family: Calibri; mso-bidi-theme-font: minor-latin">
</p></span></p><p class="MsoNormal" style="MARGIN: 0cm 0cm 10pt"><span lang="EN-GB" style="COLOR: #002060; mso-ansi-language: EN-GB; mso-bidi-font-family: Calibri; mso-bidi-theme-font: minor-latin"></p></span></p><p class="MsoNormal" style="MARGIN: 0cm 0cm 10pt"><span lang="EN-GB" style="COLOR: #002060; mso-ansi-language: EN-GB; mso-bidi-font-family: Calibri; mso-bidi-theme-font: minor-latin"></p></span></p><p class="MsoNormal" style="MARGIN: 0cm 0cm 10pt"></p><p class="MsoNormal" style="MARGIN: 0cm 0cm 10pt"><span lang="EN-GB" style="COLOR: #002060; mso-ansi-language: EN-GB; mso-bidi-font-family: Calibri; mso-bidi-theme-font: minor-latin"><font size="3"><font face="Calibri">Now it’s time to make the first nose cone.</p></font></font></span></p><p class="MsoNormal" style="MARGIN: 0cm 0cm 10pt"><span lang="EN-GB" style="COLOR: #002060; mso-ansi-language: EN-GB; mso-bidi-font-family: Calibri; mso-bidi-theme-font: minor-latin"><font size="3"><font face="Calibri">First the moulds are being waxed and brushed with a special pasty resin. This one is not for flying we need this cone for making another mould. The part of the series is made of complete other material and techniques. We’ll place pictures of these techniques later.
</p></font></font></span></p><p class="MsoNormal" style="MARGIN: 0cm 0cm 10pt"><span lang="EN-GB" style="COLOR: #002060; mso-ansi-language: EN-GB; mso-bidi-font-family: Calibri; mso-bidi-theme-font: minor-latin">
</p></span></p><p class="MsoNormal" style="MARGIN: 0cm 0cm 10pt"><span lang="EN-GB" style="COLOR: #002060; mso-ansi-language: EN-GB; mso-bidi-font-family: Calibri; mso-bidi-theme-font: minor-latin"><font size="3"><font face="Calibri">After a curing time of 1 day the next 3 layer 165 glass are laminated, then the connecting area has the correct thickness.</p></font></font></span></p><p class="MsoNormal" style="MARGIN: 0cm 0cm 10pt"><span lang="EN-GB" style="COLOR: #002060; mso-ansi-language: EN-GB; mso-bidi-font-family: Calibri; mso-bidi-theme-font: minor-latin">
</p></span></p><p class="MsoNormal" style="MARGIN: 0cm 0cm 10pt"><span lang="EN-GB" style="COLOR: #002060; mso-ansi-language: EN-GB; mso-bidi-font-family: Calibri; mso-bidi-theme-font: minor-latin"><font size="3"><font face="Calibri">Now both halves are screwed together.</p></font></font></span></p><p class="MsoNormal" style="MARGIN: 0cm 0cm 10pt"><span lang="EN-GB" style="COLOR: #002060; mso-ansi-language: EN-GB; mso-bidi-font-family: Calibri; mso-bidi-theme-font: minor-latin">
</p></span></p><p class="MsoNormal" style="MARGIN: 0cm 0cm 10pt"></p><p class="MsoNormal" style="MARGIN: 0cm 0cm 10pt"><span lang="EN-GB" style="COLOR: #002060; mso-ansi-language: EN-GB; mso-bidi-font-family: Calibri; mso-bidi-theme-font: minor-latin"><font size="3"><font face="Calibri">After 2 days curing time the edge is cut with a sharp knife.</p></font></font></span></p><p class="MsoNormal" style="MARGIN: 0cm 0cm 10pt"><span lang="EN-GB" style="COLOR: #002060; mso-ansi-language: EN-GB; mso-bidi-font-family: Calibri; mso-bidi-theme-font: minor-latin">
</p></span></p><p class="MsoNormal" style="MARGIN: 0cm 0cm 10pt"><span lang="EN-GB" style="COLOR: #002060; mso-ansi-language: EN-GB; mso-bidi-font-family: Calibri; mso-bidi-theme-font: minor-latin"><font size="3"><font face="Calibri">Now the nose cone can be dismoulded.</p></font></font></span></p><p class="MsoNormal" style="MARGIN: 0cm 0cm 10pt"><span lang="EN-GB" style="COLOR: #002060; mso-ansi-language: EN-GB; mso-bidi-font-family: Calibri; mso-bidi-theme-font: minor-latin">
</p></span></p><p class="MsoNormal" style="MARGIN: 0cm 0cm 10pt"><span lang="EN-GB" style="COLOR: #002060; mso-ansi-language: EN-GB; mso-bidi-font-family: Calibri; mso-bidi-theme-font: minor-latin"><font size="3"><font face="Calibri">During the curing times Peter has finished the fuselage so far that he can begin with the detailing. He has spent many hours with sanding. Here you can see the tail part of the fuselage which is blacked with contrast powder.</p></font></font></span></p><p class="MsoNormal" style="MARGIN: 0cm 0cm 10pt">
</p><p class="MsoNormal" style="MARGIN: 0cm 0cm 10pt"><span lang="EN-GB" style="COLOR: #002060; mso-ansi-language: EN-GB; mso-bidi-font-family: Calibri; mso-bidi-theme-font: minor-latin"><font size="3"><font face="Calibri">The powder is rubbed on the parts with a sponge. During sanding with 600 paper small scratches and holes get visible much better. Now Peter has to sand as long as all of these holes and scratched are removed. On the picture you can see Peter’s favourite grinding machine which is used with papers above K120.</p></font></font></span></p><p class="MsoNormal" style="MARGIN: 0cm 0cm 10pt"><span lang="EN-GB" style="COLOR: #002060; mso-ansi-language: EN-GB; mso-bidi-font-family: Calibri; mso-bidi-theme-font: minor-latin"><font size="3"><font face="Calibri">Finally after detailing The parts are sandes again with 1200 paper and then they are polished.
</p></font></font></span></p><p class="MsoNormal" style="MARGIN: 0cm 0cm 10pt"><span lang="EN-GB" style="COLOR: #002060; mso-ansi-language: EN-GB; mso-bidi-font-family: Calibri; mso-bidi-theme-font: minor-latin">
</p></span></p><p class="MsoNormal" style="MARGIN: 0cm 0cm 10pt"></p><p class="MsoNormal" style="MARGIN: 0cm 0cm 10pt"></p><p class="MsoNormal" style="MARGIN: 0cm 0cm 10pt"><span lang="EN-GB" style="COLOR: #002060; mso-ansi-language: EN-GB; mso-bidi-font-family: Calibri; mso-bidi-theme-font: minor-latin"></p></span></p><p class="MsoNormal" style="MARGIN: 0cm 0cm 10pt"><span lang="EN-GB" style="COLOR: #002060; mso-ansi-language: EN-GB; mso-bidi-font-family: Calibri; mso-bidi-theme-font: minor-latin"></p></span></p><p class="MsoNormal" style="MARGIN: 0cm 0cm 10pt"><span lang="EN-GB" style="COLOR: #002060; mso-ansi-language: EN-GB; mso-bidi-font-family: Calibri; mso-bidi-theme-font: minor-latin"></p></span></p><p class="MsoNormal" style="MARGIN: 0cm 0cm 10pt"></p><p class="MsoNormal" style="MARGIN: 0cm 0cm 10pt"><span lang="EN-GB" style="COLOR: #002060; mso-ansi-language: EN-GB; mso-bidi-font-family: Calibri; mso-bidi-theme-font: minor-latin"><font face="Calibri" size="3"> </font></p></span></p><p class="MsoNormal" style="MARGIN: 0cm 0cm 10pt"><span lang="EN-GB" style="COLOR: #002060; mso-ansi-language: EN-GB; mso-bidi-font-family: Calibri; mso-bidi-theme-font: minor-latin"><font size="3"><font face="Calibri">More information will follow.
</p></font></font></span></p><p class="MsoNormal" style="MARGIN: 0cm 0cm 10pt"><span lang="EN-GB" style="COLOR: #002060; mso-ansi-language: EN-GB; mso-bidi-font-family: Calibri; mso-bidi-theme-font: minor-latin"><font size="3"><font face="Calibri">I wish you all a good week and thank you for the good feedback on our project.
</p></font></font></span></p><p class="MsoNormal" style="MARGIN: 0cm 0cm 10pt"><span lang="EN-GB" style="COLOR: #002060; mso-ansi-language: EN-GB; mso-bidi-font-family: Calibri; mso-bidi-theme-font: minor-latin">
<font face="Calibri" size="3"> </font></p></span></p><p class="MsoNormal" style="MARGIN: 0cm 0cm 10pt"><span style="FONT-FAMILY: "Calibri","sans-serif"; COLOR: #002060; mso-bidi-theme-font: minor-latin; mso-ascii-theme-font: minor-latin; mso-hansi-theme-font: minor-latin"><font size="3">Modellsport Schweighofer</font></span><span style="COLOR: #002060; mso-bidi-font-family: Calibri; mso-bidi-theme-font: minor-latin">
<font face="Calibri" size="3">Wirtschaftspark 9 • 8530 Deutschlandsberg
</font></span><span style="COLOR: #002060; mso-bidi-font-family: Calibri; mso-bidi-theme-font: minor-latin"><font face="Calibri" size="3">[email protected]</font></span><span class="MsoHyperlink"><span style="COLOR: #002060; mso-bidi-font-family: Calibri; mso-bidi-theme-font: minor-latin">
</p></span></span></p>
08-01-2013 | 12:42 AM
#37
Thread Starter
Member
Joined: Apr 2013
Posts: 30
Likes: 0
Received 0 Likes
on
0 Posts
From: DeutschlandsbergNon, AUSTRIA
<div style="margin: 0cm 0cm 10pt">Schweighofer Alpha Jet Project (Part 18)</div><div style="margin: 0cm 0cm 10pt"><span style="color: #002060">The visit at Red Bull</span></div><div style="margin: 0cm 0cm 10pt"><span style="color: #002060">At the 24<sup>th</sup> July 2013 we visited Red Bull and had the opportunity to see the Alpha jet together with Peter Cmyral and Robert Furchs. The trip from our company to Hangar-7 (</span><font color="#0000ff">http://www.hangar-7.com/de/the-flying-bulls/der-hangar-8/</font><span style="color: #002060">) lasts about 3 hours. We arrived at 10 am in front of the Hangar 8 (service hangar).I think after the Airpower the mechanics have a lot of work – the hangar was full with airplanes.</span></div><div style="margin: 0cm 0cm 10pt"> </div><div style="margin: 0cm 0cm 10pt"><span style="color: #002060">The airplanes are all in a top condition polishes with glossy surfaces. Everything is clean, no parts and tools are lying around nevertheless the work is done. I had to lay down some times for taking pictures and my clothes haven’t got dirty. After a short talk to the manager we started our work.</span></div><div style="margin: 0cm 0cm 10pt">
 </div><div style="margin: 0cm 0cm 10pt"><span style="color: #002060">We have measured the complete undercarriage, compared all angles with our drawings and found some mistakes we had to clear. We got the opportunity to film the retracting process, this is really impressive and enlightening. The video clip could be a help for future Alpha Jet builder.</span></div><div style="margin: 0cm 0cm 10pt">
 </div><div style="margin: 0cm 0cm 10pt">
 </div><div style="margin: 0cm 0cm 10pt">
 </div><div style="margin: 0cm 0cm 10pt"><span style="color: #002060">The statement of Wilbert on RC-Network concerning the flaps made me insecure a little bit. For this we have checked the flaps too and found out we have to make some changes. The flap changes its position during the extending progress some centimetres towards the fuselage.</span></div><div style="margin: 0cm 0cm 10pt">
 </div><div style="margin: 0cm 0cm 10pt">
 </div><div style="margin: 0cm 0cm 10pt"><span style="color: #002060">For this the flaps are bevelled on the fuselage side. This bevel allows them to slide to the side. </span></div><div style="margin: 0cm 0cm 10pt"><span style="color: #002060">Our Alpha Jet has here an edge and we have to change this detail of our construction.</span></div><div style="margin: 0cm 0cm 10pt">
 </div><div style="margin: 0cm 0cm 10pt">
 </div><div style="margin: 0cm 0cm 10pt"><span style="color: #002060">Thank you Wilbert for making me insecure!</span></div><div style="margin: 0cm 0cm 10pt"><span style="color: #002060">The next part we have checked was the elevator with its bearing and linkage. Fortunately a spare Elevator was on stock. We have compared it with our construction, here everything is all richt.</span></div><div style="margin: 0cm 0cm 10pt">
 </div><div style="margin: 0cm 0cm 10pt">
 </div><div style="margin: 0cm 0cm 10pt"><span style="color: #002060">At last I have made many pictures of the cockpit. In my opinion a detailed scale cockpit is very important for our model.</span></div><div style="margin: 0cm 0cm 10pt">
 </div><div style="margin: 0cm 0cm 10pt">
 </div><div style="margin: 0cm 0cm 10pt">
 </div><div style="margin: 0cm 0cm 10pt">
 </div><div style="margin: 0cm 0cm 10pt">
 </div><div style="margin: 0cm 0cm 10pt"><span style="color: #002060">In the evening we have visited the Ikarus restaurant where we enjoyed our well-earned beer.</span></div><div style="margin: 0cm 0cm 10pt">
 </div><div style="margin: 0cm 0cm 10pt">
 </div><div style="margin: 0cm 0cm 10pt">
 </div><div style="margin: 0cm 0cm 10pt">
 </div><div style="margin: 0cm 0cm 10pt">
 </div><div style="margin: 0cm 0cm 10pt">
 </div><div style="margin: 0cm 0cm 10pt"><span style="color: #222222">I can only</span><span style="color: #222222"> advise everyone to go to Salzburg and to look at the world of Red Bull (http://www.hangar-7.com/de/). I can only advise everyone to go to Salzburg and to look at the world of Red Bull (</span><font color="#0000ff">http://www.hangar-7.com/de/</font><span style="color: #222222">).</span></div><div style="margin: 0cm 0cm 10pt"><span style="color: #222222">I’d like to sys thank you to Red Bull, the technicians, Robert Fuchs and Peter Cmyral for this wonderful day.</span></div><div style="margin: 0cm 0cm 10pt"><span style="color: #222222">In the meanwhile Peter Glück has made some progress….</span></div><div style="margin: 0cm 0cm 10pt"><span style="color: #002060">Modellsport Schweighofer</span><span style="color: #002060">
Wirtschaftspark 9 • 8530 Deutschlandsberg
</span><span style="color: #002060">[email protected]</span></div>
</div><div style="margin: 0cm 0cm 10pt"><span style="color: #002060">The airplanes are all in a top condition polishes with glossy surfaces. Everything is clean, no parts and tools are lying around nevertheless the work is done. I had to lay down some times for taking pictures and my clothes haven’t got dirty. After a short talk to the manager we started our work.</span></div><div style="margin: 0cm 0cm 10pt"></div><div style="margin: 0cm 0cm 10pt"><span style="color: #002060">We have measured the complete undercarriage, compared all angles with our drawings and found some mistakes we had to clear. We got the opportunity to film the retracting process, this is really impressive and enlightening. The video clip could be a help for future Alpha Jet builder.</span></div><div style="margin: 0cm 0cm 10pt"></div><div style="margin: 0cm 0cm 10pt"></div><div style="margin: 0cm 0cm 10pt"></div><div style="margin: 0cm 0cm 10pt"><span style="color: #002060">The statement of Wilbert on RC-Network concerning the flaps made me insecure a little bit. For this we have checked the flaps too and found out we have to make some changes. The flap changes its position during the extending progress some centimetres towards the fuselage.</span></div><div style="margin: 0cm 0cm 10pt"></div><div style="margin: 0cm 0cm 10pt"></div><div style="margin: 0cm 0cm 10pt"><span style="color: #002060">For this the flaps are bevelled on the fuselage side. This bevel allows them to slide to the side. </span></div><div style="margin: 0cm 0cm 10pt"><span style="color: #002060">Our Alpha Jet has here an edge and we have to change this detail of our construction.</span></div><div style="margin: 0cm 0cm 10pt"></div><div style="margin: 0cm 0cm 10pt"></div><div style="margin: 0cm 0cm 10pt"><span style="color: #002060">Thank you Wilbert for making me insecure!</span></div><div style="margin: 0cm 0cm 10pt"><span style="color: #002060">The next part we have checked was the elevator with its bearing and linkage. Fortunately a spare Elevator was on stock. We have compared it with our construction, here everything is all richt.</span></div><div style="margin: 0cm 0cm 10pt"></div><div style="margin: 0cm 0cm 10pt"></div><div style="margin: 0cm 0cm 10pt"><span style="color: #002060">At last I have made many pictures of the cockpit. In my opinion a detailed scale cockpit is very important for our model.</span></div><div style="margin: 0cm 0cm 10pt"></div><div style="margin: 0cm 0cm 10pt"></div><div style="margin: 0cm 0cm 10pt"></div><div style="margin: 0cm 0cm 10pt"></div><div style="margin: 0cm 0cm 10pt"></div><div style="margin: 0cm 0cm 10pt"><span style="color: #002060">In the evening we have visited the Ikarus restaurant where we enjoyed our well-earned beer.</span></div><div style="margin: 0cm 0cm 10pt"></div><div style="margin: 0cm 0cm 10pt"></div><div style="margin: 0cm 0cm 10pt"></div><div style="margin: 0cm 0cm 10pt"></div><div style="margin: 0cm 0cm 10pt"></div><div style="margin: 0cm 0cm 10pt"></div><div style="margin: 0cm 0cm 10pt"><span style="color: #222222">I can only</span><span style="color: #222222"> advise everyone to go to Salzburg and to look at the world of Red Bull (http://www.hangar-7.com/de/). I can only advise everyone to go to Salzburg and to look at the world of Red Bull (</span><font color="#0000ff">http://www.hangar-7.com/de/</font><span style="color: #222222">).</span></div><div style="margin: 0cm 0cm 10pt"><span style="color: #222222">I’d like to sys thank you to Red Bull, the technicians, Robert Fuchs and Peter Cmyral for this wonderful day.</span></div><div style="margin: 0cm 0cm 10pt"><span style="color: #222222">In the meanwhile Peter Glück has made some progress….</span></div><div style="margin: 0cm 0cm 10pt"><span style="color: #002060">Modellsport Schweighofer</span><span style="color: #002060">Wirtschaftspark 9 • 8530 Deutschlandsberg
</span><span style="color: #002060">[email protected]</span></div>
08-01-2013 | 10:37 PM
#38
Thread Starter
Member
Joined: Apr 2013
Posts: 30
Likes: 0
Received 0 Likes
on
0 Posts
From: DeutschlandsbergNon, AUSTRIA
<div style="margin: 0cm 0cm 10pt">Schweighofer Alpha Jet Project (Part 19)</div><div style="margin: 0cm 0cm 10pt"><span style="color: #002060">As promised here’s the video of the retract sequence:
[youtube]http://www.youtube.com/watch?v=AXiuz4XFlaE&feature=player_embedded[/youtube]</span></div><div style="margin: 0cm 0cm 10pt"><span style="color: #002060"><iframe height="360" src="http://www.youtube.com/embed/AXiuz4XFlaE?feature=player_embedded" frameborder="0" width="640" allowfullscreen=""></iframe></span></div><div style="margin: 0cm 0cm 10pt"></div><div style="margin: 0cm 0cm 10pt"><span style="color: #002060">In the meanwhile Peter Glück has started detailing the fuselage. Before this I’ll tell you about the last works on the nose cone:</span></div><div style="margin: 0cm 0cm 10pt"><span style="color: #002060">Here you can see the preparations for the nose cone:</span></div><div style="margin: 0cm 0cm 10pt"> </div><div style="margin: 0cm 0cm 10pt">
 </div><div style="margin: 0cm 0cm 10pt"><span style="color: #002060">Now filler is attached to the fuselage and the nose cone is pressed against the fuselage until the filler is dried. Now the cone is disassembled, here you can see the result:</span></div><div style="margin: 0cm 0cm 10pt">
 </div><div style="margin: 0cm 0cm 10pt"><span style="color: #002060">Now the finished cone can be pushed onto the fuselage it fits perfect!</span></div><div style="margin: 0cm 0cm 10pt">
 </div><div style="margin: 0cm 0cm 10pt">
 </div><div style="margin: 0cm 0cm 10pt"><span style="color: #002060">The fuselage is ready detailed. The most work is to mark the correct positions.</span></div><div style="margin: 0cm 0cm 10pt">
 </div><div style="margin: 0cm 0cm 10pt">
 </div><div style="margin: 0cm 0cm 10pt">
 </div><div style="margin: 0cm 0cm 10pt"><span style="color: #002060">After marking the detailing process can begin. More than 1000 rivets have to be scratched into the model. We had the chance to check the surface of the original very well at our Red Bull visit. The Alpha jet has no heightened areas, for this the planking with metal sheets is not necessary.</span></div><div style="margin: 0cm 0cm 10pt">
 </div><div style="margin: 0cm 0cm 10pt">
 </div><div style="margin: 0cm 0cm 10pt">
 </div><div style="margin: 0cm 0cm 10pt">
 </div><div style="margin: 0cm 0cm 10pt"><span style="color: #002060">We have finished the fuselage!!!</span></div><div style="margin: 0cm 0cm 10pt">
 </div><div style="margin: 0cm 0cm 10pt">
 </div><div style="margin: 0cm 0cm 10pt">
 </div><div style="margin: 0cm 0cm 10pt">
 </div><div style="margin: 0cm 0cm 10pt">
 </div><div style="margin: 0cm 0cm 10pt">
 </div><div style="margin: 0cm 0cm 10pt">
 </div><div style="margin: 0cm 0cm 10pt"><span style="color: #002060">Peter Glück has worked more than 18 hours per day with the Alpha Jet, but the bigger part is already done.</span></div><div style="margin: 0cm 0cm 10pt">
 </div><div style="margin: 0cm 0cm 10pt">
 </div><div style="margin: 0cm 0cm 10pt">
 </div><div style="margin: 0cm 0cm 10pt">
 </div><div style="margin: 0cm 0cm 10pt">
 </div><div style="margin: 0cm 0cm 10pt">
 </div><div style="margin: 0cm 0cm 10pt">
 </div><div style="margin: 0cm 0cm 10pt">
 </div><div style="margin: 0cm 0cm 10pt"><span style="color: #002060">We have a very tense time line and we get under pressure to catch our deadline. For this reason the fuselage was picked up and is on the way to Uwe Riehm (Paritech). Uwe confirmed the deadline for the jetpower fair can be catched if he gets all the parts until next week. I guess the wings still will be wet when we stick the parts together at the fair.</span></div><div style="margin: 0cm 0cm 10pt"></div><div style="margin: 0cm 0cm 10pt"><span style="color: #002060">Modellsport Schweighofer</span><span style="color: #002060">
Wirtschaftspark 9 • 8530 Deutschlandsberg
</span><span style="color: #002060">[email protected]</span></div>
[youtube]http://www.youtube.com/watch?v=AXiuz4XFlaE&feature=player_embedded[/youtube]</span></div><div style="margin: 0cm 0cm 10pt"><span style="color: #002060"><iframe height="360" src="http://www.youtube.com/embed/AXiuz4XFlaE?feature=player_embedded" frameborder="0" width="640" allowfullscreen=""></iframe></span></div><div style="margin: 0cm 0cm 10pt"></div><div style="margin: 0cm 0cm 10pt"><span style="color: #002060">In the meanwhile Peter Glück has started detailing the fuselage. Before this I’ll tell you about the last works on the nose cone:</span></div><div style="margin: 0cm 0cm 10pt"><span style="color: #002060">Here you can see the preparations for the nose cone:</span></div><div style="margin: 0cm 0cm 10pt">
</div><div style="margin: 0cm 0cm 10pt"></div><div style="margin: 0cm 0cm 10pt"><span style="color: #002060">Now filler is attached to the fuselage and the nose cone is pressed against the fuselage until the filler is dried. Now the cone is disassembled, here you can see the result:</span></div><div style="margin: 0cm 0cm 10pt"></div><div style="margin: 0cm 0cm 10pt"><span style="color: #002060">Now the finished cone can be pushed onto the fuselage it fits perfect!</span></div><div style="margin: 0cm 0cm 10pt"></div><div style="margin: 0cm 0cm 10pt"></div><div style="margin: 0cm 0cm 10pt"><span style="color: #002060">The fuselage is ready detailed. The most work is to mark the correct positions.</span></div><div style="margin: 0cm 0cm 10pt"></div><div style="margin: 0cm 0cm 10pt"></div><div style="margin: 0cm 0cm 10pt"></div><div style="margin: 0cm 0cm 10pt"><span style="color: #002060">After marking the detailing process can begin. More than 1000 rivets have to be scratched into the model. We had the chance to check the surface of the original very well at our Red Bull visit. The Alpha jet has no heightened areas, for this the planking with metal sheets is not necessary.</span></div><div style="margin: 0cm 0cm 10pt"></div><div style="margin: 0cm 0cm 10pt"></div><div style="margin: 0cm 0cm 10pt"></div><div style="margin: 0cm 0cm 10pt"></div><div style="margin: 0cm 0cm 10pt"><span style="color: #002060">We have finished the fuselage!!!</span></div><div style="margin: 0cm 0cm 10pt"></div><div style="margin: 0cm 0cm 10pt"></div><div style="margin: 0cm 0cm 10pt"></div><div style="margin: 0cm 0cm 10pt"></div><div style="margin: 0cm 0cm 10pt"></div><div style="margin: 0cm 0cm 10pt"></div><div style="margin: 0cm 0cm 10pt"></div><div style="margin: 0cm 0cm 10pt"><span style="color: #002060">Peter Glück has worked more than 18 hours per day with the Alpha Jet, but the bigger part is already done.</span></div><div style="margin: 0cm 0cm 10pt"></div><div style="margin: 0cm 0cm 10pt"></div><div style="margin: 0cm 0cm 10pt"></div><div style="margin: 0cm 0cm 10pt"></div><div style="margin: 0cm 0cm 10pt"></div><div style="margin: 0cm 0cm 10pt"></div><div style="margin: 0cm 0cm 10pt"></div><div style="margin: 0cm 0cm 10pt"></div><div style="margin: 0cm 0cm 10pt"><span style="color: #002060">We have a very tense time line and we get under pressure to catch our deadline. For this reason the fuselage was picked up and is on the way to Uwe Riehm (Paritech). Uwe confirmed the deadline for the jetpower fair can be catched if he gets all the parts until next week. I guess the wings still will be wet when we stick the parts together at the fair.</span></div><div style="margin: 0cm 0cm 10pt"></div><div style="margin: 0cm 0cm 10pt"><span style="color: #002060">Modellsport Schweighofer</span><span style="color: #002060">Wirtschaftspark 9 • 8530 Deutschlandsberg
</span><span style="color: #002060">[email protected]</span></div>
08-19-2013 | 06:18 AM
#39
Thread Starter
Member
Joined: Apr 2013
Posts: 30
Likes: 0
Received 0 Likes
on
0 Posts
From: DeutschlandsbergNon, AUSTRIA
Schweighofer Alpha Jet Project (Part 20)
After the fuselage was out of Peter�s workshop he began detailing the wings and control surfaces. It�s possible to plan and build a master model in 9 months and get ready to mould the first prototype. I will of course report on the progress of our Alpha Jets at Paritech and am really looking forward when I get the model for the first time to face.
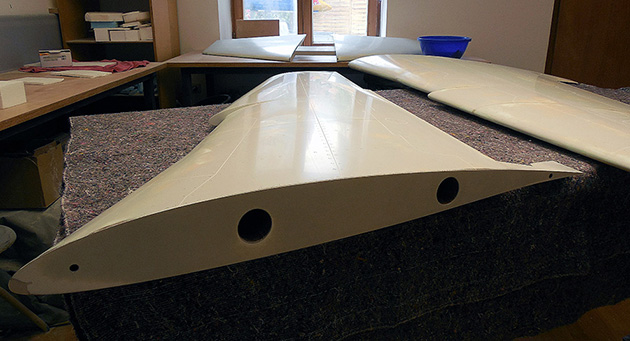
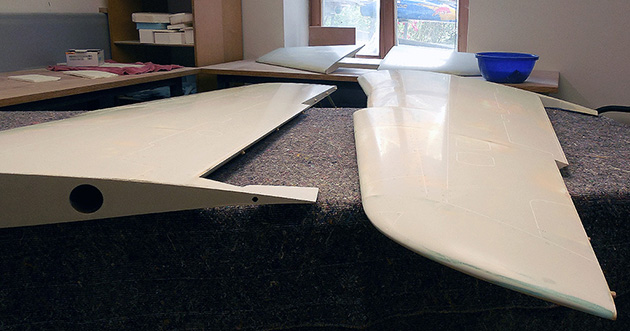
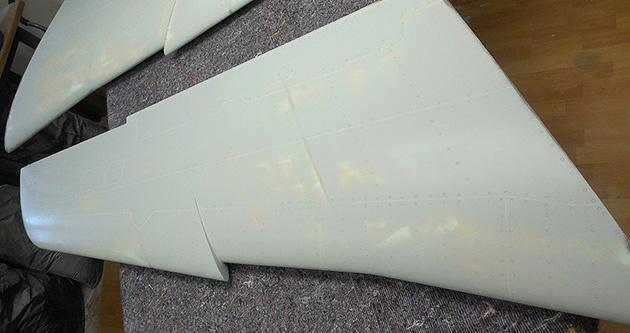
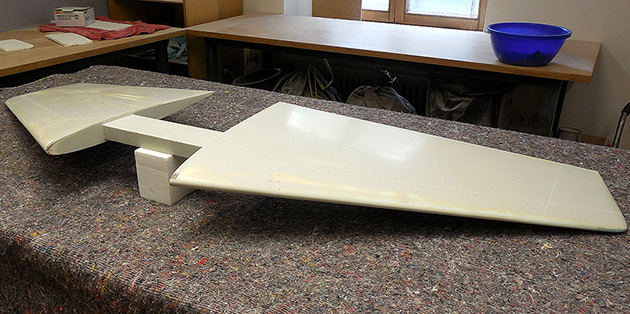
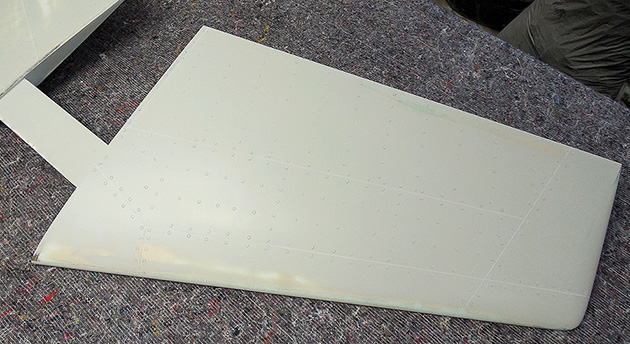
The rudders are finished too.
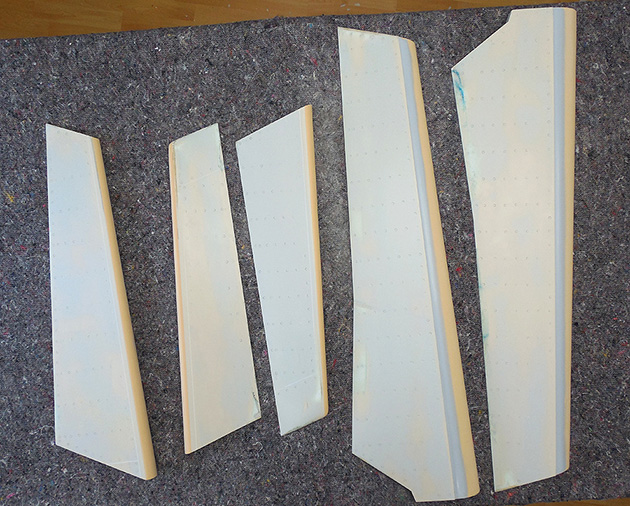
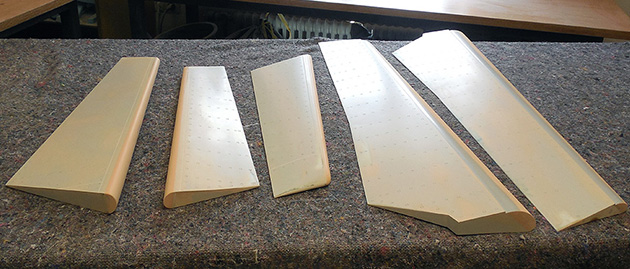
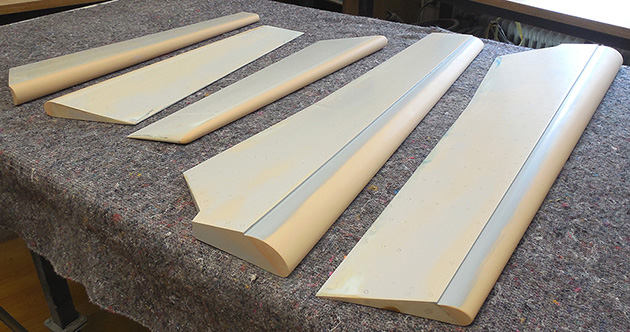
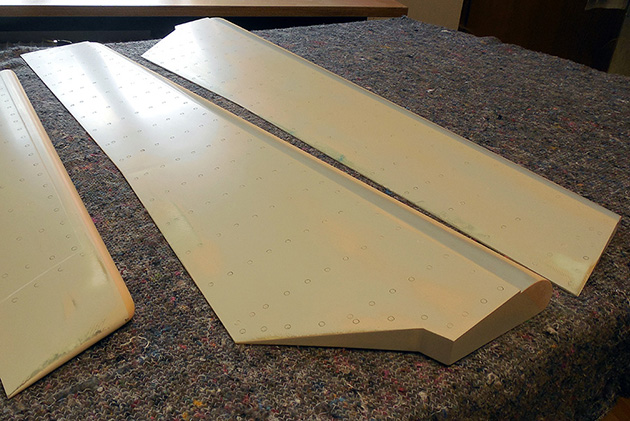
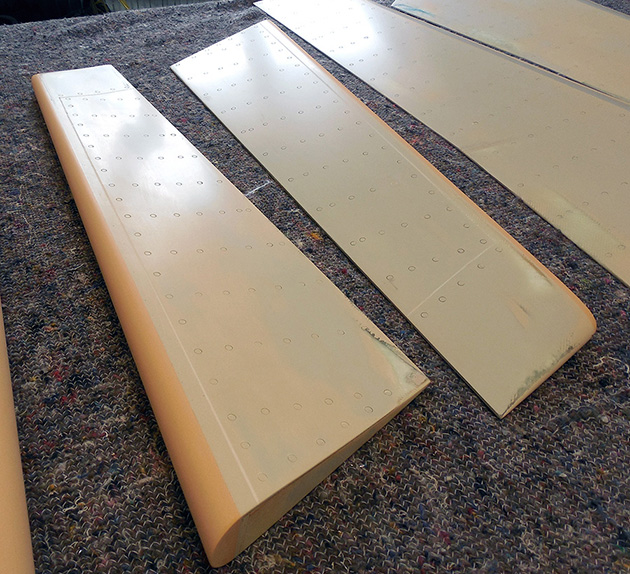
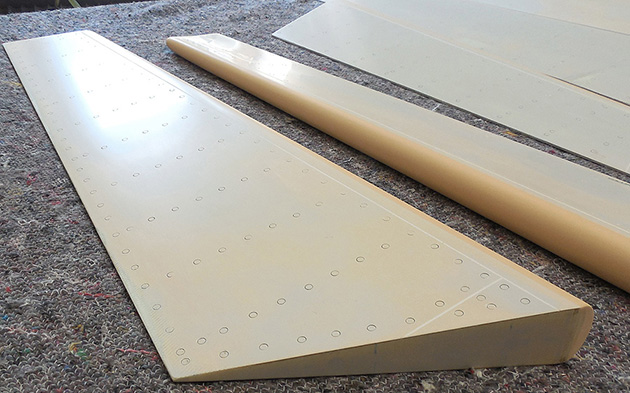
As soon as I get the pictures from Uwe I�ll tell you about the making of the moulds.
Modellsport Schweighofer
Wirtschaftspark 9 � 8530 Deutschlandsberg
[email protected]
After the fuselage was out of Peter�s workshop he began detailing the wings and control surfaces. It�s possible to plan and build a master model in 9 months and get ready to mould the first prototype. I will of course report on the progress of our Alpha Jets at Paritech and am really looking forward when I get the model for the first time to face.
The rudders are finished too.
As soon as I get the pictures from Uwe I�ll tell you about the making of the moulds.
Modellsport Schweighofer
Wirtschaftspark 9 � 8530 Deutschlandsberg
[email protected]
08-25-2013 | 11:03 PM
#40
Thread Starter
Member
Joined: Apr 2013
Posts: 30
Likes: 0
Received 0 Likes
on
0 Posts
From: DeutschlandsbergNon, AUSTRIA
Schweighofer Alpha Jet Project (Part 22)
More pictures of the mould�
In the meanwhile all parts have been rubbed with wax. Uwe Riehm has started working with the fuselage rear part, where he starts again with the parting line.
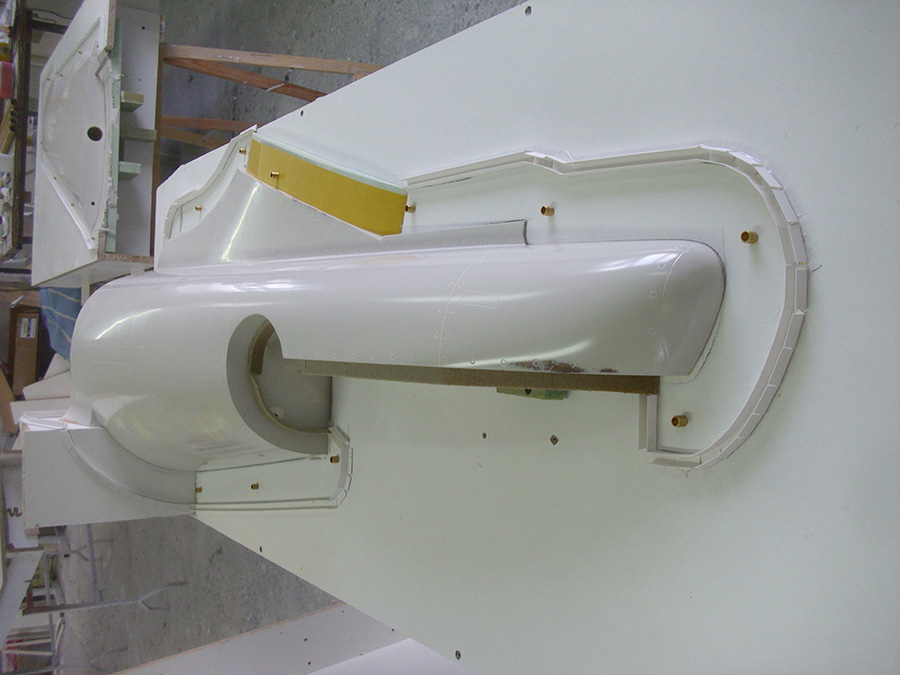
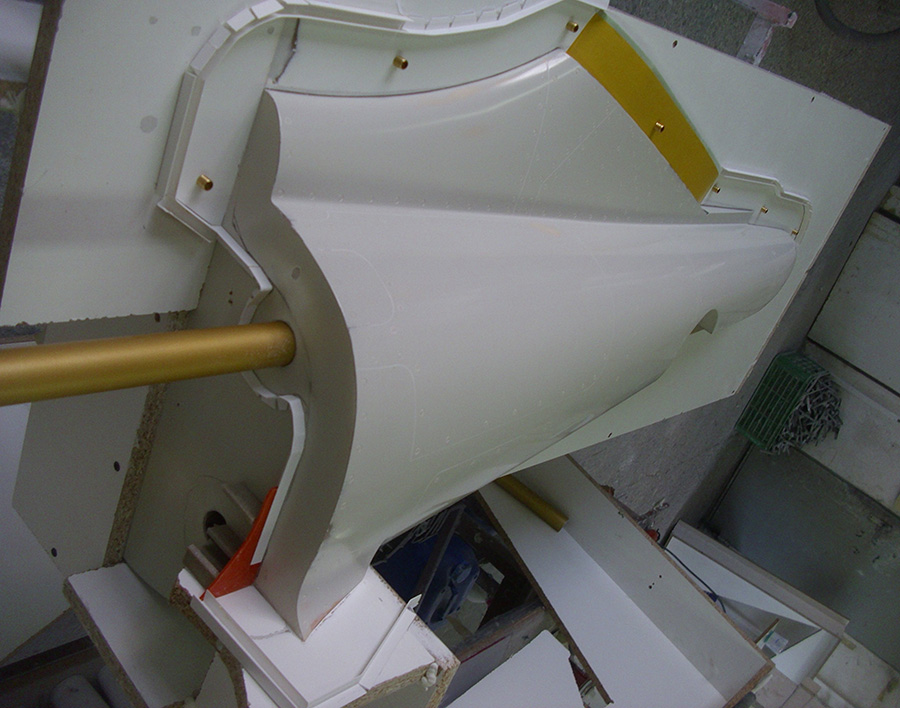
Next step � fixing the connection pins and applying the resin.
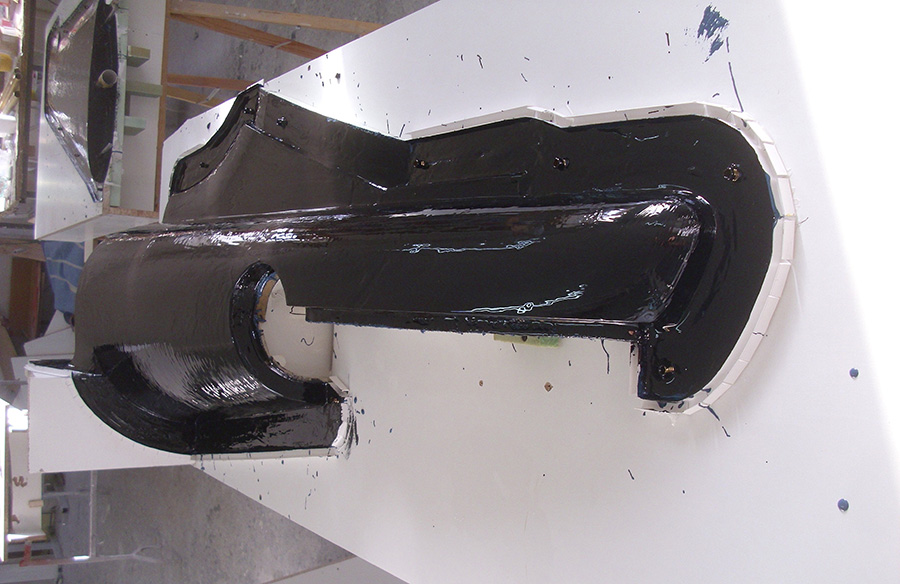
After curing this half of the mould is ready and it can be started with the second part.
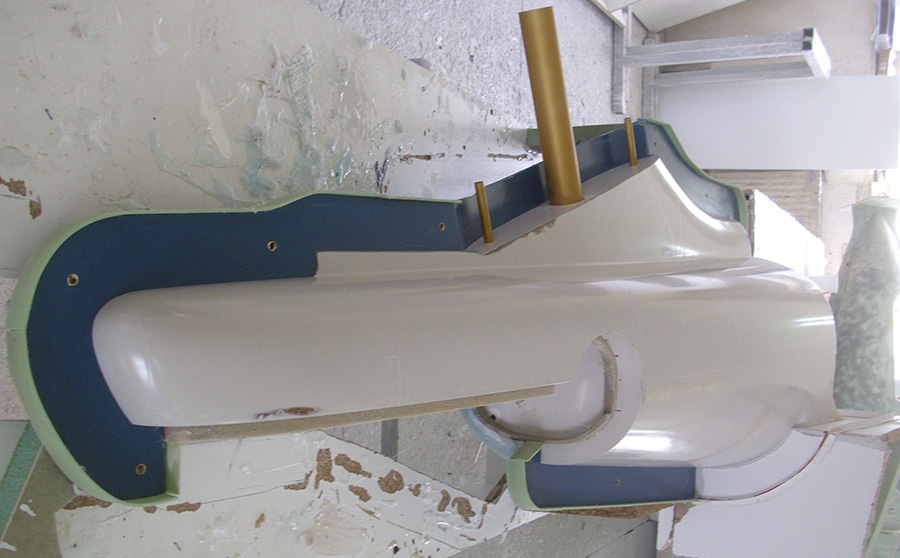
In the meantime Uwe also started the wings and control surfaces. In the next picture you can see how Uwe makes the parting line.
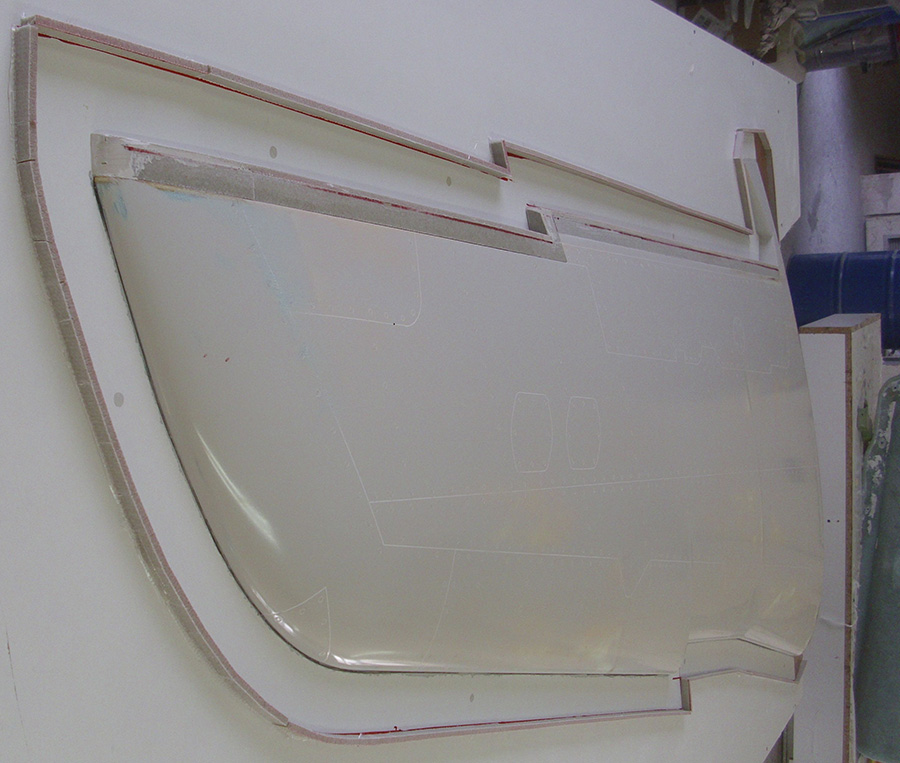
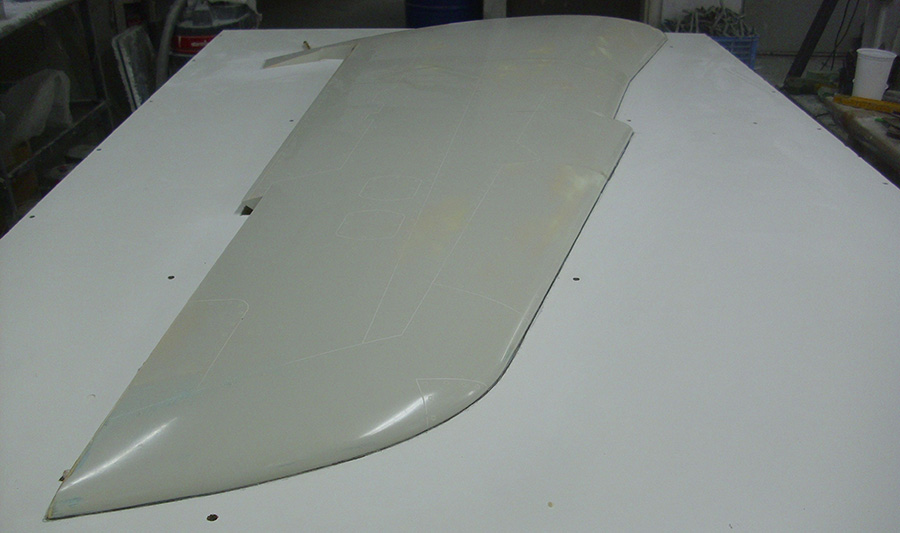
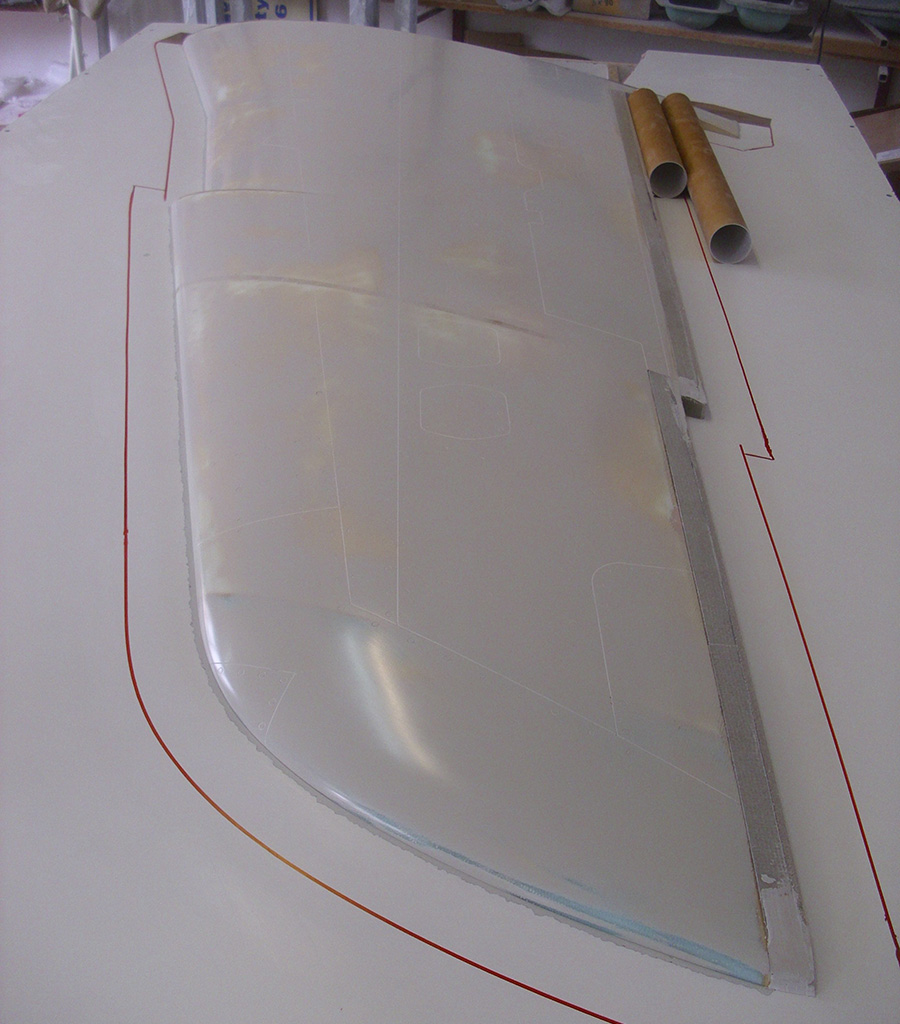
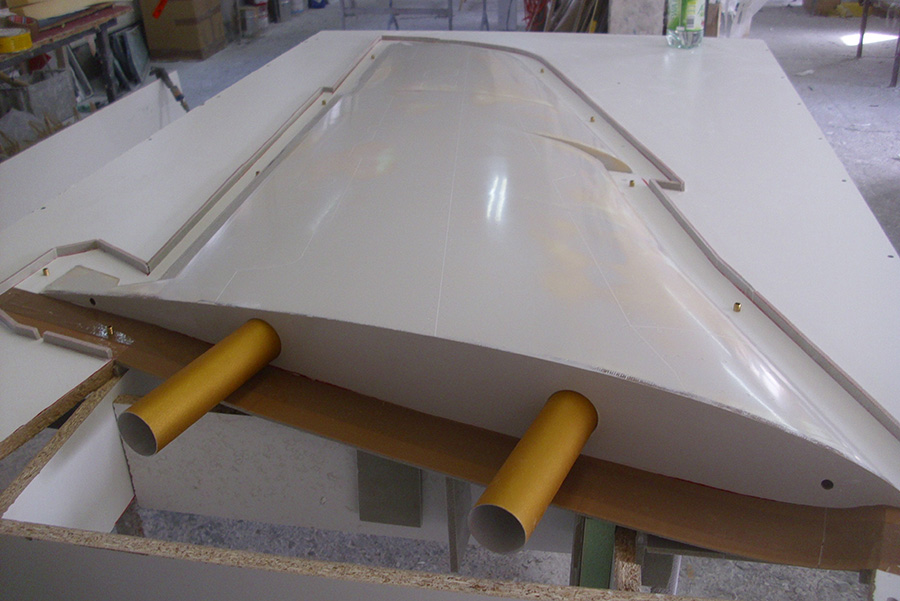
To avoid the mould from warping, Uwe reinforces it with steel rails

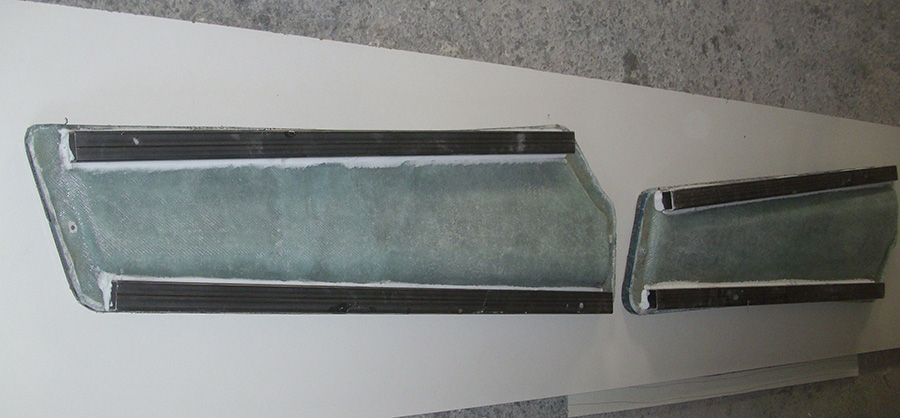
The rudder and the air intake is ready, now Uwe can start with waxing and painting.
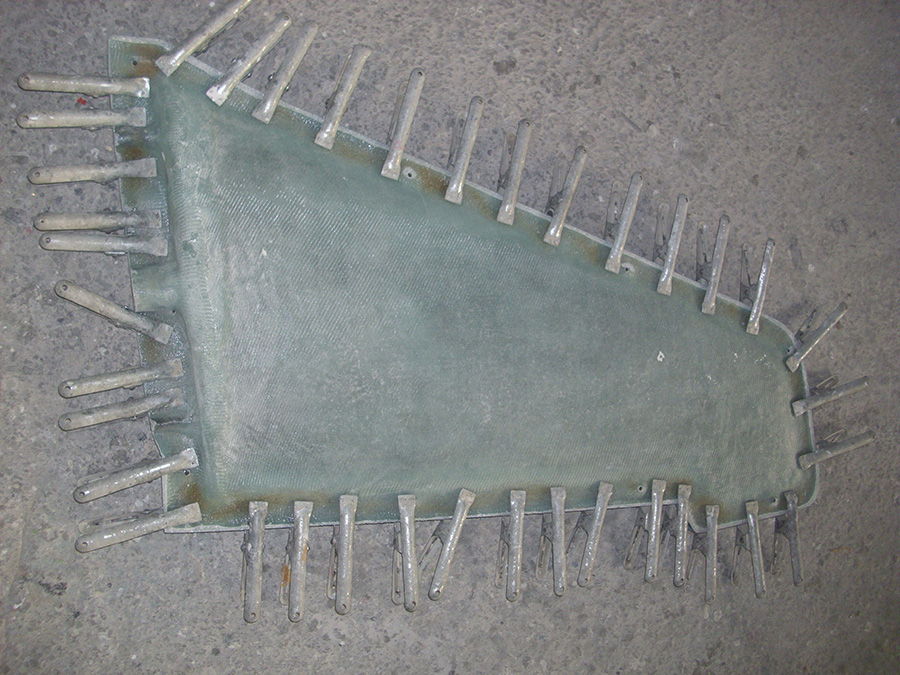
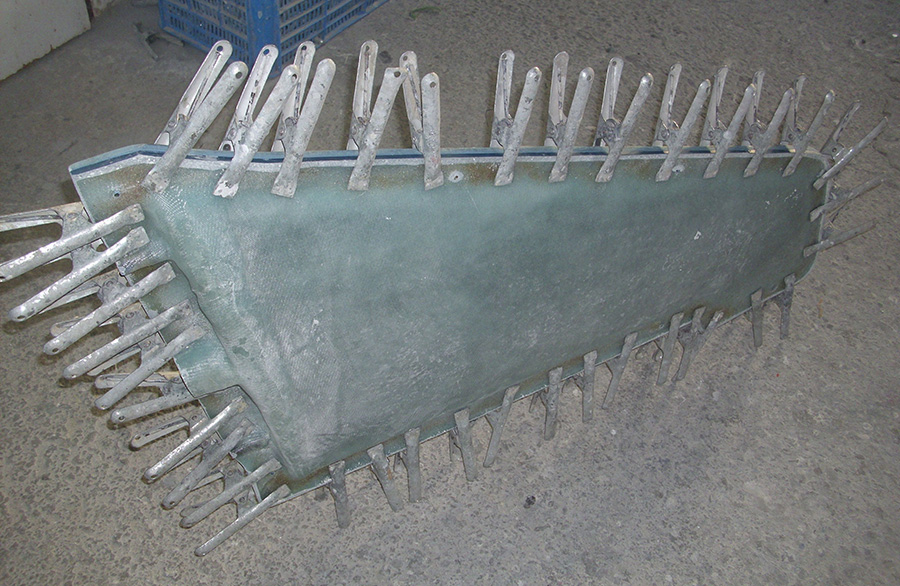
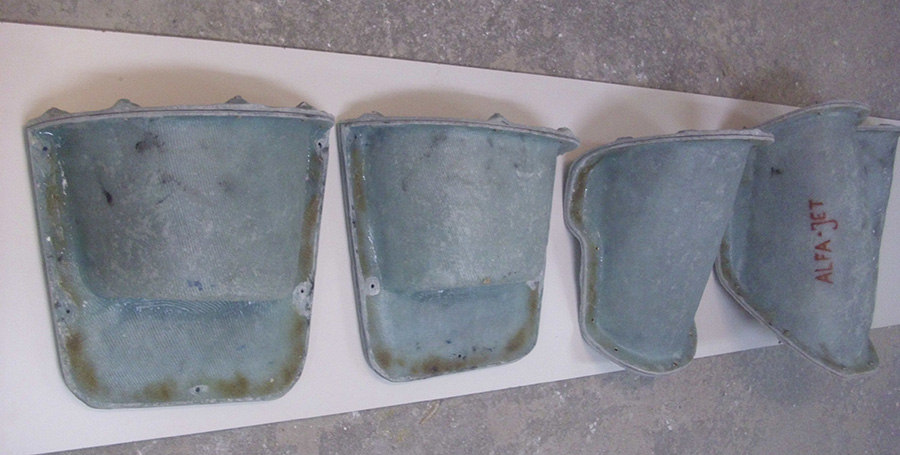
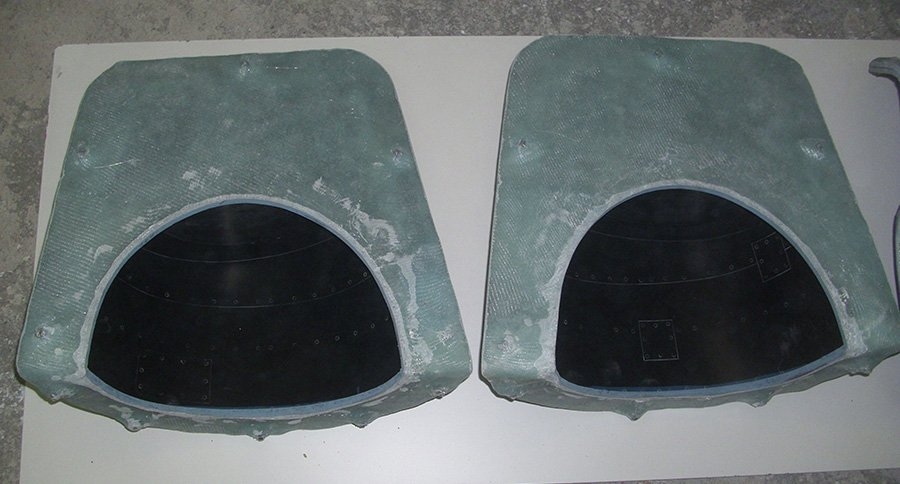
After curing some days the first part of the mould is ready and the work for the second part can begin.
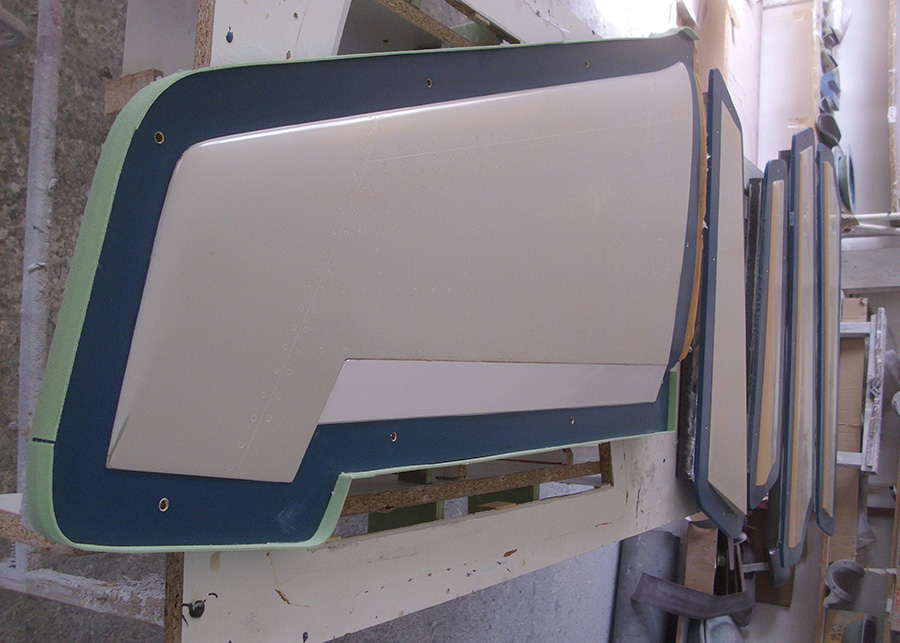
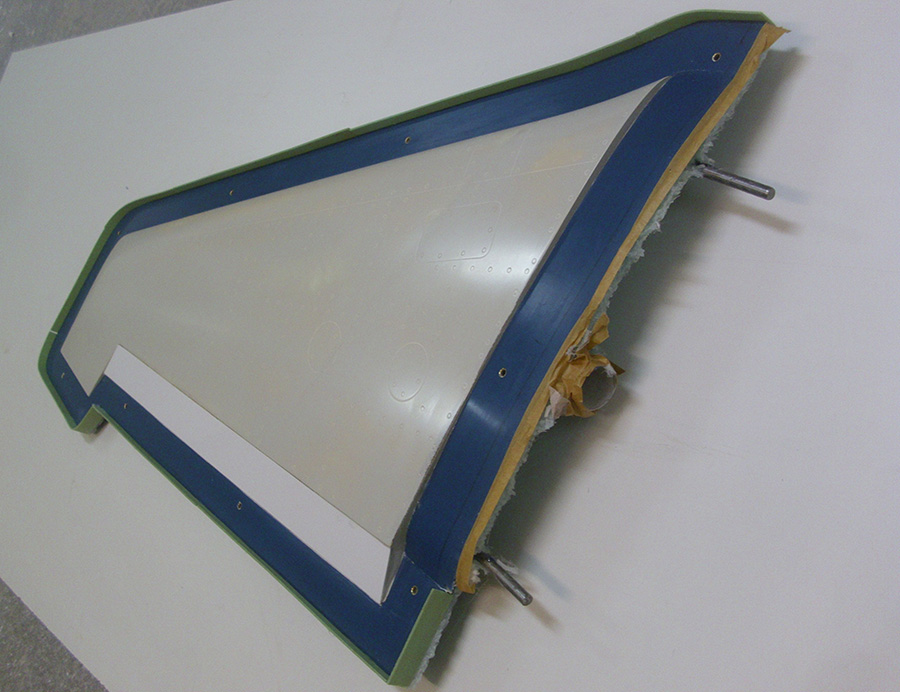
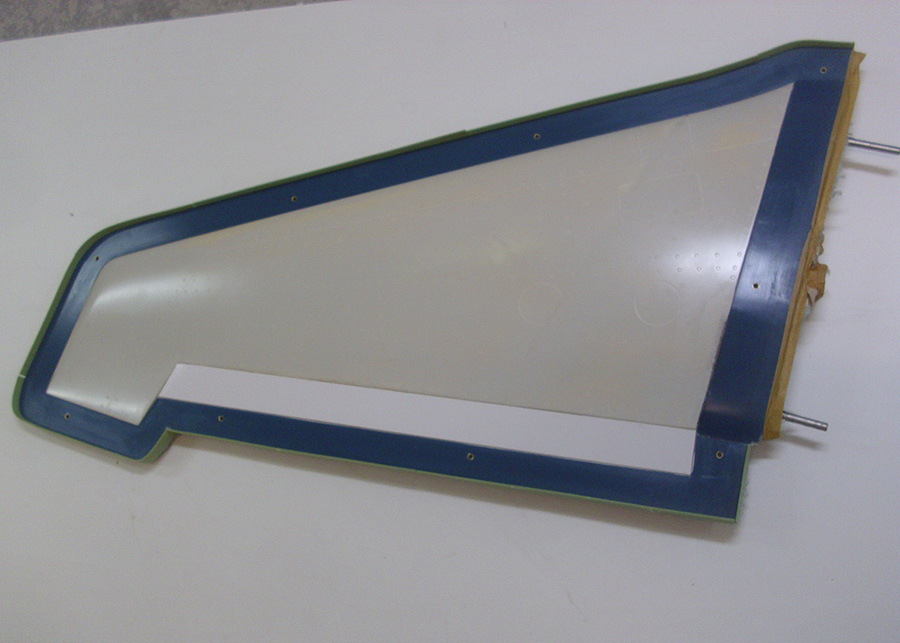
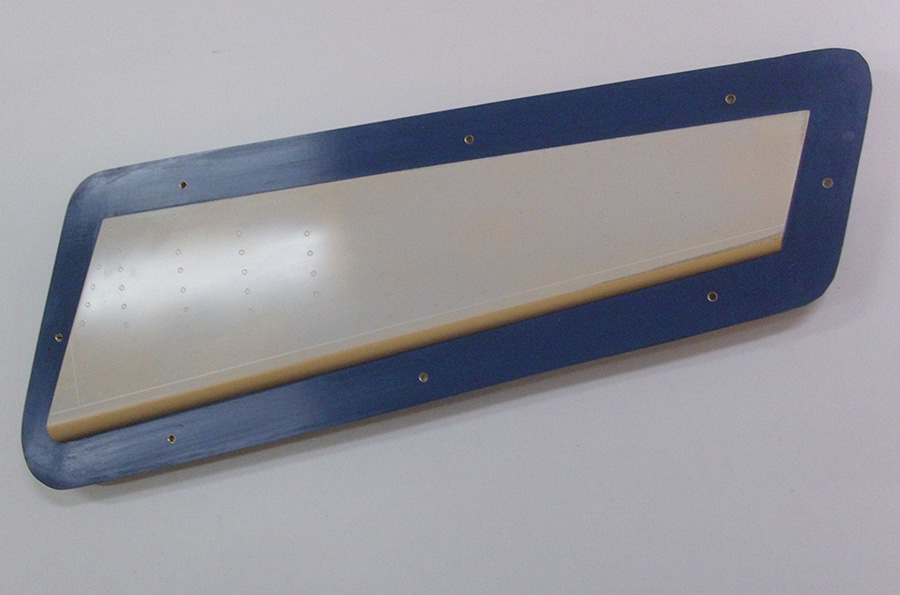
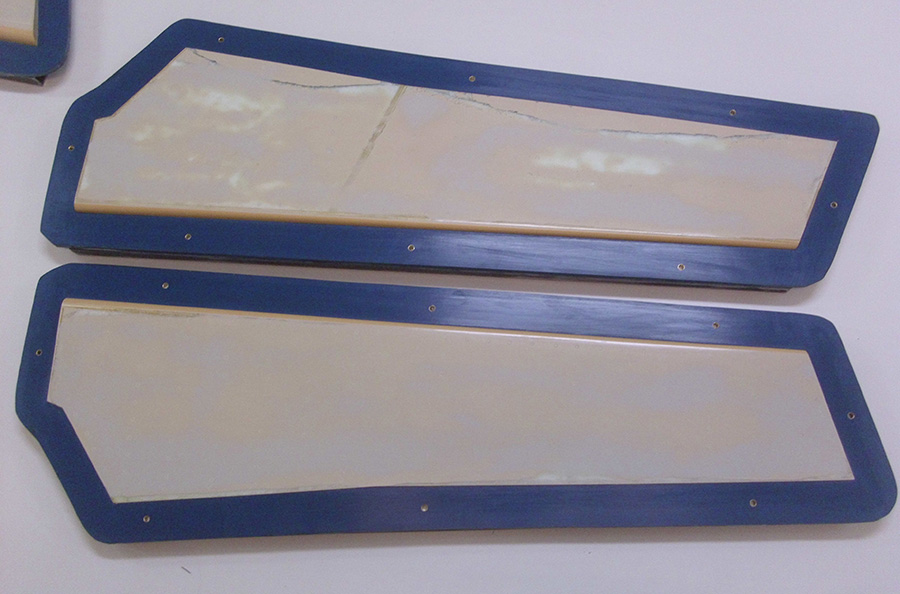
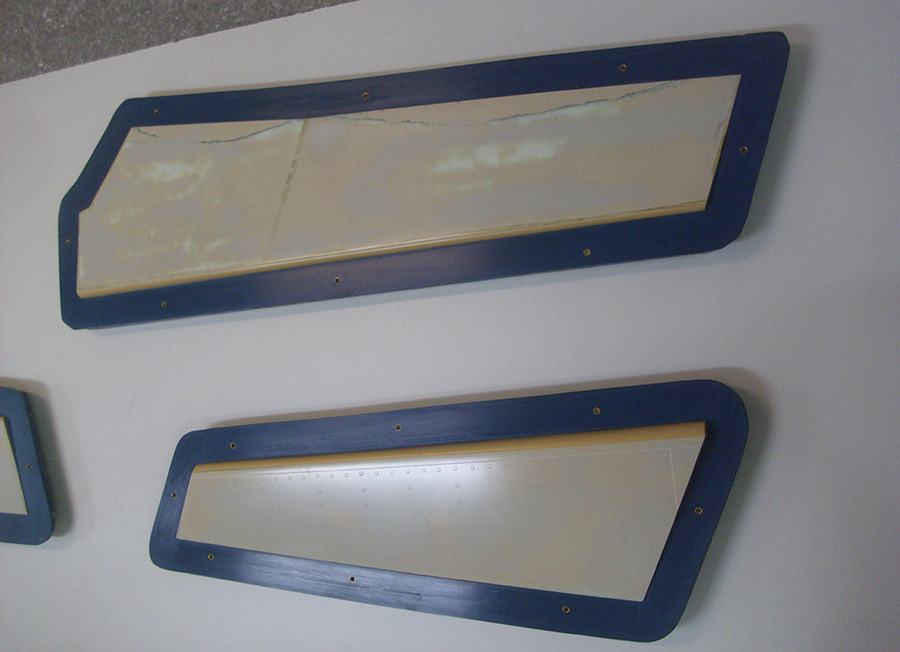
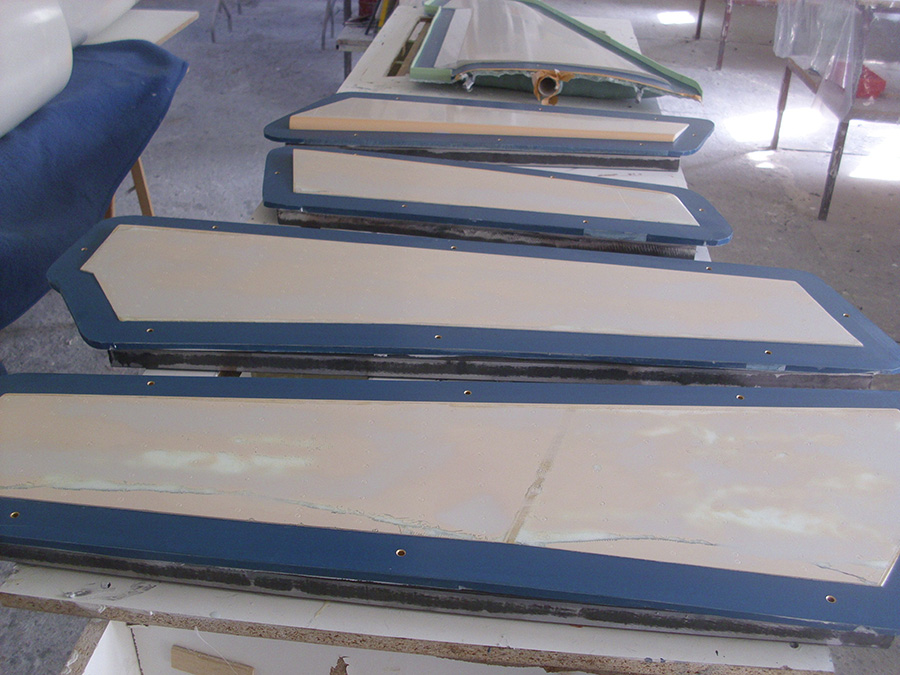
After a short break Peter Gl�ck resumes the work on the other parts of the Alpha Jet. Tank and tank support are planned.
Greetings
Mario Walter
More pictures of the mould�
In the meanwhile all parts have been rubbed with wax. Uwe Riehm has started working with the fuselage rear part, where he starts again with the parting line.
Next step � fixing the connection pins and applying the resin.
After curing this half of the mould is ready and it can be started with the second part.
In the meantime Uwe also started the wings and control surfaces. In the next picture you can see how Uwe makes the parting line.
To avoid the mould from warping, Uwe reinforces it with steel rails
The rudder and the air intake is ready, now Uwe can start with waxing and painting.
After curing some days the first part of the mould is ready and the work for the second part can begin.
After a short break Peter Gl�ck resumes the work on the other parts of the Alpha Jet. Tank and tank support are planned.
Greetings
Mario Walter
08-29-2013 | 06:40 AM
#41
Thread Starter
Member
Joined: Apr 2013
Posts: 30
Likes: 0
Received 0 Likes
on
0 Posts
From: DeutschlandsbergNon, AUSTRIA
Schweighofer Alpha Jet Project (Part 23)
The moulds are finished and have all together a weight of 209kg!
Uwe Riehm has uses these materials:
� 180m� fiber in different strengths and materials
� 20 kg Epoxy Resin for surfaces
� 130 kg Epoxy Resin for the fibre
� 70 kg Glass fiber
� 8 kg Carbon fiber
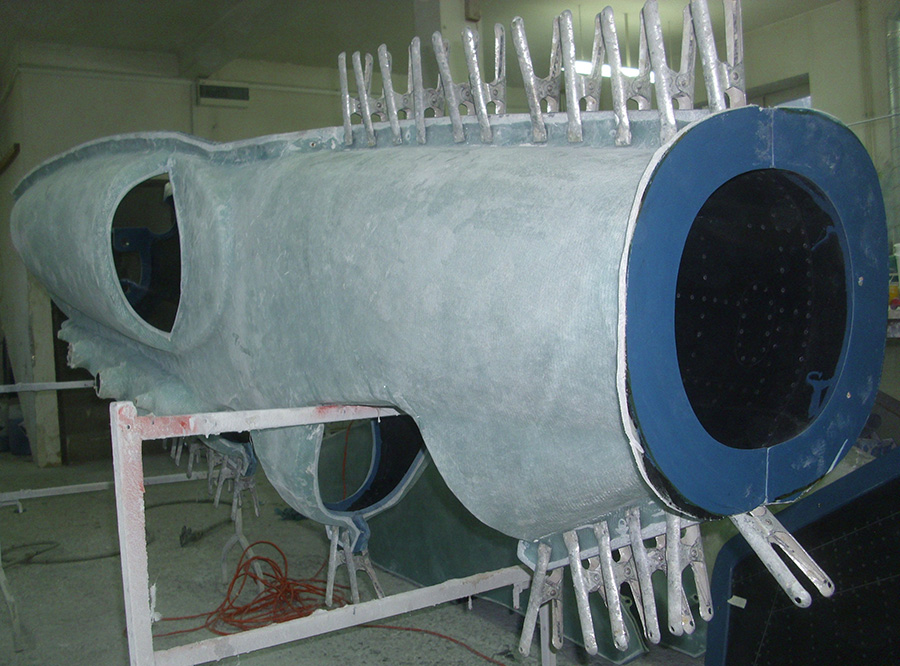
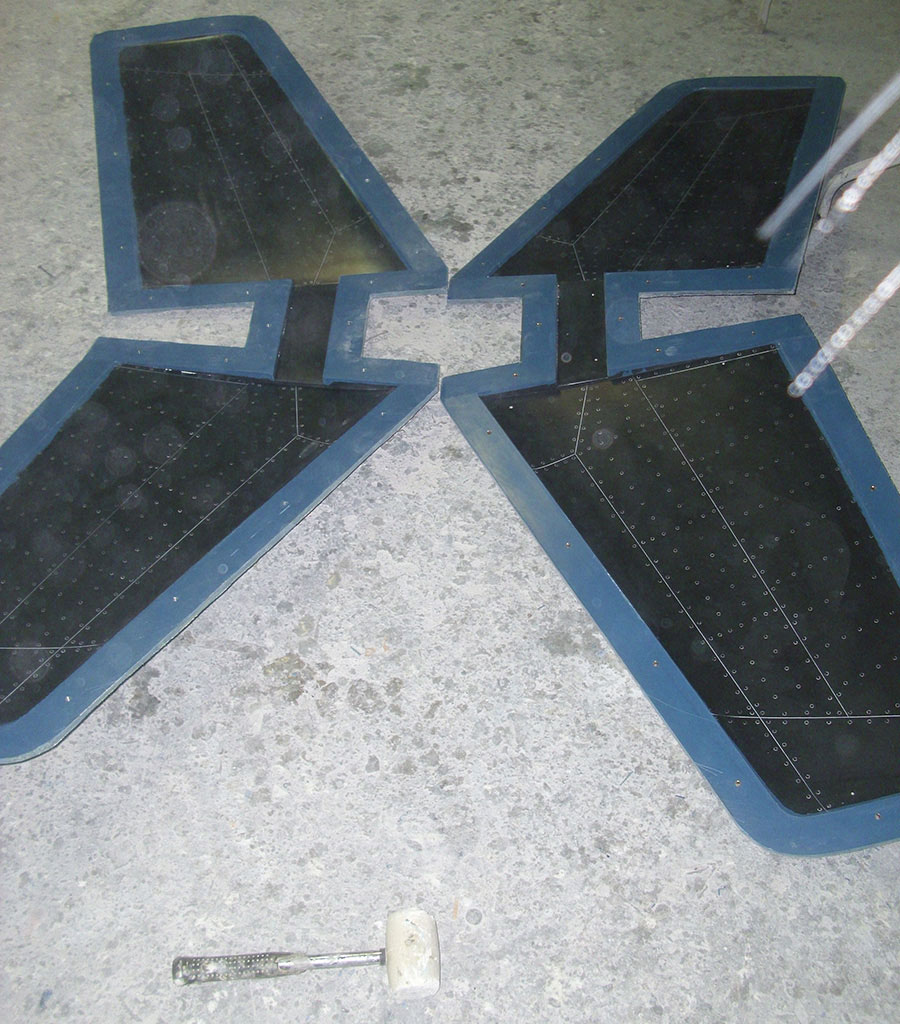
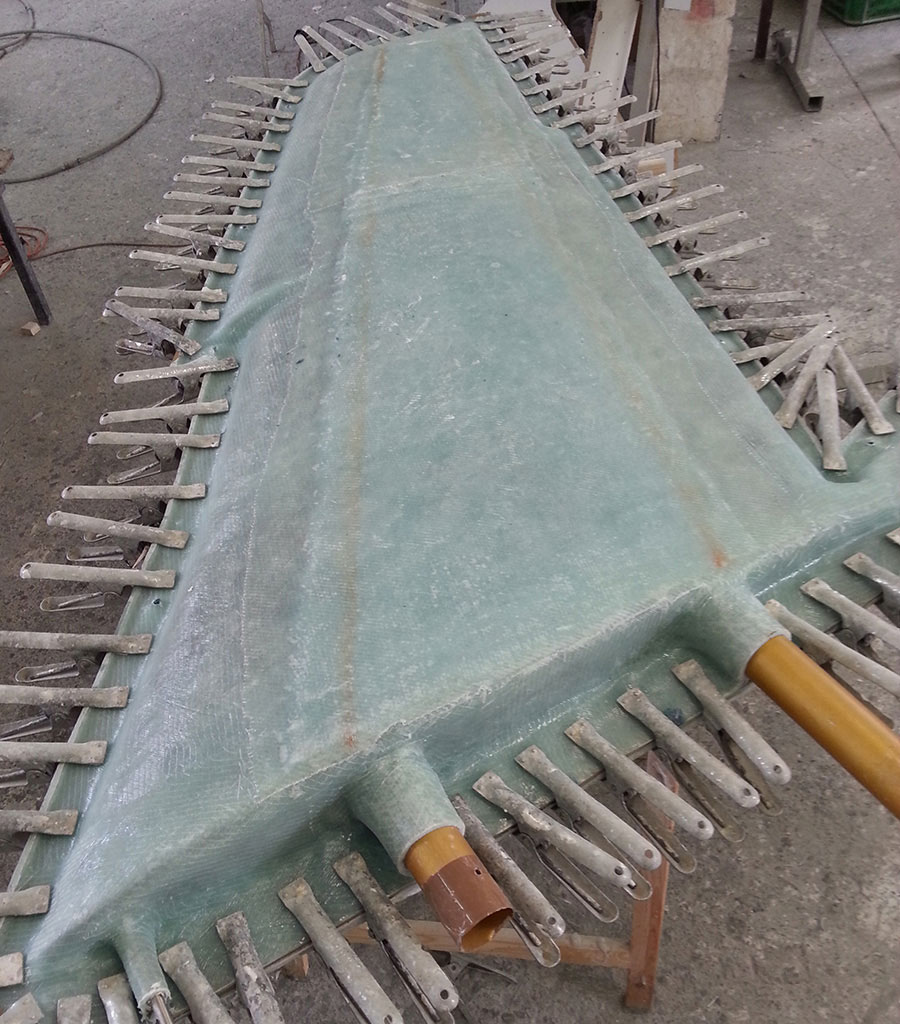

First Uwe produces a prototype which you can see at the Jetpower fair. Using this prototype we will adjust the undercarriage, cockpit, elevator and the complete former set. As you can see in the http://www.alphajet-projekt.at/conte...ig.jpgpictures some parts are already finished � we�ll catch the timeline for the Jetpower.
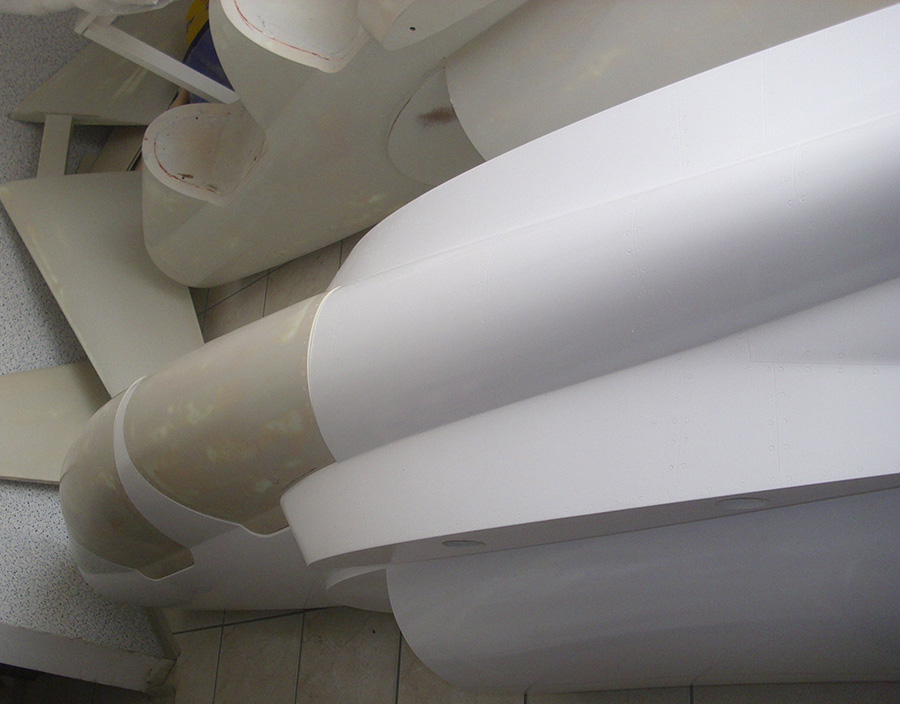
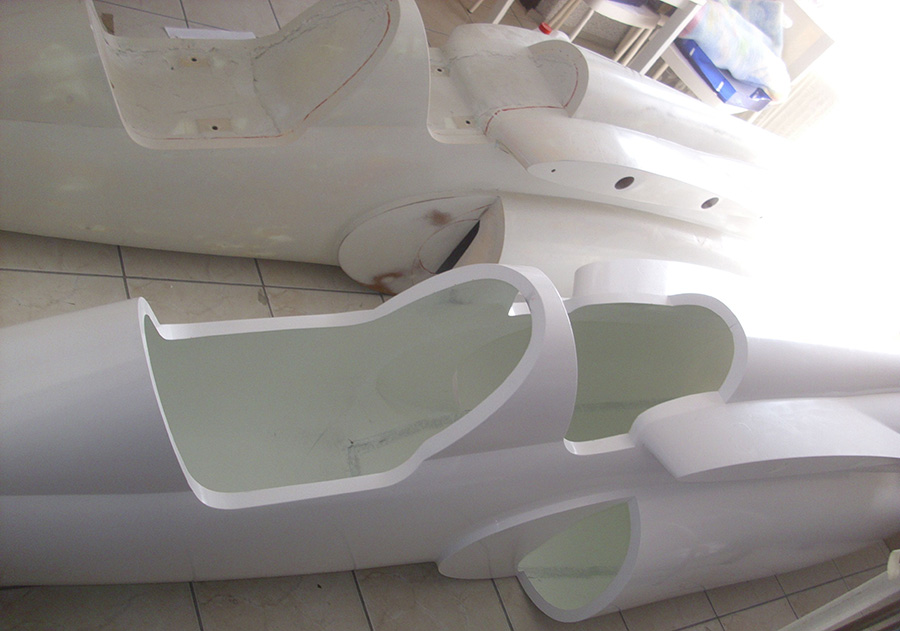
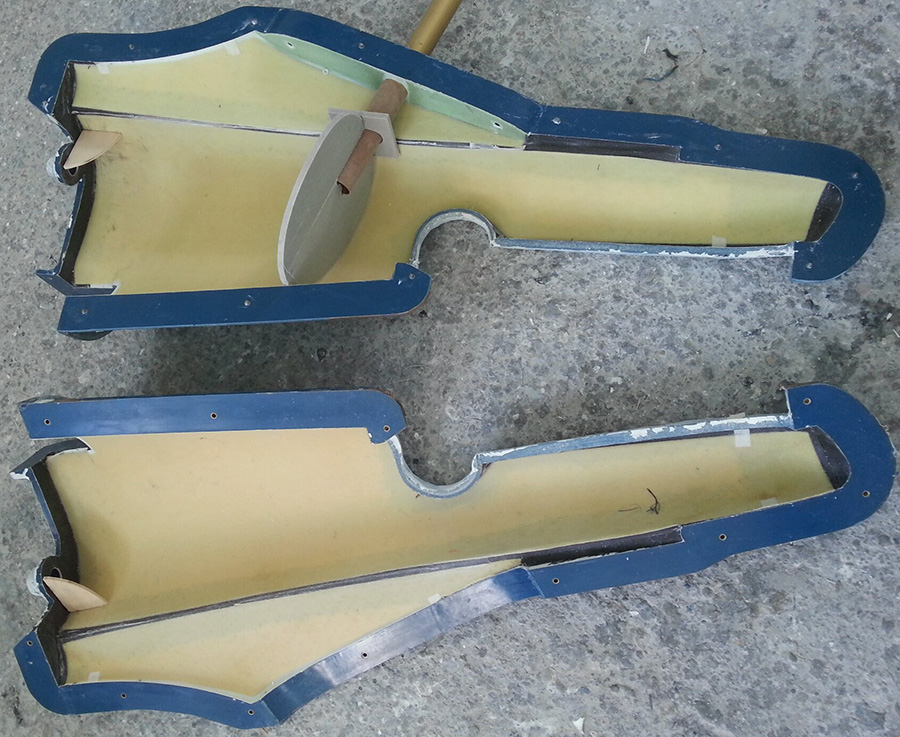
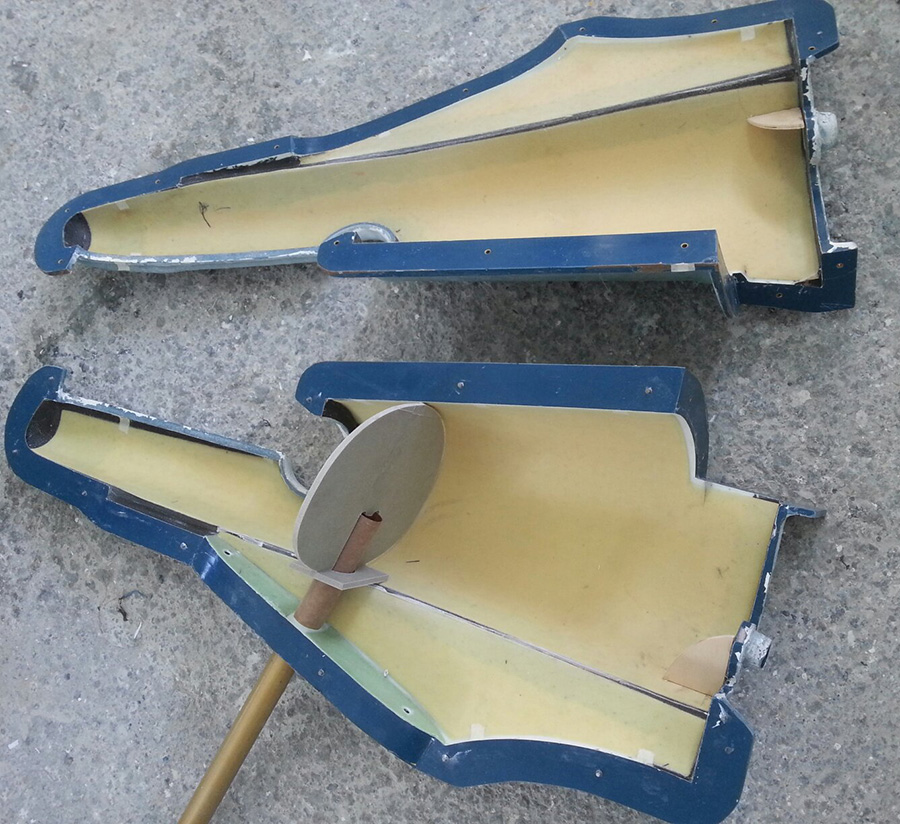
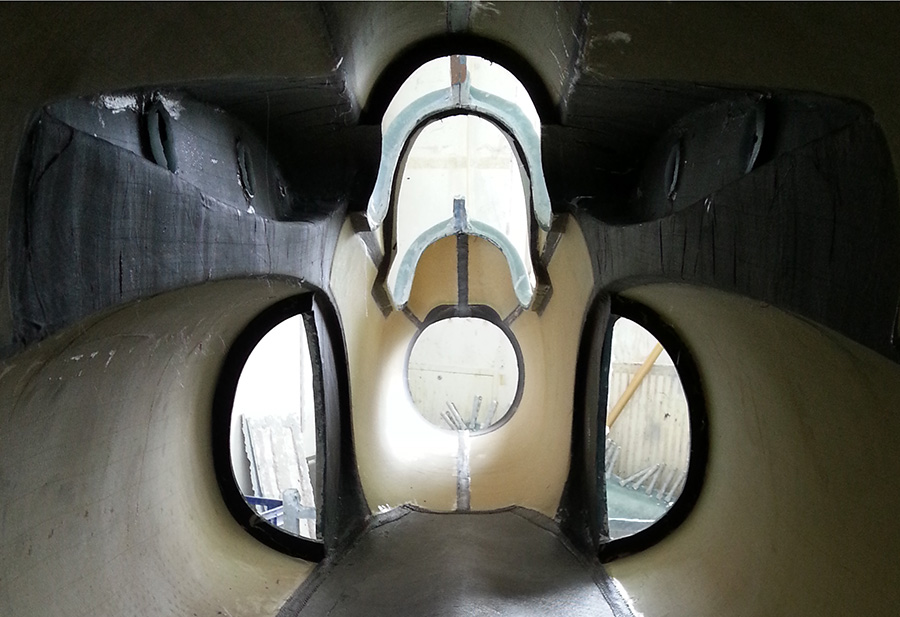

Peter Gl�ck is already working on the weapon carriers and tanks, parts which are essential to such a model. The now laminated and plastered tank is fixed at a right angle. Then the groove is milled using 6mm cutters.
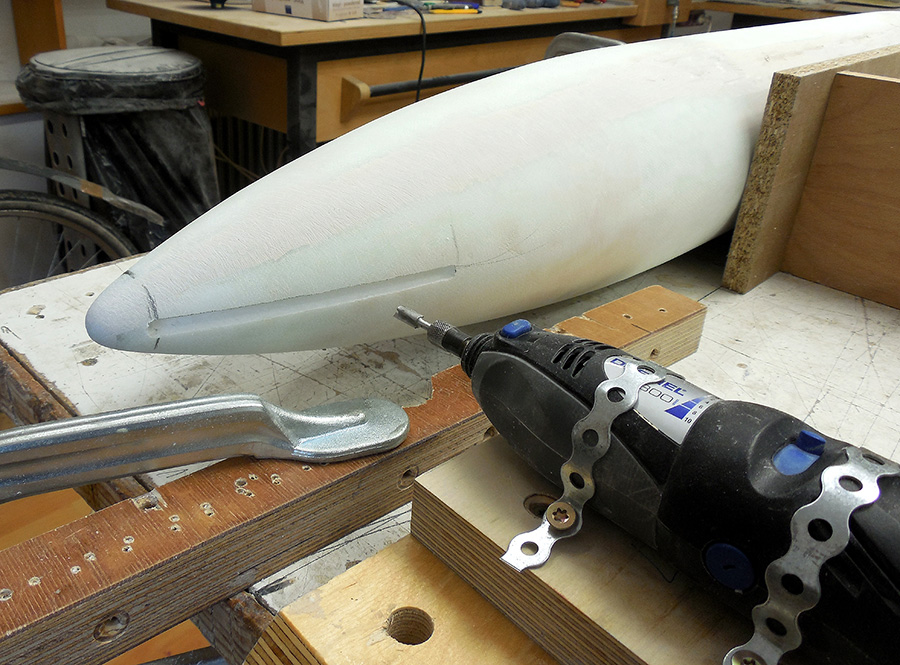
After milling the control surfaces are glued with PU resin.
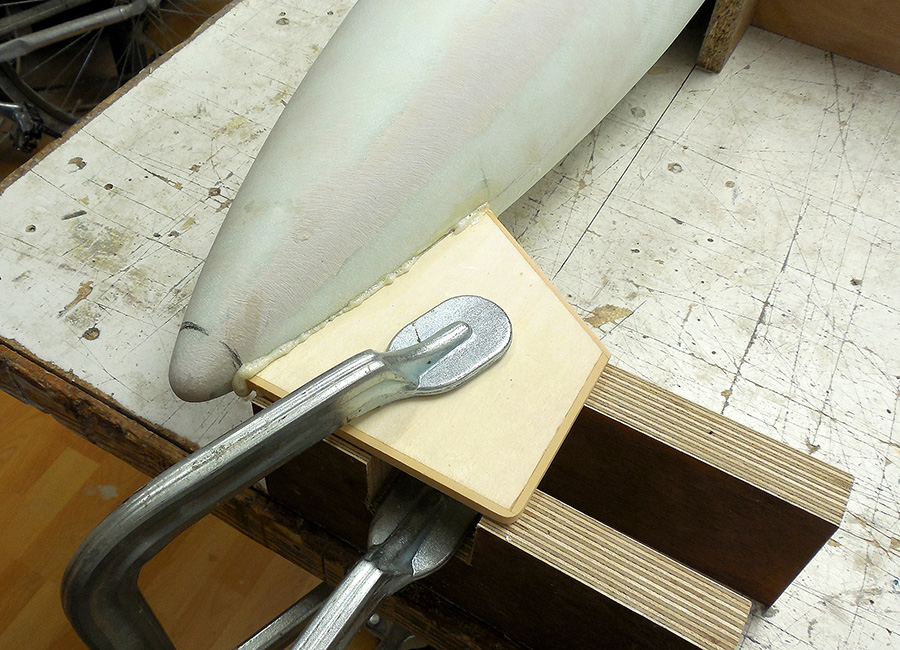
Then the tanks are grinded and filled.
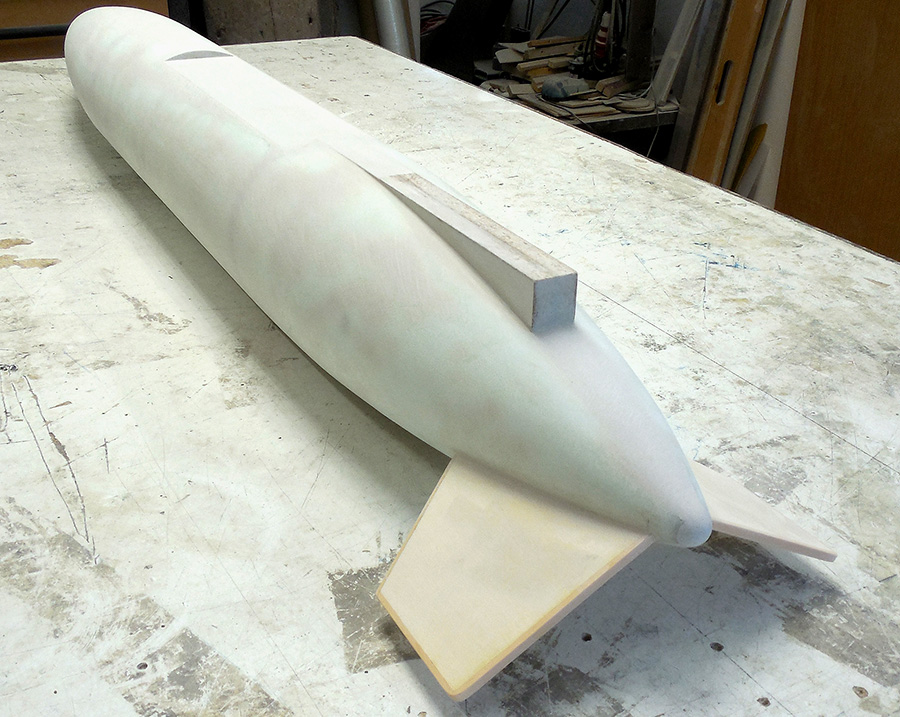
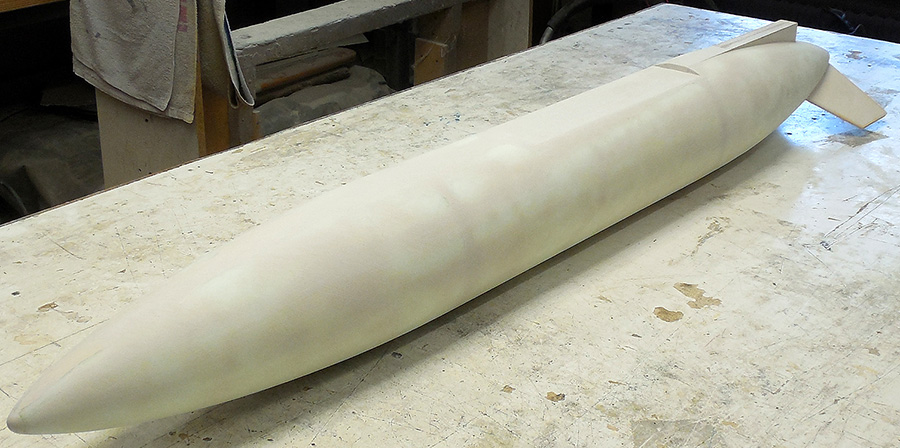
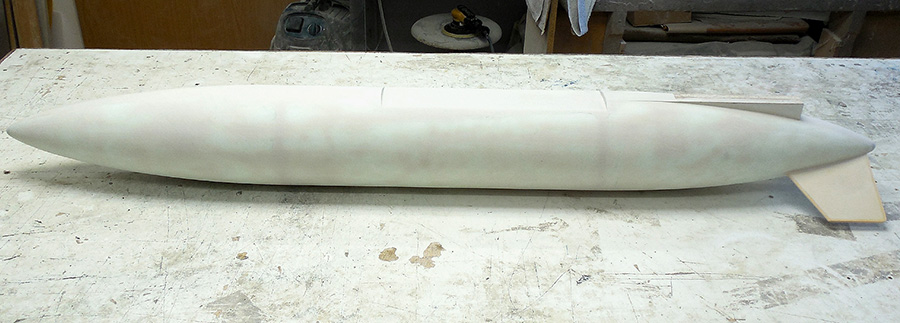
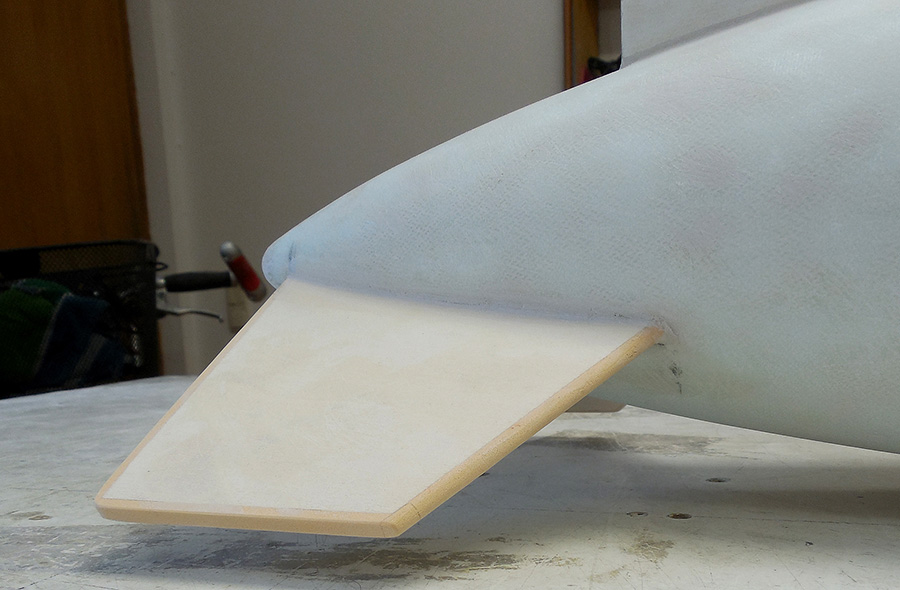
The beams are made of white coated 26mm wood plates. The round sections are made again of Necuron. After the Jetpower Peter gets back the master models and then he can start with the molding of the support on the wings.
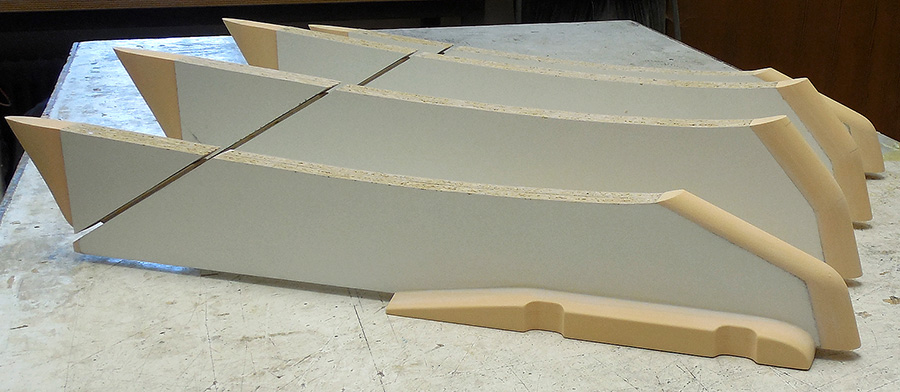
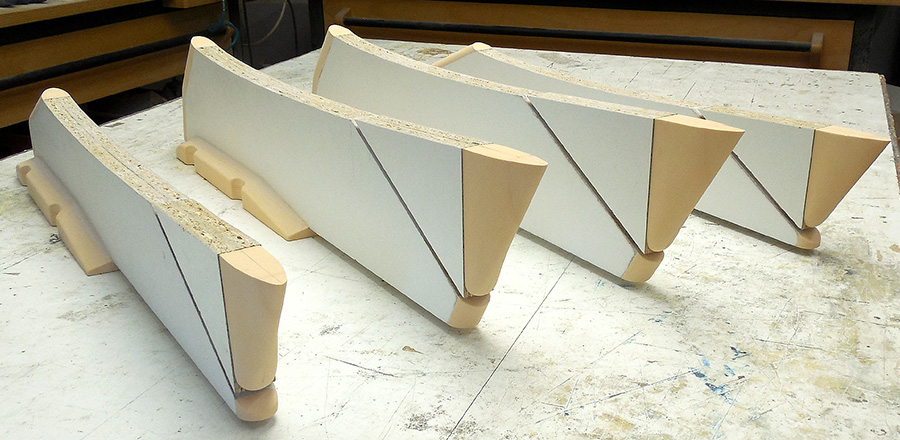
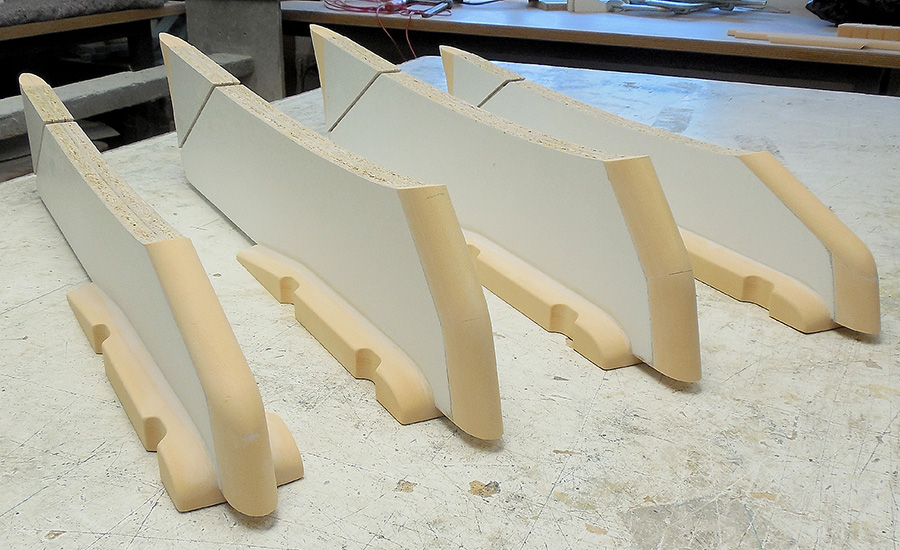
Next step: Pictures of all finished moulds, preparation for the Jetpower.
Modellsport Schweighofer
Wirtschaftspark 9 � 8530 Deutschlandsberg
[email protected]
The moulds are finished and have all together a weight of 209kg!
Uwe Riehm has uses these materials:
� 180m� fiber in different strengths and materials
� 20 kg Epoxy Resin for surfaces
� 130 kg Epoxy Resin for the fibre
� 70 kg Glass fiber
� 8 kg Carbon fiber
First Uwe produces a prototype which you can see at the Jetpower fair. Using this prototype we will adjust the undercarriage, cockpit, elevator and the complete former set. As you can see in the http://www.alphajet-projekt.at/conte...ig.jpgpictures some parts are already finished � we�ll catch the timeline for the Jetpower.
Peter Gl�ck is already working on the weapon carriers and tanks, parts which are essential to such a model. The now laminated and plastered tank is fixed at a right angle. Then the groove is milled using 6mm cutters.
After milling the control surfaces are glued with PU resin.
Then the tanks are grinded and filled.
The beams are made of white coated 26mm wood plates. The round sections are made again of Necuron. After the Jetpower Peter gets back the master models and then he can start with the molding of the support on the wings.
Next step: Pictures of all finished moulds, preparation for the Jetpower.
Modellsport Schweighofer
Wirtschaftspark 9 � 8530 Deutschlandsberg
[email protected]
 09-03-2013 | 02:41 AM
#43
Thread Starter
Member
Joined: Apr 2013
Posts: 30
Likes: 0
Received 0 Likes
on
0 Posts
From: DeutschlandsbergNon, AUSTRIA
Schweighofer Alpha Jet Project (Part 24)
The fuel tanks are finished.
Because of many questions about the tank, I�ll describe the production a little bit more detailed. First the individual segments are cut with hot wire.
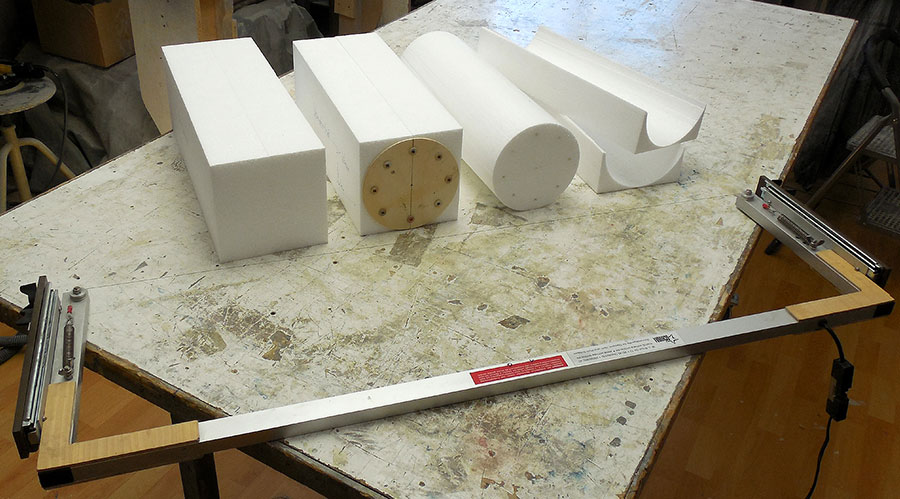
Then the three parts are glued together.
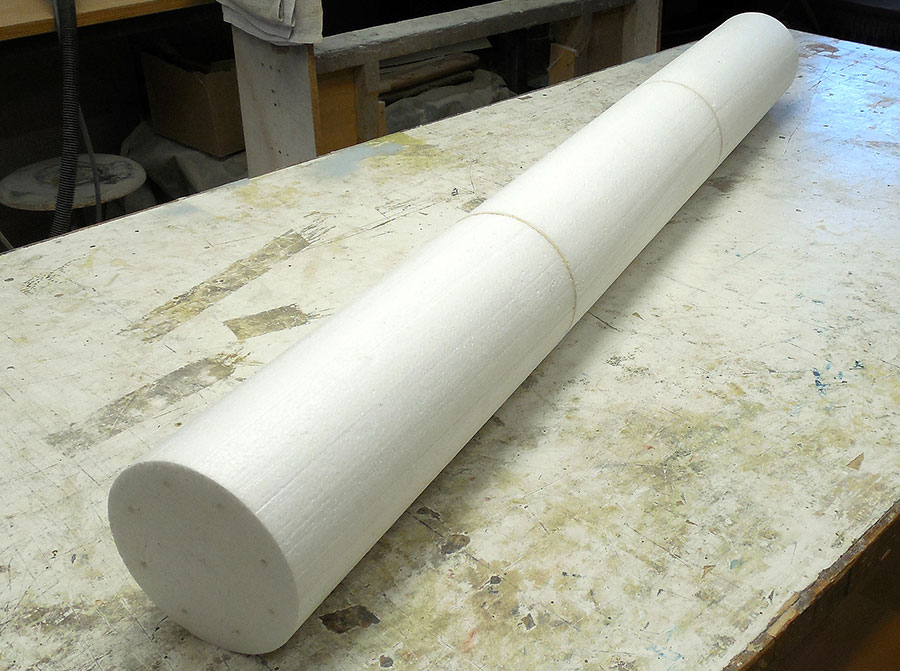
Then with the aid of two masks facets are cut with hot wire, the tank is always rotated one piece. So you get automatically a symmetrical shape and the tip is exactly in the middle. The more you turn the tank, the more accurate it approached to the final shape and the less the facets need to be edited.
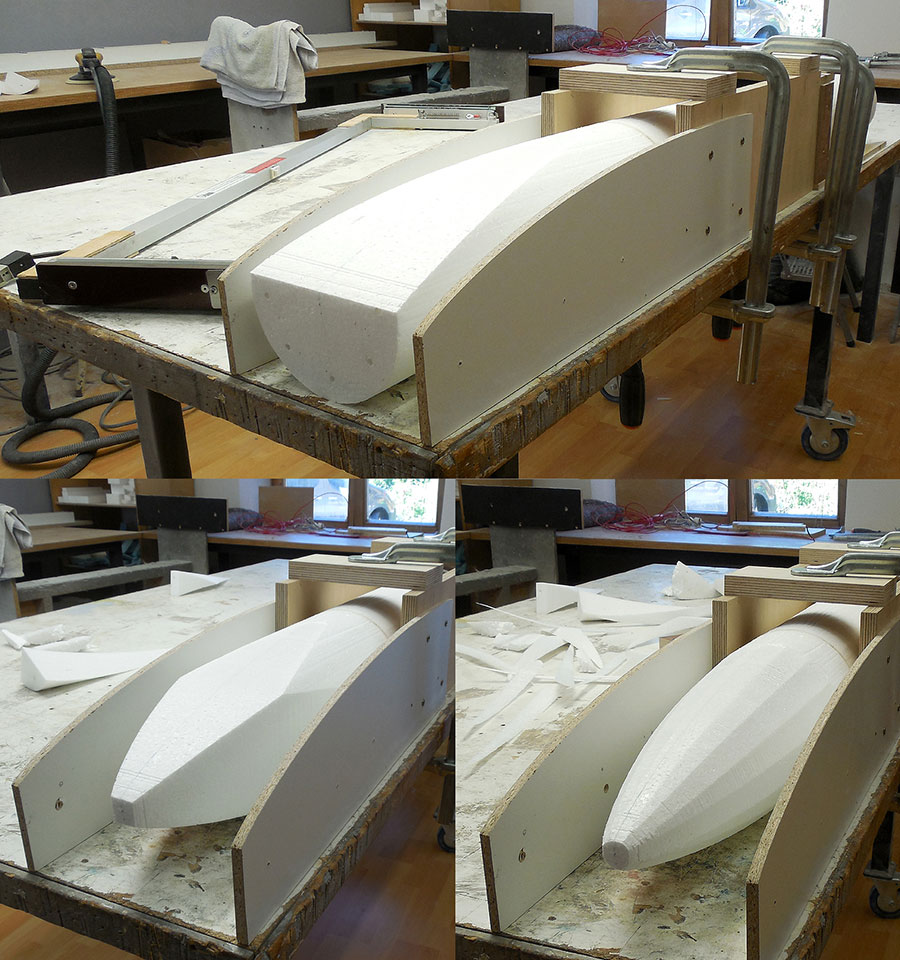
Now the tank is sanded and ready for laminating.
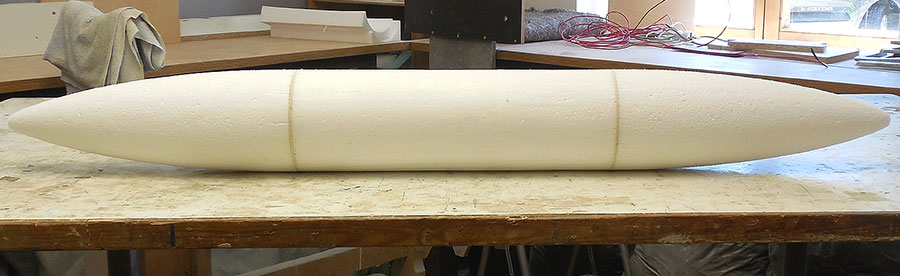
At the ends 1cm is missing because such rounded tips are difficult to laminate. These are later formed with putty.

Now Peter Gl�ck has finished the tanks and supports
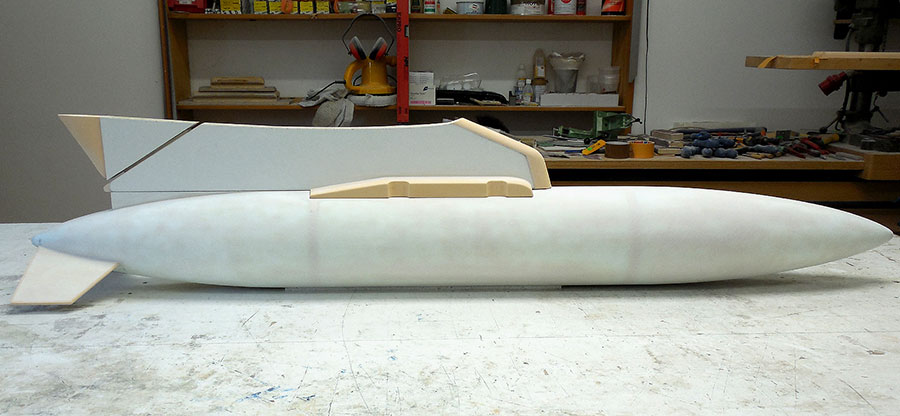

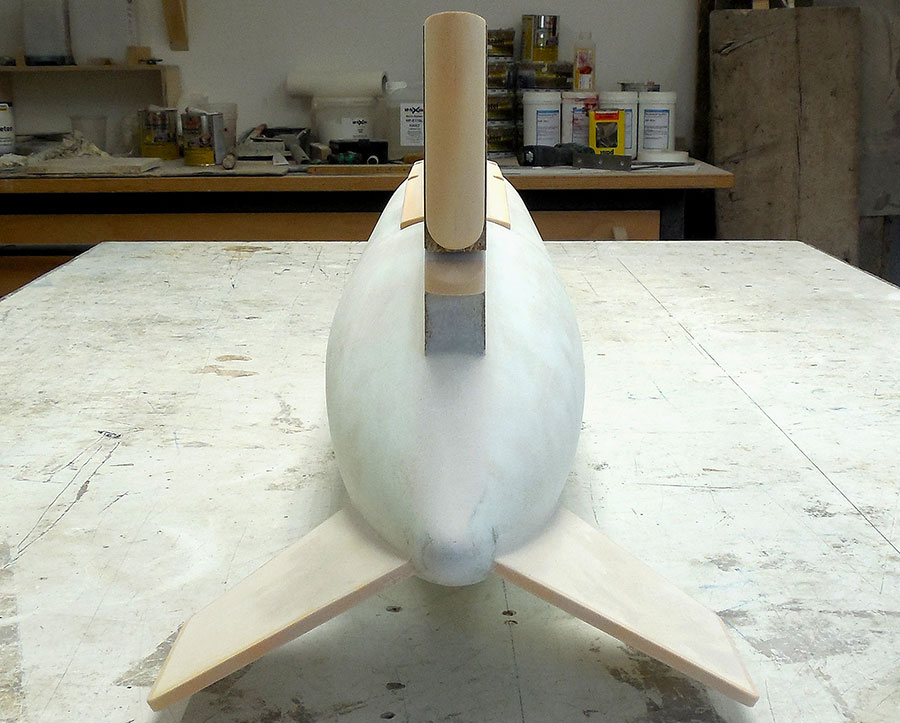
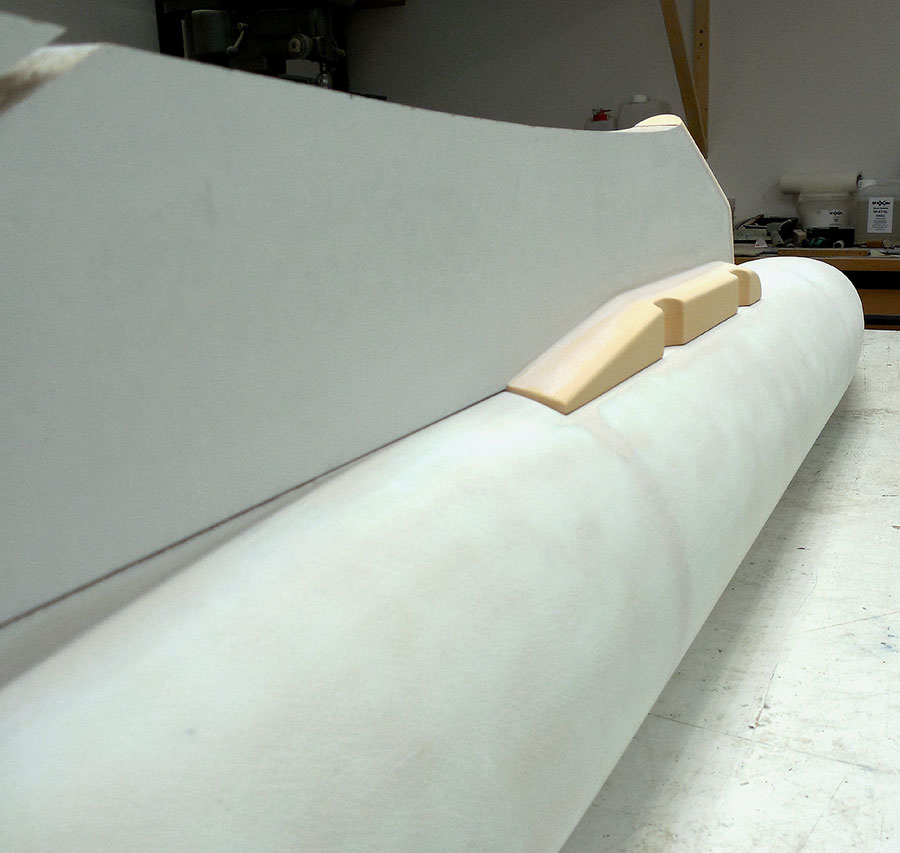
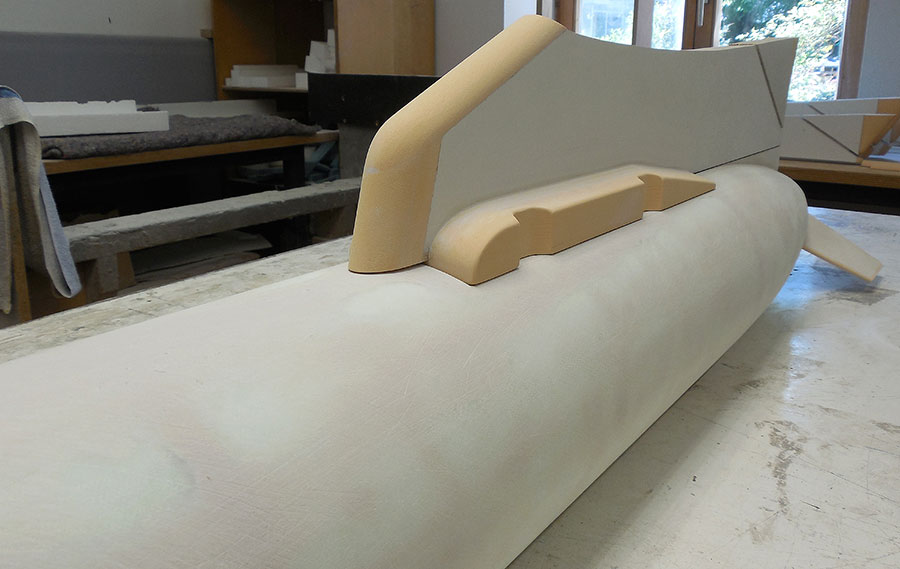
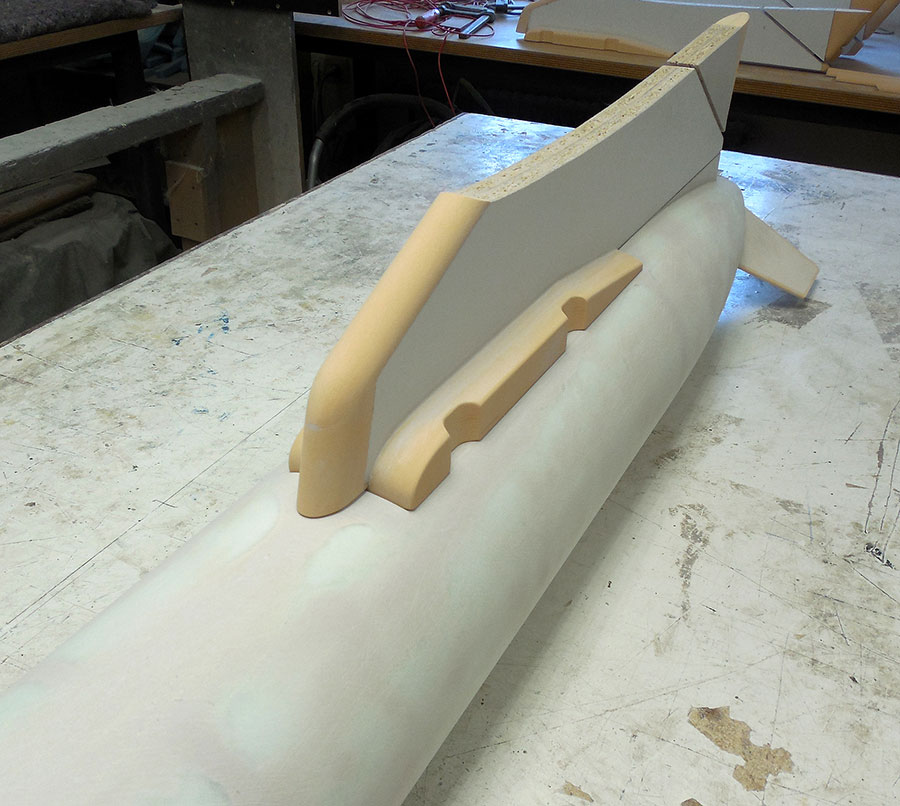

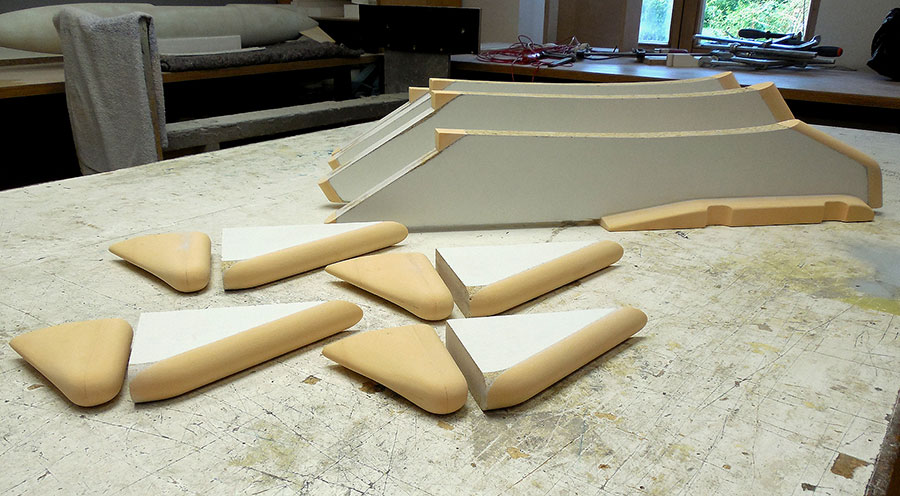
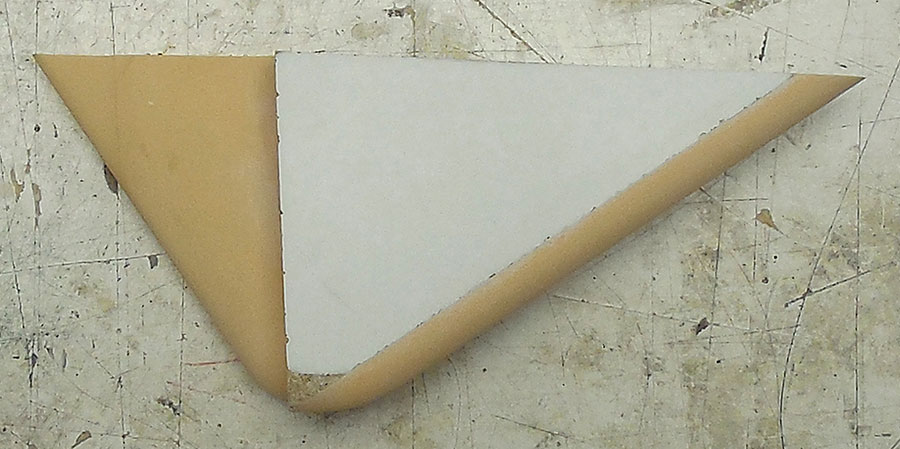
We got the original models from Uwe Riehm. We�ll send the wings to Peter Gl�ck , so that he can adjust the supports to the negative V-shape. I�ll keep you up to date.
Uwe Riehm has finished the prototype of the Alpha Jet. We have met in Munich last weekend and I�ve seen the bird live for the first time.
It blew me away�You can see the model at the Jetpower. Matching to the prototype we are starting a new contest on Facebook:
What�s the weight (in grams) of the Prototype in 1:2,58 Scale?
The contest starts at Wednesday 4[SUP]th[/SUP] Speptember.
Log in to Facebook or come to our Modellsport Schweighofer booth at the Jetpower and win a Alpha Jet from Flitework.
At this point a little note from me: The prototype weights more than 1500 but less than 2500 g.
The contest ends on 15[SUP]th[/SUP] September at 24:00. Then we will analyse the results and notify the winner.
For details on the contest soon on http://www.facebook.com/ModellsportSchweighofer
Modellsport Schweighofer
Wirtschaftspark 9 � 8530 Deutschlandsberg
[email protected]
The fuel tanks are finished.
Because of many questions about the tank, I�ll describe the production a little bit more detailed. First the individual segments are cut with hot wire.
Then the three parts are glued together.
Then with the aid of two masks facets are cut with hot wire, the tank is always rotated one piece. So you get automatically a symmetrical shape and the tip is exactly in the middle. The more you turn the tank, the more accurate it approached to the final shape and the less the facets need to be edited.
Now the tank is sanded and ready for laminating.
At the ends 1cm is missing because such rounded tips are difficult to laminate. These are later formed with putty.
Now Peter Gl�ck has finished the tanks and supports
We got the original models from Uwe Riehm. We�ll send the wings to Peter Gl�ck , so that he can adjust the supports to the negative V-shape. I�ll keep you up to date.
Uwe Riehm has finished the prototype of the Alpha Jet. We have met in Munich last weekend and I�ve seen the bird live for the first time.
It blew me away�You can see the model at the Jetpower. Matching to the prototype we are starting a new contest on Facebook:
What�s the weight (in grams) of the Prototype in 1:2,58 Scale?
The contest starts at Wednesday 4[SUP]th[/SUP] Speptember.
Log in to Facebook or come to our Modellsport Schweighofer booth at the Jetpower and win a Alpha Jet from Flitework.
At this point a little note from me: The prototype weights more than 1500 but less than 2500 g.
The contest ends on 15[SUP]th[/SUP] September at 24:00. Then we will analyse the results and notify the winner.
For details on the contest soon on http://www.facebook.com/ModellsportSchweighofer
Modellsport Schweighofer
Wirtschaftspark 9 � 8530 Deutschlandsberg
[email protected]
09-26-2013 | 05:04 AM
#45
Thread Starter
Member
Joined: Apr 2013
Posts: 30
Likes: 0
Received 0 Likes
on
0 Posts
From: DeutschlandsbergNon, AUSTRIA
Schweighofer Alpha Jet Project (Part 25)
The contest has ended - the winner is determined All parts of the Alphajet were weighted.
The result is as follows: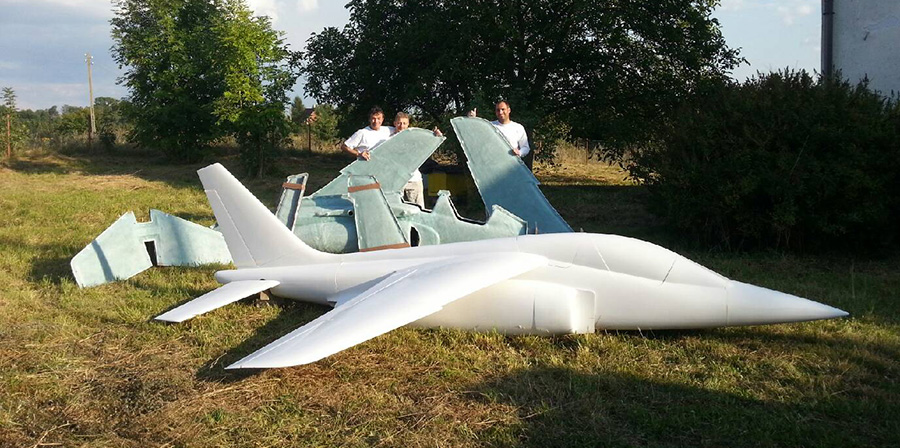
Nose cone: 580g
Elecator: 1440g
Front canopy: 500g
Rear canopy: 360g
Tail: 1940g
Flaps right: 520g
Flaps left: 520g
Rudder: 1160g
Left wing: 2800g
Right wing: 2800g
Fuselage: 9920g
Total: 22780g
As with any game, there can be only one winner. With 22,769 g Mr. Karl-Heinz Mohr has landed nearly a direct hit. Unfortunately we have no e-mail address or telephone number. Mr. Karl-Heinz contact us in [email protected]
We congratulate you and wish you much fun on this journey with this wonderful model aircraft.
The Jetpower fair is over � for us, the exhibition was a great success. We would like to sincerely thank all our visitors, friends and clients. The interest was very high, and encourages us to keep going.
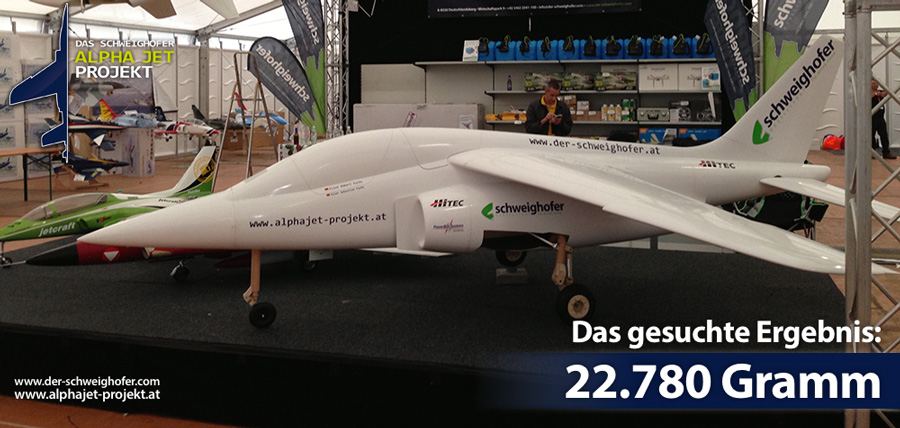
We continue with our project.
Peter Gl�ck has received his original models and can continue with the shaping of the tank carrier. For this, the wings must be fixed horizontally. The wings of the Alpha Jets have a negative dihedral. For this reason, teaching / bulletin boards provide with 6 degree angle of inclination that our tank holder can be mounted at the correct angle later.

Now, the parts can be molded with the known method. Here we work again with packing tape.
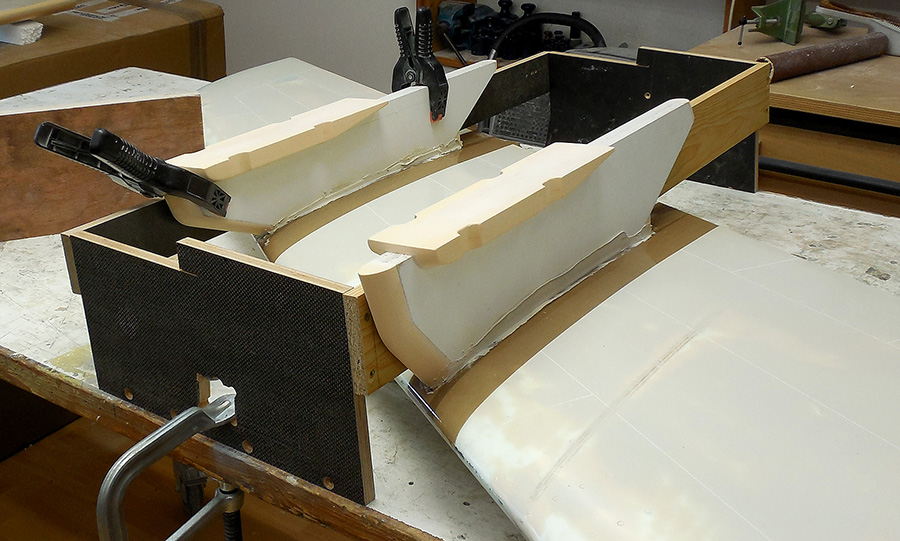
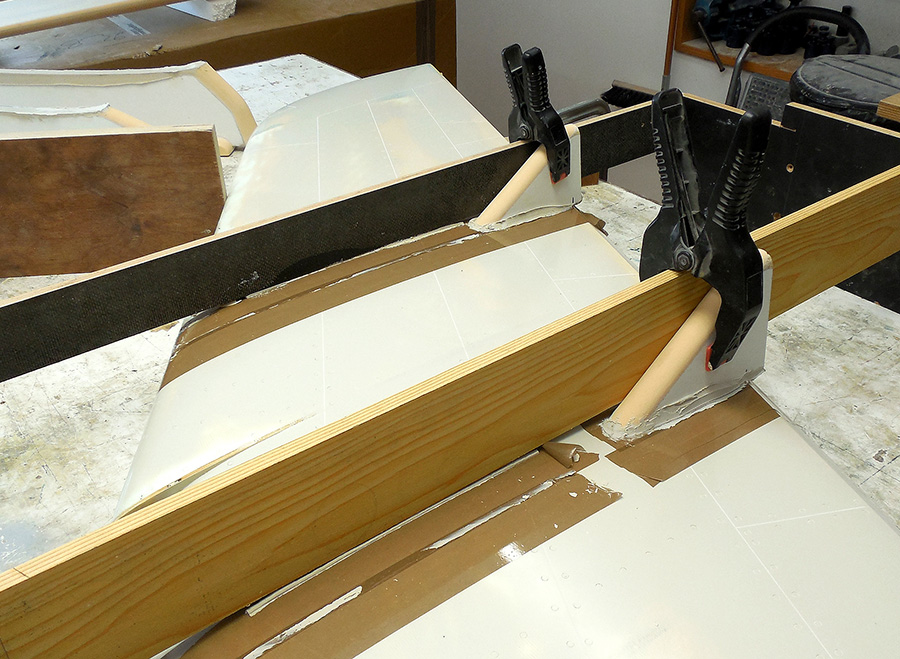

Peter has always marked out the position of each part on the bulletin board to have an orientation for the position of the next part. This is important so that later it all fits together. This weekend you go into the painting chamber and then to the detailing.
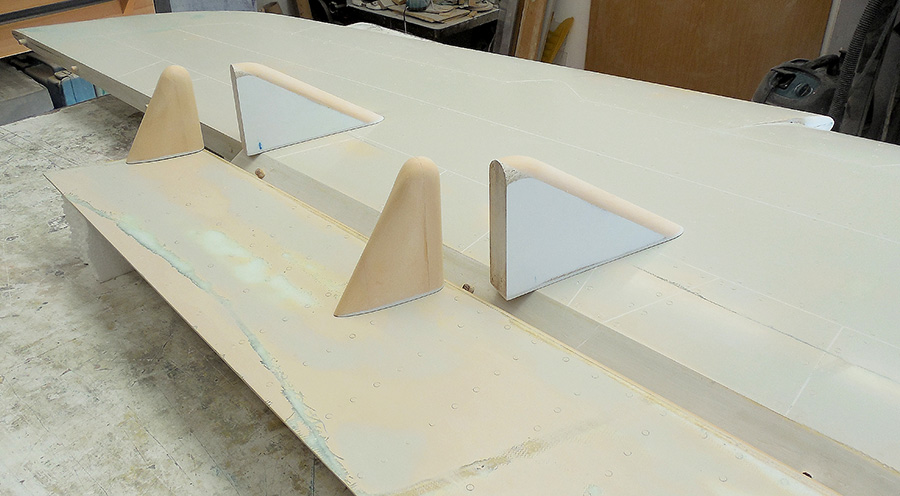
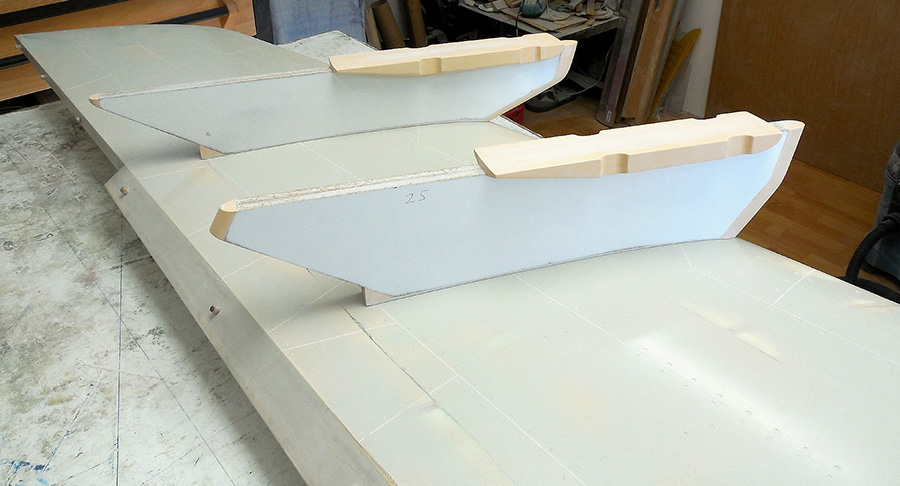
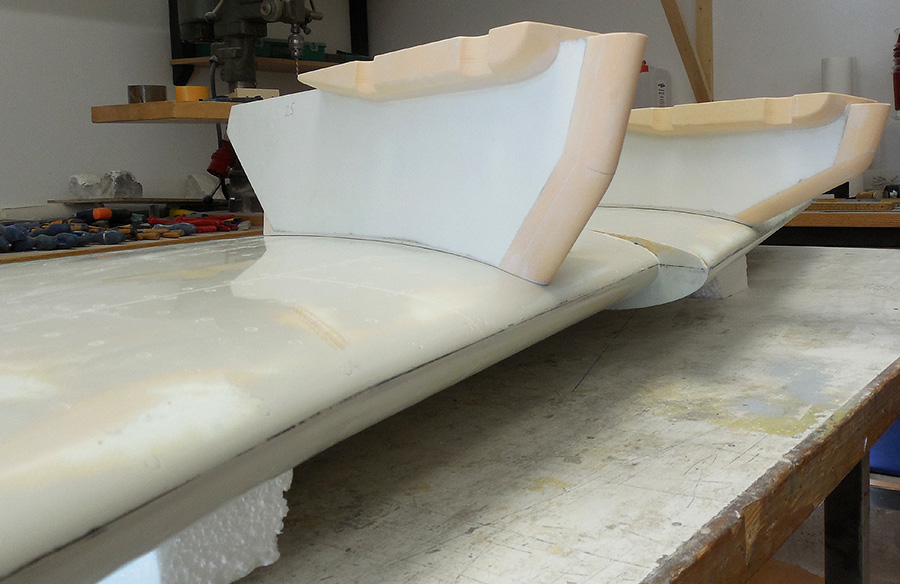
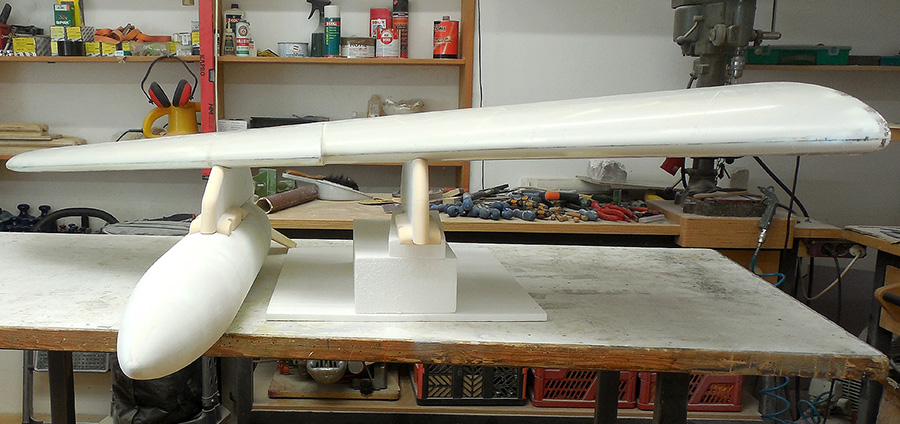
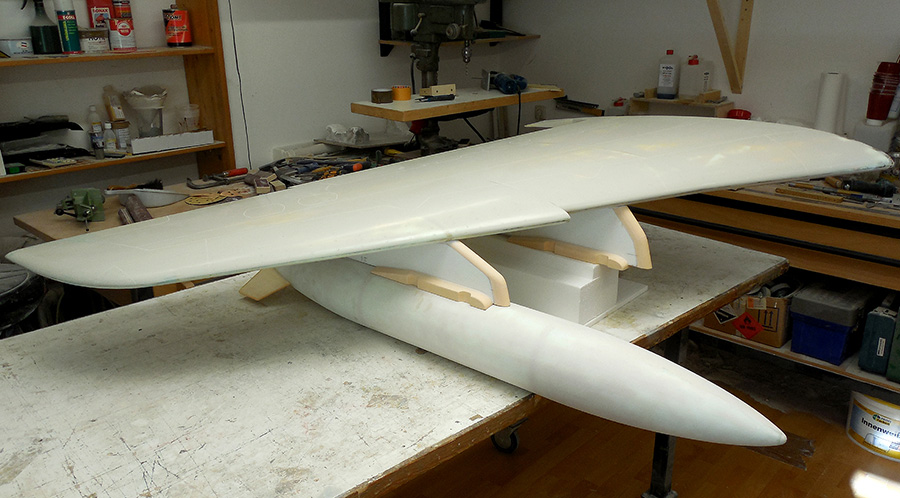
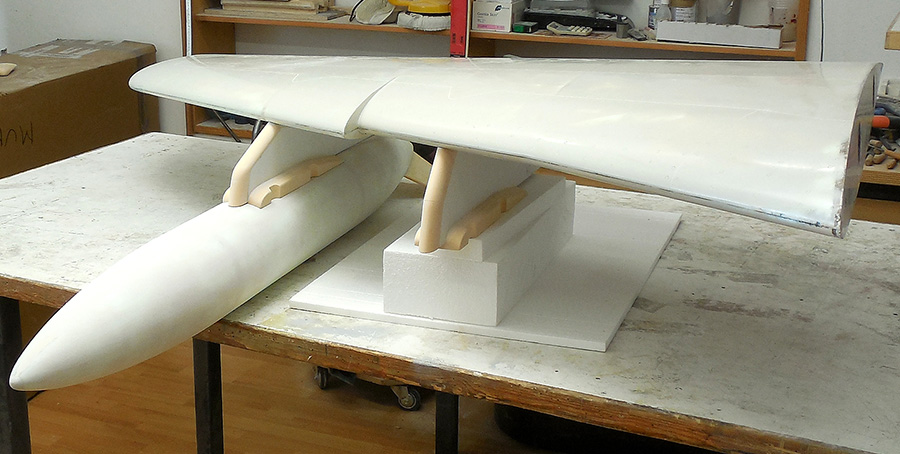
Some have certainly seen our retract dummies at the Jetpower fair. This allowed us to simulate the retract progress perfectly.
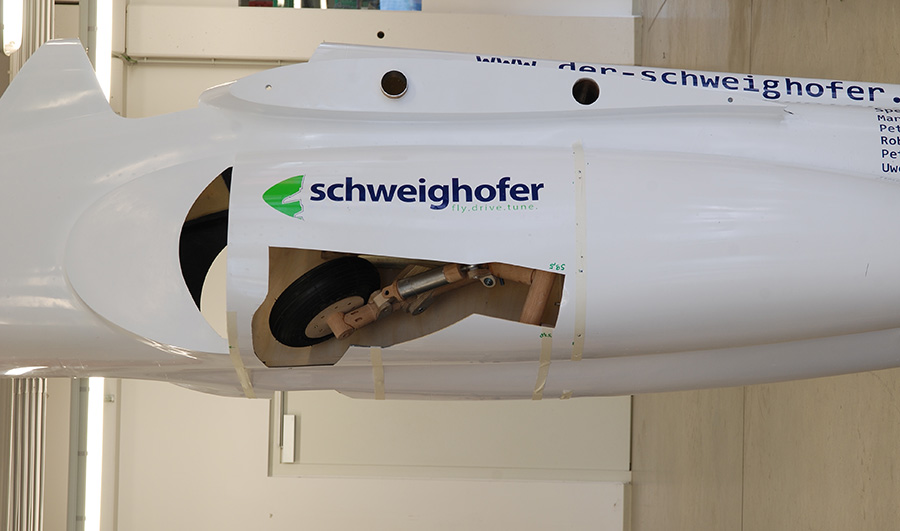
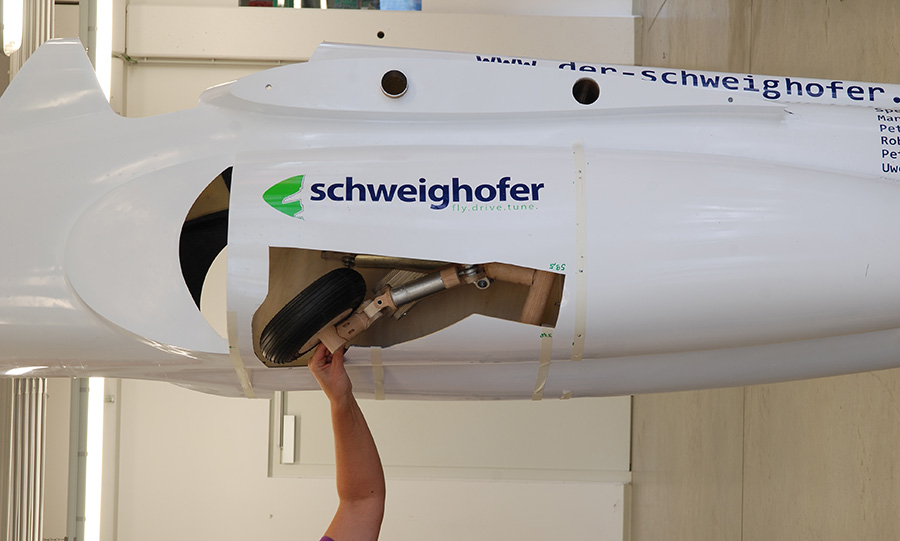
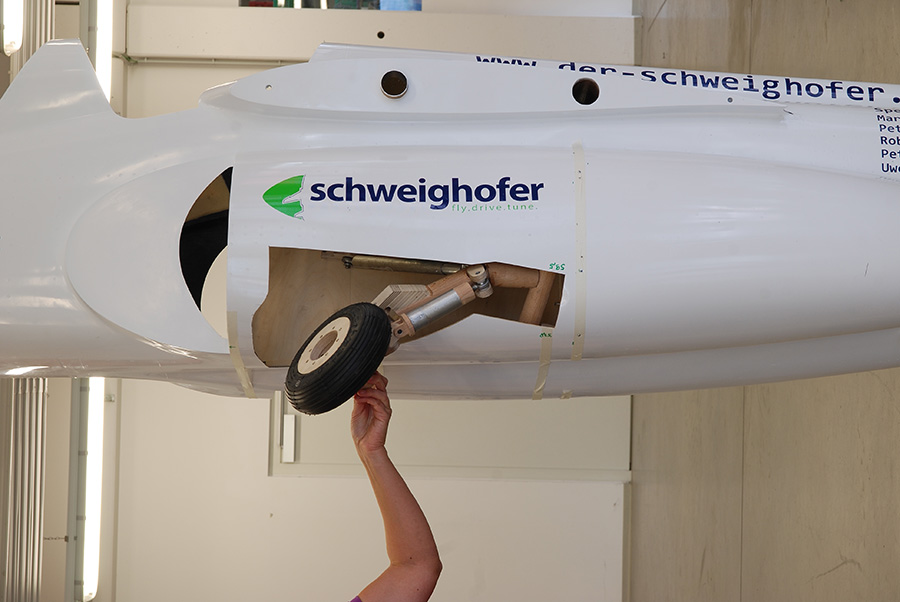
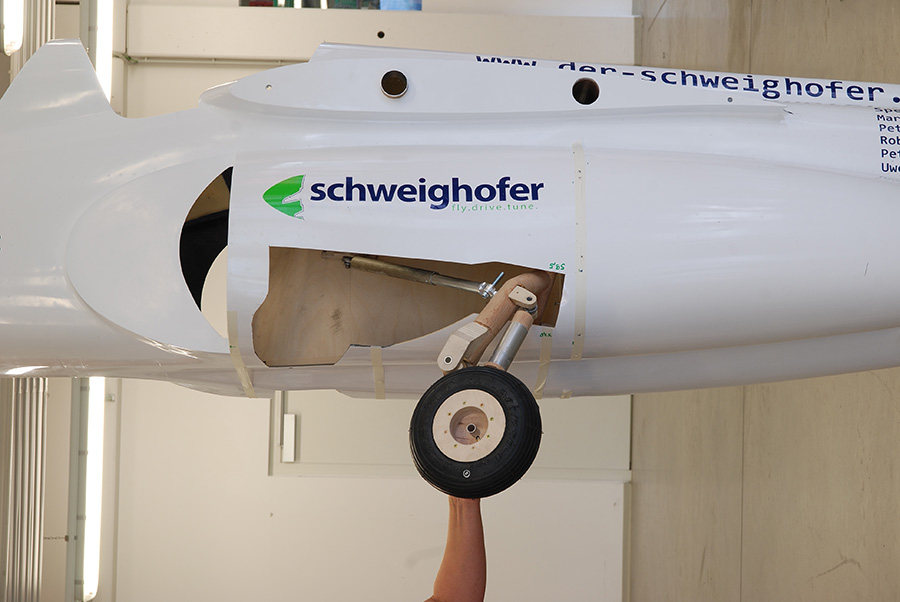
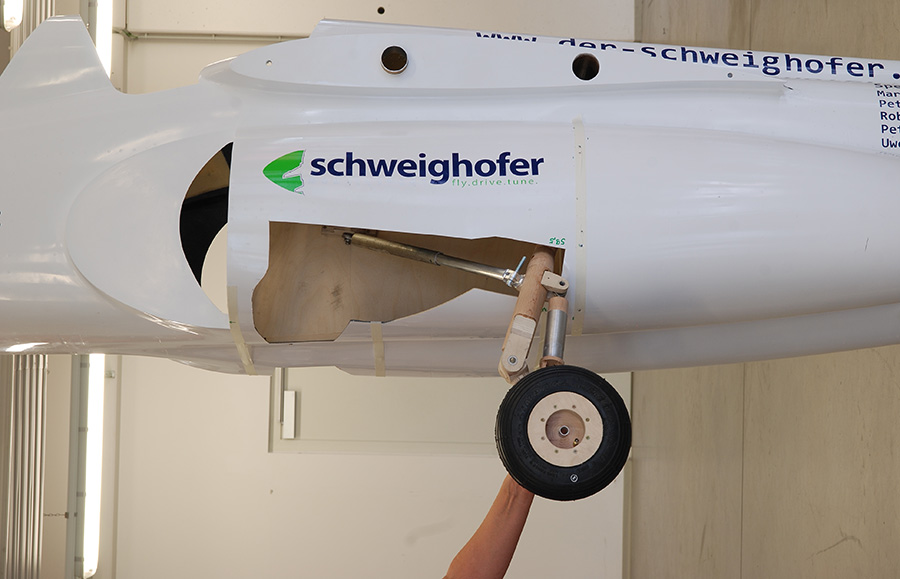
Do make sure all the drawings fit before milling the retract parts, Markus L�tzenburger agreed to make a 3D printed model of the undercarriage. In one or the other drench questions about 3D printing to. Markus L�tzenburger (markus33) is here then surely will answer your questions.
Modellsport Schweighofer
Wirtschaftspark 9 � 8530 Deutschlandsberg
[email protected]
The contest has ended - the winner is determined All parts of the Alphajet were weighted.
The result is as follows:
Nose cone: 580g
Elecator: 1440g
Front canopy: 500g
Rear canopy: 360g
Tail: 1940g
Flaps right: 520g
Flaps left: 520g
Rudder: 1160g
Left wing: 2800g
Right wing: 2800g
Fuselage: 9920g
Total: 22780g
As with any game, there can be only one winner. With 22,769 g Mr. Karl-Heinz Mohr has landed nearly a direct hit. Unfortunately we have no e-mail address or telephone number. Mr. Karl-Heinz contact us in [email protected]
We congratulate you and wish you much fun on this journey with this wonderful model aircraft.
The Jetpower fair is over � for us, the exhibition was a great success. We would like to sincerely thank all our visitors, friends and clients. The interest was very high, and encourages us to keep going.
We continue with our project.
Peter Gl�ck has received his original models and can continue with the shaping of the tank carrier. For this, the wings must be fixed horizontally. The wings of the Alpha Jets have a negative dihedral. For this reason, teaching / bulletin boards provide with 6 degree angle of inclination that our tank holder can be mounted at the correct angle later.
Now, the parts can be molded with the known method. Here we work again with packing tape.

Peter has always marked out the position of each part on the bulletin board to have an orientation for the position of the next part. This is important so that later it all fits together. This weekend you go into the painting chamber and then to the detailing.

Some have certainly seen our retract dummies at the Jetpower fair. This allowed us to simulate the retract progress perfectly.


Do make sure all the drawings fit before milling the retract parts, Markus L�tzenburger agreed to make a 3D printed model of the undercarriage. In one or the other drench questions about 3D printing to. Markus L�tzenburger (markus33) is here then surely will answer your questions.
Modellsport Schweighofer
Wirtschaftspark 9 � 8530 Deutschlandsberg
[email protected]
09-26-2013 | 06:52 AM
#46
Senior Member
Joined: Feb 2011
Posts: 864
Likes: 0
Received 0 Likes
on
0 Posts
From: london, UNITED KINGDOM
Saw this at JP and was stunned by the size when it was in front of me!. It is a fantastic project and I am following with great interest. Keep up the good work chaps.
11-26-2013 | 01:14 AM
#47
Thread Starter
Member
Joined: Apr 2013
Posts: 30
Likes: 0
Received 0 Likes
on
0 Posts
From: DeutschlandsbergNon, AUSTRIA
Schweighofer Alpha Jet Project (Part 26)
After Uwe Riehms� short holiday we continue with the report. Independent from this other work has been done for our project. I�m currently ordering all news and will report in the next weeks.
Peter Gl�ck has started with the detailing of the tanks:


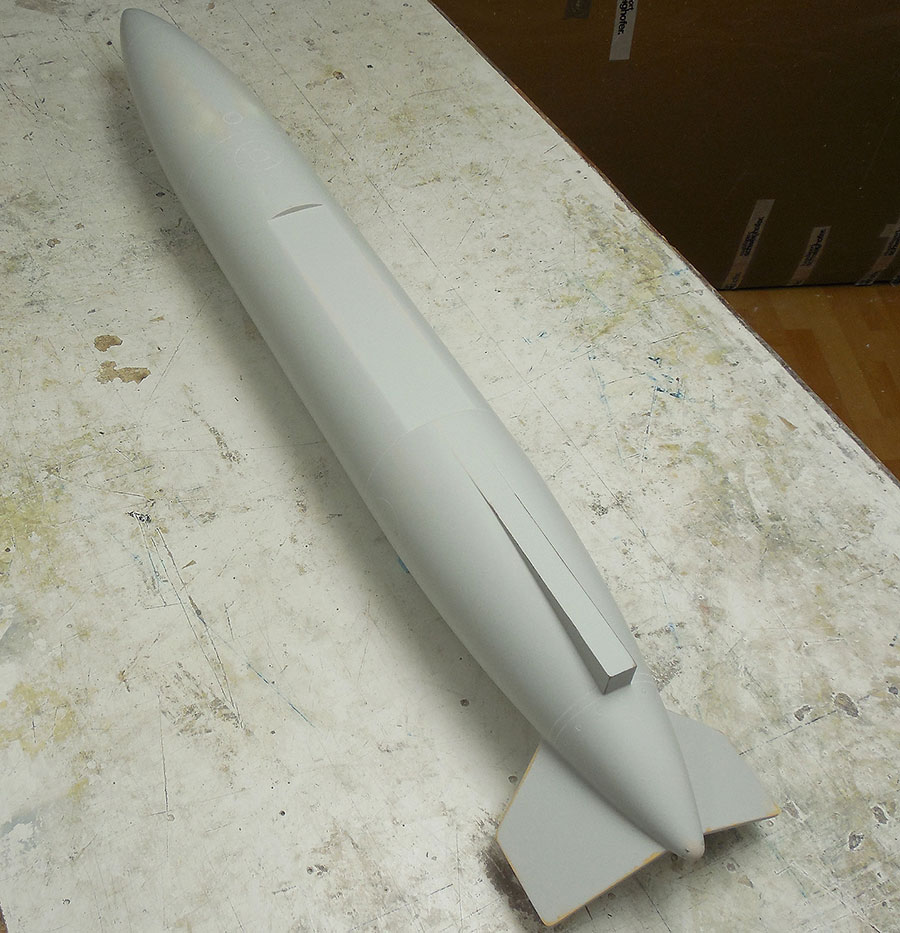
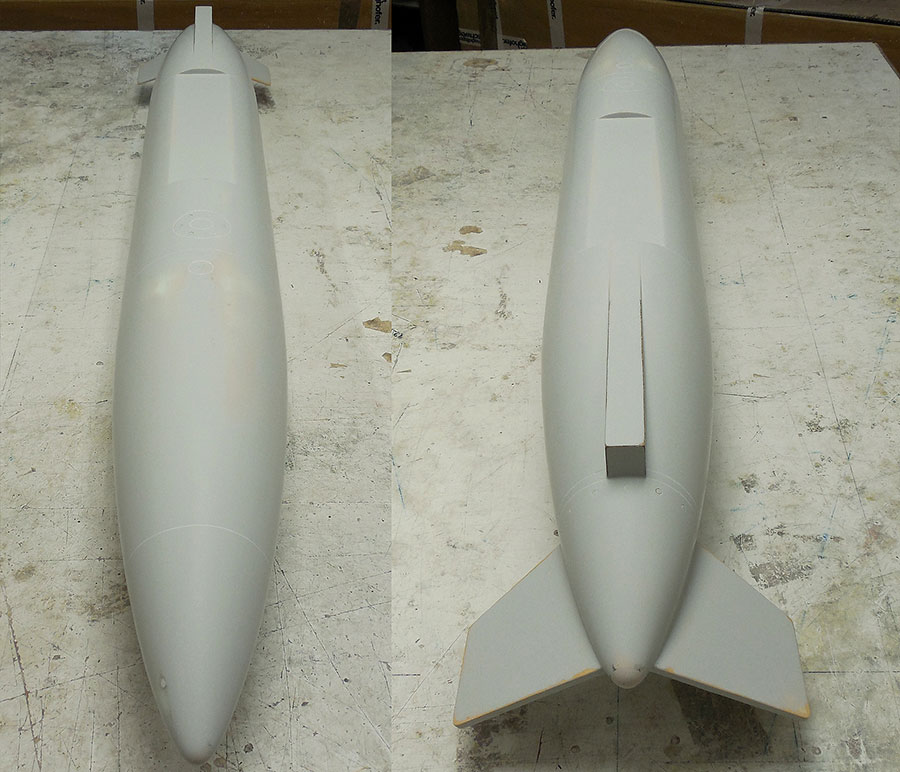
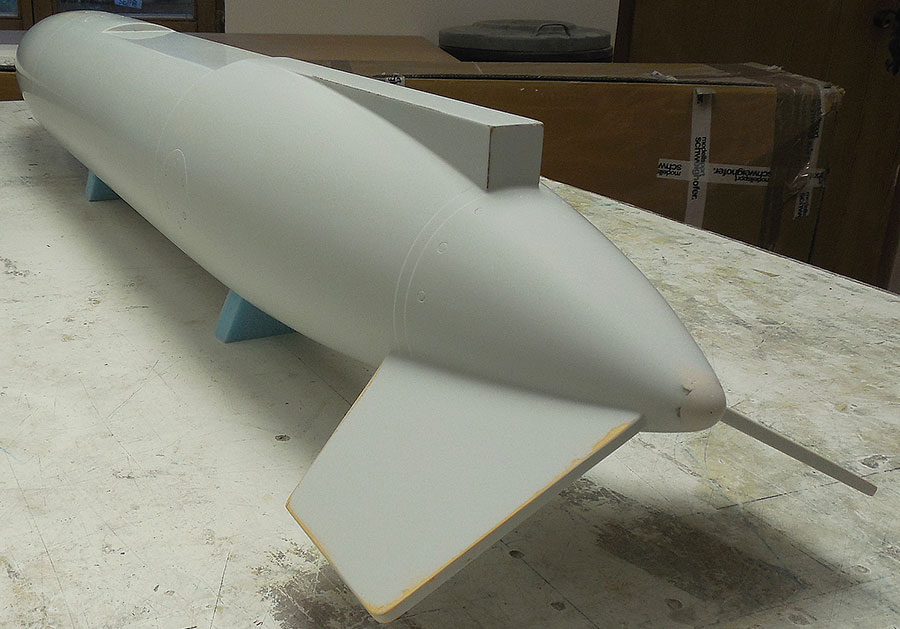
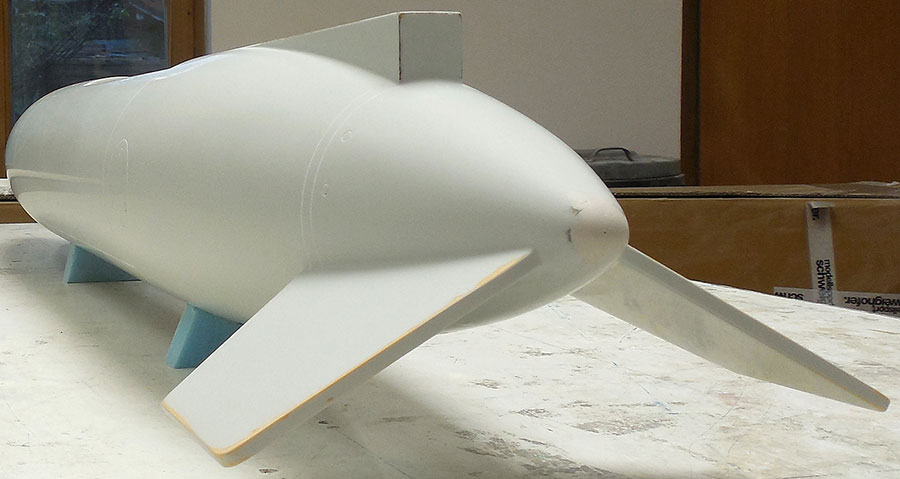
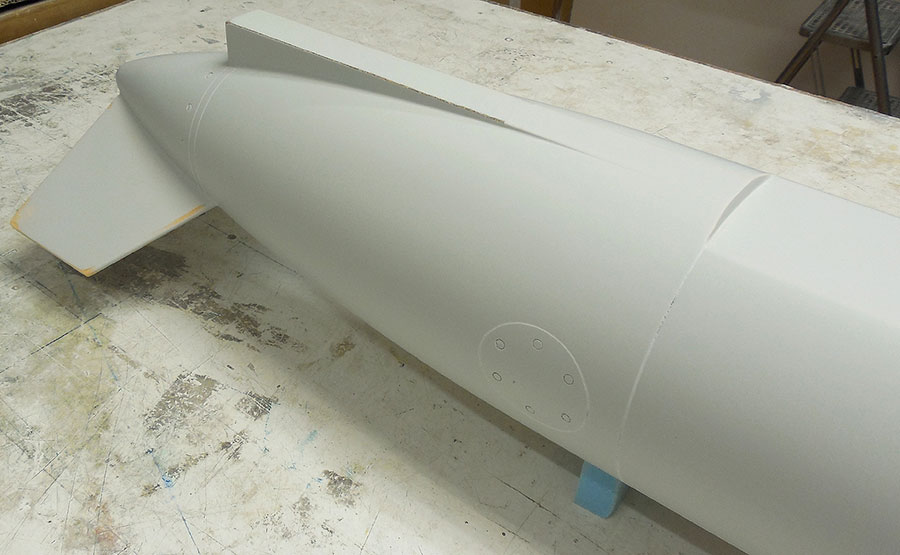 they are now ready for casting. The details of the pylons are much more complicate as we thought. We still don�t have all the necessary documents which Markus L�tzenburger is going to organize. In Order to loose not too much time Peter has created the covering of the Aileron connections. This is made of Necuron.
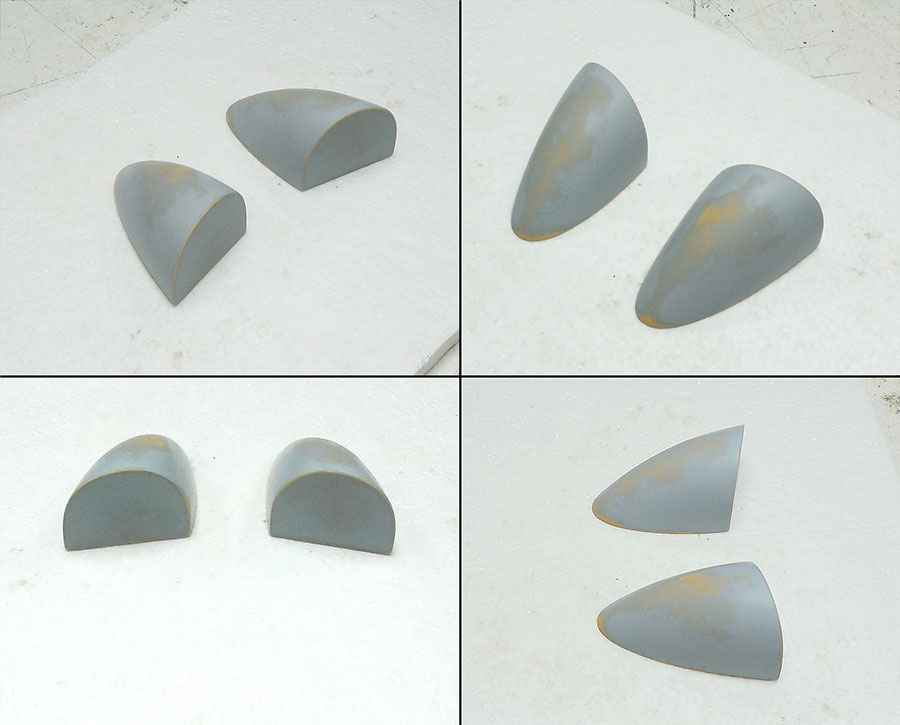
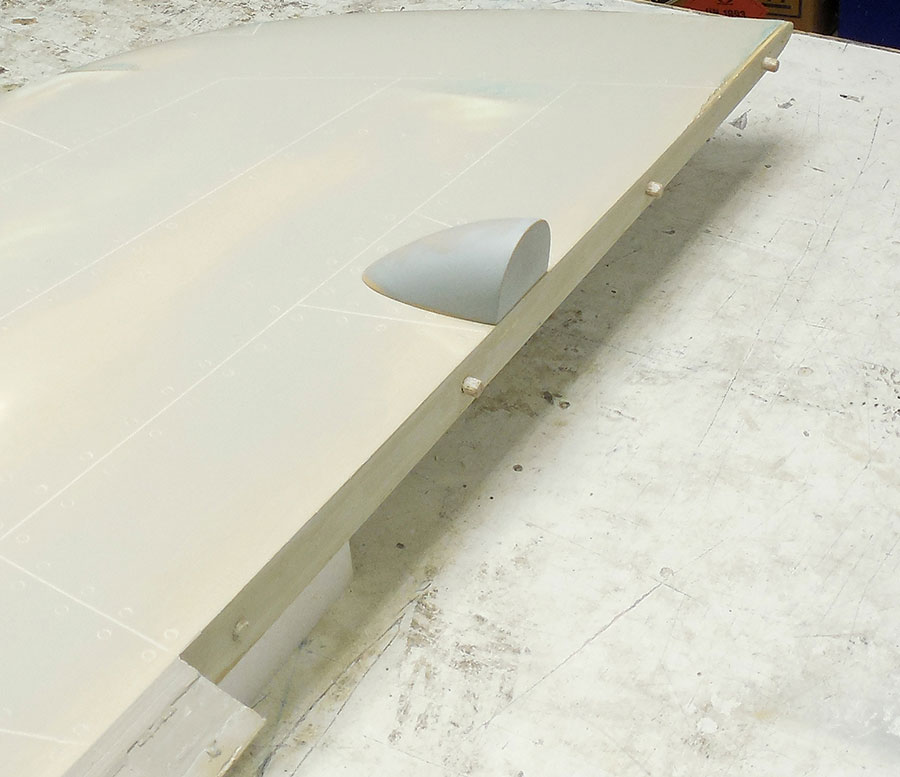
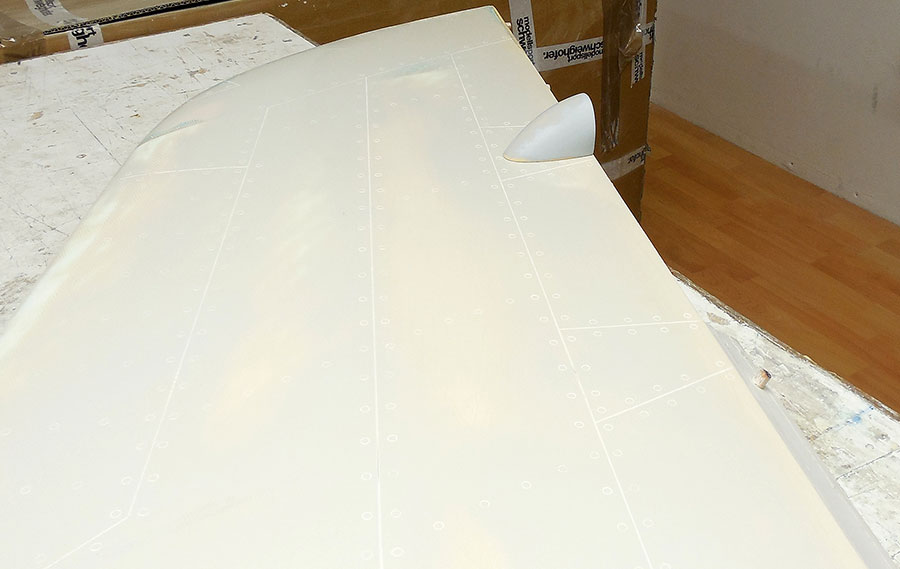
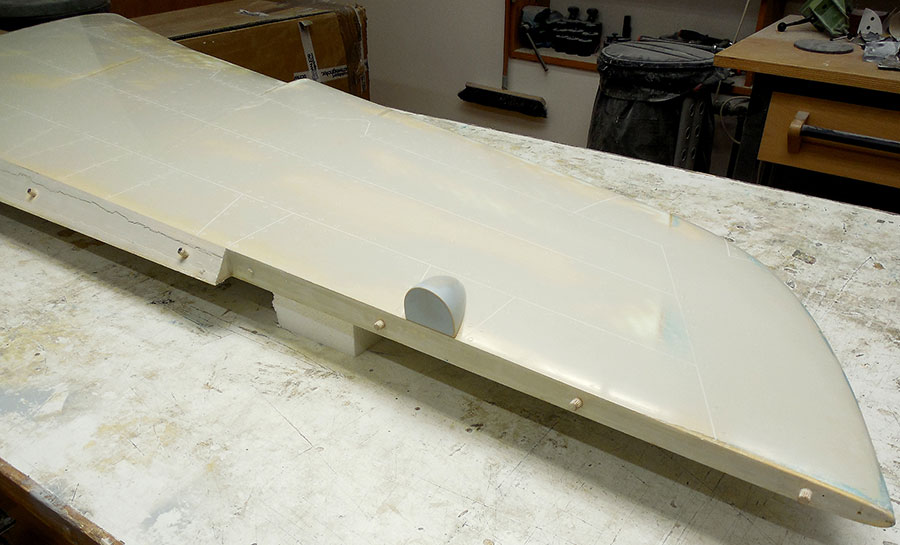
Peter Cmyral also has not slept and he has finished the drawings for the undercarriage. Now it�s important to control and to check the data before they are milled.
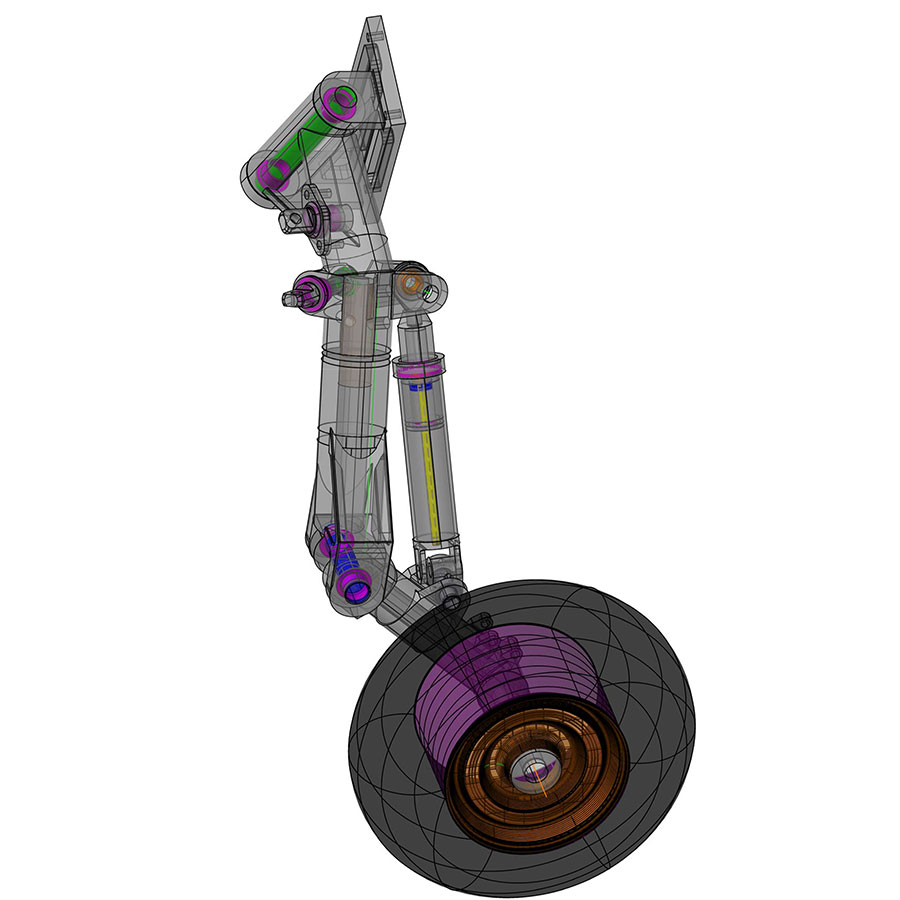
Throughout the week I will report about the 3D Print of the undercarriage parts. (Markus L�tzenburger)
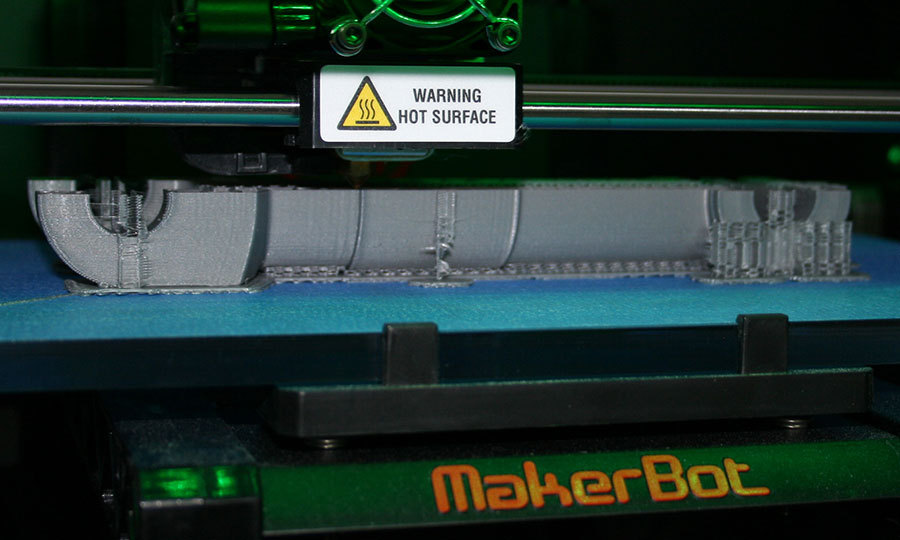
With this method we can produce all the gear parts to check all the steps. For all of you who are interested in 3D printing some questions may enlighten.
Modellsport Schweighofer
Wirtschaftspark 9 � 8530 Deutschlandsberg
[email protected]
After Uwe Riehms� short holiday we continue with the report. Independent from this other work has been done for our project. I�m currently ordering all news and will report in the next weeks.
Peter Gl�ck has started with the detailing of the tanks:

Peter Cmyral also has not slept and he has finished the drawings for the undercarriage. Now it�s important to control and to check the data before they are milled.
Throughout the week I will report about the 3D Print of the undercarriage parts. (Markus L�tzenburger)
With this method we can produce all the gear parts to check all the steps. For all of you who are interested in 3D printing some questions may enlighten.
Modellsport Schweighofer
Wirtschaftspark 9 � 8530 Deutschlandsberg
[email protected]
11-26-2013 | 01:18 AM
#48
Thread Starter
Member
Joined: Apr 2013
Posts: 30
Likes: 0
Received 0 Likes
on
0 Posts
From: DeutschlandsbergNon, AUSTRIA
Schweighofer Alpha Jet Project (Part 27)
Printing of the prototype undercarriage legs of the Alpha Jet.
MoLoTEC Modellbau und Elektronik, Markus L�tzenburger
3D Printing is a technique to produce 3-dimensional items which are created in a CAD program in a fast and cheap way. The advantage of 3D printing is the possibility to create complex parts without building a mould and without having a lot of waste material.
The area of application is creating prototypes and small series. In the aviation and aerospace industry 3D printed parts are used in large numbers. For example in a F18 Hornet ou can find 86 laser sintered parts.
There are several different printing techniques. For example, stereolithography and laser sintering. The technique used here, Fused Deposition Modeling (FDM) based on the melting layers of a plastic material through an extruder nozzle. The material is supplied in the form of a wire from the top. The 3D printer model is the Replicator2 from MakerBot, USA. The material used is PLA (polylactide). A report based on lactic acid plastic with excellent features. PLA is also often referred to as bioplastics. The material has a very low moisture absorption, is very good UV resistant and has a high color fastness. Of the mechanical properties it resembles the PET and can stick well with superglue and epoxy resin.

To print an object at all you need a solid in file form. To create such a body 3D CAD drawing programs are required to spend the body in the STL file format and can export. Parts in STL format to be read and processed by the printer software.

Since the 3D plotting printer material has to the body in the printer software will "cut slices" in the first place. This is also where the technical term. This software is called a slicer. Similarly, the CAM software generates the G codes for CNC milling machine as in milling, the slicer generates the codes for the printer. The maximum resolution or the lowest layer thickness is 0.01 mm for this printer. And filling the contour of the body is calculated in each slice layer. This is important for the 3D printer, because the body is not completely filled with material. This would unnecessarily consume a lot of material and increase the pressure times tremendously. The software calculates a "skin" and fill in the form of a honeycomb structure. The thickness of the "skin", and the density of the filling is set by the user.
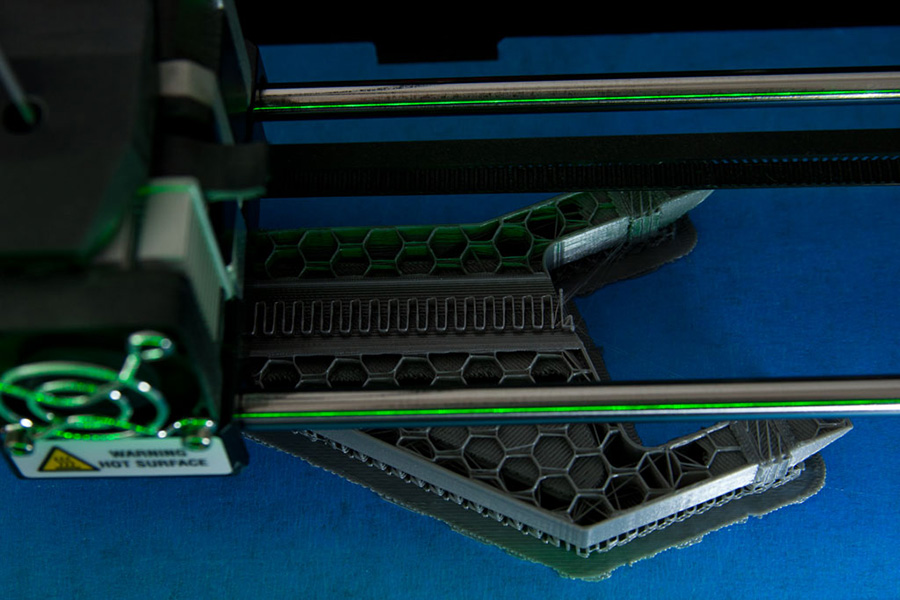
Depending on the size of the part, intended use and required surface quality, the layer thicknesses are determined. Here was worked with a dissolution of the layer thickness of 0.3 mm. Of this very much depends on the pressure of time. The lower arm of the Alpha Jet landing gear needed 4 hours with a resolution of 0.3 mm. If you were this body print at a resolution of 0.1 mm, the pressure would increase duration to 12 hours. At the maximum resolution of 0.01 mm to 120 hours. In addition to the layer thickness or dissolution, the overall quality of the component nor the printer you are using, the exact extruder temperature and print speed is dependent. This must be set individually for each component and is usually based on previous experience.
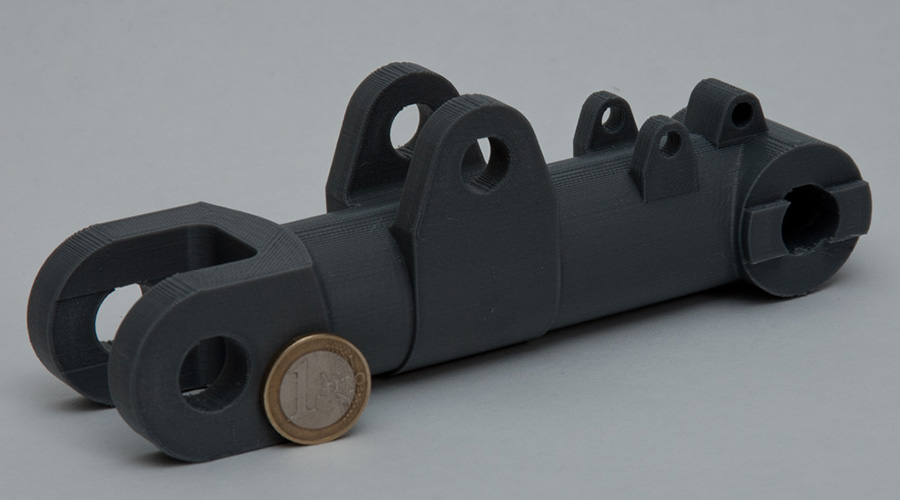
Since the 3D printer the body overhangs are built in layers only partially printable without support. From a certain angle of the sprayed plastic would only fall into the void. This can be explained Slicer a function name "Support". This support also be printed to support overhangs. These supports are like a skeleton and to be necessary if, for example within a body larger holes or openings are present. The exact position of the support is automatically set by the slicer. The plastic is sprayed so that the body is indeed supported, but the support can only slightly be liable and easy to remove.
Here, the supports are good to see. The inclined surface at the base could create even without support of the printer.

The finished parts of the Alpha Jet landing gear, main landing gear leg with the lower wing. All parts together weigh 250 g and required a total of 12 hours printing time.
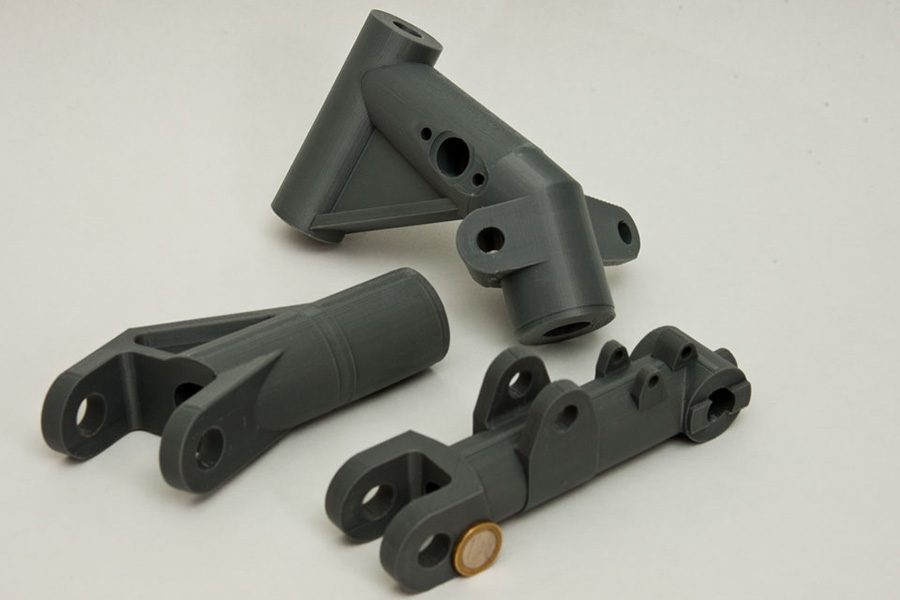
Based on this prototype parts, you can now easily verify the correct functioning of the model. In this stage of development necessary changes to the design would be considerably - cheaper than at the final fully-milled parts.
If you have further questions about 3D printing, you may like to look at http://www.molotec.de
Modellsport Schweighofer
Wirtschaftspark 9 � 8530 Deutschlandsberg
[email protected]
Printing of the prototype undercarriage legs of the Alpha Jet.
MoLoTEC Modellbau und Elektronik, Markus L�tzenburger
3D Printing is a technique to produce 3-dimensional items which are created in a CAD program in a fast and cheap way. The advantage of 3D printing is the possibility to create complex parts without building a mould and without having a lot of waste material.
The area of application is creating prototypes and small series. In the aviation and aerospace industry 3D printed parts are used in large numbers. For example in a F18 Hornet ou can find 86 laser sintered parts.
There are several different printing techniques. For example, stereolithography and laser sintering. The technique used here, Fused Deposition Modeling (FDM) based on the melting layers of a plastic material through an extruder nozzle. The material is supplied in the form of a wire from the top. The 3D printer model is the Replicator2 from MakerBot, USA. The material used is PLA (polylactide). A report based on lactic acid plastic with excellent features. PLA is also often referred to as bioplastics. The material has a very low moisture absorption, is very good UV resistant and has a high color fastness. Of the mechanical properties it resembles the PET and can stick well with superglue and epoxy resin.
To print an object at all you need a solid in file form. To create such a body 3D CAD drawing programs are required to spend the body in the STL file format and can export. Parts in STL format to be read and processed by the printer software.
Since the 3D plotting printer material has to the body in the printer software will "cut slices" in the first place. This is also where the technical term. This software is called a slicer. Similarly, the CAM software generates the G codes for CNC milling machine as in milling, the slicer generates the codes for the printer. The maximum resolution or the lowest layer thickness is 0.01 mm for this printer. And filling the contour of the body is calculated in each slice layer. This is important for the 3D printer, because the body is not completely filled with material. This would unnecessarily consume a lot of material and increase the pressure times tremendously. The software calculates a "skin" and fill in the form of a honeycomb structure. The thickness of the "skin", and the density of the filling is set by the user.
Depending on the size of the part, intended use and required surface quality, the layer thicknesses are determined. Here was worked with a dissolution of the layer thickness of 0.3 mm. Of this very much depends on the pressure of time. The lower arm of the Alpha Jet landing gear needed 4 hours with a resolution of 0.3 mm. If you were this body print at a resolution of 0.1 mm, the pressure would increase duration to 12 hours. At the maximum resolution of 0.01 mm to 120 hours. In addition to the layer thickness or dissolution, the overall quality of the component nor the printer you are using, the exact extruder temperature and print speed is dependent. This must be set individually for each component and is usually based on previous experience.
Since the 3D printer the body overhangs are built in layers only partially printable without support. From a certain angle of the sprayed plastic would only fall into the void. This can be explained Slicer a function name "Support". This support also be printed to support overhangs. These supports are like a skeleton and to be necessary if, for example within a body larger holes or openings are present. The exact position of the support is automatically set by the slicer. The plastic is sprayed so that the body is indeed supported, but the support can only slightly be liable and easy to remove.
Here, the supports are good to see. The inclined surface at the base could create even without support of the printer.
The finished parts of the Alpha Jet landing gear, main landing gear leg with the lower wing. All parts together weigh 250 g and required a total of 12 hours printing time.
Based on this prototype parts, you can now easily verify the correct functioning of the model. In this stage of development necessary changes to the design would be considerably - cheaper than at the final fully-milled parts.
If you have further questions about 3D printing, you may like to look at http://www.molotec.de
Modellsport Schweighofer
Wirtschaftspark 9 � 8530 Deutschlandsberg
[email protected]
12-03-2013 | 12:02 AM
#49
Thread Starter
Member
Joined: Apr 2013
Posts: 30
Likes: 0
Received 0 Likes
on
0 Posts
From: DeutschlandsbergNon, AUSTRIA
Schweighofer Alpha Jet Project (Part 28)
The tanks are finished.
Peter Gl�ck has finished the detailing for our Alpha Jet. Now it�s time to wait for the adaption of the speed brakes, retract coverings and so on.
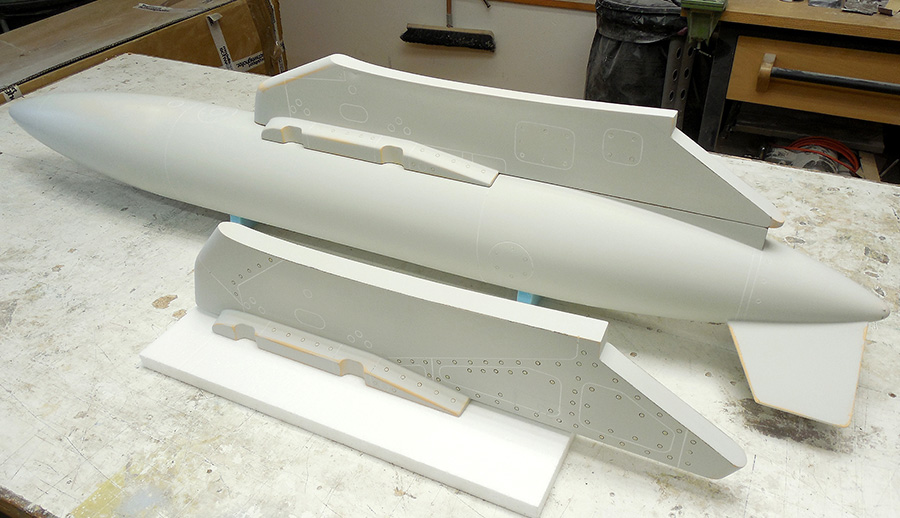
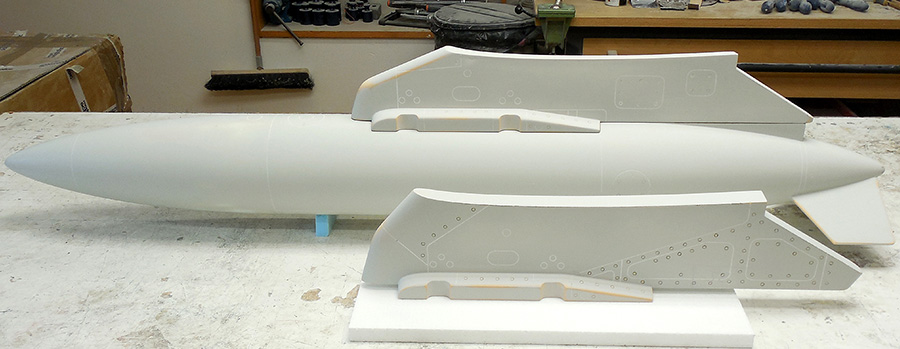
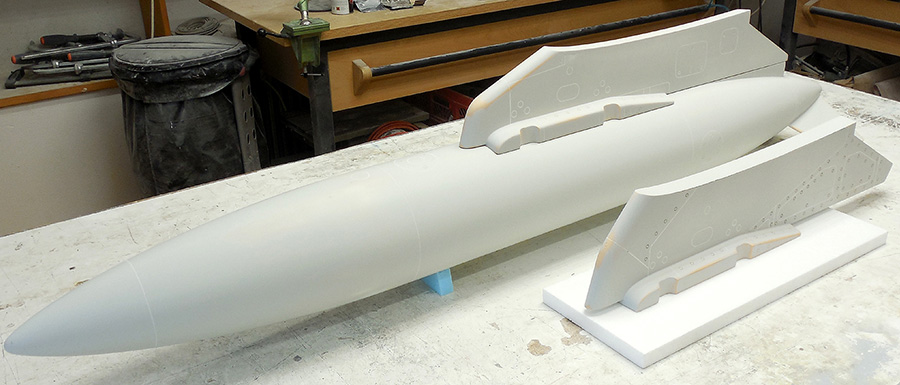
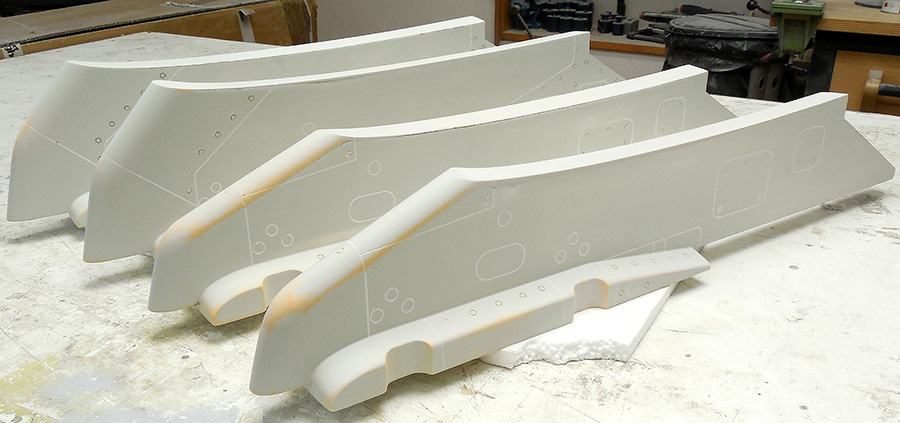
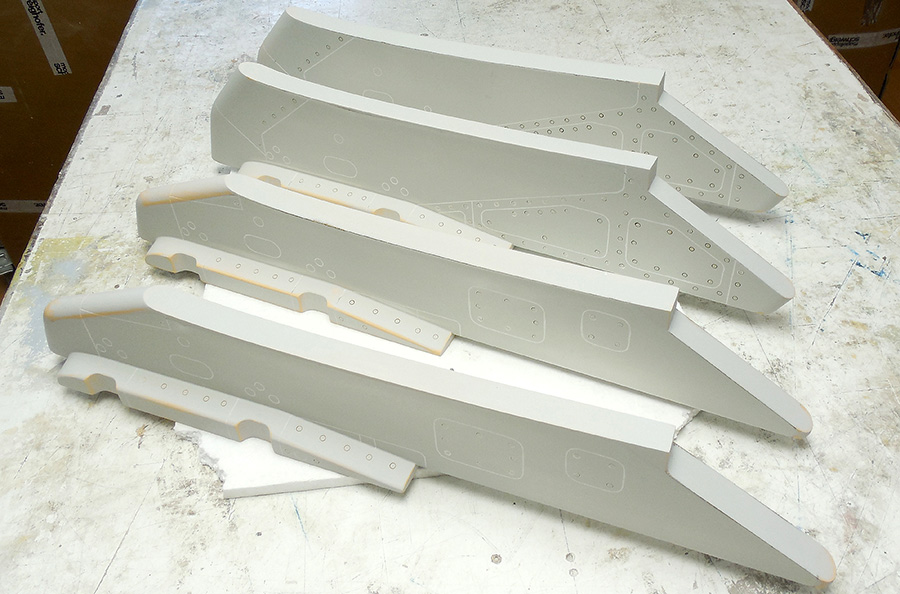
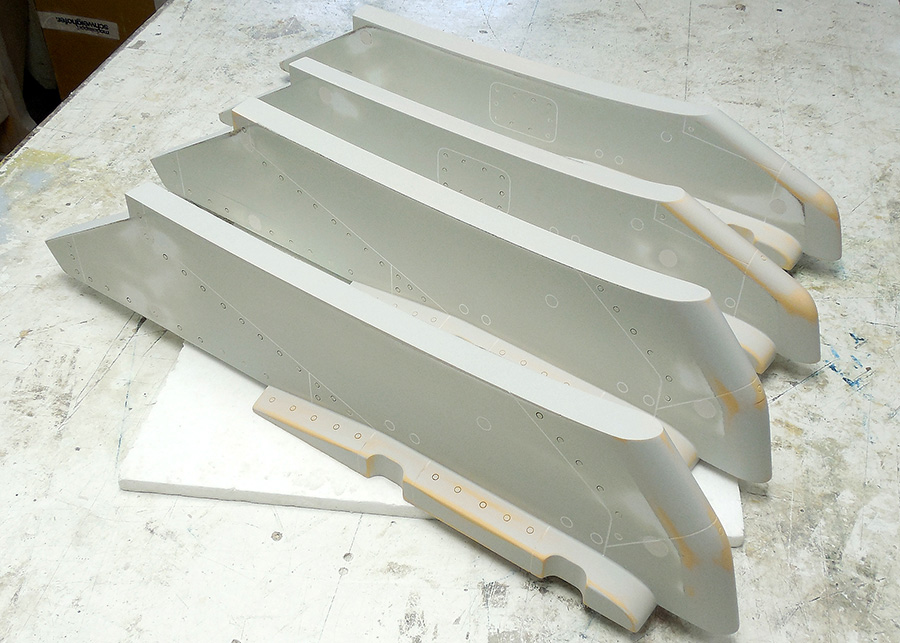
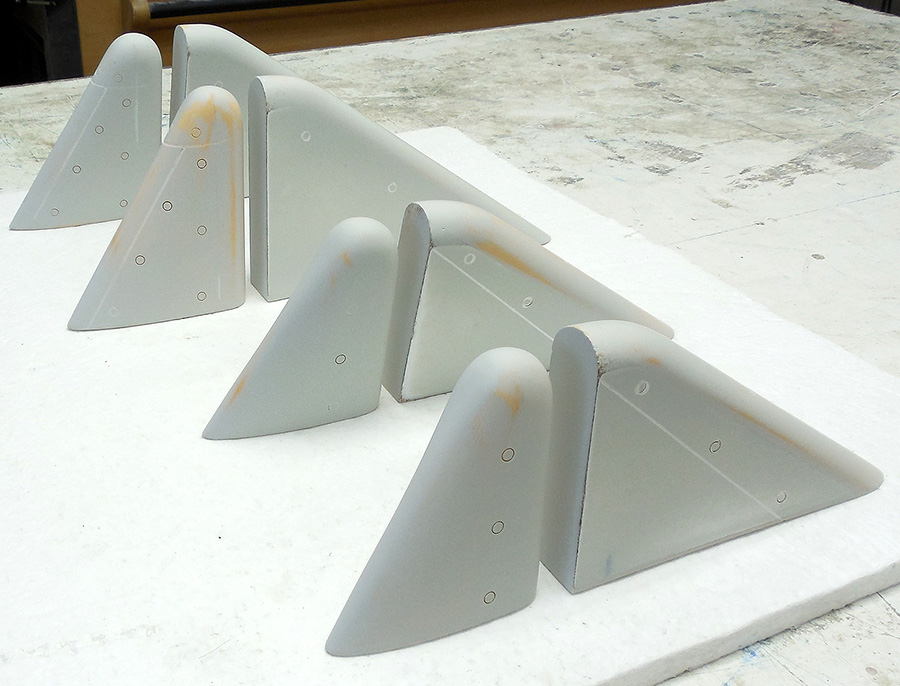
You can certainly imagine that very strong rudders forces occur in such a large model. The electrical components have to be selected very well. For this reason, I first begin with the servos.
After a long evaluation phase we decided to use the Hitec HS-1000SGT. (Distributed by Multiplex company). Important were several factors for me. First, there is a long-standing relationship between the companies and multiplex Schweighofer. Secondly, we have in J�rgen Scholz a competent contact person and probably the most important point is that after a long testing phase, no servo from a different manufacturer has met these requirements. Attached the specifications of the servo:
Torque 11,1V: 84 kg/cm
Speed 11,1V: 0,26 sec/60�
Torque 14,8V: 110 kg/cm
Speed 14,8V: 0,19 sec/60�
Measurement: 64 x 33 x 73 mm
Weight: 363g
The power supply will be done with Powerbox Systems. As soon As I have more information I�ll make a report.
In the meanwhile Peter Cmyral has finished the construction of the undercarriage. Die Front mechanic is finished and is currently printed in 3D technics.
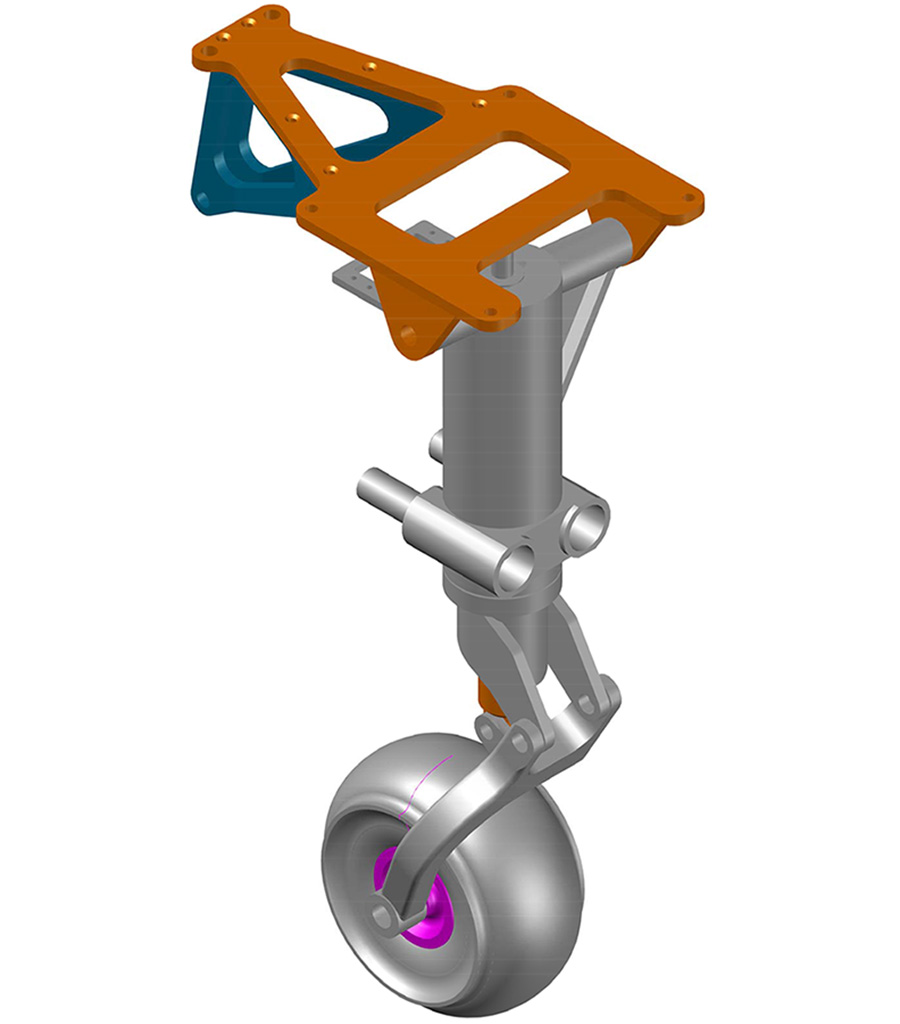
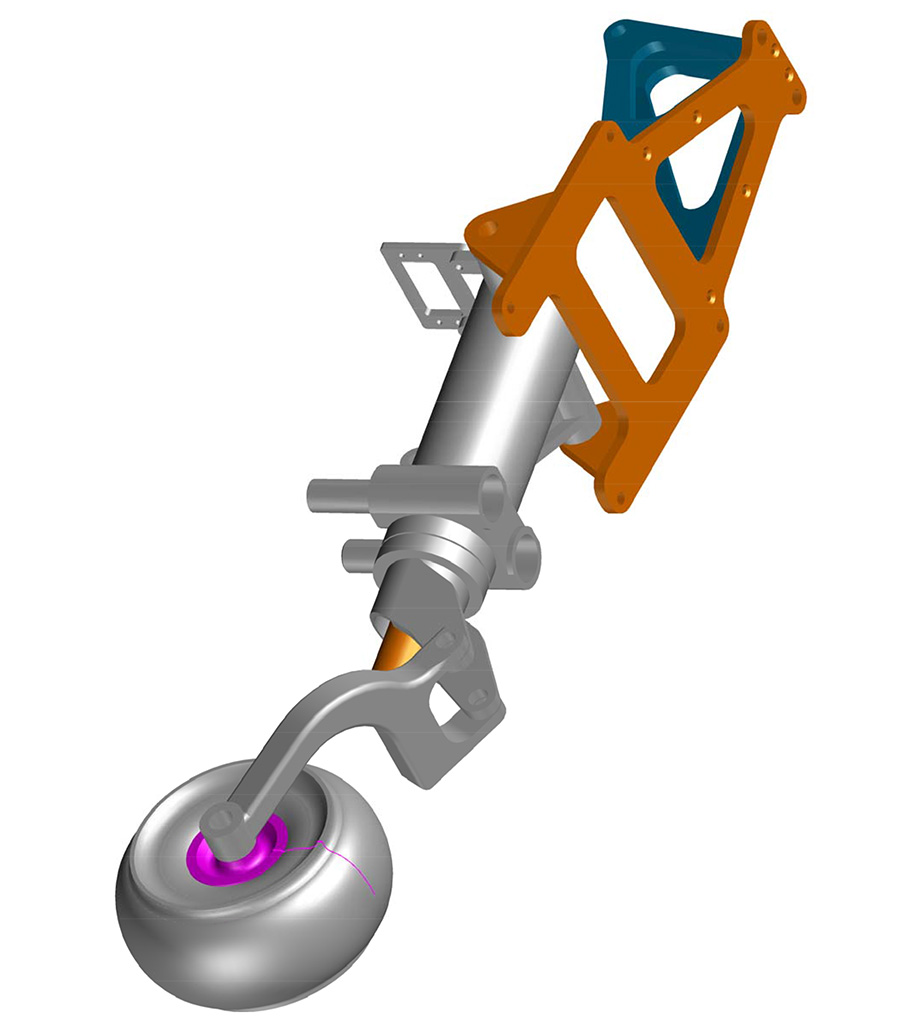
After long discussions we have decided to make the activation of our retract with a hydraulic system. Here there is only one address, that of Peter H�usl. Peter has been working for a long time apart with the topic hydraulic systems for model aircraft. I will report about him and his Company.
Modellsport Schweighofer
Wirtschaftspark 9 � 8530 Deutschlandsberg
[email protected]
The tanks are finished.
Peter Gl�ck has finished the detailing for our Alpha Jet. Now it�s time to wait for the adaption of the speed brakes, retract coverings and so on.
You can certainly imagine that very strong rudders forces occur in such a large model. The electrical components have to be selected very well. For this reason, I first begin with the servos.
After a long evaluation phase we decided to use the Hitec HS-1000SGT. (Distributed by Multiplex company). Important were several factors for me. First, there is a long-standing relationship between the companies and multiplex Schweighofer. Secondly, we have in J�rgen Scholz a competent contact person and probably the most important point is that after a long testing phase, no servo from a different manufacturer has met these requirements. Attached the specifications of the servo:
Torque 11,1V: 84 kg/cm
Speed 11,1V: 0,26 sec/60�
Torque 14,8V: 110 kg/cm
Speed 14,8V: 0,19 sec/60�
Measurement: 64 x 33 x 73 mm
Weight: 363g
The power supply will be done with Powerbox Systems. As soon As I have more information I�ll make a report.
In the meanwhile Peter Cmyral has finished the construction of the undercarriage. Die Front mechanic is finished and is currently printed in 3D technics.
After long discussions we have decided to make the activation of our retract with a hydraulic system. Here there is only one address, that of Peter H�usl. Peter has been working for a long time apart with the topic hydraulic systems for model aircraft. I will report about him and his Company.
Modellsport Schweighofer
Wirtschaftspark 9 � 8530 Deutschlandsberg
[email protected]
12-17-2013 | 12:11 AM
#50
Thread Starter
Member
Joined: Apr 2013
Posts: 30
Likes: 0
Received 0 Likes
on
0 Posts
From: DeutschlandsbergNon, AUSTRIA
Schweighofer Alpha Jet Project (Part 29)
Unique projects need unique solutions. One part of the front mechanics reaches the limits of the base of the printing area. The problem that can arise 3D printing in large parts of the FDM, is called in the jargon "warping". This refers to the "peel" the corners of the components. This was not supposed to occur when PLA used print material. But not in real life�
Why is that? Well, the plastic is sprayed over a large area in hot and pasty form. Layer by layer and is cooled immediately. Here, however, is the problem. This creates substantial stresses in the part the result that the lower layers contracts harder than the upper fresh layers. This pulls the corners of the components up. The more layers to come now and the bigger the parts, the stronger this effect. The forces which are caused are very large.
The only way to work against this effect is to keep the the component at a high temperature after printing. The temperature must be high enough to get the tension out of the component, low enough to obtain sufficient strength for subsequent sprayed layers. This can be achieved only with using a heated and adjustable printing pad. Unfortunately, the Replicator2 from MakerBot has no heated print bed. The Replicator2X would have. On demand in the USA I was unfortunately informed of MakerBot that it is not possible to retrofit the heated print bed.
What now? So there is only one way: to construct a custom made heated print bed for the Replicator2.
The following conditions must be met:
� Ensure that the bed has to fit into the holder provided without mechanical modification of the printer.
� The new printing bed must be absolutely identical in shape and magnitude to the series bed. Also, the thickness , because the setting of the Z- axis ( height ) can not be adjusted - It is not supported by the printer controller . The "leveling",and the Fine-adjusting of the printing bed can only be done in tenths of a millimeter and is only used for fine adjustment of the extrusion distance .
� Ensure that the bed must have an absolutely uniform heat distribution
� The print bed surface must be absolutely flat and plane-parallel to the bottom.
� The temperatures that are needed are about 60 � C for PLA and 120 � C for ABS printing materials.
� Interchangeable pressure bed surfaces for the various print materials.
� The control of the pressure bed heating is indeed self-sufficient, after printing , the heater must be switched off but . An electronic connection to the controller of the printer is not possible.
In sum, a challenging task. I decided after a long planning and design phase for a 3 - piece design of the pressure bed.
The first part is machined from a solid frame made of GRP material can withstand the maximum temperatures. The second part of an aluminum plate with an inserted heating coil. The third part of the print bed surface can be replaced depending on the material. A thin plexiglass plate, covered with 3M Scotch Blue Tape for unheated PLA prints of small components, a thin GRP panel for 60 � C heated PLA prints. A thin, glued with Kapton tape aluminum plate for 120 � C heated ABS prints.
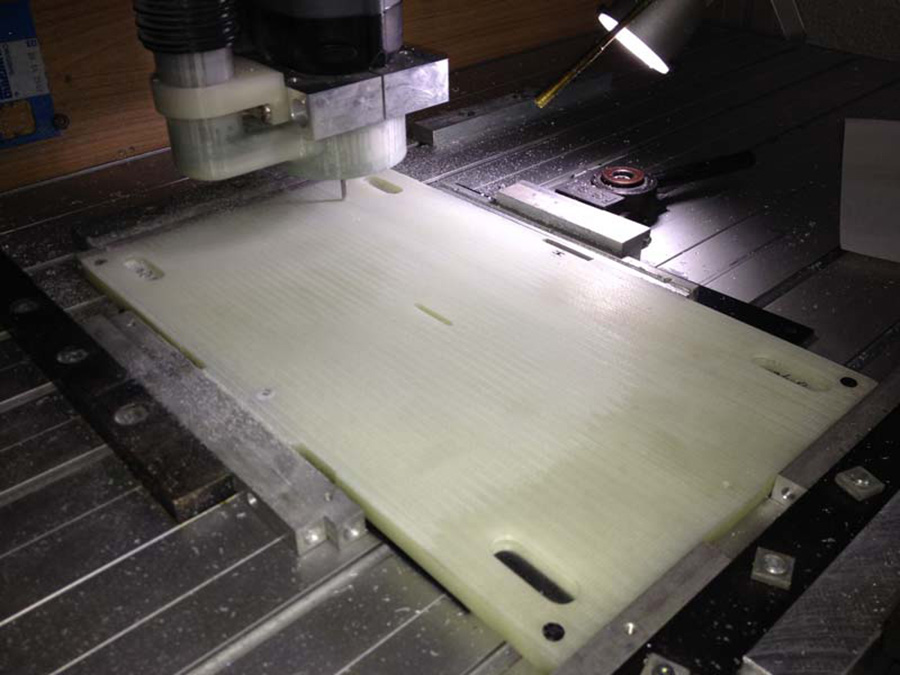
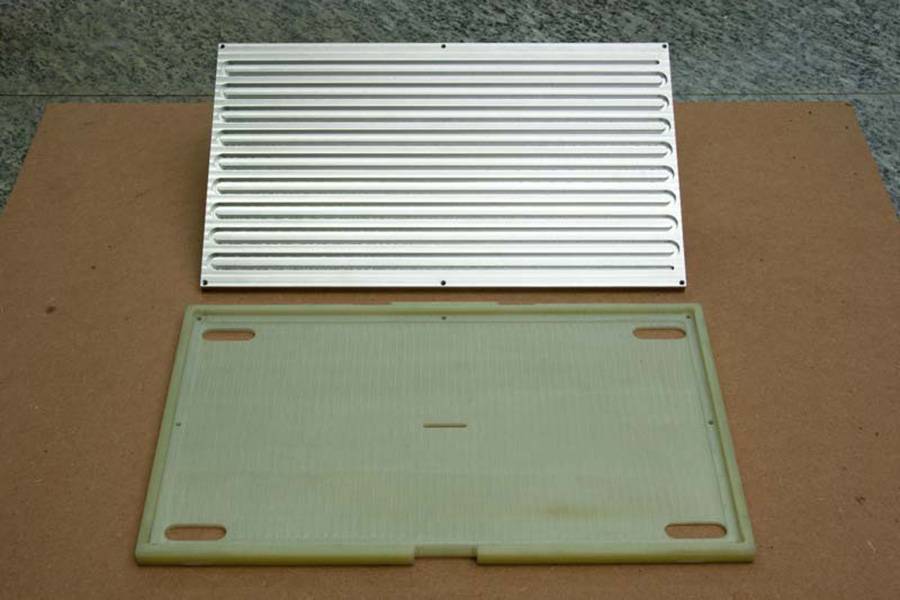
Now it went to the design of the heating. Through a friend I was able to contact the company Pr�ziwa GmbH. This small company specializes in the production of heating cords. This contact was an absolute hit. I was created exactly according to my needs a heater cord. The default was: 24V voltage at 20 � C ambient temperature, a max. To achieve a temperature of the heated bed of 160 � C. The length of the heating cord had to be exactly 4860mm and max. Diameter of 3 mm. The required power about 150W.
After a week I got a little package with the heater cord. And these fit absolutely perfectly into the helical groove machined in the aluminum plate. The length agreed to the millimeter. Thank you Hr. Krizler of Pr�ziwa Heizkordel GmbH!!
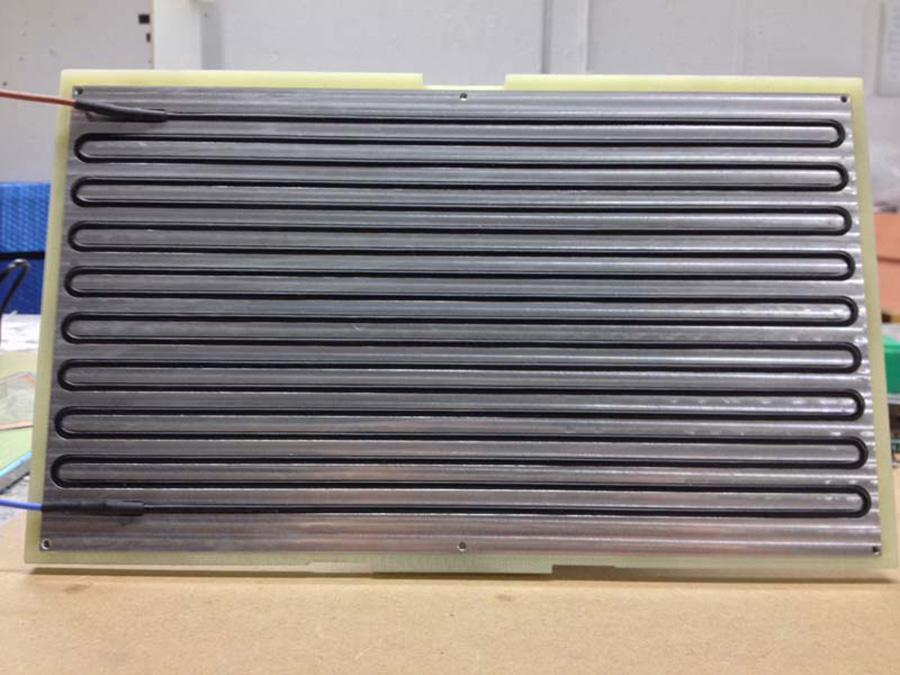
A little setback there was with the aluminum plate. Although I had the plate milled flat on both sides before I milled the groove for the heating coil, the disk has after milling the groove and the relaxation warped like a withered leaf. The resulting stresses in the material through the groove are simply too high and are not going to get a grip on even after multiple attempts.
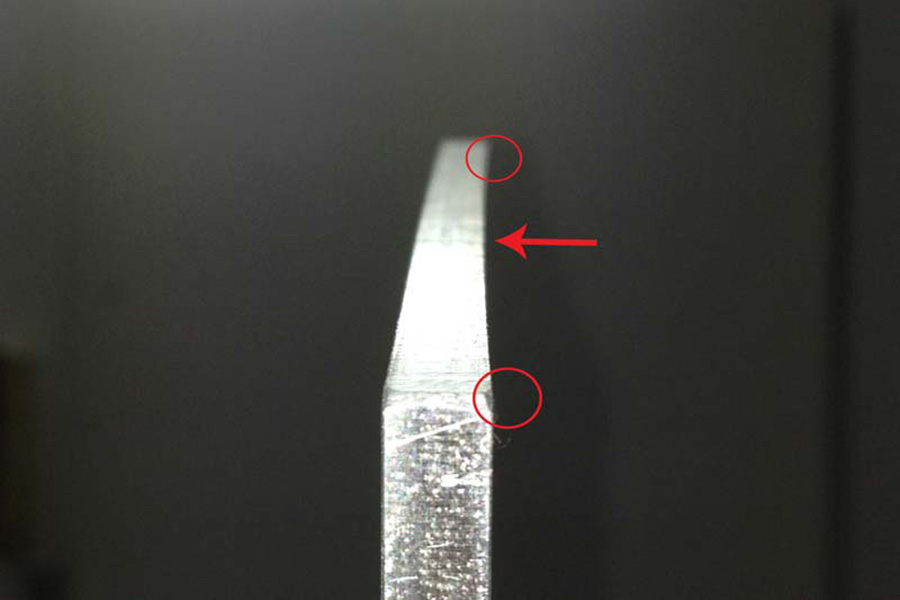
This helped turn a long personal conversation with my aluminum supplier, the company Alu Meier in Munich, to solve the problem. He recommended me to use co-molded and flat-milled from the factory aluminum plates. Precision Aluminium Cast plates , not the usual rolled plates. Also, this tip was worth gold. This plate material is completely resistant and free of stress. With this material a complete flat heating base was made.
So now looks like the hot stage mounted.
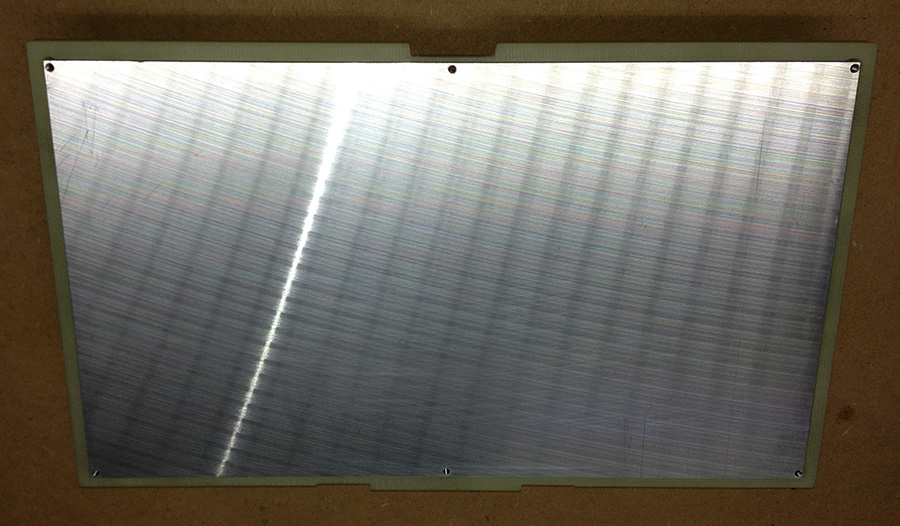
In the coming days, the final assembly and the heating control is realized. Thus should be the last, but associated with the largest expense component can be printed before Christmas.
Markus L�tzenburger
Mark, I thank you already now with you for your help on this project!
Modellsport Schweighofer
Wirtschaftspark 9 � 8530 Deutschlandsberg
[email protected]
Unique projects need unique solutions. One part of the front mechanics reaches the limits of the base of the printing area. The problem that can arise 3D printing in large parts of the FDM, is called in the jargon "warping". This refers to the "peel" the corners of the components. This was not supposed to occur when PLA used print material. But not in real life�
Why is that? Well, the plastic is sprayed over a large area in hot and pasty form. Layer by layer and is cooled immediately. Here, however, is the problem. This creates substantial stresses in the part the result that the lower layers contracts harder than the upper fresh layers. This pulls the corners of the components up. The more layers to come now and the bigger the parts, the stronger this effect. The forces which are caused are very large.
The only way to work against this effect is to keep the the component at a high temperature after printing. The temperature must be high enough to get the tension out of the component, low enough to obtain sufficient strength for subsequent sprayed layers. This can be achieved only with using a heated and adjustable printing pad. Unfortunately, the Replicator2 from MakerBot has no heated print bed. The Replicator2X would have. On demand in the USA I was unfortunately informed of MakerBot that it is not possible to retrofit the heated print bed.
What now? So there is only one way: to construct a custom made heated print bed for the Replicator2.
The following conditions must be met:
� Ensure that the bed has to fit into the holder provided without mechanical modification of the printer.
� The new printing bed must be absolutely identical in shape and magnitude to the series bed. Also, the thickness , because the setting of the Z- axis ( height ) can not be adjusted - It is not supported by the printer controller . The "leveling",and the Fine-adjusting of the printing bed can only be done in tenths of a millimeter and is only used for fine adjustment of the extrusion distance .
� Ensure that the bed must have an absolutely uniform heat distribution
� The print bed surface must be absolutely flat and plane-parallel to the bottom.
� The temperatures that are needed are about 60 � C for PLA and 120 � C for ABS printing materials.
� Interchangeable pressure bed surfaces for the various print materials.
� The control of the pressure bed heating is indeed self-sufficient, after printing , the heater must be switched off but . An electronic connection to the controller of the printer is not possible.
In sum, a challenging task. I decided after a long planning and design phase for a 3 - piece design of the pressure bed.
The first part is machined from a solid frame made of GRP material can withstand the maximum temperatures. The second part of an aluminum plate with an inserted heating coil. The third part of the print bed surface can be replaced depending on the material. A thin plexiglass plate, covered with 3M Scotch Blue Tape for unheated PLA prints of small components, a thin GRP panel for 60 � C heated PLA prints. A thin, glued with Kapton tape aluminum plate for 120 � C heated ABS prints.
Now it went to the design of the heating. Through a friend I was able to contact the company Pr�ziwa GmbH. This small company specializes in the production of heating cords. This contact was an absolute hit. I was created exactly according to my needs a heater cord. The default was: 24V voltage at 20 � C ambient temperature, a max. To achieve a temperature of the heated bed of 160 � C. The length of the heating cord had to be exactly 4860mm and max. Diameter of 3 mm. The required power about 150W.
After a week I got a little package with the heater cord. And these fit absolutely perfectly into the helical groove machined in the aluminum plate. The length agreed to the millimeter. Thank you Hr. Krizler of Pr�ziwa Heizkordel GmbH!!
A little setback there was with the aluminum plate. Although I had the plate milled flat on both sides before I milled the groove for the heating coil, the disk has after milling the groove and the relaxation warped like a withered leaf. The resulting stresses in the material through the groove are simply too high and are not going to get a grip on even after multiple attempts.
This helped turn a long personal conversation with my aluminum supplier, the company Alu Meier in Munich, to solve the problem. He recommended me to use co-molded and flat-milled from the factory aluminum plates. Precision Aluminium Cast plates , not the usual rolled plates. Also, this tip was worth gold. This plate material is completely resistant and free of stress. With this material a complete flat heating base was made.
So now looks like the hot stage mounted.
In the coming days, the final assembly and the heating control is realized. Thus should be the last, but associated with the largest expense component can be printed before Christmas.
Markus L�tzenburger
Mark, I thank you already now with you for your help on this project!
Modellsport Schweighofer
Wirtschaftspark 9 � 8530 Deutschlandsberg
[email protected]


